


popeye the sailor
-
Posts
16,007 -
Joined
-
Last visited
Content Type
Profiles
Forums
Gallery
Events
Everything posted by popeye the sailor
-
 I think you are right Jack. gee.......I think I'll look into a gauge like that I need to get a new grill........last year we had a violent wind event and silly me left the umbrella attached to it..........the wind blew it over. one of the knobs broke, so I've been using the good knob on both burners. it finally gave out, so now I'm using vise grips. did just a little on the Dr 1.........should have something soon
 -
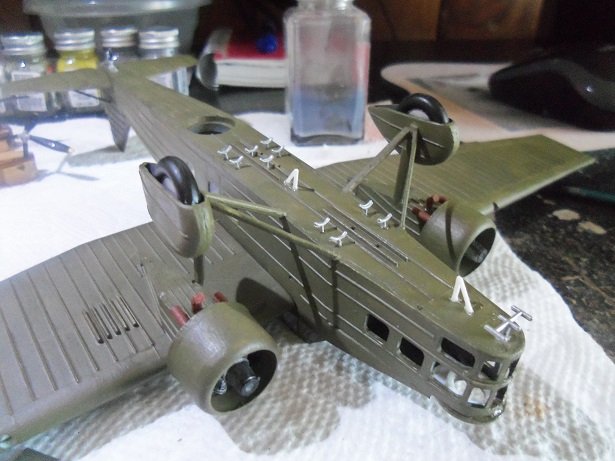
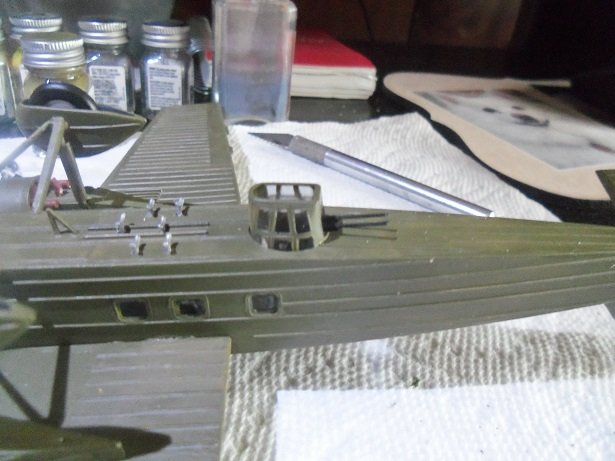
here is some more progress........ I add some of the decals from the ill fated sheet. I tipped the blades for the Memphis Belle props and I continued with these. next was the tail gear........it now has support from all three wheels. for the underbelly, I set up the bomb racks. I was short one of the rack arms, so I will be one bomb less. I will use CA to fill in the holes. also added are some of the antenna apparatus....a couple more parts will go topside. I got home this evening and for fun, fitted the props. I still have the nose glass to do.........I abandoned the window maker. there's a bit of a mess inside the fuselage.......glad that it won't be seen. clearly I need to practice to get the ability back I also cemented the belly turret in place I wish you all a super duper Father's day!
- 63 replies
-
- 13
-

-
nicely done.....looks great!
-
I'm finally here! I have been trying like crazy Michael, to get to the point where I could look in, but I kept running out of time. looks to be a very unique project......the building backdrops are nicely done! I'll be following along
-
catching up with your progress Pat.......the overall picts of the deck look superb........the layout is fantastic! the cannons are done very well........very cleanly done.......the screw is cool too! ...just beautiful workmanship
- 1,021 replies
-
- 6
-
-
- gun dispatch vessel
- victoria
- (and 2 more)
-
superb looking model Mustafa rigging looks top notch........congratz my friend
- 54 replies
-
- 1
-
-
- mantua
- santa maria
- (and 1 more)
-
I got a little progress done..........got some more decals on............then the fridge issue hit, and there went my morning one small mishap.........I have accumulated quite a collection of decals for the B 17. ....you figure I ordered a set for the Nine........then a set for the Wulfe Hound. I had the pack I was working from up on top of my printer. I reached for it and some of the cut pieces of decals fell into the water that was directly below. I managed to use a few for the MB 200 {since there aren't too many decals for it}, but sadly, the rest went into the trash. I added some more to the fuselage........but the bulk of the work went into the wings. I had selected and cut out a bunch of them, and I needed to get them on........tired of picking them up off the floor {wind effect}. I'll see if I can get more done tomorrow..........no surprise though that there are errands to run. we'll see how that goes
-
props look perfect! she's com'in along nicely
-
is that the Corel Mayflower Patrick? no difference.......these two ship are alike in many ways you got me there Tom......I never gave the rudder enough thought yep......that's an old kit.....the nice thing is that you have all the parts to assemble the tops........the kit I have was an incomplete kit {missing some parts}. I believe Billing's at the time used basswood for the planking. I've become accustomed to using Obechi, which is what Billing's supplies in most of their more recent offerings. back in the day, they used to supply mahogany as well......I have a whole bundle of it from the second Norkap kit I got. I'm using the kit to build the progress another fishing boat that was produced back around the early run of the Nordkap. is your kit laser cut? if not, then your kit is likely 30 or more, years old! I took a few liberties with the planking too...I also changed the bulwarks a little. for the bow spirit.......it's in my log. I can agree that the instructions lead a lot to be desired . I'm glad I finally got to see your build....look'in forward in seeing another beauty come out of the box
- 135 replies
-
- 1
-
-
- billing boats
- half moon
- (and 1 more)
-
the tube was clear Jack.......I had to roll up paper towel to sop up the water as it collected in the tray. this set up is a joke! reminds me of when we lived on Spruce St. the refrigerator was on it's last leg when we moved in. I was curious about how it was slanted....it should be level. it quit working and I checked it out...........come to find out, the previous tenant never checked the drainage tray. it was once overfull.....spilling onto the floor underneath, rotting it out. if not for the joices, it would have fallen through the floor. the landlord was a Russian fellow and had no idea how to repair the damage. I told him that if he got the materials, I would fix it. he asked to help me.......I said sure. I took my skill saw and adjusted the blade to the thickness of the floor, and cut out the bad part........filled it back in with the plywood he bought. I'm not an expert at tiling floors, but I think I did a good job. the landlord was so pleased.......he had a surplus of wood in the dellar and he let me build a workbench....'"use what you need, " he said he was a pretty nice fellow too....we liked him a lot.......his name was Uri. I never minded doing thing for him....everything I needed, he'd get it! I had better times there though..........this guy is a tightwad. we asked him if he had the receipt for the fridge { he bought it at Home Depot}........he can't find it. .....a two year old fridge, and he can't find the receipt. he deserves what he gets. I think this will be the biggest Dr 1 I'll build to date.........of course, if I got off my behind and got with the program, the Gillow's plane will be the biggest. it has a 20 inch wingspan. oh....don't think I get favor.........she's still the budget director.....if she thinks we can't afford it, no new toys for me. I don't recall the last time I bought any wood.......although I've been submitting my needs for flat stock @ Hobby Lobby. ....and if the fridge wasn't enough...........I went to cook the burgers on the grill, and I ran out of gas
-
name something that can ruin your day..........I got one. our fridge is still on the fritz! there is no division between freezer and fridge.....everything is freezing in the bottom we had a guy come out to look at it.........he replaced the controller. this morning, the admiral showed me the burger patties we bought yesterday....half froze. I wasn't going to get involved with it.....the landlord bought it......let him deal with it. this time, I looked into it.......noticed the icy frost spot on the back wall of the freezer. the admiral showed it to the guy.......he said that there might be ice behind the wall...........but he didn't check it out........just ordered the controller. by what she told me, he didn't check out much of anything. this is a frost free refrigerator.......this type of nonsense isn't supposed to happen. there is no cold division between the freezer and the fridge.........I took the back wall cover off. it revealed a large chunk of ice where the the build up of ice was on the outside of the wall. it covered part of the condenser, as well as the freezer sensor. the ice was removed.........all residual water sopt up from inside the bottom........no REAL catch basin in this mangy thing......it's all bolted in place! I spoke to the landlord.......who knows if he understood what I was telling him. long story short.......I'll see if it cures the problem. if it happens again, I would suspect that the defrost heater is at fault. the guy didn't even know that maytag refrigerators have a diagnostic circuit.......I found that out from a crumpled up paper in the back of the fridge, in the compressor cavity. what a world........what a world! the admiral was so happy {I guess}, that I could order a model.........a 1:28 Fokker Dr 1 it will look good next to my Fokker D VII.
-
......and 6 feet apart? {had to ask } look'in good at any rate
-
I just wash them in a light detergent with a bit of a scrub. then I buff the tread with sandpaper to give them a worn look. likely vinyl. great looking chassis
-
I'm glad that someone made use of the blog I did that on my second Cutty.........never could figure why Revell wanted you to use multiple pieces of chain to do something so simple . the Cutty blog should be there also......originally, I posted it on Blogger. most sailing ships were rigged that way.......whether it be chain or rope. this must be a newer kit....Revell Germany? I got the second one from E-bay........the decal sheet was trash. I reordered another one using the missing parts request that Revell used to do, but that one was badly micro cracked. I opted to make my own decals.......had to use a paint marker to do the depth markers. I love your deck........it looks very good. I believe the company is ScaleMates that does a wooden deck for these large scale models........even for the Connie. I also have the U.S.S. United states, another second ship {the first one met an untimely demise by my own hand { yes, I admit it }. I made wooden decks for her.....currently in the closet........been in there for a couple of years. what a pain it was to do, but boy, it was worth it last year......or was it two???????.......I forget, I bought the Connie..........it will be my second time on her as well. I can't say.......but I plan to do something different with her icky Mae............ these large scale kits from Revell are about the best I've ever built.........they are my favorite. there are nay sayers out there....but ignore them. I've never had to stuff brass rod in the masts and I used the plastic eye bolts with no problem at all. I mentioned somewhere concerning 'zero tolerance' rigging. if your interested, let me know......it's quite simple. there are many builds of the Revell Cutty, but check out some of the wood builds too, as they might give you an idea or two. glad I looked in.......your doing a splendid job! pleased to follow along. here are some other blogs I did, as well as in rigging the Cutty http://seymore-thecuttysark-abuildlog.blogspot.com/
-
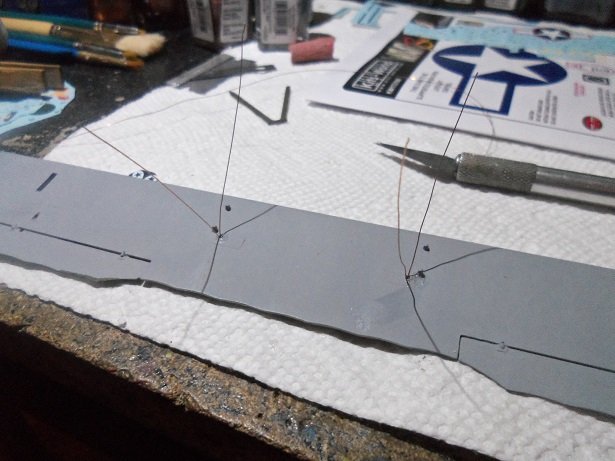
I was thinking of the Dr1 today............I need to do a dry fit to see how the cabane struts meet the underside of the top wing. as I guessed, they meet at those pins.......but of course, won't go in between them. I can adjust that. so now that I know, I can cement the top wing onto the interplane struts.........but not until I add the control cables from the underside to the fuselage. so this is the first task.......
-
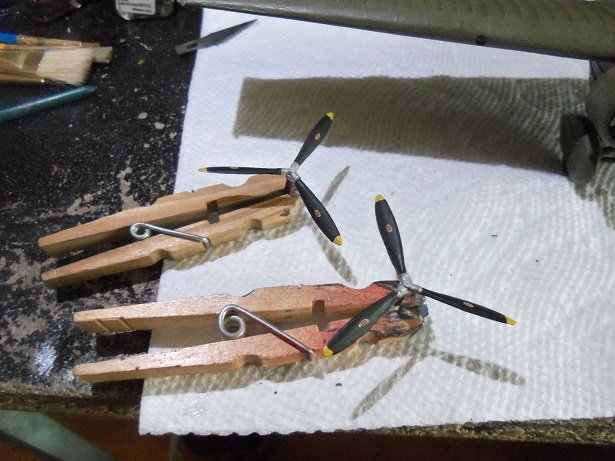
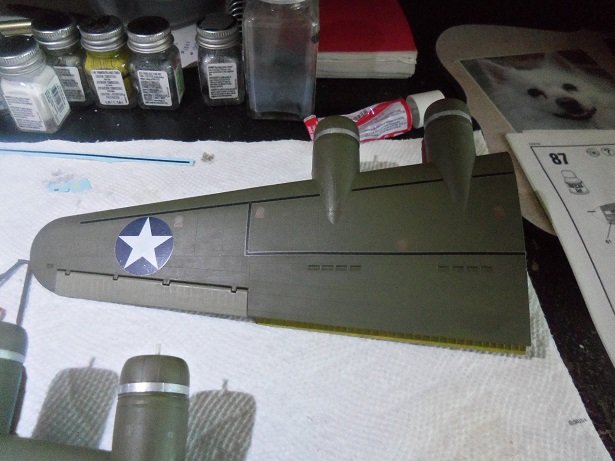
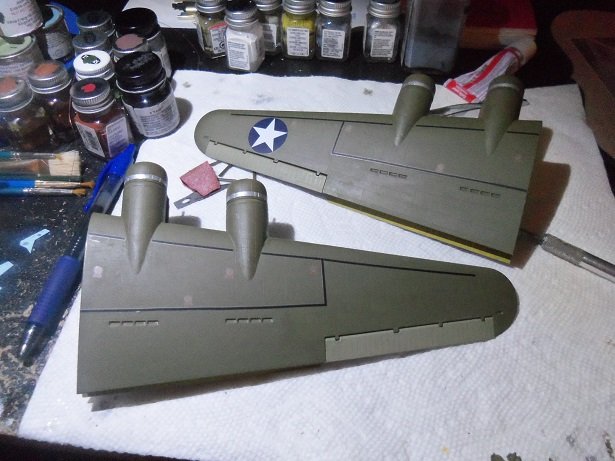
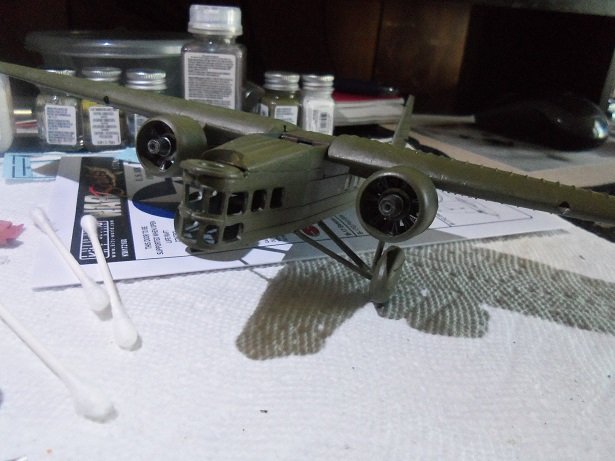
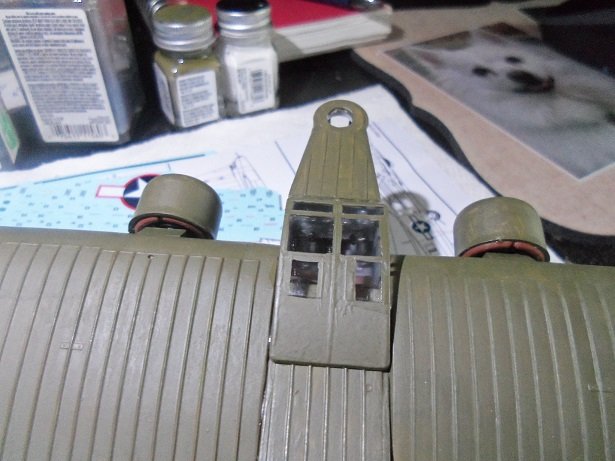
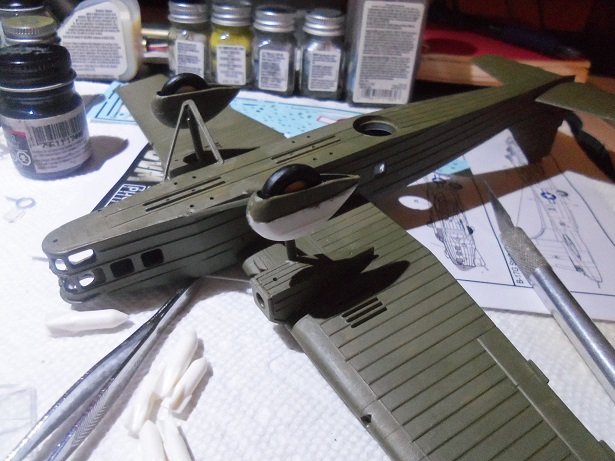
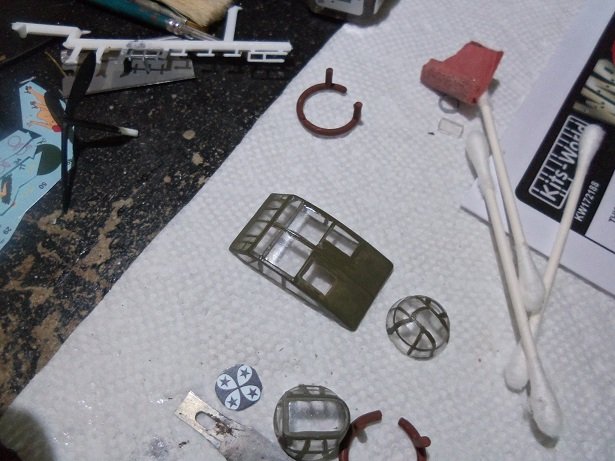
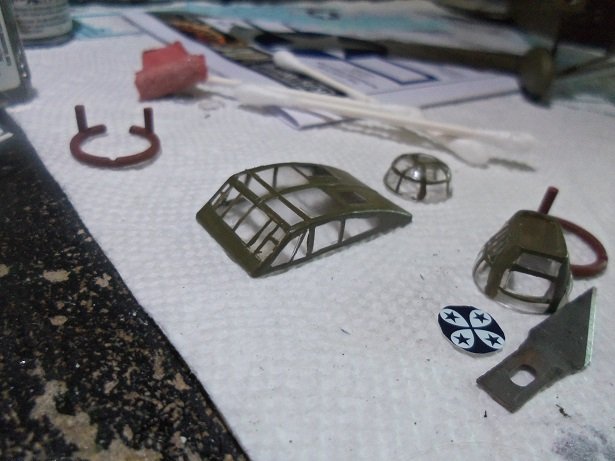
that swamp water green is Olive Drab {you'd think I cornered the market on the stuff}. I have the feeling that by the time I get to the B 25, I'm going to be burnt out on Olive green...........Navy comes to mind come right down to it, it's actually a French plane, flown by the Czech Air Force.......they collaborated to build this plane, an obscure contribution to 1930 aircraft. I do have a few more progress pictures. thanks for the kind word Eilman and OC.........thanks also for all the likes I assembled the engines and then added them to the model the exhaust is ported out the bottom I did a little detail work to the instrument panel....what I could see, and added it. the sticks {steering wheels} were added too. the cockpit glass was added to finish it off. the glass in this model is not very good......I should count myself lucky that the frame work detail was there for me to follow.

- 63 replies
-
- 13
-
-
another plane that I love to build {alright.......so I love everything that is modeling}. looks very nice
-
cockpits look great Mike. it nice to see that the cabane struts are molded to the fuselage........the interplane struts are much easier to put in later. guess I have the knack of finding kits that are the other way around very nice job!
-
sand it down to see if it decreases the damage........then plank over the hull. by doing so, you can go a little beyond the excess material limits. actually. if you wanted ti try something out of the box, cut off the bulwark material, and scratch build the bulwarks after. judging from the damage on the starboard side and the transom, it might be another viable choice you can make.
-
what a wonderful kit! yepper....if you've never nibbed before, you'll be an ace when your done superg job so far !
-
yepper.....the fun never stops after the top starts spin'in. but there are some that still tend to put a label on things: when you solve your first problem on your own when you finish your first model when you draw first blood when you plank your first hull when you buy your first power tool..........you mean business!!!! when you realize that filler is your friend as is said, it's all relative.......I tend to think that if you find that you like the hobby and decide to stick with it, then you've hit your first milestone welcome to the force! may you have many years of relaxing frustration.
-
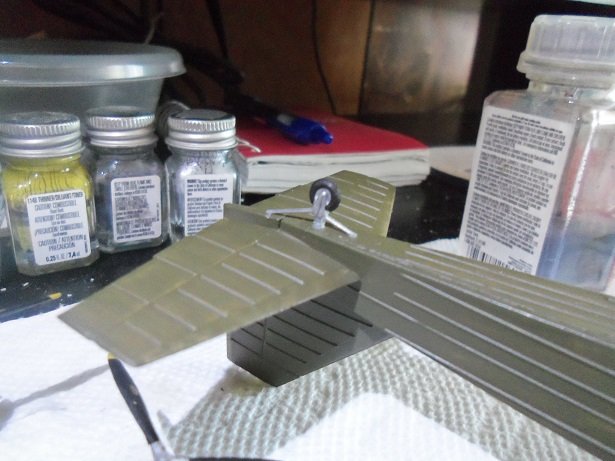
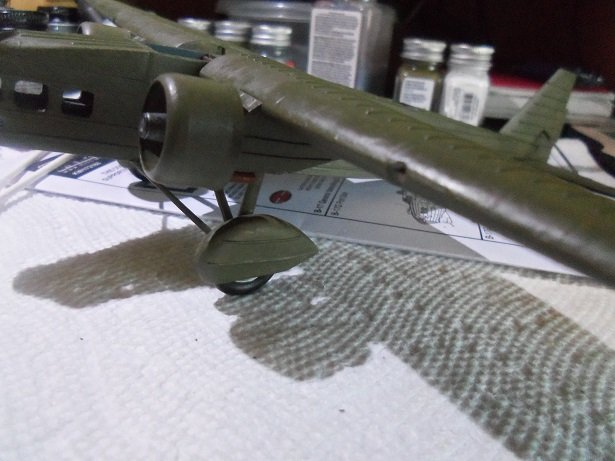
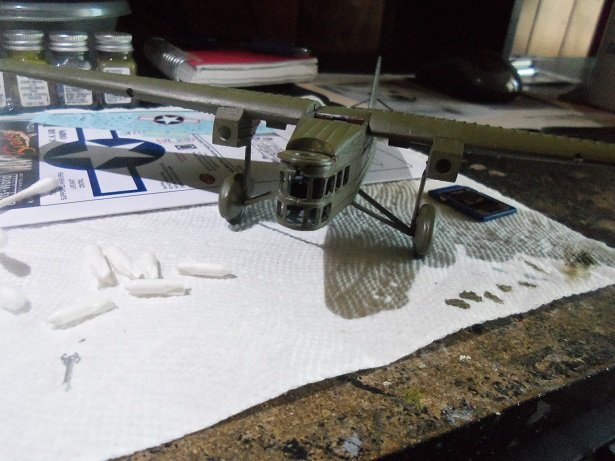
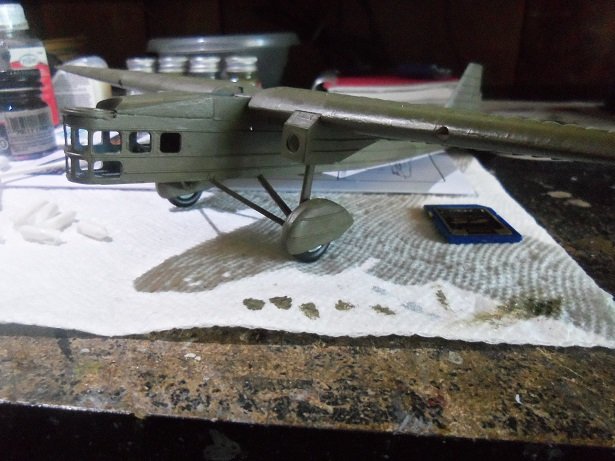
while I'm here........I may as well show a bit more progress on this corrugated beauty. the tires and covers are added to the model........now to get the tail gear painted and in place. the gear assembly is kinda interesting......like it's on stilts ....and with it now painted....looks much better now that I have some pictures......... I thought that this was an obscure aircraft, and wouldn't have to many pictures of it. part of it is true.......actual pictures are rather scant, but there are many pictures of the finished model. now that I have a better idea of how it looks........ I'm fairly satisfied with the dry fit. now to let this dry fully........on to the engines

- 63 replies
-
- 10
-
-
thanks Ken..........I've seen a few others that look pretty interesting. I stand corrected though........I was looking for images so I could get a good idea about the cockpit glass, and I saw that eduards does a masking kit for them. I got a few other cool decal ideas too.......if these decals don't look good
-
ohhhh........a ticket waiting to happen are you talking about the plane?
