No Idea
-
Posts
1,036 -
Joined
-
Last visited
Content Type
Profiles
Forums
Gallery
Events
Everything posted by No Idea
-
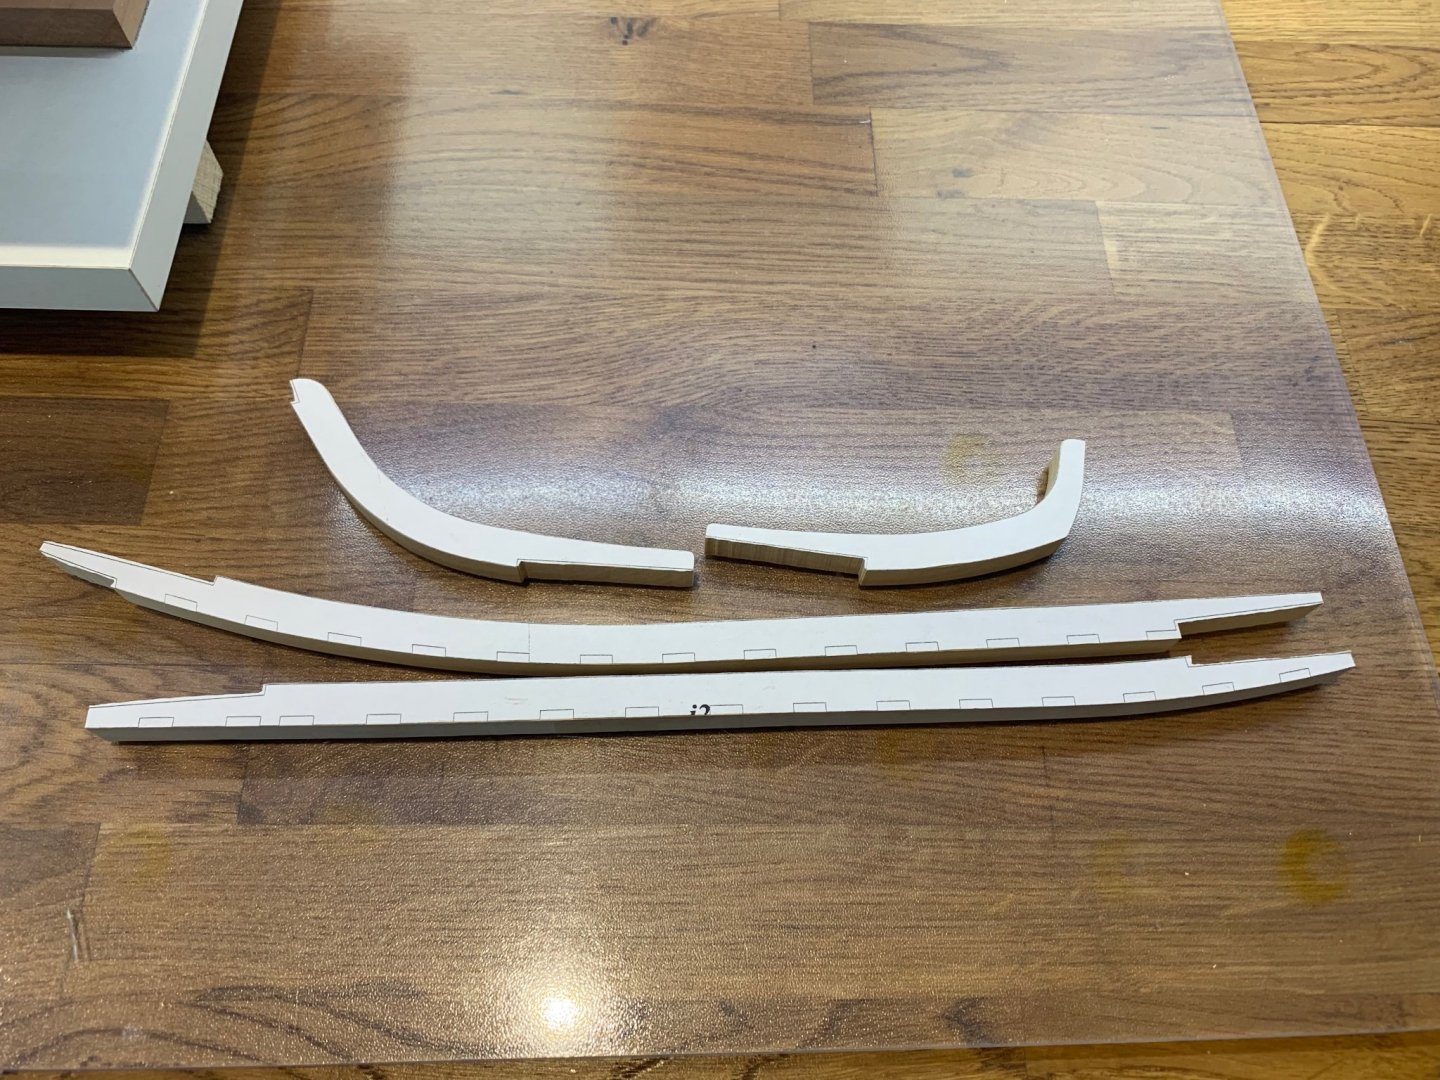
 Hi Kevin - I photocopy the plans and then carefully cut out each piece with some very sharp scissors and glue them to the wood. It saves an awful lot of drawing.
 -
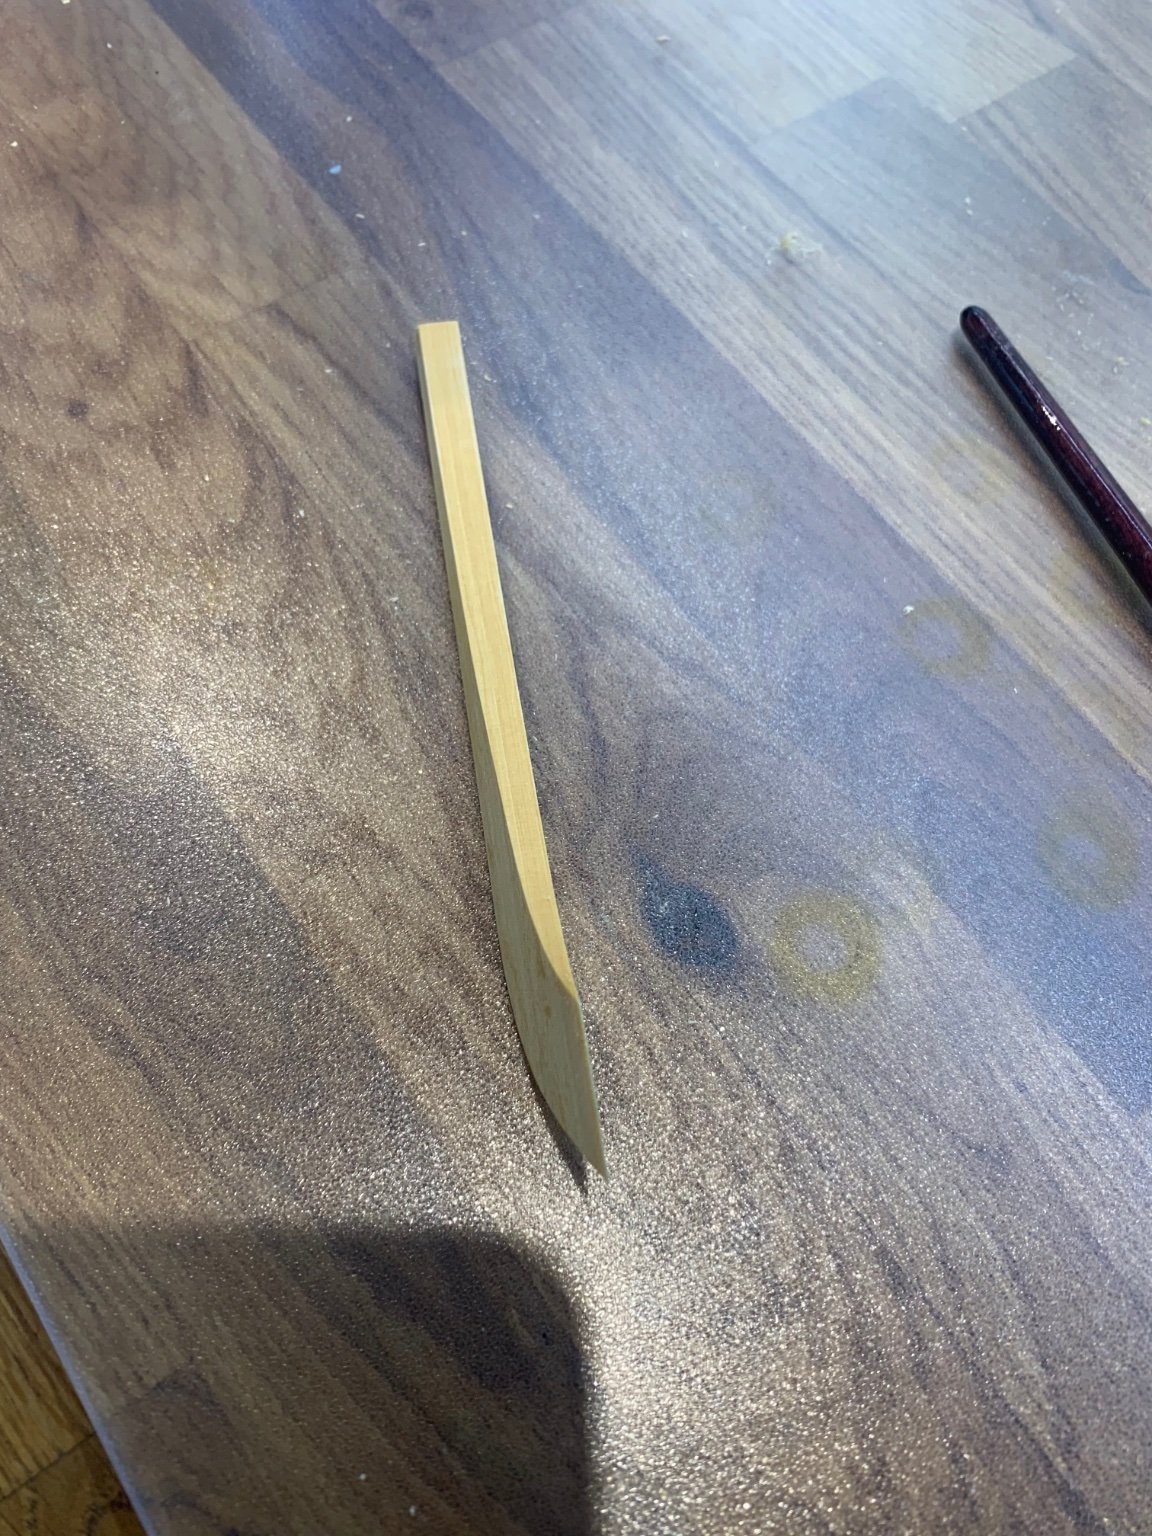
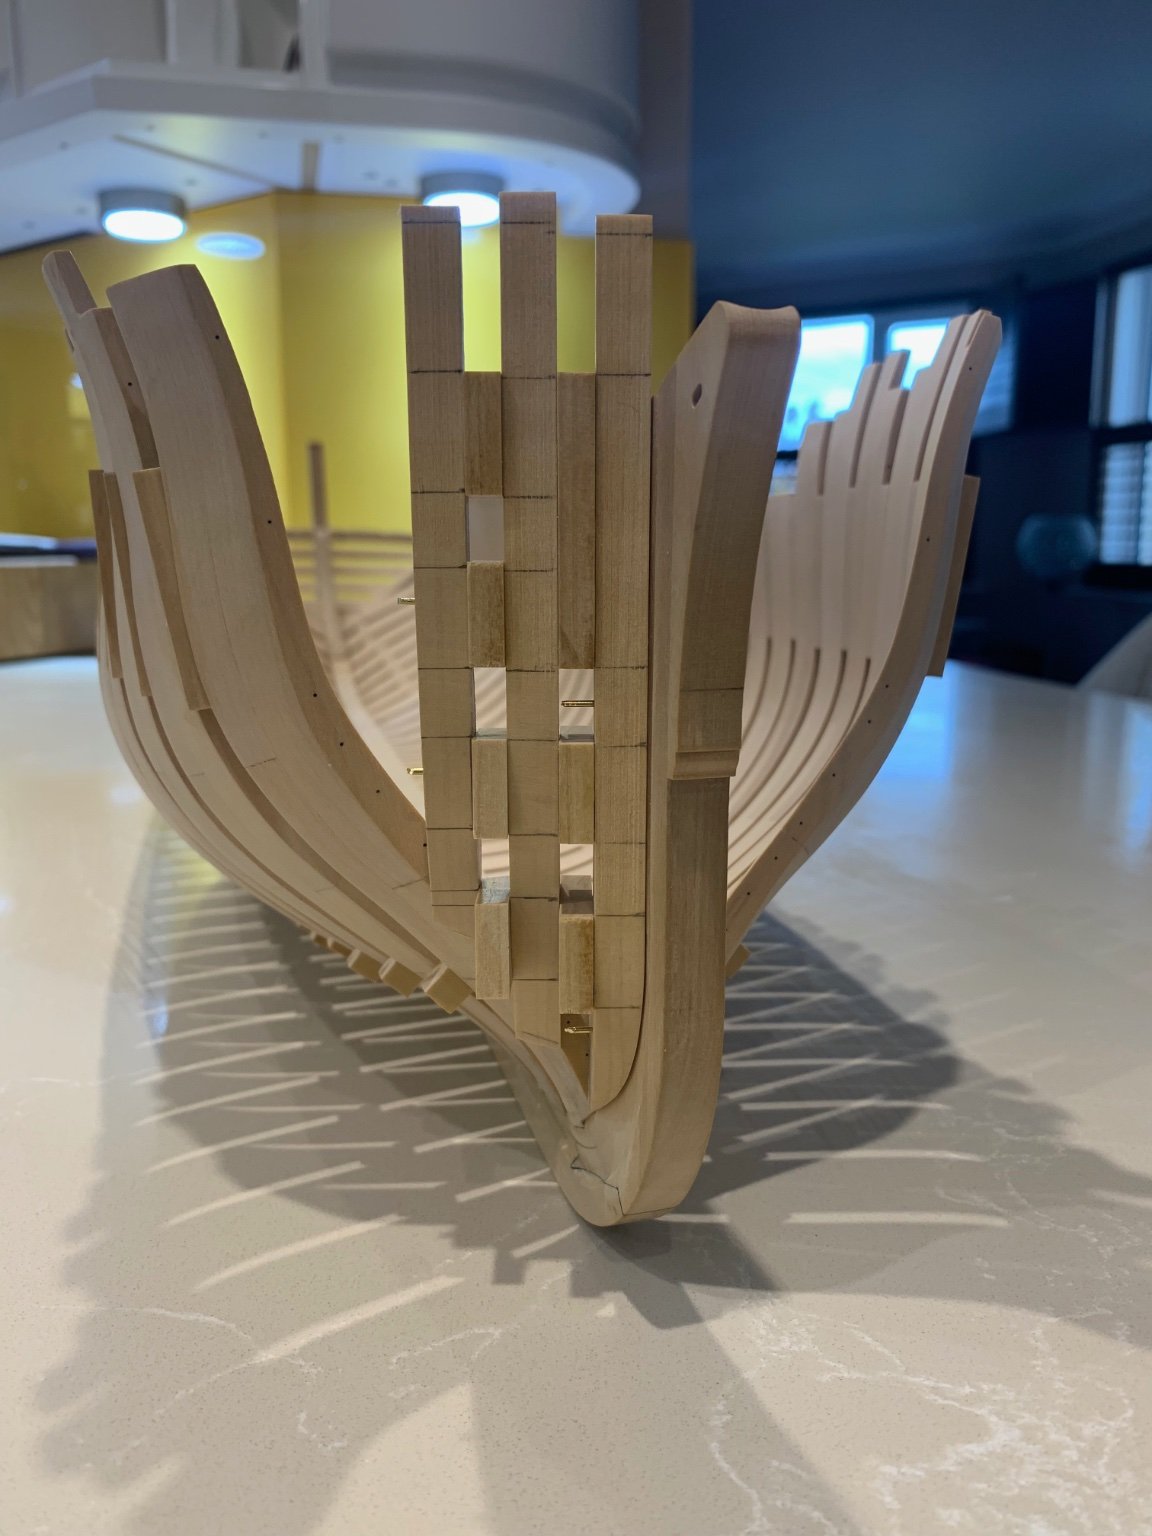
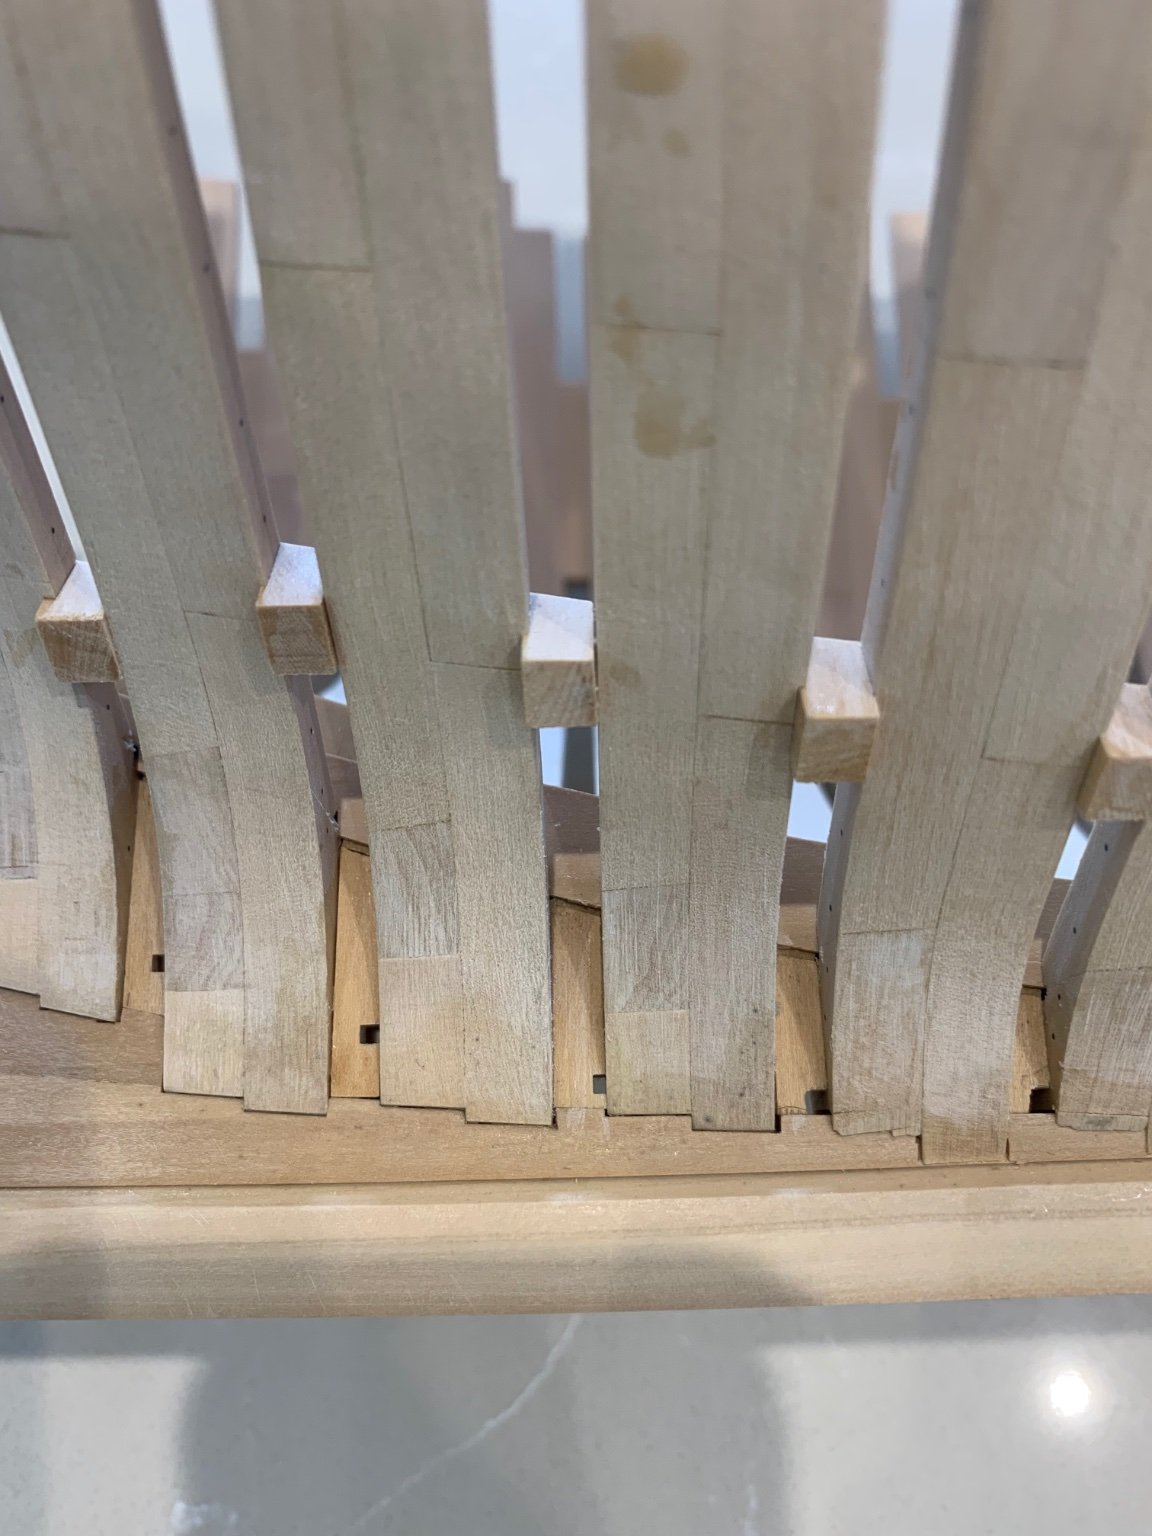
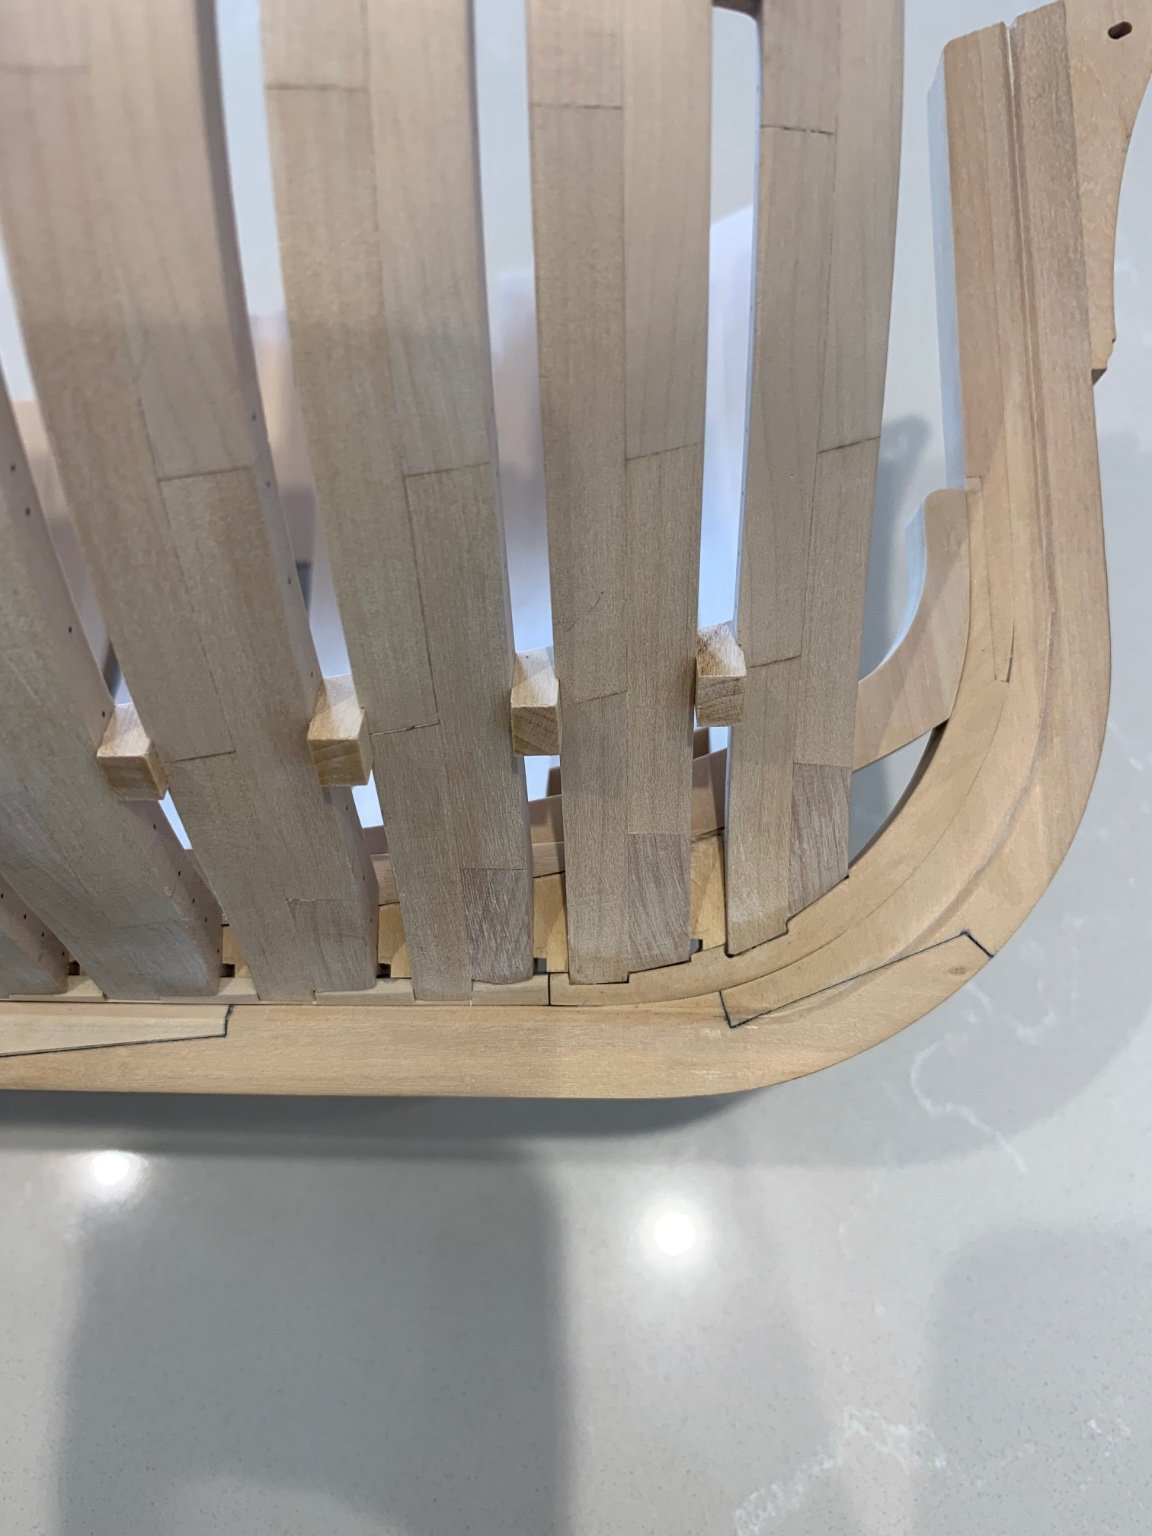
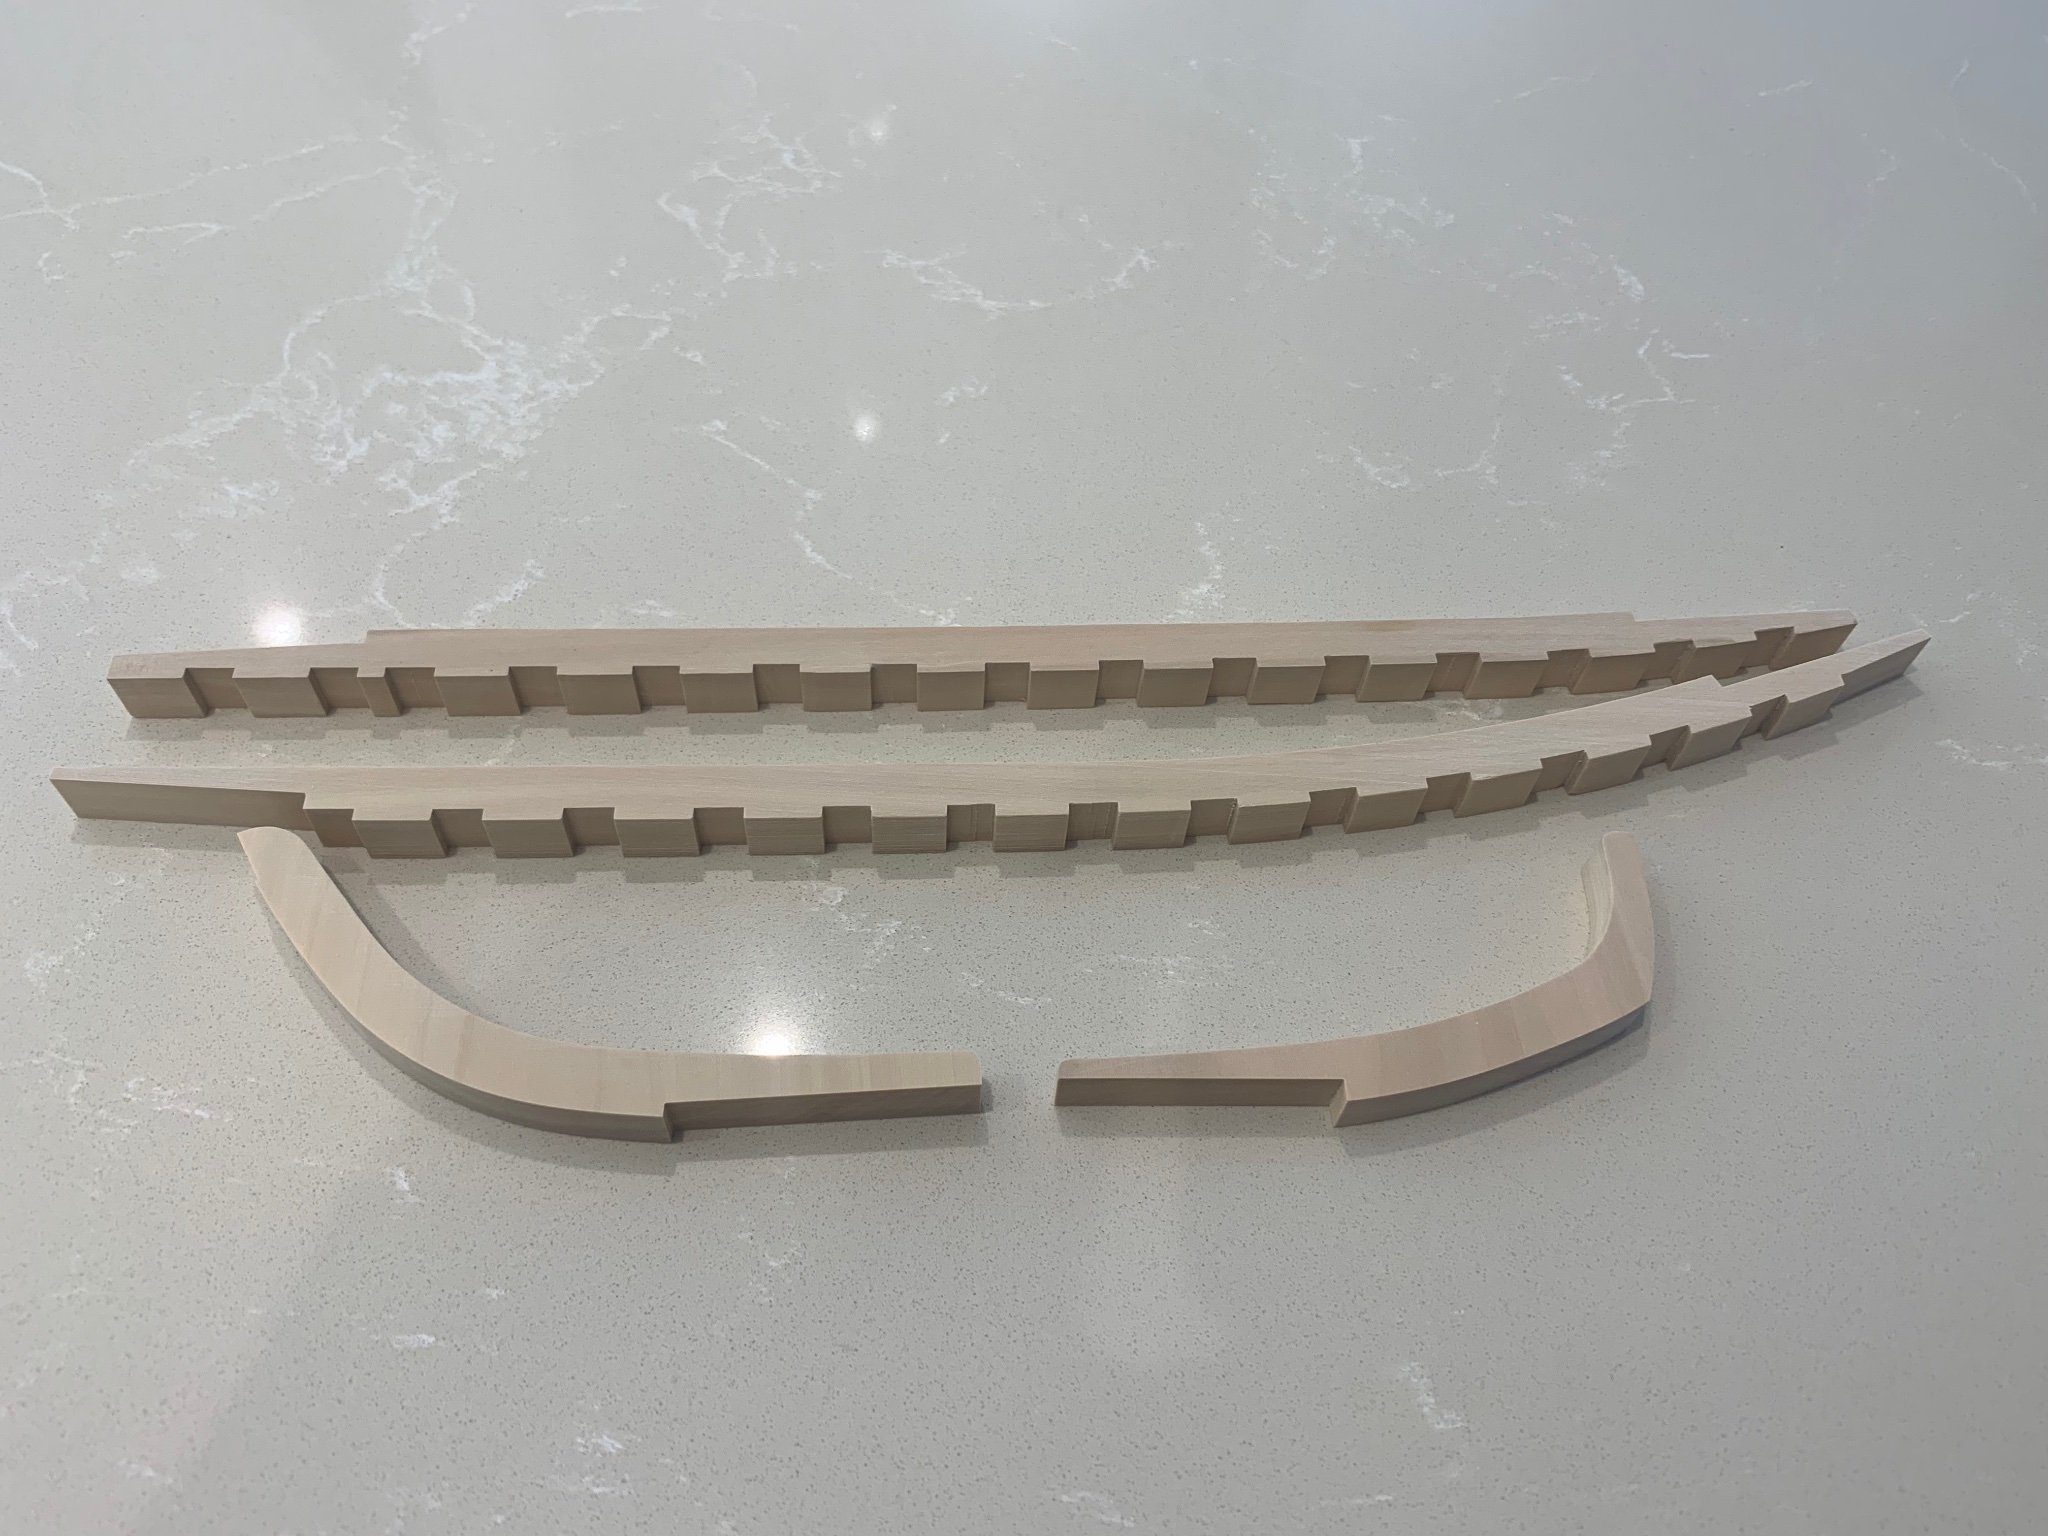
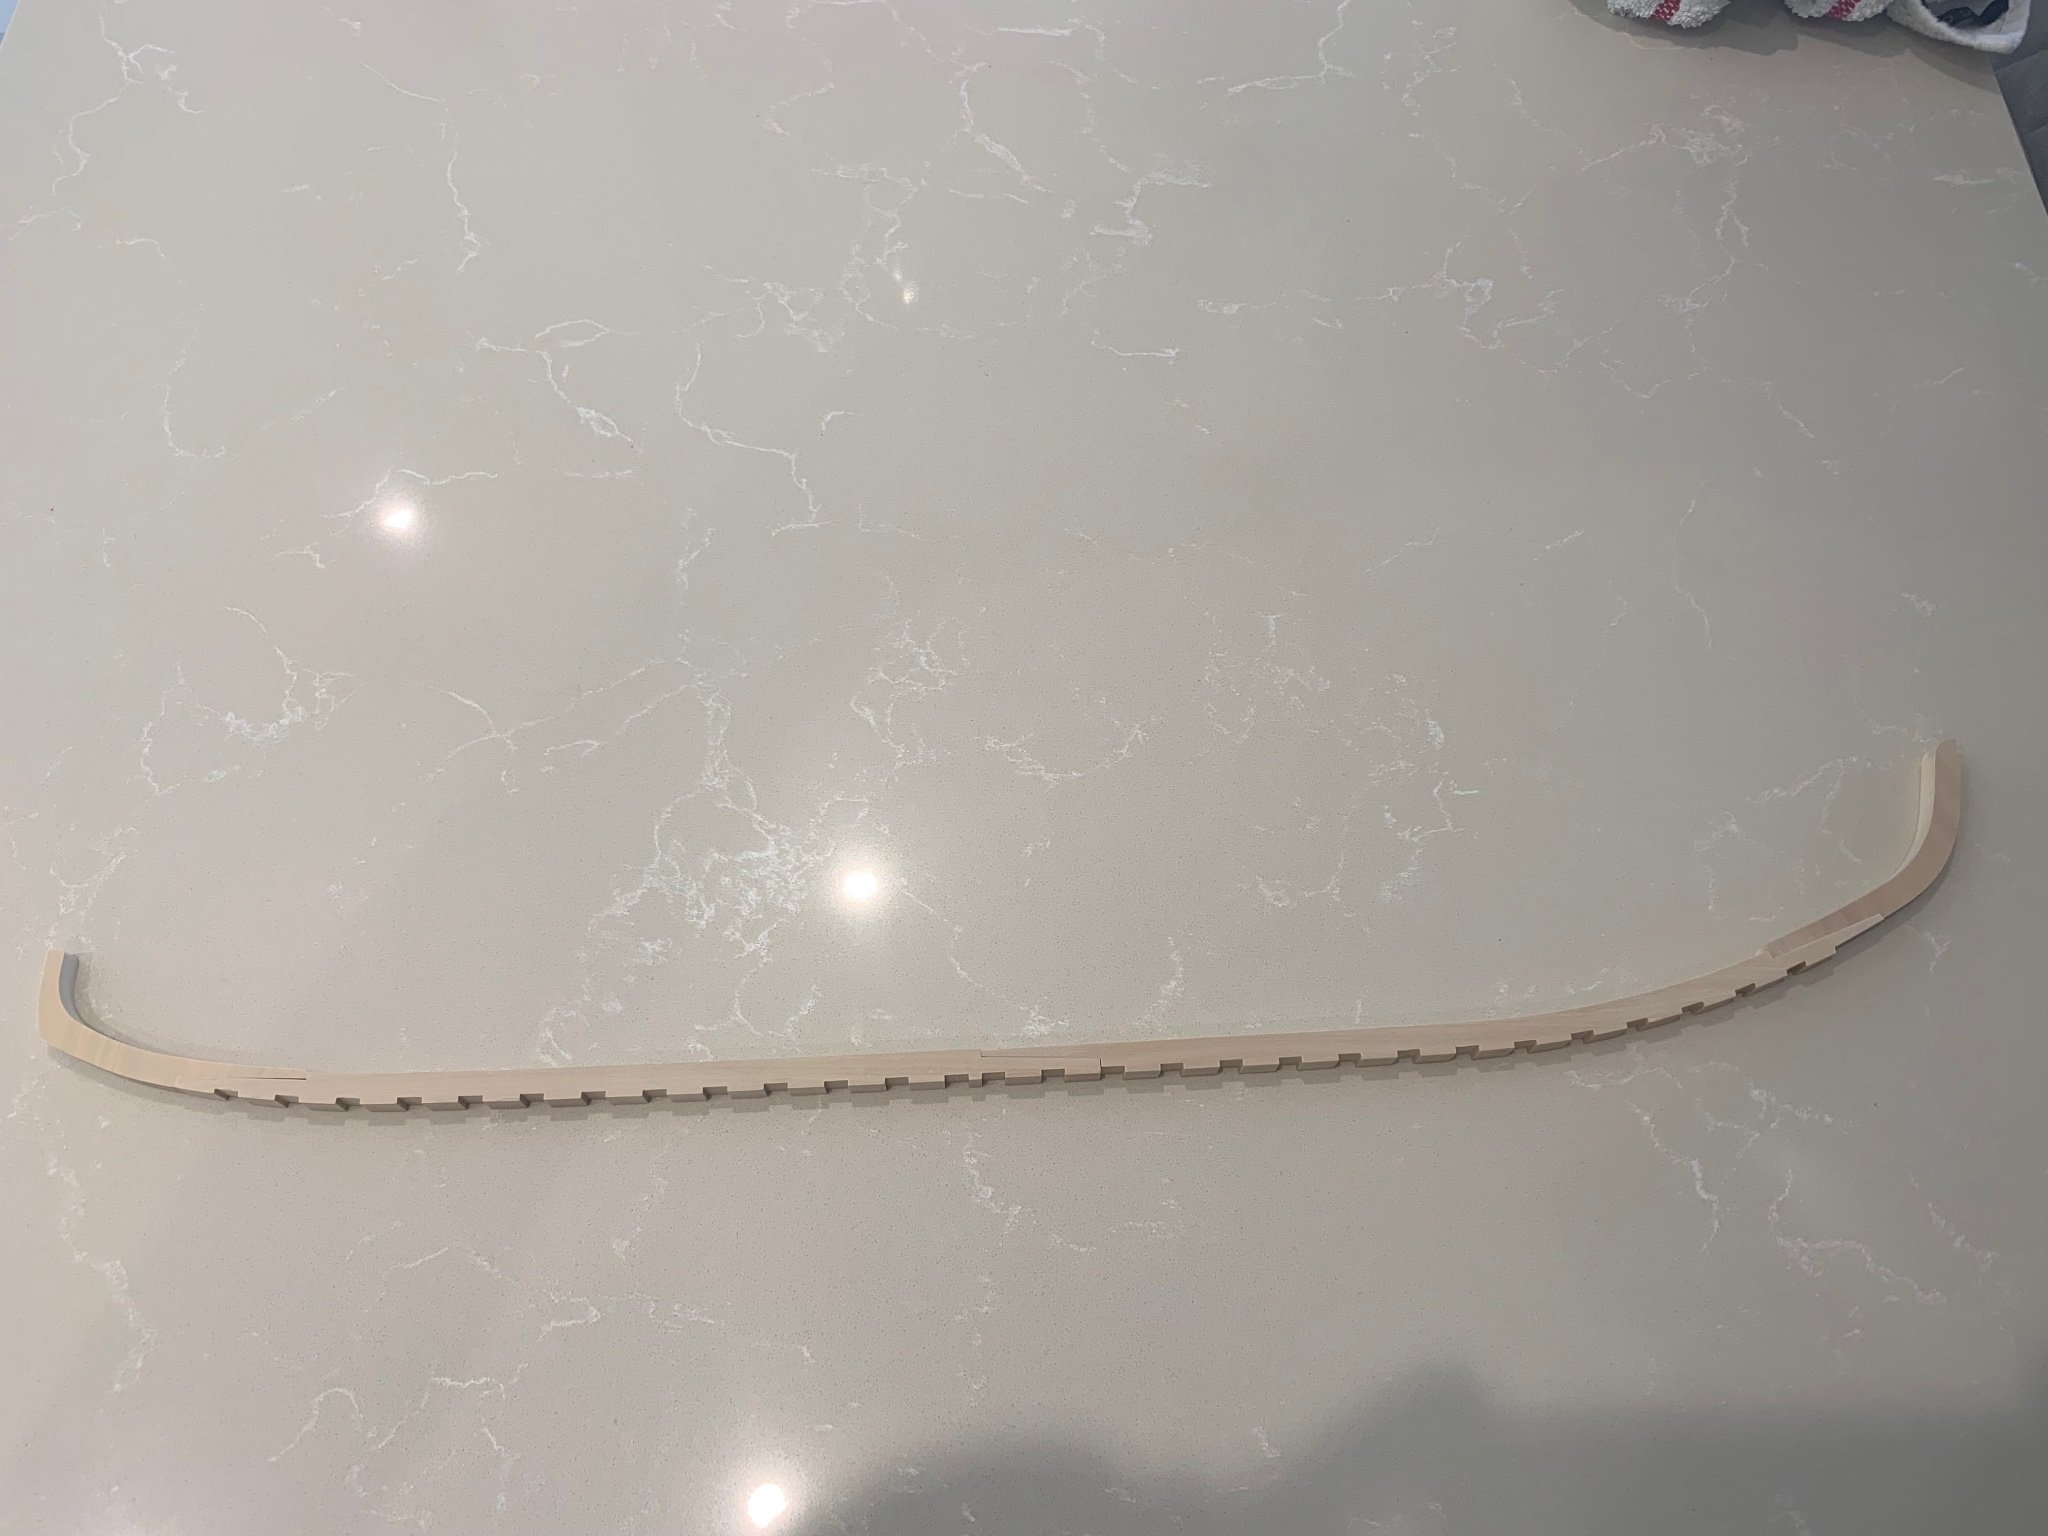
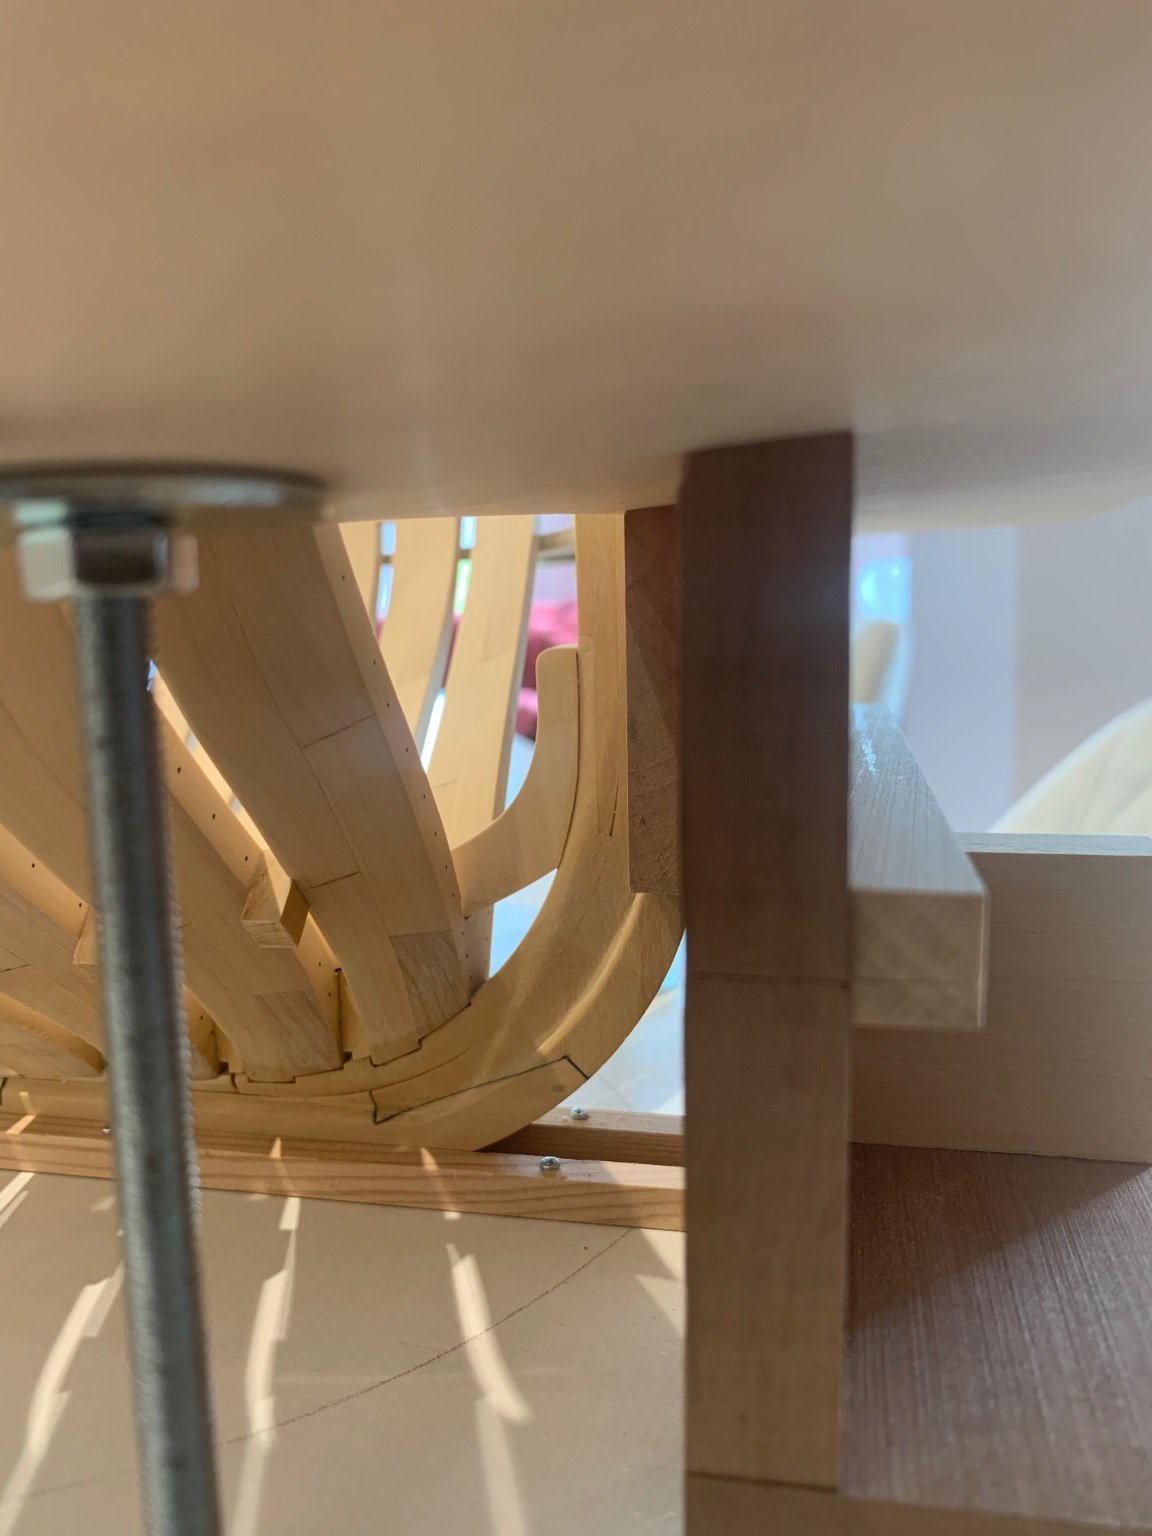
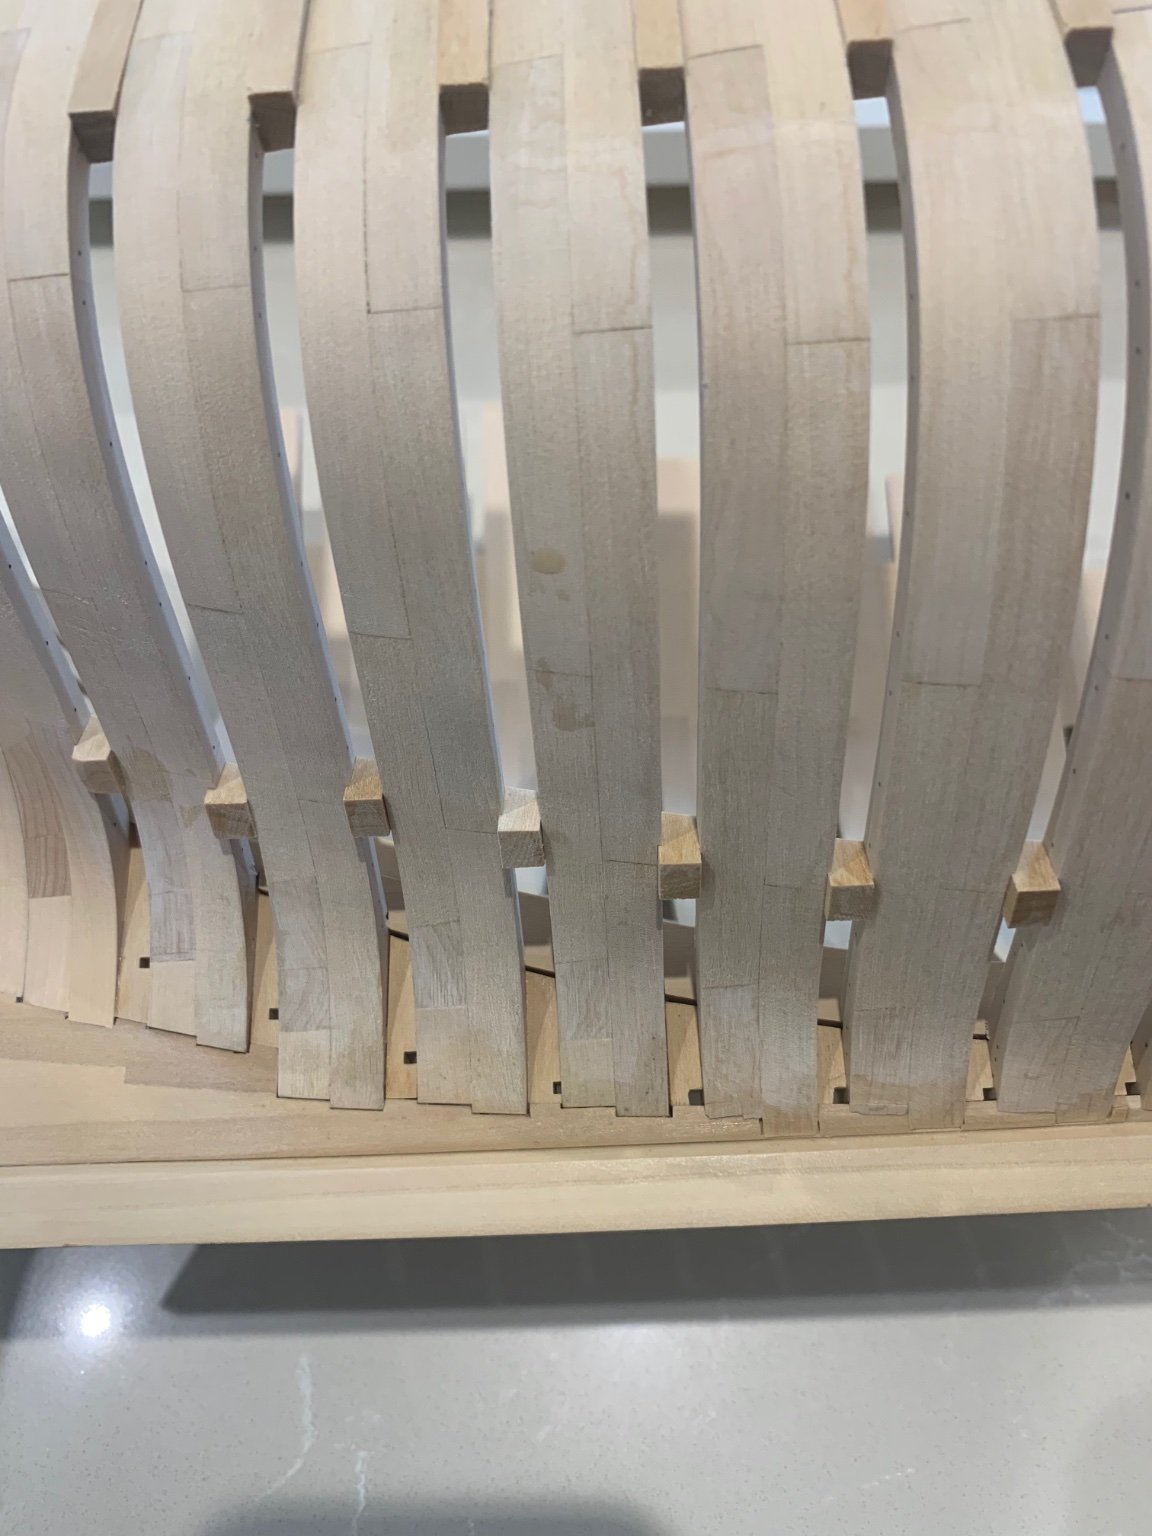
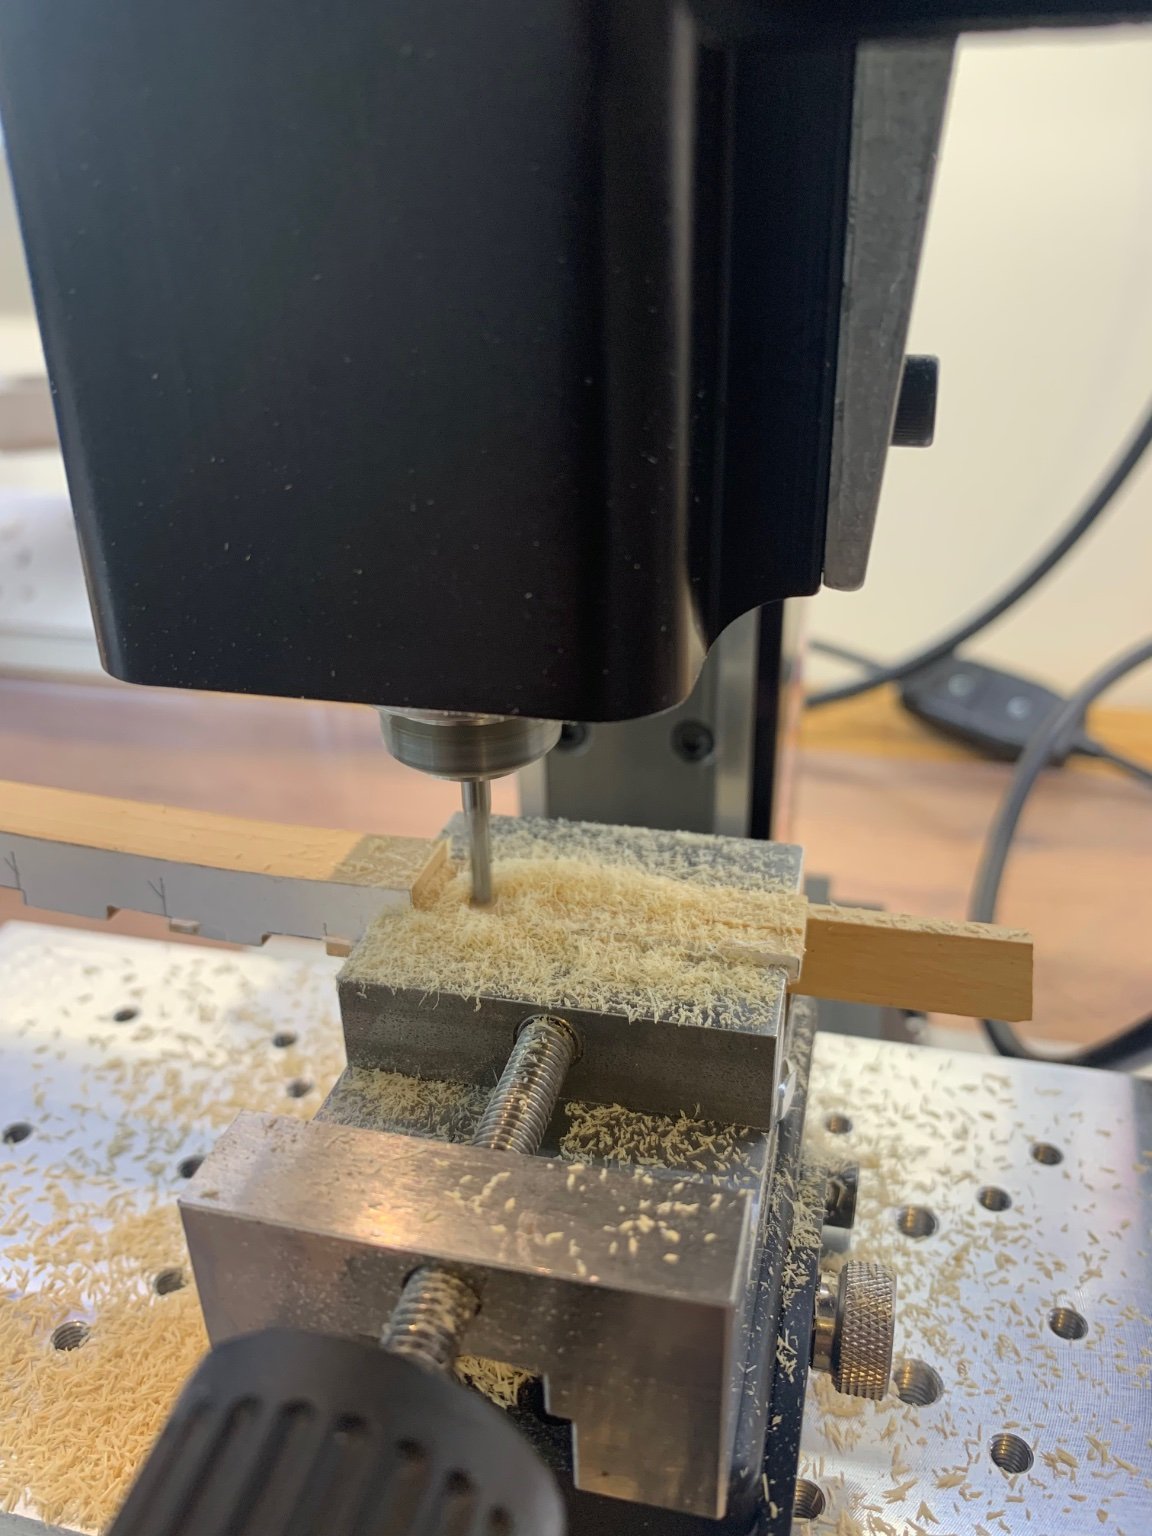
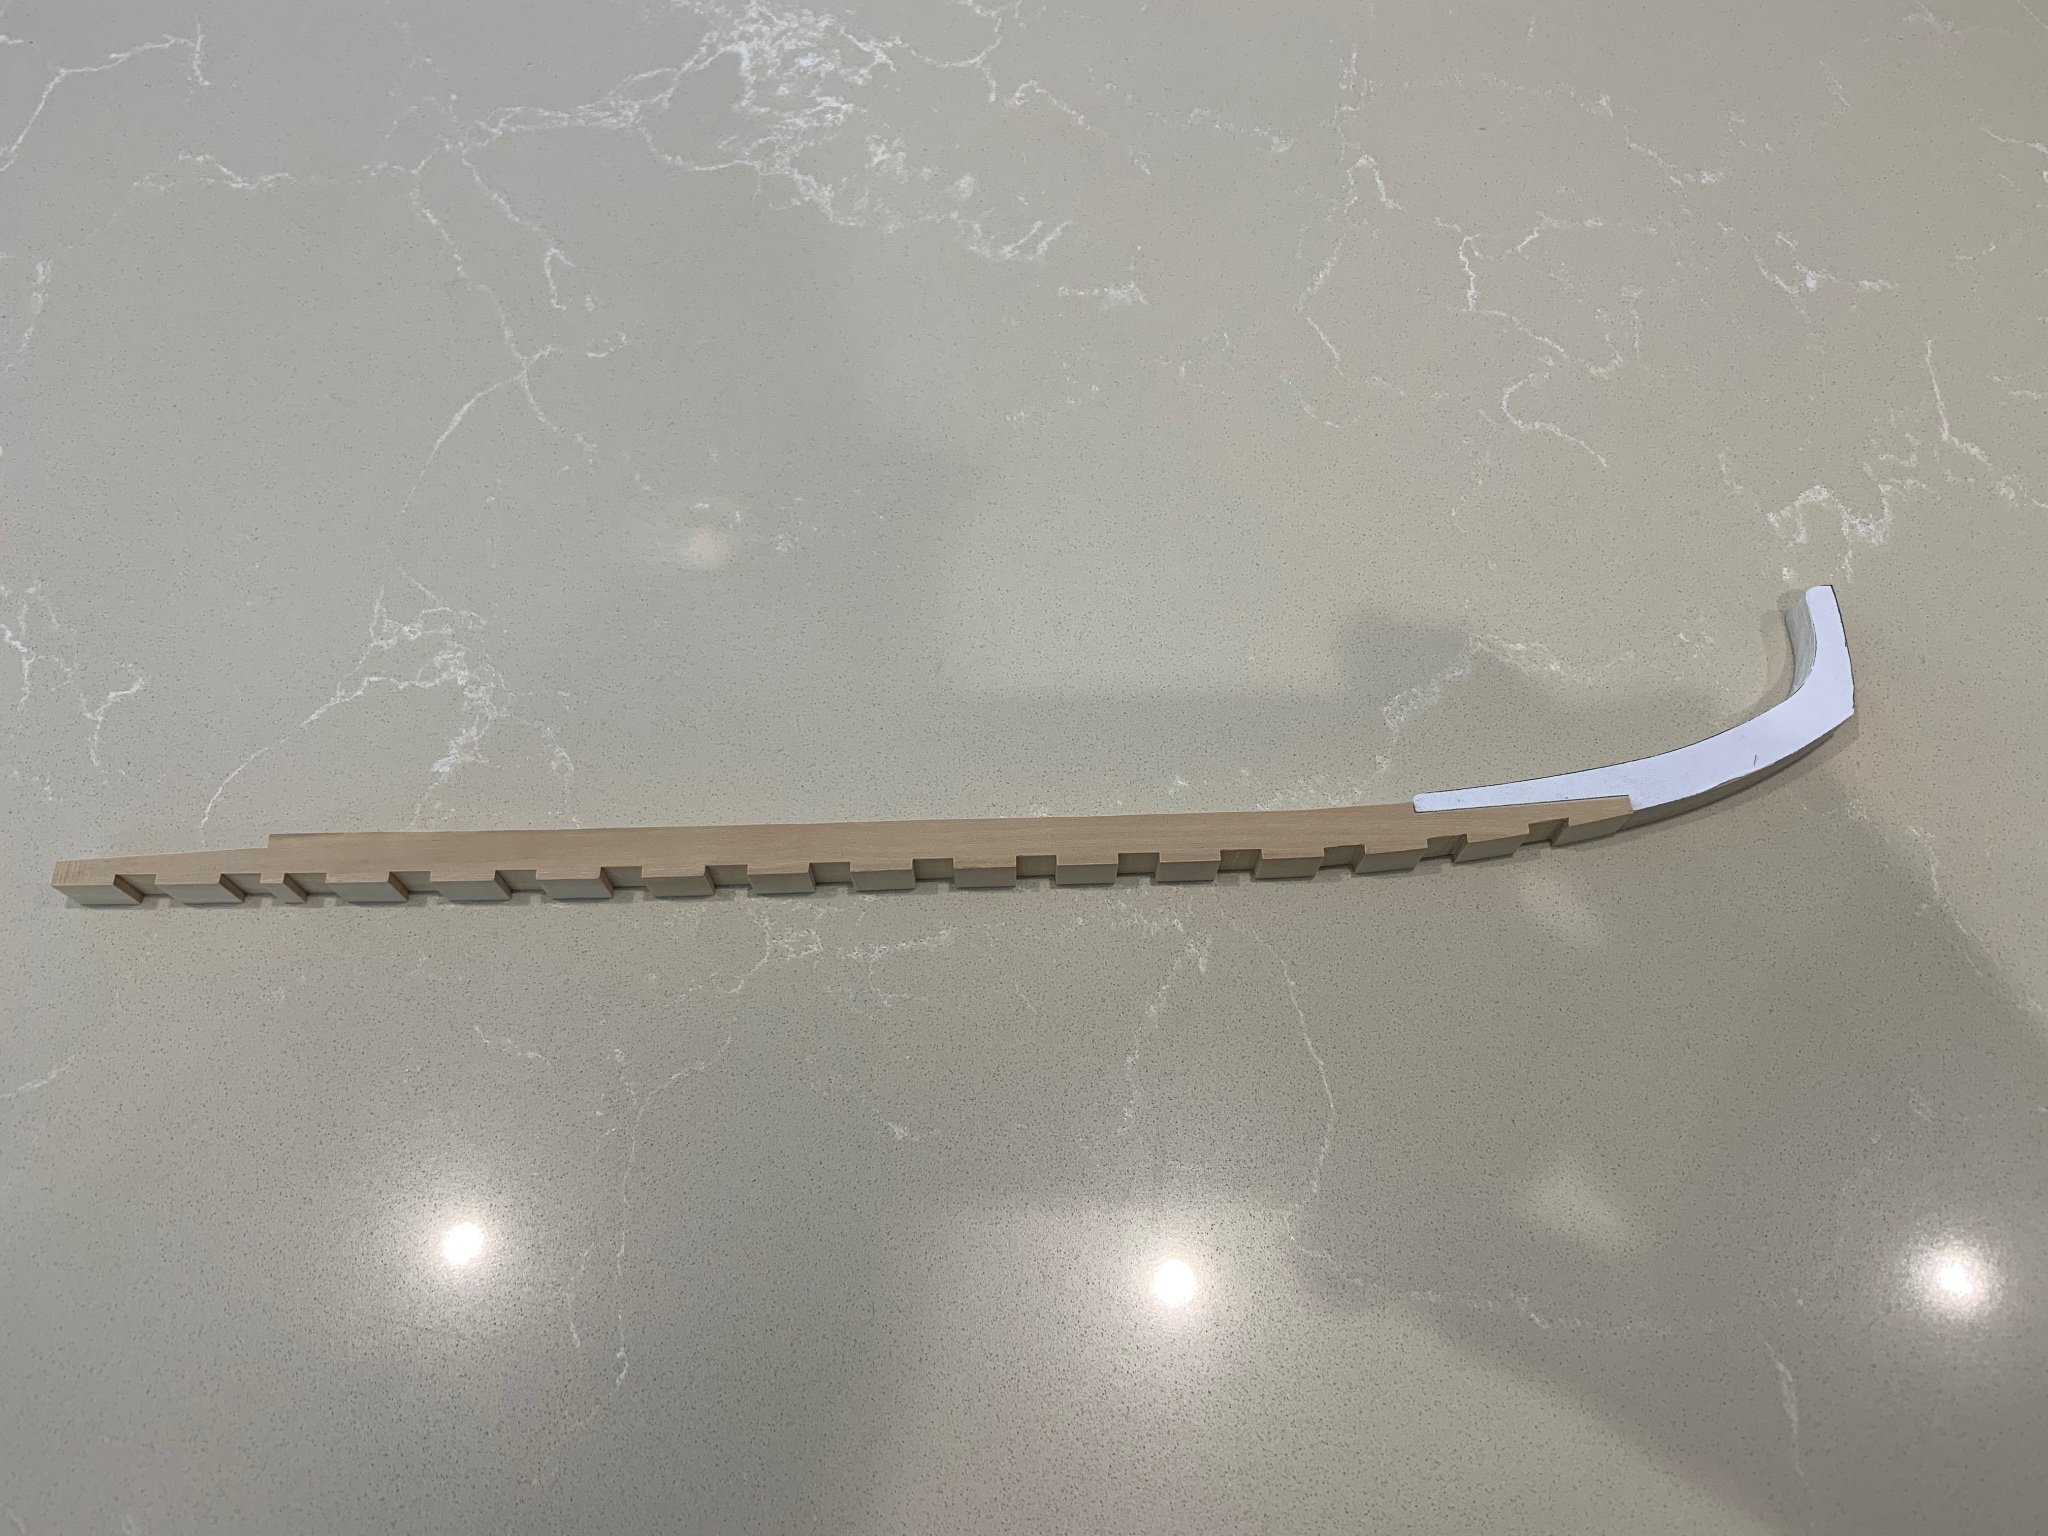
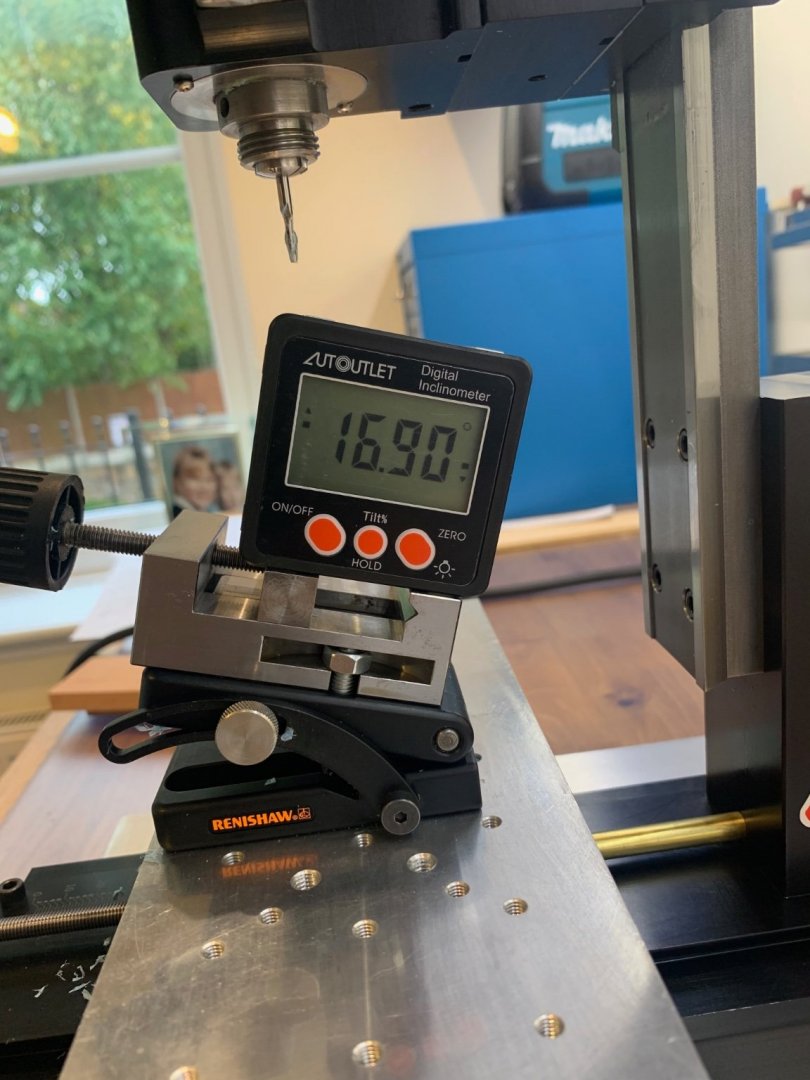
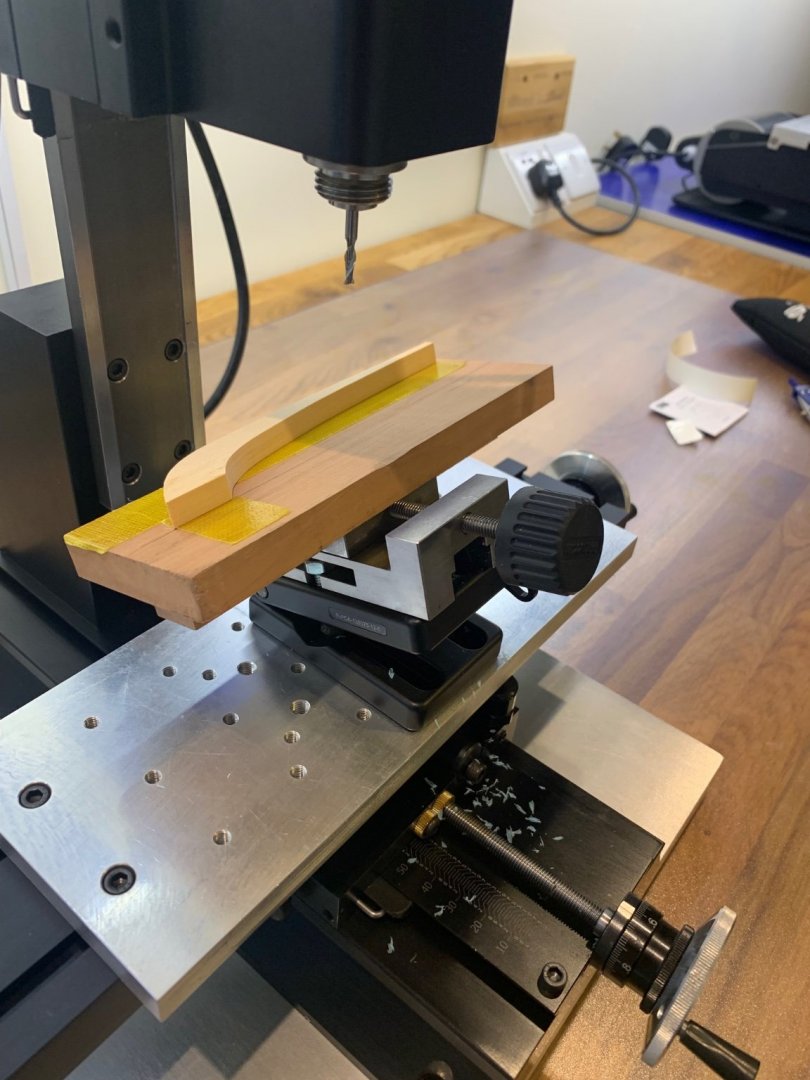
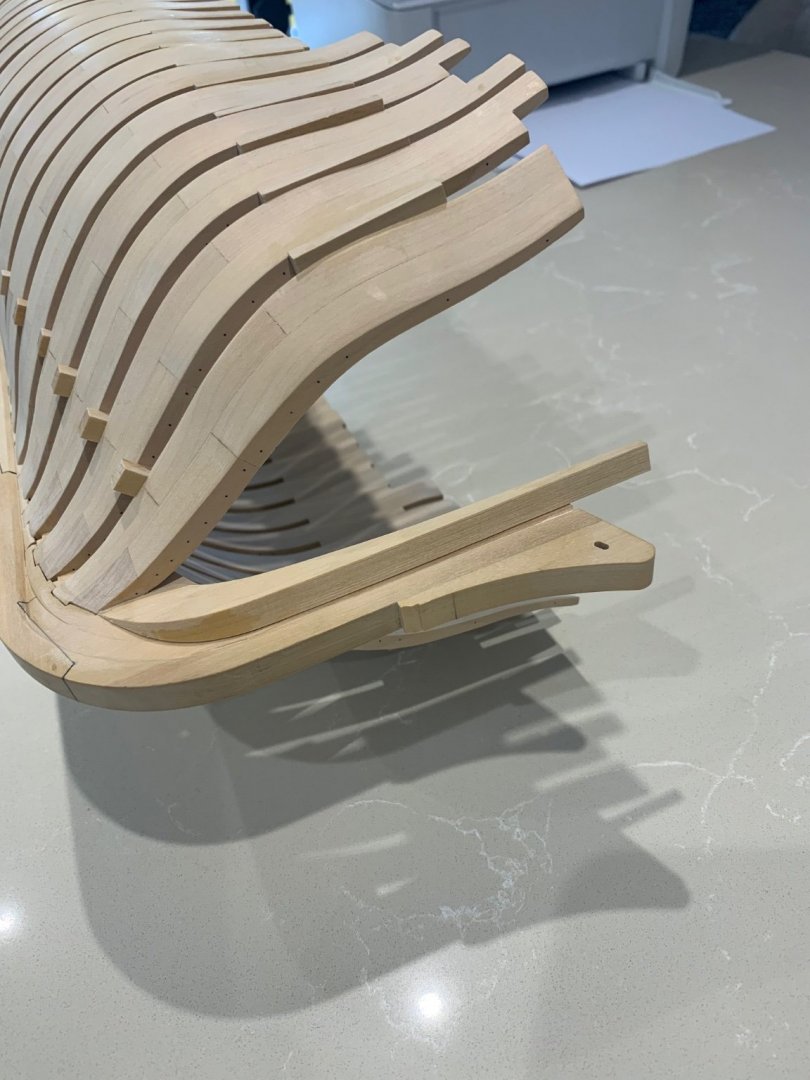
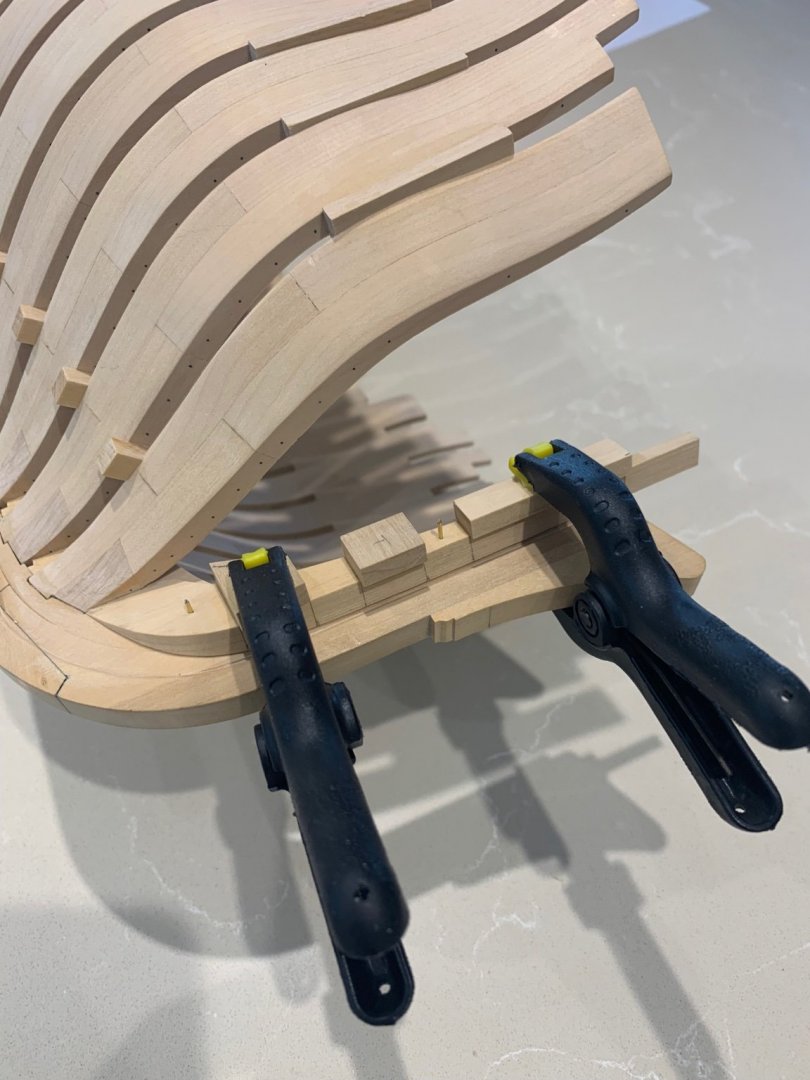
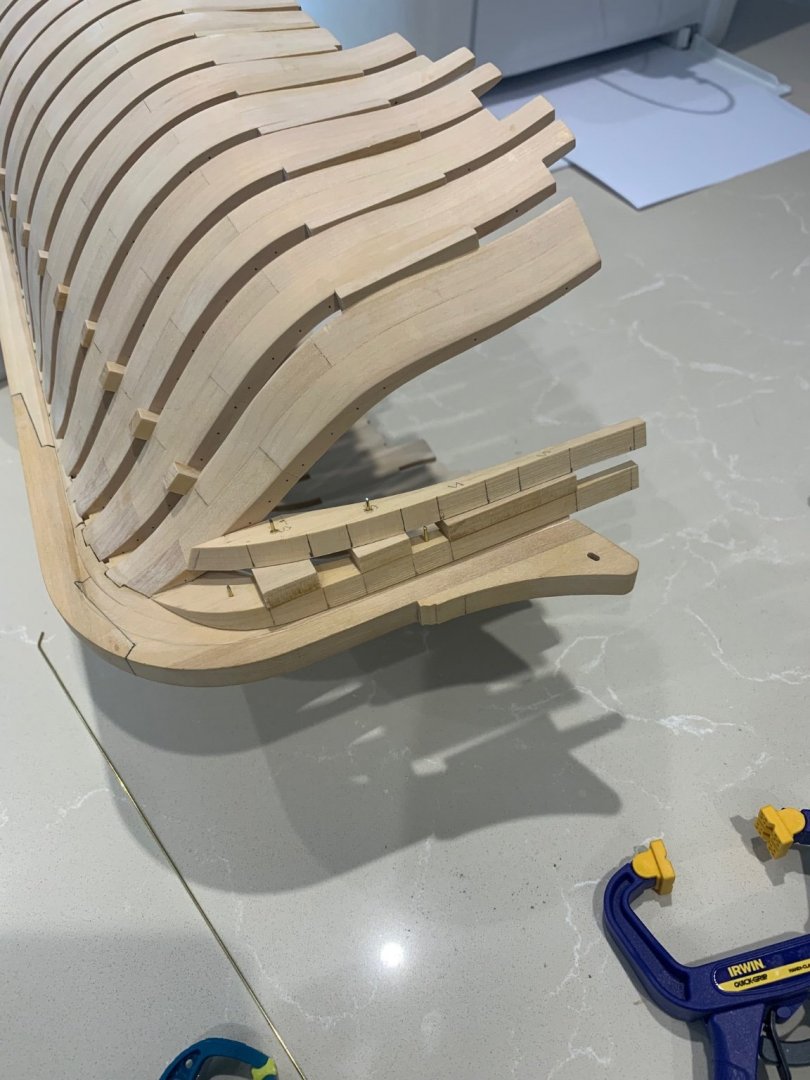
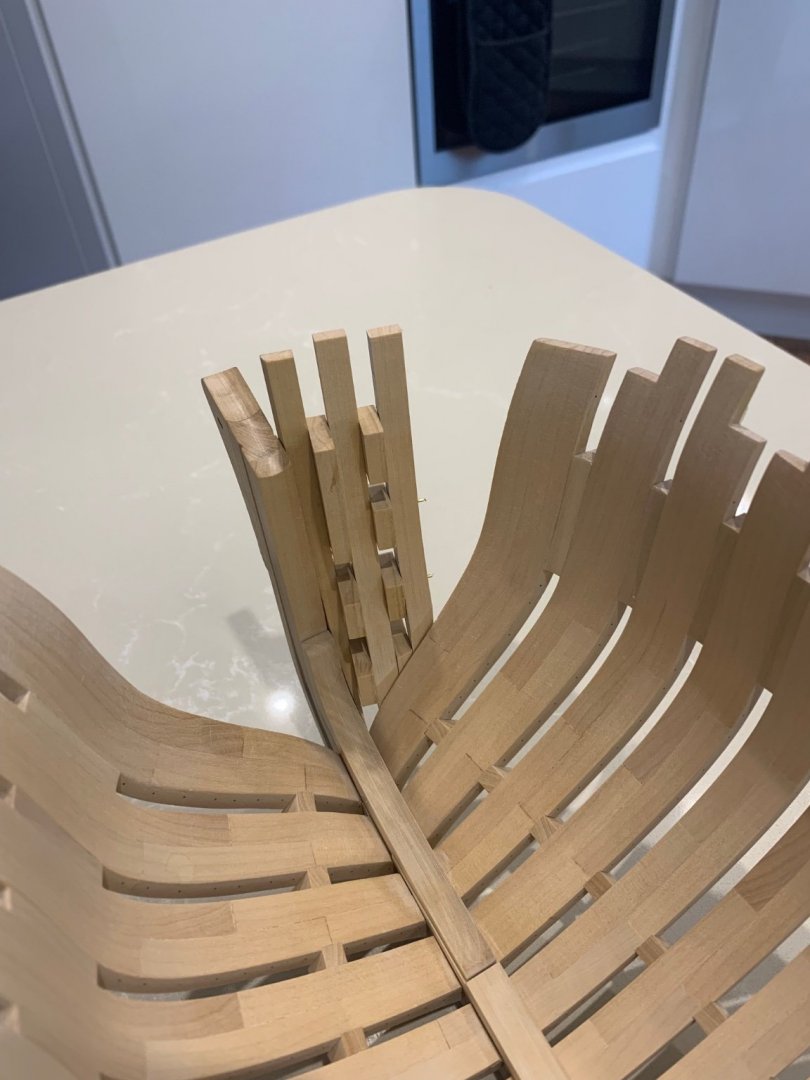
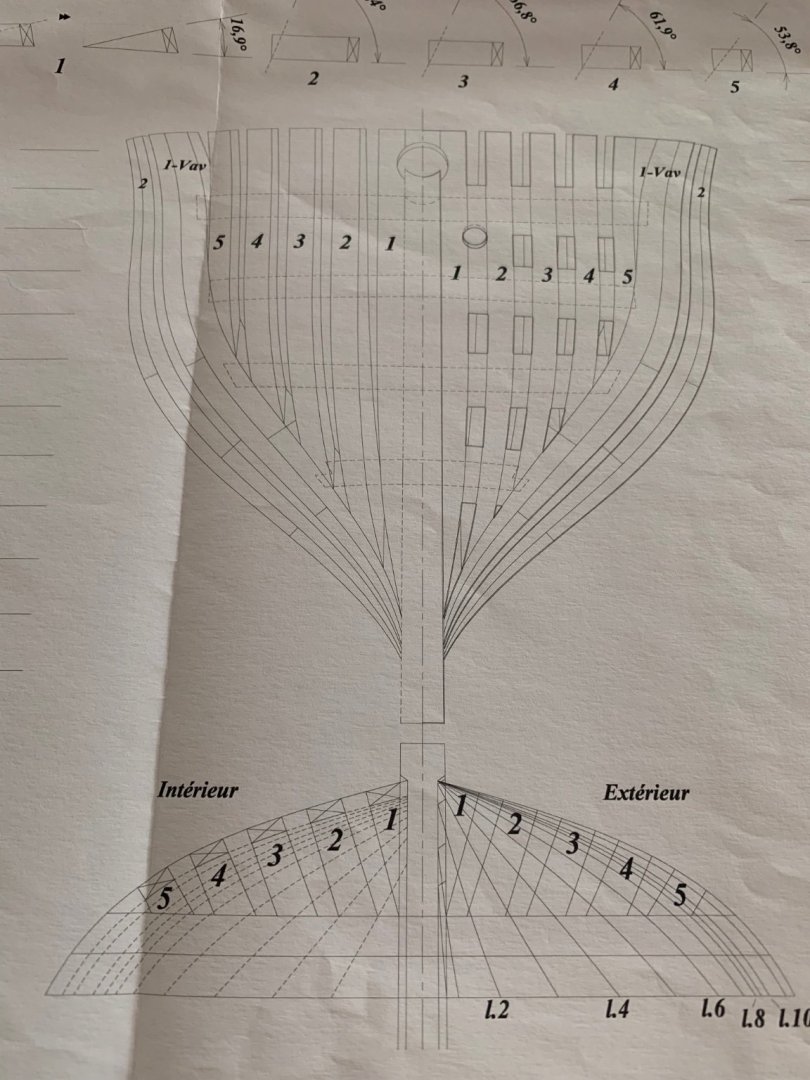
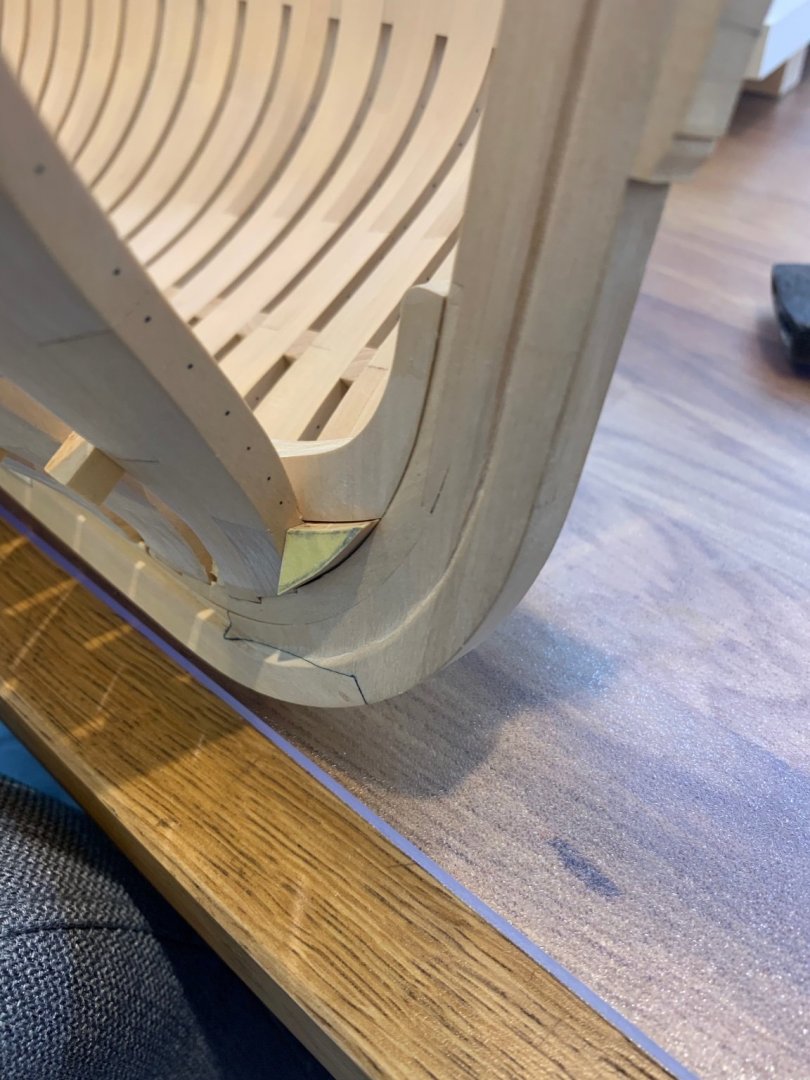
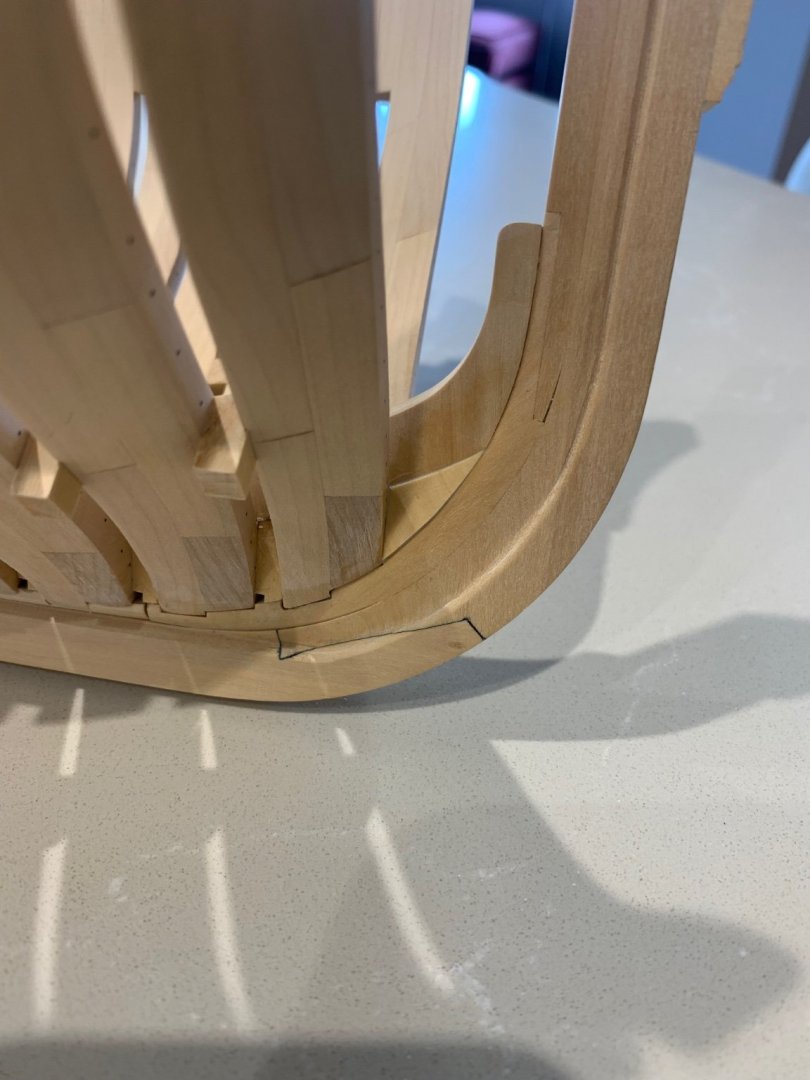
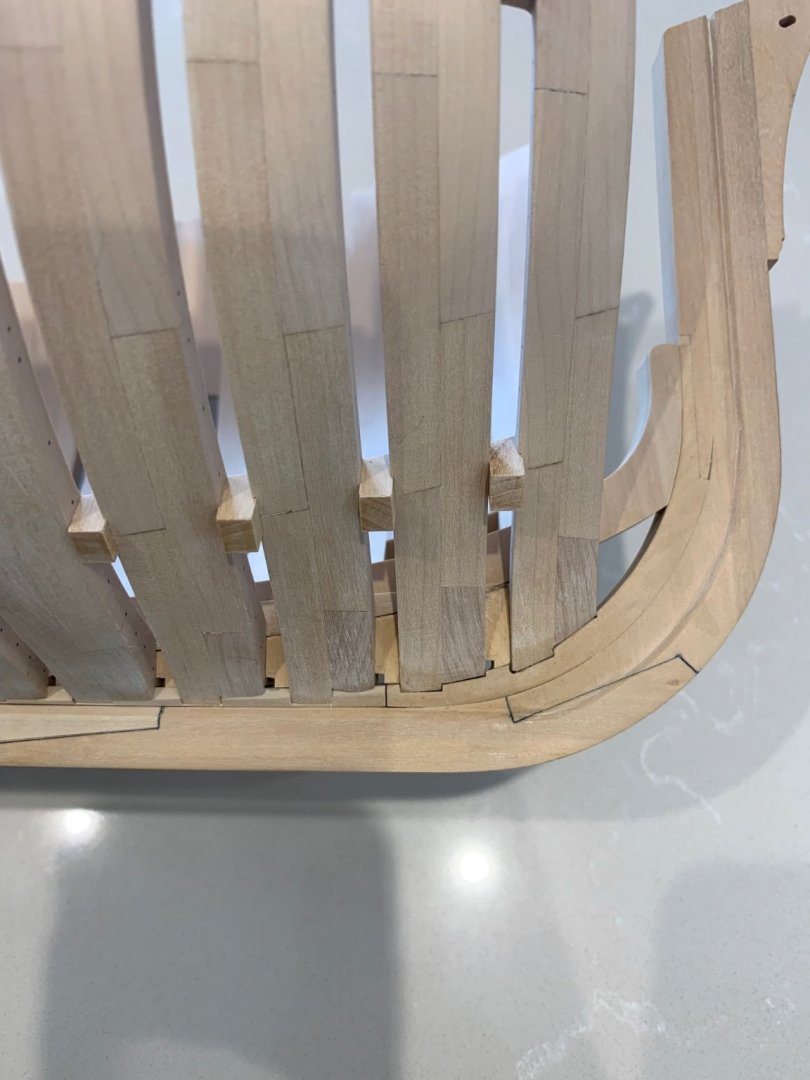
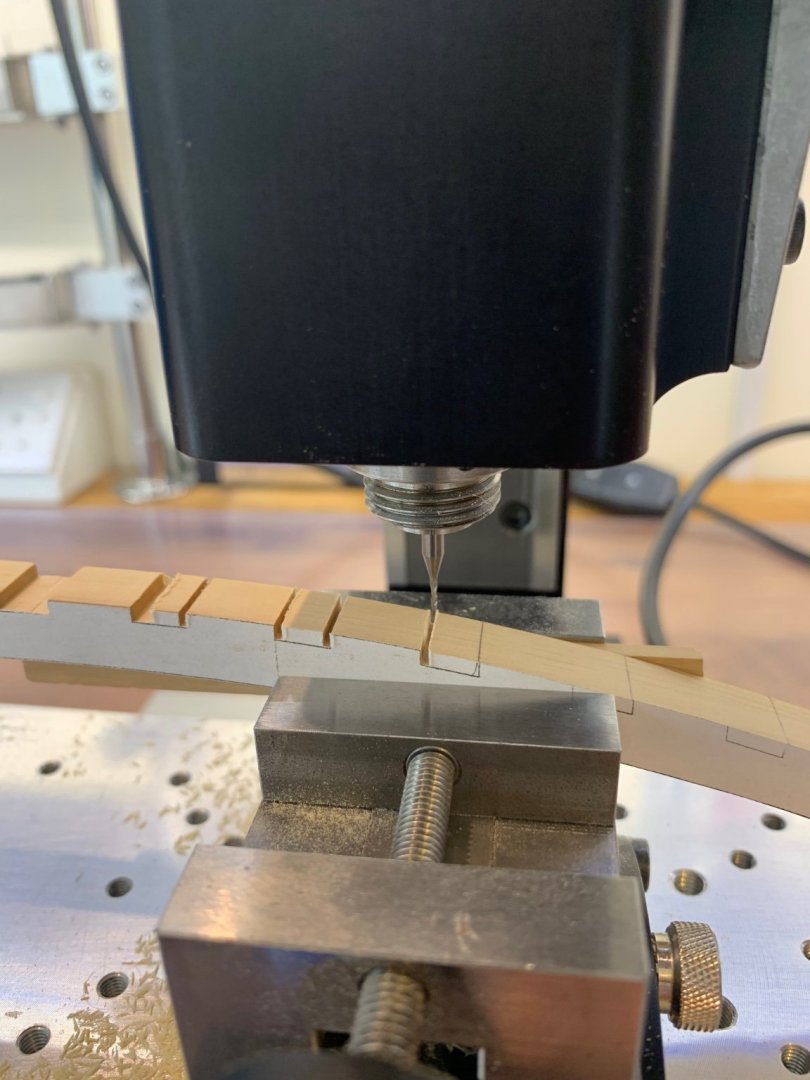
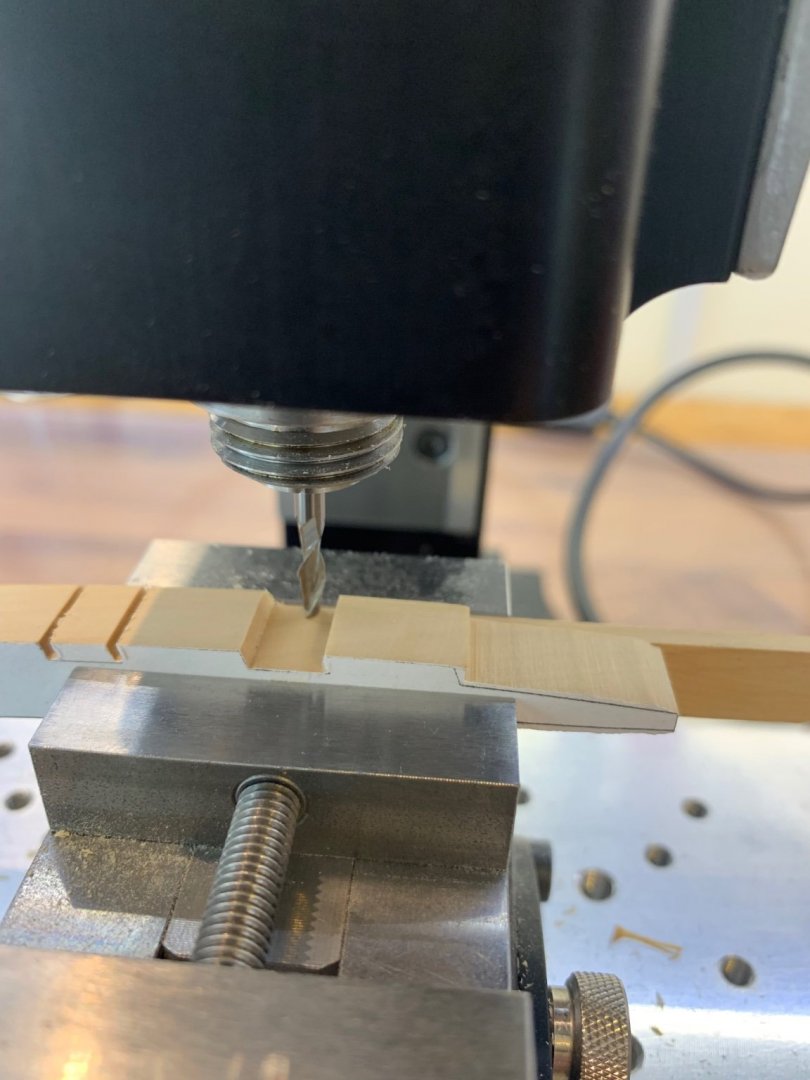
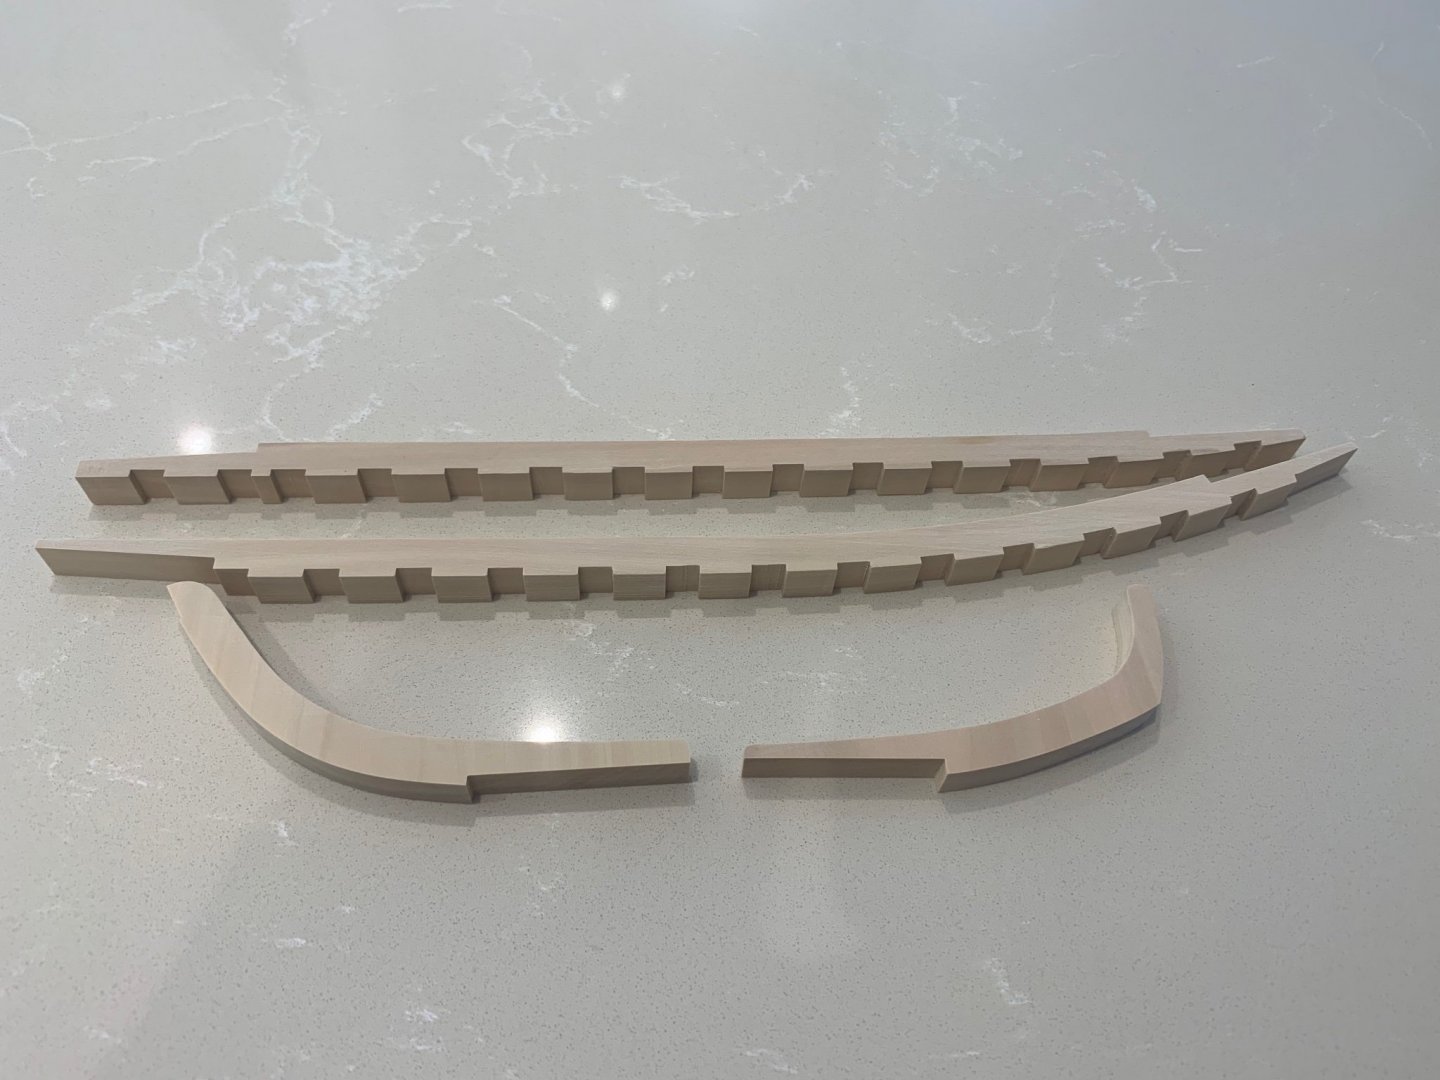
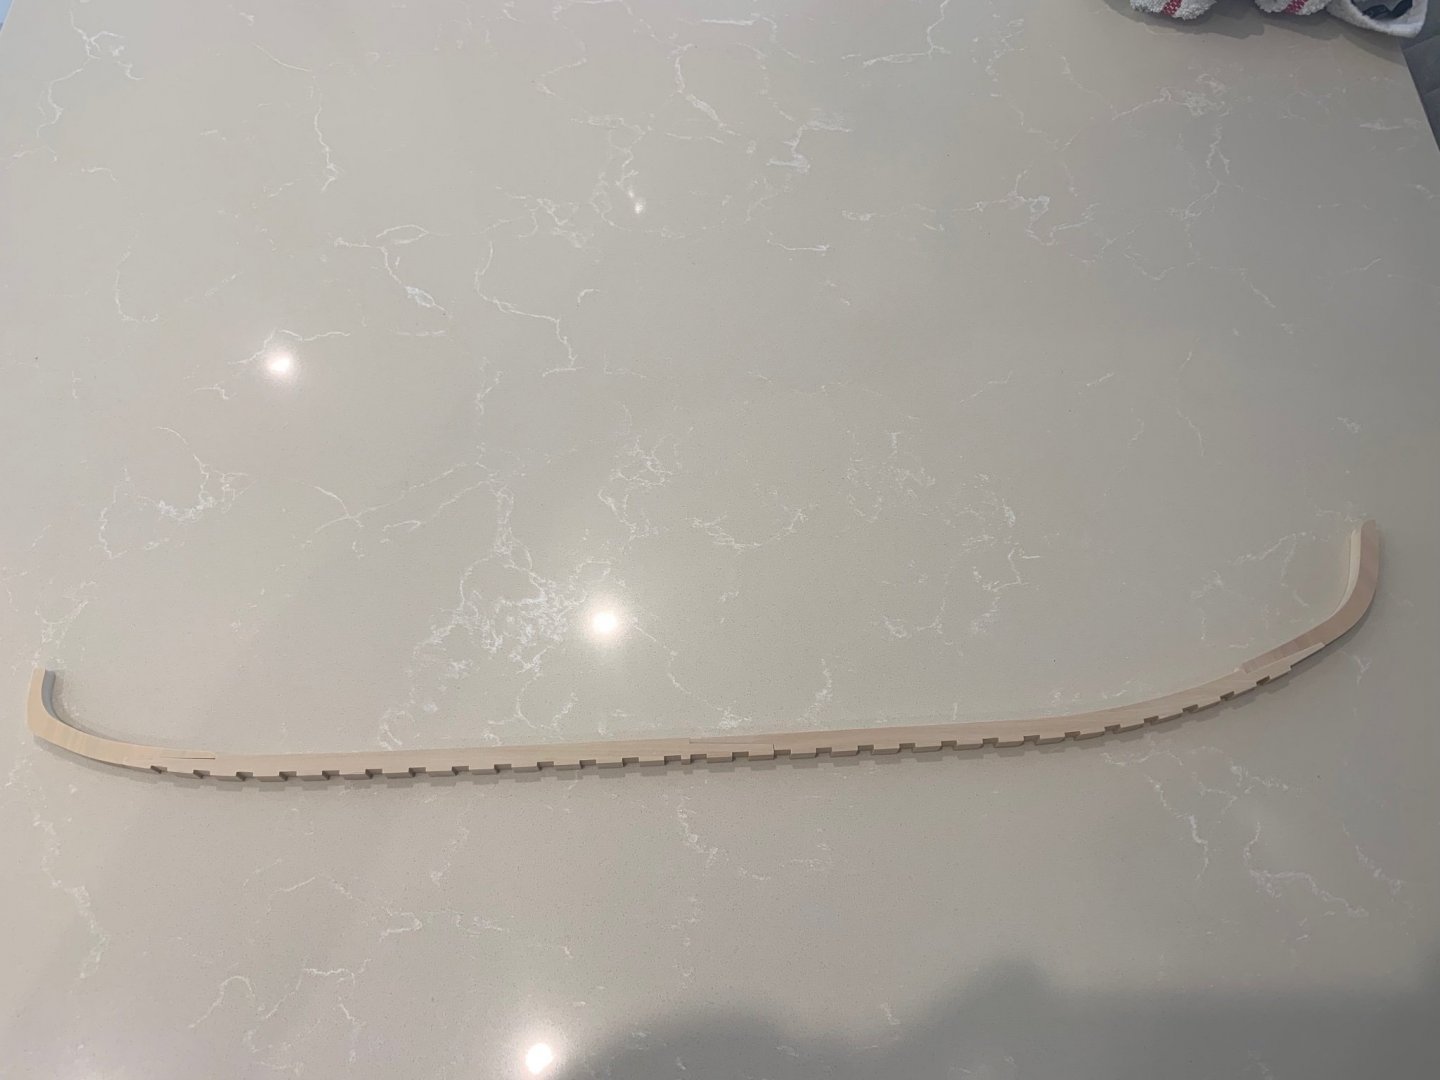
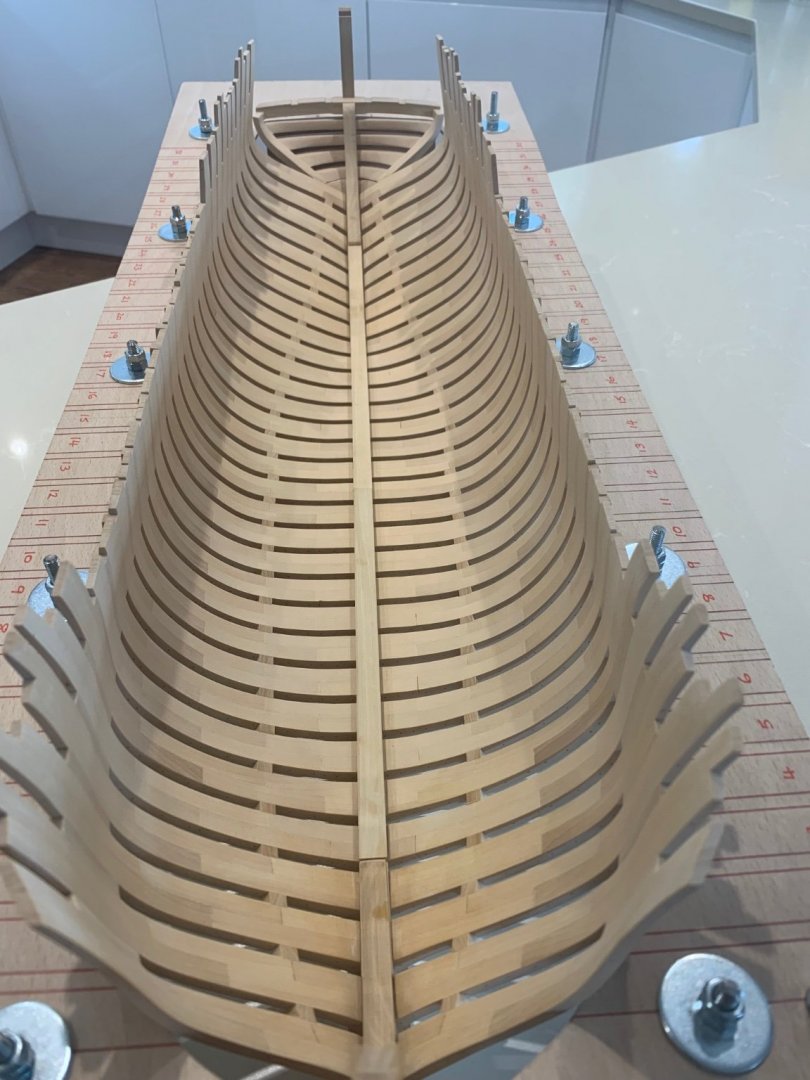
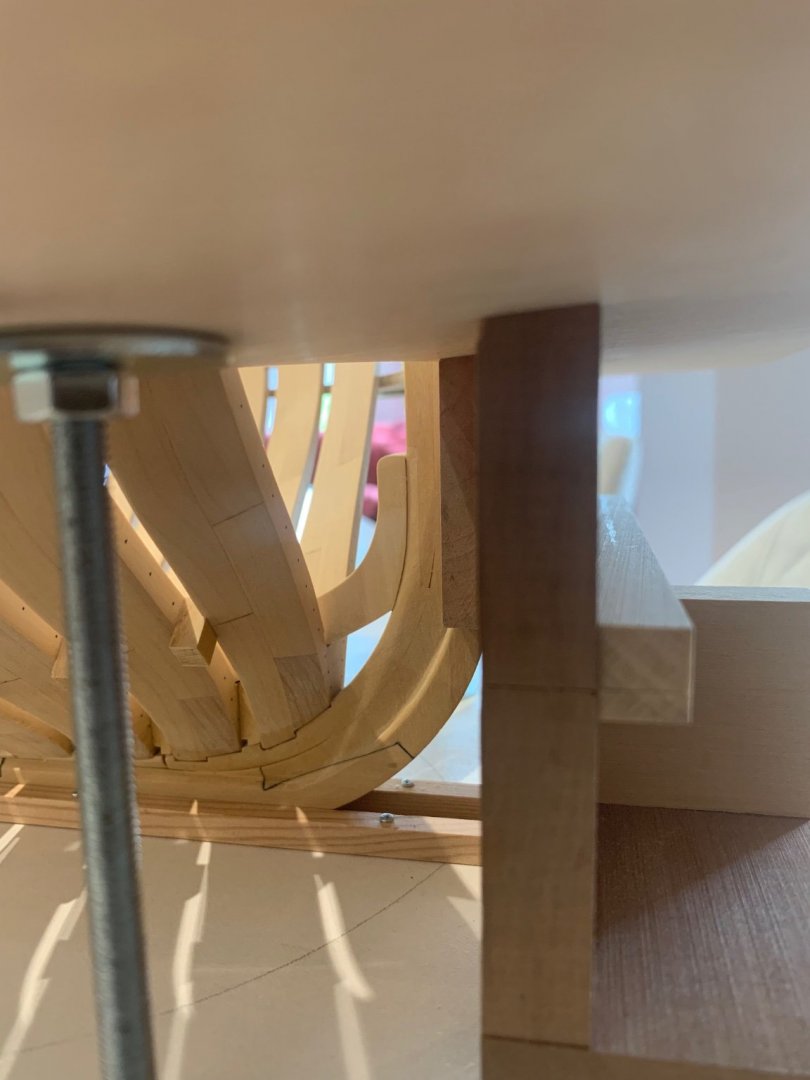
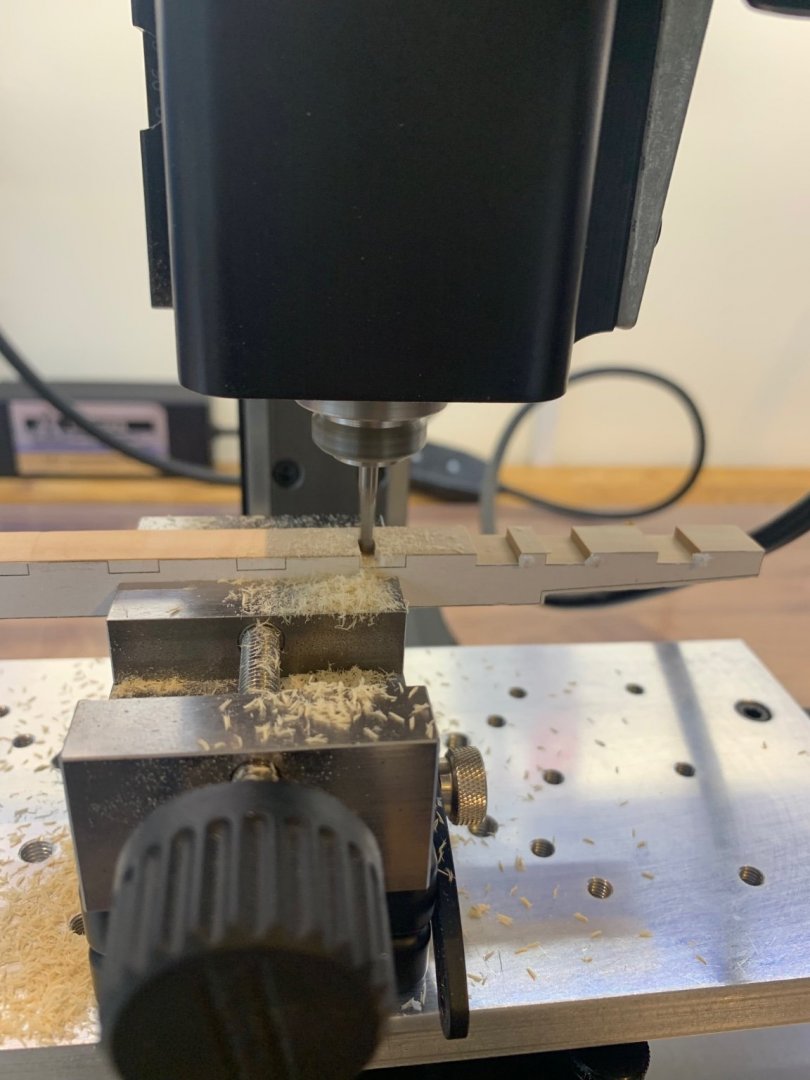
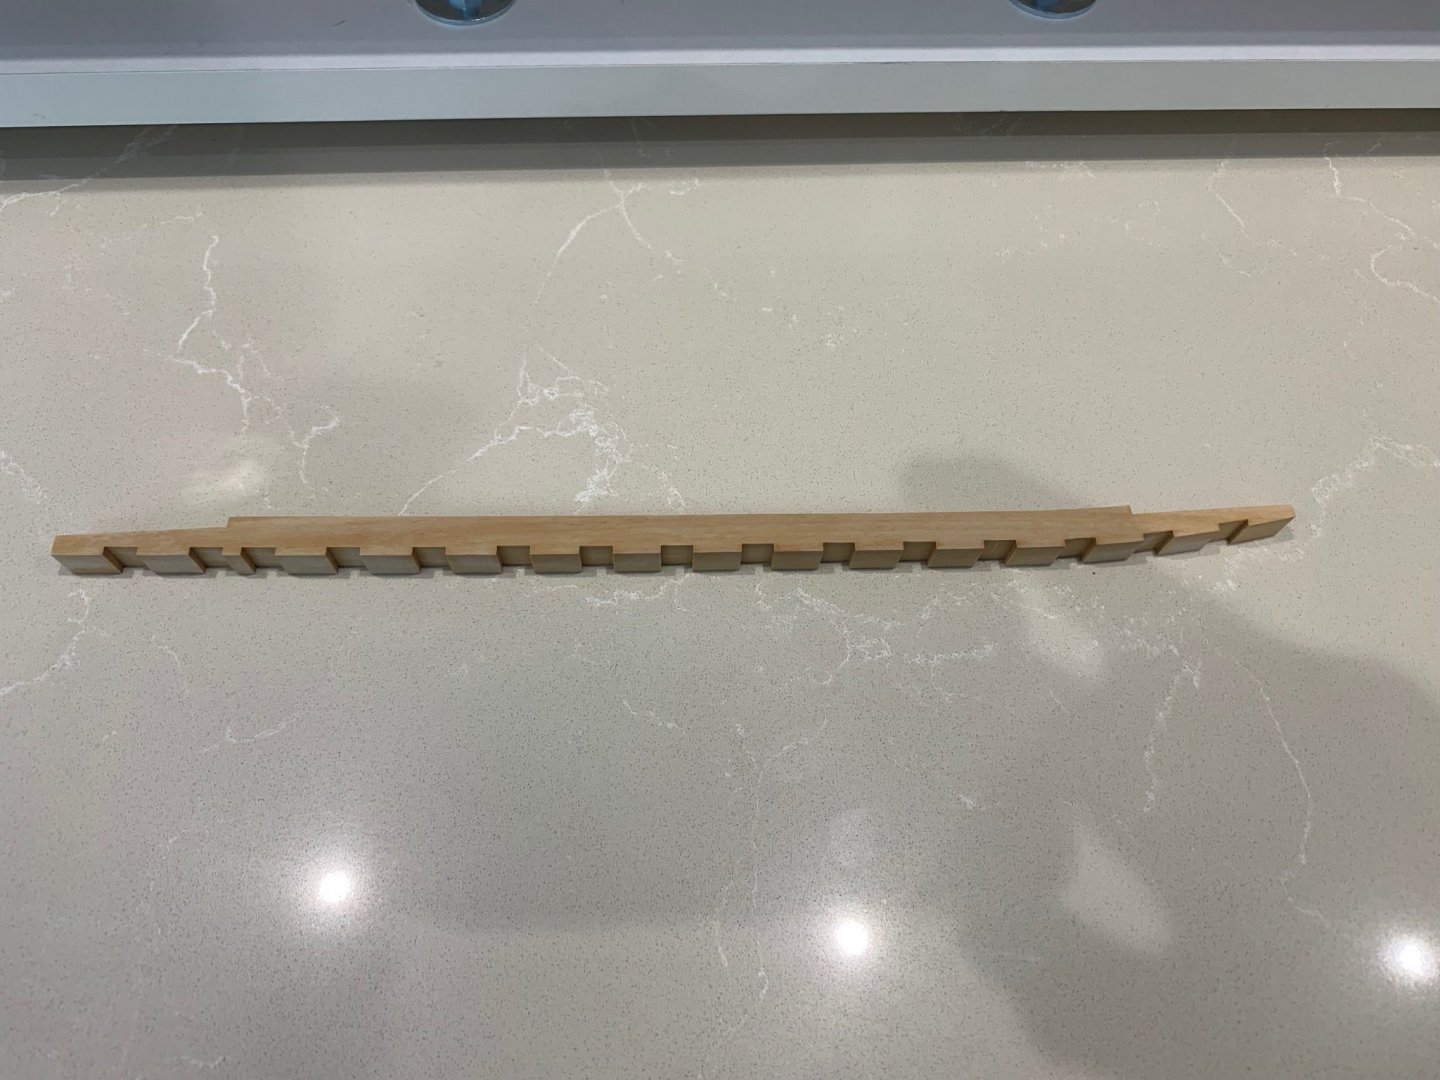
Hi all Sorry for the lack of updates I've been busy doing other things so the build is taking a bit of a back seat just for the moment. I have to admit I really have had problems getting my head around the drawings for the hawse timbers. I've been looking at Adrian Sorolla's book and it seemed to me that his pictures really didn't quite match the plans by Gerard. So I've been going around in circles trying to get a working understanding. My conclusion is that Adrian very cleverly simplified the design slightly for ease of build. The first hawse timber is very slender and requires a very accurate taper of 16.9 degrees to set the rest of the timbers up. I think that Adrian left this first timber fairly flat and then sanded the shape both inside and out once built. So what with me being one for a bit of self punishment I decided to follow the plans to the letter. This obviously meant that I had to cut this taper into hawse timber one. At first I tried sanding this taper but failed as the timber becomes so thin that the end kept on breaking off. So I knew that it had to be machined and I eventually solved this problem. I purchased a cheap angle meter for £12 which has proven invaluable for this job. I also made a very simple jig for the mill vice which to my surprise actually worked with a bit of double sided tape. Anyway I now have 3 of the 5 hawse timbers lined up on the starboard side. I have held the timbers temporarily together with some 1mm brass rod which I will swap out for wood when it comes to gluing the whole assembly together. I want to glue it together but not to the hull so that I can sand it into shape off of the ship. Some pictures below which probably explain it all better than my words. I'm glad that I'm moving forward again and I'm much better now at interpreting drawings now - well until the next problem! Mark


-
NAIAD 1797 by Bitao - 1:60
No Idea replied to Bitao's topic in - Build logs for subjects built 1751 - 1800
That is beautiful work bitao 👍👍 -
Hi Kevin - you say that you are worried about being a ship builder. Mate you are building a ship so you are a ship builder 👍. keep going bud as it looks great and stop beating yourself up! This is a really good build.
- 312 replies
-
- 7
-

-
- enterprise
- caf
- (and 1 more)
-
Veritas Miniature Worktop from Lee Valley Tools
No Idea replied to Jack12477's topic in Modeling tools and Workshop Equipment
Hi Mate I too use Panavise but prefer this vice https://www.amazon.co.uk/PANAVISE-8103-Standard-Head-Silver/dp/B0002BC1XQ/ref=mp_s_a_1_12?adgrpid=55927007751&dchild=1&gclid=EAIaIQobChMIuoL54rvt8wIVFeDtCh0EswsCEAAYASAAEgJZ-_D_BwE&hvadid=259082504851&hvdev=m&hvlocphy=1006500&hvnetw=g&hvqmt=b&hvrand=7524682549615227343&hvtargid=kwd-296013458331&hydadcr=7433_1749334&keywords=panavise&qid=1635436527&sr=8-12 They make all different vice jaws too. I use the brass jaws for wood and it would just fit into your existing base. -
I have to echo what’s already been said. I’m glad your back on this as I think your doing a great job. The ships really looking fantastic. Just remember - if it was easy everyone would be doing it. They’re not - but you are 😉
- 312 replies
-
- 5
-
-
- enterprise
- caf
- (and 1 more)
-
That is such nice work and in scale too........Your patience and skill is to be admired as thats a lot of treenails and it looks simply awesome!
-
Thanks druxey I had a feeling that would be the answer. I'll just have to take my time and try and get them right Thanks for the help Dziadeczek much appreciated.
-
Workshop Vacuum cleaners
No Idea replied to DaveBaxt's topic in Modeling tools and Workshop Equipment
Just to add to this thread I have now replaced my Bosch Gas 20 with a Festool CTM Midi extractor. There's not that much difference in overall size and the CTM fits nicely under my bench. The CTM is a class M extractor which is a step up from the Bosch which was L class. It seems very well made but most importantly for me it is a lot quieter. It also has a very long hose so I can put it further away too and I have found that low power on this machine is about the same as full power on my old machine. However it is a very expensive machine so only time will tell whether it was worth it or not. Also considering the price it came with no tools for cleaning up at all. This was an additional cost even though it was a small one I think the manufacturers could supply them with the machine. If you really want to go for it you can buy a bluetooth switch that turns it on and off at the tool end to save walking back to the machine. I also think that this should be supplied as standard. I'm just waiting for an adaptor to join the Festool hose to my tools now but having run it up the lower noise will be bliss in my workshop as I had my old machine on for most of the time. -
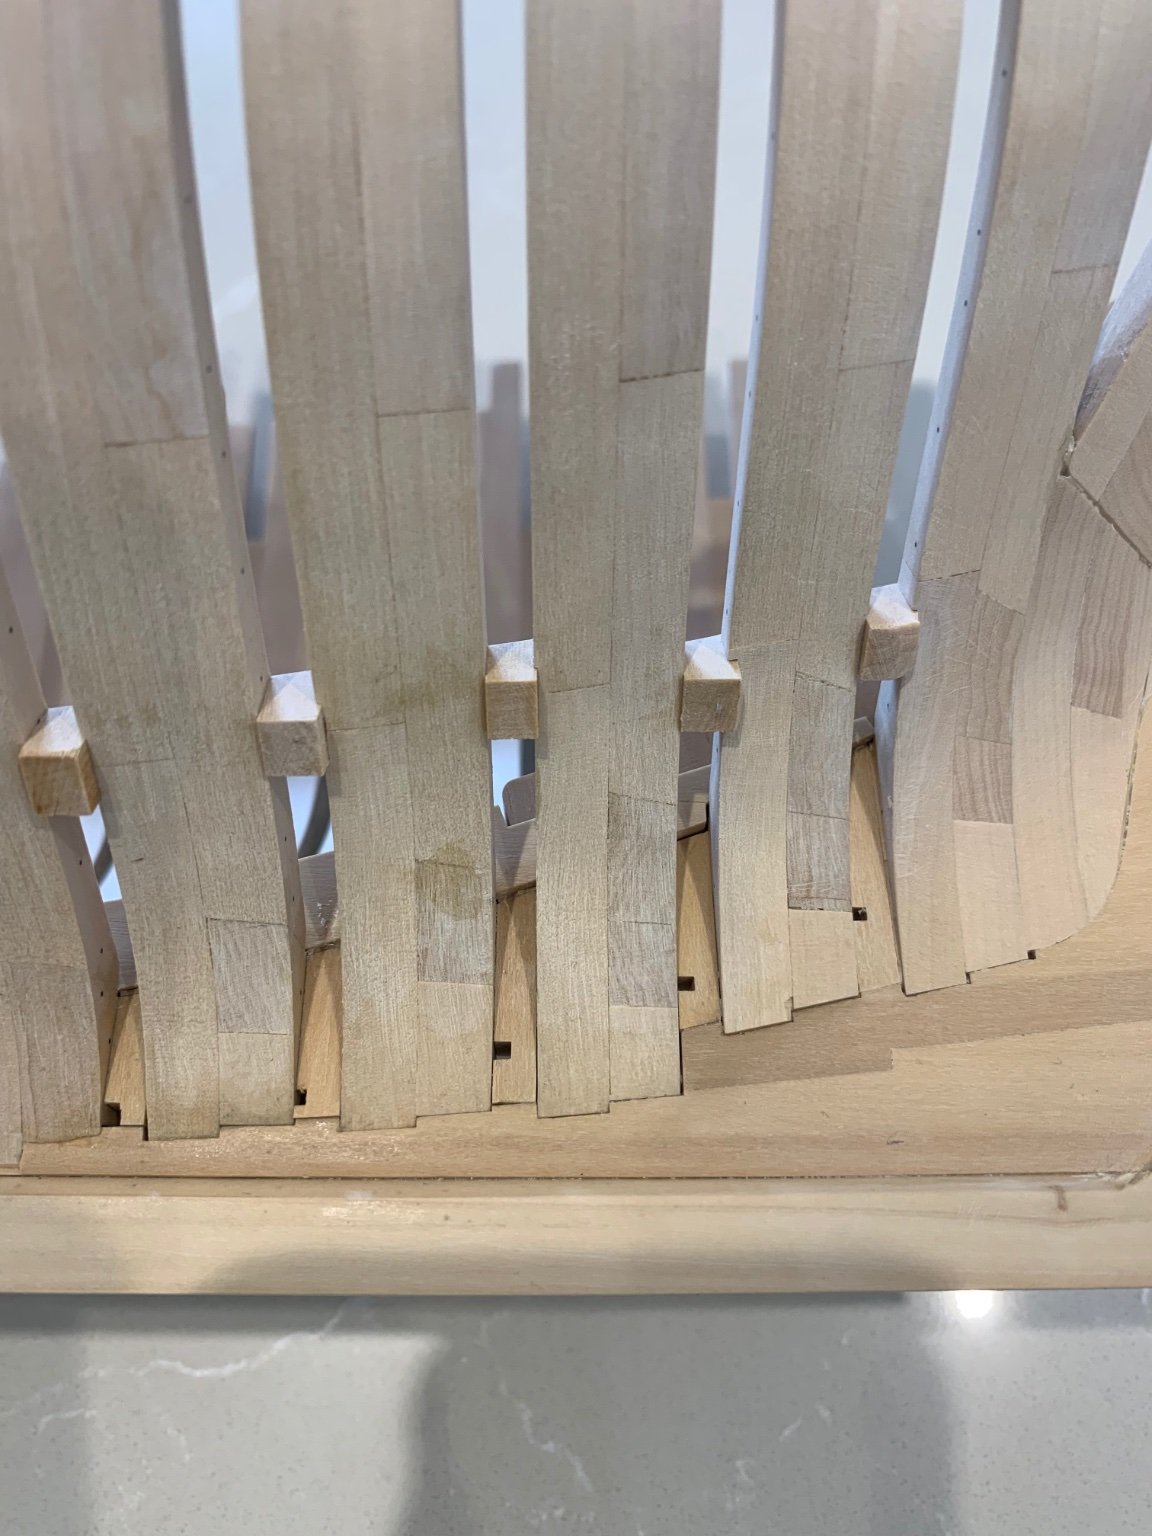
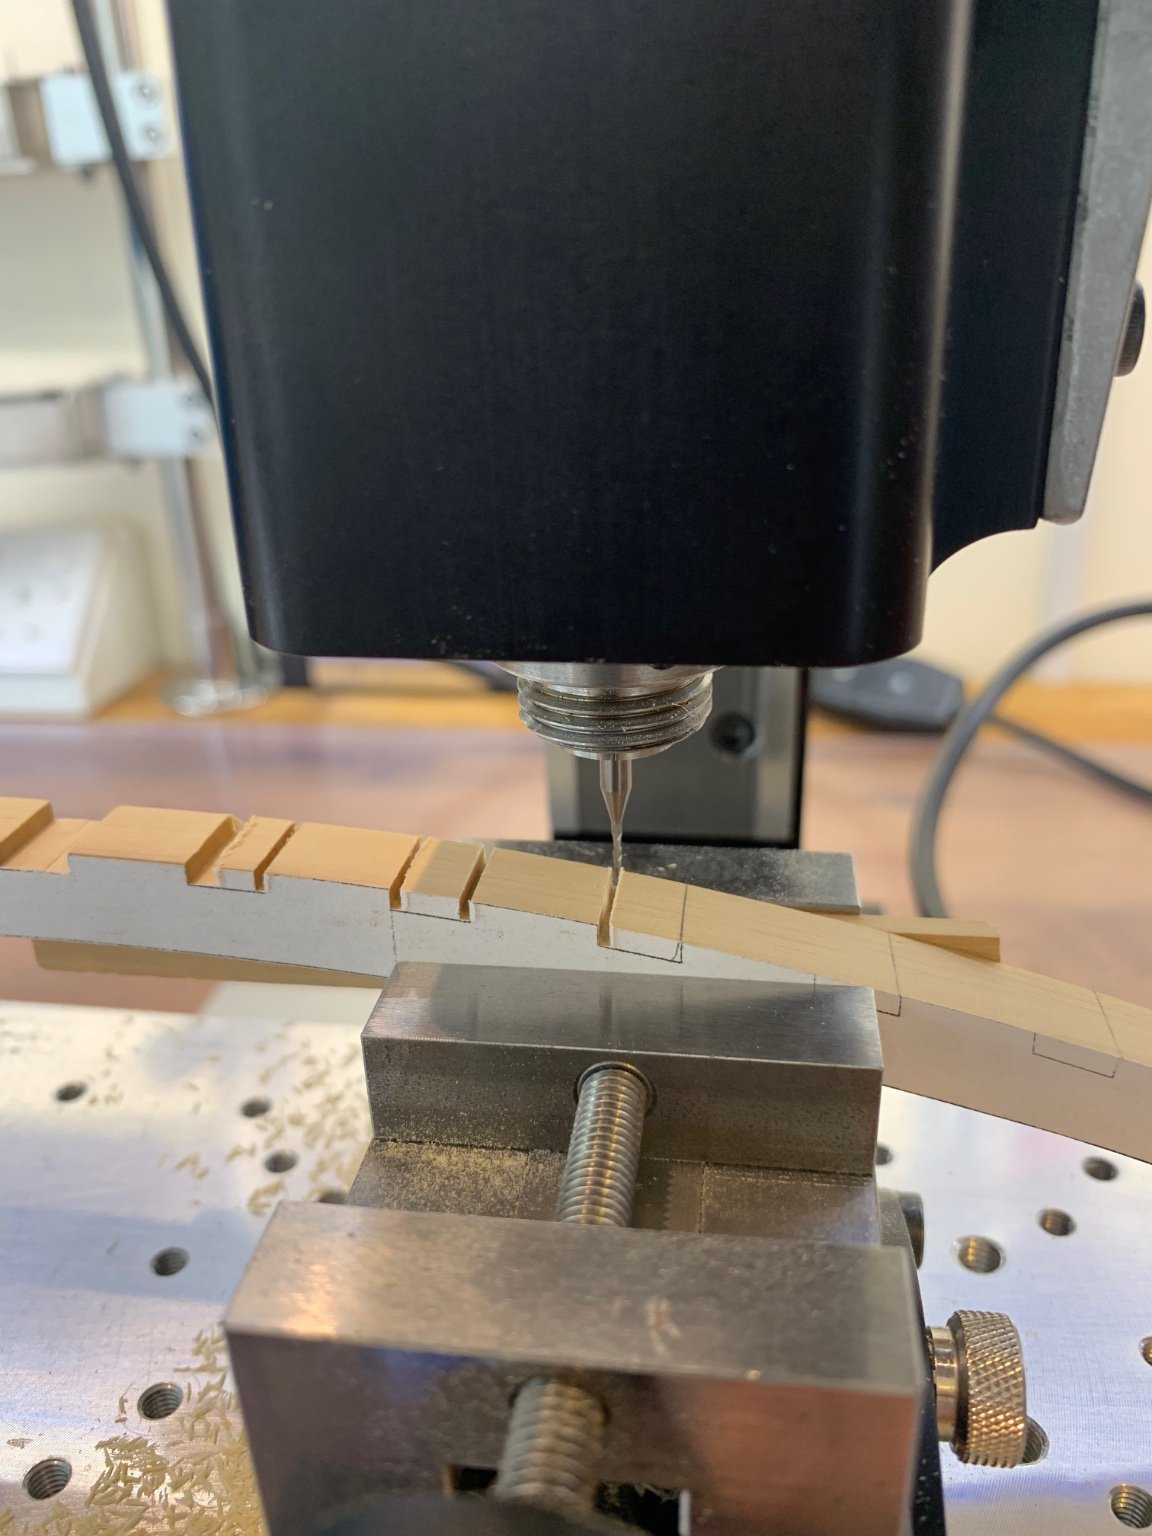
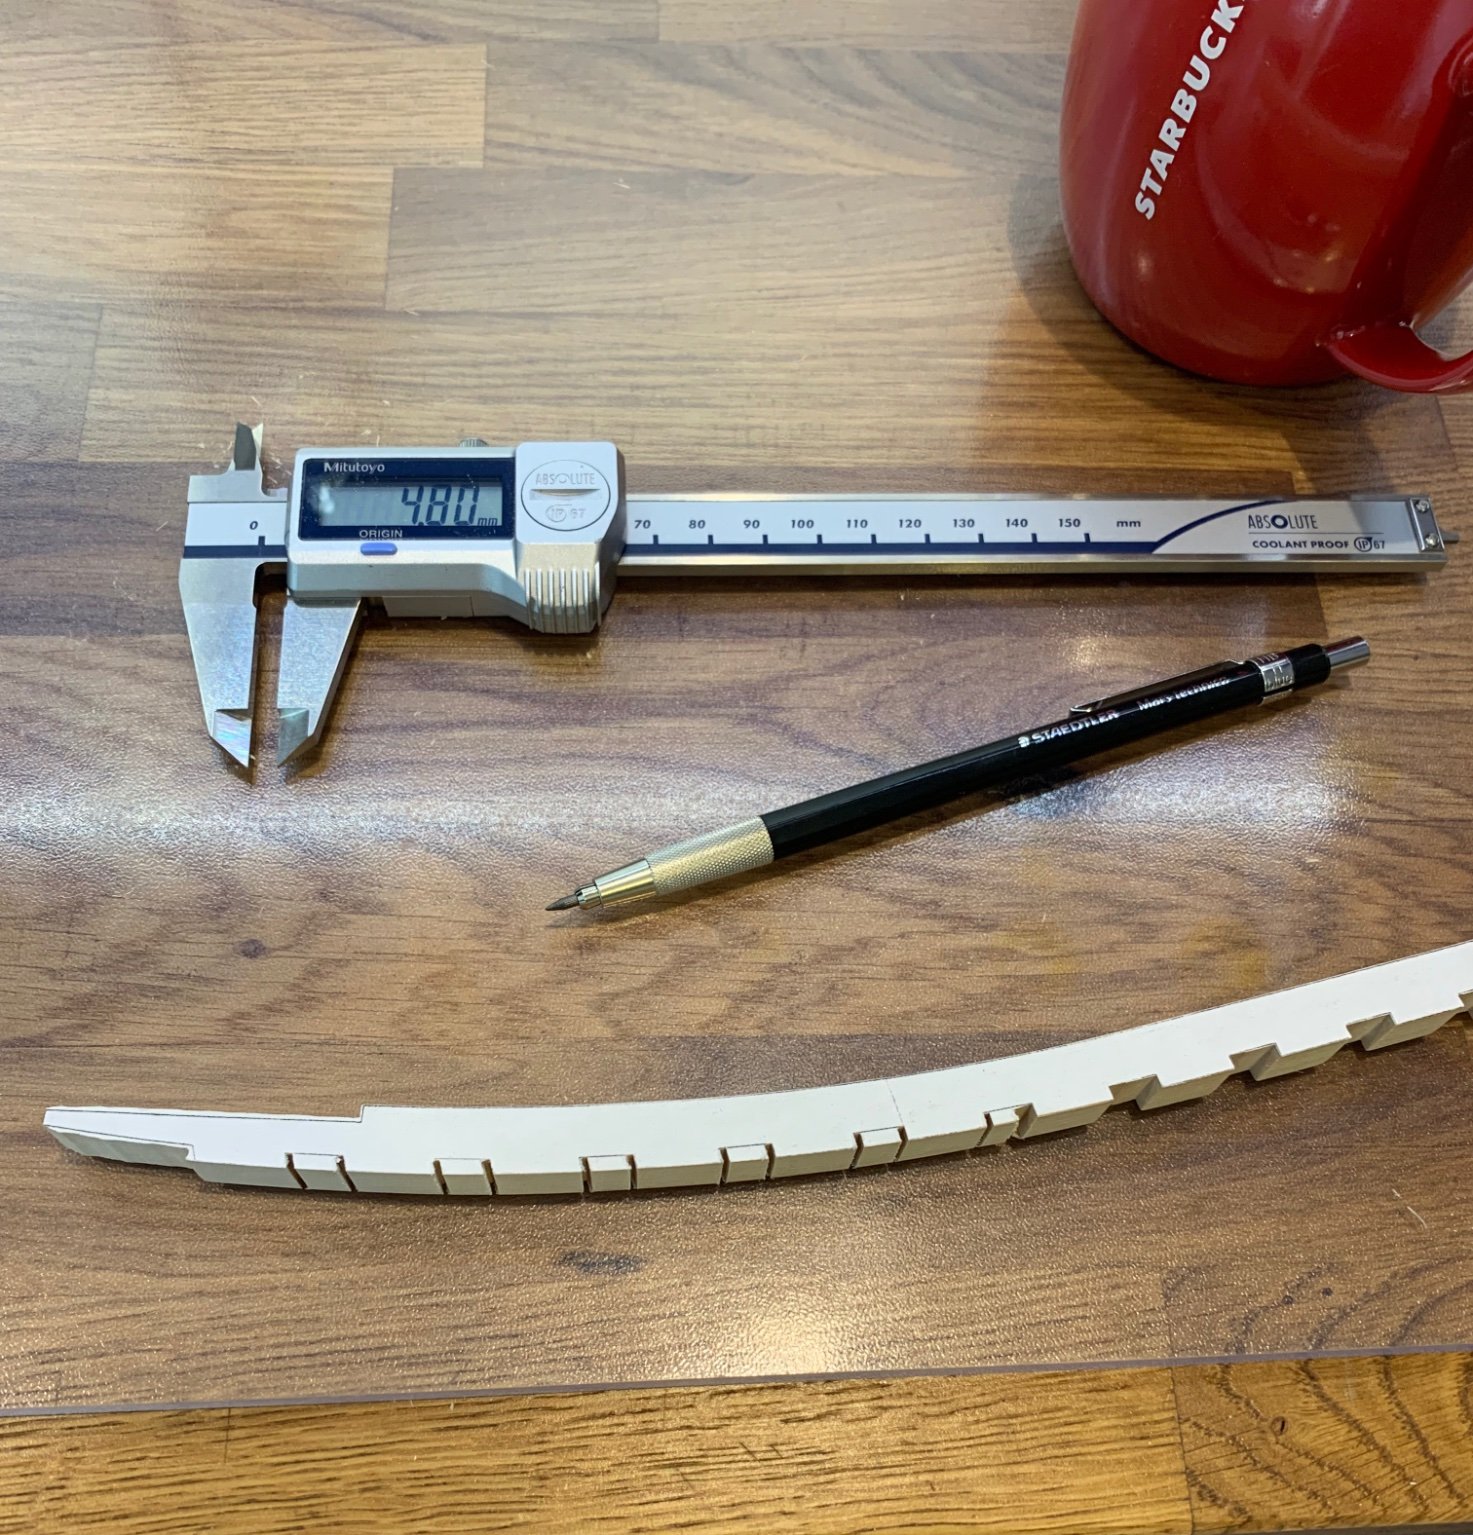
Hi everyone - I need some help from you please as I'm a bit confused. As you know interpreting drawings is not my strongest point and I would appreciate your opinions on the attached drawing. I'm not sure about the filler pieces between the vertical hawse timbers. I think that the drawing says that as the filler pieces go down towards the keel they taper slightly so that they are thinner at the bottom than the top. It looks like its only a slight taper or is it an optical illusion?? I've reached the point where I'm confusing myself so all advice/comments will be very welcome. If they do taper I can take the measurements from the plan but I just wanted to check before I start. Sorry about the lack of updates but I bought a new dust extractor and I'm still waiting for an adaptor to make it fit my machines. It should be here next week and there's no way I'm using them with any kind of extraction. Thanks all - Mark
-
Hi stuglo I also thought about doing this but the M70 is too small for this vice. In the end I sold my M70 and bought a Sherline. Maybe it’s time to learn to cook 😂
-
Not a detailed update this weekend as I've still not had much time on my hands. I've made the infill piece between the first frame and the apron which completes the whole keelson assembly. I don't know how everyone else gets the shapes for pieces like this but I've found masking tape to be a winner. I just put it in place and then use a pencil to get the outside shape. Then simply cut it and sand it to the shape until it fits. I'm moving onto the hawse timbers next but I need to get my head around how they all fit together first. I'll take the plans to work so I can be ready for next weekend and hopefully make some serious sawdust Mark
-
Beautiful work and what a great idea for twisting planks - I'm stealing that one.
-
NAIAD 1797 by Bitao - 1:60
No Idea replied to Bitao's topic in - Build logs for subjects built 1751 - 1800
bitao that looks amazing 👍 Do you have any pictures of your frame making as they are just so clean and precise! Also you should manufacture your hull jig - I'd buy one from you. -
Workshop Vacuum cleaners
No Idea replied to DaveBaxt's topic in Modeling tools and Workshop Equipment
Hi John that’s interesting as I am thinking about buying this tool too so thanks for the information. Just out of interest could you please let me know what the hose diameter is for the tool end. -
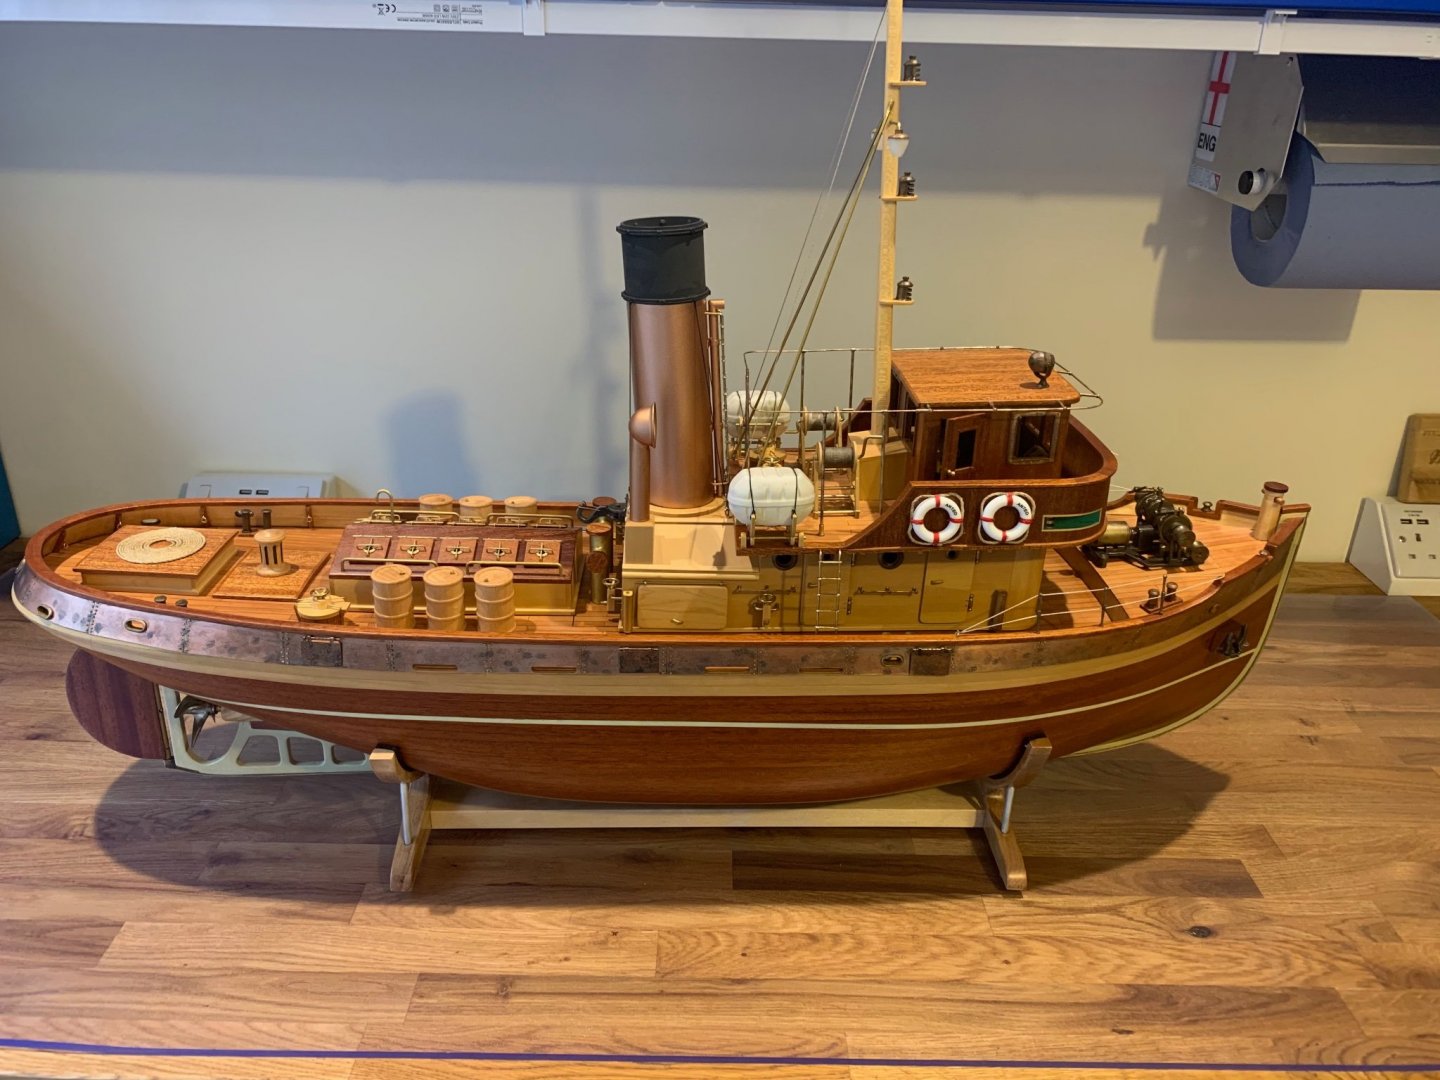
Yep it sure is - my last build was a kit which I think I changed about 85% of it to try and make it better. A radio controlled live steam powered Italian tug.
-
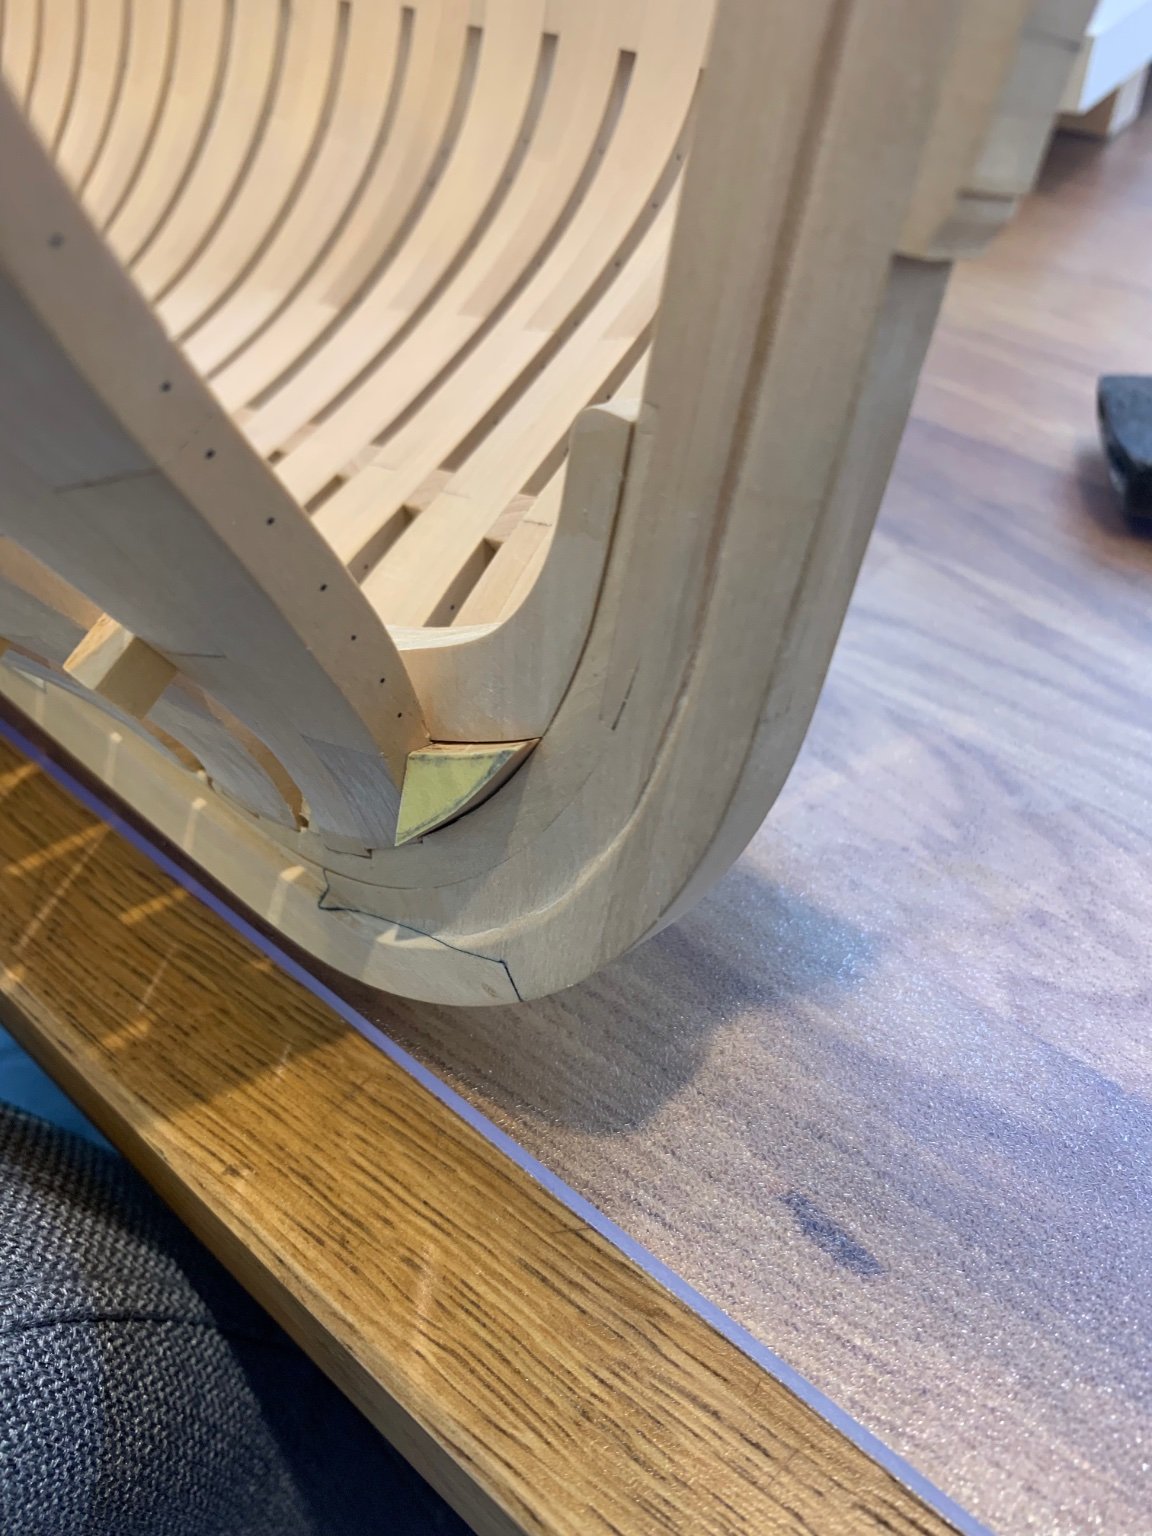
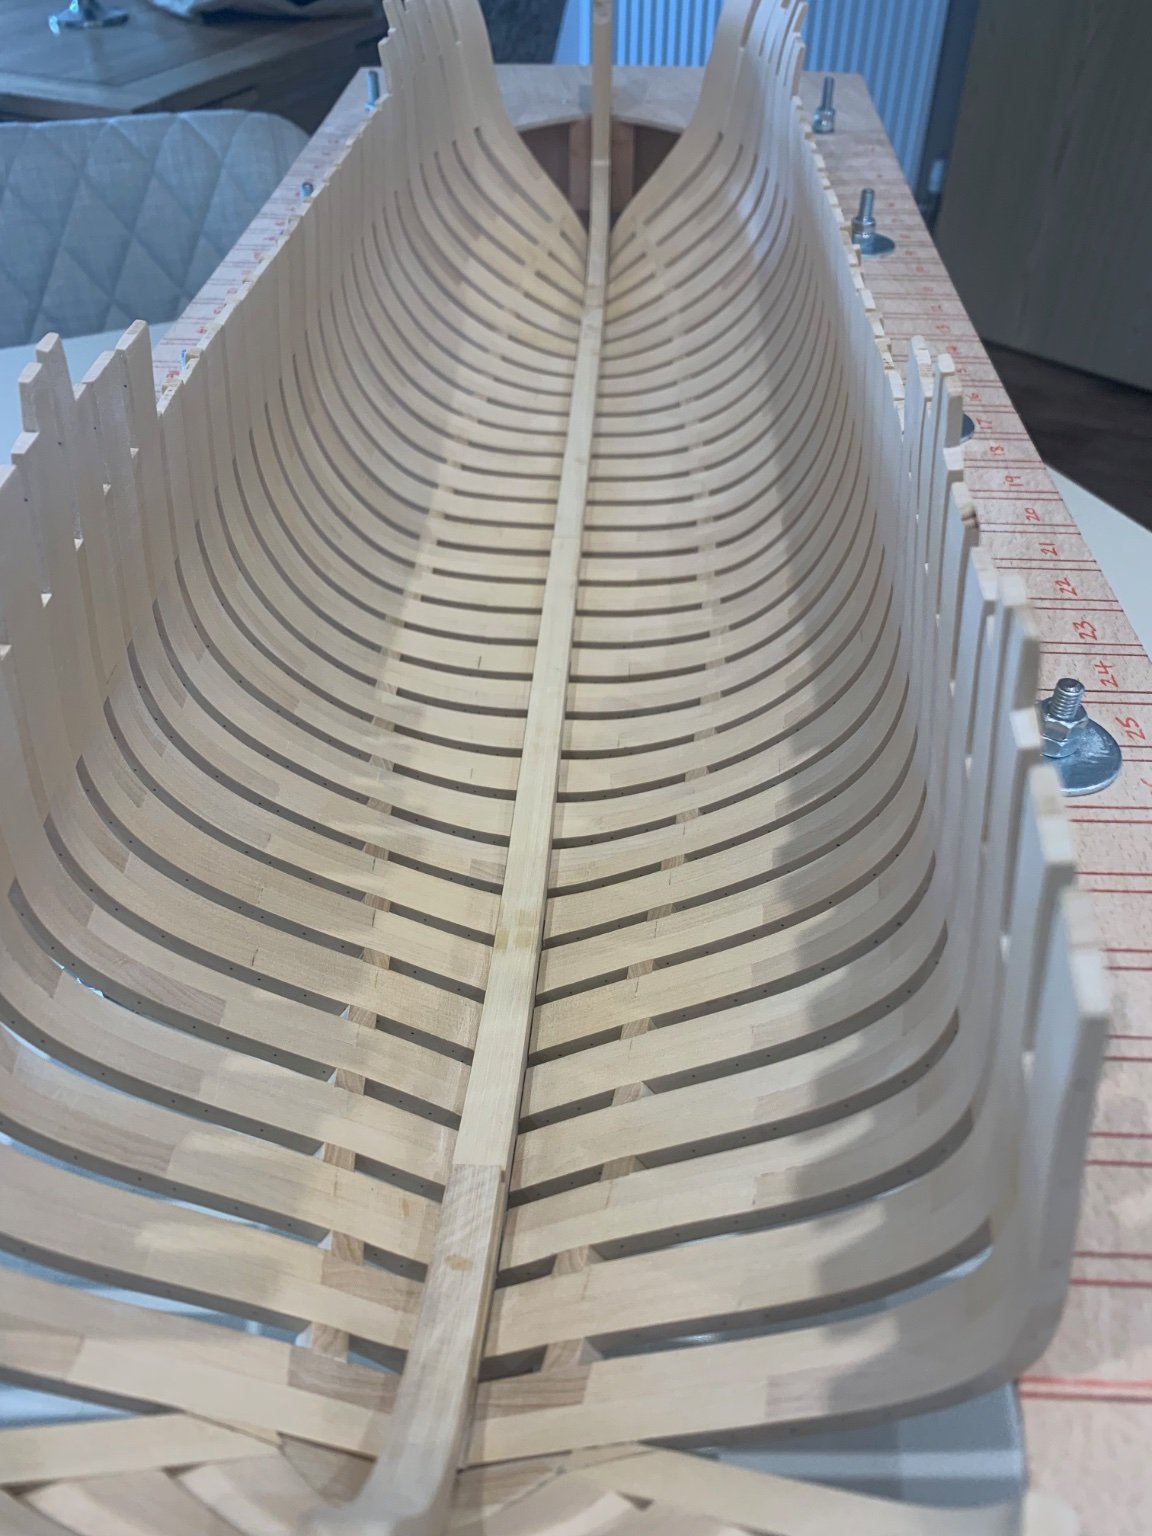
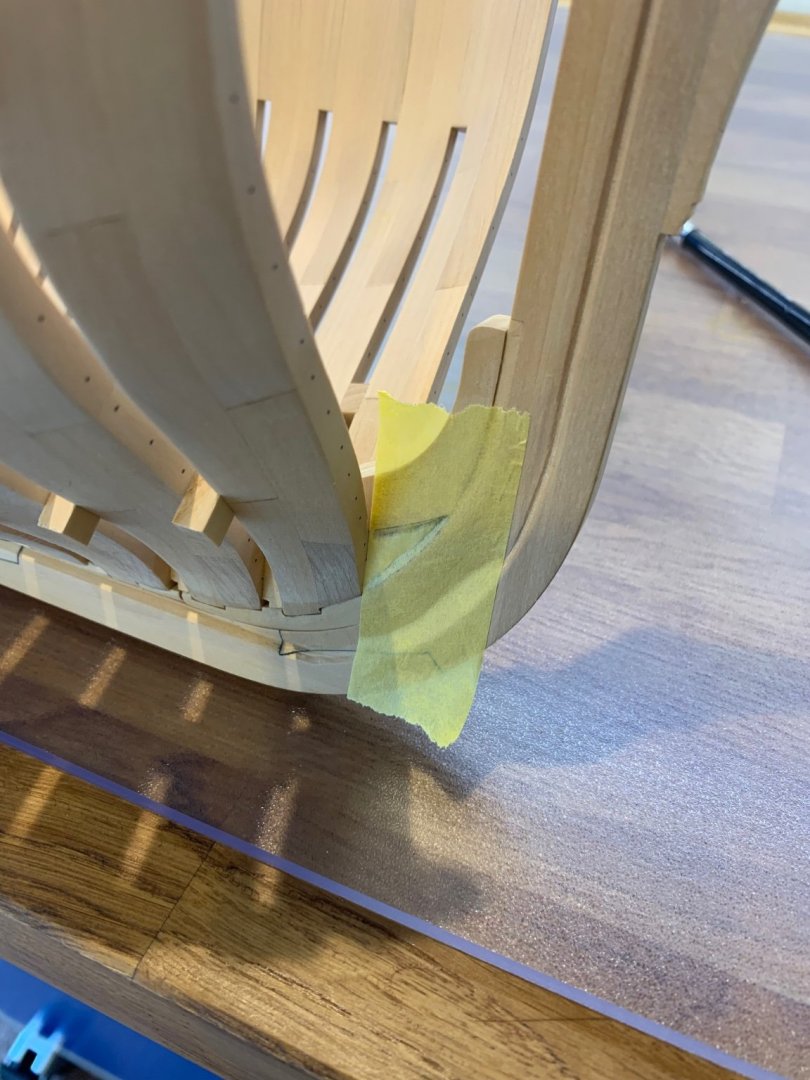
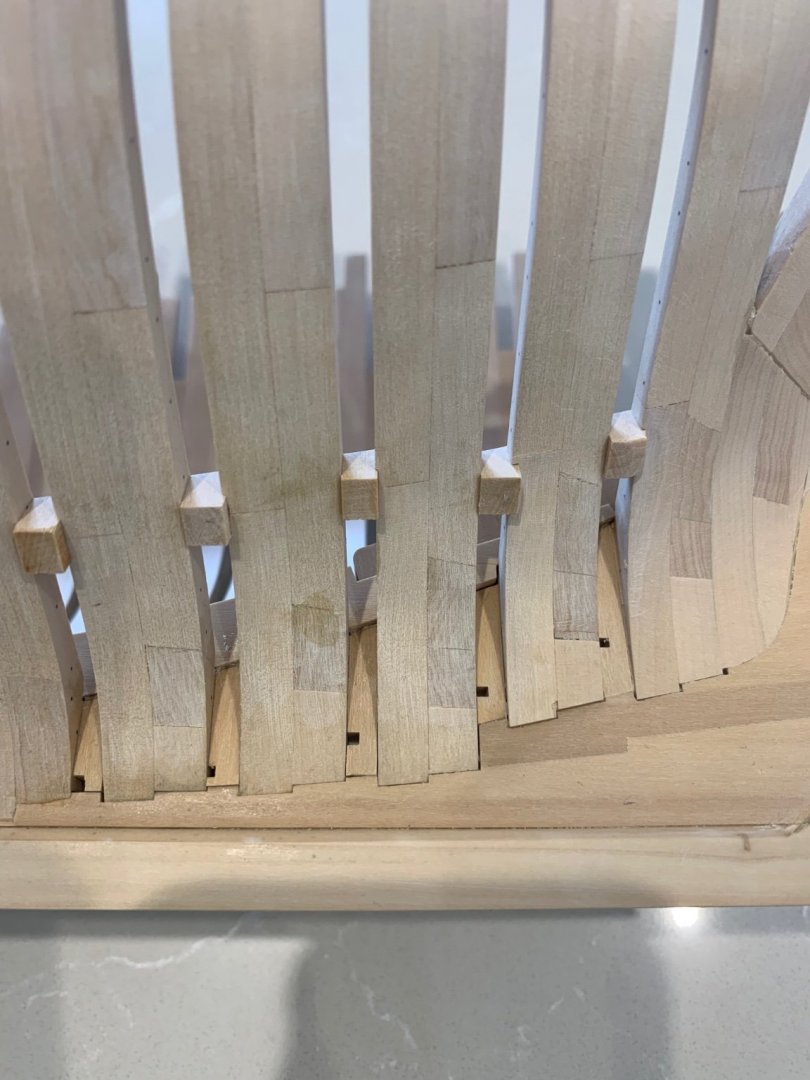
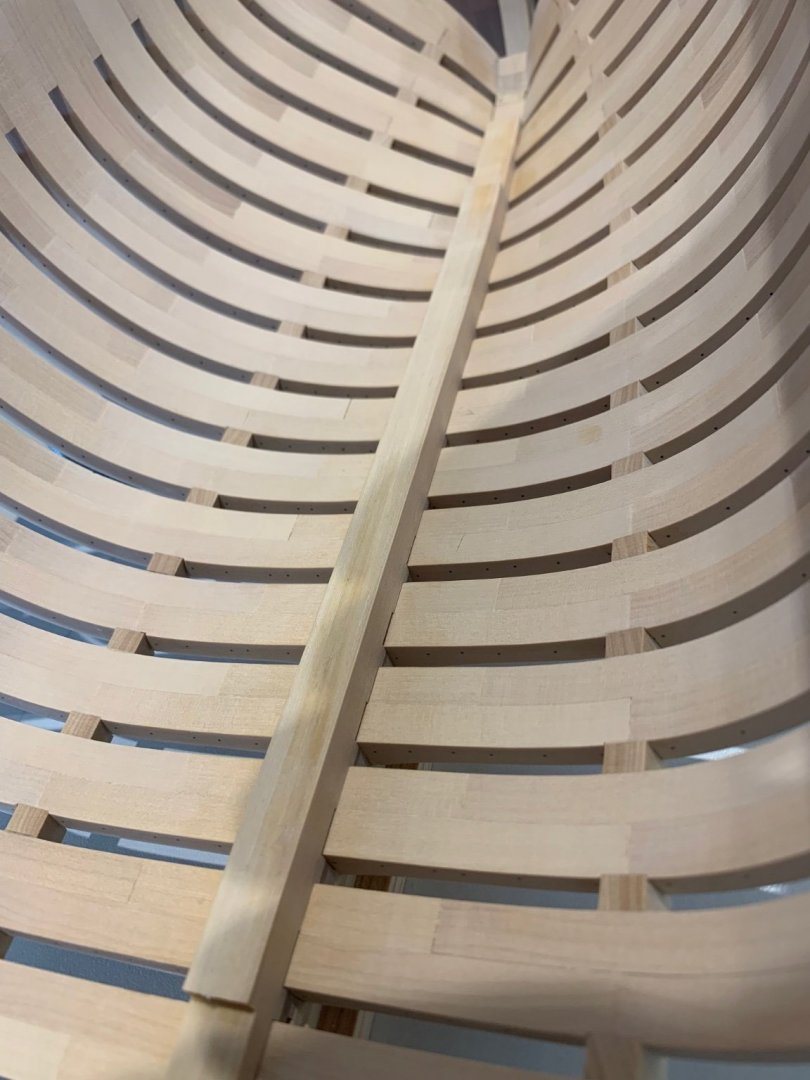
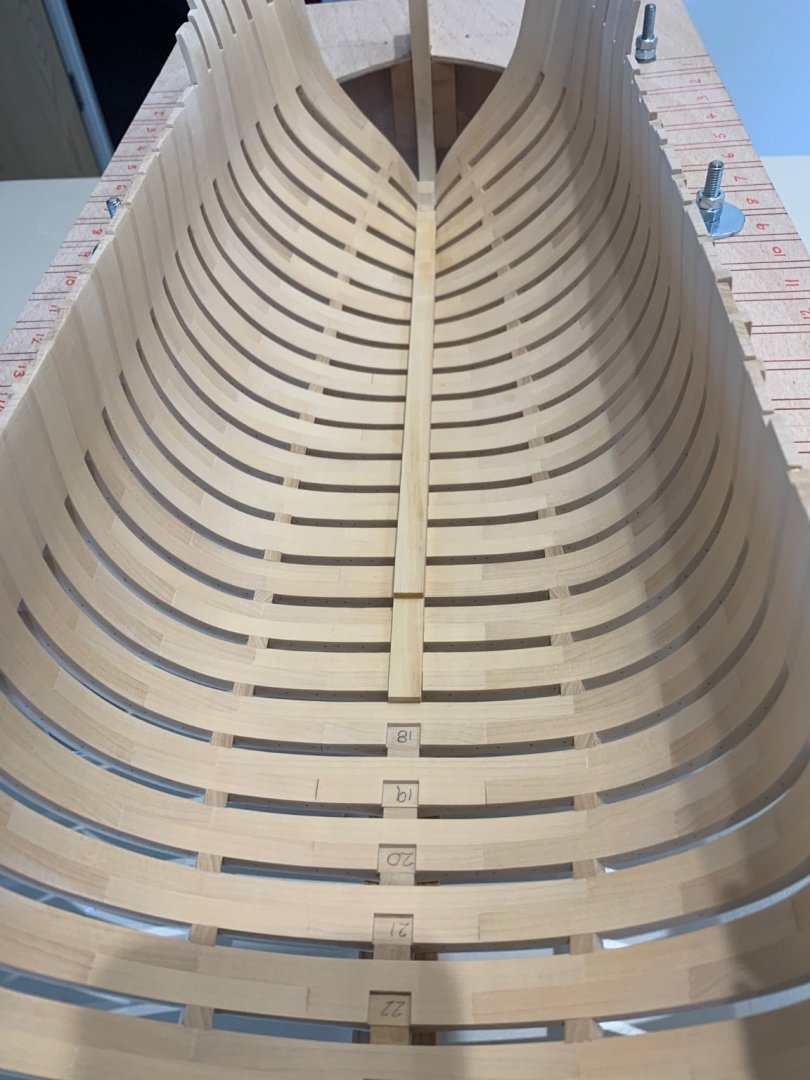
Now I know what I said but this little gap has been doing my head in 🤣 So today my truck decided to breakdown so its a day off from work for me!! So I decided to make the thin little shims to fill the gaps and I'm glad that I have. I've not cleaned anything up yet so the pictures are just the shims glued in and trimmed to length with a chisel. I'm glad to say that I am "gapless" now and the average shim was 0.6mm thick. I only had to put one shim up at the stem. I think it will look better with a good sanding too. At some point I really need to have a good clean up of the entire hull but I'll wait until I've closed the bow and the stern. I can now sleep soundly at night; it can't just be me that dwells on these things - Back to the family now too! Cheers Mark

-
Hi both and thanks for your thoughts on this. The keelson is now glued in as this was as low as I could get it after many hours of fettling it to fit. I felt that I had reached the point where if I removed anymore material I would make the gap wider rather than smaller. Having slept on this and taking Greg’s point I think I’m going to leave this for the time being. I’ll see how I feel at a later date as after all there is no rush. I have to be honest it actually fitted better than I thought that it would 😎
-
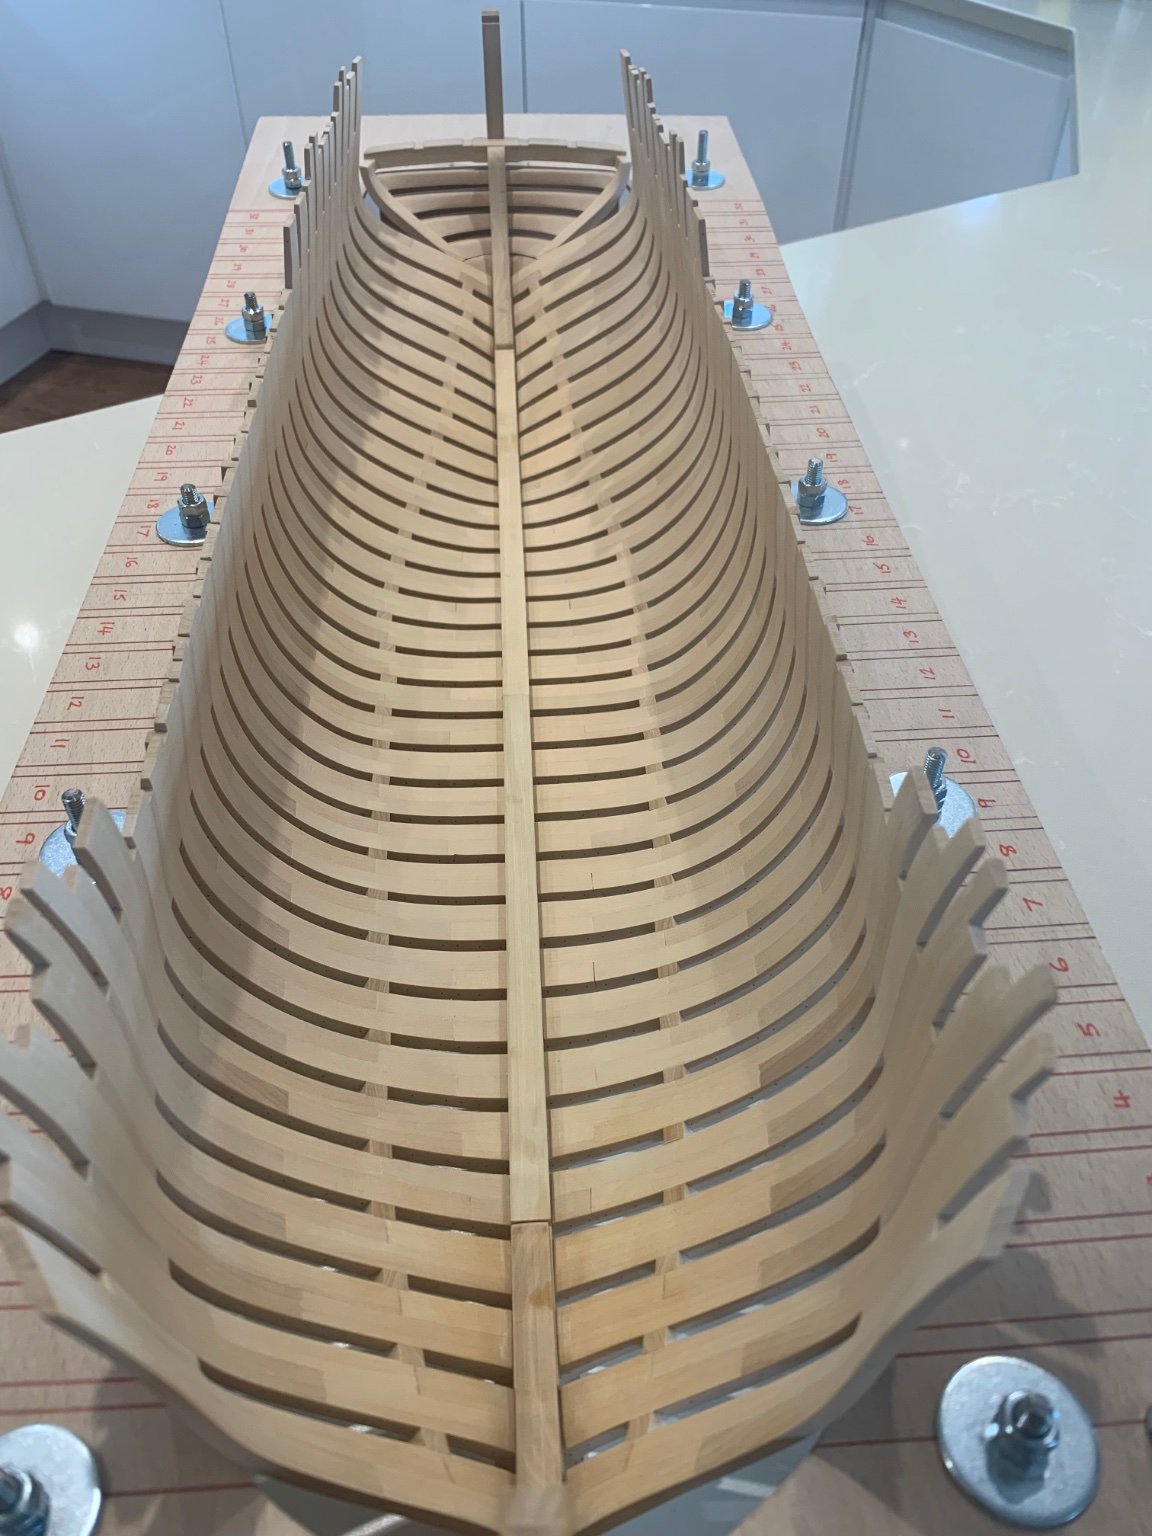
Thanks for the comments 👍 I've now completed the keelson assembly or the patience tester as its now called in my home 🤣 So many joints on 4 pieces of wood that as I have found have to be spot on or it will just not fit. Making the parts was not too hard but getting them to fit takes literally hours. I didn't have to remove too much material to do this I just had to work out where to remove it from. This was for me one of those jobs where it would be far too easy to remove loads of wood and end up with bad joints. Cutting the notches in the curved part of the keelson was interesting as its so easy to loose the correct angle of the cut. I found that the best way of doing this was to mill out the vertical angles first with a 1mm end mill and then remove the centre afterwards. I was also amazed at just how little glue is required to hold the whole assembly in place. Because its such a high fit I only used a very small amount which was great as there was virtually no clean up to do. I do have one small issue - I just could not get the keelson to get fully down towards the stern. I have a small gap of less than 1mm so I really need some opinions on this. Do I just leave it as it is or should I make up some filler out of PVA and sawdust to fill the gap? Its a bit too small I think to successfully put slivers of wood in but I would appreciate others thoughts. I also still need to make a piece to fill the gap between the apron and the first frame but that's my next job. I cannot do any more work for two weeks as I've got family staying and they need my time but I'll get back on this when I can. Cheers Mark


-
That's a really nice job and welcome to MSW too. The Cutty Sark is a special ship to me as I grew up in South London and as kids we used to ride our skateboards around her. That was many years before the fire and also many years before she became popular too. We pretty much used to have her all to ourselves.
-
Workshop Vacuum cleaners
No Idea replied to DaveBaxt's topic in Modeling tools and Workshop Equipment
Hi Dave - I currently use a Bosch Gas20 vac on all of my tools but after a few years of use I've realised its just so noisy. In fact it really gets on my nerves now. It has great extraction but crickey its so loud!!! I've realised that I need something a bit quieter so I'm looking at Festool as a solution. I'm going to visit my local Axminster tools and get a demo so that I know its worth the money. If its quieter and also has good extraction I'lll be getting one. -
Hi Allan thanks mate 👍 I wasn't going to document this build as its my first POF but I'm really glad that I have. Not only do I get lots of great advice its actually given me something to look back at too. I've now made a start on the keelson and as per usual I glued the templates to the wood that I had previously made ready. Next I roughed out their outer shape which didn't take too long. I've decided to start on the keelson part that goes over both of the master frames. I milled out the rebates and also cut the scarf joints too. This is not difficult to do - but I took all of my measurements especially the depth of the cuts from the original plans. I find that I get better results doing this rather than just milling to the template lines. The keelson fits - oh boy does it fit in fact I struggled to get it back off of the frames when I needed too. Now it doesn't fit quite correctly at the moment as there is a gap of about 1mm - 1.5mm between it and the frame chocks. I've tracked this down to the frame rebates being slightly too high which also has the knock on effect of raising the final position of the stemson. I don't think that this will be a problem as I just need to sand the high spots lower, but you just know that it's one of those jobs which is going to take ages to get a good fit. I'm going to get this part right before moving on to anything else. Adrian Sorolla has this exact same issue in his book and he solves this issue by packing the gaps with slivers of wood. I may have to do this too but I'll try and reduce it first by sanding. Mark


-
What a fantastic build your ship is looking great. I really like your attention to detail - I’m in on this one 👍
-
New Workshop Bench Height ??
No Idea replied to PeteB's topic in Modeling tools and Workshop Equipment
Hi Pete - I've just measured my bench height for you and it stands at 900mm high. I have found this to be a good height for me to work at building my ship and also for my power tools too. The only tool that I have found that I use lower is my thickness sander. I place this on a metal cupboard that is 670mm high as I like to be over the top of this tool when I'm using it. I'm sure that I'm just talking about personal preference here which we all obviously have. I'm 5' 8" tall and this works well for me. Good luck with the new man cave as we all need one at some point in our lives. -
Yet another fantastic video - thanks Kevin for going to all of the trouble making these very informative and honest diaries of your build 👍