druxey
-
Posts
13,377 -
Joined
-
Last visited
Content Type
Profiles
Forums
Gallery
Events
Everything posted by druxey
-
 We hoist a glass to you on the laying of your keel, Ed! And eagerly await your progress reports....
- 3,618 replies
-
- 1
-

-
- young america
- clipper
- (and 1 more)
-
Are you speaking of the turns around the lashing? If so, these are important because they tighten any lashing. It forces the round turns down slightly between the two parts of the shroud so they 'bite' and prevent anything slipping. Using a sewing needle works perfectly for executing lashings.
-
Damp - not wet! - brushes of various sizes can pick up dust and quite large particles by surface tension and/or adhesion. It's a tedious process, but will deal with everything the vacuum won't.
-
Dan: I learned a great technique from a jeweller for silver soldering successive joints. She told me that, as well as using 'hard' (high melting point) for the first joint, 'medium' for the next and 'easy' for the third, you can protect previously soldered joints with yellow ochre. This is in powder form. Mix with a little water to a paste, then paint it over the joints you want protected. Heat will turn this red, but it will wash off when pickled. There is also now an 'extra easy' grade of silver solder available, but she doesn't recommend using it - it doesn't make a very good joint. Hope this is of some help.
-
Mark: the prop could be uncoupled from the shaft before it was raised, in the vertical position.
- 346 replies
-
- 1
-
-
- terror
- polar exploration
- (and 2 more)
-
Amanda by Tblack - FINISHED - RESTORATION
druxey replied to TBlack's topic in - Build logs for subjects built 1851 - 1900
Tom: you mention 'no channels'. These ships did not have them in the traditional way. The deadeyes were usually attached to straps fixed to the bulwarks and appeared either through or just inside the rails. What you've done looks right. -
Most collars have eyes spliced into their ends and these ends are lashed around the spar. Start with a longer length of line than needed and start seizing the various blocks/hearts/eyes into it. Then form the eye splices at the ends of the collar.
-
From 1:60 to 1:72 scale, Ed? Most of is tend to build to ever increasing scales as our eyesight becomes less than perfect! Looks like a terrific start.
- 3,618 replies
-
- 1
-
-
- young america
- clipper
- (and 1 more)
-
If well sealed and then well stirred, enamel paints will last a while. I have some tinlets (Humbrol, in this instance) from 1986 that are still good and being used now! A squirt from a can of inert gas on top to displace air before sealing will also extend paint life.
-
I agree with Dan: a horizontal board will do it.
-
Ah, well, it's pennant penance for you next time, John. Don't you just hate when that happens? Think twice, cut once.... My sympathy. The model looks great, BTW.
-
Very nice work, Toni. I suspect that there were 'filler' pieces above the doors that need to be short for privacy and or security.
-
Nice to see your progress, Gary. It always brings a smile to my face when seeing your work. Excellent!
-
If port sills were all horizontal and not parallel to the deck sheer then the planking of each inside would need to be chiselled out square. In addition, the curve of the ship's sides prevents port lids from being interchangeable. You could ask why a ship has sheer and is not flat along the decks. Sheer is required to counteract the tendency for the (wooden) structure to sag and for drainage. A ship is very unlike the architecture of a building, where all items are at right angles, parallel and eight horizontal or vertical, modern day cruise ships excepted!
-
Ports are spec'd at 28" deep by 30" wide for a 32 gun ship (Steel, 1805). The sizes you quote are very close to those for a 38 gun ship (30" x 34").
-
...and then the fun begins! I hope your tools are well-honed, Tim.
-
Is there no stopping you and this navy of 1:36 scale models? I wonder if anyone else is turning out models at this scale. Nice start, Jerry.
-
Unfortunately this is the weakness of kit-supplied planking strips. If you can get a fine-grained veneer from a local source (I assume you don't have the power tools to machine your own plank sheet 'blanks'), you might consider that route. Spiling is definitely the way to go if you want the nice planking look of scratch-built models.
-
HMS Naiad 1797 by albert - FINISHED - 1/48
druxey replied to albert's topic in - Build logs for subjects built 1751 - 1800
This is where things start to get interesting! -
HMS Naiad 1797 by albert - FINISHED - 1/48
druxey replied to albert's topic in - Build logs for subjects built 1751 - 1800
Now that is a brilliant beginning, Albert! -
Those catheads are tough beasts to wrestle, but it looks like you've won, despite the battle damage!
-
Protecting Copper
druxey replied to Patrick Haw's topic in Building, Framing, Planking and plating a ships hull and deck
If you absolutely want a shiny copper bottom, you will need to be very careful not to pull up plate edges while cleaning them. This is virtually impossible! However, if you are successful, you will also need to swab the copper with acetone to remove any trace of grease before spraying with lacquer as suggested. Otherwise your fingerprints will come back to haunt you! -
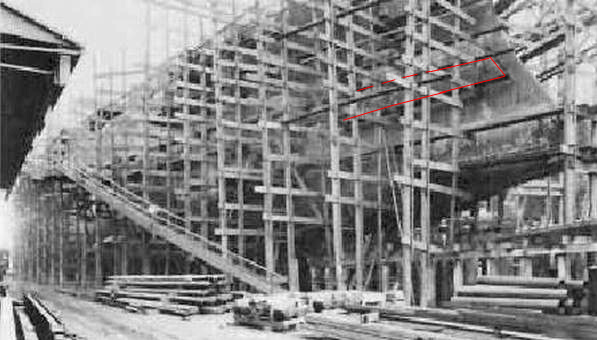
The 'under construction' photo appears to show the fore end of an armour belt with the fore end angled to match the curve of the stem.