HOLIDAY DONATION DRIVE - SUPPORT MSW - DO YOUR PART TO KEEP THIS GREAT FORUM GOING! (Only 20 donations so far - C'mon guys!)
×

md1400cs
-
Posts
2,839 -
Joined
-
Last visited
Content Type
Profiles
Forums
Gallery
Events
Everything posted by md1400cs
-
 Jan, Nice to see that your shipyard is employed again. Welcome back to work indeed. Cheers,
 -
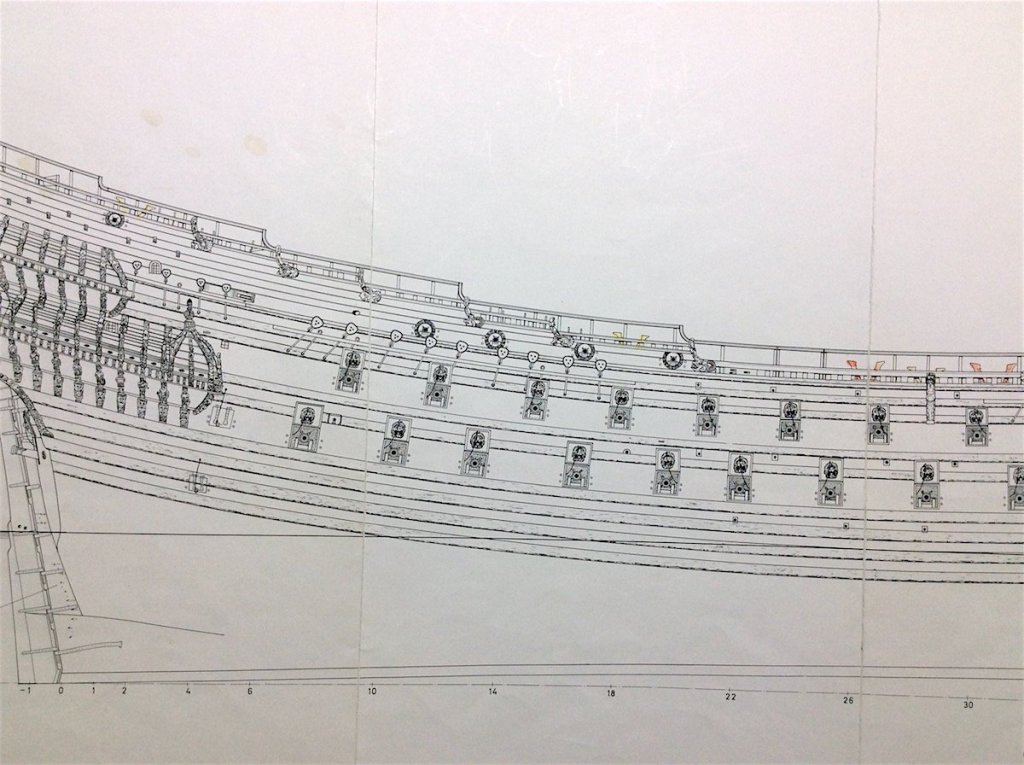
Pucko, More of the same info. This from the Museum plans set. Members notices seem correct, odd that you would receive this type of template. Nice update - good luck with your "cutout" decisions ----
- 305 replies
-
- 6
-

-
- deagostini
- vasa
- (and 1 more)
-
Anton, Great work, you're build is coming along very nicely. Your research will certainly also pay off as well. Excellent work on your gun deck openings. I sure wish that I had learned that before - (for my current build) - too late now. But how to do the openings correctly is now in my memory bank (:-) Cheers,
- 322 replies
-
- 4
-
-
- sergal
- sovereign of the seas
- (and 5 more)
-
praise and honor received for an achievement. les lauriers I think that this is the French translation. Though in your country German is also very common as well as Dutch.
- 756 replies
-
- 2
-
-
- galleon
- golden hind
- (and 2 more)
-
Dennis, Just catching up to your great build - nice indeed.
- 453 replies
-
- 5
-
-
- thermopylae
- sergal
- (and 1 more)
-
Patrick, Really enjoy following along- great build. Your level of research is also impressive - kudos.... Cheers,
- 756 replies
-
- 3
-
-
- galleon
- golden hind
- (and 2 more)
-
Anton, Just saw your current build as it came up...Nice start- looking to be very good indeed. Will also follow along from dry-dock. Cheers,
- 322 replies
-
- 4
-
-
- sergal
- sovereign of the seas
- (and 5 more)
-
Liberto, Just discovered your current build. As has been repeated over-and-over again SUPERLATIVE work. Such a pleasure for the eyes, and for the brain for learning as well. You will have too many "likes" from me today, then I decided just to look, read, and not continue to bury your in-mail. Will, of course, also follow along. Cheers,
-
B.E, just hit your "like" button too many times (re-visiting)
- 366 replies
-
- 3
-
-
- pegasus
- victory models
- (and 2 more)
-
Jack, I had been "silently" following your build. Great work indeed. Looks brilliant. And after "binging" over the last couple of months catching up on History Channel's four seasons of Vikings (Amazon Prime has it) became so interested in Viking ships. So ordered the Billings - and will refer to your great log as well. PS: Vikings has been renewed for two more seasons (5-6) Cheers,
-
B.E, Nice looking base. If I may be so bold as to offer an opinion? Your case frames should be (IMHO) "minimalist" if you plan on using wood framing; sometimes case frames are too striking (large) and "out of scale with contents within. Subjective on my part - but sharing (:-) PS: Cheers, again on log resurrection/re-build and completion of this brilliant ship. I would venture to guess that your extensively well researched and detailed build log along with the 100s of excellent photos could be turned into a book of sorts. This might have been mentioned here before? With respect,
- 366 replies
-
- 4
-
-
- pegasus
- victory models
- (and 2 more)
-
Ulises, Yes, understand your time of grief. We have all been, or will be "there"... But, yes life does go on. Your coiled ropes method will be part of my next build. (:-) Con Respeto.
- 786 replies
-
- 2
-
-
- Royal Louis
- Finished
- (and 1 more)
-
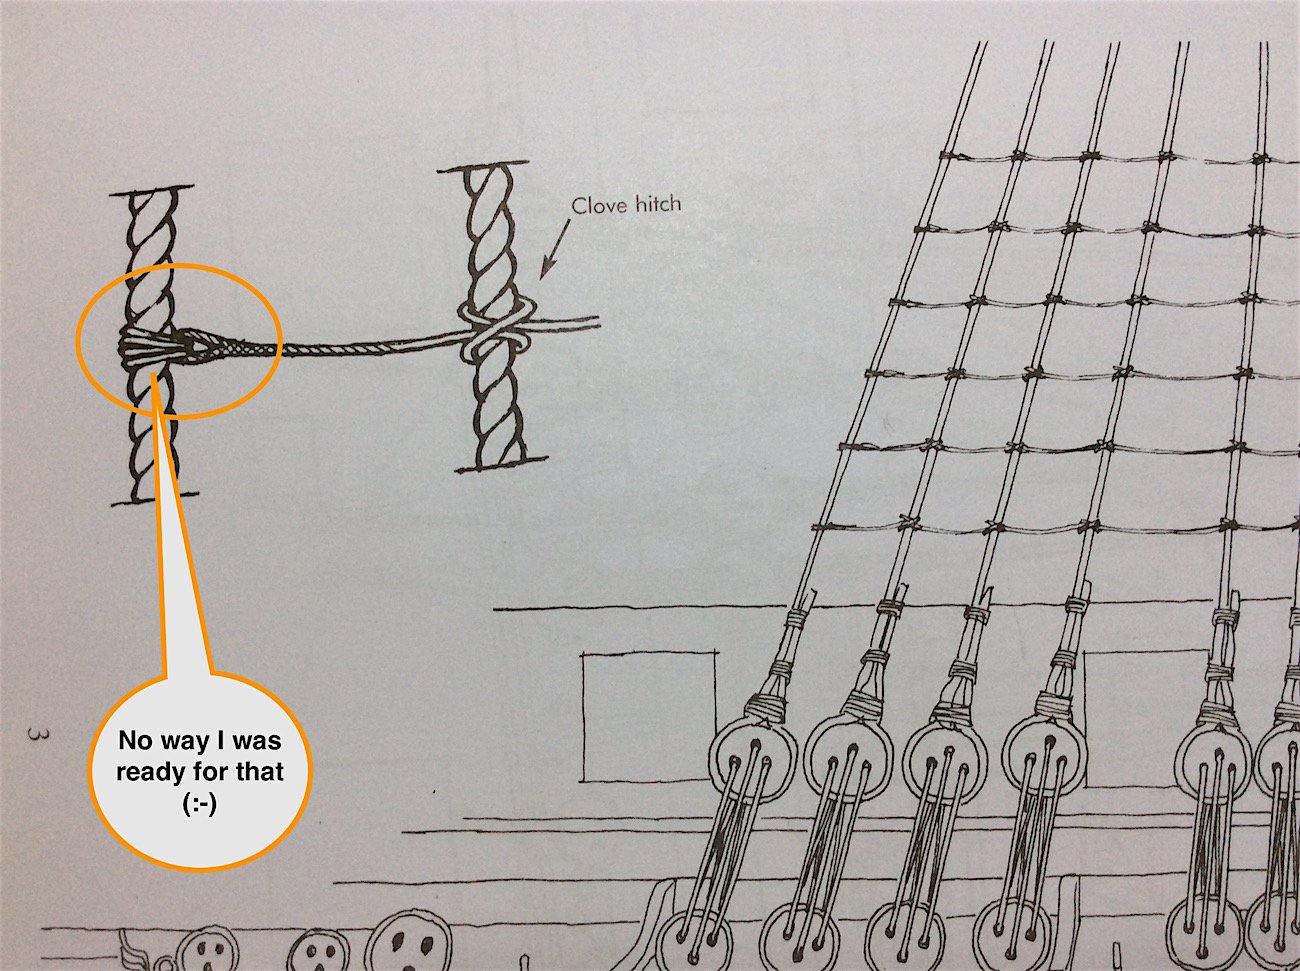
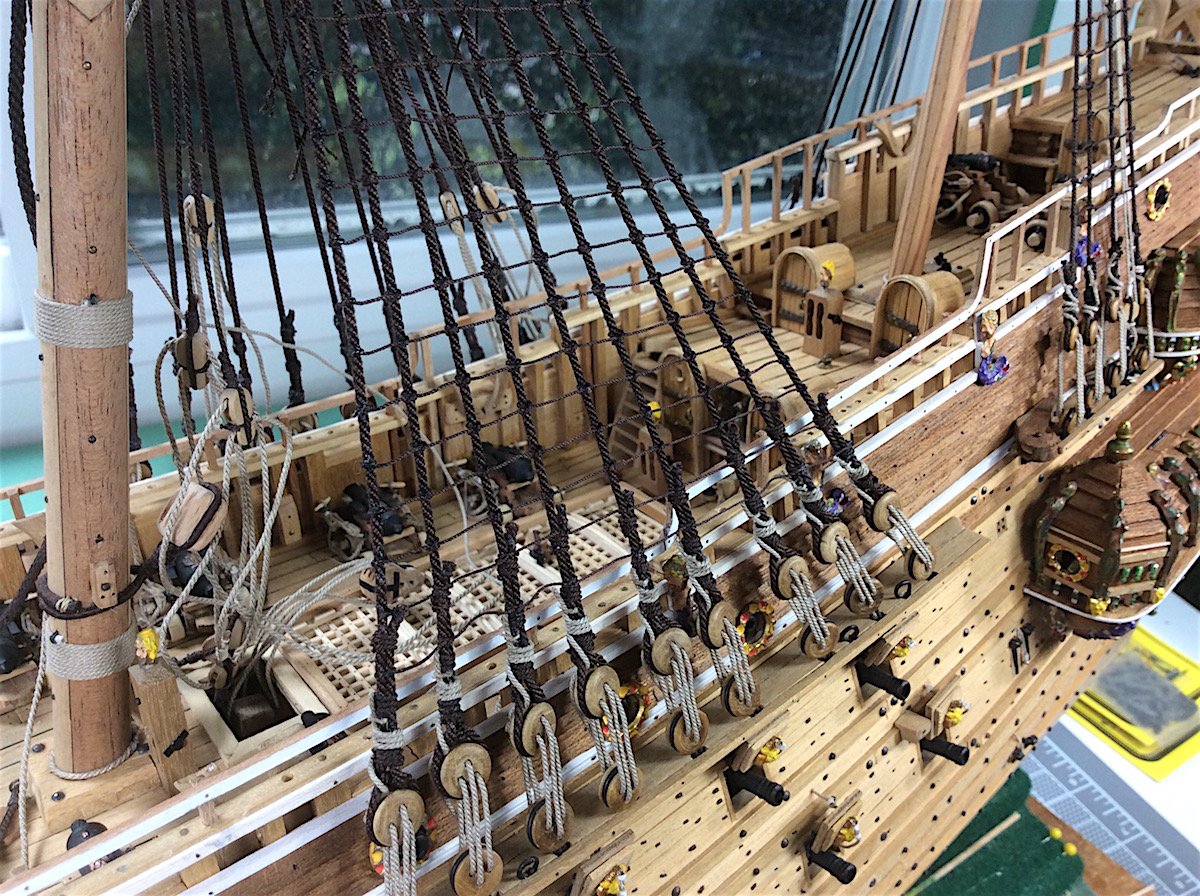
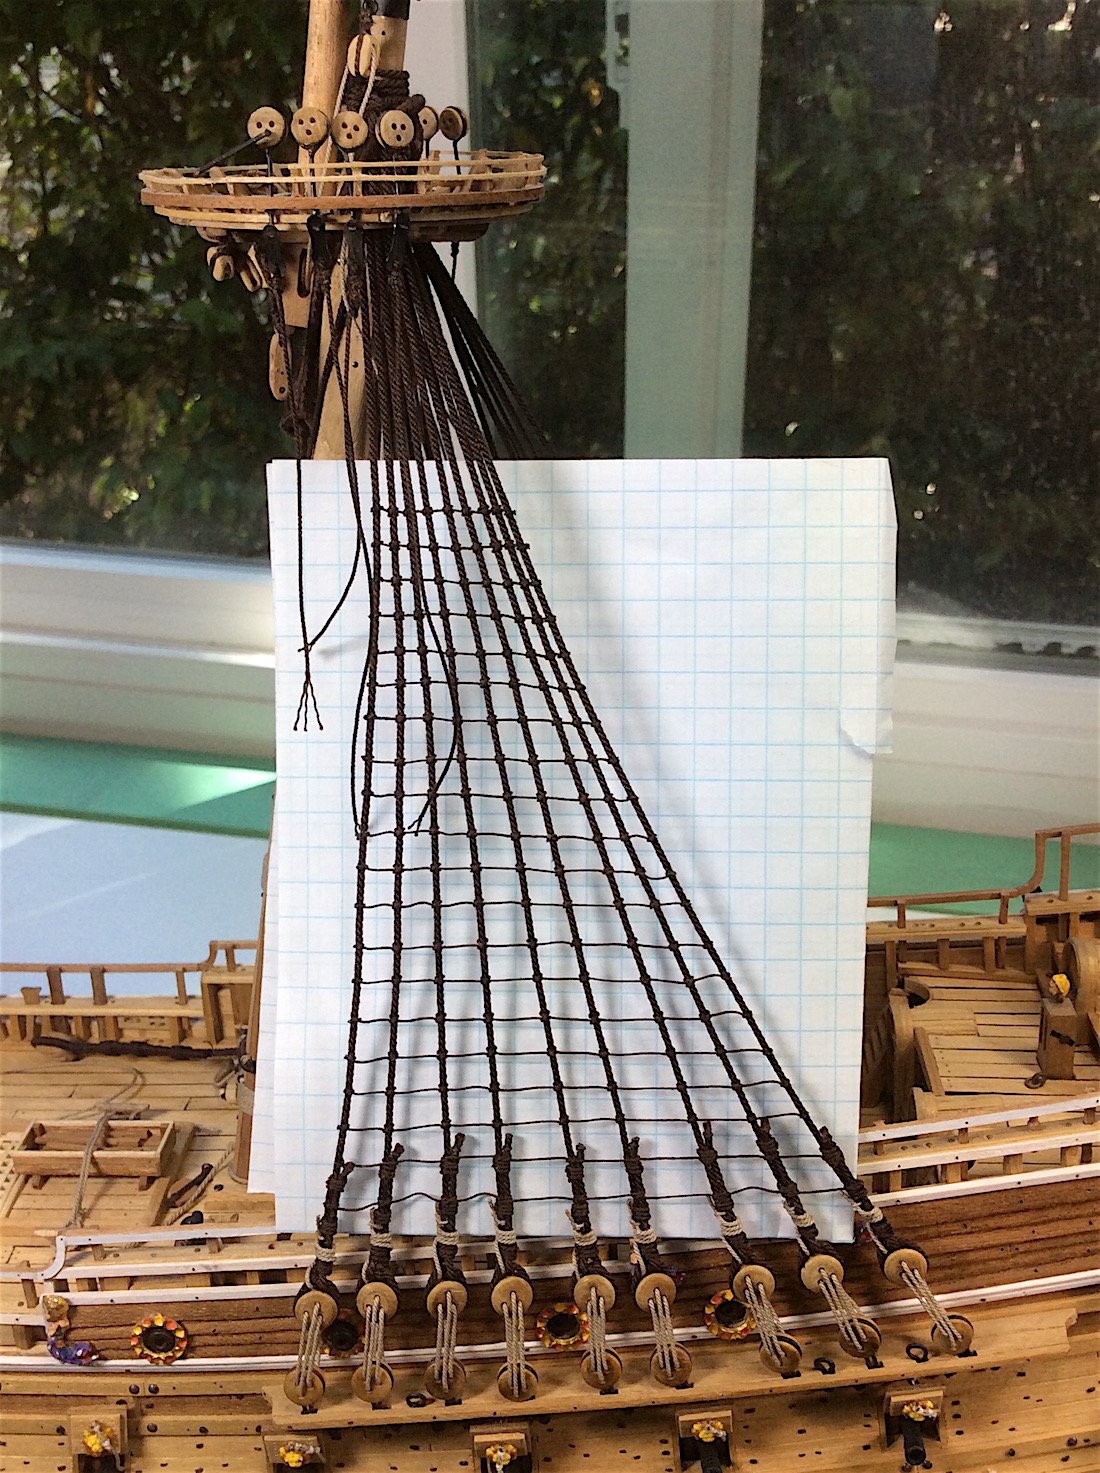
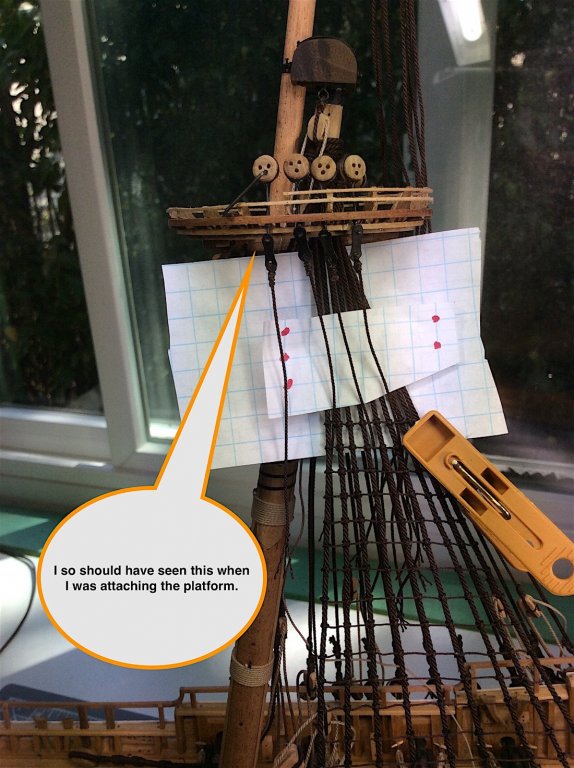
Small update but: What have I learned (for me) to begin work on foremast ratlines, after having to remove the first six rows of the main, and starting over? (newbie at this) Shroud ratlines. 1) Space-correctly, tighten and pre-glue each first shroud ratline knot (I happen to be R. handed so started with fore to aft). This “pre-locks” correct vertical spacing for all rows up as I go along. I was thinking of actually correctly tying the first and last ratlines - per row-but way toooo much work. And over the top minutia that would visually disappear. (see pic 1) 2) Next just give a gentle pull to each succeeding clove hitch as I thread the row 3) Don’t glue completed clove hitches on each row as I go up to the next row. 4) Don’t worry about the very last knot (aft side shroud) that will be revisited. =============================== 5) After all rows have been laced then fine tune adjust (vertically) all knots up and down the shrouds to properly space all rows so that they horizontally blend with each other and the platform above. Took me several “visits” to think that the results were acceptable. 6) Now fine-tune (if needed) clutch hitch tensions on each row. 7) Double check that rows are still evenly spaced 8) Glue clove hitches with a very tiny dab of G-S Hypo Cement. 7) Re-adjust and glue that last left-over aft knot on each row from before (4). 8) Then tiny dab of Flat Clear as needed to make G-S Hypo Cement totally disappear. 9) Clove hitches should be just a bit “firmer” for next mast ============================ What have I learned for next build (though it will be a cross-section only mainmasts to worry about). Nice change of venue – looking forward to it. Platform/top Well, this was due to my inexperience in lack of understanding/knowledge of how, in the aggregate, the proper locations of the futtock plates and dead-eyes can lead to problems later with regard to mast, yards and shroud spacing. Pics explain my dilemma. I will have to remove the forward deadeyes and re-fit them toward the stern. This will need to be done for the lower foremast as well Yikes!!., and with the upper masts – Oh no! still learning -TOO late for those, however minor – it’s still not right; spars will become crowded with shrouds. Grrr (lot’s of grrrs I know J) Mates - thanks so much for your continued interest in this build. I hope that my mistakes will be helpful to some other members. Cheers,


-
Wasa by jhart65 - Corel
md1400cs replied to jhart65's topic in - Kit build logs for subjects built from 1501 - 1750
Hello jhart65, This will work great. Saw slowly especially when you reach the end of the casting nub.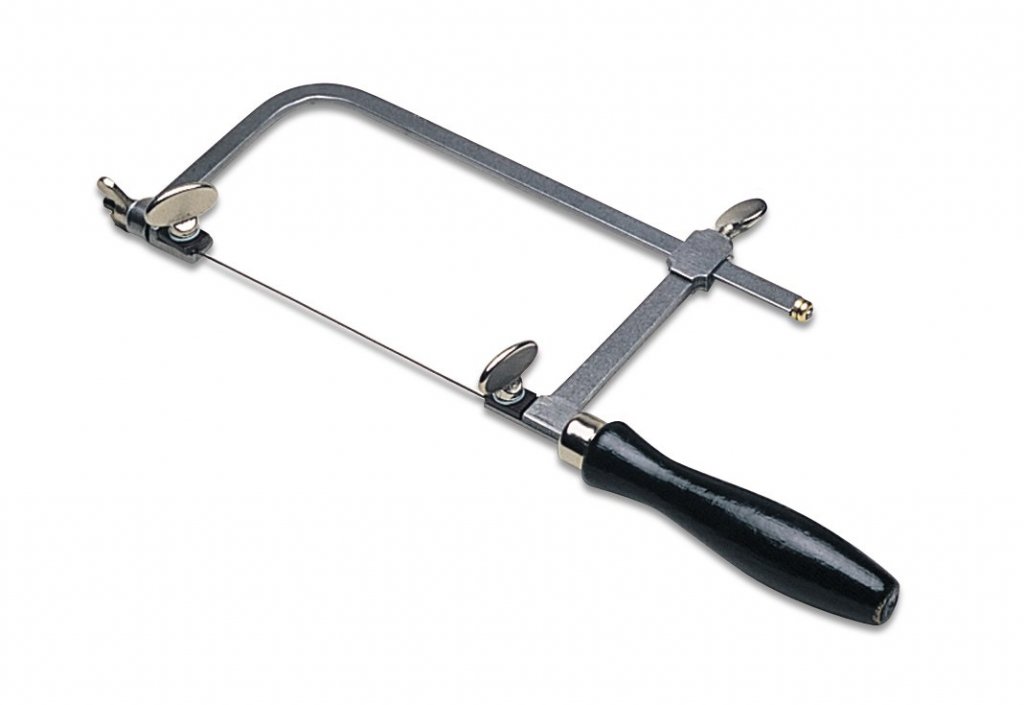
-
Patrick, Nice updates - just catching up. So like all of your tools as well. GH looking to be a great build indeed. Cheers,
- 756 replies
-
- 2
-
-
- galleon
- golden hind
- (and 2 more)
-
Lights look great. Yup the post from Hubac'sHistorian is certainly intriguing. So two ships at a time - Model railroad (with lights) other hobby, dog, occasional libation, ice storms, an Admiral, work, you certainly have a busy life xo Cheers,
-
Art, Yes -super impressive indeed. Beautiful work - so much detail within such a small scale. PS: Your site is also quite impressive. Cheers,
-
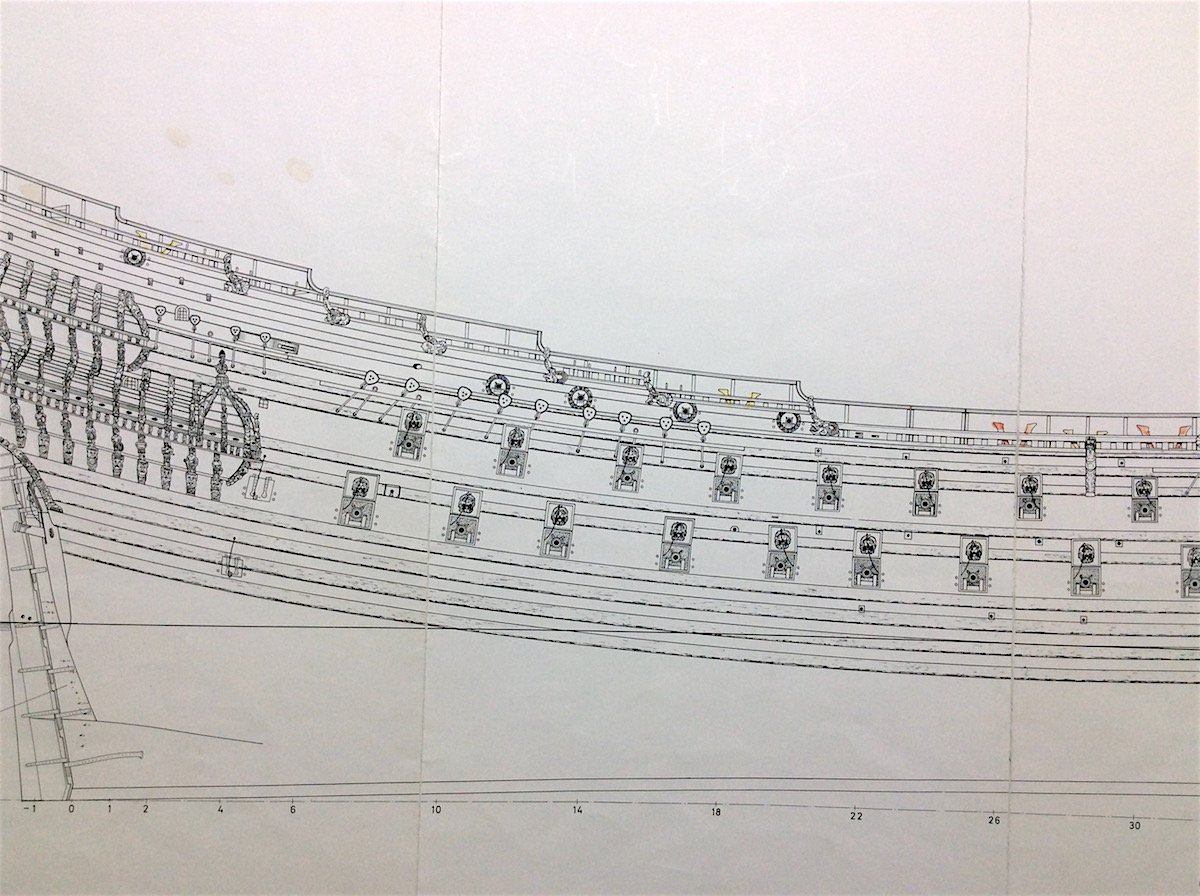
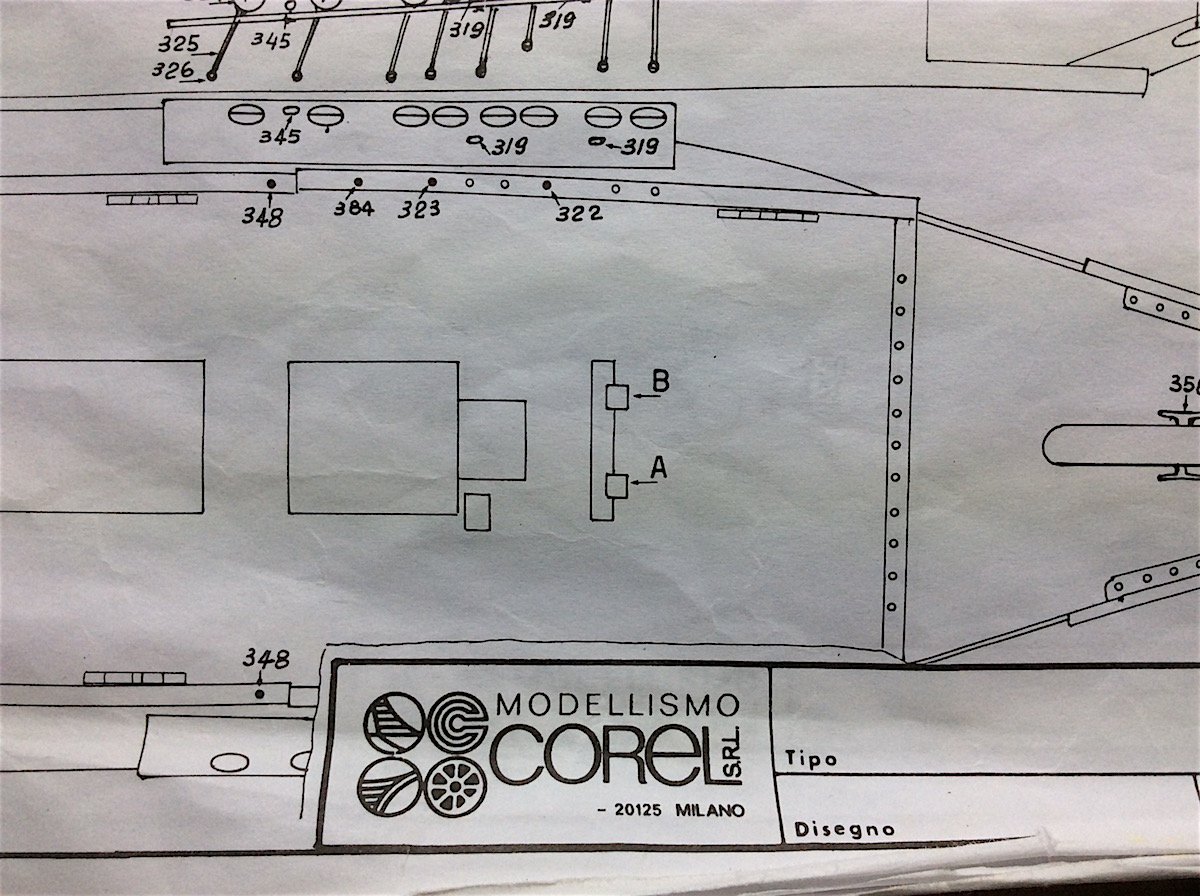
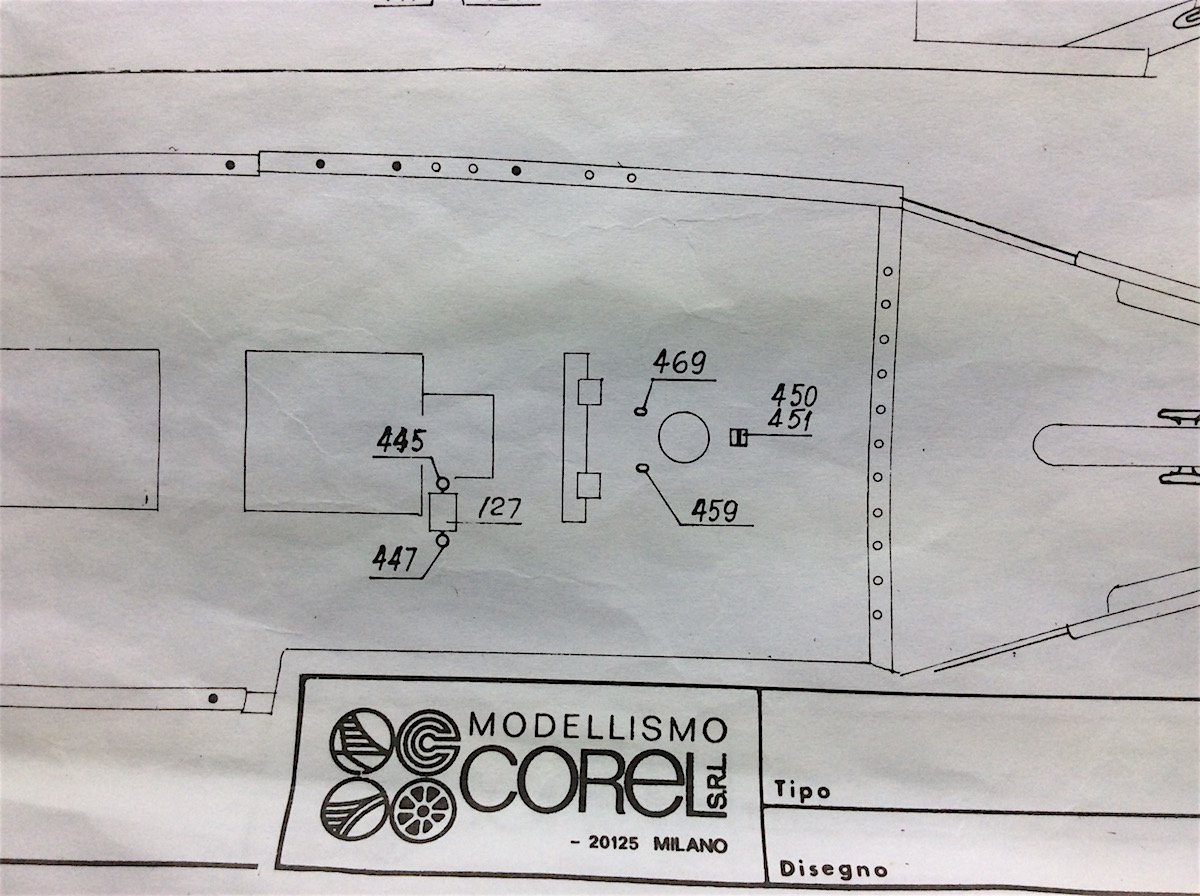
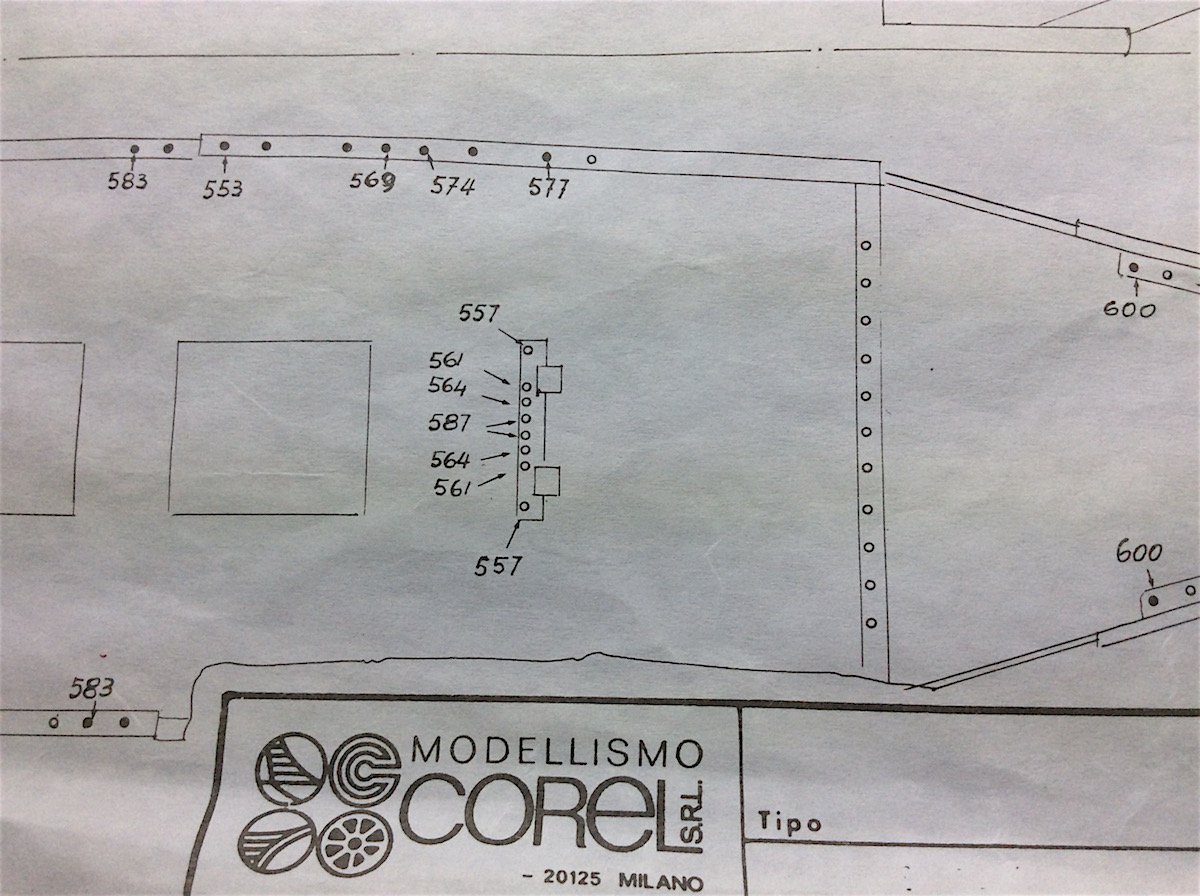
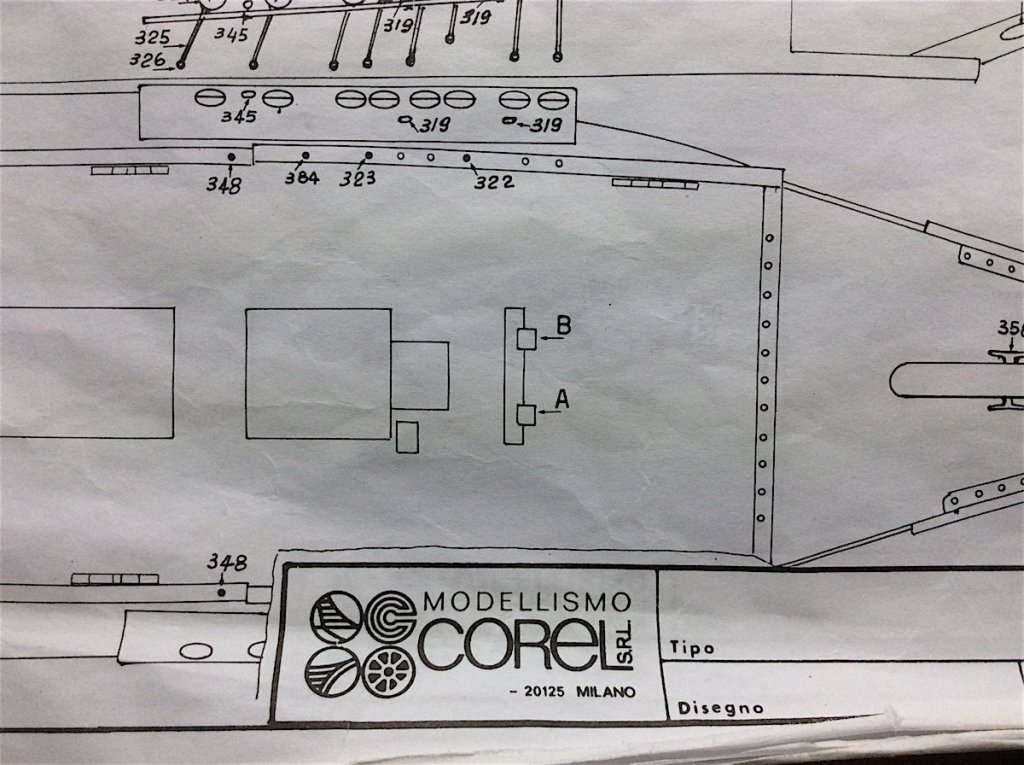
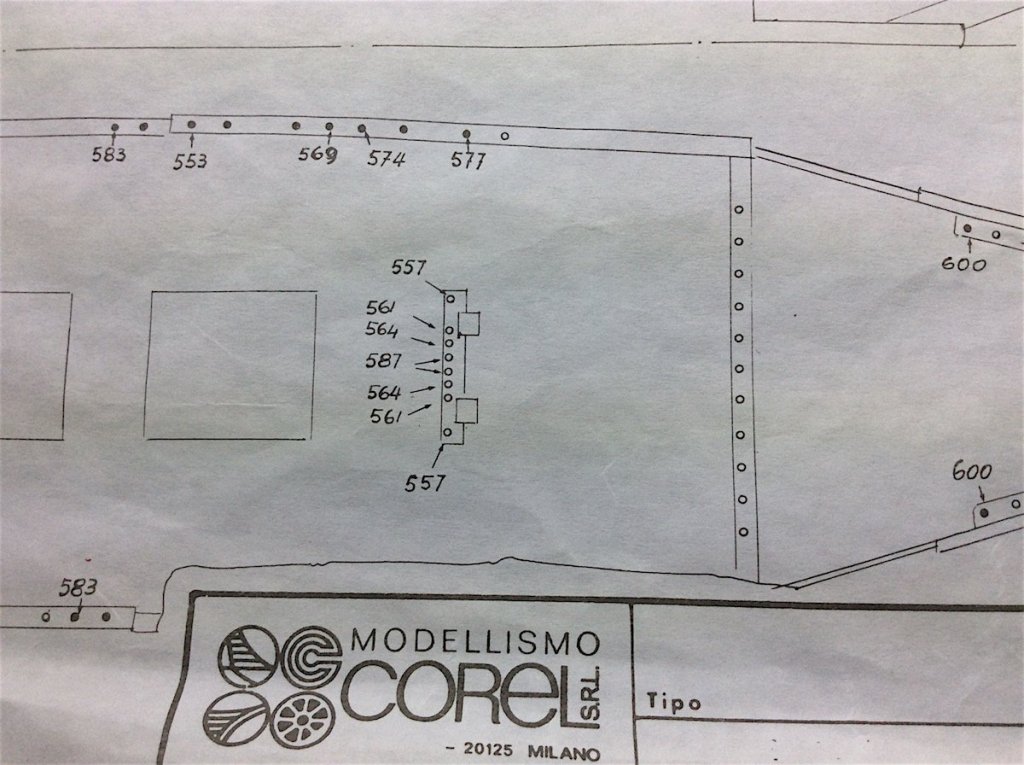
Thanks Mates for your posts. Karl, I just looked at the pin locations sheets you sent me, and no the Billings do not have pins either in of those two locations. PS: Karl, mi compadre, I will be re-visiting your log for sails help (:-) Patrick thanks again. So just the Corel AND the museum's 1/10th got it wrong - now that's an irony indeed. EJ, might want to ask some questions at "masting, rigging, sails. Certainly members who have not followed this particular thread would have this knowledge base, and they would certainly be helpful. Your Couronne was built at the same time as the Vasa. I'm sure that the French were "ahead" of any navy's of their day - I'm sure that they thought as much then, prob. still do today ha ha. So keep the pin holes!! But that would be interesting historically French vs Dutch 1628-36 Cheers,
-
Popeye thanks SO much for going through this build. Your words are so encouraging as well – thanks again mate And thanks for all the likes and just dropping by ---------------------------------- Yes yes – “It's All Coming Back to Me Now” (Borrowed this from David Crosby). After I decided to rebuild the knights, and looking at the 1/1 for how they should look, I did not drill any holes. Thanks Patrick for clearing my weak memory. My initial build, did in fact follow Corel’s instructions (including that railing ha ha) YES the original not have pinholes. I, now, remember thinking at the time, “well the ropes and shrouds will just wrap around the horizontal frame bit. The 1/10th has it with pins, so I started panicking (sort-of) forgetting about the 1/1 photos - now that my head is wrapped in standing and running rigging thinking. I then received a call from a MSW friend (who also built the Corel Wasa). He mentioned that he saw my latest post and called to let me know that he had met and spoken with Fred Hocker at a NRG meeting sometime back. Frank showed him iPad photos of his award winning (3) ship. Fred then let him know that the pin rails that Frank had installed (per Corel instructions) are in error as are the 1/10th. Then Frank did further research and learned that early 1600s shrouds were just wrapped around the horizontal frames. It was not until later in the century that “the lights” came on” for the pins to make much more sense. I then also looked again that the museum ship plans (1981) also do not have pinholes. So this mystery is put to rest. This is part of the problem of taking soooo long to complete a ship build – for me anyways. Let’s see how DeAgostini handles this issue with their new Vasa kit. Cheers,
-
Yes good plan EJ. Learning is part of the seasoning. This particular "issue" won't happen with my next build. I will certainly do as you suggest also looking at all rigging sheets. I wonder if the "pin" rigging problem that I had is only particular to Corel instructions?. Though I assume that kits at this level the instruction writers assume that "we know what we are doing" (:-) and would be aware of needed pins later on... That aside, now working on the shroud ratlines for the lower main (first time here as well) So with eight strands clover hitched, realized that rows were not aligning horizontally with the platform above. Though I thought that I had figured this bit in with the first lower row. And, of course, the expert that I am, I glued many of the knots so as not to have then loosen later. HA HA. So had to unstring all the rows and start all over again. Luckily none of the main shrouds were damaged, So learned NOT to glue anything until all rows up to the platform are attached. Then I can use tweezers for minor spacing adjustments. THEN glue. Having fun - good learning going on here as well. Cheers,
-
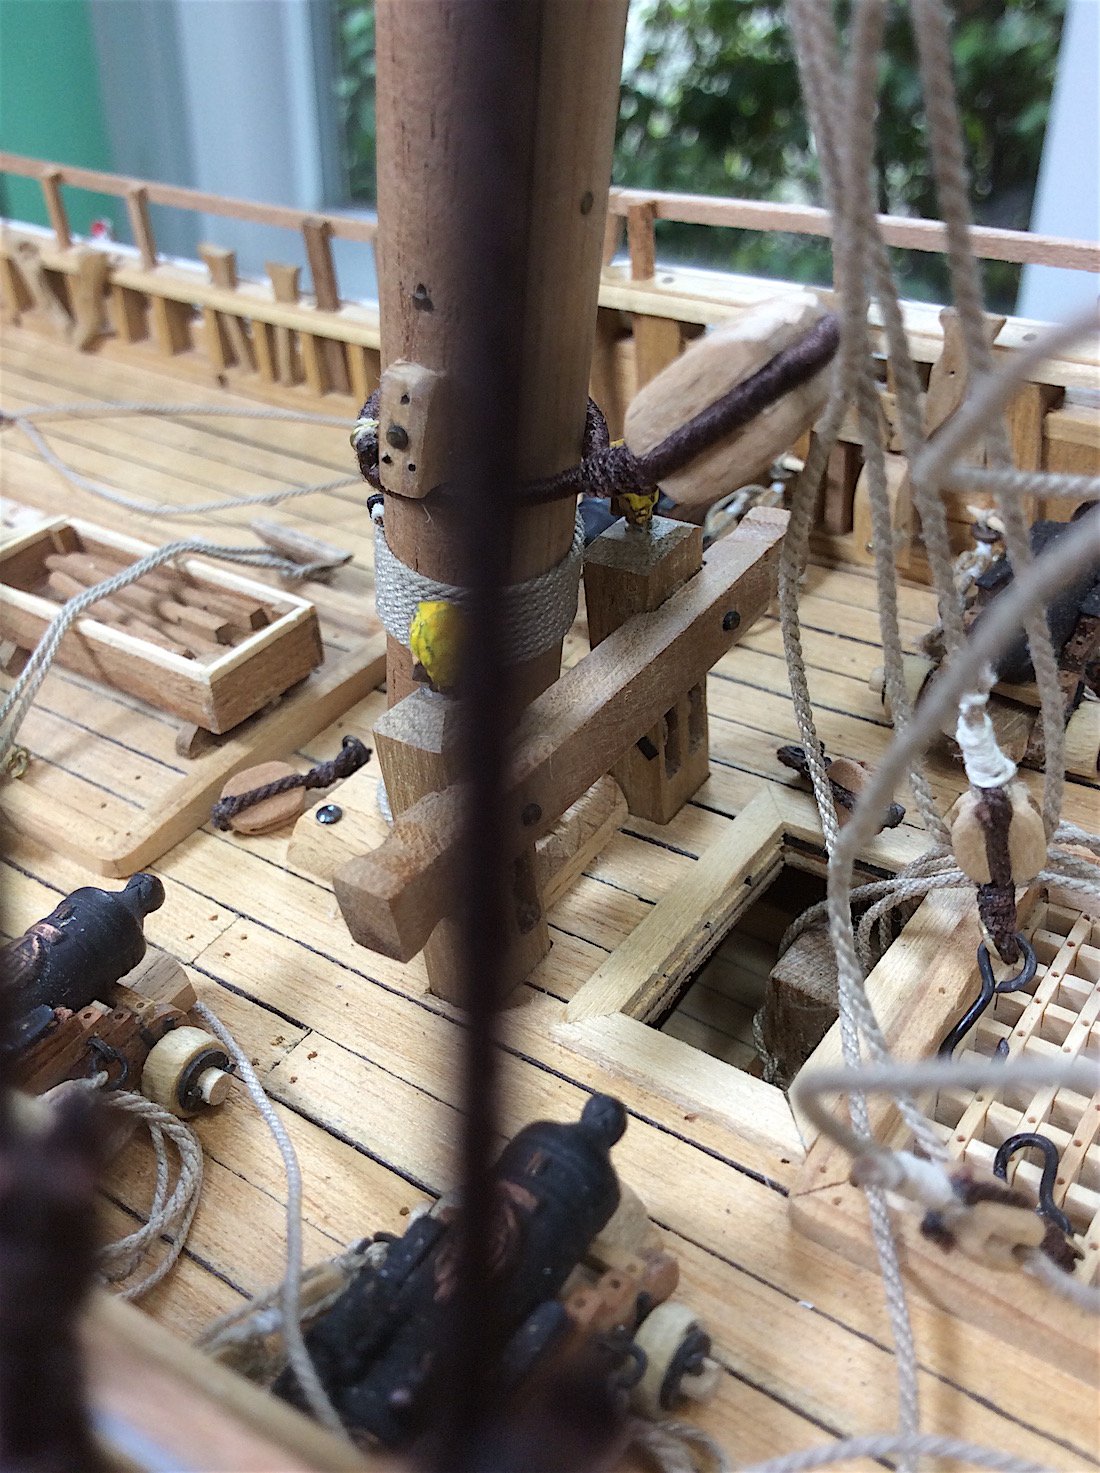
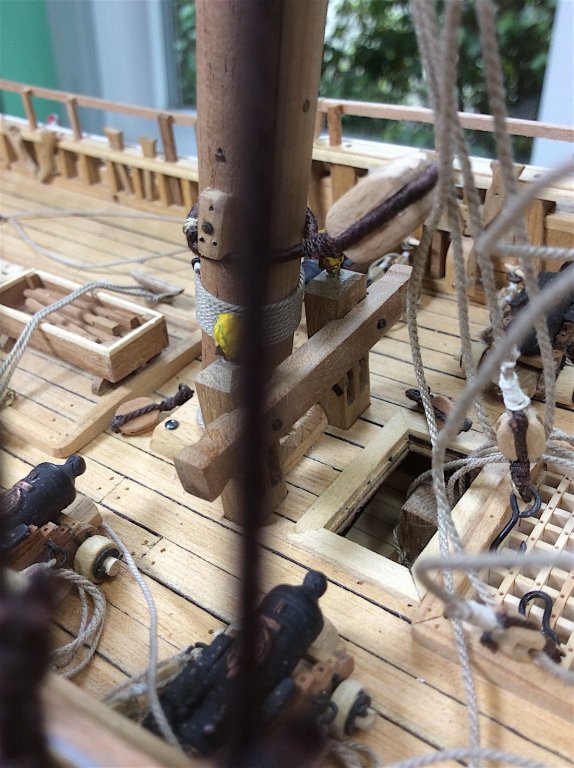
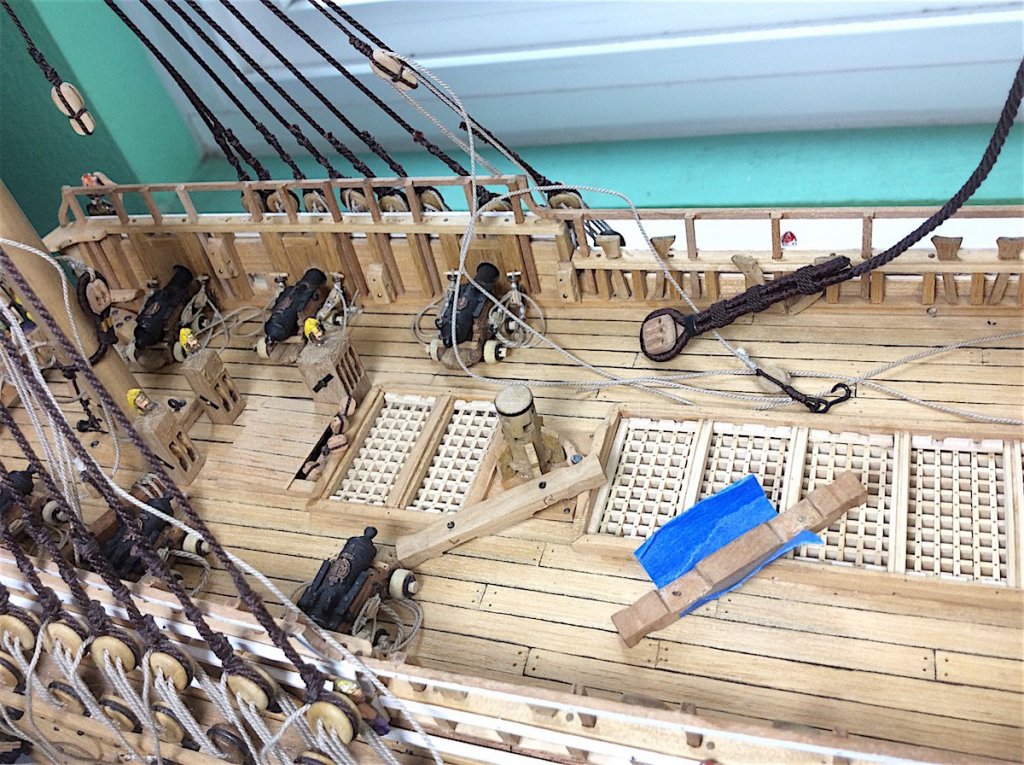
Hi Mates, Got myself into a bit of a mess. As I’ve mentioned this is my second build. My Santa Maria so many years ago, by comparison, was a walk in the park, even for me a first time builder. Well as I have been really learning so much about rigging this Vasa I realize now, in retrospect, that I had/have very little foresight. For example; I installed the knights with cross-bits at the base of the foremast and main, without thinking ahead. I was happy that I had learned how to use the Proxxon to make slits for the sheaves. And let it go at that – happy to install. Even added nails in the cross pieces to “look” better. So, now, looking ahead at the Corel rigging plans I realize that the cross-bits also needed pin holes (a lot of them) It took the THIRD, and last Corel rigging page to point this out to me (a learner) grrrrr. There was no way that I could drill these fourteen holes at this point. Thought that I could wiggle the knights free and pull them up through the weather deck. The first set install they were just glued into place on the weather deck. When I built new ones with the sheaves I also cut holes through the deck and ran the new knights to the deck below. They were not “going anywhere” curses. Then thought that I would just tear out the two cross pieces and make new ones, but was nervous about those cross bit nails. Turns out the nails were only decorative and the cross bits just snapped off using small pliers. ===================== Sharing because I’m super relieved, and in case another builder misses this foresight as I did as a newbie. Cheers Mates sorry for the long prose. Ok time for a single malt – I think ha ha

-
Ken, I'm sure to be repeating here, that said - your log is SO step-by-step informative. I'm sure that members are very appreciative of the extra time it also takes you to add, locate text within your excellent photos, of an also beautiful build. Cheers,