mtaylor
-
Posts
26,273 -
Joined
-
Last visited
Content Type
Profiles
Forums
Gallery
Events
Everything posted by mtaylor
-
Xebec by mij - FINISHED - 1:60 scale
mtaylor replied to mij's topic in - Build logs for subjects built 1751 - 1800
Don, ANCRE has a monograph and plans for a Xebec: http://ancre.fr/en/monographies-en/18-monographie-du-requin-chebec-1750-.html It's available in English. -
If you have a particular model in mind, search MSW for build logs. You'll get a variety of ideas and methods. In this forum: http://modelshipworld.com/index.php/forum/12-shop-notes-ship-modeling-tips-techniques-and-research/are lots of topics on "how-to". We also have an article database: http://modelshipworldforum.com/ship-modeling-articles-and-downloads.php that has a lot of mini-practicums. I look at this way... the information is here on MSW and costs nothing... why buy it?
-
Hi Steve, Welcome to MSW. Here's a link on how to add pictures: http://modelshipworld.com/index.php/topic/540-how-to-add-pictures-in-your-posts-and-pms/ There's more than few "pinned" topics here to help with just about everything: http://modelshipworld.com/index.php/forum/47-questionsinstructions-on-how-to-use-and-post-to-this-forumsite-problems-or-suggestions/ As for parts, if you can tell us what you're looking for, I'm sure we can help.
-
I'm going to follow along, Frank... looks like there's open seat over there....
-
No problem Mike. We all share... I may not use the "best" methods but I'm finding which ones work for me and so far I have no reason to turn her into kindling.
-
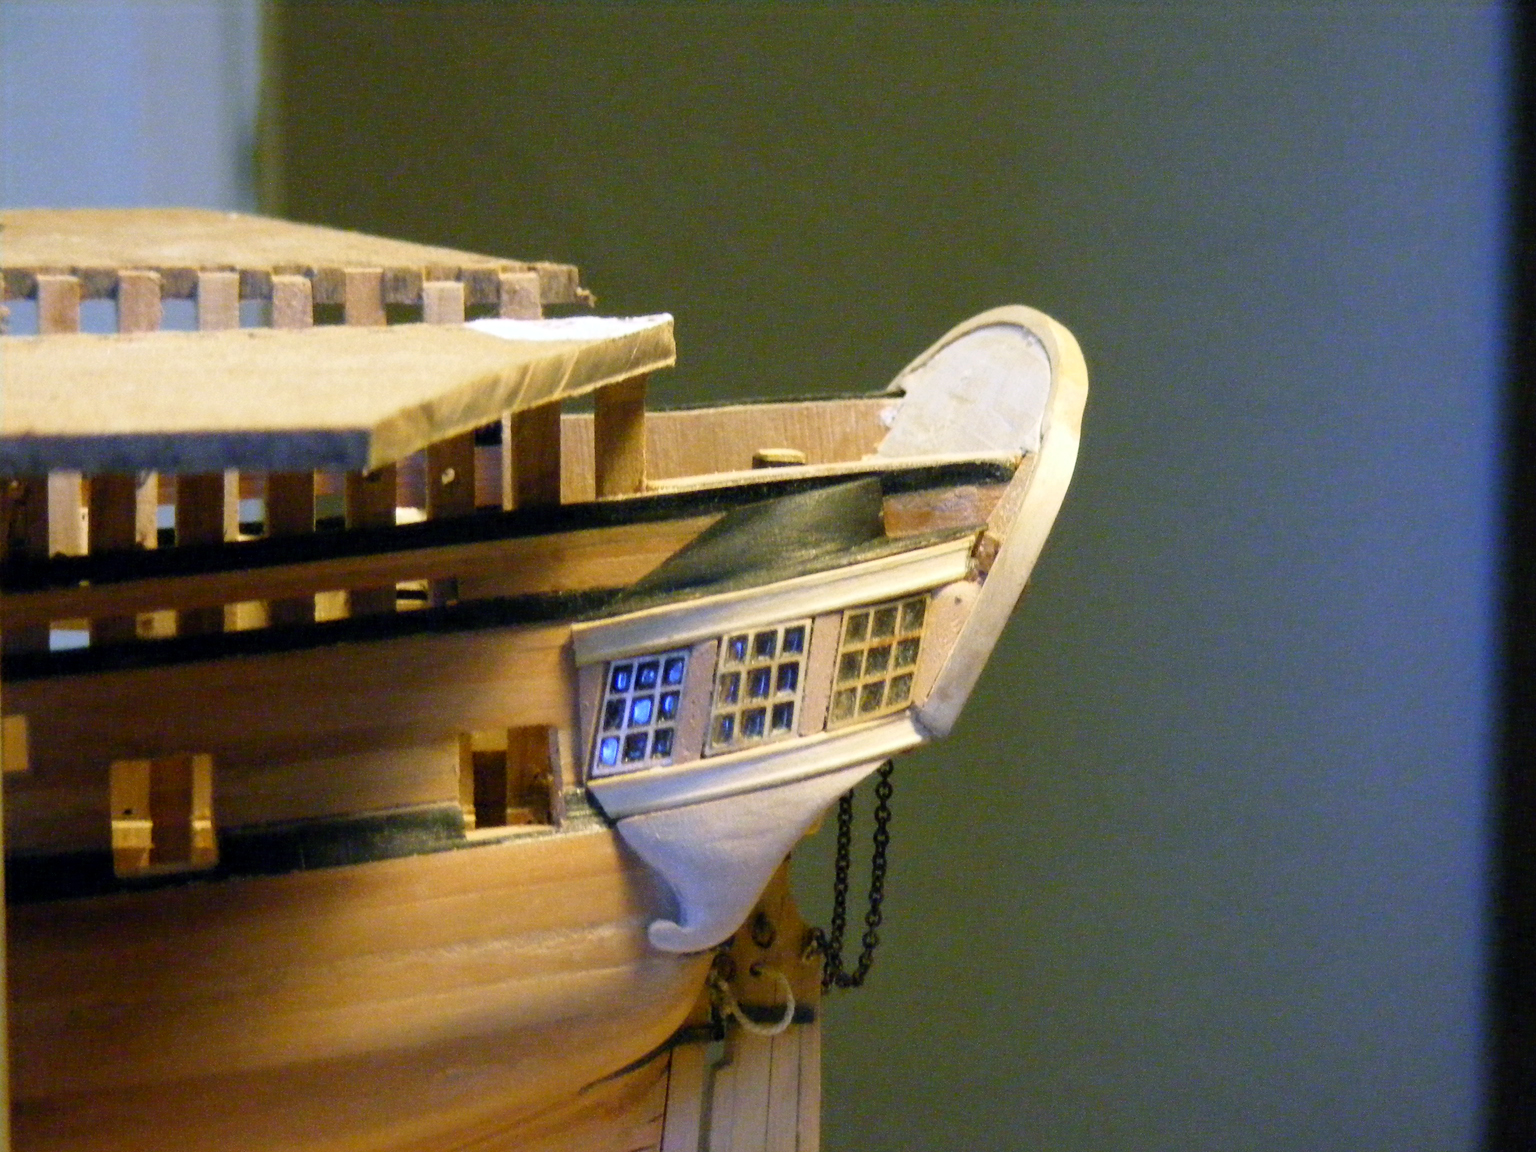
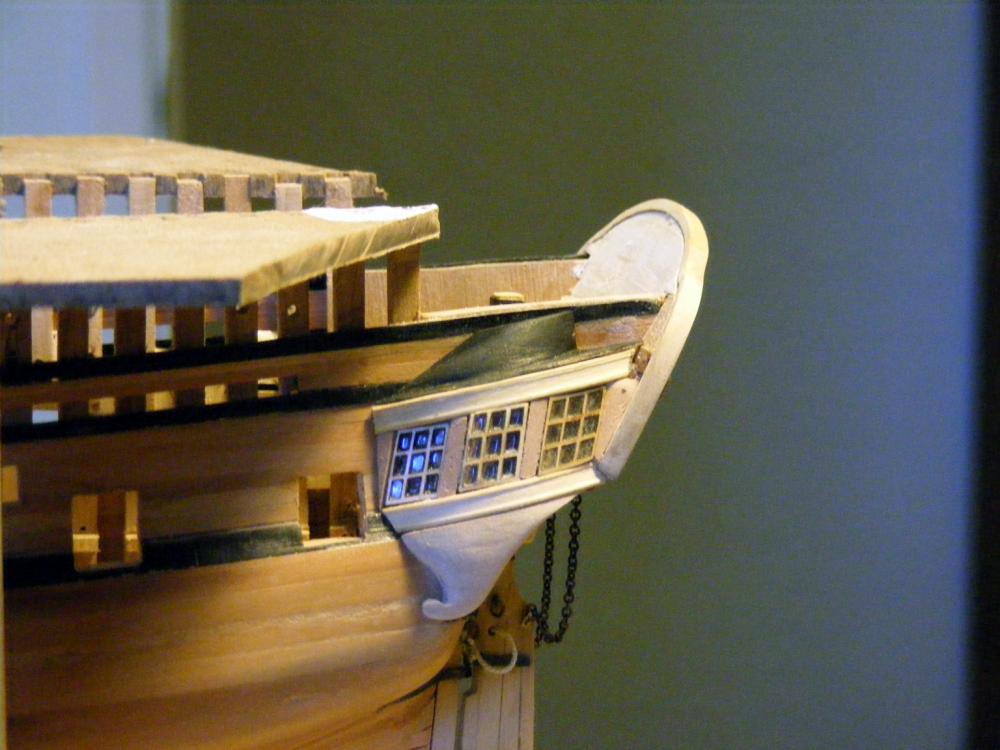
Thanks for the birthday wishes... Well.. it was back and forth.. cutting, breaking or feeding the carpet monster today.... but the gallery tops are done. The Admiral approves, which is good since I'm building this for her. So Happy Dance... I've only tacked the roof tops in place as I'm going to fiddle with some settings over the next couple of weeks and see if I can get better parts for the decorations. Doubtful, but worth a shot or two... I'm thinking a nice Kentucky Bourbon. Pictures below. Carvings are started and I'll work on them at a leisurely pace. But for now, I'm going to start the lower deck. Less fiddly, methinks. But first.. I need to refresh myself on the plans, make some spales, and put in a small dedication plaque. Did I mention, clean the workshop and do maintenance on the power tools?


-
Laser Cutters - A caution
mtaylor replied to mtaylor's topic in Modeling tools and Workshop Equipment
Or the smell of cooking me.... Luckily, this unit has a good safety switch. If I open the lid, the laser shuts down. But my habit is to hit either the main power or the laser "arming" switch and make sure it's off even when the machine isn't cutting. -
Nice looking launch, Sjors. Can I order a couple in assorted sizes?
-
Laser Cutters - A caution
mtaylor replied to mtaylor's topic in Modeling tools and Workshop Equipment
On the first one, I was cutting at 6 maybe 7 mA according to the meter. The second was just above 3 mA (I was etching and the tube doesn't fire until 3 mA.) Max is 15mA = 45W and I never power over 13 mA to promote tube life. I was cutting and etching at 12mm/Second. When I was testing, they did claim 21mA is max but the testing sheet says 15 = 45.7W so for the test, I did run it one time at full power...but not going to do that again. It cut 1/4" box like butter.. so I think it's capable of more than 45W. Ventilation.. I have an air compressor at the lens and the standard exhaust fan leading outside. I've been cutting replacement bits and pieces all day today and no issue. Same settings, same wood, same thickness... same $!%&@ parts that either break easy or the carpet monster eats . As I said, it happens... I read a lot on Sawmillcreek and there's been a couple a year. Most of them were like mine, a flareup.. hotspot.., something... small flame that if not stopped will get bigger. I ended up with minor soot and some scorched wood. -
What Carl said about the plates, Jason. As for plate up or plate down.... well, that's been part of a lot of discussion. On the cleats.... the size of these seems to vary by country and by shipyard it seems. When it doubt, go with the TFFM.
-
I'm playing catch up, JP. So many great logs and not enough time. Looking pretty darned good.
- 194 replies
-
- 3
-

-
- armed virginia sloop
- model shipways
- (and 1 more)
-
I had some fireworks in the shop yesterday. I had a couple of flareups on the wood being cut in the Death Star. It was a first for me, but my handy spray bottle took care of it fast. If you ever use a laser cutter, watch it up close when cutting. I suspect it's the thinness of the wood and oil (?) in the Euro Box that caused the problem. This wood seems to cut rather inconsistently and I've ended up re-cutting parts several times. From reading other sites, this isn't all that uncommon. It can happen with any wood at just about any power setting. Sometimes it's just flareup and out, sometimes (as in mine) they need to be put out. On the other sites they get reports a couple times a year of guys losing their workshop or some of their house. So if you're using your own, a friends, one at the library or MakerSpace a couple of things... find out where the water bottle and fire extinguisher are located. I keep mine off to one side so I'm reaching over or under the cutter. And I have both. Lastly, when the cutter is operating, watch it cut. Don't go get a cup of coffee or watch videos on Youtube. Stay watchful, and be careful out there.
- 6 replies
-
- 14
-
-
Ah... no problem guys... we have a topic for that with our resident doc... http://modelshipworld.com/index.php/topic/474-therapy-for-shipaholics/
-
No worries on the drop planks and stealers, Don. Normal SOP for these beasts. If you have gaps, save the sawdust and use it with either bit of watered down glue (PVA) or the finish material and make a slurry. Fill the gaps and sand well. That usually does the trick. And that is a lovely planking job you have going on there.
- 653 replies
-
- 10
-
-
- trabakul
- marisstella
- (and 1 more)
-
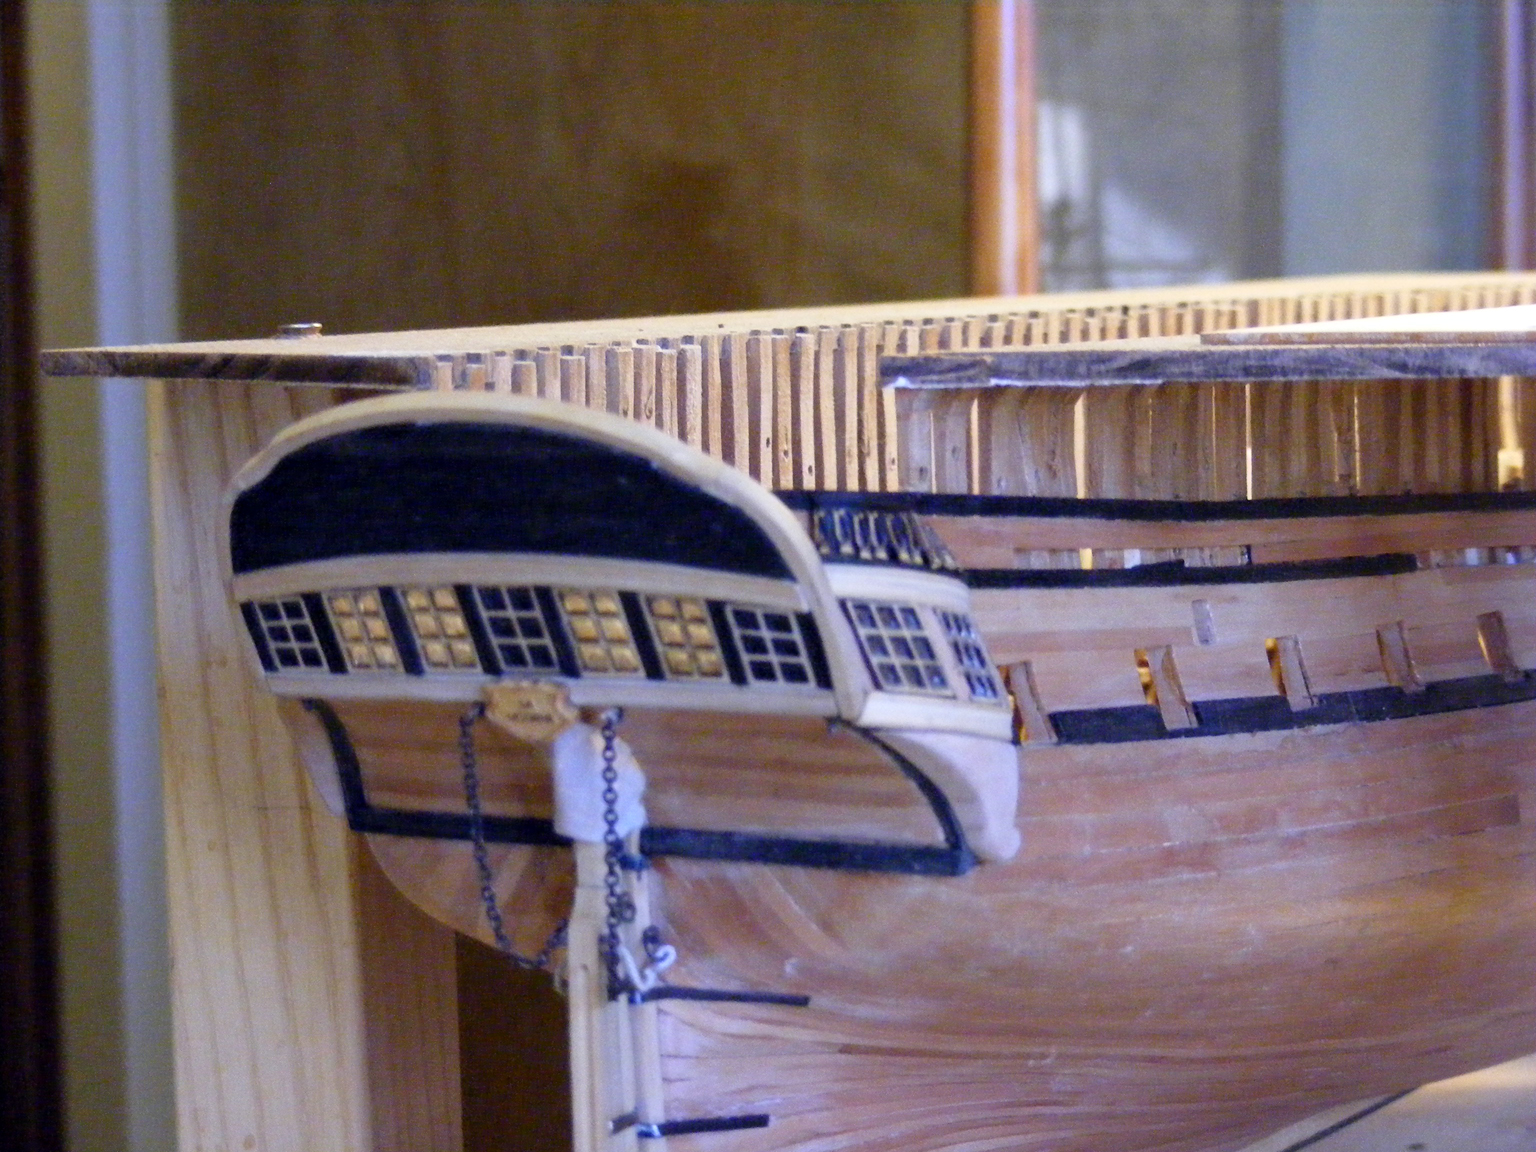
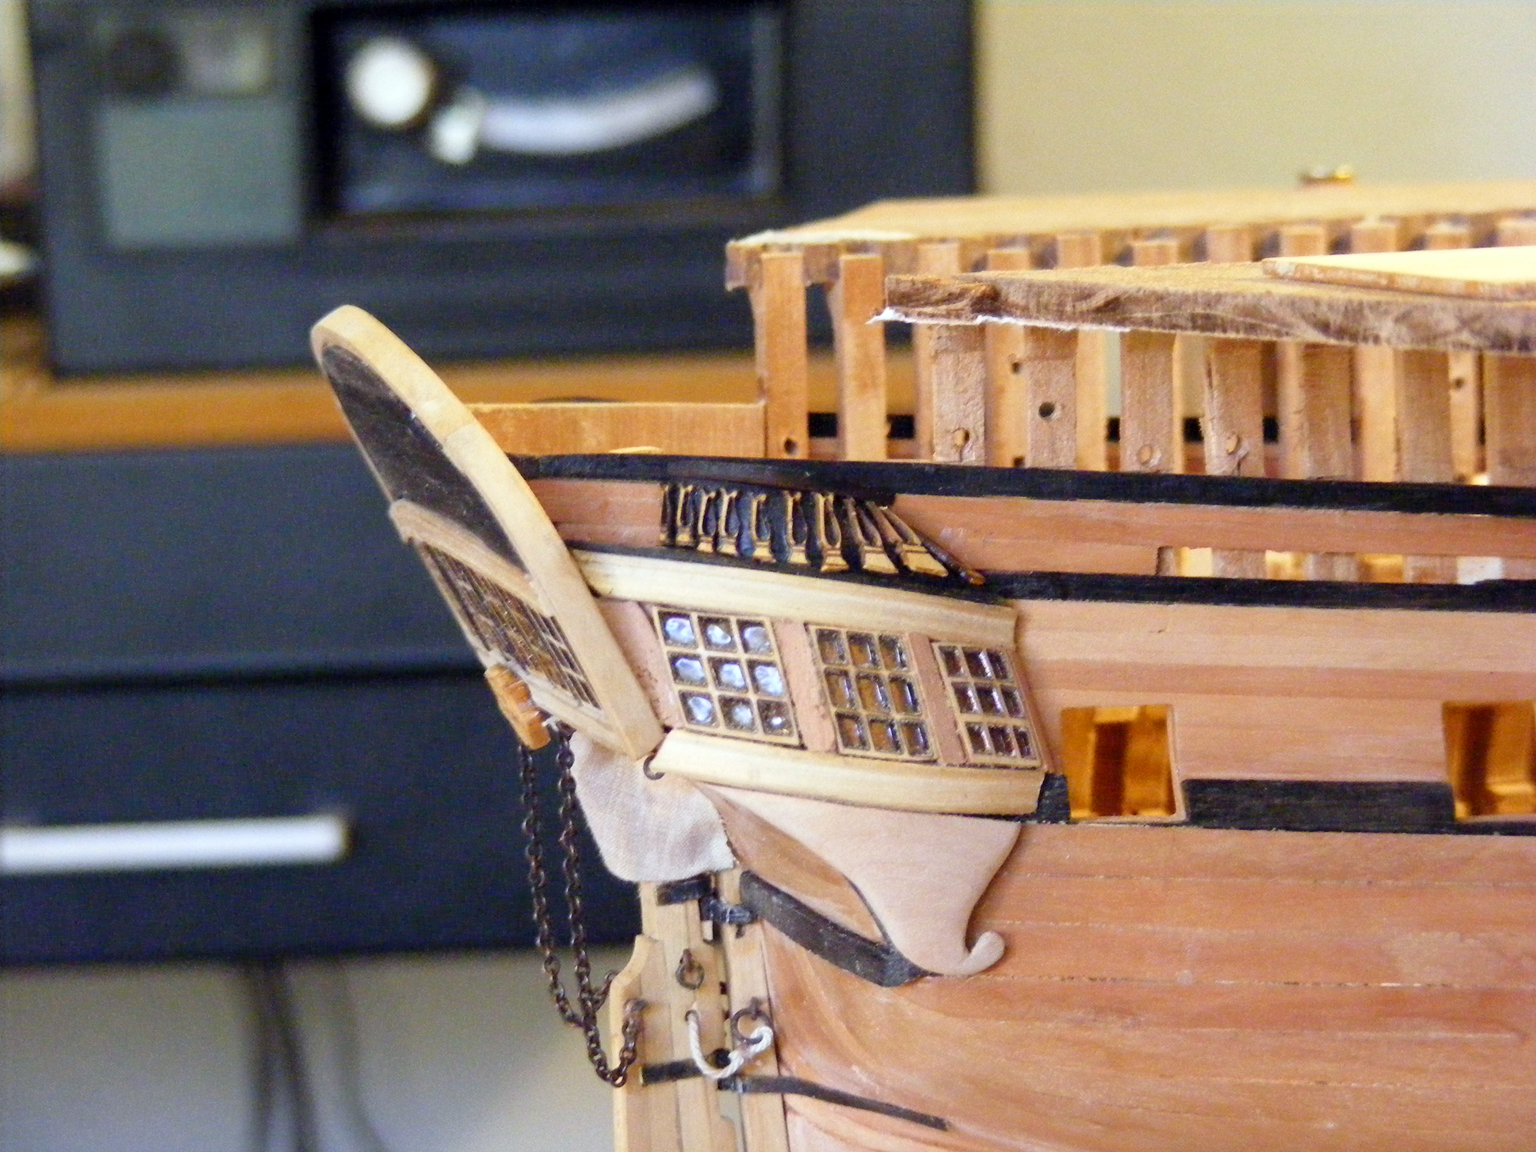
Thanks for the birthday wishes and the comments. See my post in "Them old jokes" for sense of how the day is going... My wife says that I'm 2 years old, with an attitude, and lots of experience. She might be right. So I'm celebrating experience today. I'm thinking I should have went larger.. seriously.. As for sailing her... I'm not letting this one see water at all, except maybe in a glass, on my desk. It tis an interesting conundrum, John. I find no indication on the NMM plans of the gun deck for any internal structure in quarter gallery area. Well.. they show the door to the galleries.. but that's it. They packed a lot into these small ships. What I've been calling the "berth deck" and it would be on an English/American ship is just the "lower deck" (I'm changing terminology henceforth). There's some officer cabins in the stern, storerooms, bread rooms, etc. Which would follow the tales of the sailors sleeping anywhere they could find a place to lay down. Minor Update and a Caution I had some fireworks in the shop yesterday. I had a couple of flareups on the wood being cut in the Death Star. It was a first for me, but my handy spray bottle took care of it fast. If you ever use a laser cutter, watch it up close when cutting. I suspect it's the thinness of the wood and oil (?) in the Euro Box that caused the problem. This wood seems to cut rather inconsistently and end up re-cutting parts several times. I'm about to recut 3 of the gallery decorations to replace ones damaged during installation. Thin wood that breaks easily. Hopefully, I'll finish this off today and post pictures. I think I'll do carvings in the background while turning my main focus to the interior. Time to do something less fiddly....
-
Hans, With the pictures and explanations, you're doing fine. Words don't always translate well and Google Translate makes a big mess of nautical terms.
-
Jud, I'm with Joel. The contemporary evidence points to what he said. Hammocks were washed on a regular basis along with clothing. Stowed in the netting after undergoing an "inspection" involving a hoop to ensure they were rolled tight enough. Foul weather and (depending on the captain and the ship) either moved to the hold or berthing deck or covered with canvas in the cranes. The reason for two was the watch system which you're familiar with... 4 on, 4 off, dog watch, etc. On washing day, the hammock would be washed and dried on deck. The extra hammock was for the sailor to use until it was dry. Most, if not all, captains were pretty strict about keeping things clean...
-
Grant, I too like the steering solution. Great idea. She's looking very shipshape and Bristol Fashion to these eyes.
- 339 replies
-
- 6
-
-
- dumas
- Chris-Craft
- (and 3 more)
-
I feel for the gun crew on that front port where the discharge pipe is located... Looks good, Daniel. I would suspect that the plumbing would be hidden. These are officer facilities you know.
-
Good looking planking, Mike. I guess problems go with the turf but you have overcome them. Great work.
-
Vaddoc, I think we've all been there. The only way to find out is try it. And then keep trying. I think you'll get the ship you want. If you're not sure about something on this, build it in cheap wood or cardboard first. It seems to work for a lot of us in figuring things out.
-
Thanks for the likes and comments. Grant, I know there's more coming at this size.... It should be interesting. Luckily, Mobbsie, I think my marathon at the computer is over for now. Then again, next week may bring something else.... Hang onto your spare set, they may come in handy. Thanks Carl. Minor math error... it's 0.79 mm... and yes those bits are getting tiny. But I think I can deal with it. 1:1 would be fun but I have to knock down a few neighbors houses to do it. That and I'm about 150 miles from the ocean.... I love the look.. the mess.. not so much. I think the last of the ebony for this ship is in place.
-
I've been diligently working while continuing to dig for information. I've looked at what seems to be a zillion plans, paintings, sketches, etc. online of French frigates... this darned ship's galleries don't match any of them. There's a couple of other odd things I noticed but since the NMM plans have them, I have to assume that the guys in the yard taking the lines, etc. knew what they were doing and drew what they saw in front of them.. My eyes are killing me from staring at the computer and the NMM plans... Aspirin helps. I've reworked the roof to match the lines (and this time allowed for tolerances and my own stupidty) and then stained it black. I momentarily thought about using ebony but 1) didn't have the proper size stock and 2) didn't want to deal with the mess. I've reworked the rail/decorations. These appear to be more decorative than an actual railing so I'm cutting the pieces as individuals and will fit them as I go. In the pics, one set of decorations has been cut and etched on 1/32" (<1mm) Euro Boxwood. The other still needs cutting but I need to thickness another chunk of wood for that as i wasted a bit getting the settings right on the cutter. There will be a black covering board for the roof top with a piece of boxwood trim around it. Well.... here goes.... wish me luck as I dive off the deep end. I hope there's water in the pool... metaphorically speaking.

-
EJ,, Looking sharp there. As for the capstan, take a look at the Billing's Wasa. That might be appropriate but I'm not 100% certain.
- 608 replies
-
- 4
-
-
- la couronne
- corel
- (and 1 more)