


mtaylor
-
Posts
26,273 -
Joined
-
Last visited
Content Type
Profiles
Forums
Gallery
Events
Everything posted by mtaylor
-
Gaetan, He took it from the NMM plan. His deck plans, lines, etc. all seem to match the NMM. Even his "squiggles" for the carvings are if not the same, similar to the NMM plan. The line is there on the NMM plan but it's faint (or I have a bad copy).
-
Brian, What Rick said about the mast hoops is correct. As tor the third hole.... I have no idea unless it's for lifting the boom or securing something to it.
-
Lovely work, Siggi. I don't know all the names either, but you're doing a beautiful job building them.
- 58 replies
-
- 2
-

-
- barge
- ships boat
- (and 1 more)
-
Thanks for the explanation about the rudder Gerhard. I mis-read your posts on the why you were redoing it.
- 72 replies
-
- 6
-
-
- bootlegger
- speedboat
- (and 1 more)
-
Neal, This chair is just the prototype? It looks fantastic so I'm not sure why you'd cast it.
-
RedDawg, Google is your friend... I found this one quickly.. http://www.modelshipmaster.com/products/pirate/Queen_Anne's_Revenge_blackbeard.htmbut the price is rather high. There was a plastic kit by Revell that shows up on Ebay regularly. Dig through Google a bit, there might be more.
-
Jud, You and Chris raise valid points. There are those who start a build log, realize they're in way over their heads and give up. There are others, who start a log, realize they're in way over their heads and the put that log on hold and get a simpler kit. One of the topics over the years has been about the number of models, unfinished, sitting in an attic or basement because the builder didn't know how to do what was needed. There's two articles in the article database that explain "how to select a kit" and "what to expect in a kit". They've been offered many time to new members. Both articles have great advice. Going from plastic to wood is a big step. Similar to going from replacing some items on your car to building one from the ground up. Same principles, just different skill set needed. In my case, my first ship was Wasa (from Billings). I opened the kit, read the directions such that they are, and put it away. I went to the hobby shop and bought a simple battle station and AL's Scottish Maid. I learned. It's humbling to realize you don't know how to do things. When those two models wiere done, I did the Wasa. We here at MSW have also seen the same thing in scratchbuilding. Look at the logs of models never finished. Even the starters like the Triton cross-section. It's tough call on things in this hobby. MSW is based on the premise that everyone wants everyone else to succeed also. Mutual support. Sometimes, the advice may seem harsh, but it's voices of experience that give it. And they give it in context of "how to learn". Some new builders do carry on and turn out a nice model but they are usually reading other logs and listening to those who have built the model. And most would tell you, they should have started with something easier. My apologies for being long winded.
- 241 replies
-
- 27
-
-
Pat, I've thought about that and the more I work on this, the smaller that "tub" area is. This is an oddball as the other ships I've seen (French) don't have this shape of gallery nor is rail/roof like this. I'm scratching my head a lot. Gaetan, I think you mis-quoted me, the quote is "I re-checked the drawings of the French ships I have and haven't seen a line in that location". There's no line there on Le Venus, Belle Poule or Hermione.
-
Beautiful and precise work, Frank. Very cleanly done. Where did you find the laser centering device?
- 649 replies
-
- 4
-
-
- dunbrody
- famine ship
- (and 2 more)
-
And therein is what is giving me pause. I re-checked the drawings of the French ships I have and haven't seen a line in that location.... Based on previous discussion, I'm leaning towards the lining top. This will probably end up just being a best guess on my part based on the "typical" for French ships and the fact that Hahn wasn't always right, either.
-
Brian, If those glue stains are PVA (carpenter's or wood glue) use isopropyl alcohol. If it's CA, then acetone. But with acetone, do it in a very well-ventilated area. Just don't soak to heavily or your planks will come off. Keep a damp cloth handy when planking and you can take the glue (PVA) off immediately.
-
I think teething problems are normal, Jon. At least she's not an RC airplane as teething problems on those are usually fatal to the craft.
-
Gerhard, I think your rudder will work. Possibly use horns on the rudder post and wire/line to the servo? As an aside, I'm not sure why you redesigned it.
- 72 replies
-
- 4
-
-
- bootlegger
- speedboat
- (and 1 more)
-
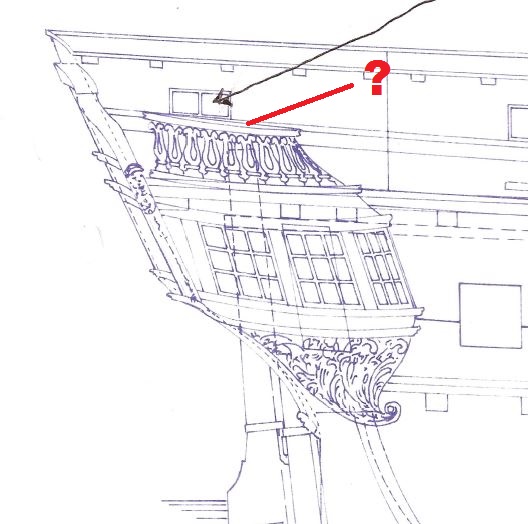
I have a question... this one goes back to "roof", "open" or "tub"... Take a look at the drawing and where the red line points to. I see the same line on the NMM drawing but it's very faint. So now I'm wondering... is that a roof line? Hahn's model has a roof/cover but..... I'm not sure what I'm seeing. I just realized today that if I don't lock my reference work (a pdf scan of the plan), I can accidently change the size of it. grrrr.... I've started over redrawing my gallery top.
-
Ken, I have the base etched into the wood as well as the top... Once shaped, I'll use the cellotape method to get the decorations/railing right.
-
I'm hoping you have a great birthday, Pat. I keep forgetting you guys down under a day ahead of us.
- 517 replies
-
- 2
-
-
- Endeavour
- Artesania Latina
- (and 1 more)
-
Pat, It didn't look right to my eye. And yes, the Death Star does make multiple parts or even reworks easier than spending a lot of time with a scroll saw. Druxey, Yep.. I did that the first time. Carved the block down and then used cellotape to get the railing. I blew it, but it's part of the learning curve. A bit of philosophy here..... My dad has a saying that I've found works for me.. "Show me a man who's never made a mistake and I'll show a man who's never tried anything different." I think I'm embracing that on this build. Then too, my dad didn't learn to use a computer until he was 75. He's a tough act to follow.
-
Minor correction to the above... I think the "tub" has to go. There's about 16 inches between the rail and hull with the re-design when I allow for the angle to be right..
-
John, Looking pretty good. Nice smooth runs. Re-run your tickstrips. From here it looks like the planks towards bow will need to start tapering. I'm also thinking that plank next to the garboard need to have that curve reduced a bit.
-
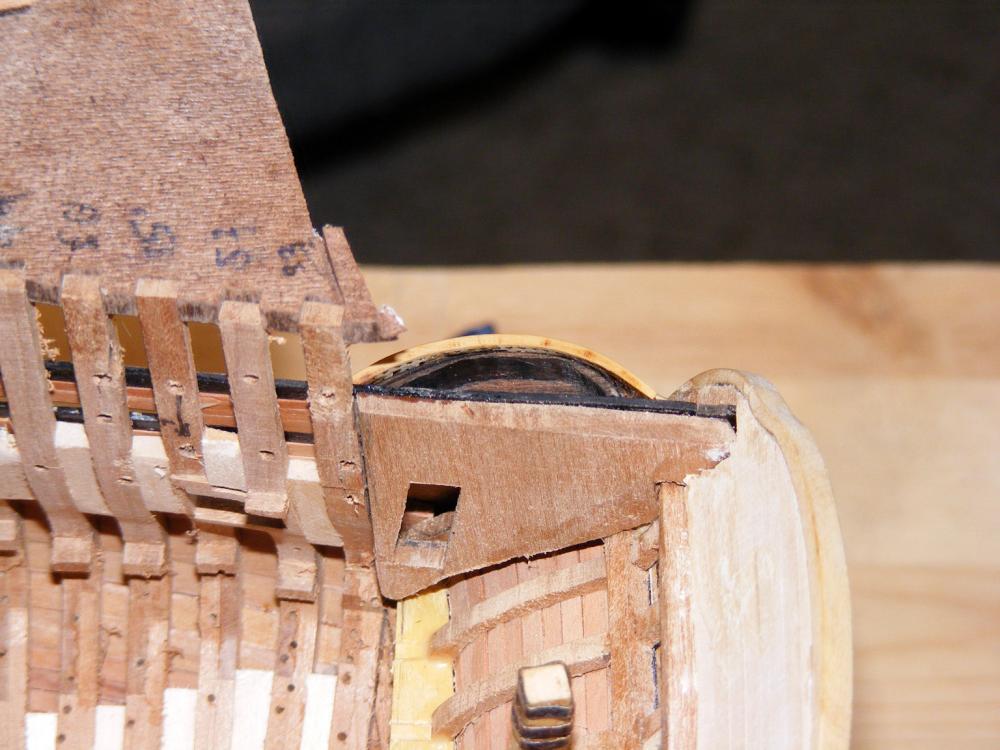
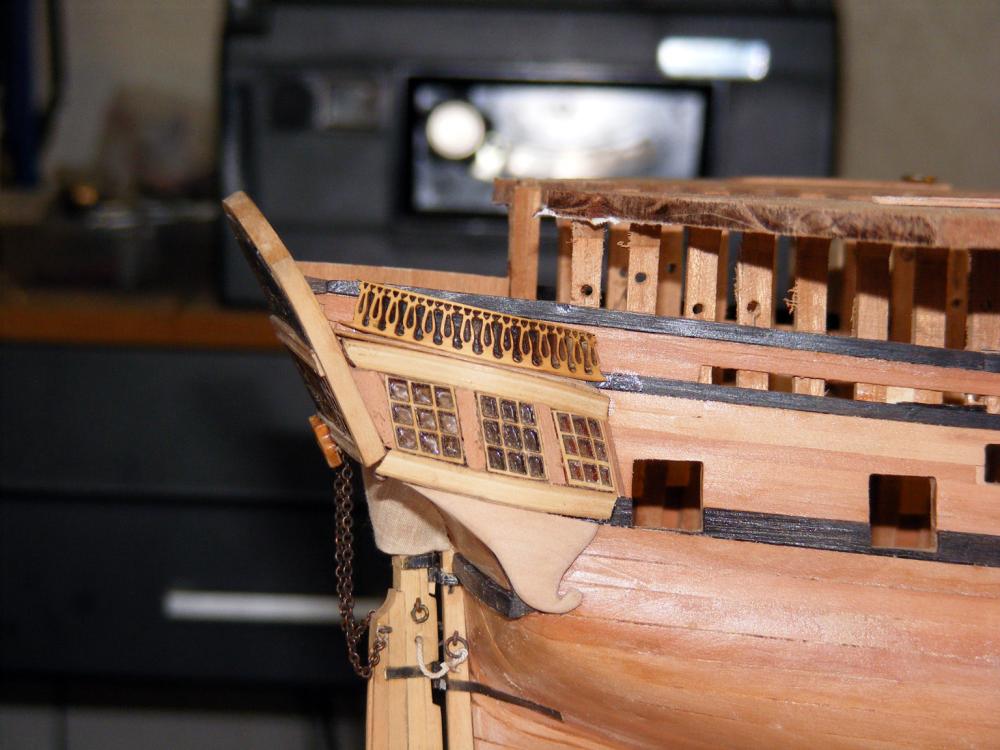
Thanks for the likes and the comments. Full disclosure time. The results this time around were not good, but have provided a learning experience. I found, I can produce the tubs, the rails, the roof and assemble them. A couple of errors reared their ugly heads and so it's back to the drawing board. I think I just need to remake the "tubs' and get the error angle and size right. First pic... doesn't look too bad. I picked a black stain for two reasons. On a test, I wasn't getting the railing sticking to either flat acrylic or flat enamel paint. The second is that the contrast is better. I used the mill to hollow out the inside of the tub, something I'd not done before so definitely learned something. Here's where the failure hit... the tub is too big and thus the railing goes too far astern and secondly, note the rollup at each of the railing at the roof join. I didn't get the angle on the tub right, The railing needs to lean in more toward the hull. Rework, re-do time has started... I hope someone else can learn from my screw-ups.
-
I think you're right on the longer strips. Plus it gives your fingers something to hold onto. Trying to hold to 1/2" plank at the end and bend it is a bear and half. On the heat.. When I hit my iron, it sizzles. The water from the soaking inside the wood turns to steam and heat and water/steam allows the lignian <sp?) inside the wood to loosen it's grip. I've noticed that if It soaks for a period time (depending thickness) and then hit it with the heat and keep heating and moving the iron, I can turn a strip of pear planking into spaghetti practically. I've tried the soak, wrap in wet paper towel and nuke in the microwave but that doesn't seem to work as well. I've also done the steaming (but the steam setup is long gone unfortuneatly) and that seemed to work the best as the whole plank gets heat and steam. I've not tried boiling yet as some have said they've done.
-
Very well said and done, Mike. And it's excellent advice. If you don't want to wait overnight on the "soak and pin" method, Add heat to the mix. After soaking, I use an old curling iron to heat the wood up and then transfer it to the ship. It helps to have the pins as ready as possible, but the wood stays pliable for a bit and bends nicely. Once cool and dry, ready to glue.
-
Looking great, Mike. Burnout does happen so maybe you should jump over to something else.
-
Cutty Sark by NenadM
mtaylor replied to NenadM's topic in - Build logs for subjects built 1851 - 1900
Just wow, Nenad. She looks wonderful. This video captures her perfectly.- 4,152 replies
-
- 6
-
-
- cutty sark
- tehnodidakta
- (and 1 more)

