HOLIDAY DONATION DRIVE - SUPPORT MSW - DO YOUR PART TO KEEP THIS GREAT FORUM GOING! (Only 66 donations so far out of 49,000 members - Can we at least get100? C'mon guys!)
×


scrubbyj427
-
Posts
1,673 -
Joined
-
Last visited
Content Type
Profiles
Forums
Gallery
Events
Everything posted by scrubbyj427
-
 Very nice Frank! You did an excellent job with those planks! That should set the tone for the rest of them.
 -
Beautiful work! What wood did you use for the frames?
-
Thanks Jp. That really looks nice, I’m glad the LEDs worked out, they are really easy to install and produce great light! I would recommend painting the underside of your false deck a dark color as the light may penetrate the wood from below. JJ
-
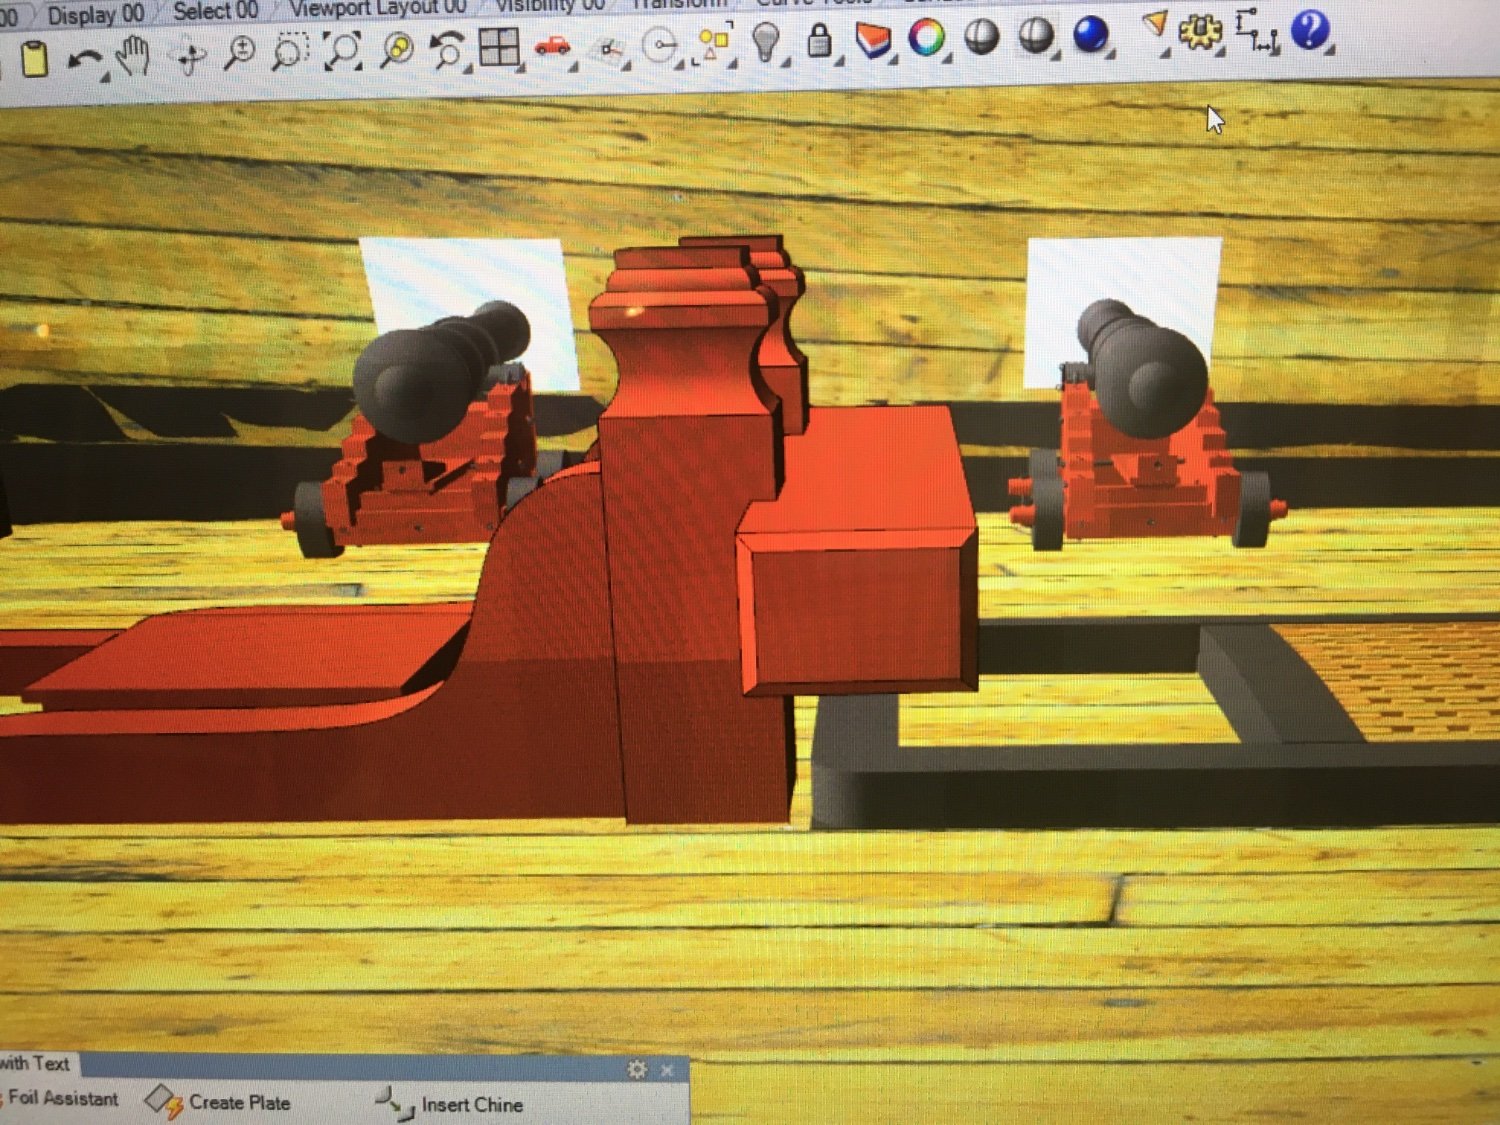
That clearance looks close to what I have, about 18-20” at 1/48 scale. I also like the guns arranged as you have them in the second photo, but I’m also curious as to how they were actually set on the real ship. Looks really good though. JJ
-
Hi Siggi, very interesting to see that so prevalent in so many designs. Wonder why they intended to obstruct a decent portion of the opening? Weird. I’ll just leave it as is then! JJ
-
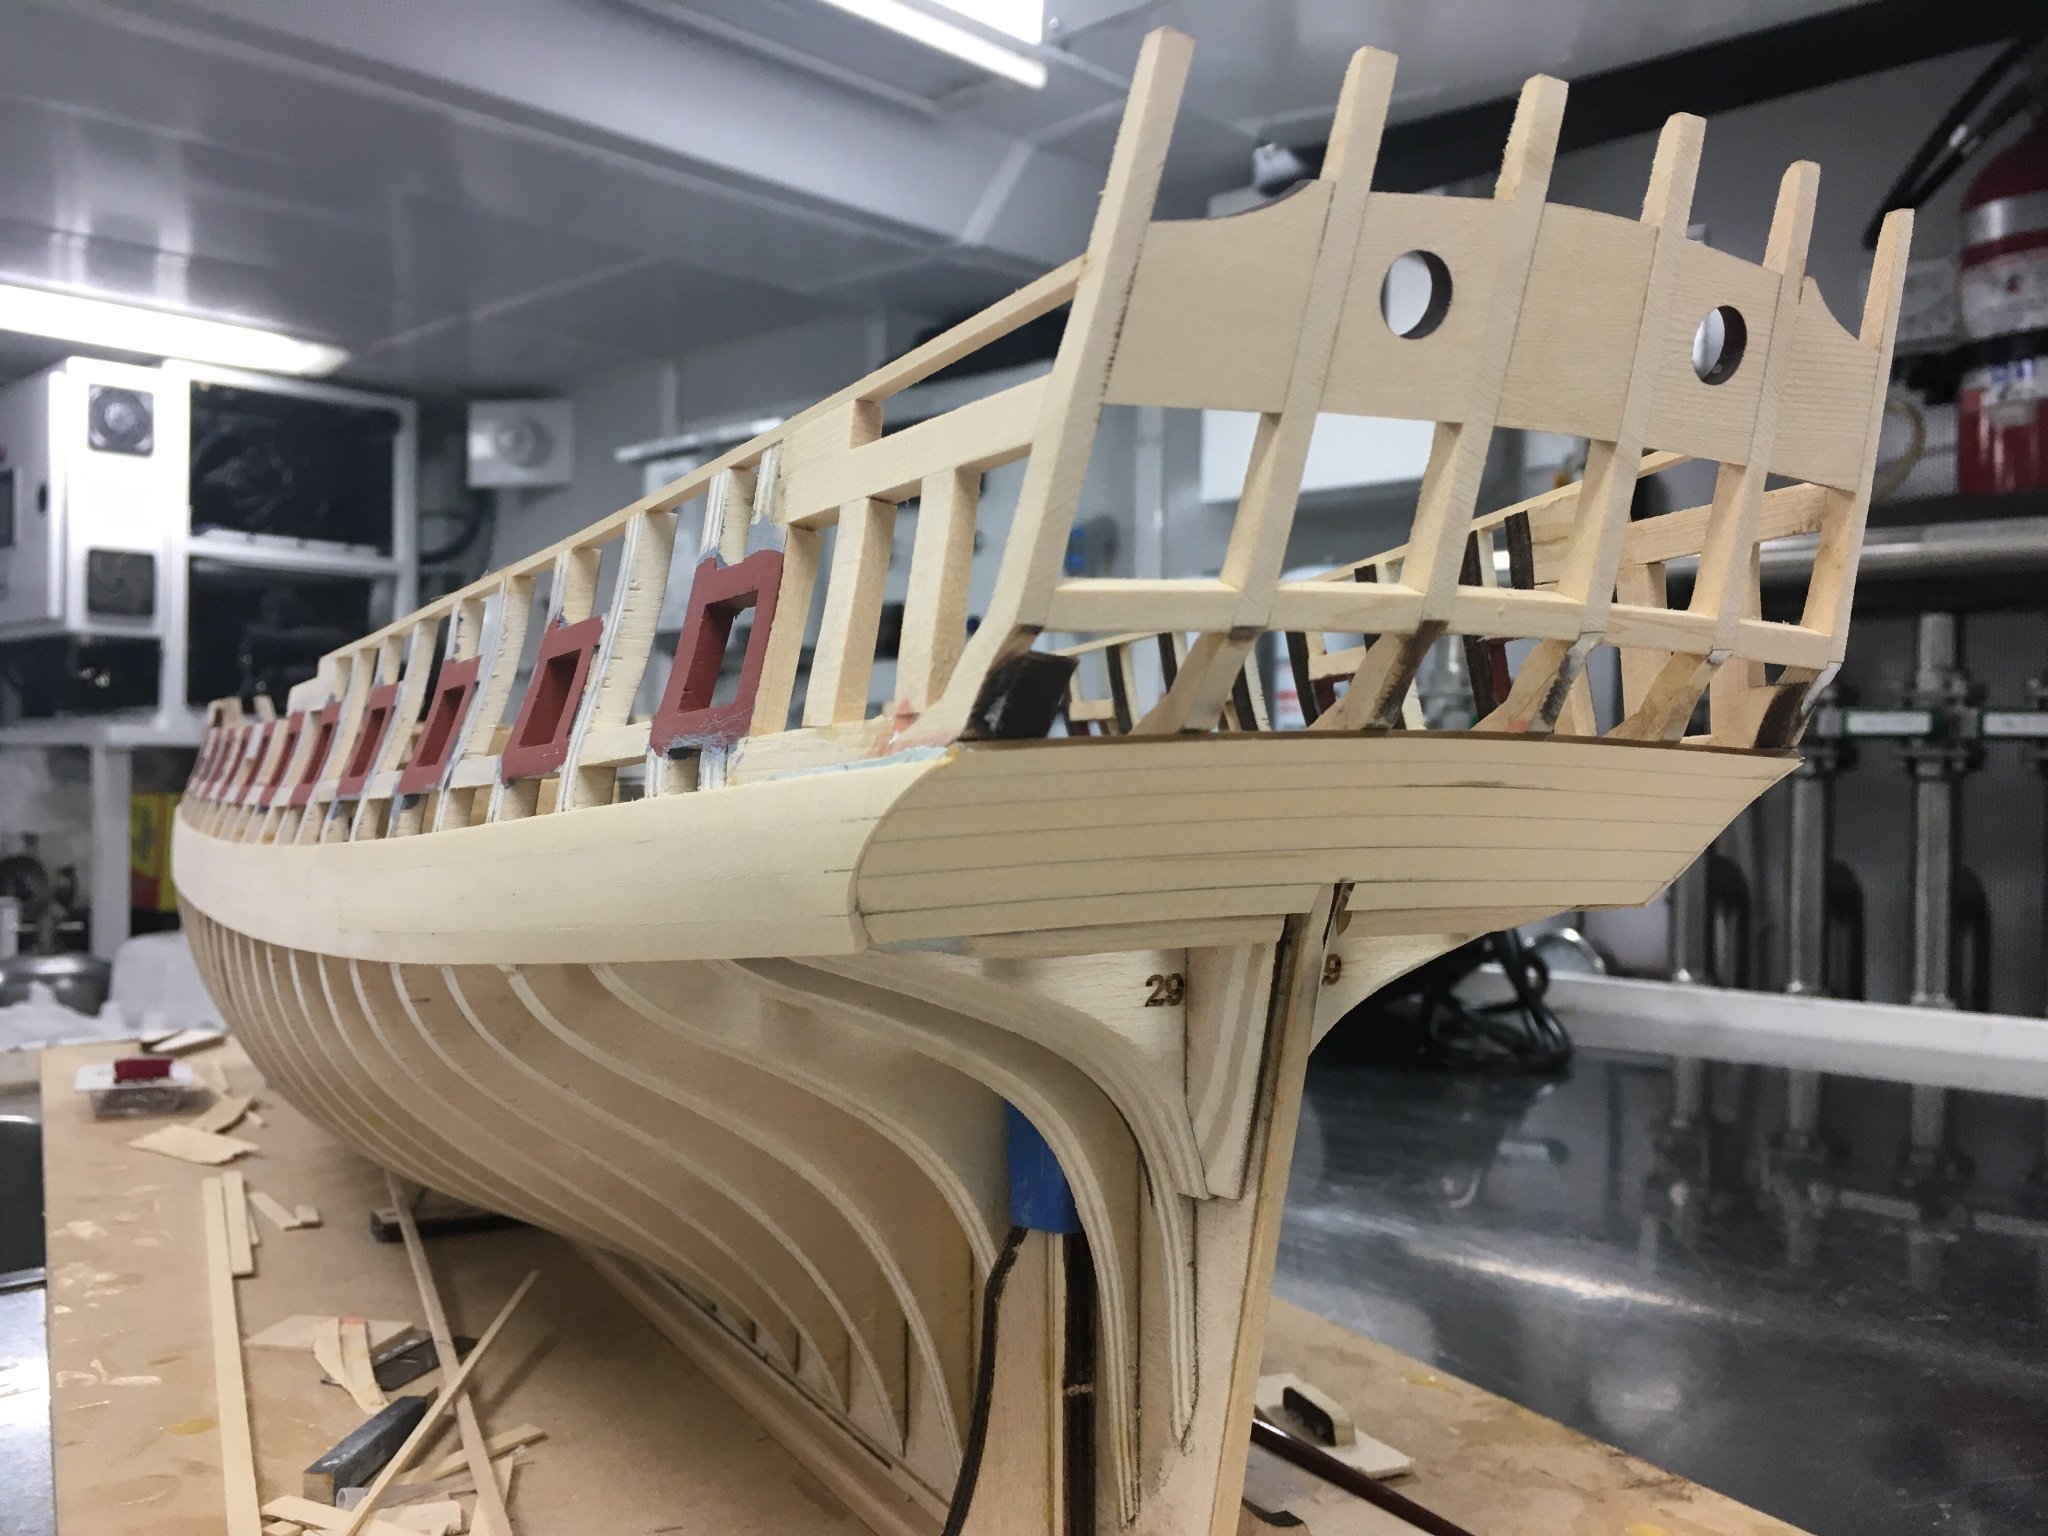
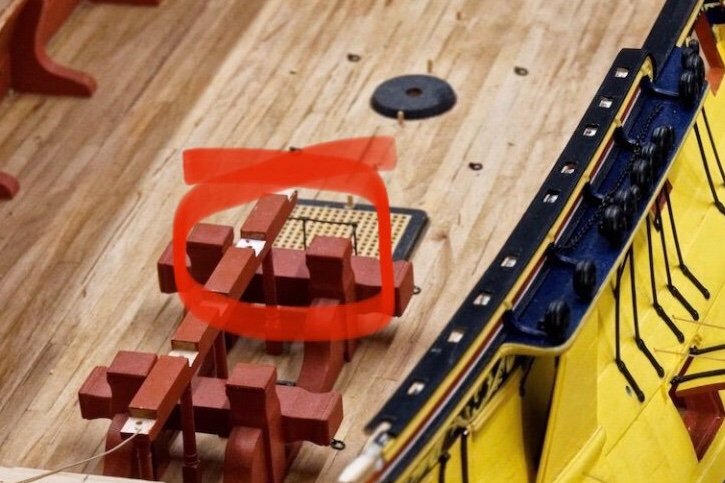
Hi Siggi, again wonderful work, I’m just in awe over this model. I just noticed in your last post that your aft FWD riding bit appears to potentially cover a portion of your FWD companionway. They reason why I ask is that I’m drafting Portland 1770 and I ran into this issues while utilizing the original drawings, I’m curious to know if you encounter this on Tiger and if so, do you move the bit or leave as designed? below is your model and the bitt appears to cover the companionway below you can see my 3D model of the bitt in question on Portland as well as the original draft also showing the error: JJ


-
That looks really good! Well on your way. Happy New Years! JJ
- 840 replies
-
- 4
-

-
- winchelsea
- Syren Ship Model Company
- (and 1 more)
-
That looks great Matt!! I do agree with Rusty, I think the 6mm one may be a bit small. Perhaps somewhere in between is where you want to be..
-
Very nice Chuck! What an achievement to produce a model of such extraordinary detail and quality and share it with us! I can’t wait to resume mine.
- 1,784 replies
-
- 1
-
-
- winchelsea
- Syren Ship Model Company
- (and 1 more)
-
Lookin great Chuck! Merry Christmas
- 1,784 replies
-
- 1
-
-
- winchelsea
- Syren Ship Model Company
- (and 1 more)
-
Excellent! Looking forward to this step!
- 1,784 replies
-
- 1
-
-
- winchelsea
- Syren Ship Model Company
- (and 1 more)
-
That looks good To my eye Frank. Your lowest strake should line up where it needs to be. Remember there are two strips of moulding that go on the lower counter and transition into the upper piece, I just accounted for those when placing the print in place.

-
My wales ended up right at the bottom of the lower counter.but as Ben described, i sanded mine too much and needed to fix using wood and filler.

-
Excellent work Frank, your slow and steady pace is really showing. Your model looks very crisp and clean and carefully put together. Well done. JJ
-
HMS Granado 1742 Kit - CAF Model - 1:48 Scale
scrubbyj427 replied to cafmodel's topic in Wood ship model kits
Awesome carvings Tom! What software are you sculpting with? -
See post 525 on chucks build log, he explains it. If you’re not there yet it will also be covered in the instructions:
- 399 replies
-
- 2
-

-
-
- winchelsea
- Syren Ship Model Company
- (and 1 more)
-
Remember all the laser etched moulding Chuck provided along the rails? They were intended to match the scrolls... there was plenty of extra... I didn’t even think about using them for the columns, clearly nobody else did either except Ben.
- 399 replies
-
- 2
-
-
- winchelsea
- Syren Ship Model Company
- (and 1 more)
-
That went right over my head when I was doing mine. I’m seriously contemplating going back and redoing those. That’s just the bees knees!
- 399 replies
-
- 1
-
-
- winchelsea
- Syren Ship Model Company
- (and 1 more)
-
It looks like you used laser etched moulding to cap your columns? Looks wonderful, what a great idea!
- 399 replies
-
- 4
-
-
- winchelsea
- Syren Ship Model Company
- (and 1 more)
-
What a stunning work of art! Well done!
-
HMS VICTORY 1765 by albert - 1/48
scrubbyj427 replied to albert's topic in - Build logs for subjects built 1751 - 1800
Beautiful work! -
That looks amazing! Very nicely done! JJ
-
I’m also onboard with the 1/4 scale, with the Winnie being my first 1/4 scale I’ve been converted. Will probably never go smaller than that ever again. A big 1/2” scale frigate or something along those lines sure looks tempting sometimes though. But Winnie has proved beyond a doubt that an amazing model can be produced at 1/4.
- 1,784 replies
-
- 2
-
-
- winchelsea
- Syren Ship Model Company
- (and 1 more)
-
That looks great Rusty! That’s such a rewarding part of the chapter to complete and complete well. I still just love how your Winnie looks with your choices of wood!
- 642 replies
-
- 2
-
-
- winchelsea
- Syren Ship Model Company
- (and 1 more)