DavidG
-
Posts
217 -
Joined
-
Last visited
Content Type
Profiles
Forums
Gallery
Events
Everything posted by DavidG
-
 you made a nice job so far. your planking looks really good. re the gunports, certainly the decision of yours, but let me share my experience. I build on Occre kit for many years. During the time I tried to raise the quality of my work, which many times resulted to take apart what I did and redo it properly. What I recognized, I usually spent excess time on planning before executing a change, because 1) I feel uncomfortable to deconstruct the model 2) I'm not sure what's the best way to do it 3) I'm uncertain if I can reach the results I want. I can't tell how much time I spent issues like this. Regardless, sooner or later I started to cut into the wood (or thread). And usually recognized, that actually doing stuff is not that difficult. Once started, I felt all previous uncertainty superfluous. It's just about cutting a new piece. Or glue a new plank. Simple steps. So, if you wish to build the Cruiser, than strip down the planks and adjust. It seems more frightening than it actually is. But whatever solution you choose, you will build a great model.
 -
a very nice model you are building, these Corel kits build into great looking ships. regarding the transom, I agree the casting doesn't fit the quality of your work. If the cast decoration piece is crisp enough, you may try to make a copy with a blue stuff and modeling clay and glue it over your wooden transom. there's a lot of how-to videos out there, make a search for blue stuff/oyumaru.
-
Hi Andrey, thank you for making and posting your videos. Over the time I went through them all, especially liked the ones on the rigging. I recognize the nice blocks you make. Do you file them individually? Or do you happen to have instruction on block making? best, David
-
good looking hull so far! use white glue for the second planking. I use small spots of CA after applying the wood glue to hold the plank in place until the glue dries. push pins, rubber bands also can help.
-
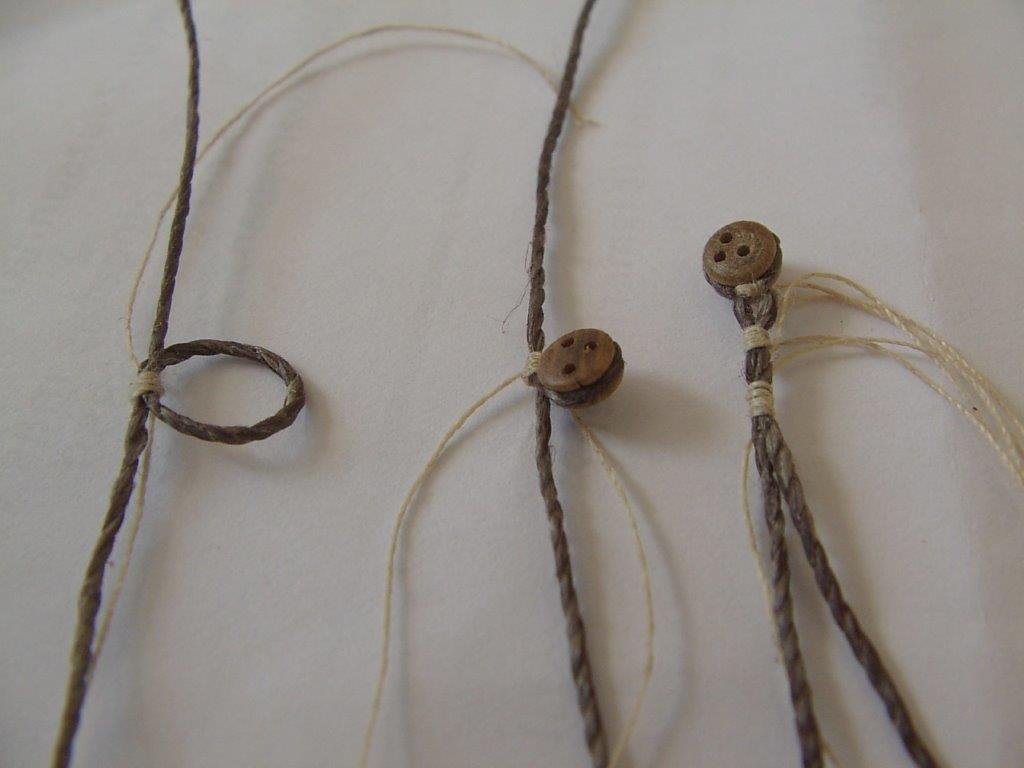
if it helps, this is how I do it: first, prepare one end of the shroud: make an empty loop by the end of it. use the thinnest thread from your kit for this. once the loop is done, insert a deadeye and pull it tight. then add the two seizing above (you can finish it by brushing on diluted glue). then, find an approximate position of the deadeye on the other end. this don't need to be exact. make an empty loop and leave it as is, for now. Then place the pair of shrouds on the model, and use a wire spacer to temporarily fix the rigged end. by sliding the empty loop on the other end, find the proper position for the other deadeye. insert a deadeye, pull it tight. Finally add the two seizings. For the last step, you may wish to remove the shroud from the model to make finishing more convenient, or use some made up device as below (I know it's not looking great): i hope it helps.
-
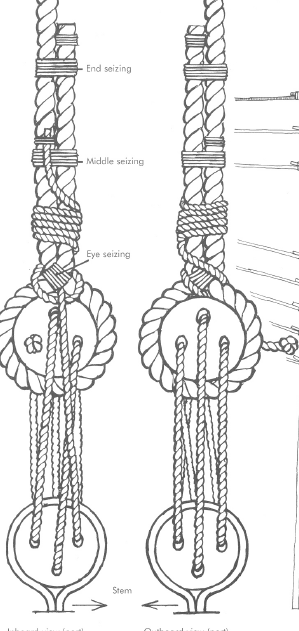
dealing with the same stage on my model, I follow the below diagram for attaching the deadeyes. The line crosses itself right above the deadeye (called a throat seizing). The beauty of the thing is, once this seizing is done, you can slide it to the correct position in the vertical plane and insert the deadeye when the position of the loop is spot on. I also share your struggle regarding the catharpins. Some modelers make it from wire (sufficiently painted). I haven't tried it, but there might be some advantages. You may also consider using thinner lines for both the futtock shrouds and the shroud seizing above the deadeyes. the model looks great, keep on the good work.
-
thanks to everyone responding to the question. as Druxey says, lateral clearance might be the key. I will follow this practice, actually I think it's the easier route. thanks again.
-
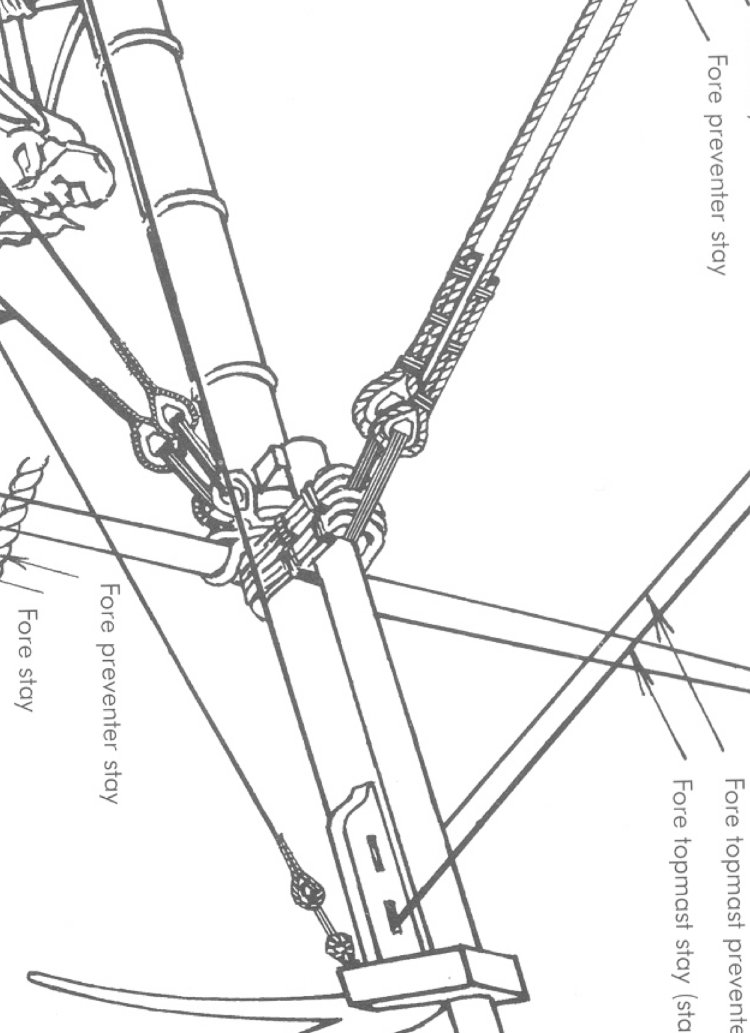
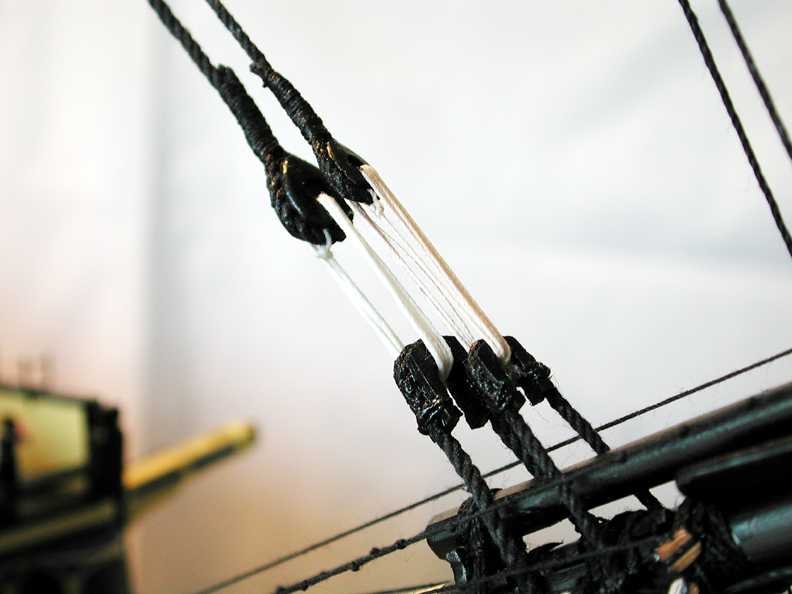
I'm in the stage to rig the stays on my model with pairs of heart blocks and getting a bit confused on the purpose of the open heart. Petersson show this in his rigging book: the legs of the block are around the jibboom and the blocks sit on top of them. This makes sense, and justifies the purpose of the open heart block design. this picture is from the Jotika website, showing the open heart blocks rigged in the air. This is the way, how the Swan rigging book shows them as well. And most of the ships I see built. But what's the point in using an open block rigged hanging in the air, if they are purposely designed to spread around the top of the mast? The Petersson way make more sense to me. But there must be a reason, why it is not seen on the models. Maybe someone can help. thank you
-
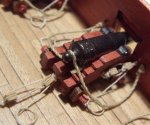
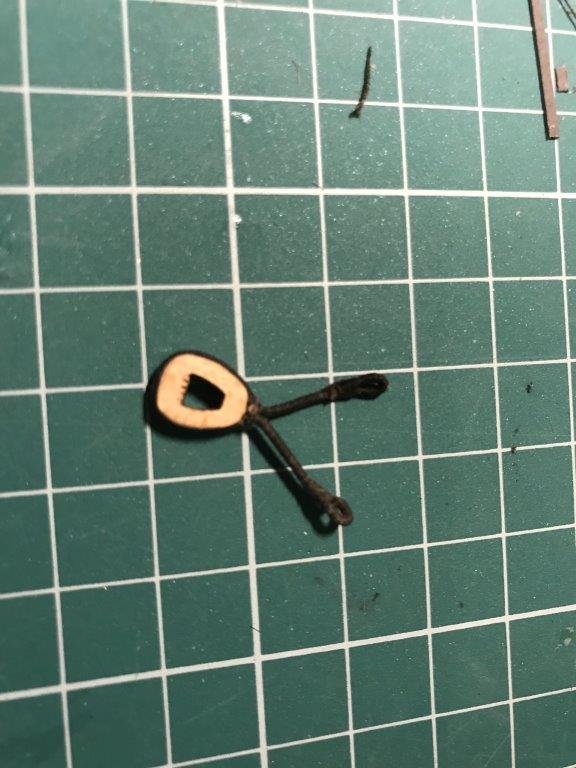
in similar situation, I used the poor man's kit for blackening: a torch and a jar of used cooking oil. If you heat up your brass piece and dip in oil, it will be dark. Regular oil makes it dark brown, it said, used motor oil will make it black. The poor picture shows my result with cooking oil. It's not black but dark brown, which is acceptable for my purposes. I don't think it works with larger pieces but for small items may be OK.

-
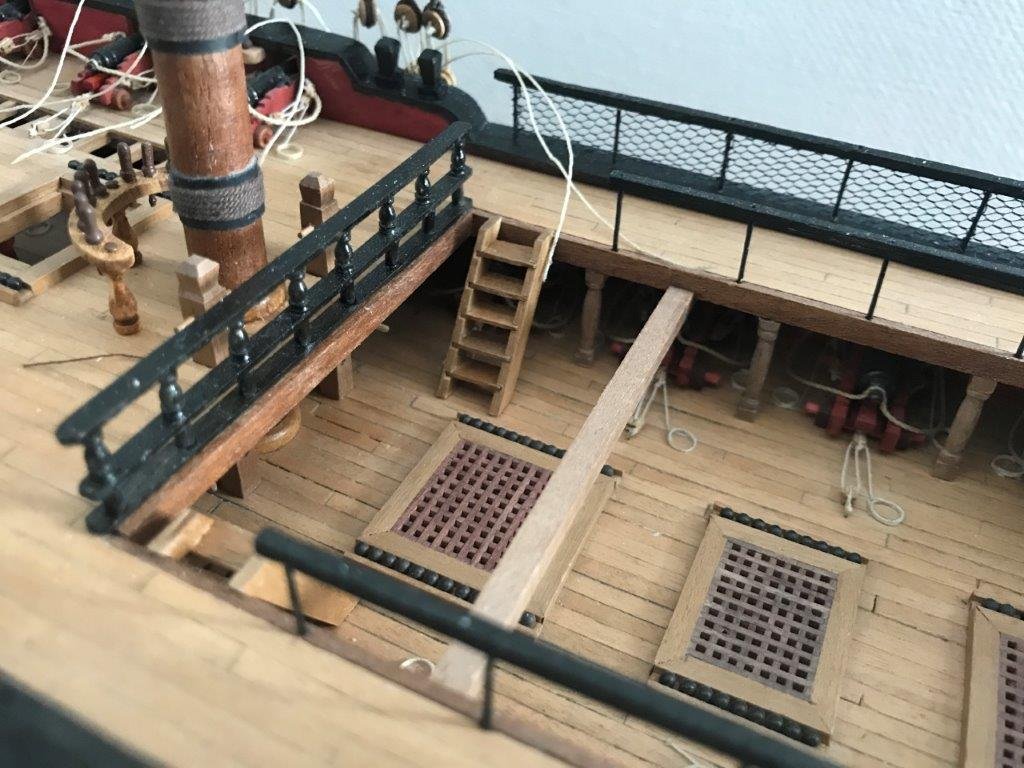
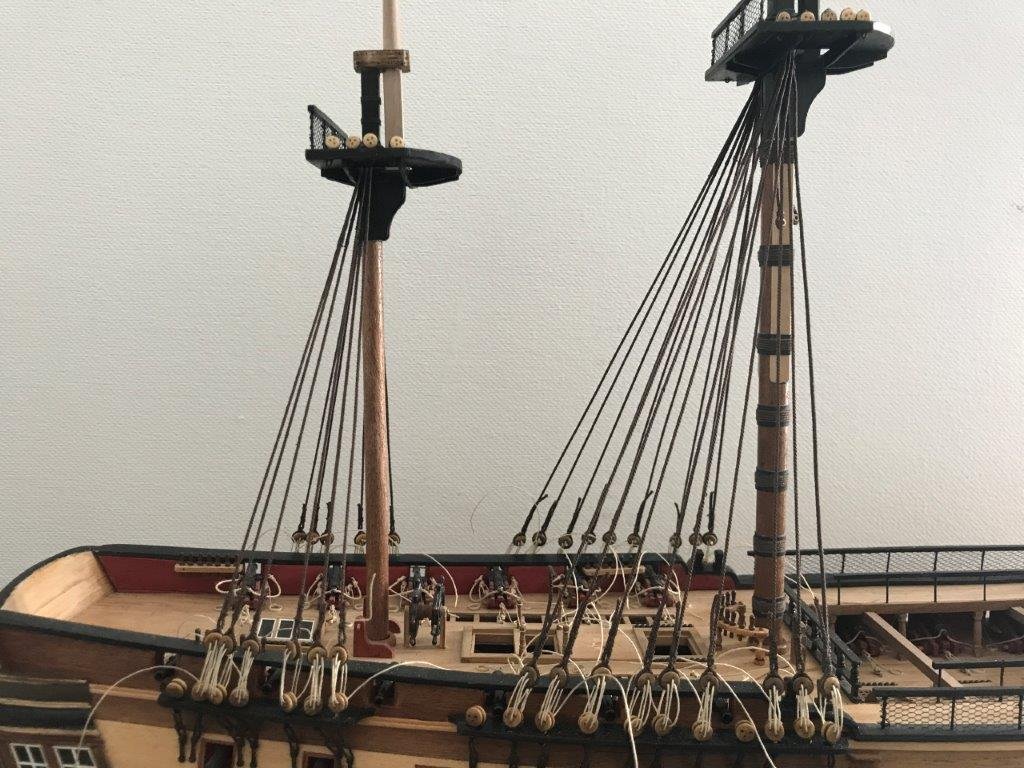
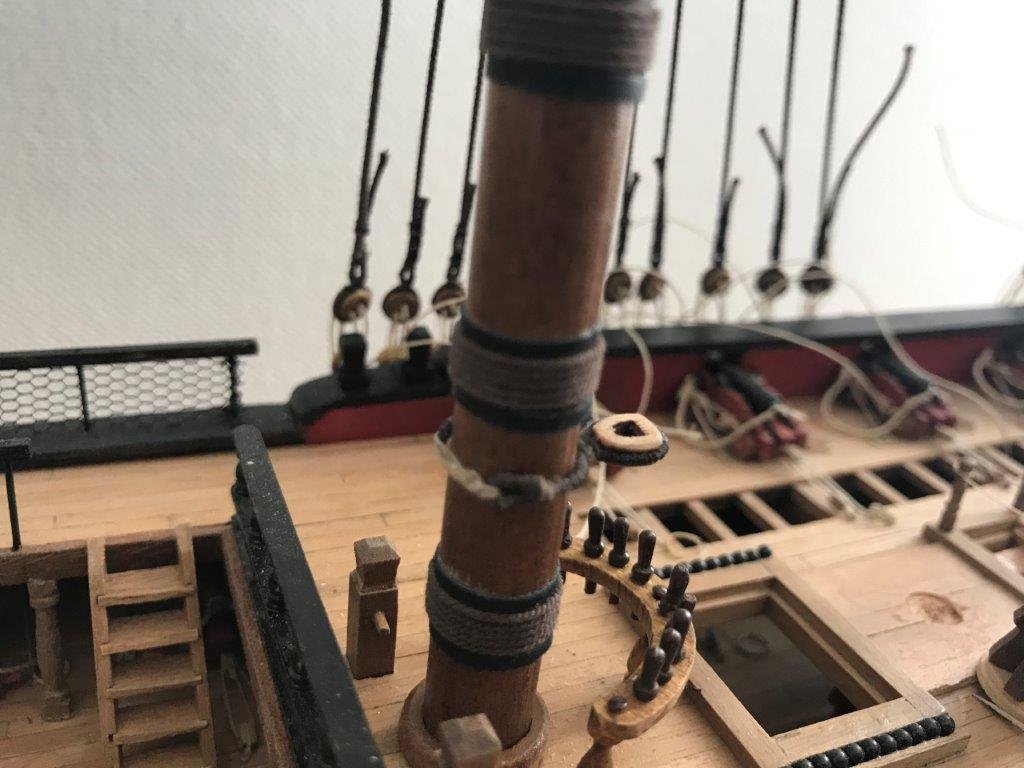
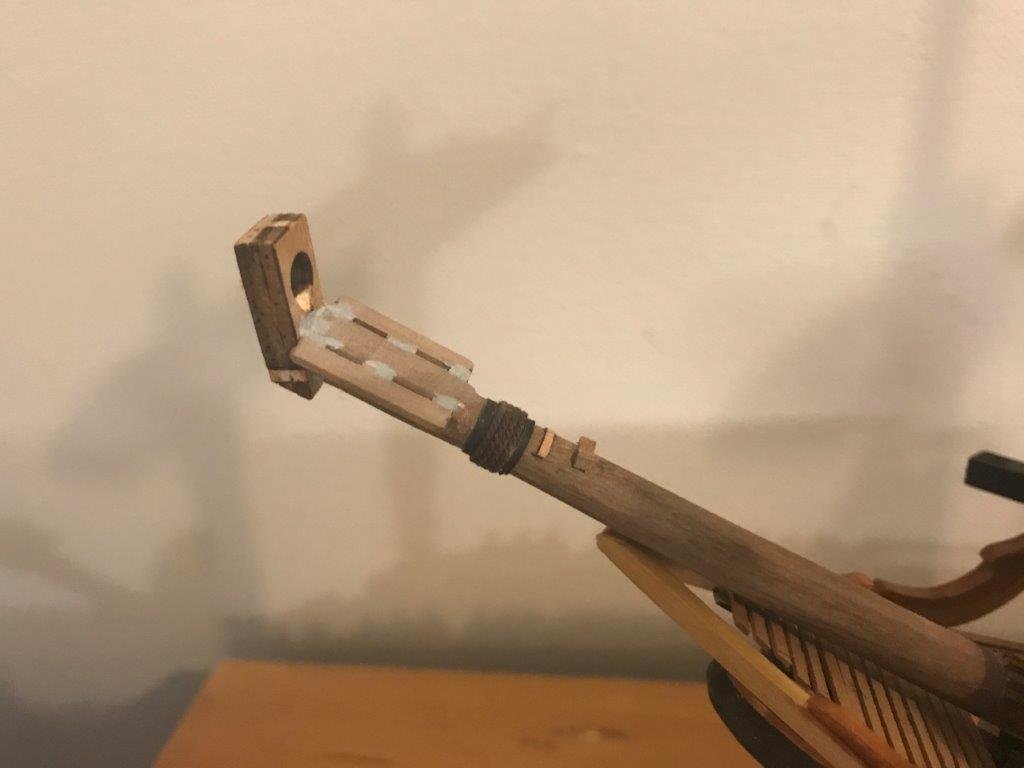
slowly the model is getting to the rigging stage. I will use it as a learning opportunity, and try out new things I haven't done before. Like serving lines (I'm getting better in it..) and making a rigging plan. The kit instruction is not much a of help, and decided I'm not going to use it (except for tracking belaying points maybe), the books of L.Peterson and Mr. Antscherl are here to help. I also recognize, the construction of my model has limitations, like the rather small scale, the initial kit design, and my modifications, which were or were not properly planned. Building without a set of plans is a new experience anyway, so let's try. Some last pieces to be fitted to the deck before it's too late, here a railing fitted front of the main mast. I also took out the bits made by the kit plan and replaced them. I rigged the mizzen shrouds first, to establish my working sequence, followed by the ones on the main mast. This time I installed burton pendants, although only one pair, due to lack of space. Lack of space became appearent by counting of deadeyes - when installing the channels, I reduced their number to be able to install proper links below, now I have to live with single backstays instead of two pairs per side. Preparing to making the stays, I installed the mizzen stay collar. I made these following the Swan books, eyes on both ends, held together by a lashing (the picture is of the fore preventer stay, but works the same logic) And installed on the mast. The lashing is less than tidy, and if I gain some more experience doing them maybe replace it. Before I start the fore shrouds, wanted to make some progress with the bowsprit. I had a lot of issues with it, partly coming from the longer than expected head rails but also because the kit is designed with a different rigging scheme in mind which I plan to execute. The picture below is it's current state - I wanted to install the wooldings , but they have to go. I need to make space for the bobstay collar to clear the figurehead, even I will make the bowsprit longer by 3 cm. The bees and cap to be painted black later. Next tasks to come: - bowsprit collars (6) - main stay collar (kit shows this rigged to the bowsprit, but sources indicate it passes a hole in the head) - bowsprit rigging (bobstays, bs shoruds) - fore shrouds - then all the stays (5). After it, I can move to the topmasts. I'm sure it will take a while..
-
Hi Simon, I'm interested in buying the machine. You don't have to send it too far best, David
-
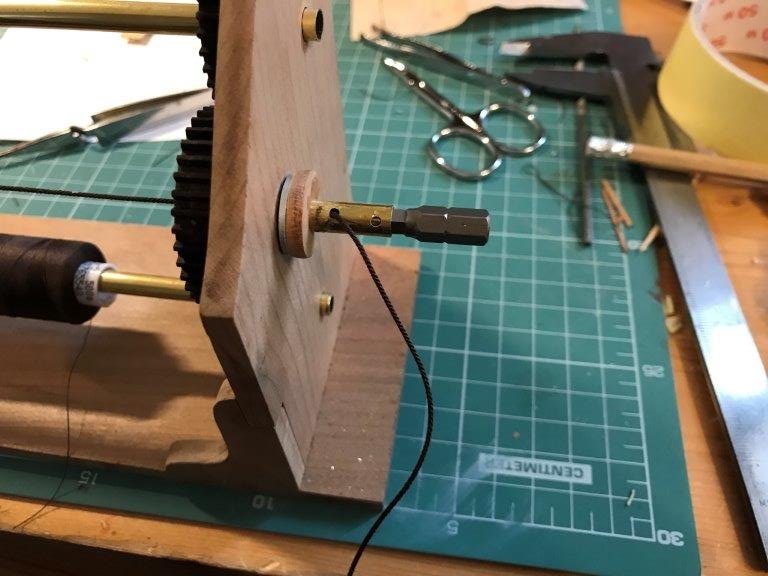
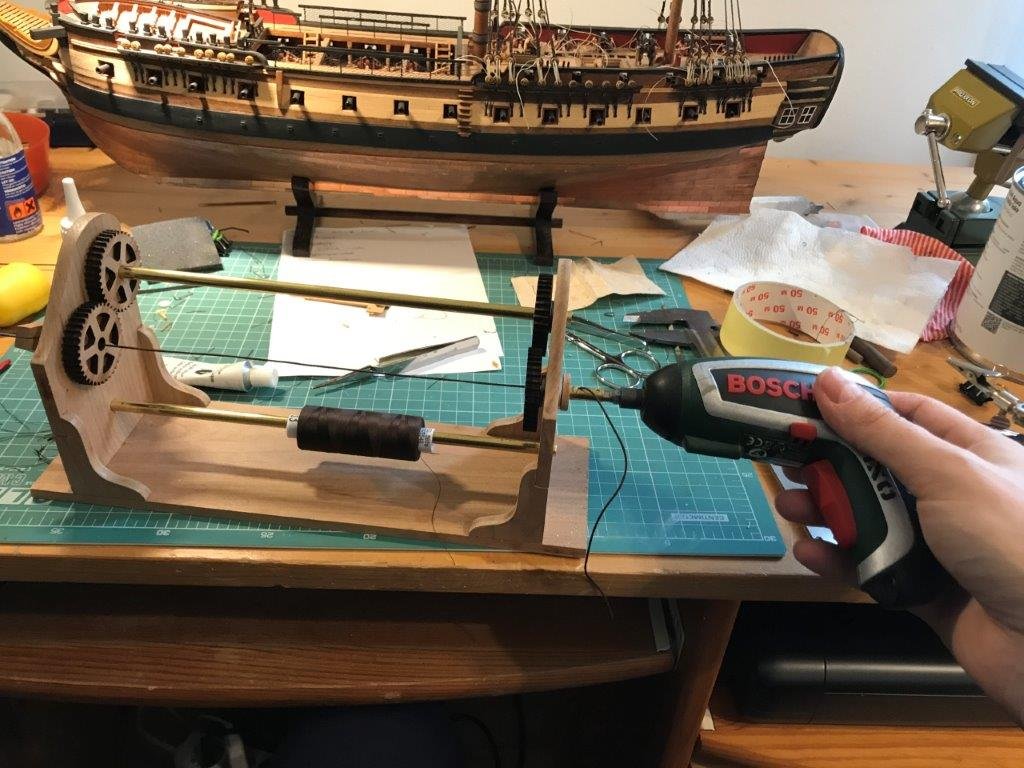
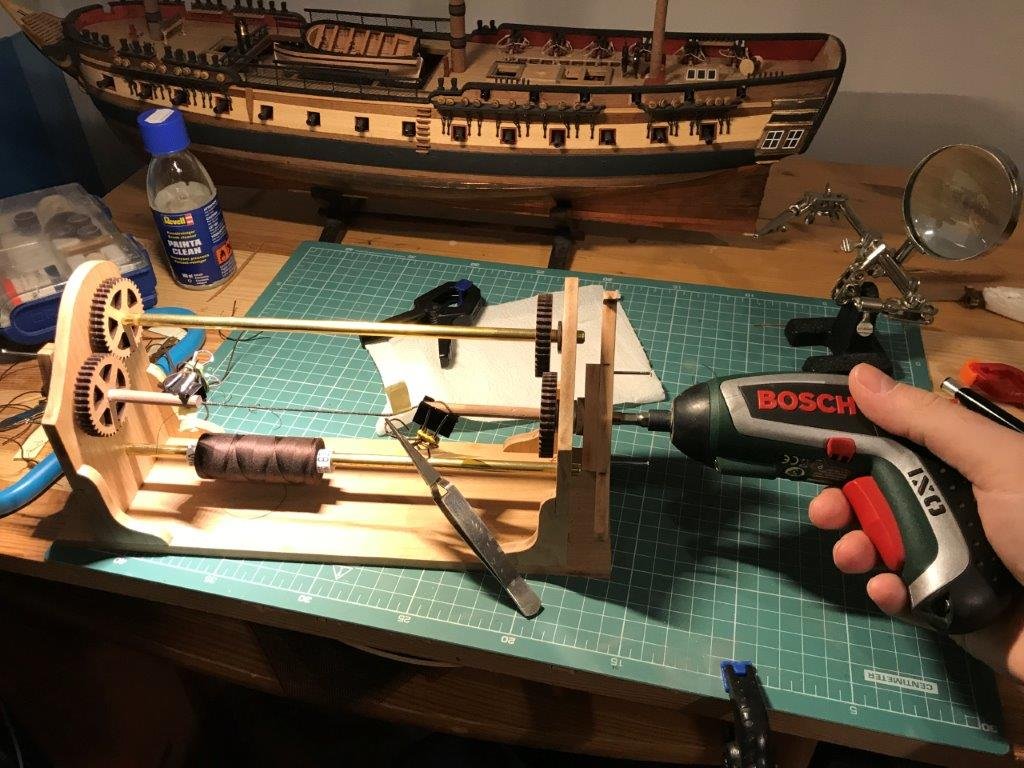
I use a handheld screwdriver to drive the serving tool. This is way slower than a standard cordless drill, and fits very well for the purpose. A 5 mm hexagonal head fits tightly to the brass tube. I removed the handle, this allowed a hole to be drilled and lead the thread out. I think the pictures make it clear.
- 11 replies
-
- 8
-

-
- block seizing serving
- serv-o-matic
- (and 1 more)
-
https://www.cornwallmodelboats.co.uk/acatalog/ship_fittings.html Hi Helge, Cornwall Model Boats sells a wide range of fittings.
-
Some builders use CA for their second planking, but there are strong arguments against it. Stains are difficult to impossible to remove (less concern if you paint it) and your are exposed to glue flumes for very long time planking such a big hull, not good for you. What works for me the best, is to apply white glue to the whole plank, also brush it to the edges, then use small spots of CA gel at the ends and each 5-10 cm along the plank to hold it in place while the glue sets. Office clips, clamps, rubber bands, supports pinned to the still unplanked first layer are also help to keep your plank in place.
-
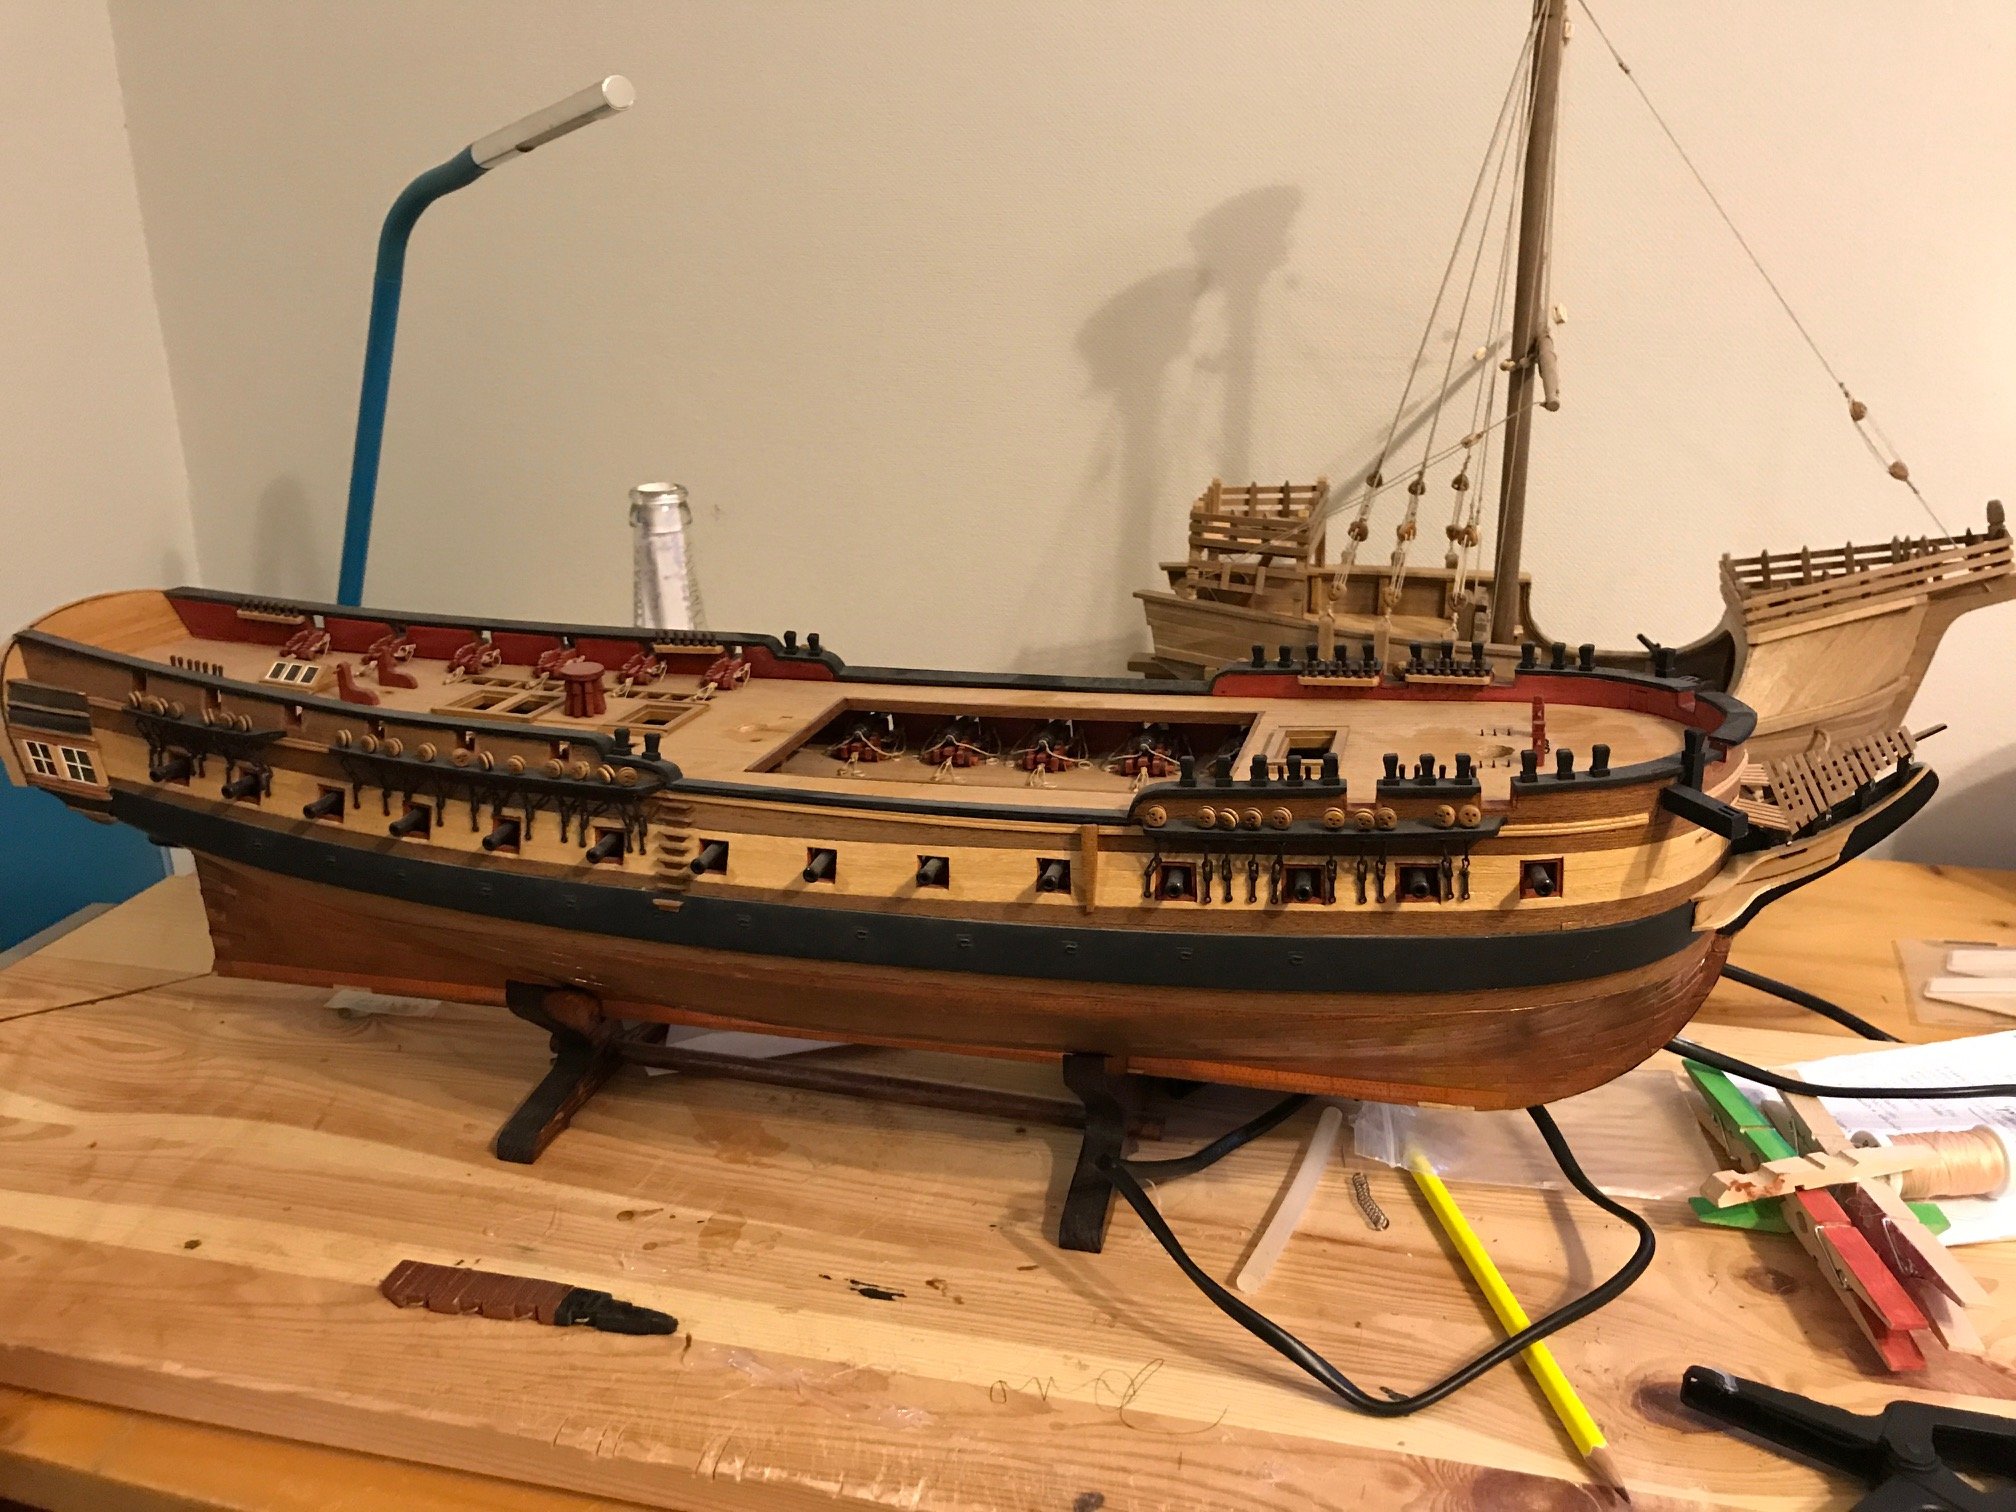
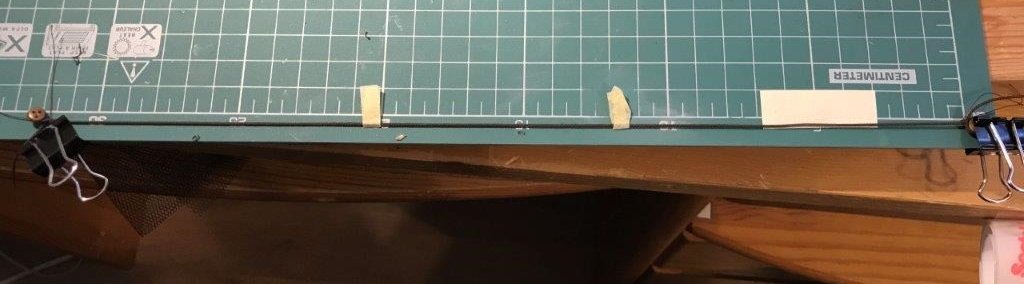
the build log catches up to the present. As the hull is almost ready, I started to do some preparation for rigging. I still don't know which rigging plan I will use, I have several sources as the Petersen book, Swan class book, kit instruction, other build logs of frigates, etc. I'm not going for historical accuracy (especially for this ship, which is not specific to any source) but see it as a learning opportunity, and most probably I will investigate each feature separately during the work. I rigged ship models before, but now I will try to advance the quality of my work. As a start, I decided to use quality rigging supplies; I was able to find a local source for high quality rigging thread, and purchased Master Korabel and Syren blocks. I also try my hand at serving lines, which I haven't done before, I will use the Syren tool for this. This post about is my experiments with serving shrouds. The mizzen mast has the least number of them, let's start with these. According to sources, the middle 1/4 of the shroud must be served. I thought it's easy: tried to measure the length of the shroud, served it with thin line then rigged the deadeyes just to see, my initial measurement was way off, and the end of the serving on the pairs was not paralel. I need to find a way to establish the proper length of the shroud before serving, so I set them up temporarily, and used wire spacers to rig the deadeyes at both end (I made a throat seizing for this). Having the - hopefully - proper length, I can measure the middle 1/4, and mark it with masking tape: then it can go to the serving tool. I had to recognize, now having the deadeyes at both ends, I can no longer fit the thread through the rods and had to insert dowels to the inside of the gears. This is fiddly job, but allowed me to drive the serving tool with a handheld screwdriver, as a 5 mm hexagonal head perfectly fits to the inside of the axles. This tool is pretty slow, maybe the same speed an experienced user achieves by hand, but provides uniform speed. Being a beginner in this trade, I'm not completely satisfied with the quality if my serving yet. For the most part it is very smooth and even, but I have issues at the start, where the line simply doesn't want to lay evenly. Unfortunately this is the most visible part of the serving. I have to experiment more with the proper angle or speed - nevertheless, there are several shroud pairs ahead of me to gain experience. This is the current state of the experiments. I will rig the seizings above the deadeyes first, then check on the model how it came out. I see this whole process is a bit complicated vs the way I rigged shrouds in the past (without serving). I'm open to any better idea.

-
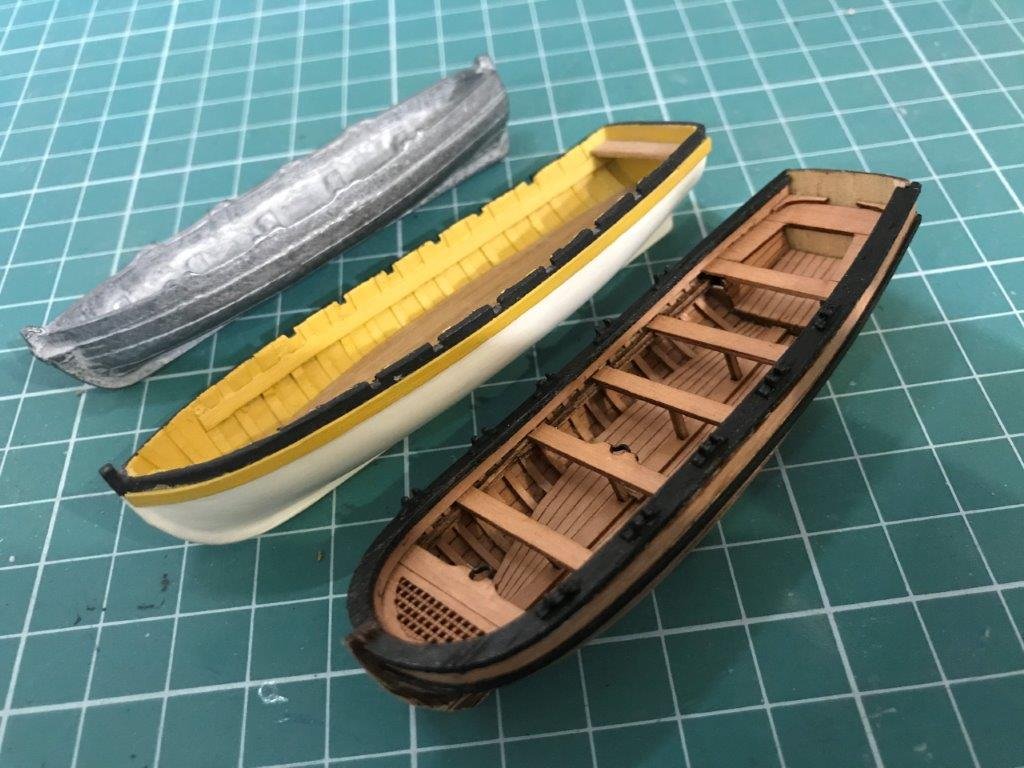
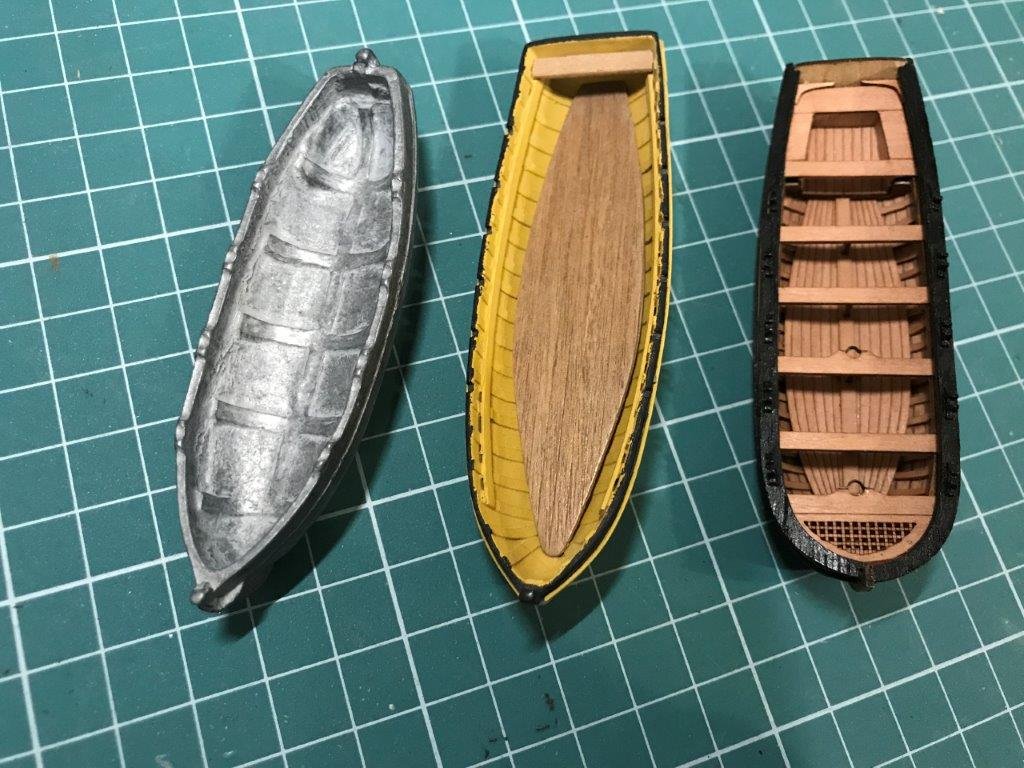
getting close to finishing the work on the hull, it was time to think on the boats. I was not a big fan of the supplied castings (left one). It is not excluded, they could be finished to a reasonable standard, but it would involve adjust the hull shape, plank it, sand away the inner frames, make a capping rail to hide the excess wall thickness etc. By the time it requires, I can make a better one, so chose to replace pretty early. Back in the years (~2010) I found the Caldercraft resin kits are the best ones out there from the rather limited selection (middle one). Good hull shape, sufficient detail, and decided to build one. This one is still unfinished, as it had to be painted, and I realized it wouldn't look right on a natural wood model. I might use it for some future project, but put it aside for now. Finally I found a Master Korabel 95mm boat kit, which is just the right size, color and detail (right one). The kit features some sophisticated engineering and hyper precise laser cut parts, which still didn't prevent me to misunderstand the assembly sequence and glued the frames to the plywood core, expected to be removed later. At the end I had to grind away the plywood plug, but surprisingly the boat itself remained intact and I was able to finish it. The precut planking makes building very convenient, my only concern is the visible plank joints due to burned edges - it is a matter of taste, I like my planking to be smooth. The boats fits to the model pretty well - which also means, I covered the last visible parts of the gun deck There is not much work left on the hull. I have to make some cosmetic improvements, install some cleats (yet to make them) and start rigging.
-
nice looking build so far. I love this ship, would be nice to see more of the build.
-
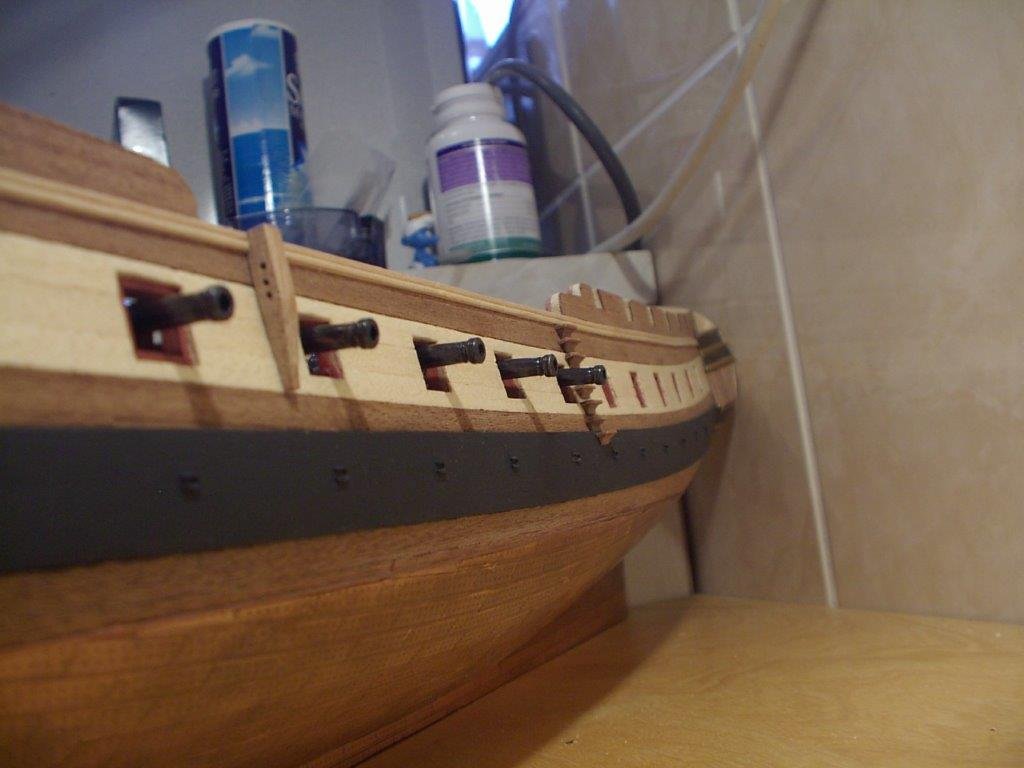
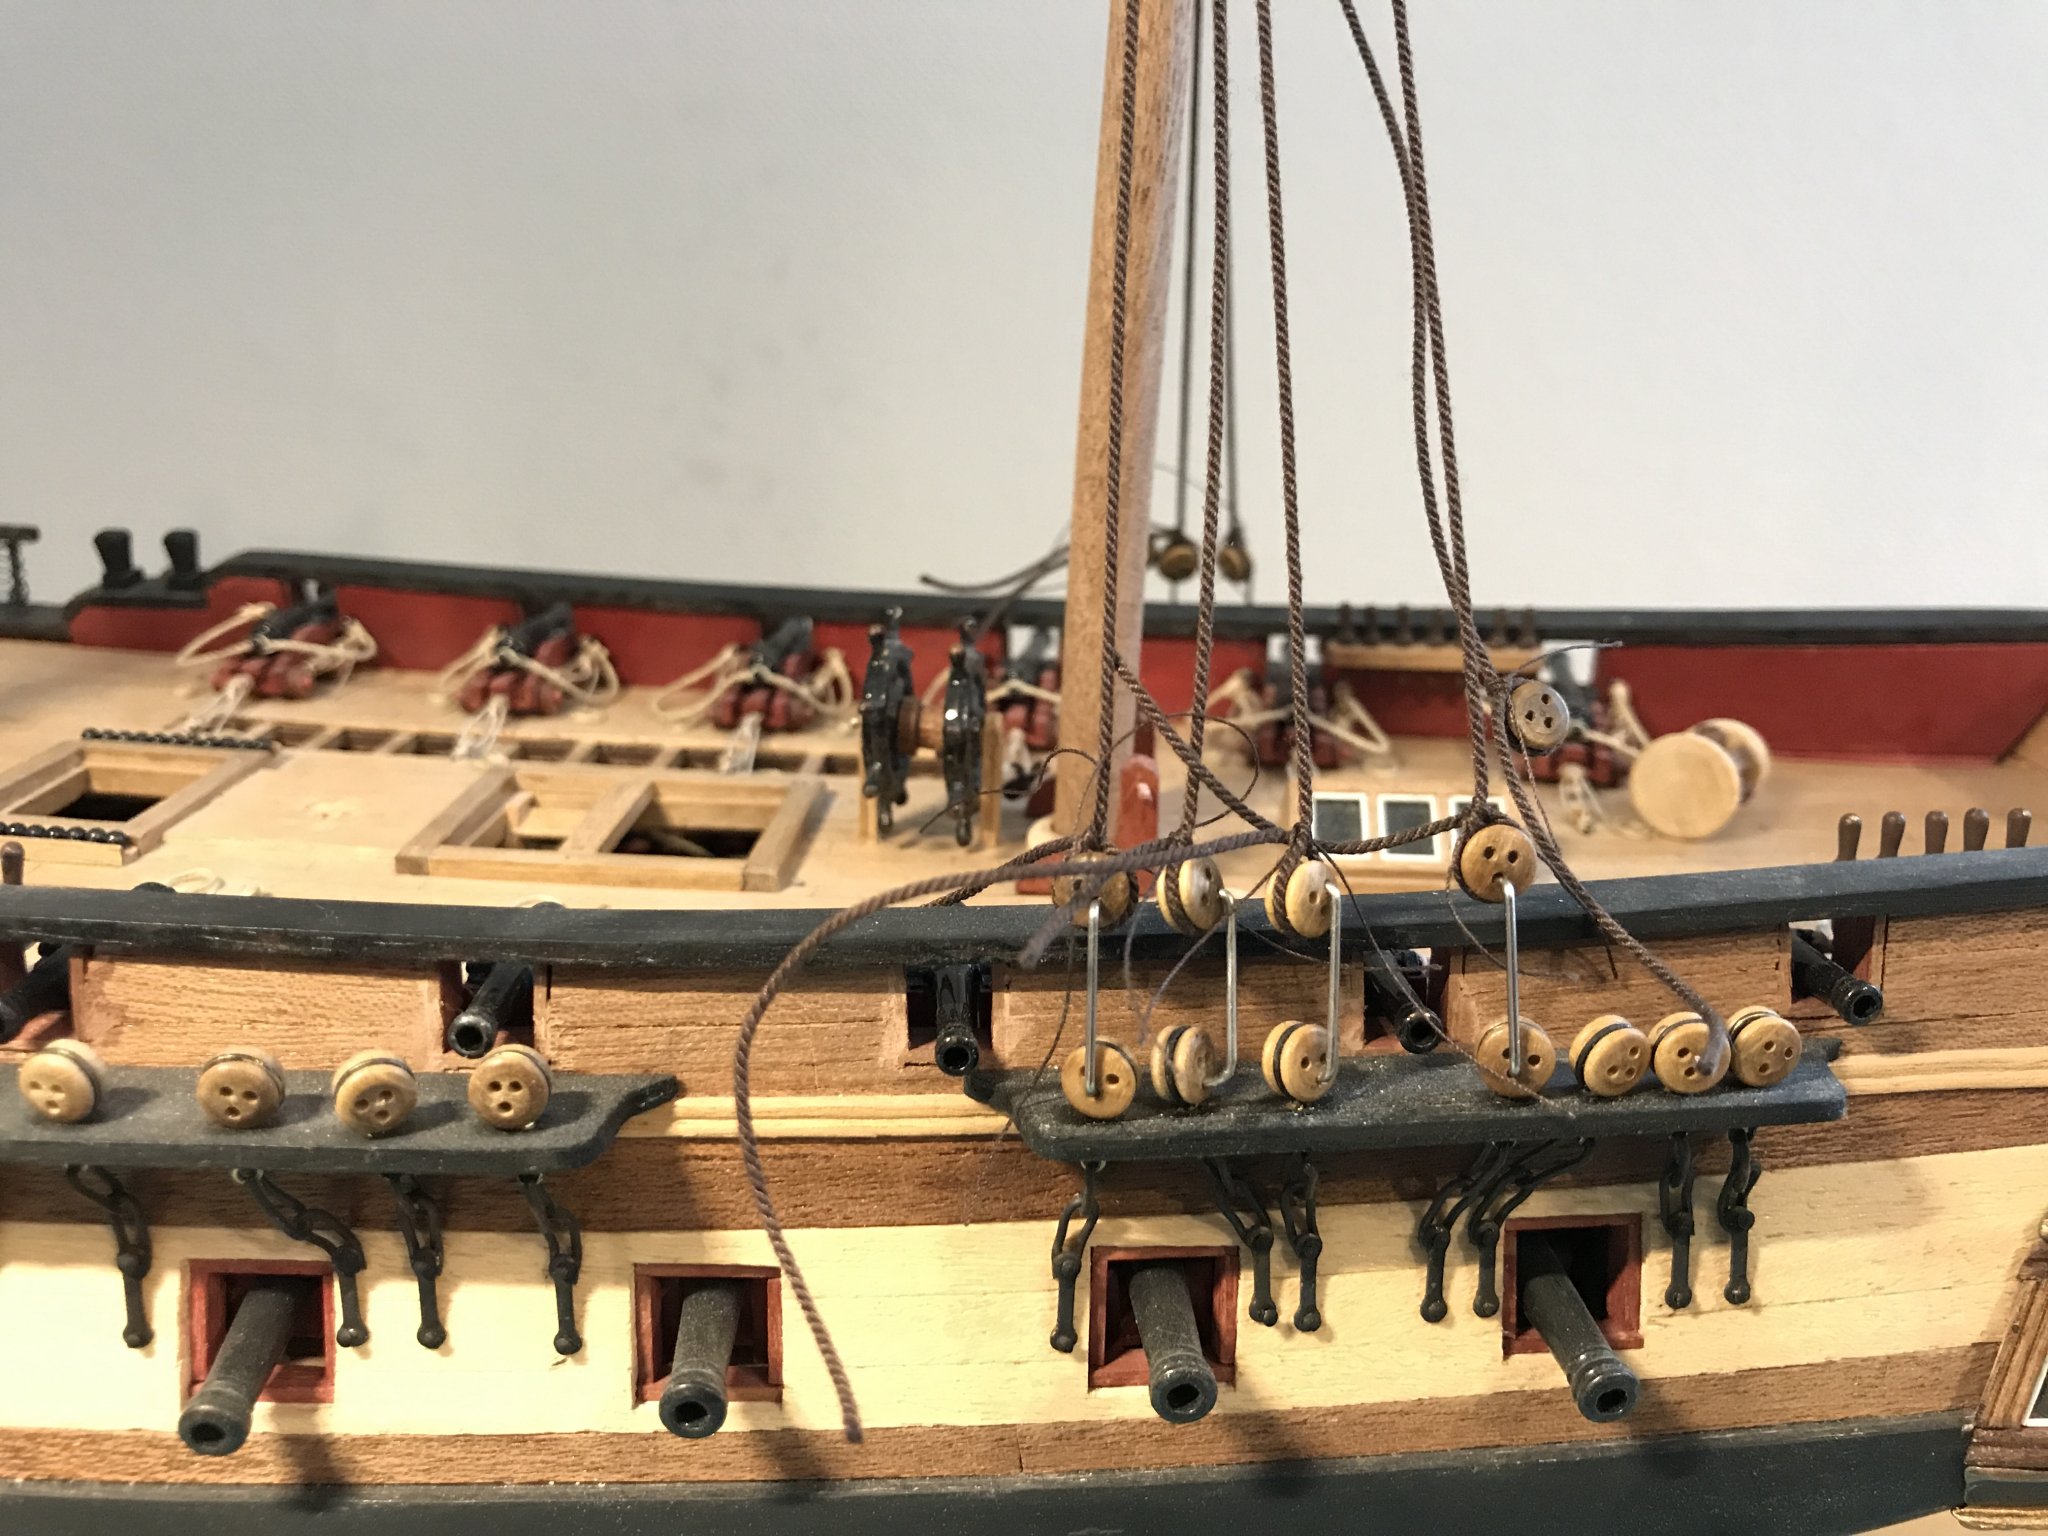
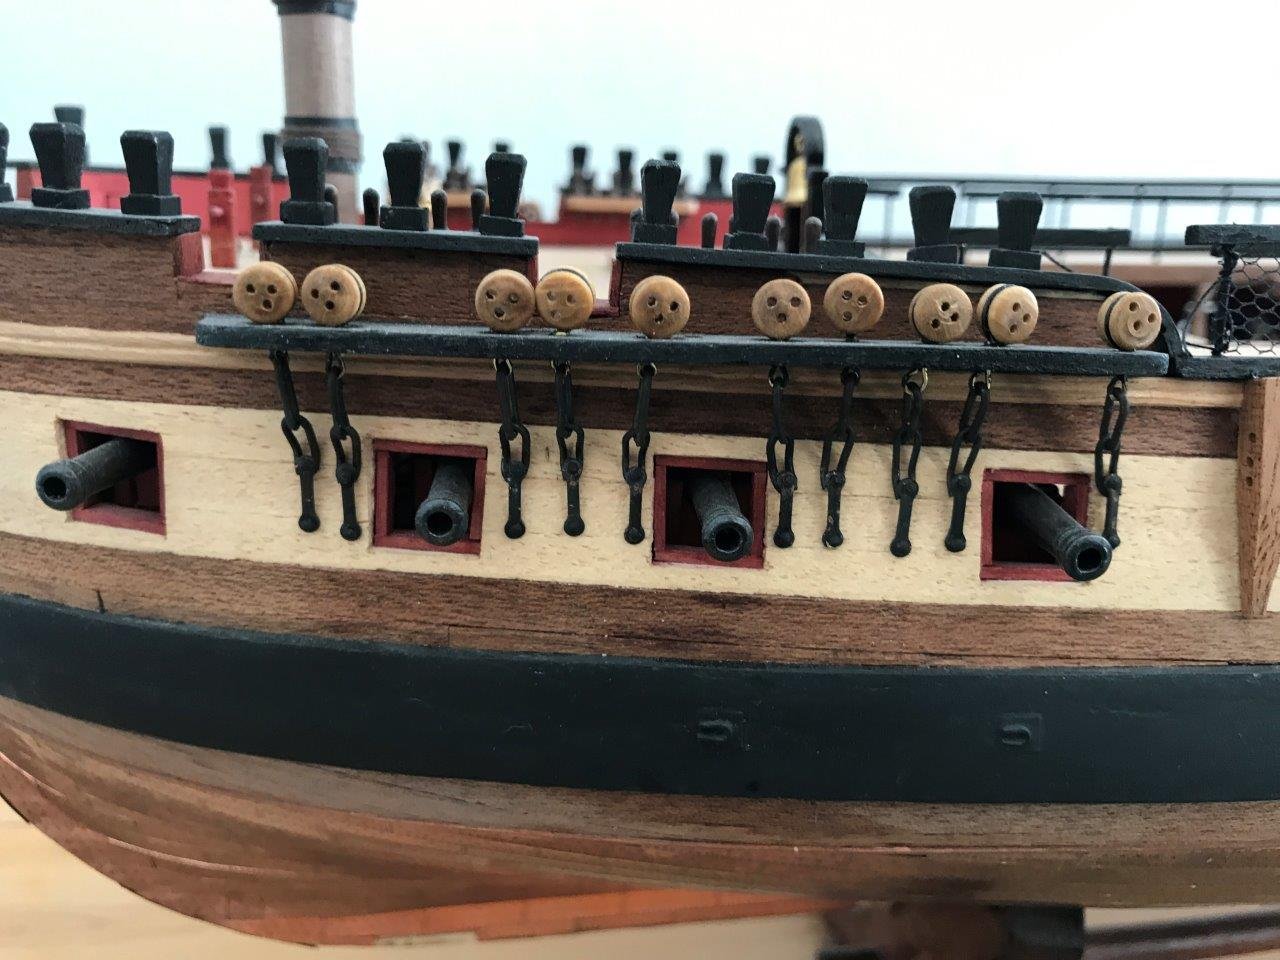
chainplates next. I used the kit channel parts, reinforced by pins, painted black. The kit offers an easy solution for the chainplates by the use of wire, hooked into a pin, the issue of having the gunports in the way is bypassed by simply omitting the problematic ones. As much I wanted to make it a little bit more correct, there is no solution for the setting the correct angle due to the placement of the ports above and below. That's why I settled on the perpendicular arrangement, when it was possible (but had to make some compromise on the main mast). I used 5mm deadeyes, stropped by wire, soldered the links and installed the lower links, which are from my leftover parts box. These are fastened by two nails, cut to length and glued in. The kit supplies nice 3mm boxwood deadeyes, which I will use on the mast tops.
-
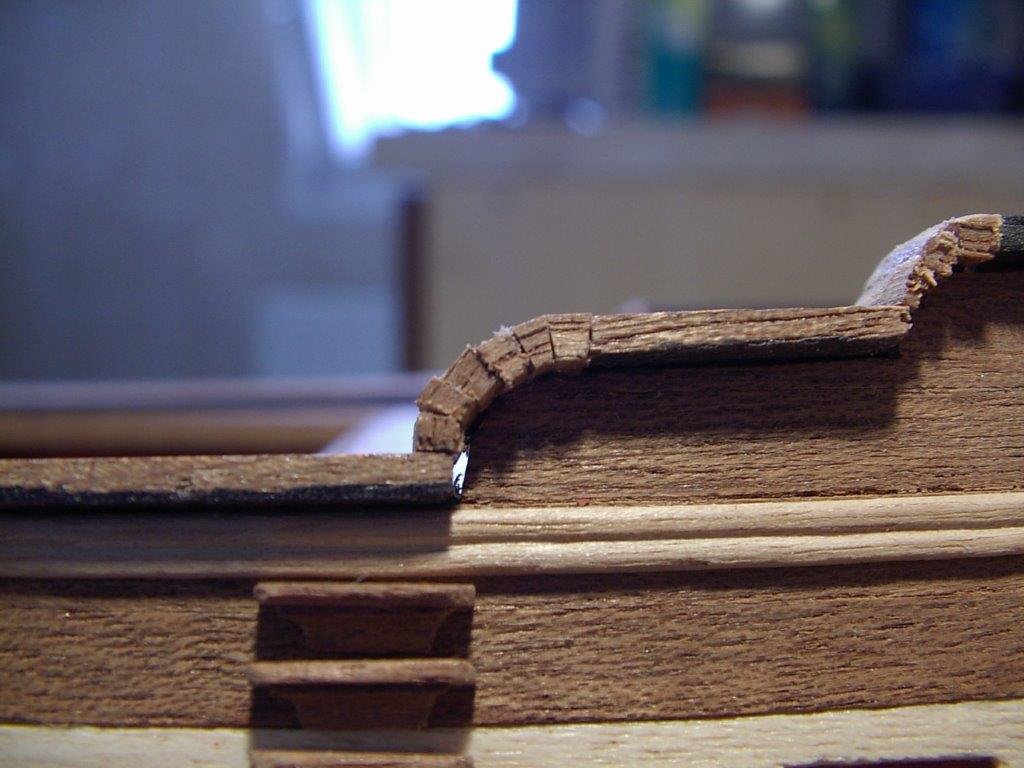
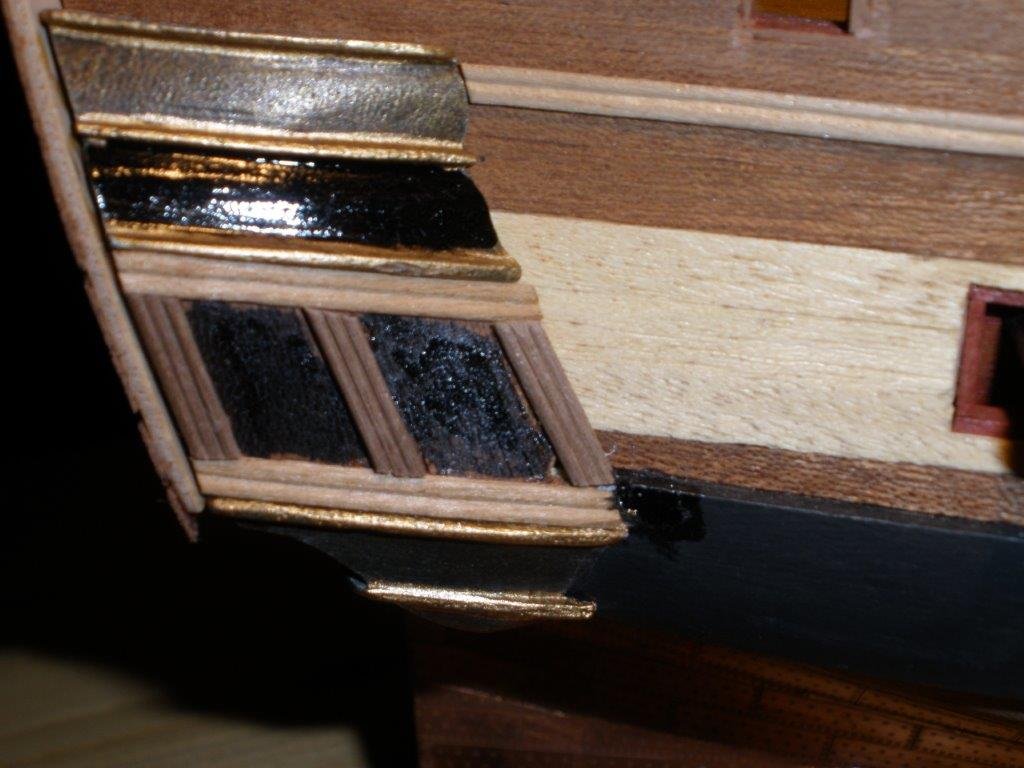
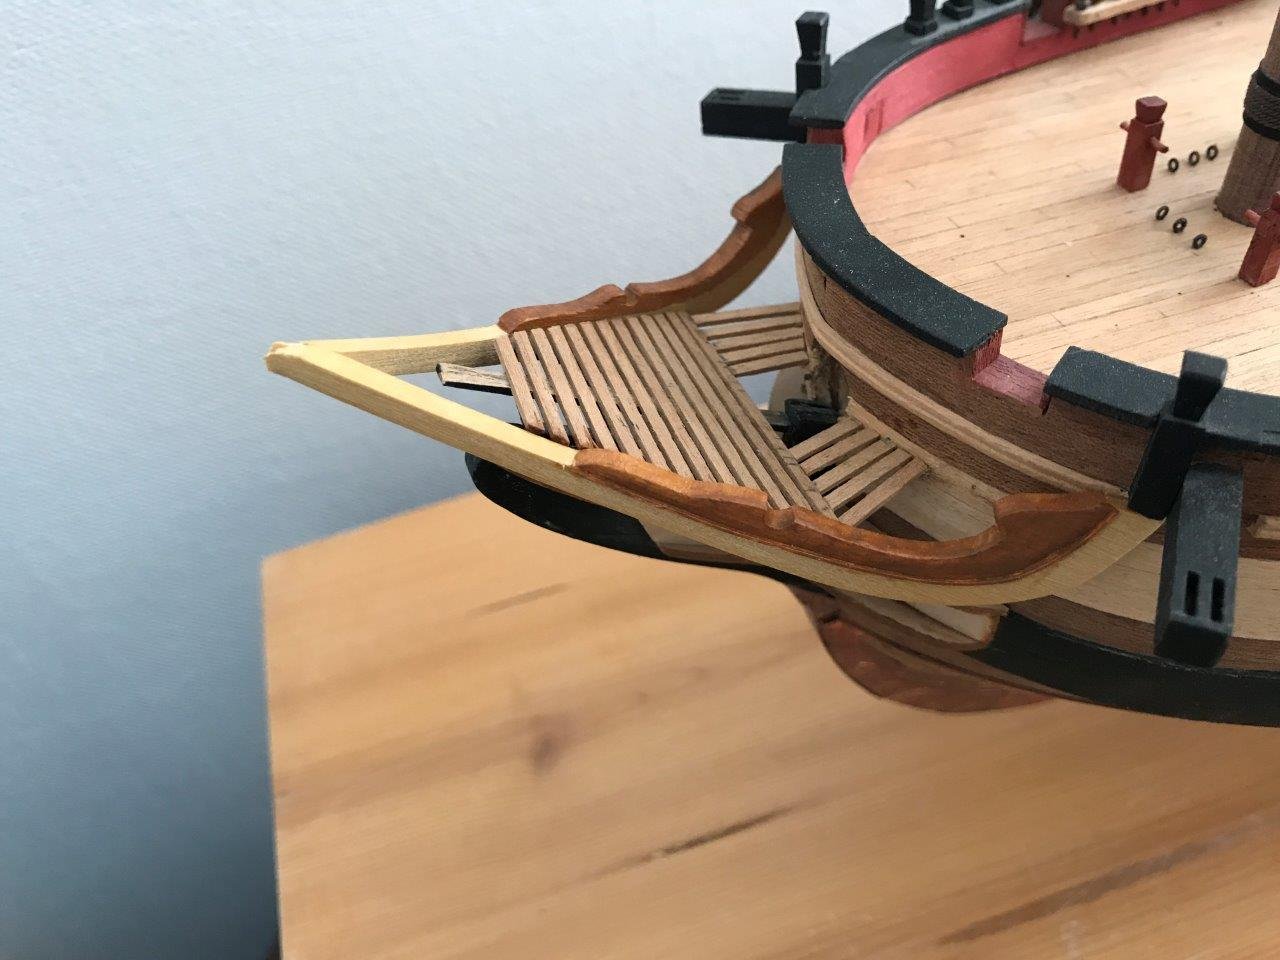
..and the most difficult part, the headrail. The kit provides a straightforward approach to build it, and I saw several examples where builders made it as suggested and came out fine. Not for me. The rail pieces was simply too short, probably due to my modifications. When I remade them in correct sizes, they met at the wrong angle. I had so many failures on this part, I gave up the experiments and didn't touch it for several years. Then following a more or less successful card template, I cut it from 3mm solid wood; I always thought the kit piece is too thin anyway. I had to use boxwood sheet for this, as the walnut ones split along the grain. There is a decorative element, supposed to be glued on top, which I didn't made separately and cut the whole thing from one piece. Finally, when the rails were in place and I inserted the bowsprit, I realized the tip is off center. So took them apart last time, adjusted the angle of the brackets, and finally painted the decorative part brown. Wasn't able to paint a sharp line, and used a thin styrene strip to define the edge. still need to add a lower rail and build up the forward grating , but happy to be over this part. I have to figure out, how the gammoning will the cross the bow platform.
-
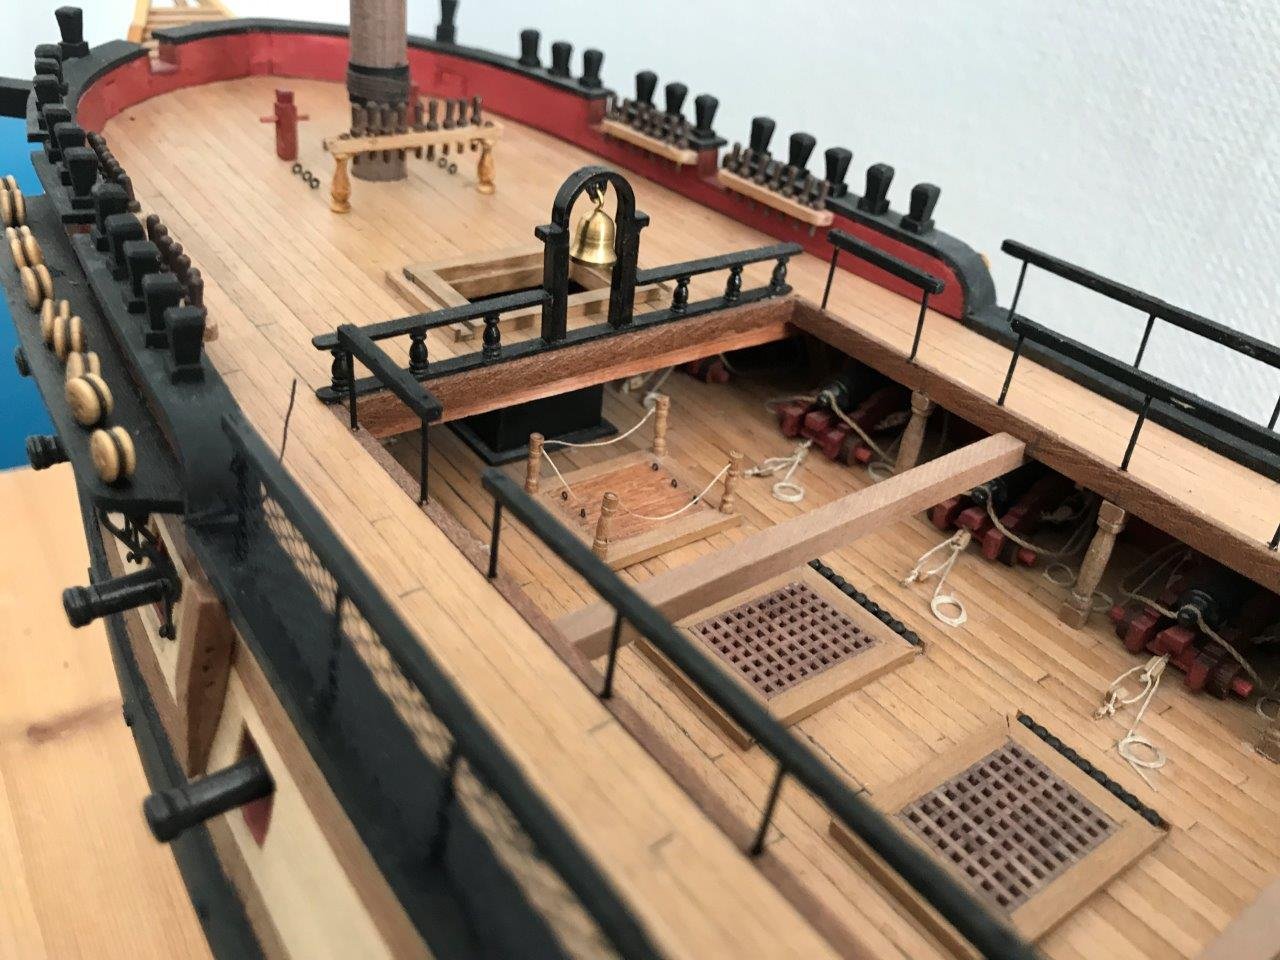
this is the fore section of the upper deck. I used the cast belfry kit piece, but remade the rail around it. Also, made some columns for the gangway supports and added the skid beams from below as I saw on several models, opposed to gluing it from the top, as the plan suggests.
-
The Victory is for the experienced builder indeed. Having built a Corel model before, I don't think the written instructions are much of help, neither I believe there is an update, as these are pretty old kits. Corel kits are share the same design principles though, and you can find several examples on this site. I recommend going through the great Belllona log, which shows quality work and very detailed: The Corel Victory is a popular subject, and I saw great models built from it. Start a build log here, and ask, if you have questions. Support of fellow builders will be much more help than any instruction book you find. Good luck for your build.
-
Bench Top 5" Disk Sander
DavidG replied to DocBlake's topic in Modeling tools and Workshop Equipment
I saw a test somewhere, where a speed regulator was used to control a fix speed disk sander, and while it worked to lower the speed, it took away so much torque, the tool became useless. I know the Brynes one is a powerful machine, so it might not apply, but the impact will be probably there. -
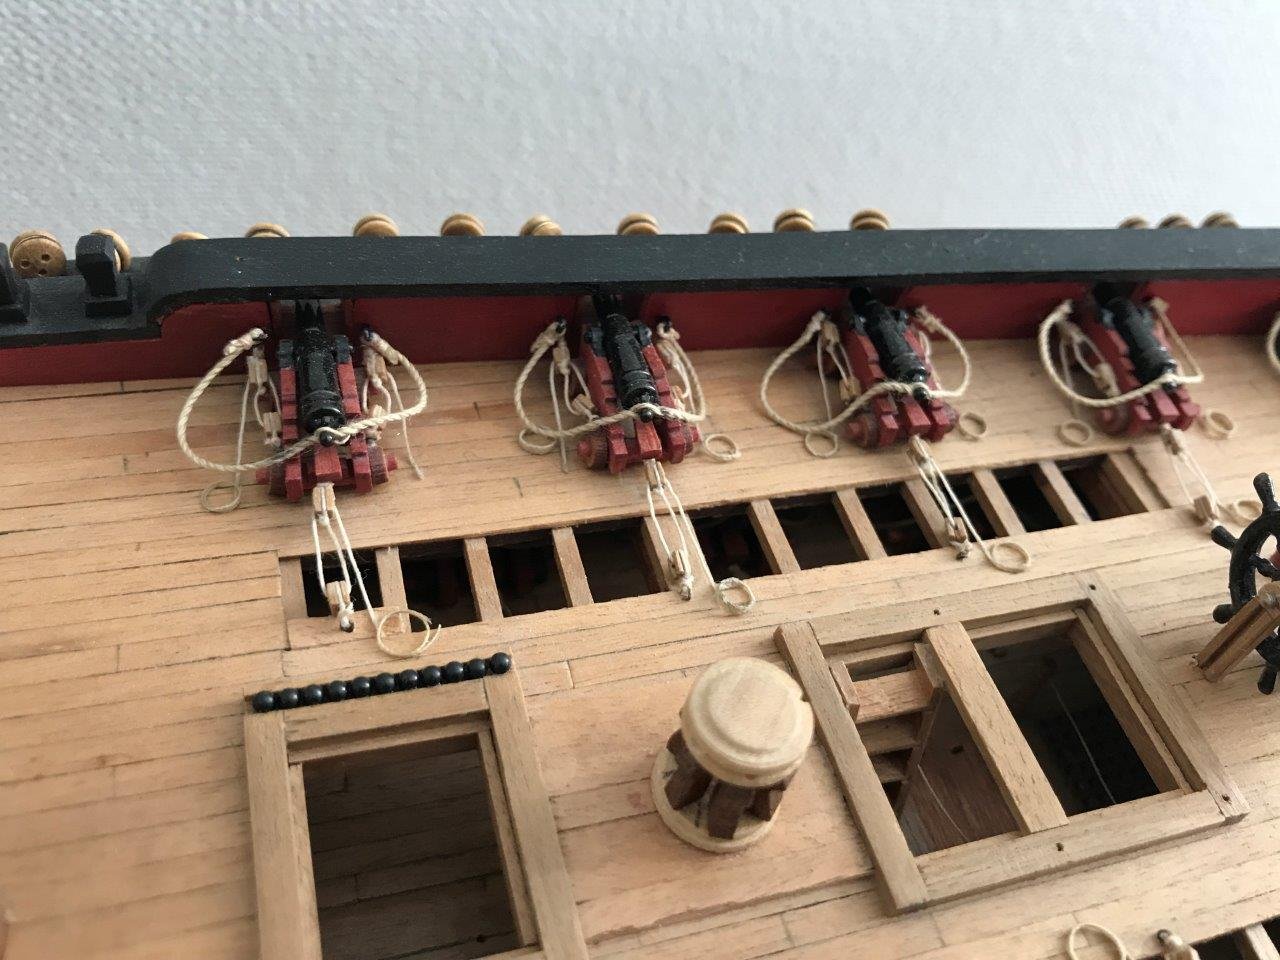
one thing to add to the gun rigging. for the breeching ropes, I untwisted the strands of the rope and inserted the cascabel. For the several attempts I tried this delivered the most satisfactory result for this small scale.
-
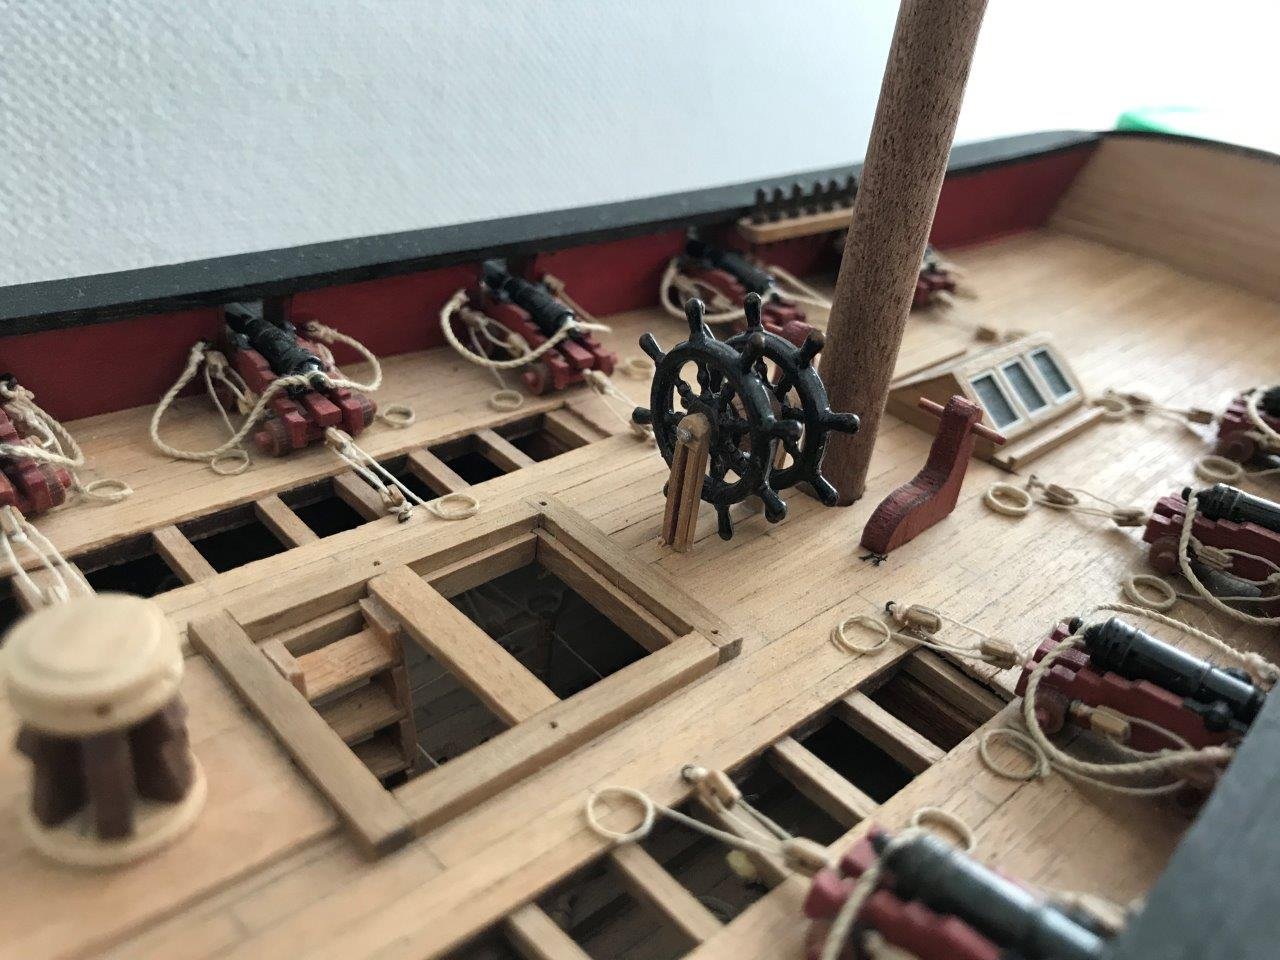
thank you OC and other for looking in. I run out of old pictures on the build, so I'm using the present state for onwards. Most of I can show it still old work. As I caught up with the build start to see the difficulties for such a long break (the project is 12 yrs old now), get the same shades of stains is impossible, also I just forgot what did I use. let's catch up with the upper deck. not that much of details like the gun deck, but still a fair number of guns, racks and loads of railings around. the upper deck guns are smaller versions of the ones placed on the gun deck. I found 26mm cast barrels which are perfect fit to the carriages. I fully rigged them with 2mm blocks - the square ones, which were available that time - now we have more choices. The capstan is the kit piece, not glued. I filed the dome head flat to make a bit more realistic, but the proportions are just not correct and the whole thing is too small. I have to make a better one, I think I have to scratch build. a shot of the aft area. Having no better options, I used the kit wheels, despite being a bit on the thick side. If I find a better one I might change it, but not going to scratch build. The wheel supported by a simple stand I made, the 1mm decorative strips extend below the deck and hold the structure in place. In the background is the hatch, which I made after the Caldercraft Diana.
-
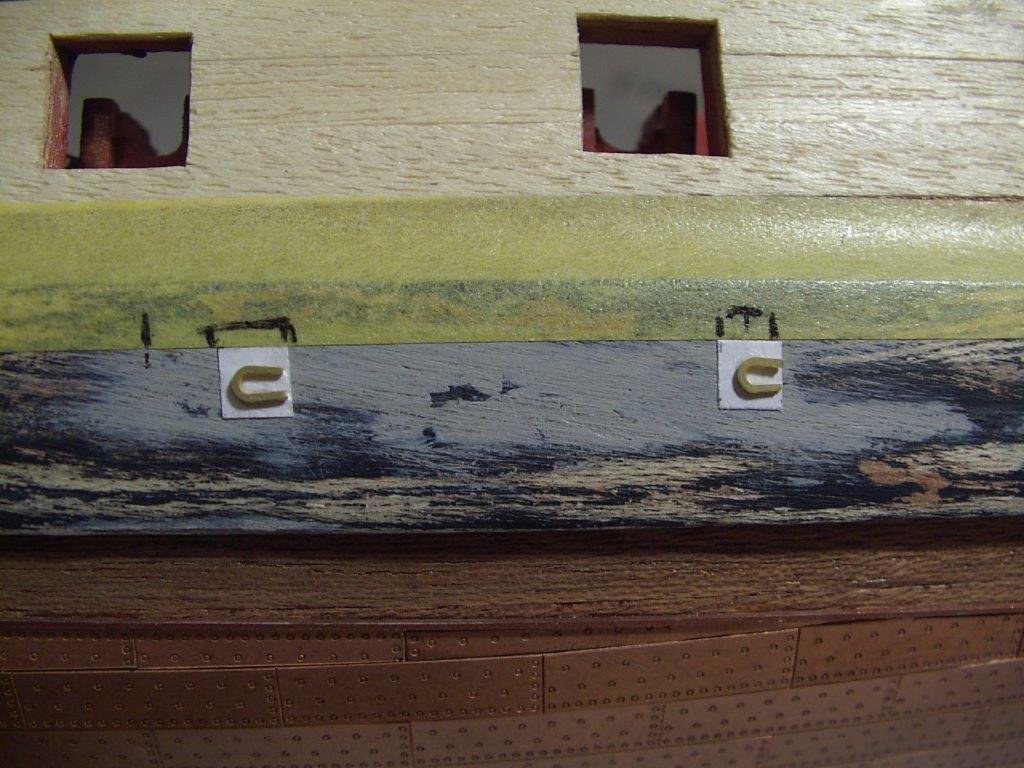
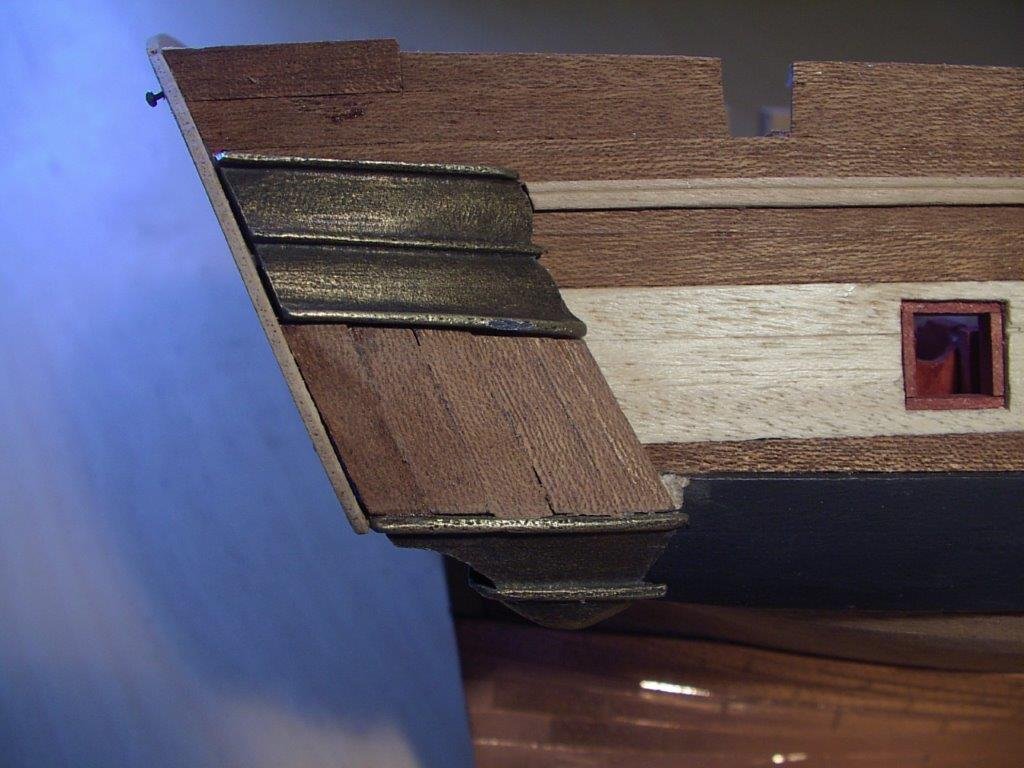
before the upper deck fittings were made, I worked on some hull details. here the curved rails are being built up by small sections. after sanding, they will look as one piece, especially painted black. making the galleries, I reverted to the kit casting pieces, but attached a lip on them to allow planking. the back side if the lower casting is awful, required a lot of filler, something I still have to deal with. the planked surface allows building up the window framing, I used a scraped moulding horizontally, and formed the columns by gluing 1x1mm walnut dowels side by side. the windows will be framed with very thin white styrene strips. I don't have a photo of it, but visible on the first picture in this log. Later I stained the wooden elements dark brown, which much improved their look. Similar to the stern, I saw very good results made with kit parts only, so at the end not sure, it was worth the effort. the plan show sweep ports across the wales, suggesting to interrupt the middle wale at regular intervals to form rectangular openings. I wanted these to be closed, and finally decided only to hint the outline of the port but add some hinges to them. The sweep port outlines were cut from regular paper -it barely sticks out - and added the hinges, which were Amati rigging hooks in their previous lives. and their (pretty subtle) final look, painted black, but no varnish yet.