Search the Community
Showing results for tags 'finished'.
-
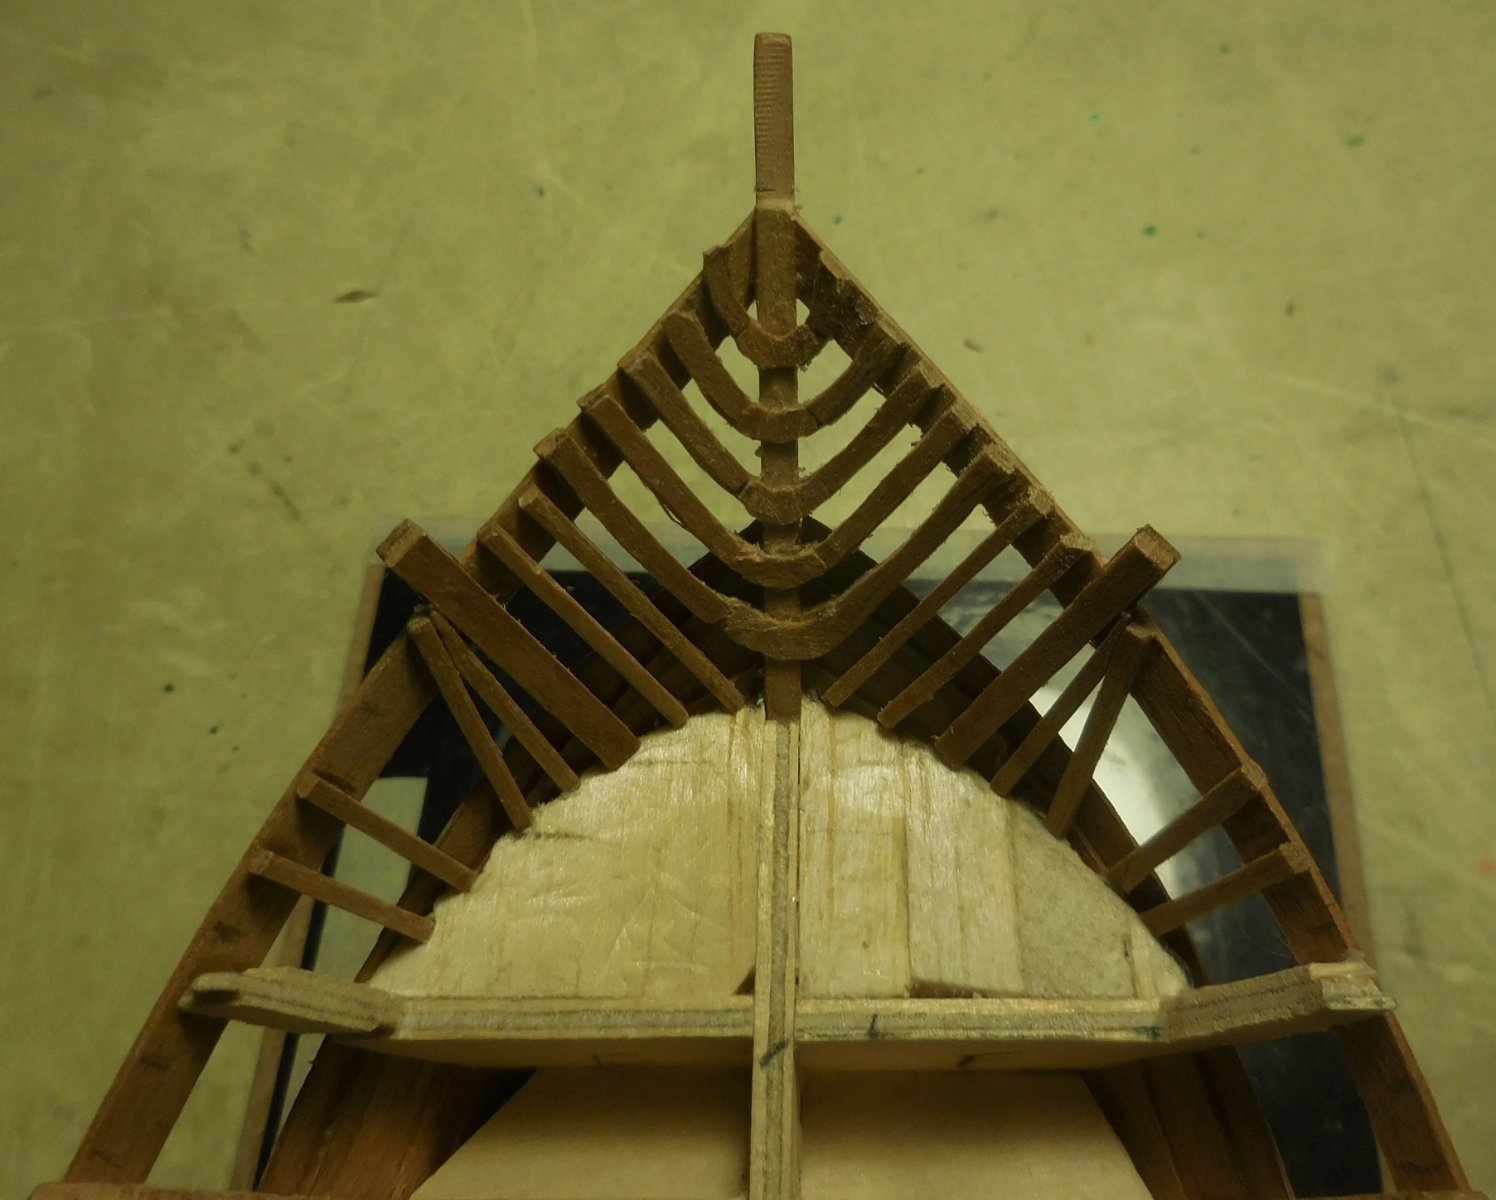
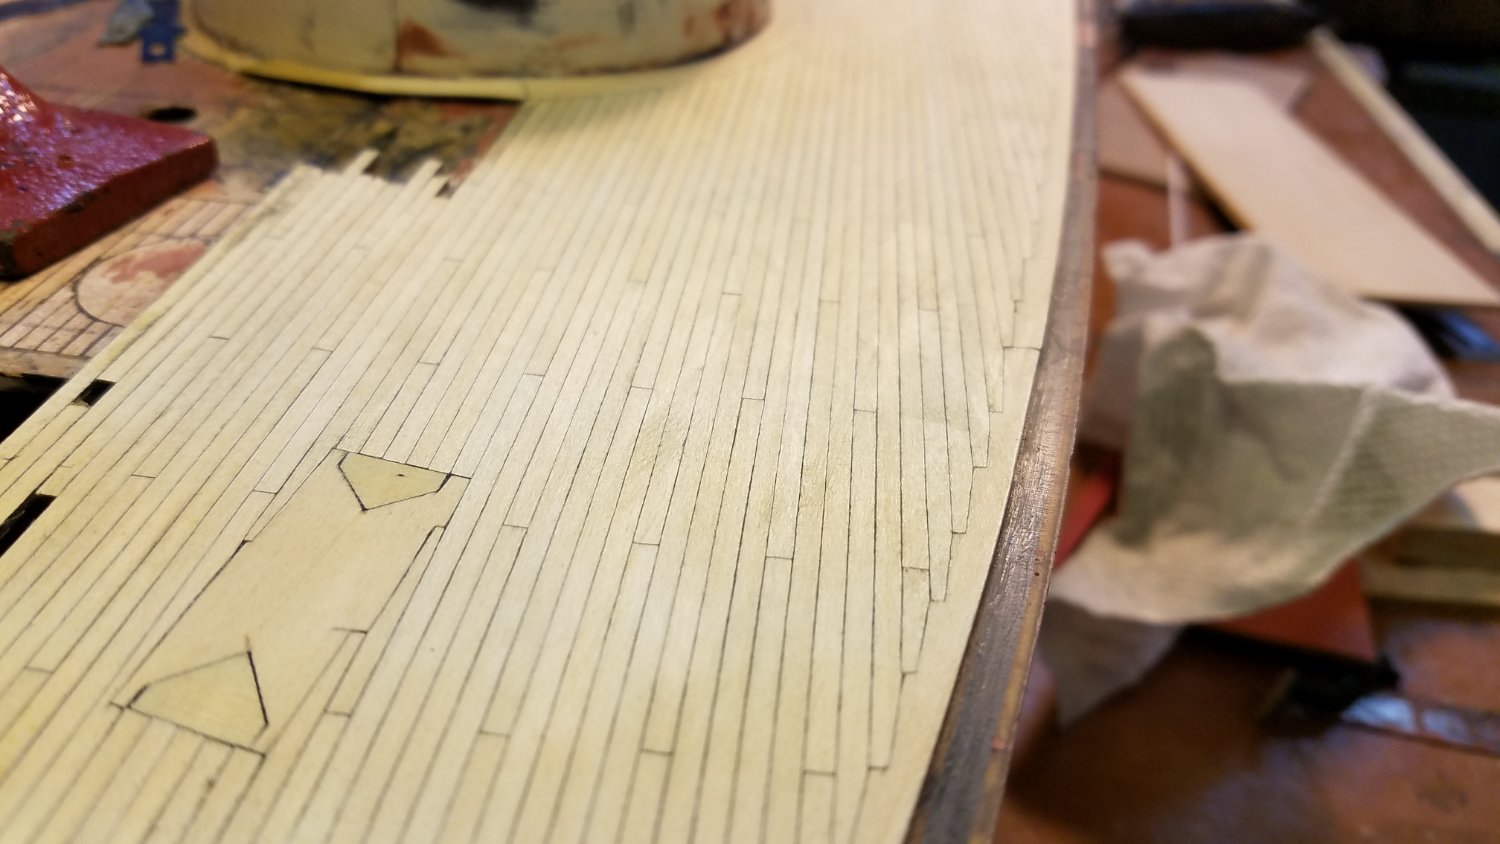
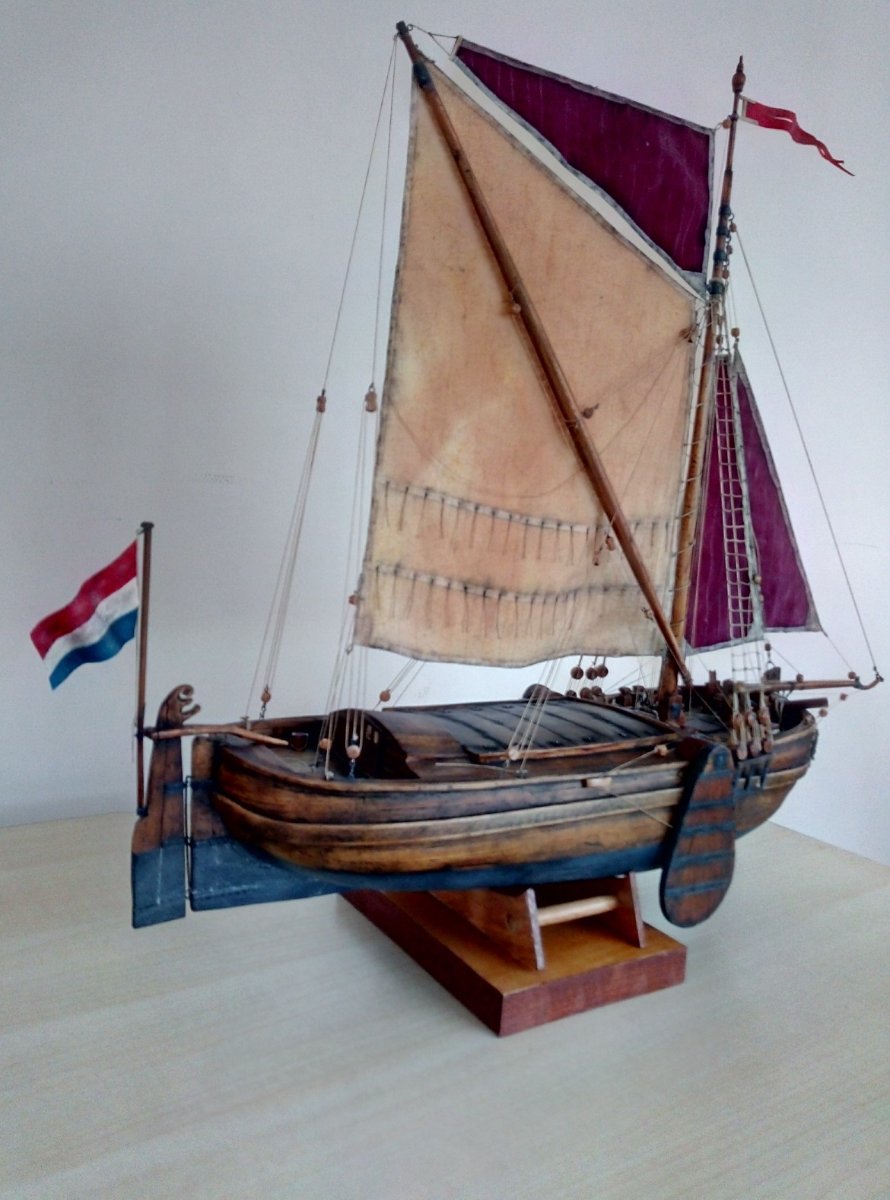
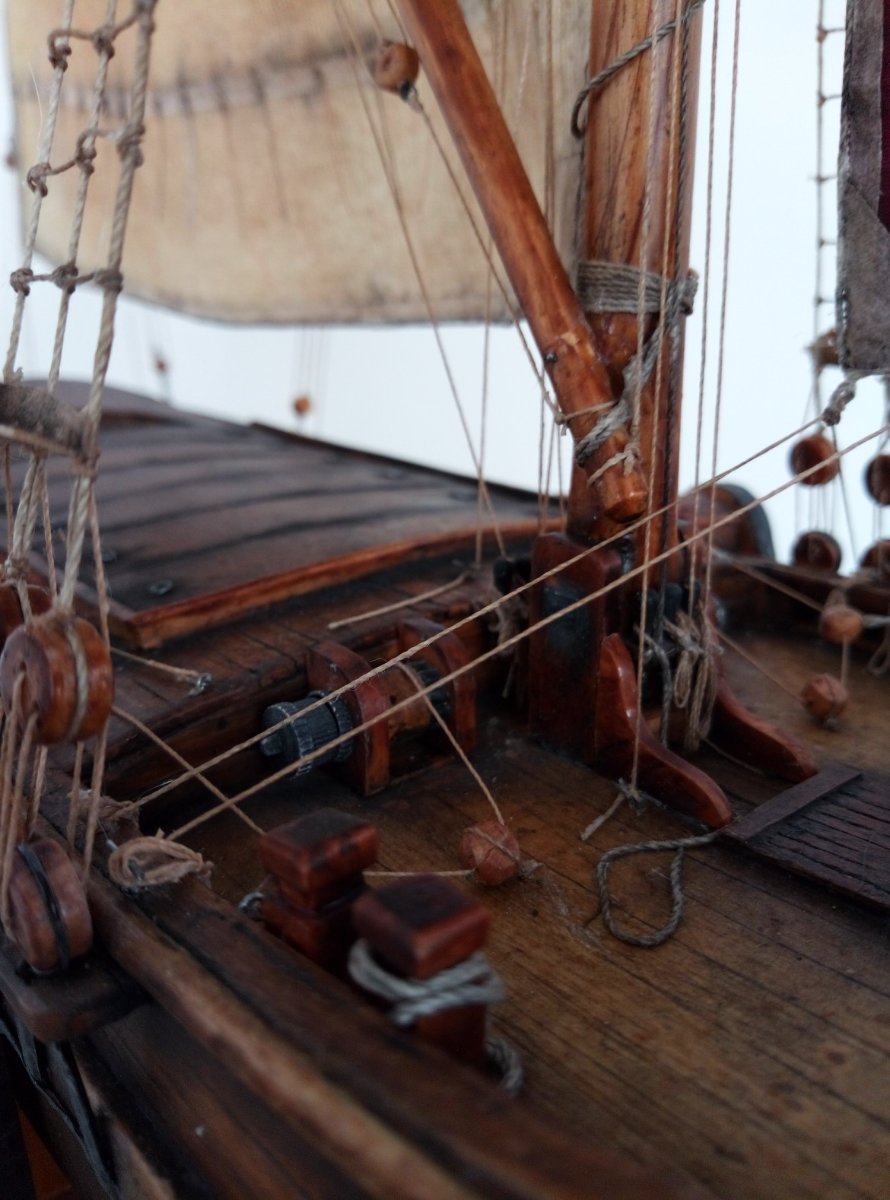
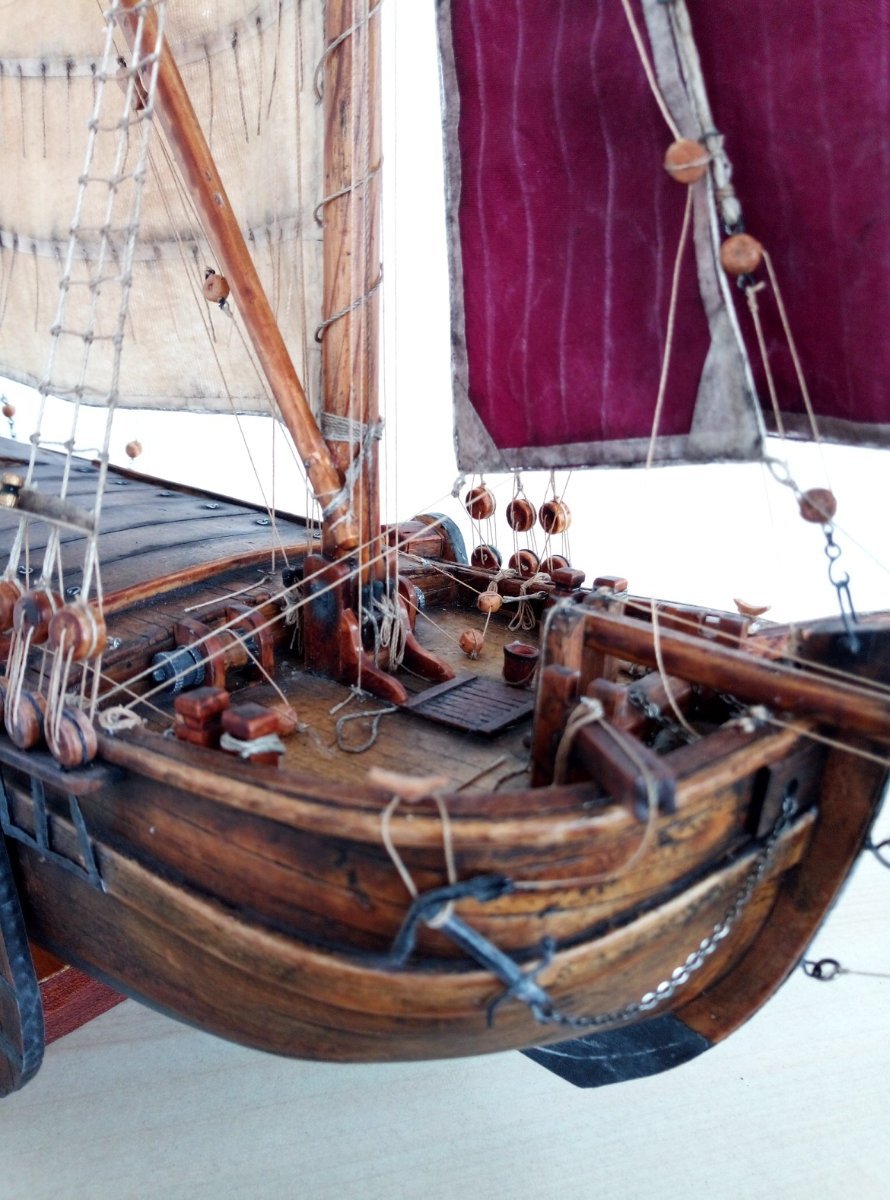
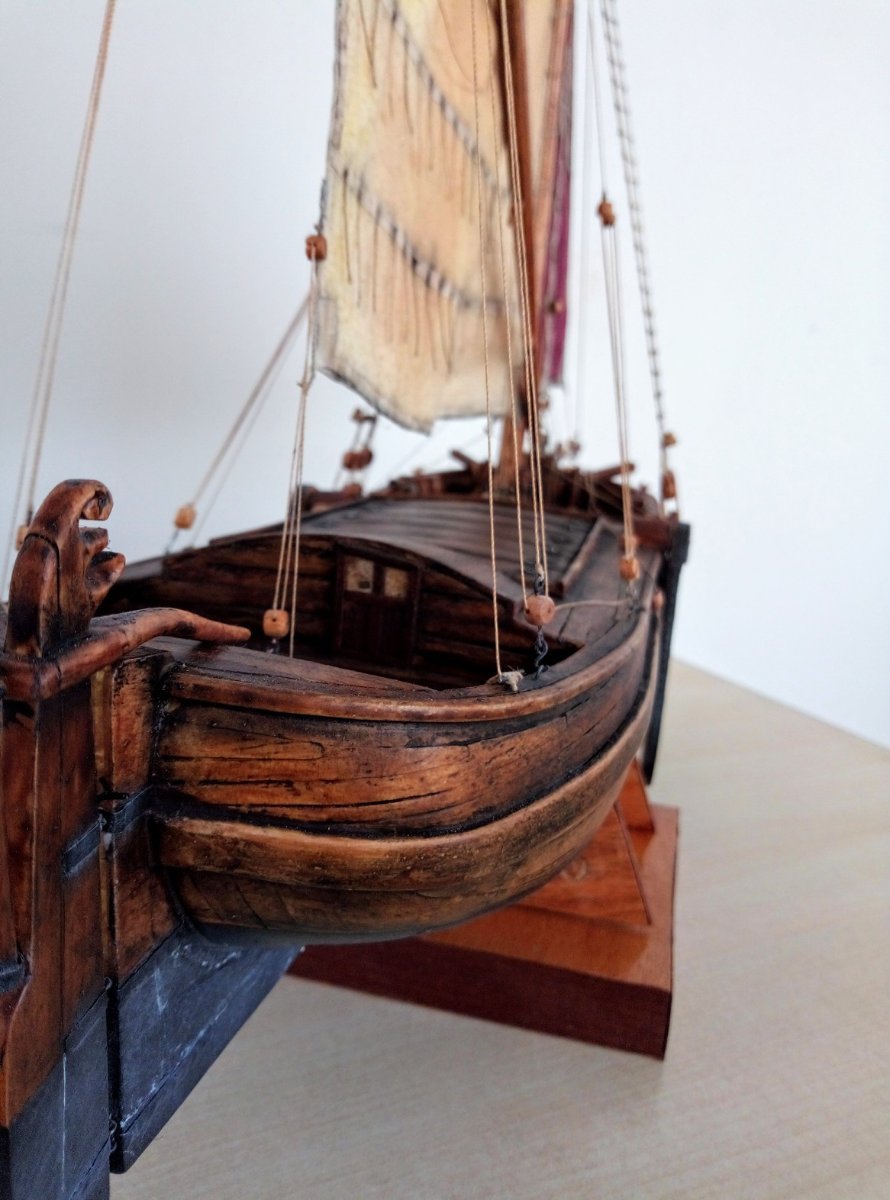
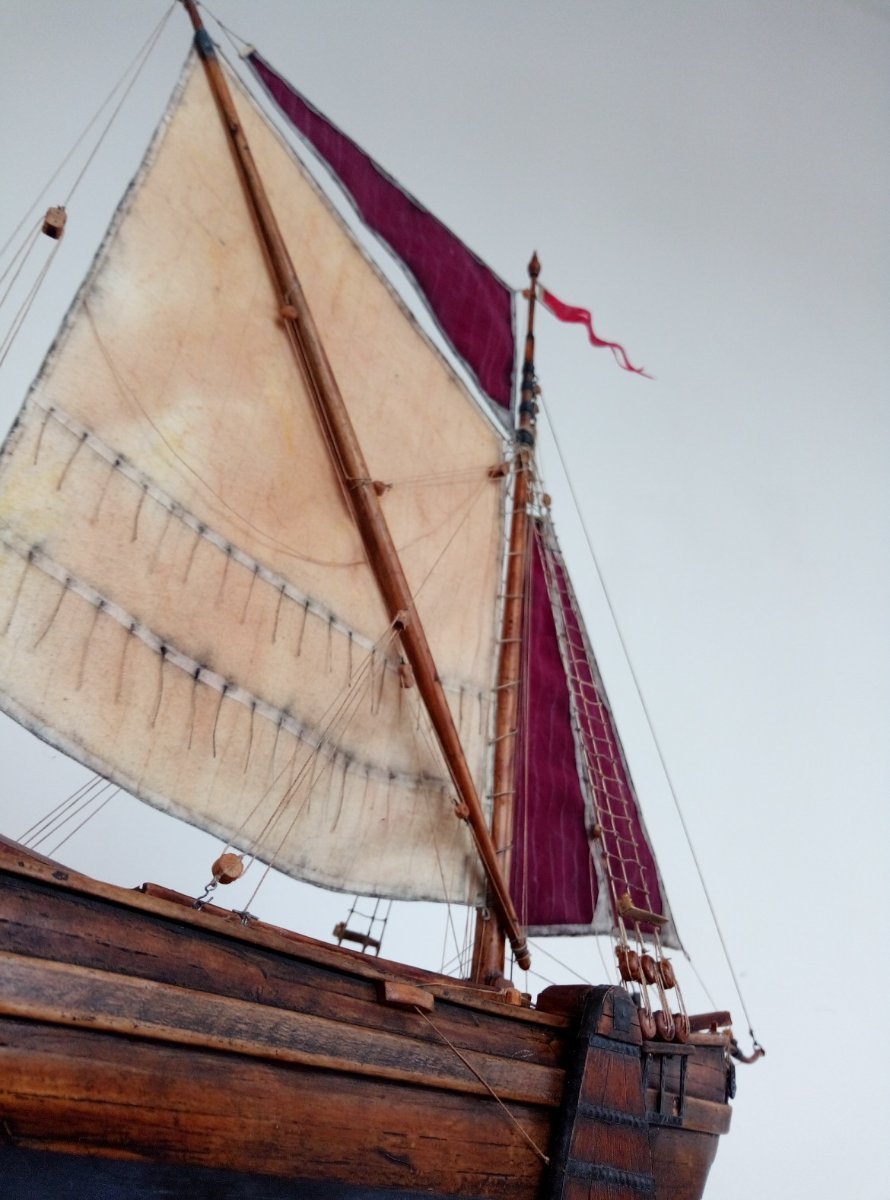
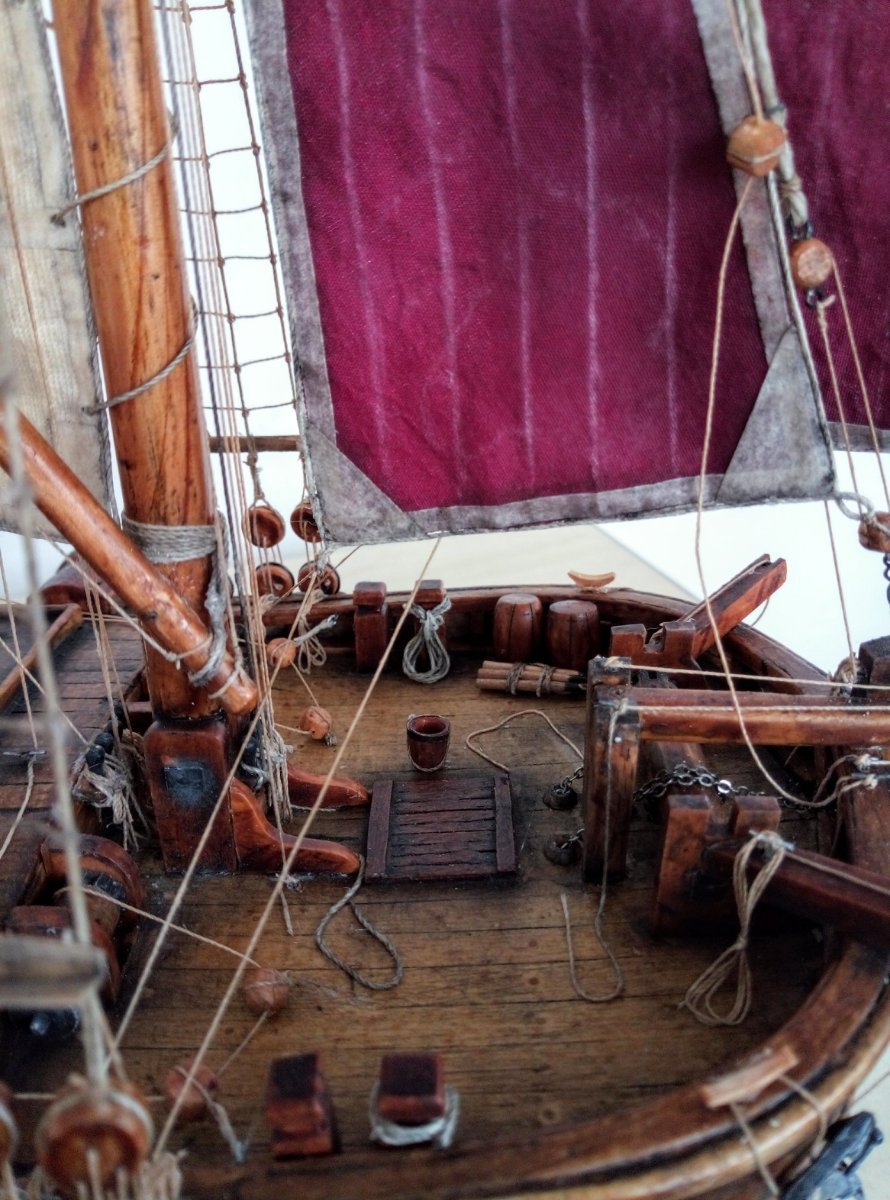
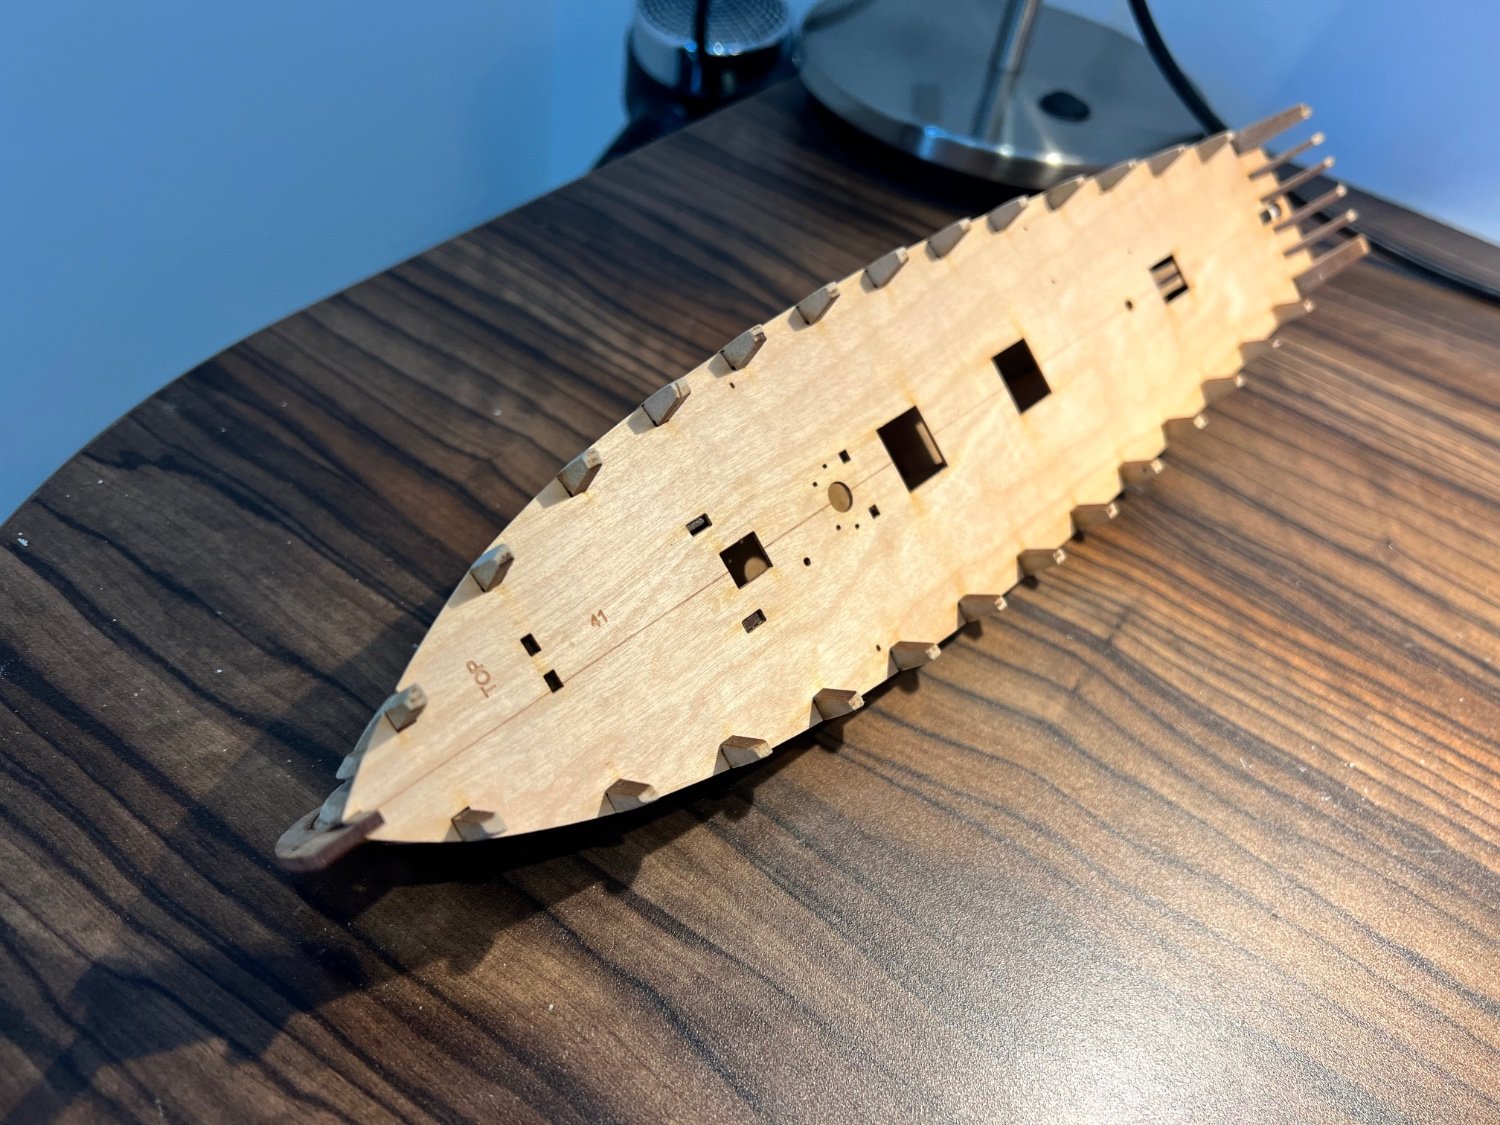
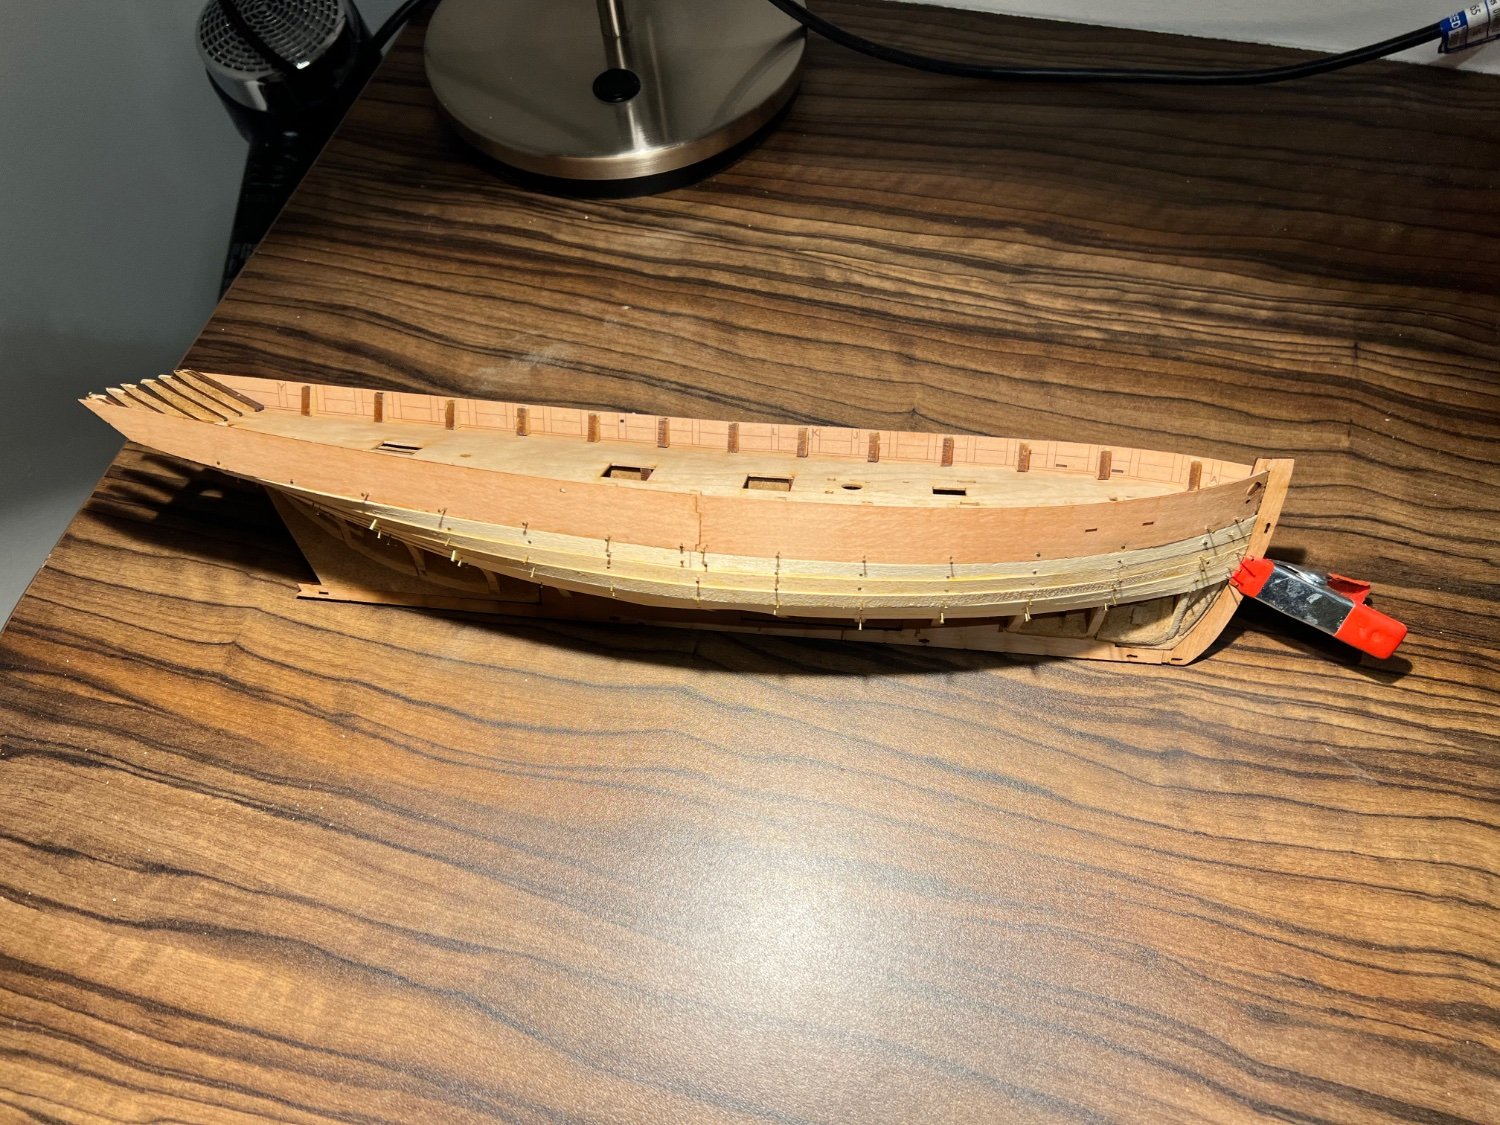
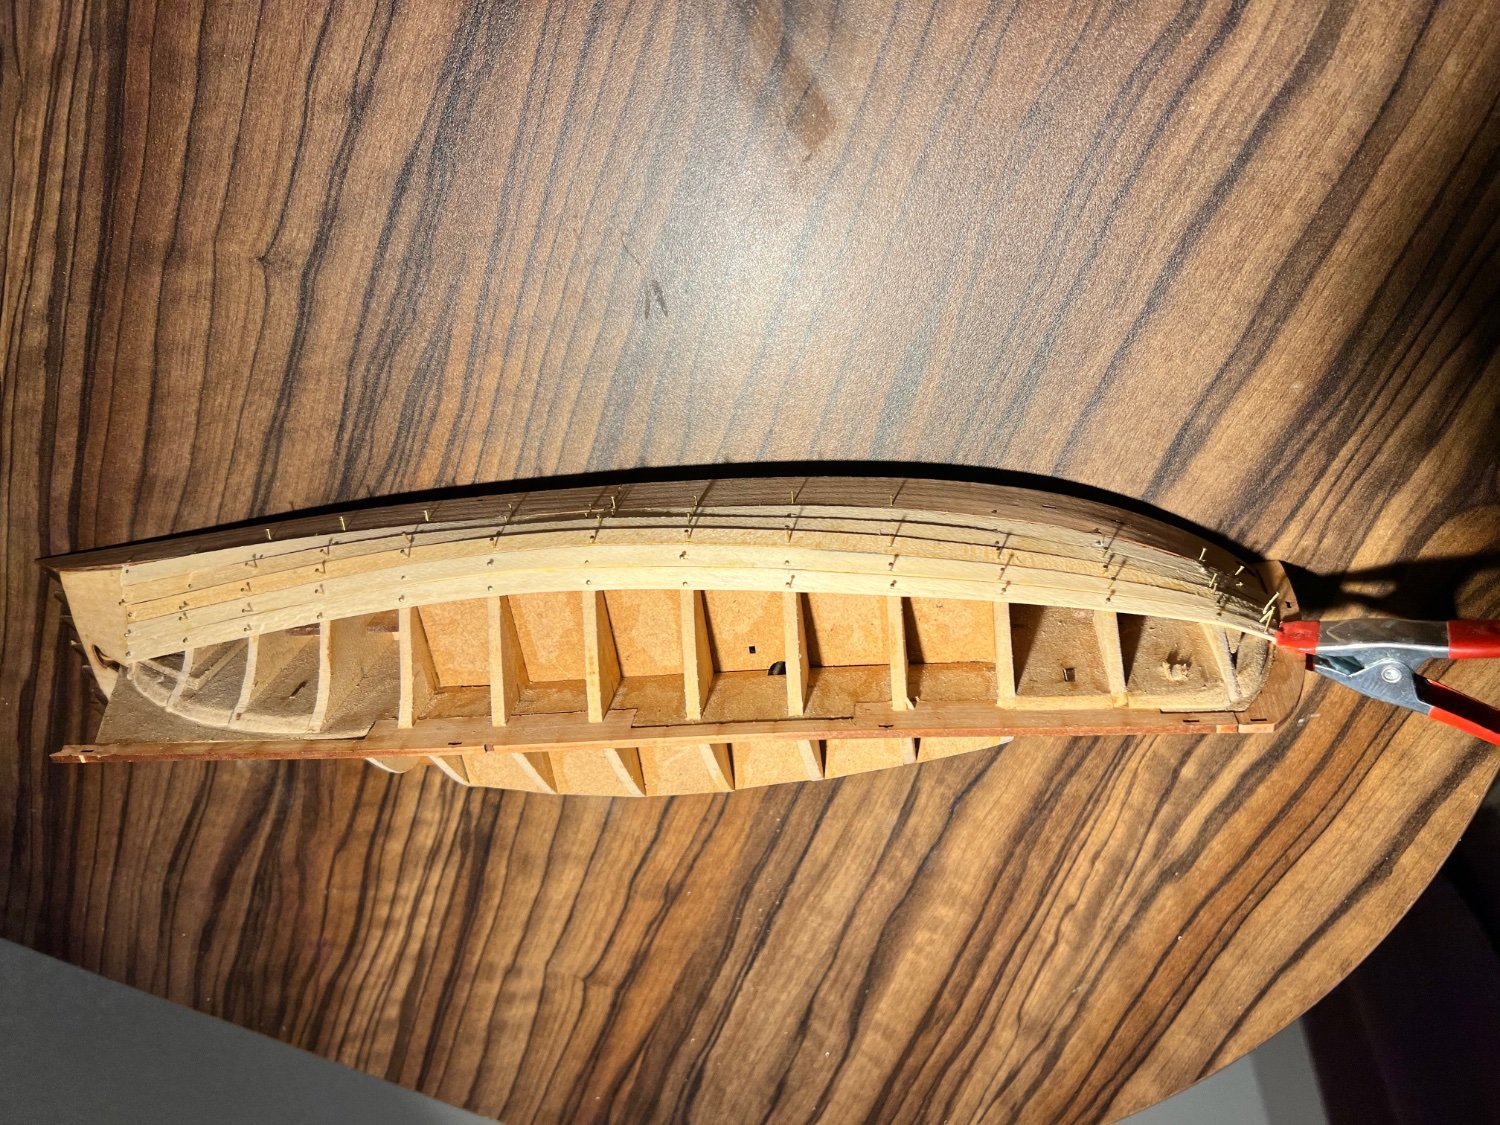
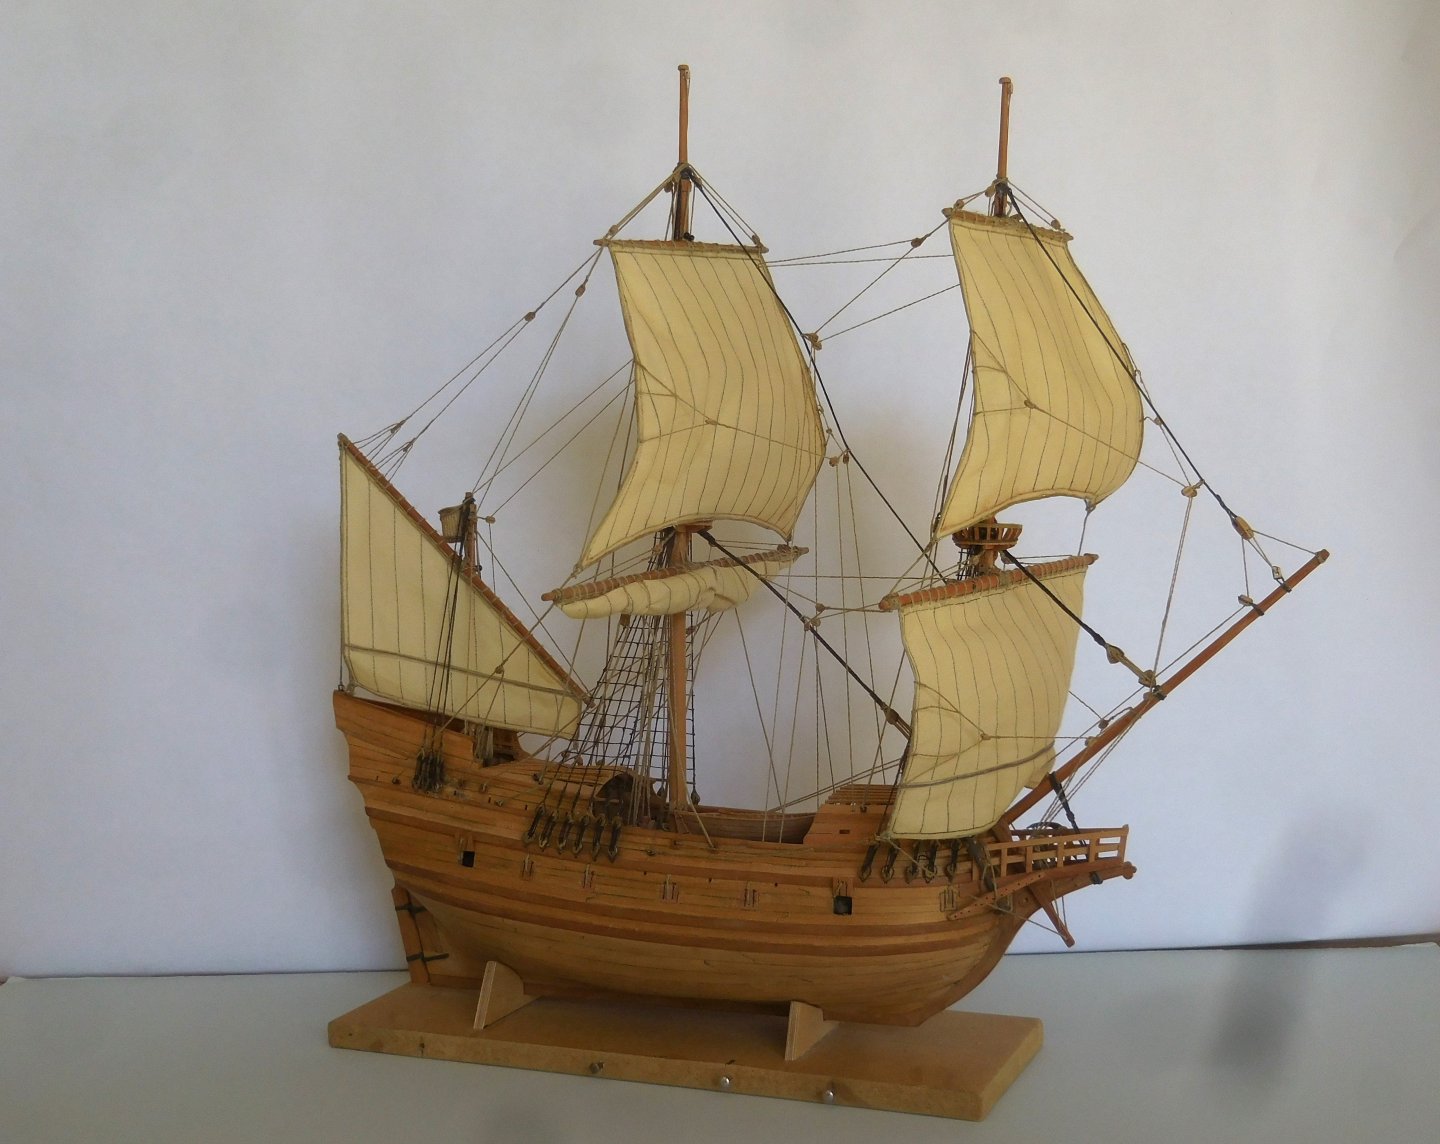
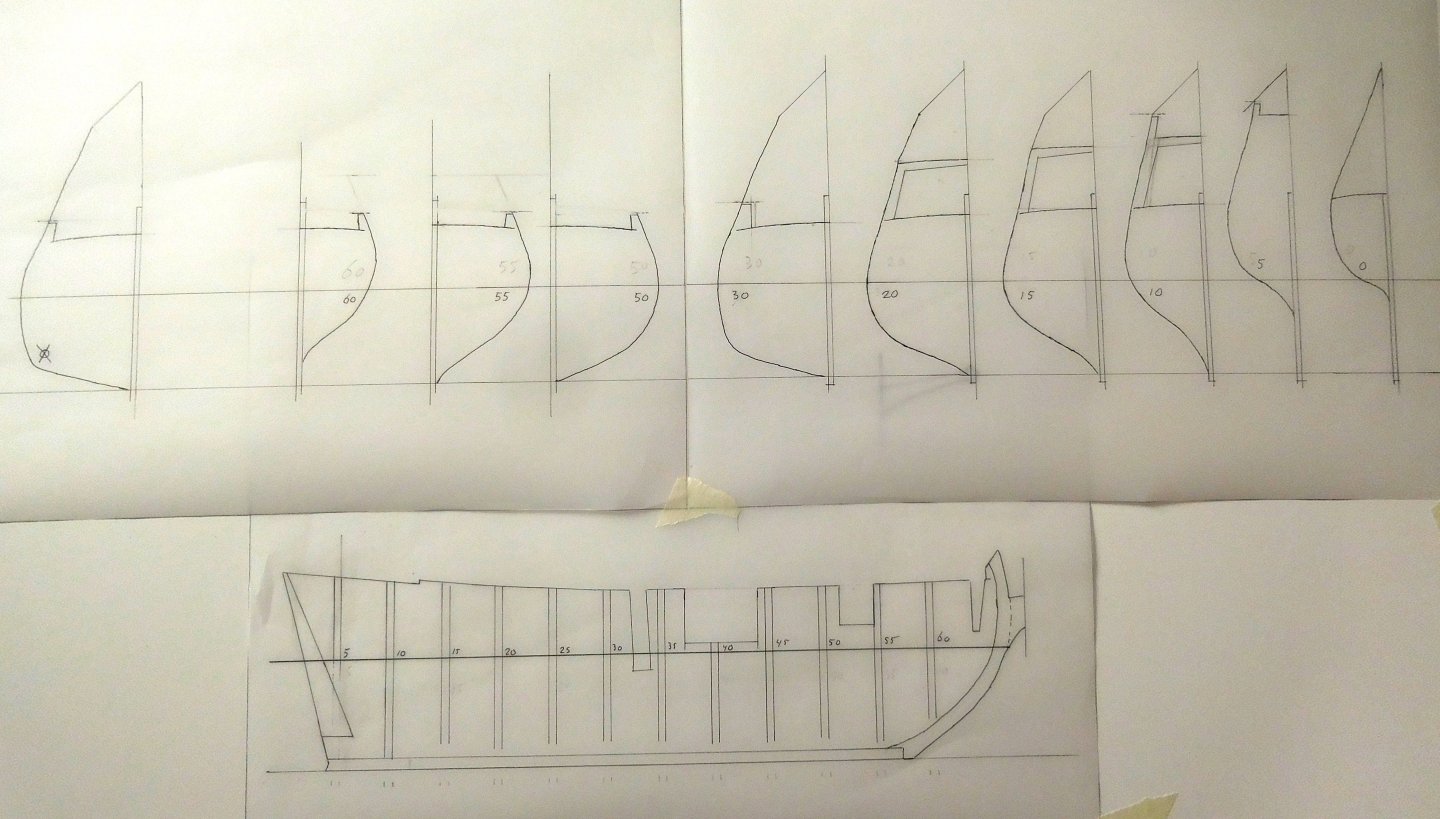
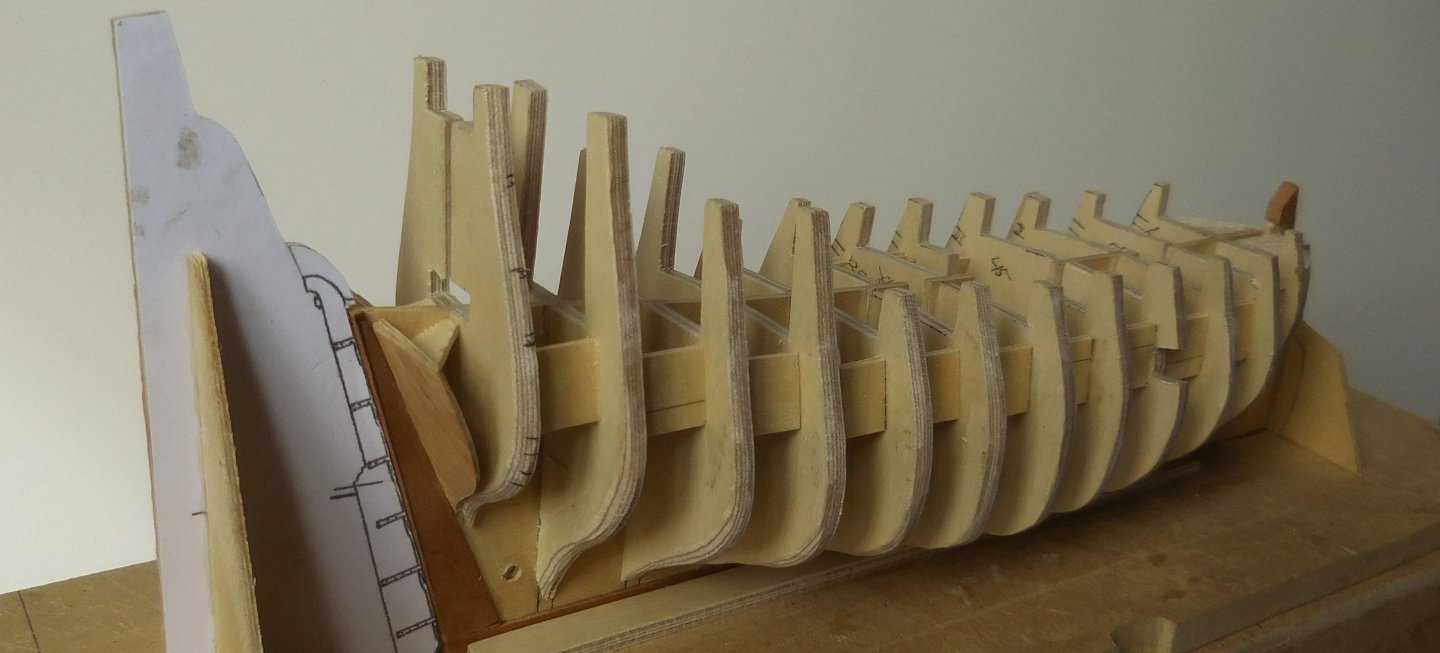
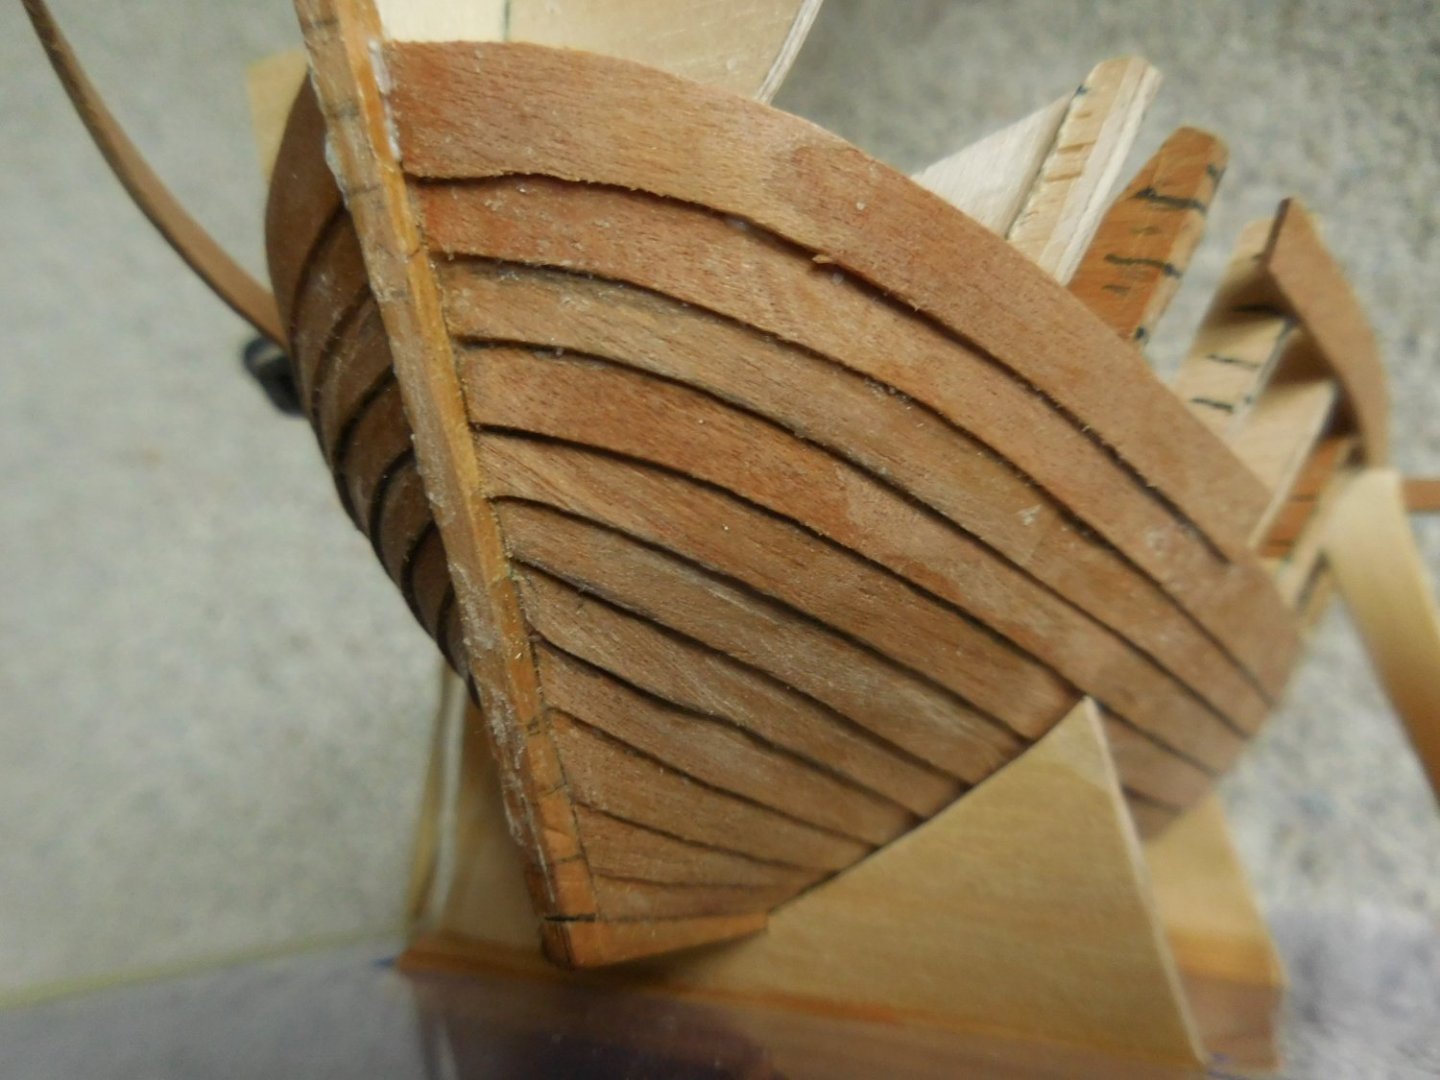
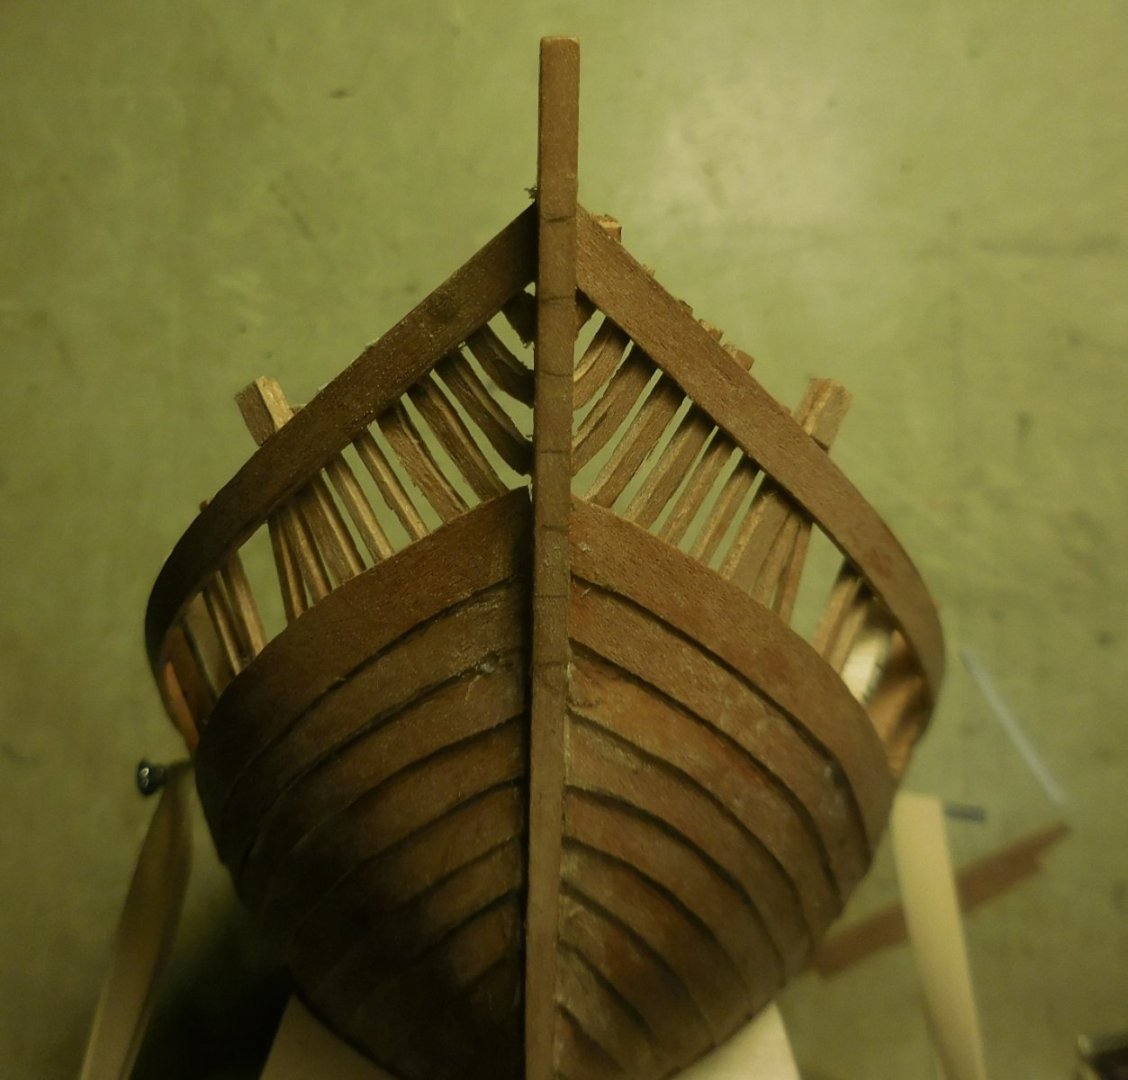
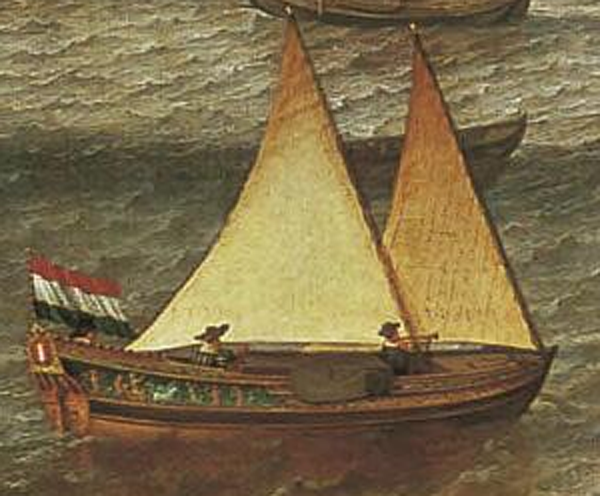
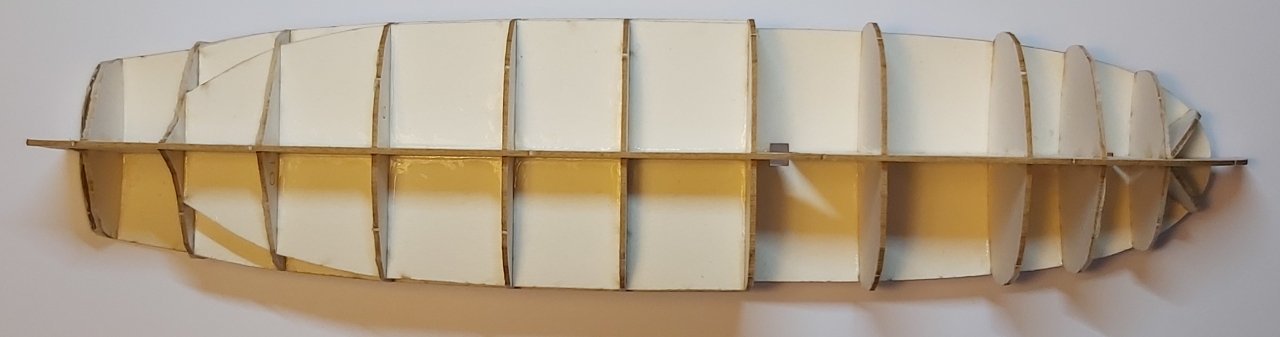
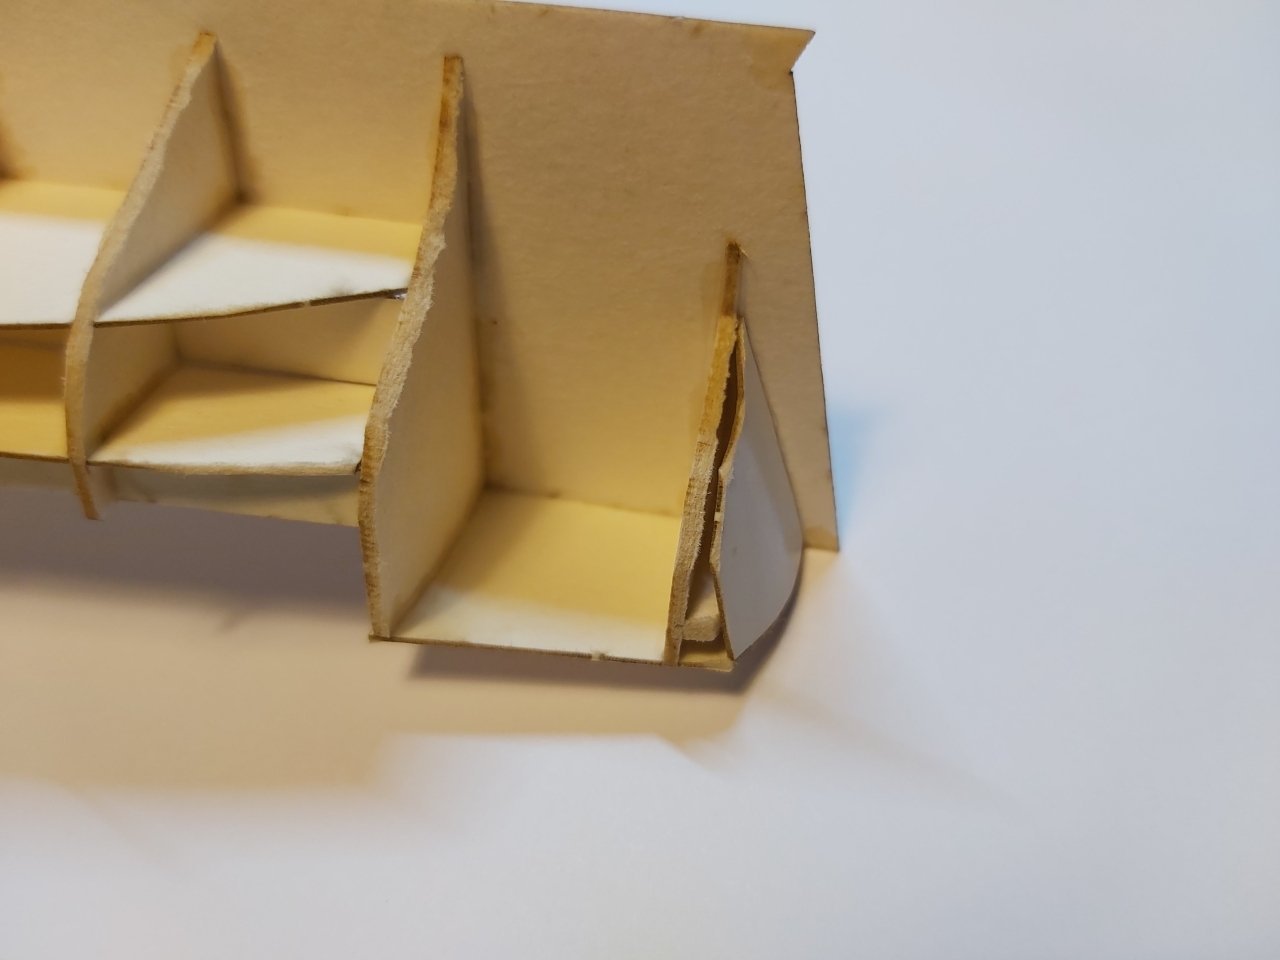
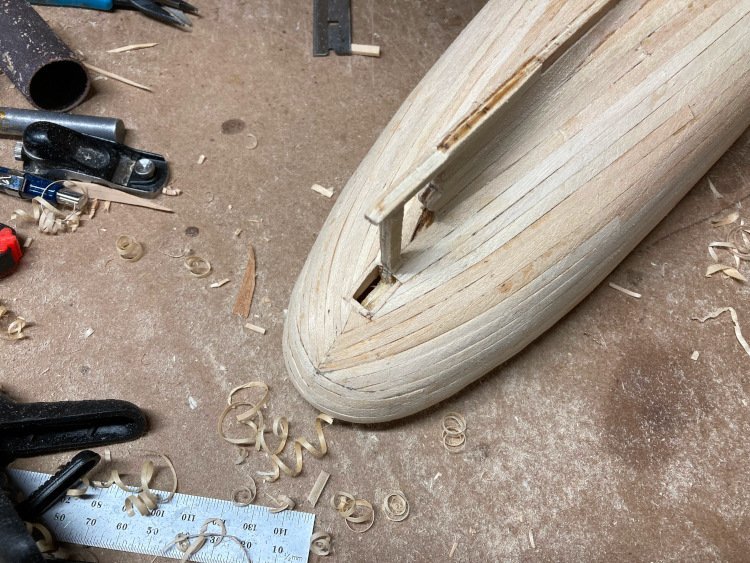
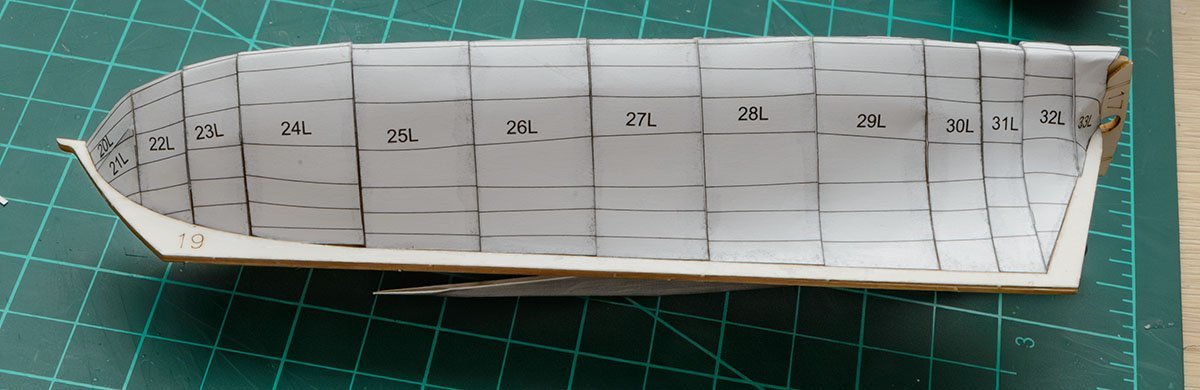
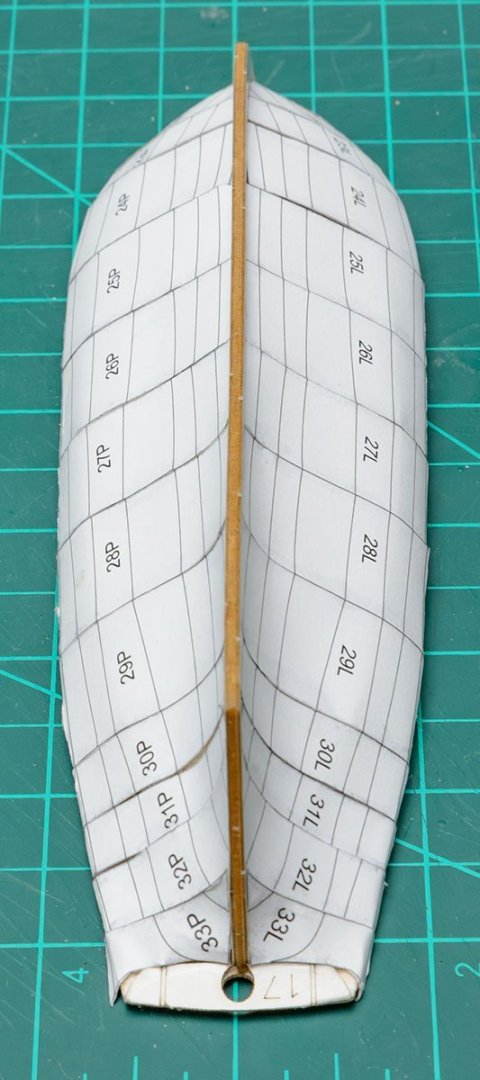
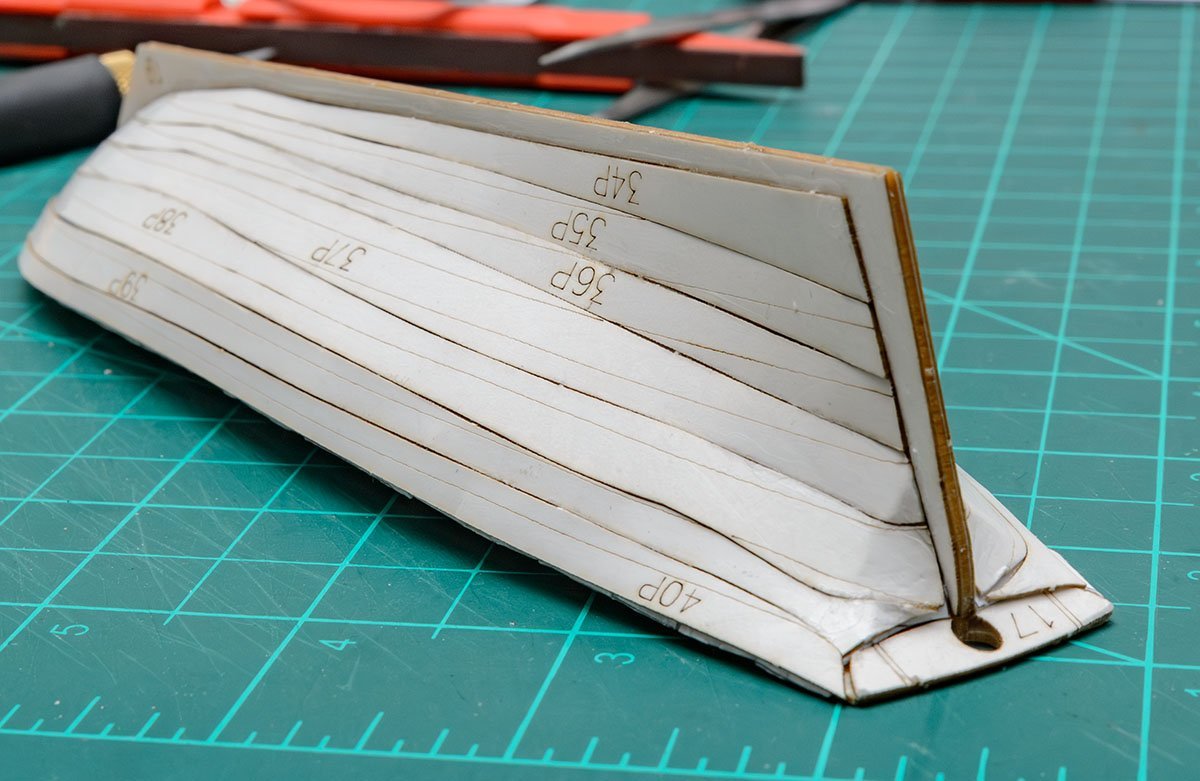
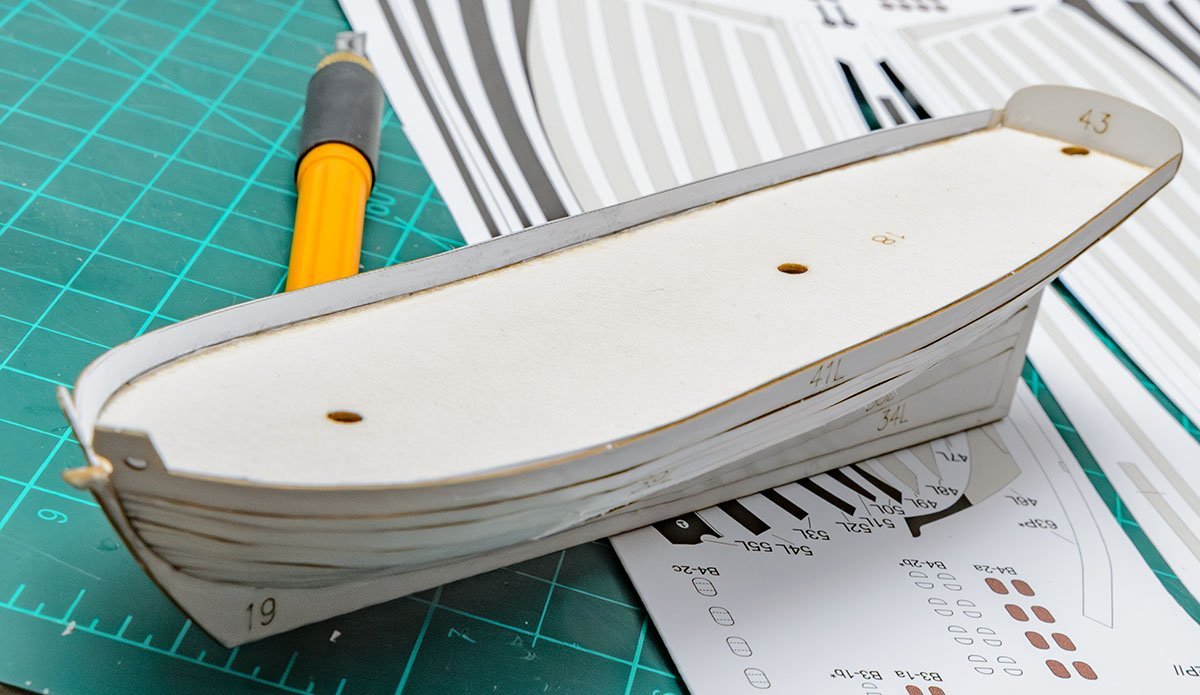
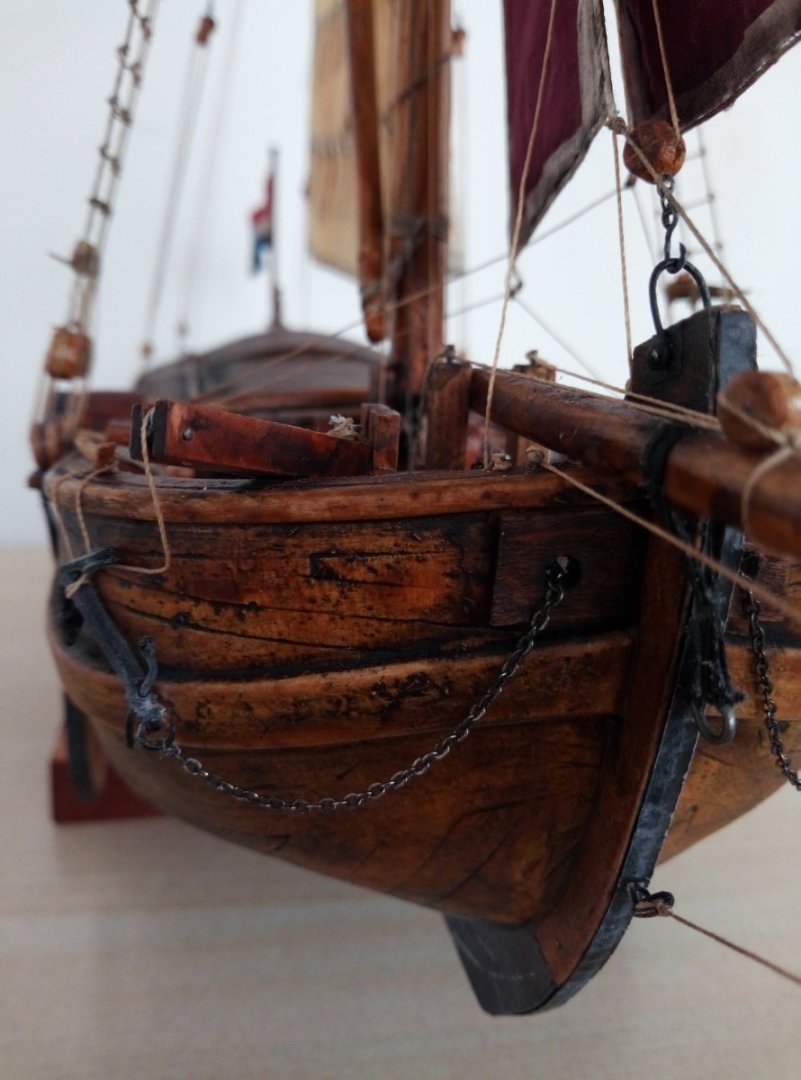
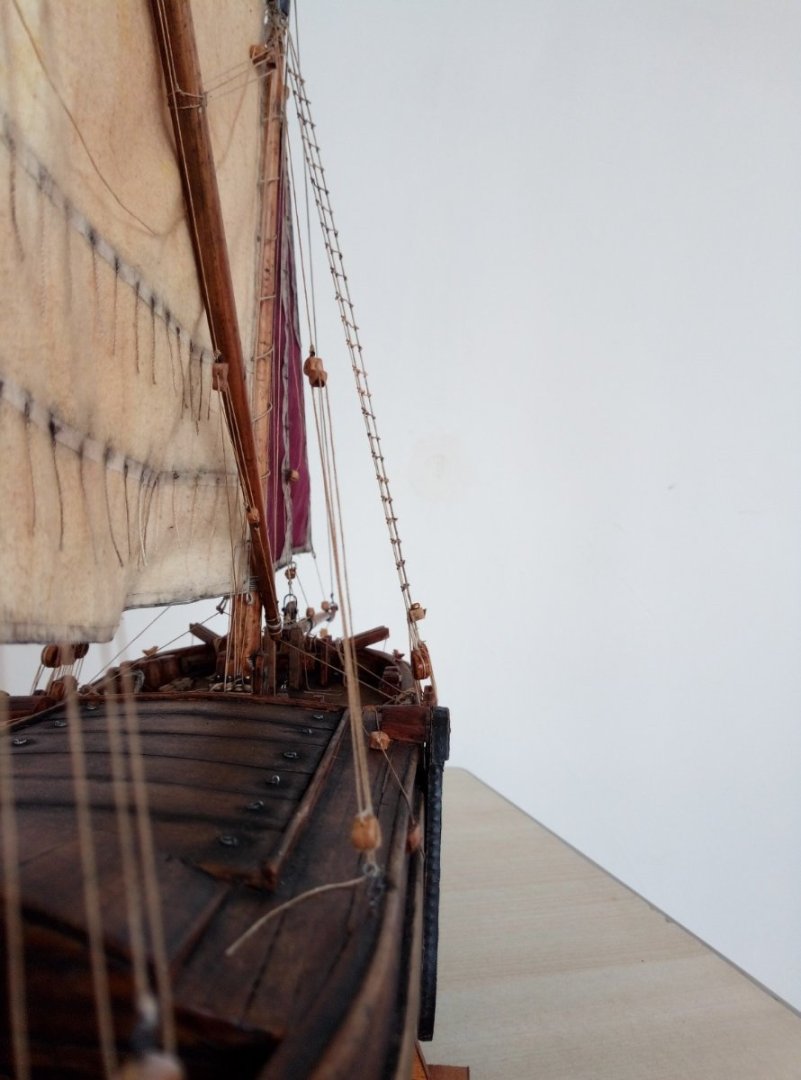
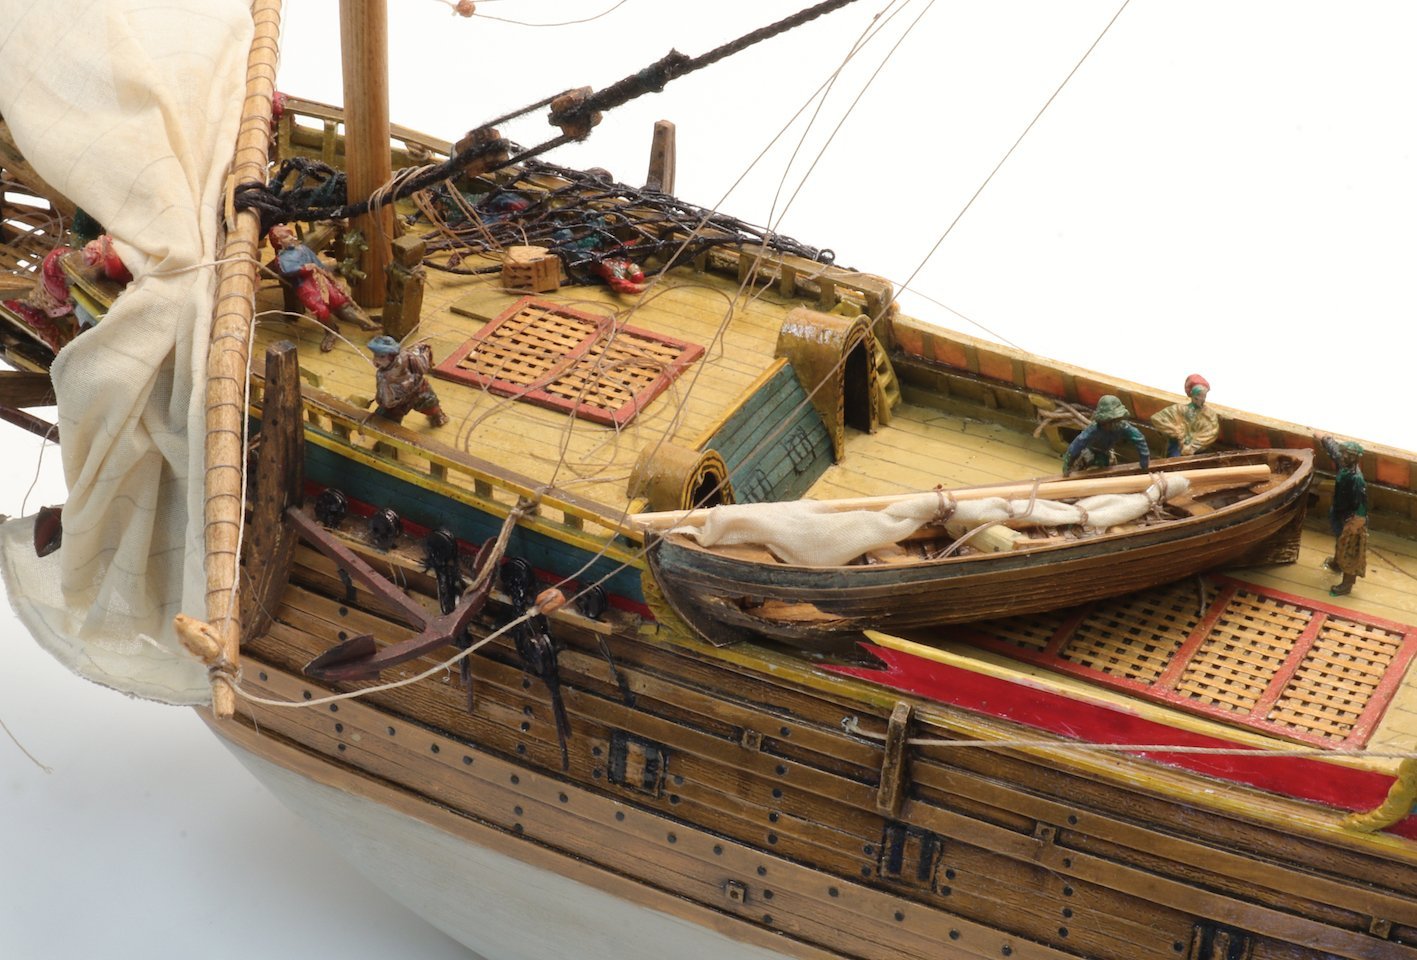
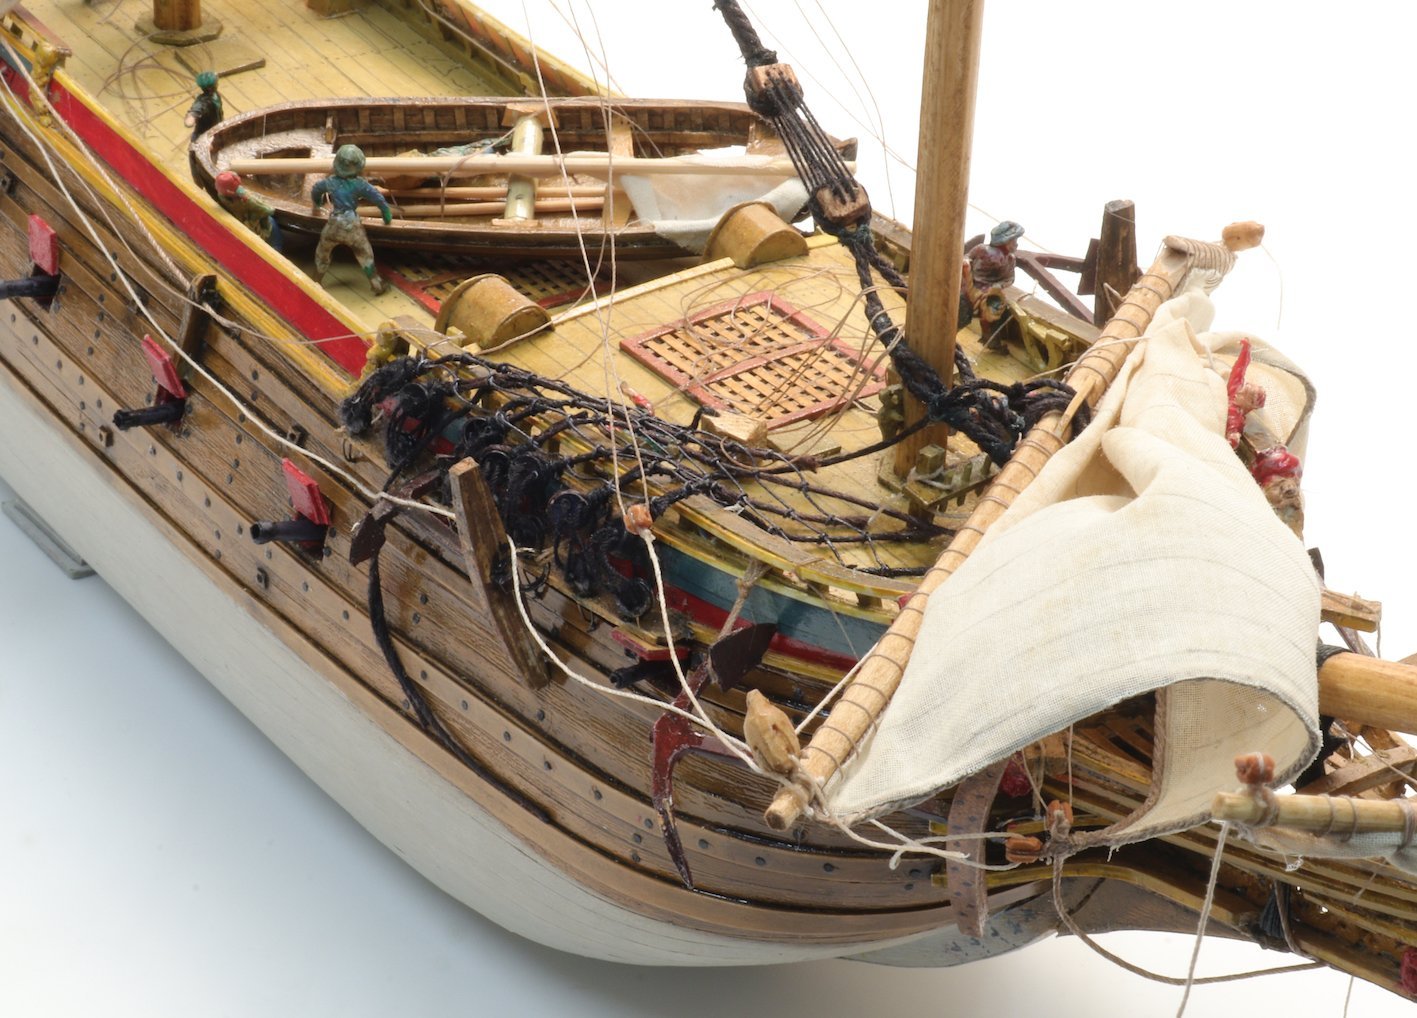
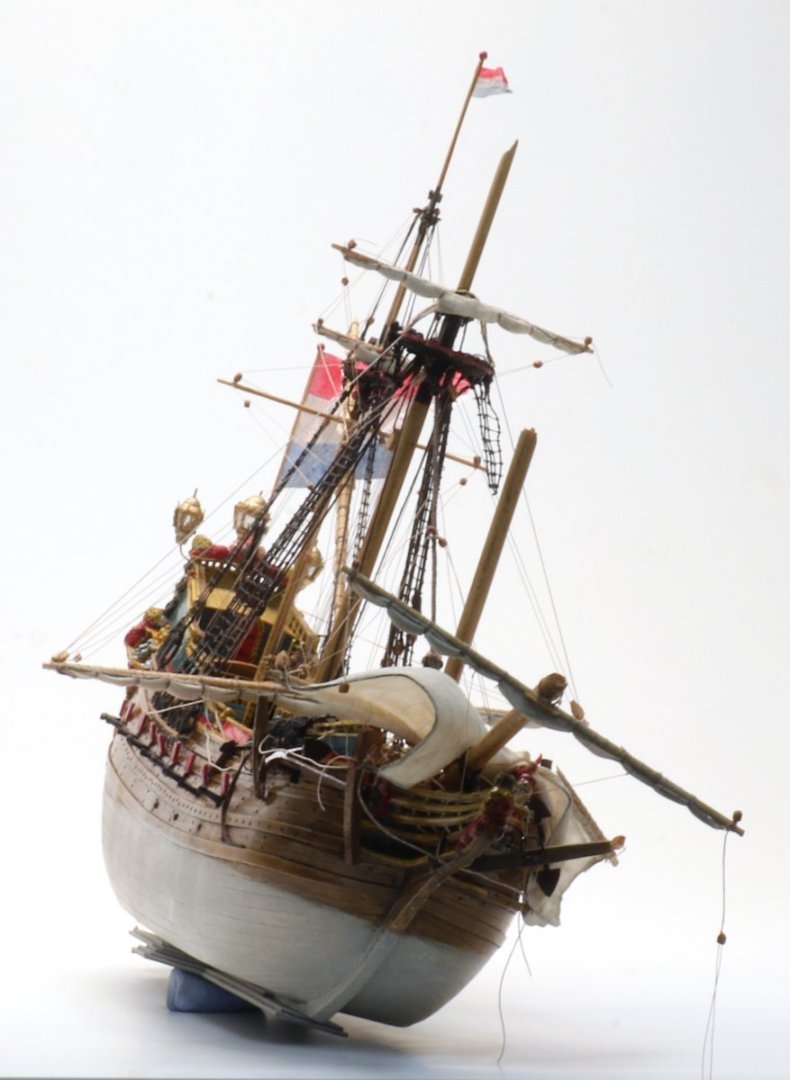
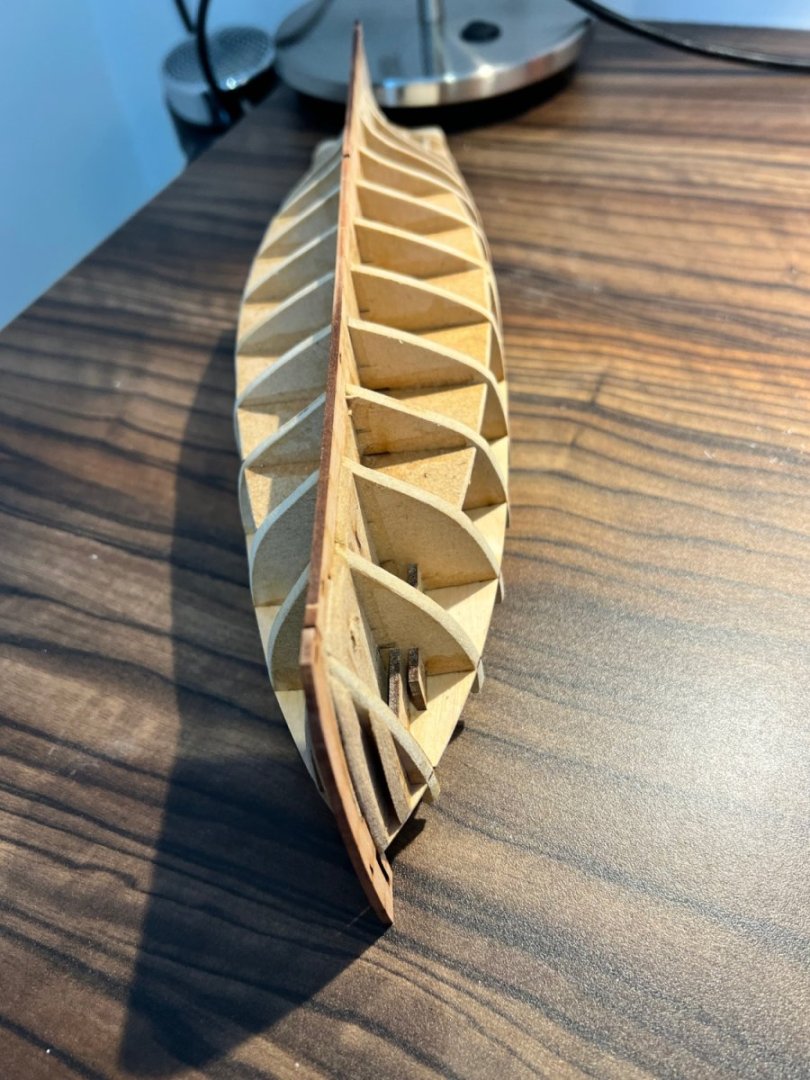
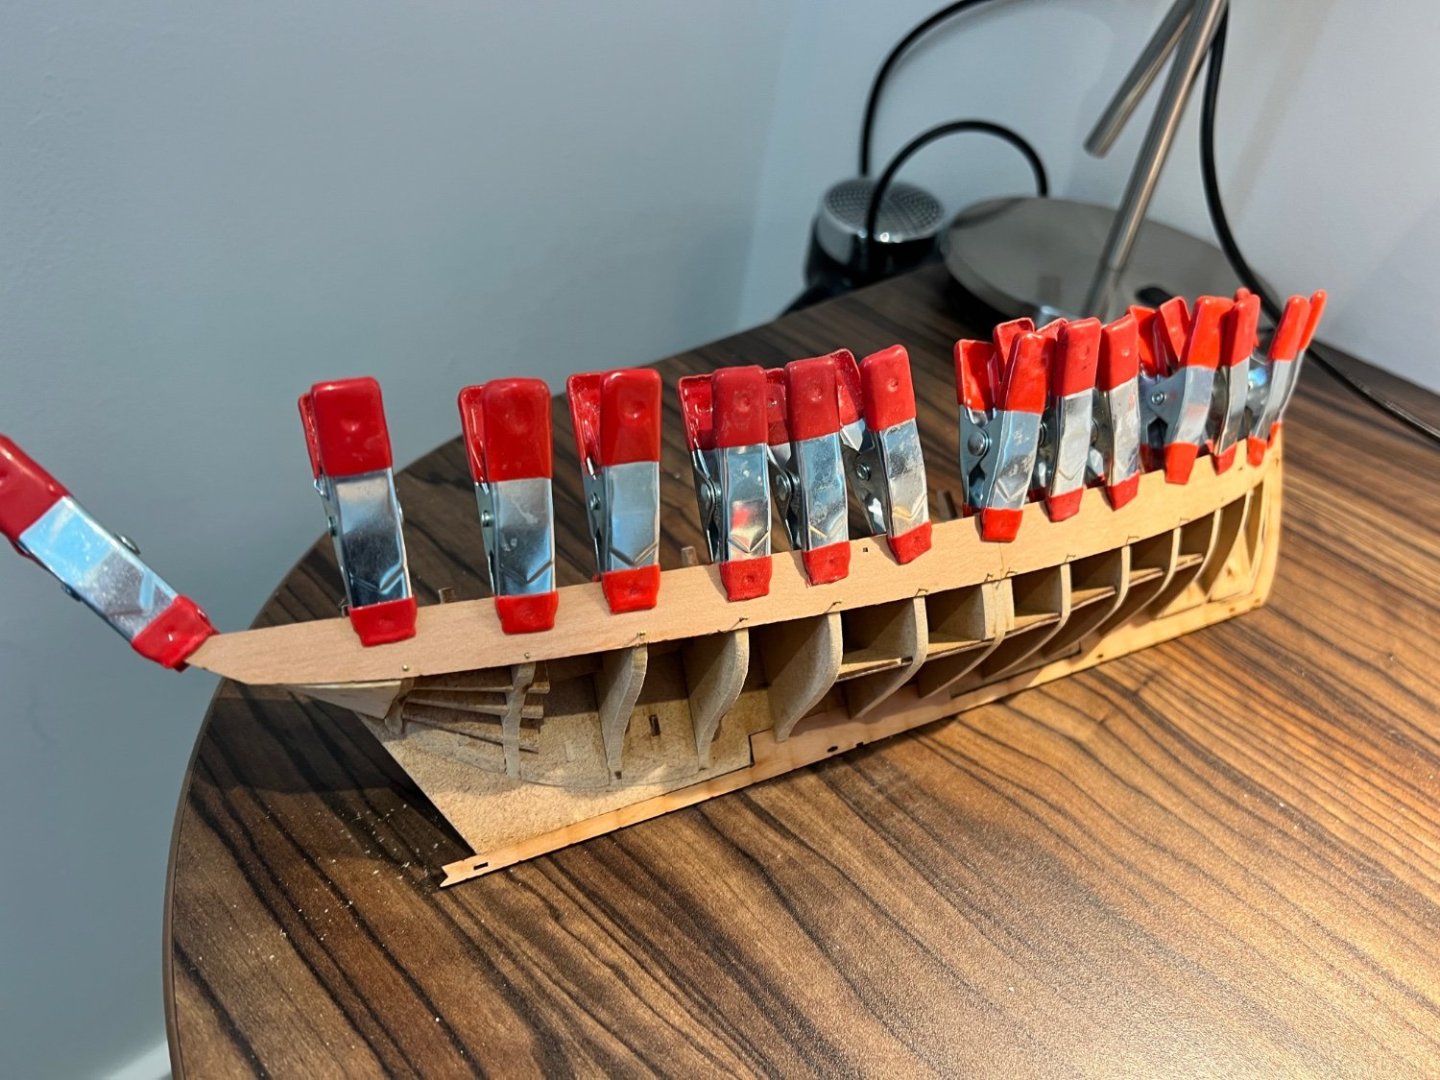
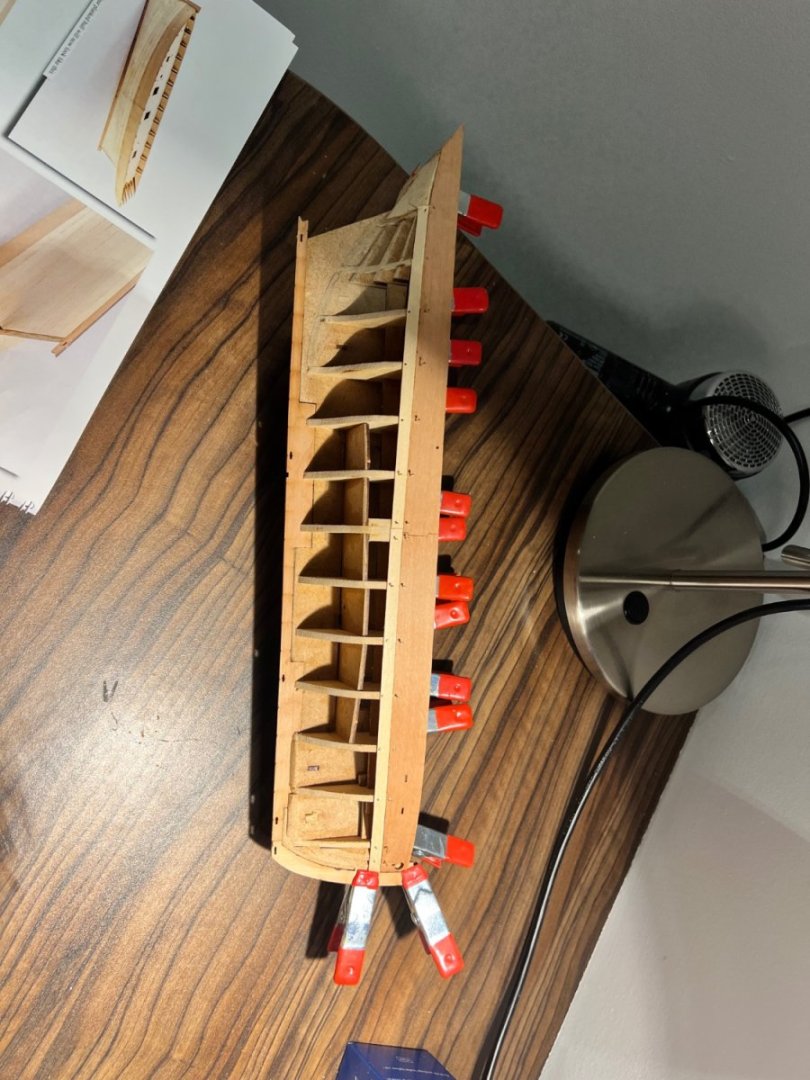
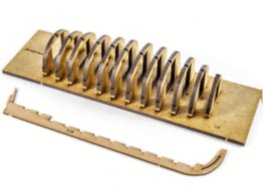
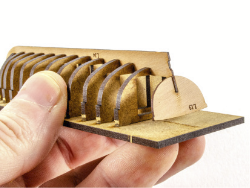
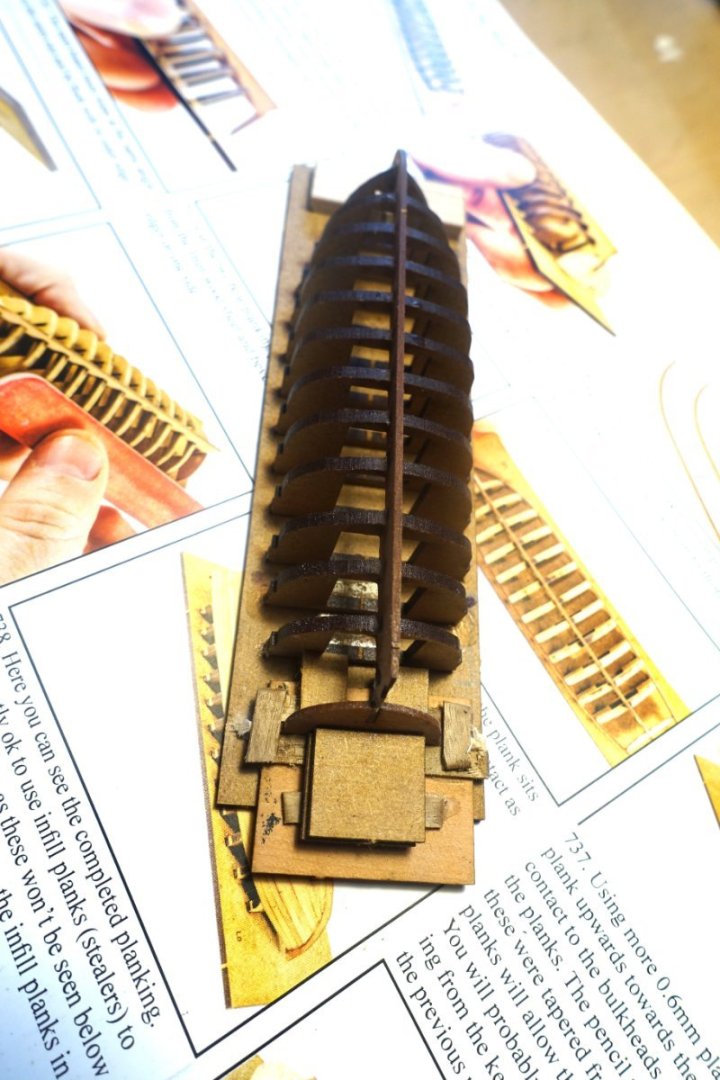
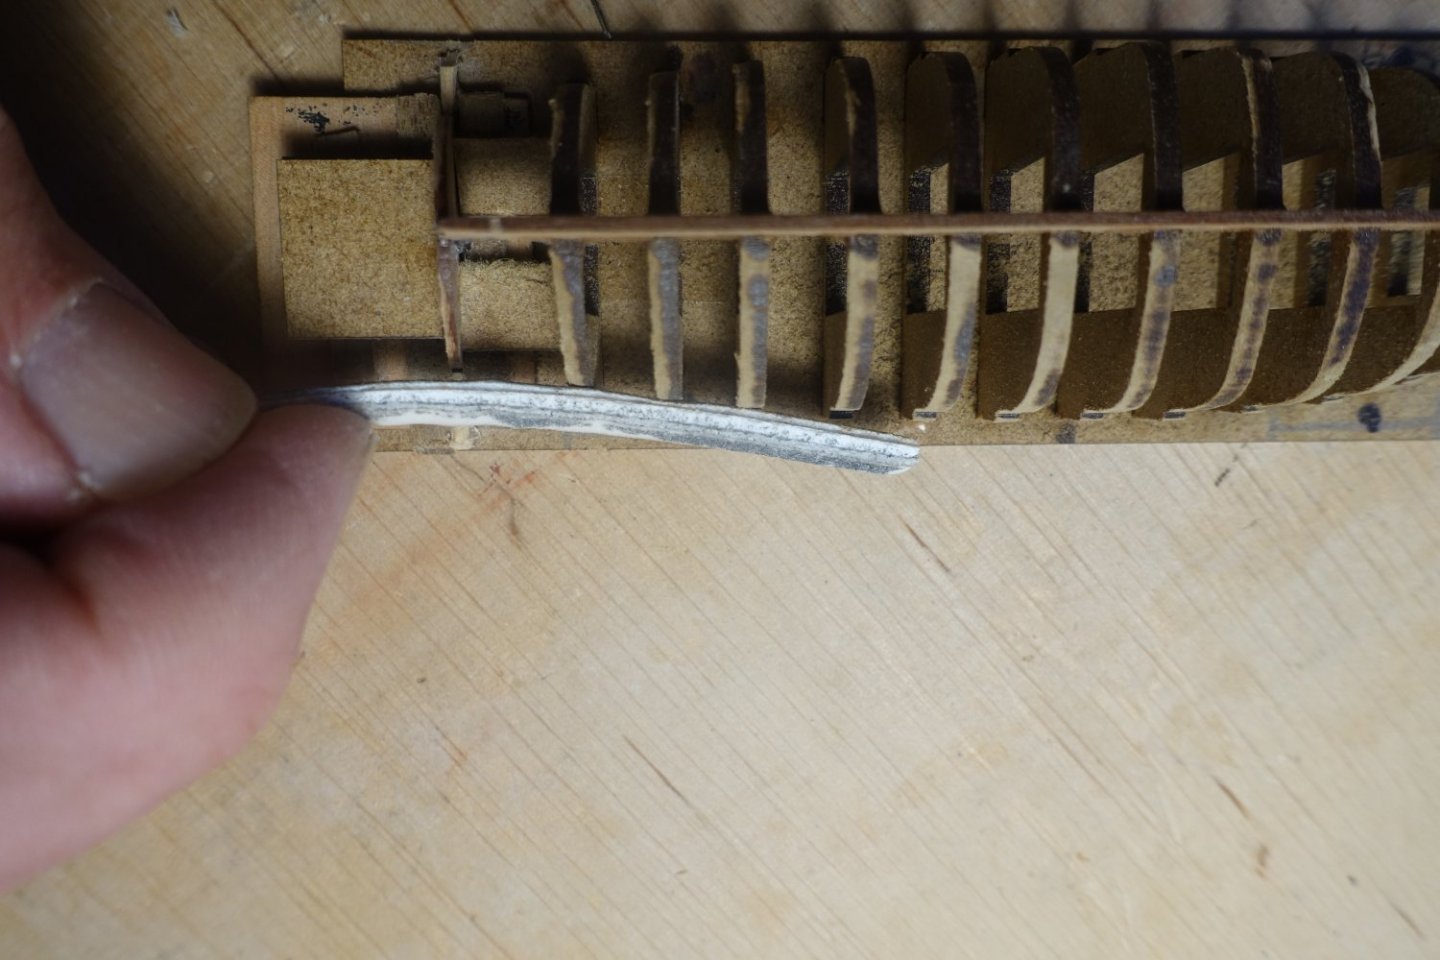
 In this topic consisting of several episodes, I am going to tell you something about the construction of this ship. Although it is very small in real life, and many times smaller on a scale of 1:87, it was a fairly difficult job to get it done and it is based on a lot of research. At the beginning of June 2018, I started building a model of the ship on which Willem Barents sailed to Nova Zembla in 1596. The Northern trade route had to be found, but that failed and Barents had to spend the winter on this island in the Arctic Ocean with 16 other crewmenbers. But the year after they returned to Holland. Shortly after this event, drawings were made of this ship that served as illustrations for the travelogue of Gerrit de Veer, one of the members of the crew. The two ships of Heemskerk and De Rijp. The commander was Barents, who was on Heemskerk's ship. The names of the ships are not mentioned anywhere. As a result, reconstruction attempts were made to find out what the ship looked like. Ab Hoving has written a book with fine detailed reconstruction drawings, which form the basis of the construction of the model with which I started. By the way, I am not supposed to call this model “the ship of Barents”. I never build models of ships that had a name, but only build ship types. In consultation with Ab Hoving, we decided to call this type an "Early Pinas". A Pinas is a very well-known type that was built frequently, especially after 1600 in Holland. This ship dates from just before that time, around 1590, and at that time a number of later inventions had not yet been applied. Since I have built more ship models on HO scale, so 1:87, it was logical that I would do that again. The models can then be compared in terms of size. Installing the rigging took a lot of time, also because it was all still unknown territory for me. In the previous 40 years, I did long-term research on Latin-rigged ships that sailed around the Mediterranean, and built models on a scale of 1:87 as a result of those studies. The rigging and hull construction are vastly different from square-rigged ships. This was my first square-rigged ship. At first I looked despondently at the drawings of the rigging, but after a while I understood all the functions. Repeatedly, I had to remove it again and try again. Ab Hoving was always ready to provide me with the necessary advice. His help was indispensable because he had also carried out the entire research on this ship and had described it in his book; HET SCHIP VAN WILLEM BARENTS. Een hypothetische reconstructie van een laat-zestiende eeuws jacht (A hypothetical reconstruction of a late sixteenth century yacht).ISBN 90-6550-772-8 Many of the techniques that can be found here are also described on my website; www.constantwillems.nl And the same applies to this model; it is a reconstruction, so there is a chance that the ship looked different in details. The construction of the hull A start was made with transferring the trusses, obtained from data from Hoving's drawings, to paper. Those drawings are on a scale of 1 : 75 and it was a simple action to take those drawings to a copy shop where they were transferred to scale HO., 1 : 87. Like all my models, I built this boat mainly from pear wood. Part of it is made of paranapine. It is built on rafters of plywood thick 3 mm. Actually a bit too thick but I tried to imitate the lip welds of the original construction and then a wide enough surface is needed to make those welds on those rafters. The trusses as I first drew them I always work with half-trusses, as can be seen in the drawing. When all the half-trusses on the port side are glued to the central truss, all imperfections on that side can be repaired very accurately by filing away excess material. When everything is satisfactorily secured, I start with the other side. To this end, moulds are made from the already glued trusses, which are carefully sawn out and glued to starboard. Thus, everything is completely equal on both sides. The longitudinal truss is made of plywood 1.5 mm thick. The bow, keel and stern are made of pear wood. These parts were glued all around against the longitudinal truss so that on the port and starboard side there is still above those parts 0,75 mm to support the ends of the planks. The locations of the numbered half-trusses are indicated on the longitudinal trusses, as shown on the drawings in the book. Because the longitudinal truss is quite thin, it can bend easily, so it was screwed onto a board and I added small distance partitions between the rafters. At the bow arrived a filler piece of balsa wood that had been filed into the right shape to give the planks at the bow the correct shape. After unscrewing the longitudinal truss, it turned out to be an indeformable unit and the other rafter halves could be glued. When everything was in place, on both sides of the longitudinal bilge, I made the stern. The construction has quite a few bends and to make that easier, a mold was placed on the work board to make the right shapes. The top piece was made of balsa wood. The black hole is the interior of the cabin where a window was later added. The lower timbers have already been installed here, which already gave the framework a lot of strength. The transom is of one mm. plywood with the planks glued on top in the right pattern. Later, the openings were added. The support boards between a number of trusses are painted black. They are behind the open, or closed, gun ports. The struts for the bulwarks were made of plywood. This is only necessary to attache the planks above the deck which form the bullwark. Once they are glued on, the plywood pieces were carefully removed and then be replaced by the struts in the correct dimensions and material. The top of the bulwark was called the rahout (Dutch word; ra is yard, hout is wood). On an early pinas it was customary to lower the yards on the bulwarks in order to stow or strike the sails. This is how the name rahout came about. On later ships, the sails were stowed or struck on the hoisted yards.
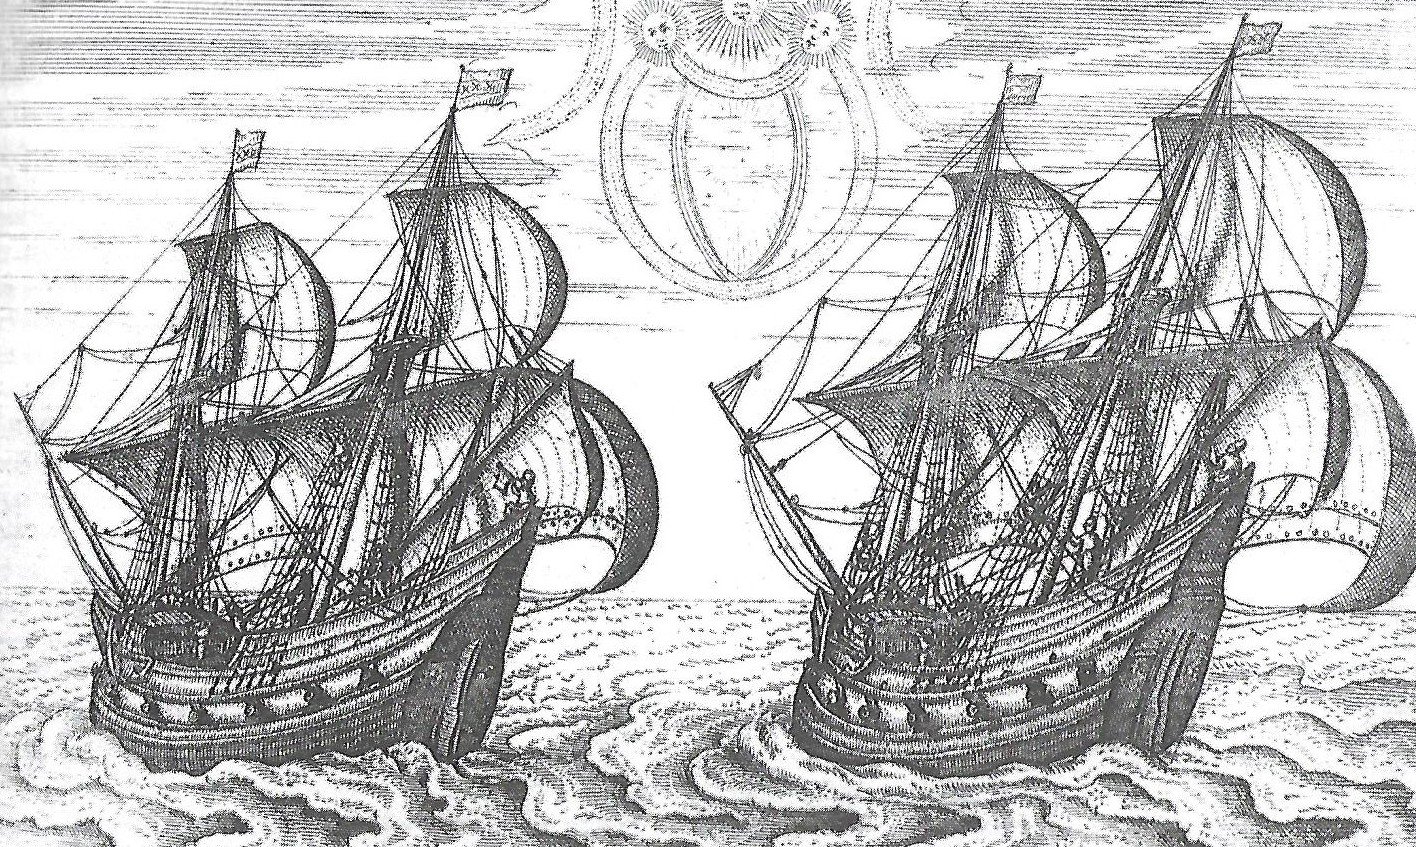


-
 As if I didn't have enough to do, a guy from the Men's Shed that I play at 2 days a week has brought in a damaged model yacht for me to fix. It's not really in terrible condition - a break in the mast, two breaks in the boom, bowsprit broken in at least three places and part of it missing, a broken part of the stand. And needs cleaning. It's a decorator model, solid hull. I've worked on it for about a day so far, allowing for breaks while the glue dries, and have made a new piece for the stand and repaired the mast and the boom. I left the sails and rigging in place as I was worried I wouldn't be able to work out how to replace them. A bit of a problem with tangled ropes as I fixed it, but I think it should sort itself out with a bit of patience. The bowsprit was beyond repair so I told the owner to buy a piece of dowel the same diameter and I'd make a new one. I'll post photos when that's done. Fortunately I was able to find some woodstain that matched the existing, so it's looking like it should all work out OK (touch wood!) Steven


-
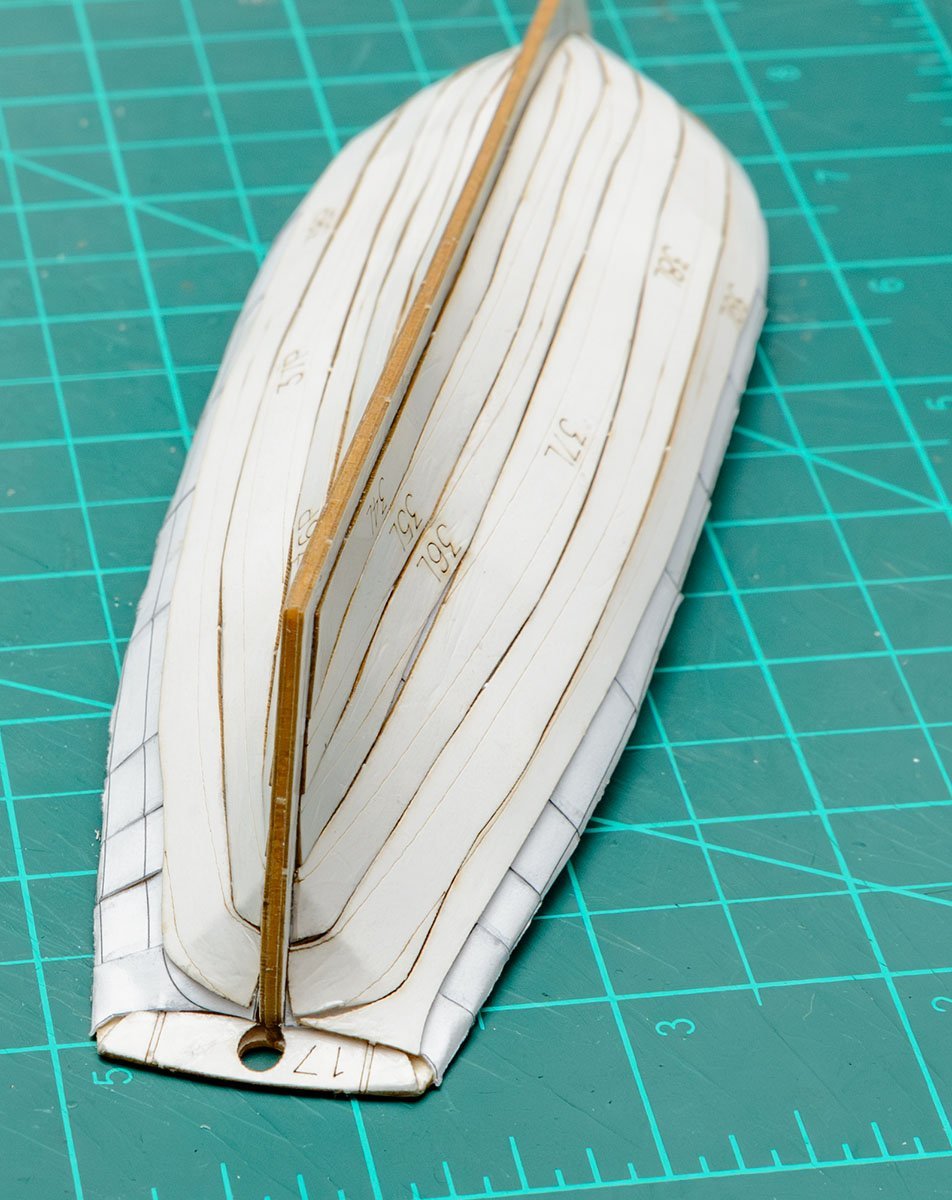
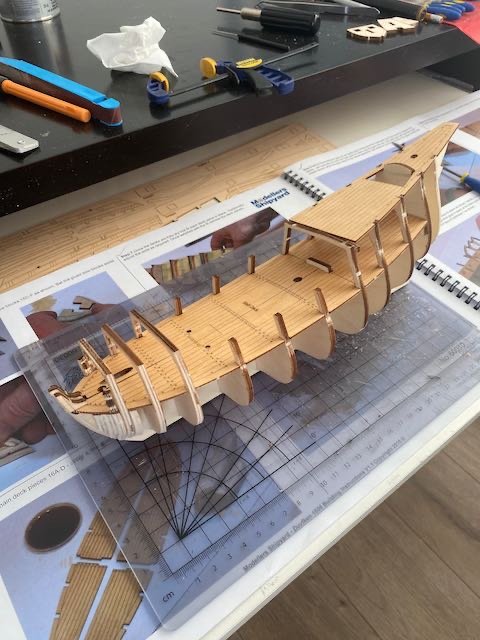
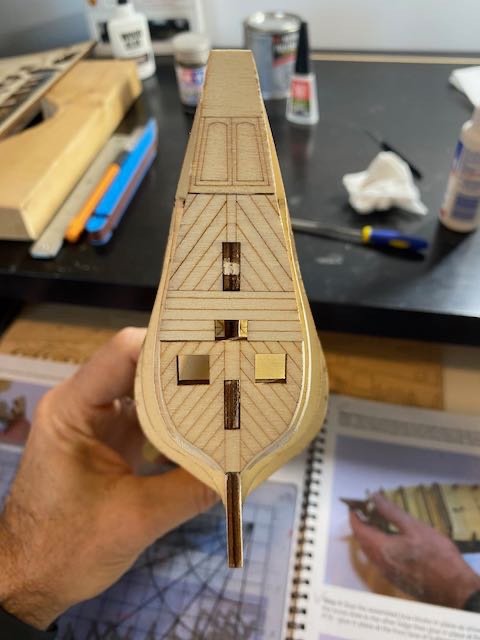
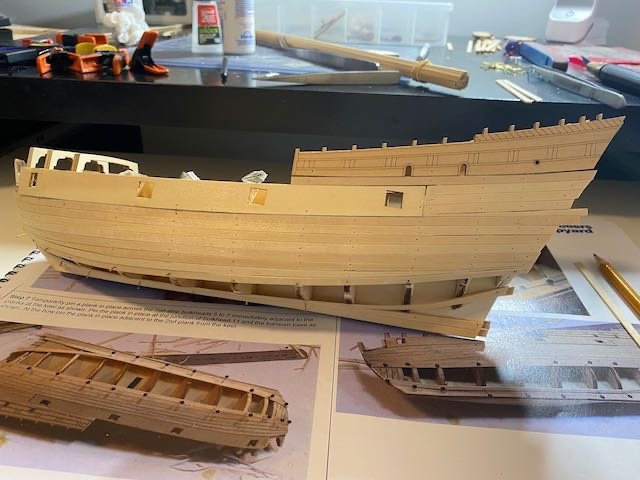
In 2023 bouwde ik een model van een kogge, een schip dat van belang was voor de handel tussen ca 1250 en 1450. Ik bouwde hem, niet vermoedend dat het Stedelijk Museum in Zutphen daar lucht van kreeg. Men vroeg mij het model onderdeel te laten worden van een expositie over de Hanzetijd, waar dit schip een grote rol in speelde. Het verslag ga ik laten zien in drie delen. Ik maak op voorhand excuses voor mijn niet perfecte kennis van de Engelse taal, maar ik koos er toch voor dit in het Engels te doen. Er komen veel termen in voor die niet goed in computertaal in het Engels zijn weer te geven. RECONSTRUCTION OF A COG Scale 1 : 87, Built in 2023 This reconstruction is exactly based on the measurements and construction of an excavated shipwreck in Holland in 1983, registrated; Oz 36, known as Nijkerk II. The results were in 2021 published by the archeologist Karel Vlierman in 2021 ; “Coghen, kleene coghen ende schuten”.In this publication you find detailed drawings of the excavated parts and a reconstruction of the hull. The German book: ; “Die Kieler Hansekogge, der Nachbau eines historischen Segelschiffes von 1380”, written by Uwe Baykowsky, 1991, was a great help especially for the rigging and the missing parts of the ship such as the mast and the yard. The wreck is until now the most complete cog which is excavated, The starboardside of te hull was almost complete. A lot had to be reconstructed on paper but the result is very satisfactory. Combined with remains of other excavated cogs it was possible to build this model Dendrochronologycal the ship was build in 1320, and wrecked around 1355. No remains werd found of the mast, rigging and rudder. Only a few marks point to the posibility of a castle on the stern. In the publication of the excavation nothing is mentioned about the sailing capabilities, also the lenght of the mast is not reconstructed. Before I started I did a lot of investigation to Mediaeval pictures Mainly concerning the rigging, the mast and the sail. Planking the hull The model is made of Mahogany vener. Attached on a frame of triplex. The keel, bow and stern are made of pearwood, attached to the long middle frame of triplex On the middle frame I attached the frames at first on the righet side and filed them in the correct shape of the hull. After that I made exact copies of all the frames on the left side and attachede them also on the middle frame. I started planking at the keel. All excavations show that the first three planks near the keel were carvel built connected, but only in the middle. Going to the stern and to the bow this construction changed in clinker built planking. The rest of the hull is entirely clinker built. The wreck showed that the hull on each side consisted of 15 planks, clinker built. I made this amount also on the model. Every plank consists of three or four parts, just like the real excavated planks The bow during planking before sanding and filing On the sternpost curved timbers were nessesary. Here the timbers in paper, before making them in wood. Most wooden constructies on the deck consit of several layers of veneer, glued upon each othter until the exact thicknesses. Above the deck the planks are attached on a number of frame timbers which are visible above the deck. In the model I made the same amount as found in the real ship. The upper plank was needed to attache them. Before placing the frame timbers I removed stsp by step all the temporary upper triplex parts of the frames.
.thumb.JPG.e95a84a84657bfd8ad8809647c5e81d7.JPG)
.thumb.JPG.cb410a0ce1af055719883d50c649bd7d.JPG)
.thumb.JPG.6b2505d646b8500acc9de09982c5221d.JPG)
.thumb.JPG.bcf5e4b76cd150195c46240c25b3591e.JPG)

-
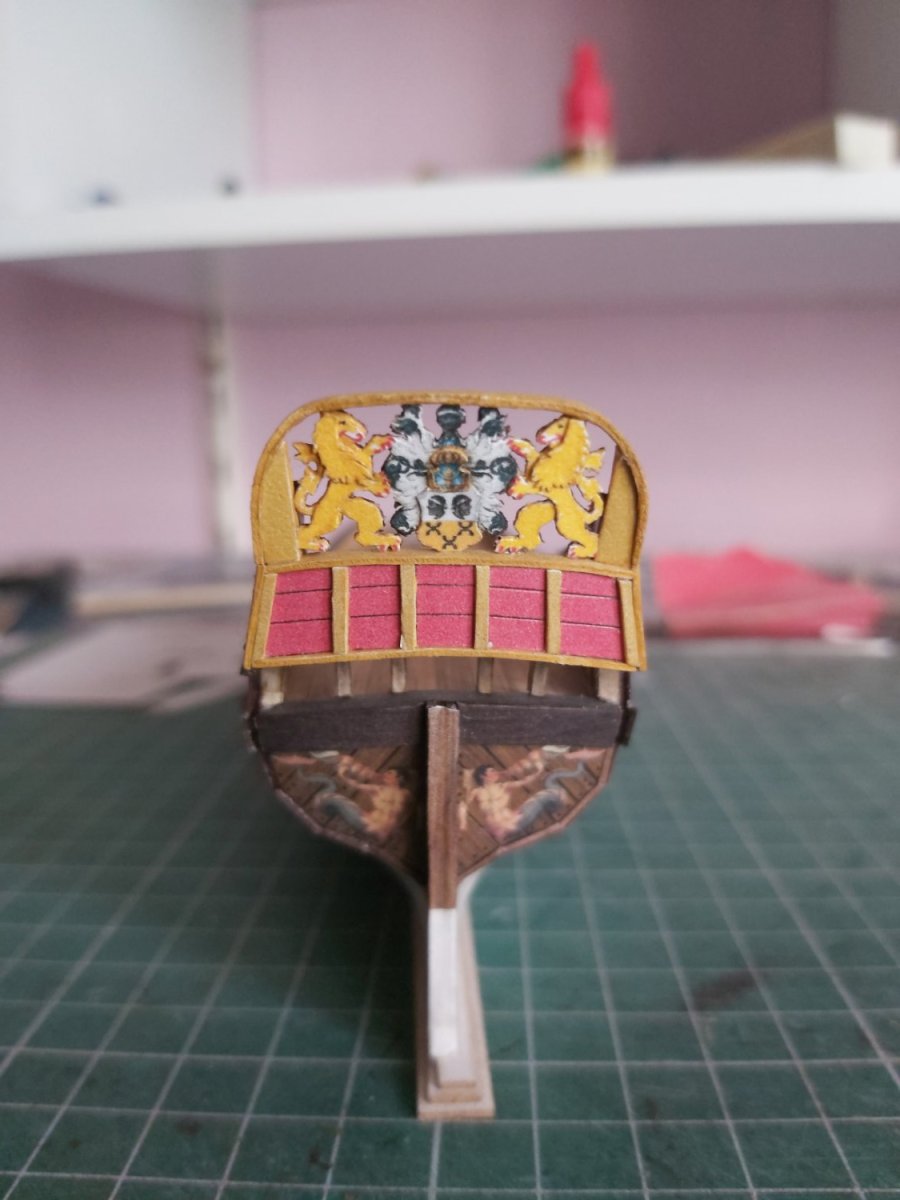
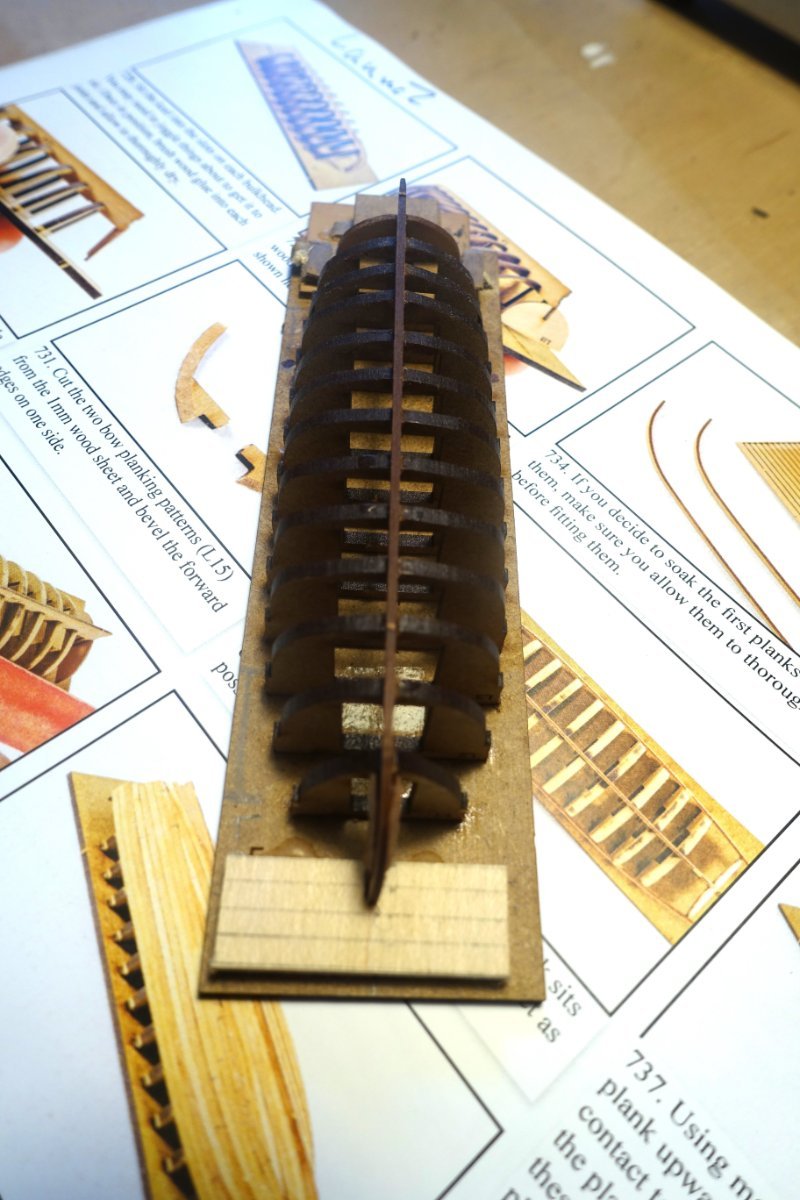
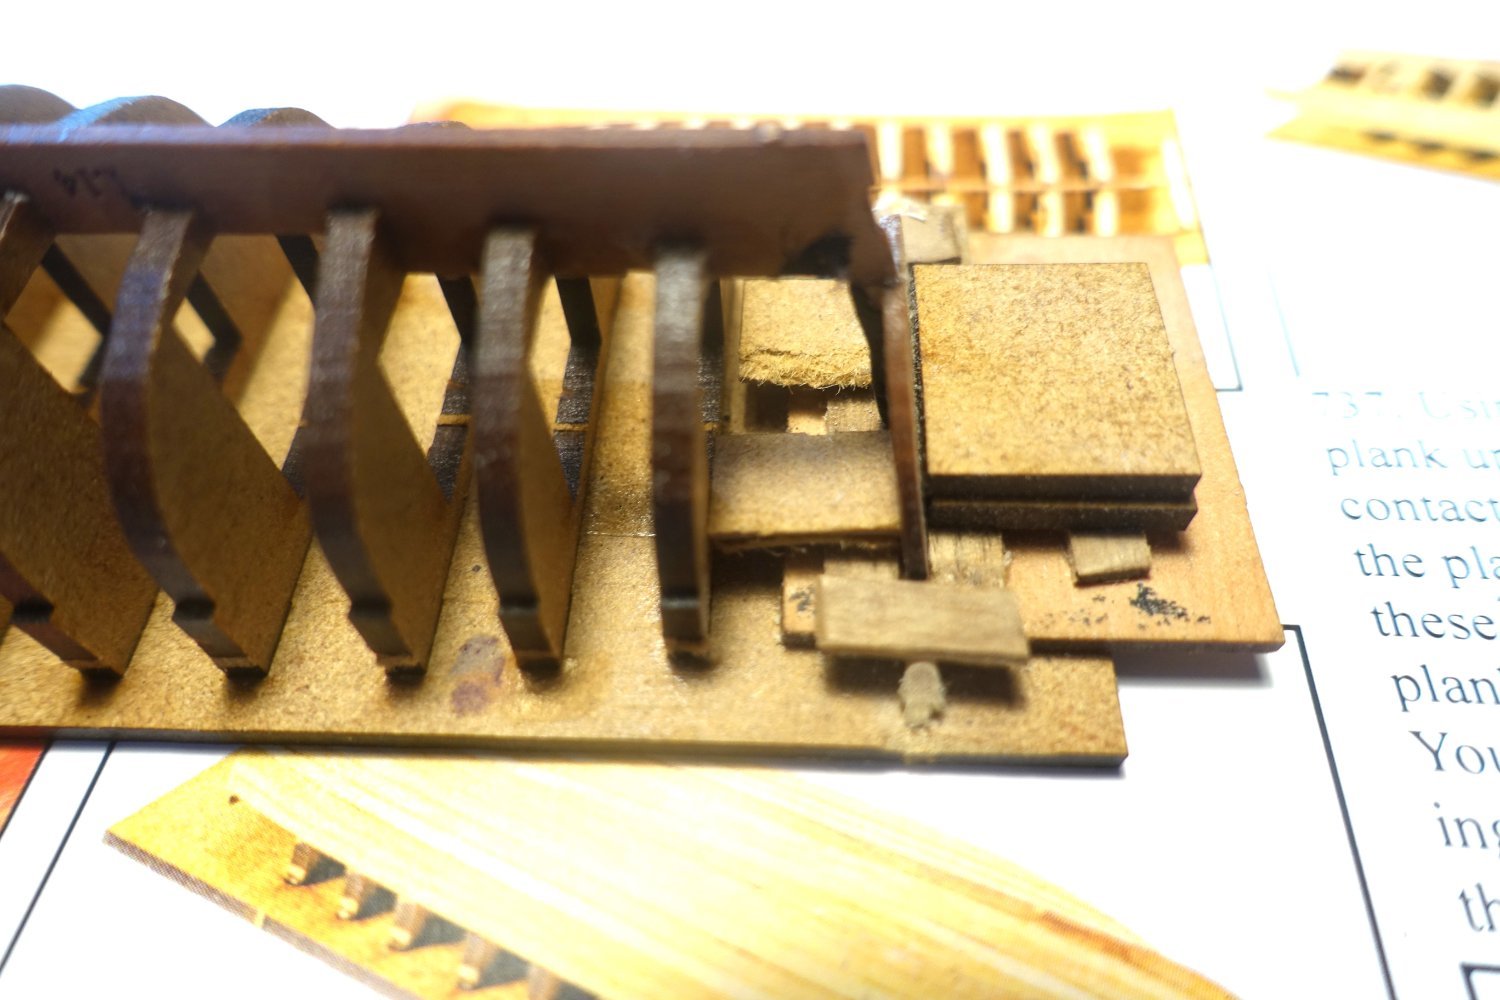
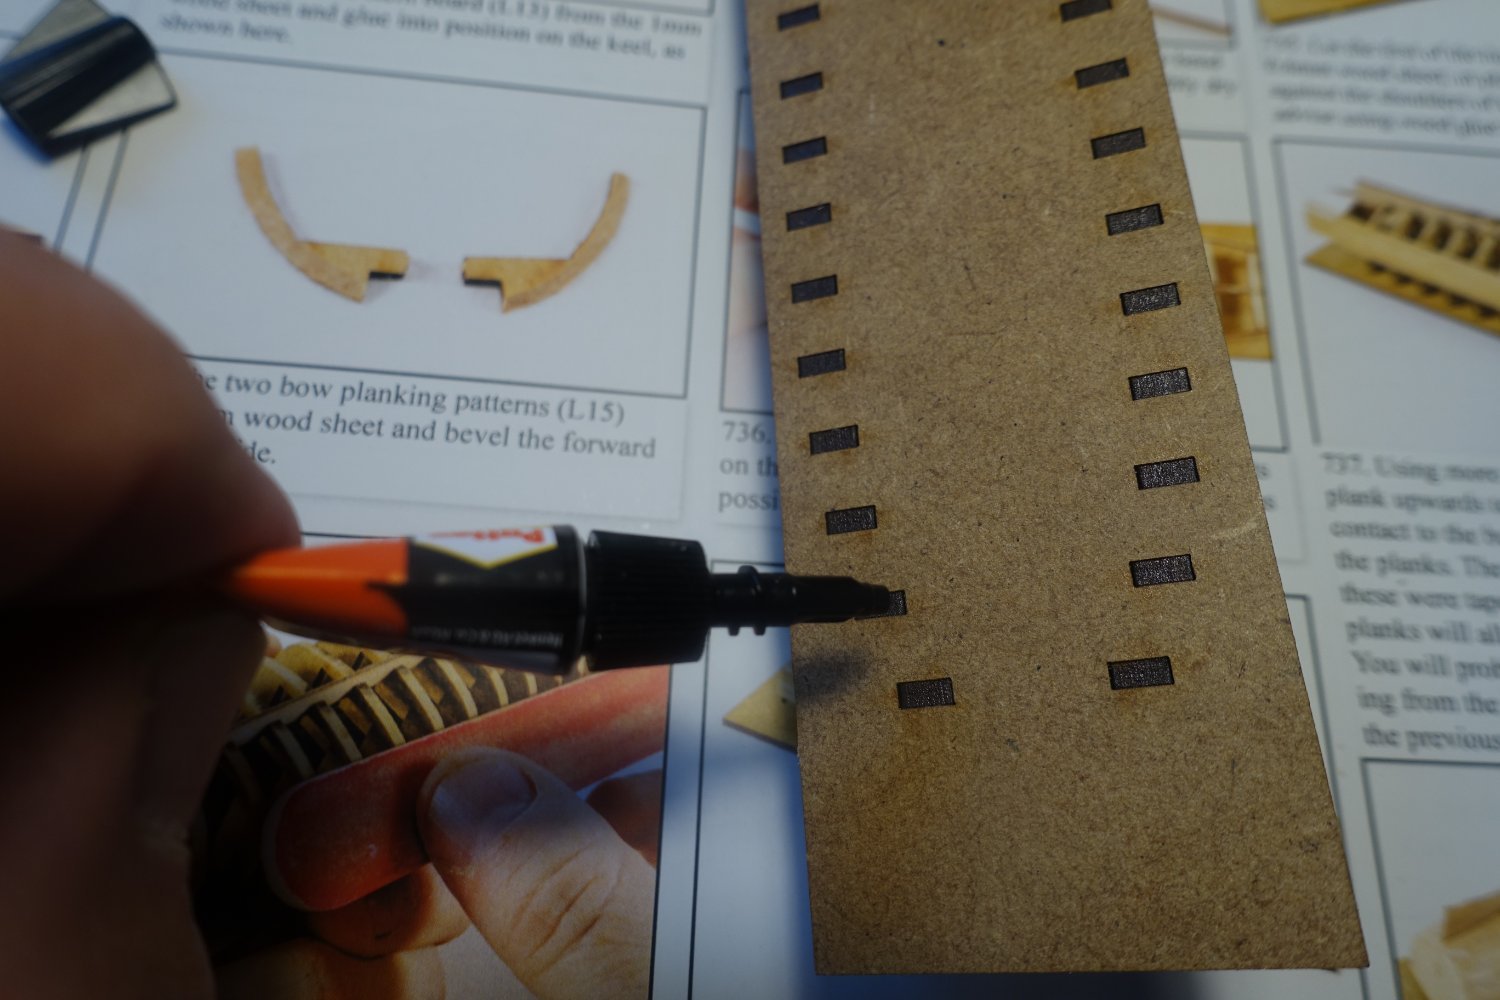
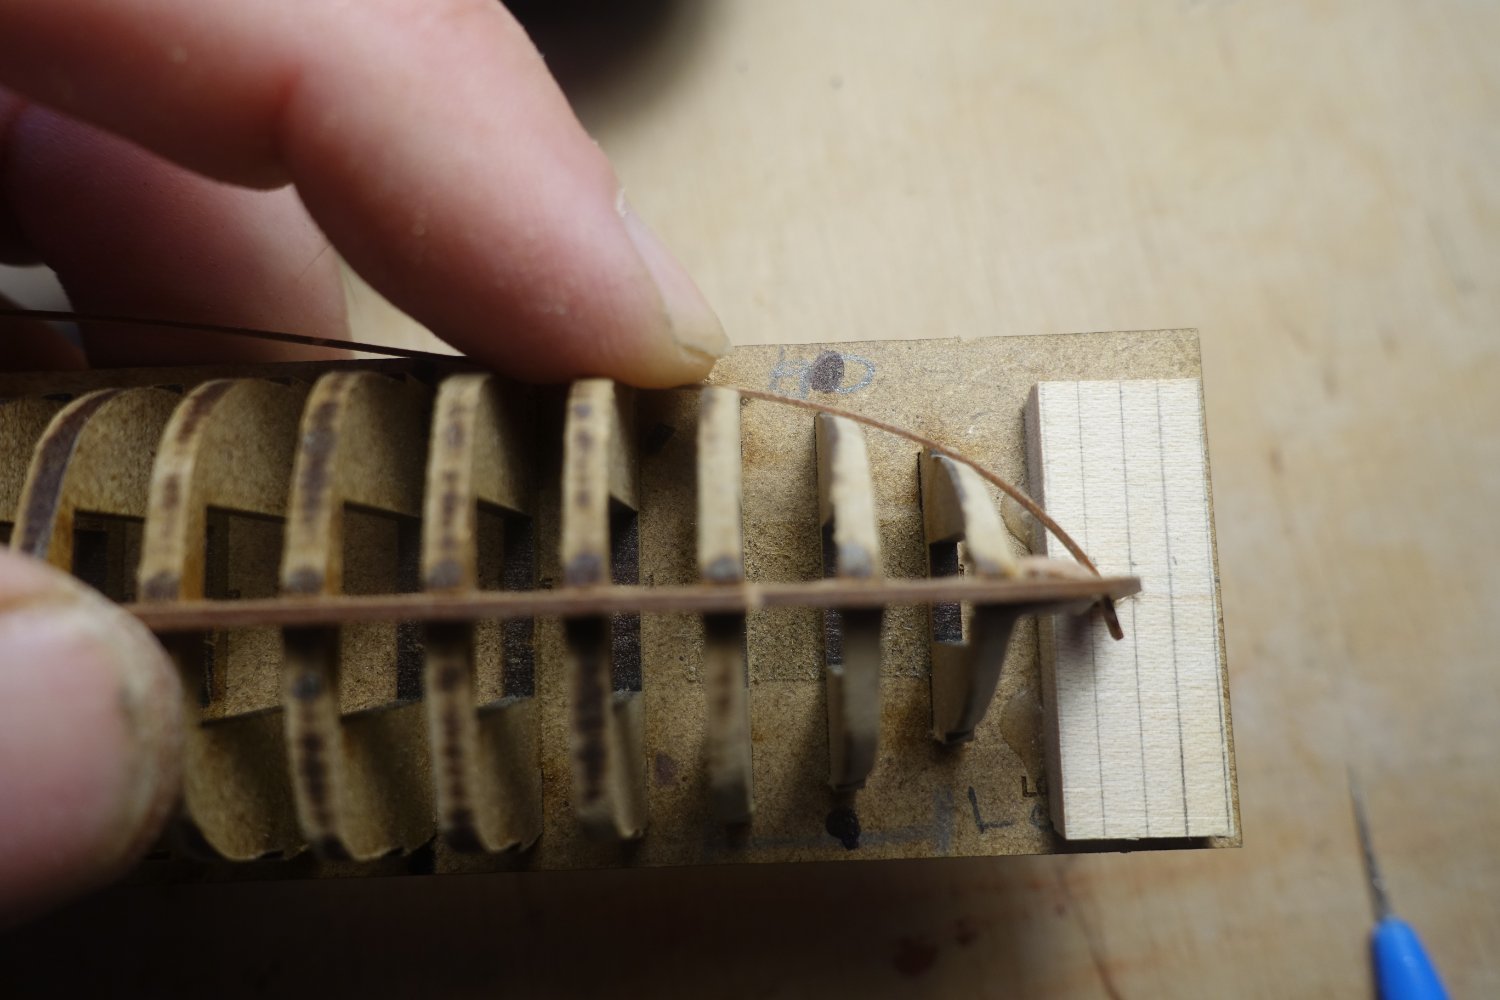
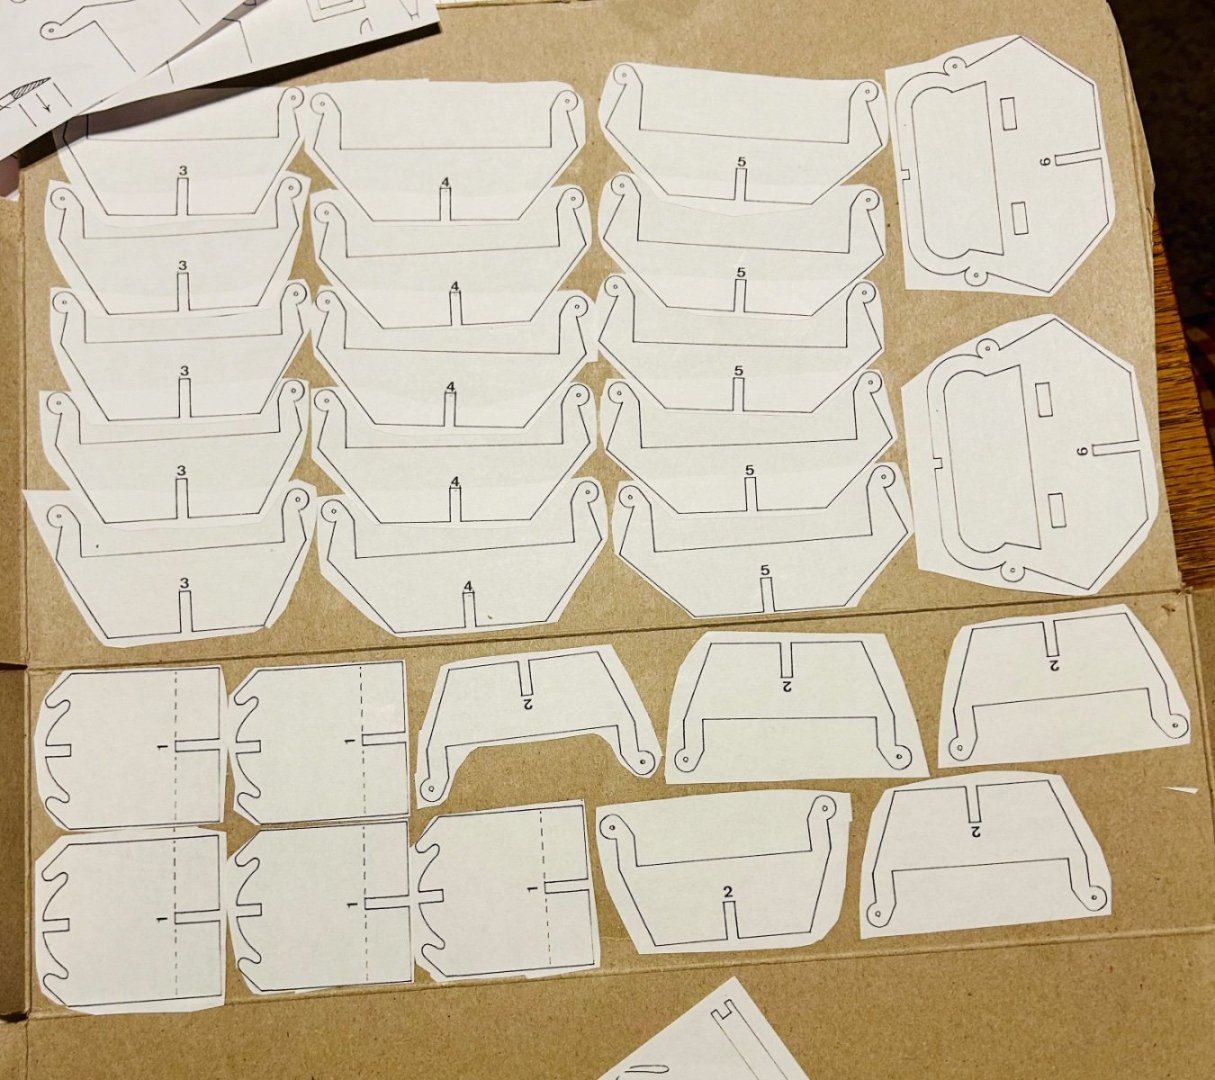
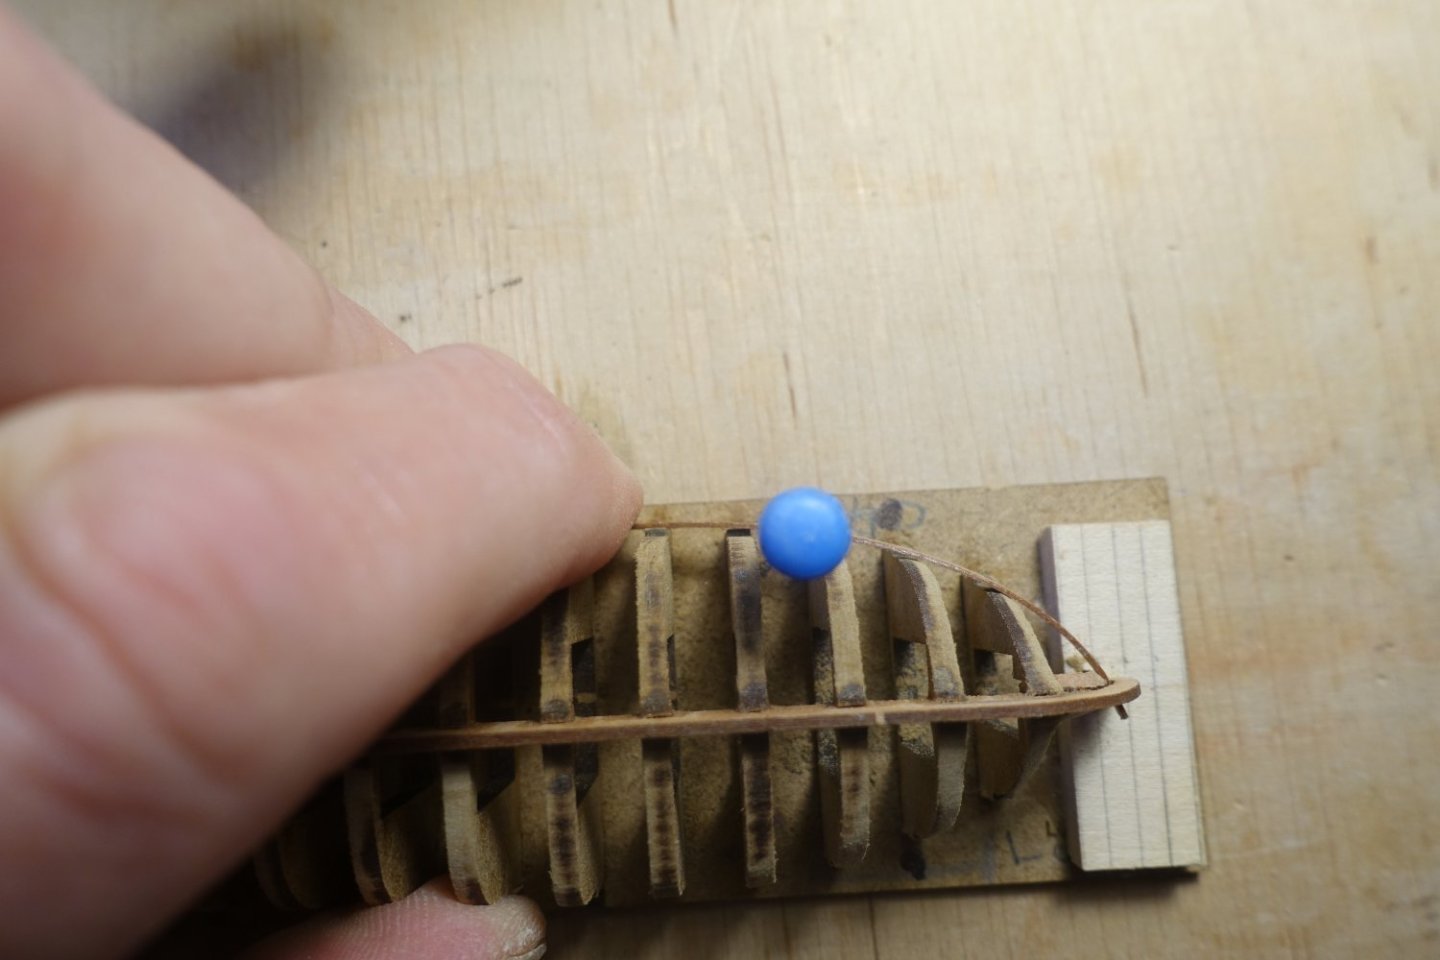
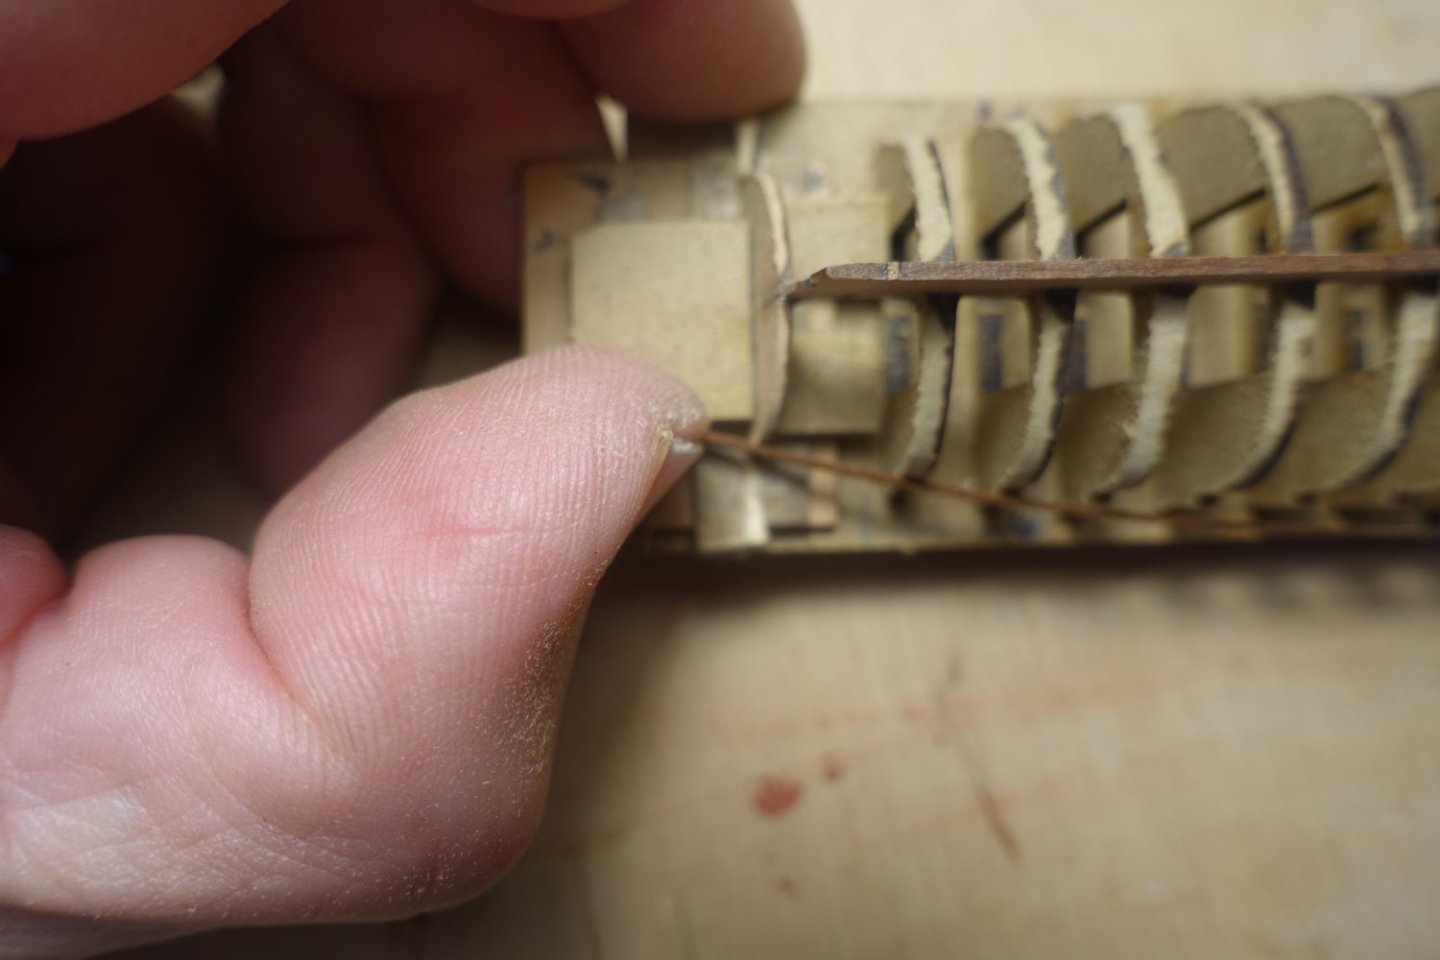
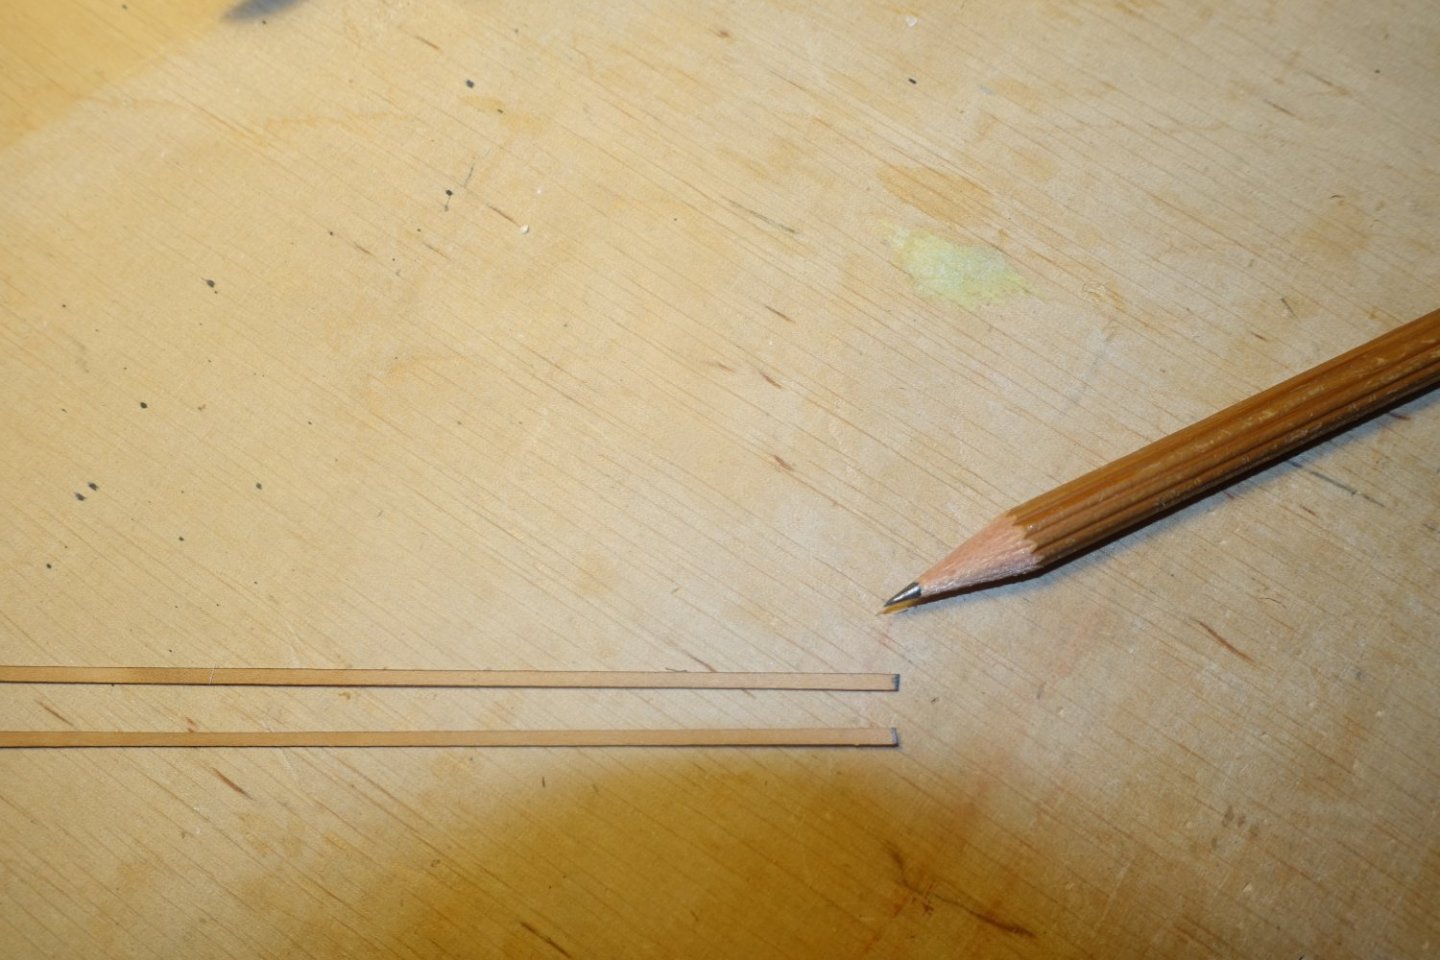
 Hello colleagues Many modeler friends said to me that it would be nice to assemble a cardboard sailing ship, but rigging is generally too difficult. Therefore, a few years ago I asked Ab Hoving for an idea for a simple model with the simplest possible rigging, and I didn't have to wait long (2-3 hours) when a precise and immediately three-dimensional design of a "recreational yacht" appeared on my computer. ", i.e. "Speeljacht". This design is very similar to the commercially available plans drawn by Cor Emke. [url]https://www.modelbouwtekeningen.nl/nvm-1006017-speeljacht-volgens-nicolaas-witsen-167.html[/url] Recreation on the water was probably not an invention of the Dutch, because in the tomb of Tutankhamun an image of the pharaoh fishing on the Nile was found, which can be considered entertainment on the water. However, until the 17th century, sailing ships of various types fulfilled basically only commercial and war functions or were used for work, such as fishing. It was only when the trade in Asia enabled merchants to build great fortunes that yachts for entertainment appeared. Maybe it was then that "yachting" appeared as a way of spending time with family, friends or for business purposes. Not only did people relax by sailing for pleasure, but such expeditions were accompanied by delicious feasts, including plenty of drinks. Nicolaes Witsen even mentions a "beer house" under the aft deck. In addition to romantic trips, owning such a yacht meant prestige and/or wealth - a bit like modern billionaires and oligarchs. The decorations were chic, but not flashy. The Netherlands was a Calvinist country, so one had to be modest. There was usually a family coat of arms on the stern. A similar model was developed in wood by Kalderstock. And for the inquisitive and curious: the Clean2Anywhere Foundation has been experimentally recycling plastic for several years, building replicas of small historical yachts from it, including this speel yacht. Link to one of the videos where you can see the construction of a speel yacht: [url]https://www.youtube.com/watch?v=eqrIHFulcZU&t=3s[/url] And how is my construction going? So quick and easy that I didn't take many photos, especially obvious stages like frame frames,... ...or "first - false planking" The retouched cardboard edges of decks has always "disgusted" me, so I experimented a bit and glued narrow strips on the visible edges, imitating the face of the boards. The stripe is 0.7 mm, my hand trembled a bit and it didn't turn out perfect, but I think it's a very good idea for the future. Since masking the edges like this has a future, I went ahead and played with the edges of the planks at the stern. There is also something to complain about, but that's my fault - I liked the idea itself. A large number of visible frames required tedious gluing and retouching, and initially I planned to glue them to the hull first and then continue covering them with the planks. Fortunately, before I started committing such stupidity, I changed my concept and built this component separately, finally gluing the finished one to the model. In total, in four stages: 2 amidships and 2 aft. The last layer of planks (in color) went very well, and of course the corrections were made on the edges that are covered with wales. This is how it turned out: Modest decorations (as I wrote at the beginning) will only be made of cardboard (no resin), so that the model is fully paper as standard. It was necessary to choose the coat of arms of some noble family. The final choice fell on the van Loon family, also because their "palace" still houses a popular museum.([url]https://www.museumvanloon.nl[/url]) That's it for now, only decorations, leeboards and very simple rigging remain. Regards Tomek


- 9 replies
-
- 17
-

-

-
- Speeljacht
- card
- (and 1 more)
-
 I'm back with a build log after a bit of an absence. I've had multiple health problems over the past year, which is in part why I didn't do a build log for my HMS Pegasus and why it took me so long to build it, being away from my shop for long periods of time. However, I seem to be in decent shape for the time being (touch wood) and am back at my workbench. In my hiatus I had been pondering what my next project would be when I stumbled across this model on the Billing website, and after a little bit more research I knew I had found it. This one appealed to me for several reasons: -I wanted something simpler than my last few builds had been -this one has almost no rigging! -it's a Canadian boat. I haven't seen any other one available as a model, apart from the Bluenose -it has a remarkable history - it's only the second boat to ever travel through the Northwest Passage and the first to make the trip twice - it's the first do make the voyage in under one year and it's the first to circumnavigate North America - it resides today at the Vancouver Maritime Museum, has been declared a National Historic Site and the great Stan Rogers recorded a song about it. -there are plenty of pictures and videos online to use as a reference -did I mention that it has almost no rigging? When I was in my 20's I built (very badly) a Billing model, but I don't recall if the quality of the kit was good or bad and I had no frame of reference in any case. So this is for all intents and purposes my first Billing kit and I have a mixed reaction to it. So far the good things are: -the laser cutting is very good and the bulkheads and centre keel fit together extremely well. They're as good as I have ever encountered. -there are quite few specialized brass fittings which are really nice and of good quality. -while the model is simplified, there are no glaring errors in its representation of the real boat. However, there are some negatives too: -there are too many poor quality plastic fittings which come on a sprue just like it was a plastic model car kit. -the hull and deck planking material is pretty rough and not very consistent in width. -while I did want a simpler model, there is too much simplification with this one. Built straight out of the box it would look like one of those gift shop ship models. At 1:72 it's large enough for the designer to have incorporated much more detail. -the plans are poorly drawn. The instruction book is all but useless, which is fine - I didn't expect it to be otherwise, but the plans are disappointing. They appear to be a 1:1 representation of the model, but they are very inaccurate. For example for some of the deck components there are discrepancies in size of up to 1/2" between the elevation and plan views. It's impossible to take measurements from the plan. Nevertheless, it's going to be lots of fun adding detail and upgrading many of the fittings. I currently have big orders in at BlueJacket and Cornwall. So far, I have the hull planked, in my usual "suitable for filler and paint" style. I'm a terrible planker, but I never worry about it because filler and paint are my best friends. I've used some planking from my stash, rather than the kit provided planking. I've made two improvements to the stern area. The kit instructions would have you just cut all of the planking off even at the last bulkhead before the stern. Then you add the two stern blocks and sand them even with the finished planking, leaving them unplanked, just to be painted. I chose to install the stern blocks first and plank over them in the usual way, however I found it to be quite a difficult stern to plank. Secondly, the kit provides for no opening to accept the rudder; it's meant to just butt up against the bottom of the hull. The real boat has a framed rectangular opening, so I added that detail. That's where I'm at! David
- 61 replies
-
- 9
-
-
- St. Roch
- Billing Boats
- (and 1 more)
-
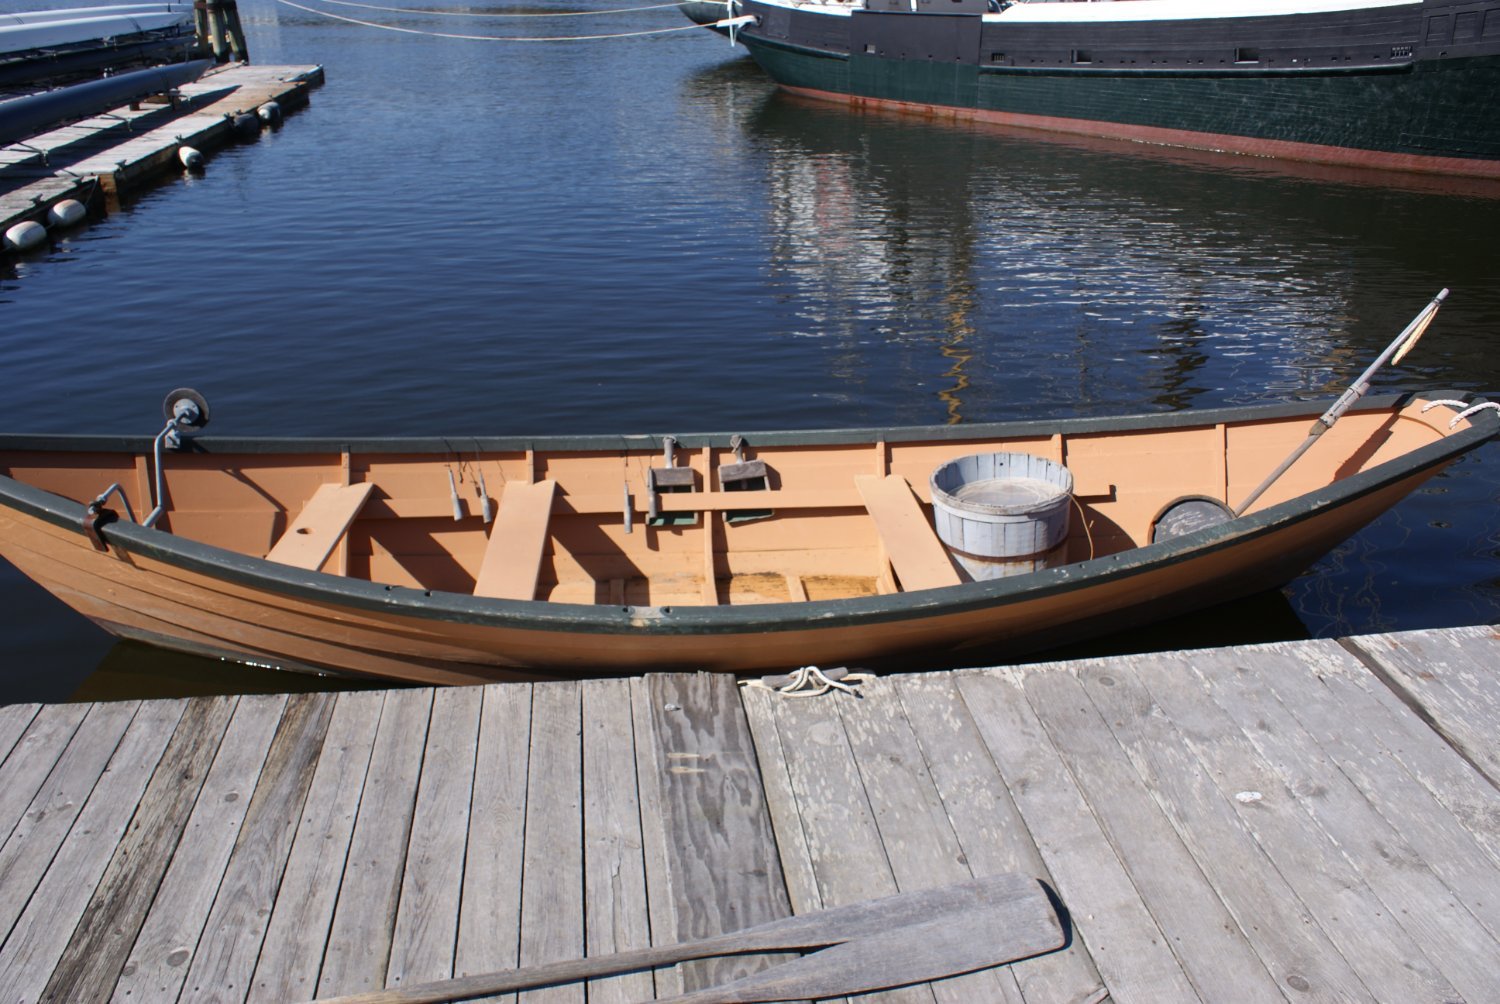
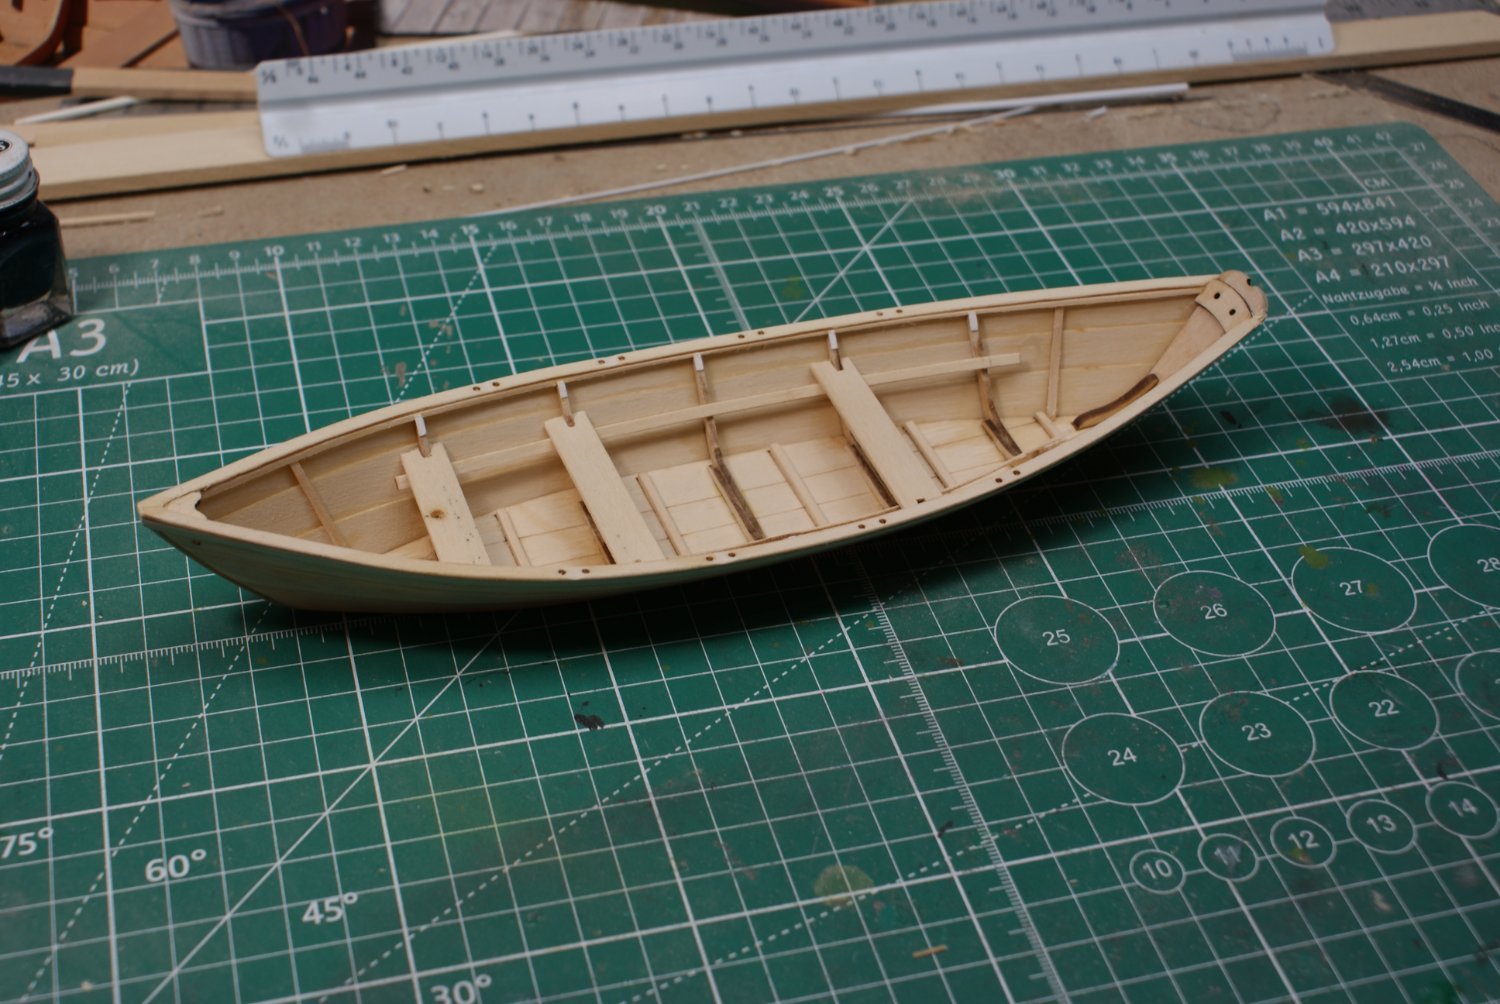
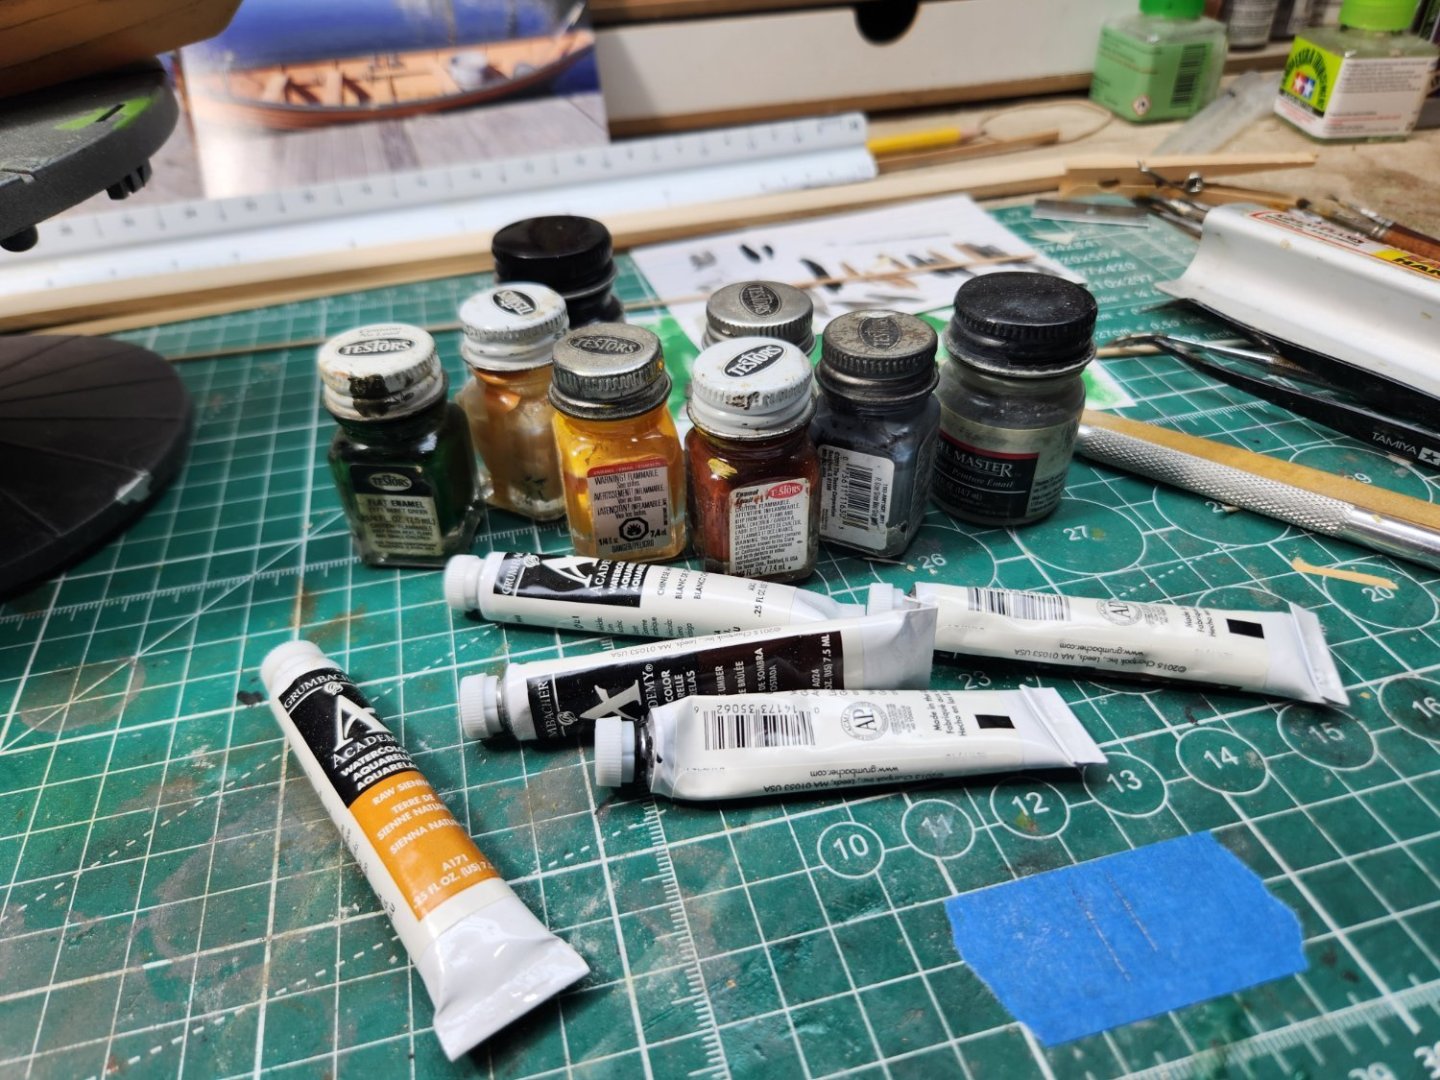
 Started this build approximately six weeks ago, it's my first build log. As a volunteer at Mystic Seaport Museum, I regularly pass a Dory exhibit and I thought it would make an interesting subject for a Diorama. My original thought was to recreate the scene in the photo, the boat tied to the dock. However, my biggest concern was modelling the water. If I mess that up, the project fails! Another option I considered was to build a scene of a Dory on a Schooner. So, that's my plan. Decided the base would be a section of deck, the last Dory being prepared for launch from the L. A. Dunton Gloucester Fishing Schooner, circa 1923 (currently undergoing full restoration at Mystic Seaport Museum) for daily fishing. The Dunton carried 10 Dory's stacked five high, port and starboard. She had a crew of 24, Captain, 3 crew, and 20 fisherman (2 per Dory). Dories could carry several tubs of longline trawl that would be set away from the schooner. Each tub could carry as much as 1,800 feet of line with a hook every fathom, or six feet. If a commercially viable fish was found on 50 of those three hundred hooks it was considered a decent haul. Dory's were painted a buff color which would show up in the fog and in bright sunlight, the same color the spars on the mother ship would carry and the dory might have a small rope on the bung, should the boat overturn. There's lots of small detail that can be added, line tubs, dory fog horn, trawl anchor, trawl buoy, bailer's, sail, etc... Fortunately, I found some 1/24 scale figures I think I can modify. To start with, build the Dory! The Kit is the Model Shipways Lowell Banks Dory, "a beginner kit is not just for beginners"! No need to document the build, there are many Dory Build logs. So, fast forward, after few minor kit modifications, base painting, I started the weathering is a work in process in process. I mixed my own batch of base colors using enamel paints. For washes I use "only" watercolor paints". Not acrylic paints. Watercolor paints are much more forgiving, if you make a mistake, just wipe off with a damp cloth or paint brush. I never weathered a ship model; I'm having fun with this! Some dark grey wash, dry brushing and paint chipping, the detail starts to develop.


- 11 replies
-
- 10
-
-
- Model Shipways
- Finished
- (and 2 more)
-
 While working on my latest model, HM Cutter Trial from Vanguard Models, I realised that it would be a good idea to have some further practice in hull preparation and planking before embarking on another full ship project. I’m hoping that this project will teach me some new techniques and help me make a better job of planking than I have previously. I am using the suggested ¼” foam-board as a base on which to build and used spraymount to glue the body plan to it. Laying out the keel, keelson stem and stern, it is clear that some trimming and fitting of the bow keelson is needed The whole kit is made in basswood making it pretty easy to cut and sand. The risk is taking off too much so slow and easy is the rule. Once the stemson is cut to length and sanded to fit the keelson lines up pretty well with the drawing. I didn’t need to fettle any of the slots for the bulkhead on the main keelson but the bow keelson required a bit of a tickle with a sanding stick. The rabbet is marked up with a pair of compasses. I measured the thickness of the sheets provided for planking which varied between 0.85 and 0.99mm. I took 0.9 as a rough mean and marked the rabbet. I used a chisel to remove the rough, then a file and finally scraped it clean with a razor blade. The keel and keelson were straightforward as a simplified 45º angle was used for the whole length. The stem is a little more difficult to do with a changing angle as the rabbet rises up the the stem pieces. However the manual provided and Toni’s log Half Hull Planking Project - Planking Downloads and Tutorials and Videos - Model Ship World™ provide plenty of useful detail and photos to help work it out Once the rabbet is cut, the keel and stem pieces can be glued up. I have used minimal glue to fix the pieces to the board to make it easier to remove the model when completed. At this stage the deadwood and stern pieces are not glued . David
- 15 replies
-
- 7
-
-
- half hull
- Half Hull Planking Project
- (and 2 more)
-
 While waiting for the HMS Speedwell project from Syren Ship Model Company I am building some smaller models to "fill in the spaces" in some of the cabinetry where the larger models will not fit.
 -
 An extensive build log in images and much more may be viewed at my web site geneberger-models.com

-
 As before, this will be a speedy project rather than quality work. This kit was released a year ago, and I bought it with full options, such as laser cut hulls and 3D printed blocks and canons. You should check out other project by Jsk.


- 16 replies
-
- 2
-
-
- Revenue Cutter
- Seahorse
- (and 2 more)
-
 Hello, sorry for not posting the photos of building stages, as I started this model on 2021, but most work was done in past 2 months...I think a real version of this boat would have allready been launched 🙂


-
 Started this before I joined, so no early pics. It's new tooling from 2023, good fit, nice and crisp details. Instructions aren't very good I believe, but maybe I am spoiled with Tamiya instruction quality. Scale is too small for me ( at my age 😬 ) but I did somehow manage to do the pe parts

-
 So , here goes, I've decided to have a go at modelling and having always being fascinated with the Titanic I thought I would start there. I've completed about half of it so far and thought I would build a log, as much for me to look back on as also to gain some expert tips from members here. I have also bought an Occre Polaris, which will be next project, I thought I would try plastic and wood and see which I like best, although I think in the end I will continue with both for variety. I've been looking at the amazing build logs on here for this model and I'm already learning, which is why I started in the first place. Anyway, here goes....
 -
 Here I go again! Having finished the ‘Mayflower’ with some difficulty I needed some more occupational therapy! In January of 1972 we found ourselves on the SS Canberra. My family and I were sailing from Southampton to Sydney. Our eldest son was eight years old at the time and to remind him of the boat we bought an Airfix model kit of the Canberra which we thought that he might build at a later date. Time went by and the Canberra kit joined the ‘Mayflower’ and went into ‘storage’ with the ‘Mayflower’ for the next 50 years. They travelled from Brisbane to Wellington to Germany with us and now, with my grown up son’s permission, I’m starting to try to build the SS Canberra! This build log will describe my problems and solutions (if any) with the build. As others have already commented, the kit was not very well made so features in the polystyrene are not often clear and pieces do not seem to fit too well sometimes. This time the first step that I took was, after washing the parts, to spray everything with a white undercoat! I soon found that the major difficulties with the build were going to be with the painting of the individual parts and applying the transfers (decals). As I found with the ‘Mayflower’ my hands were not too steady and I did have some problems masking and painting some small parts. The windows were a nightmare (see later).
-
 Howdy folks. I made an introduction topic in early 2020, bought a couple starter kits and tools, and then a bunch of weird stuff happened which brought about my never even opening the shipping box. Now as the weird series of events continues relentlessly toward no clear destination, I've arrived at a point where it makes sense to build some model boats. The short version leading to this point involves: Originally living in my vehicle on the Appalachian Trail, and perceiving some time and a need for some hobby to keep me busy in early 2020 while I was living alone in one of the trail maintenance facilities Having to get out of there after it was condemned and deciding it was time to actually try settling down in Maine as I'd long wanted to do Acquiring vacant land which used to be a farm in Midcoast Maine, converting a shed into a cabin, and building a timber frame house Deciding I'd like to get into sailing, falling in with sailors and boatbuilders, and winding up with full-size wooden boats about the place, including an actual Grand Banks dory which my housemate (one of the aforementioned boatbuilders) brought along Deciding I'm really very interested in building a weird 25'6" Phil Bolger-designed schooner, the William D Jochems, and ordering plans Although I have built a house I still work all over the Appalachian Trail, and having a sailboat that I can trailer without great difficulty, use as a camper during the work week, and easily launch and rig in the nearest handy body of water on the weekends seems pretty snazzy Deciding to build a model of that before building it full-sized, and finally Deciding to build the model boats I already have before building a 1:16 scale William D Jochems before building a full-sized schooner in my garage So there's the short version leading up to today, when I made space on the old table on sawhorses that has floated around the house serving in numerous capacities. It was previously sitting against a wall where I'm going to start building a big buffet cabinet for the dining room part of the large open "great room" space. I cut the packing tape, opened up the Lowell Grand Banks Dory box, and took inventory of its contents plus the other tools and stuff I'd ordered so long ago. That's as far as I got tonight, that and the logging back in here, writing this, and hoping it may be of some entertainment. Cheers, Shepherd
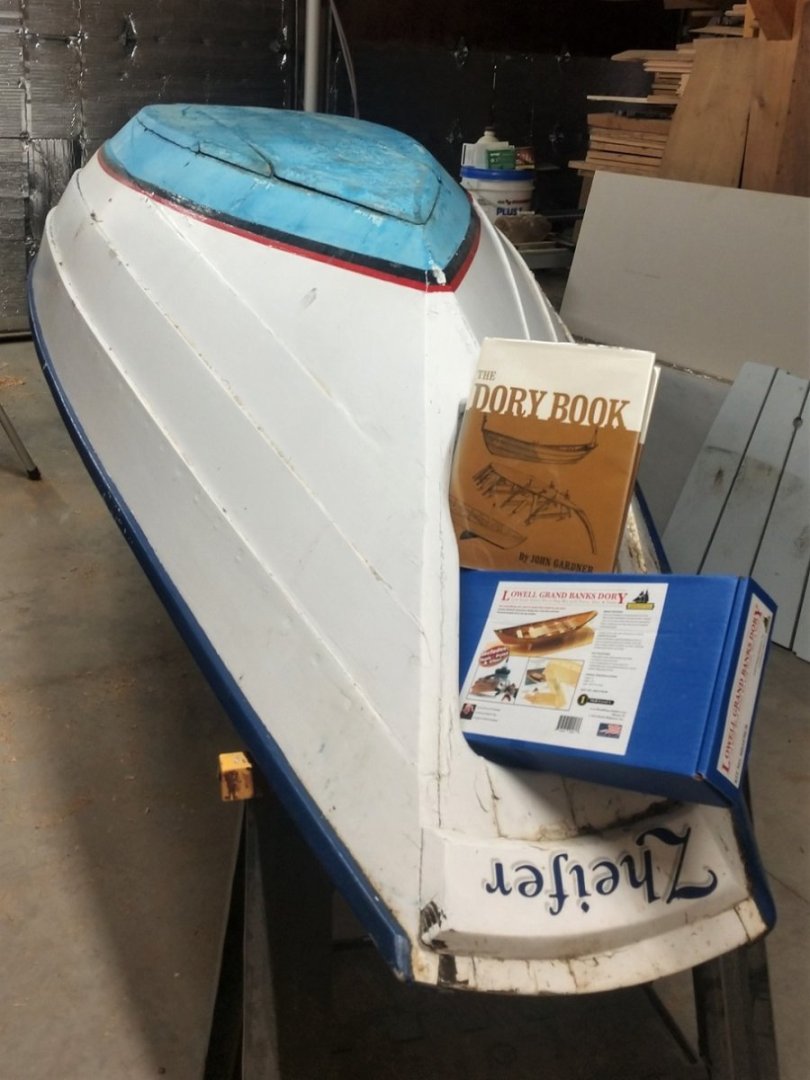

- 11 replies
-
- 6
-
-
- Lowell Grand Banks Dory
- Model Shipways
- (and 1 more)
-
 Hello fellow shipwrights, i have, since i built my San Gabriel, wanted to build a Portuguese caravel. The kit should be here by Monday, so this is, for now, just a research log. My goal is to impress Woodrat and Steven (and myself) by only using firsthand, contemporary (or near-contemporary) sources for this theoretical reconstruction of a Portuguese caravel. This ship is based on the Heller Nina kit, which leaves a lot to be desired OOB, and this gives me a huge canvas for introducing historically accurate features into the build. My first order of business is to obtain a reliable feed of information. Or, i could just wait until Steven is done with his San Marco ship, and steal whatever rig he decides to use. This is what the ship should look like when it's finished:
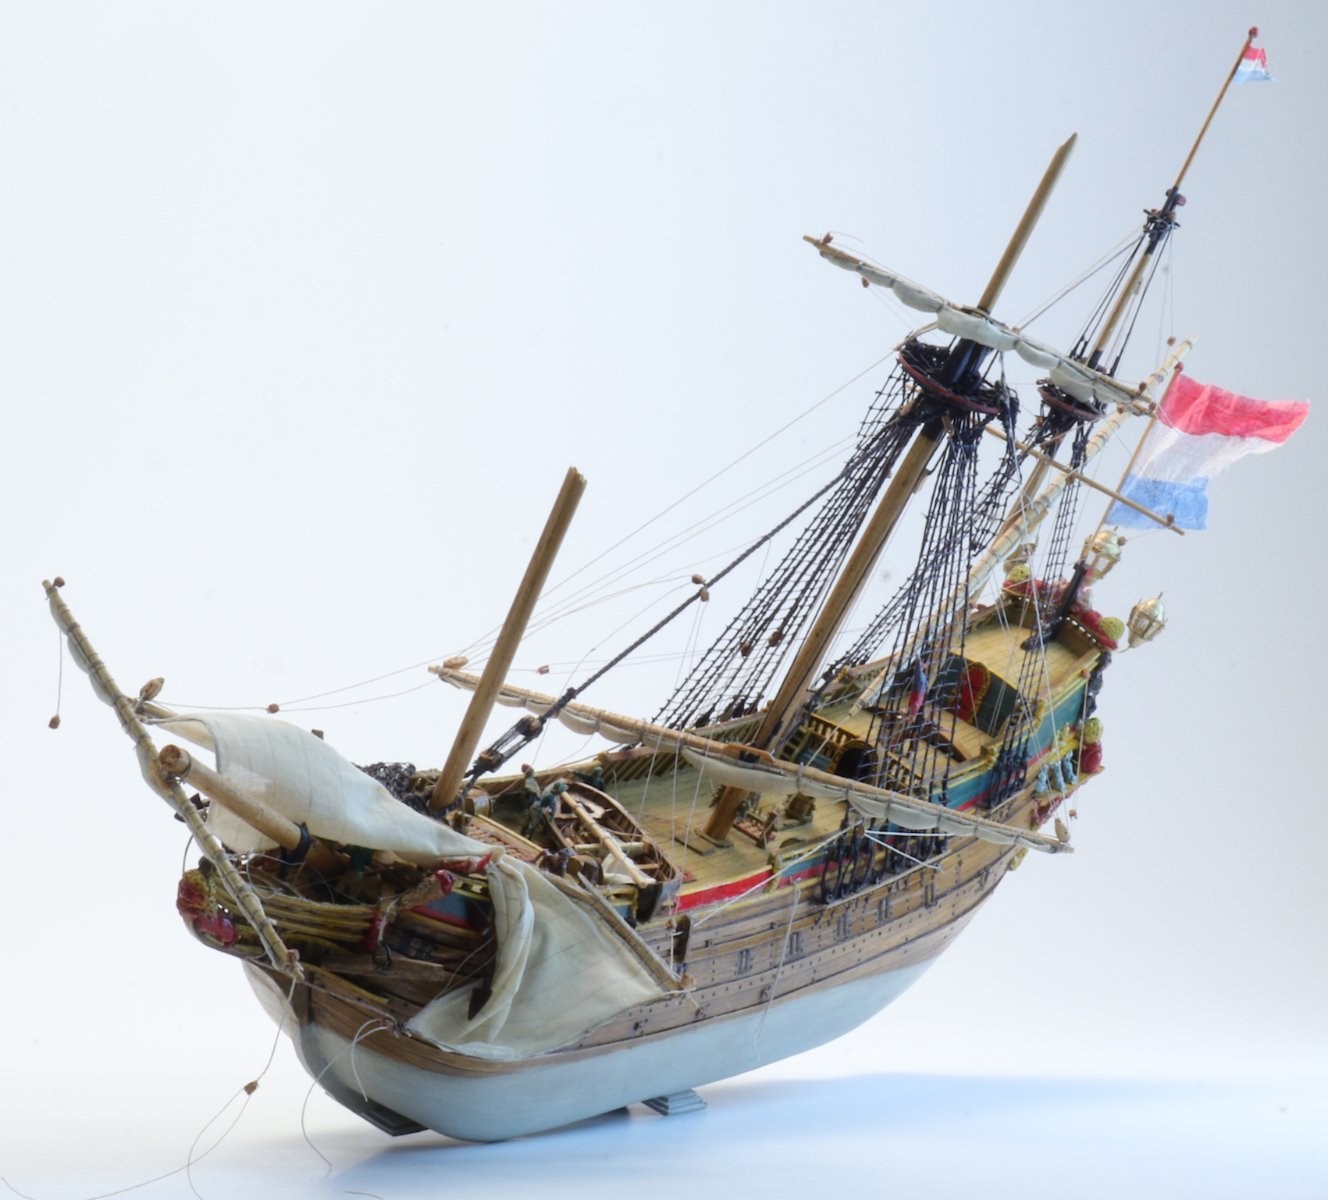
-
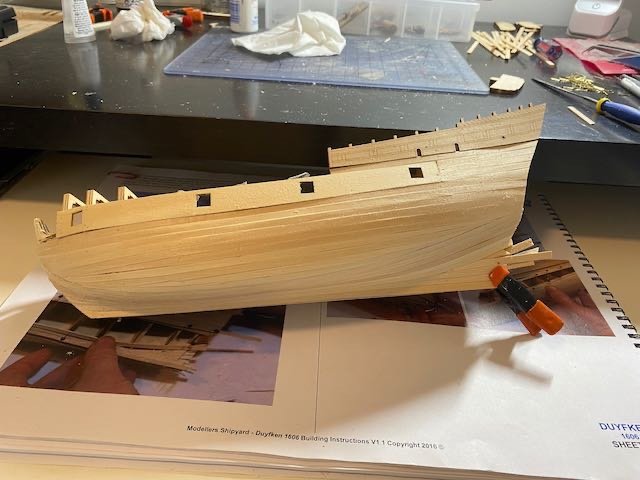
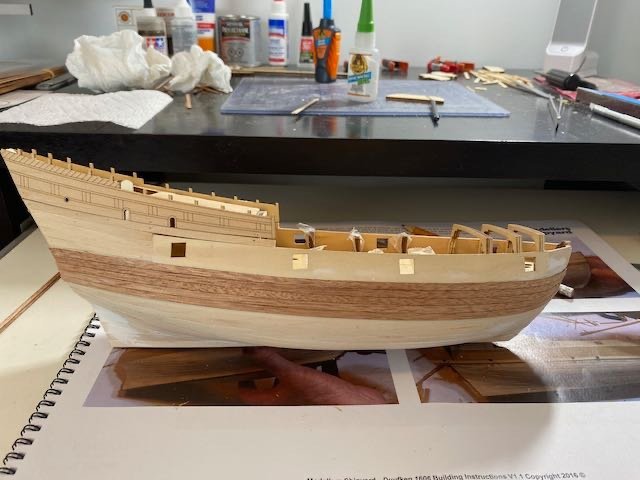
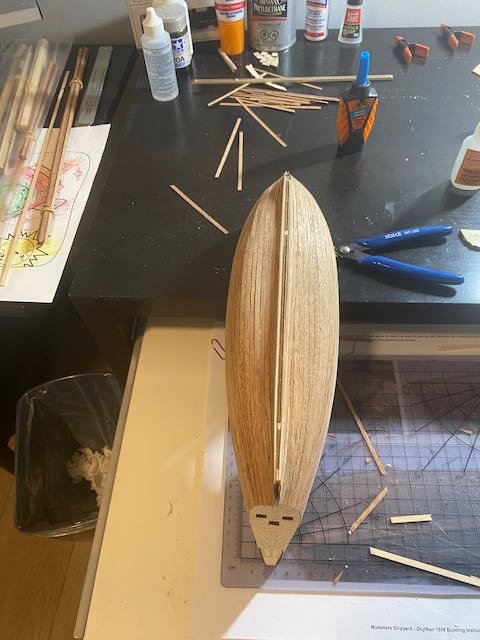
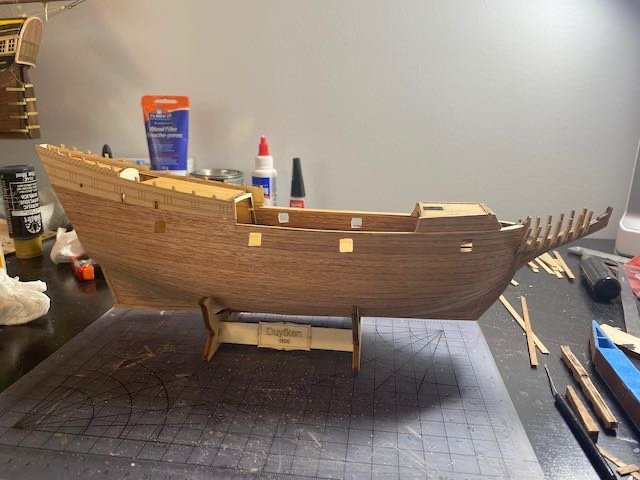
 I have started my next build, named Duyfken. The kit is a pretty good one from Modellers Shipyard, have not seen any issues with parts so far. Here are some of my progress pics..

- 16 replies
-
- 6
-
-
- Duyfken
- Modellers Shipyard
- (and 1 more)
-
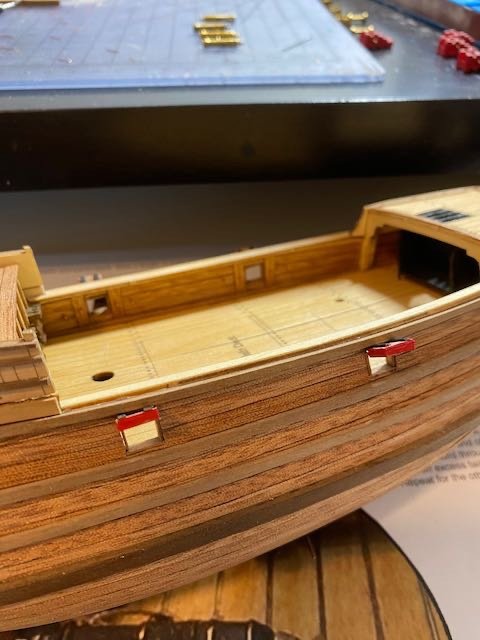
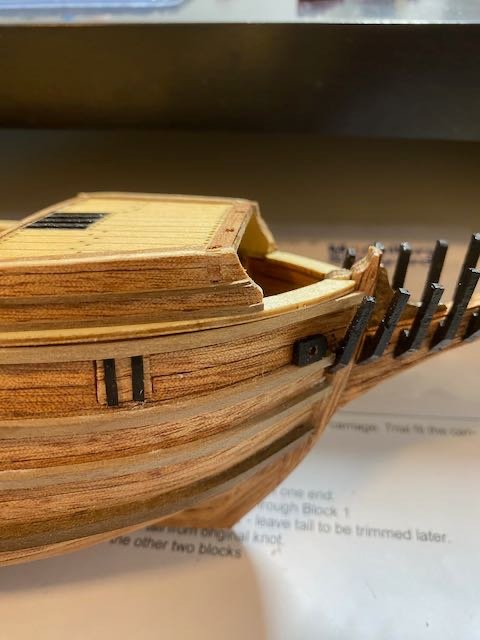
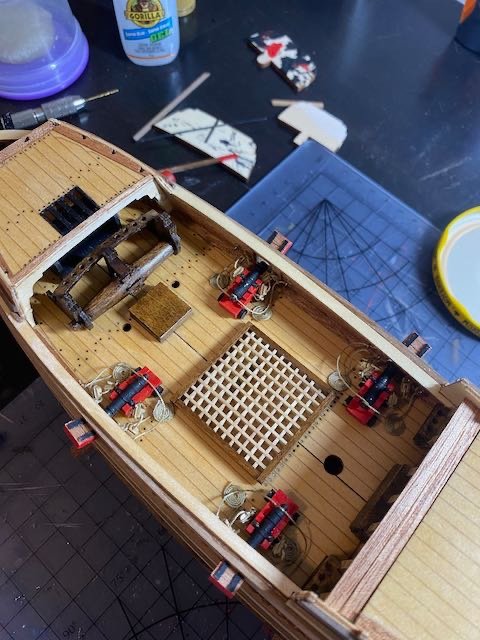
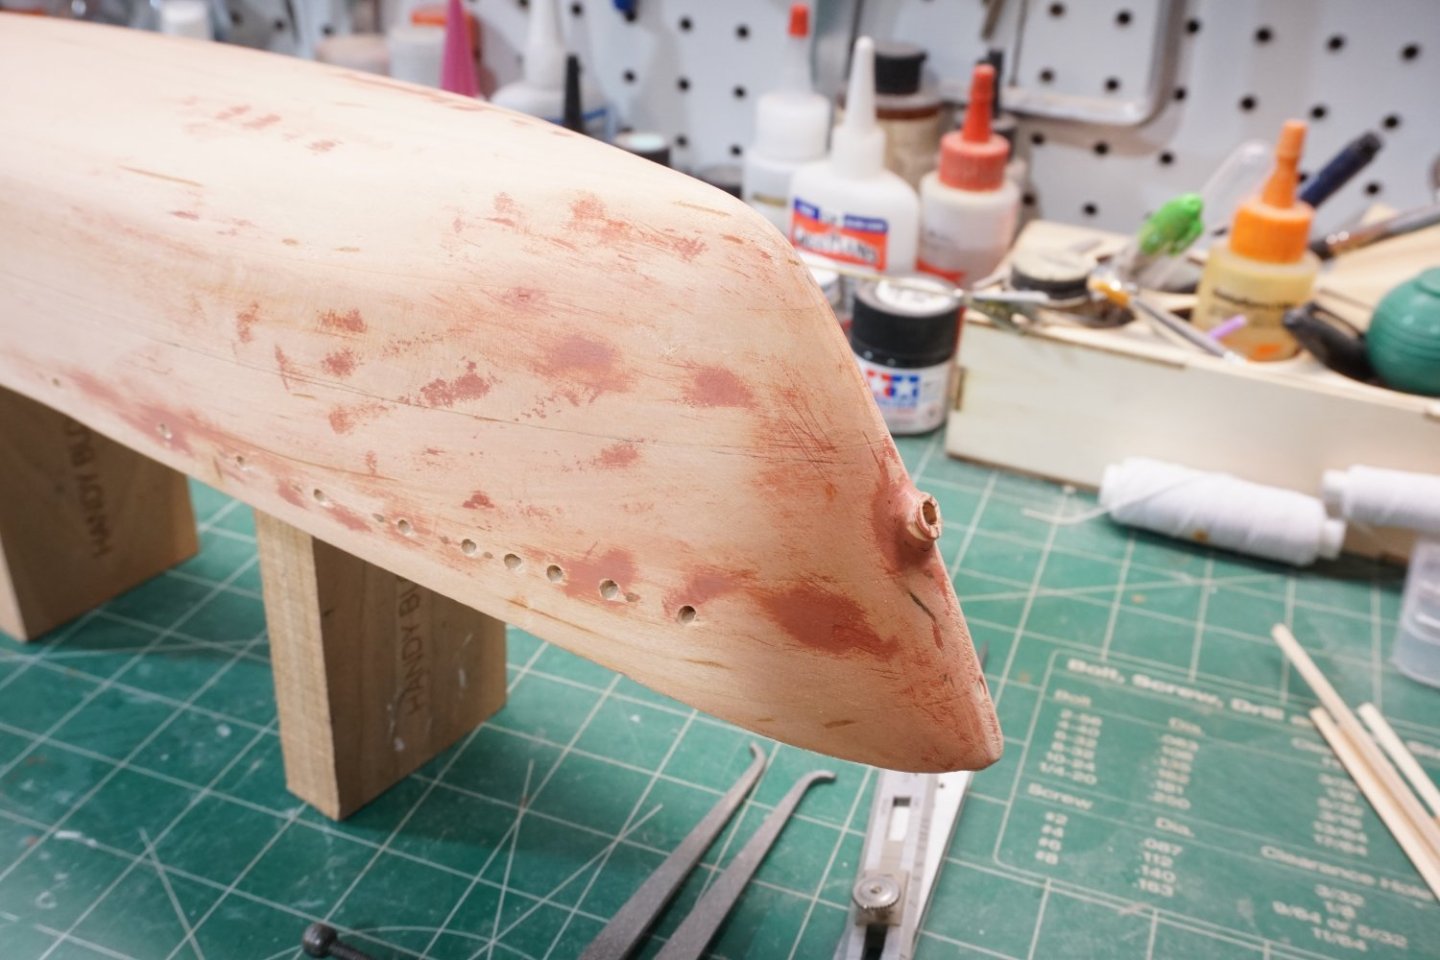
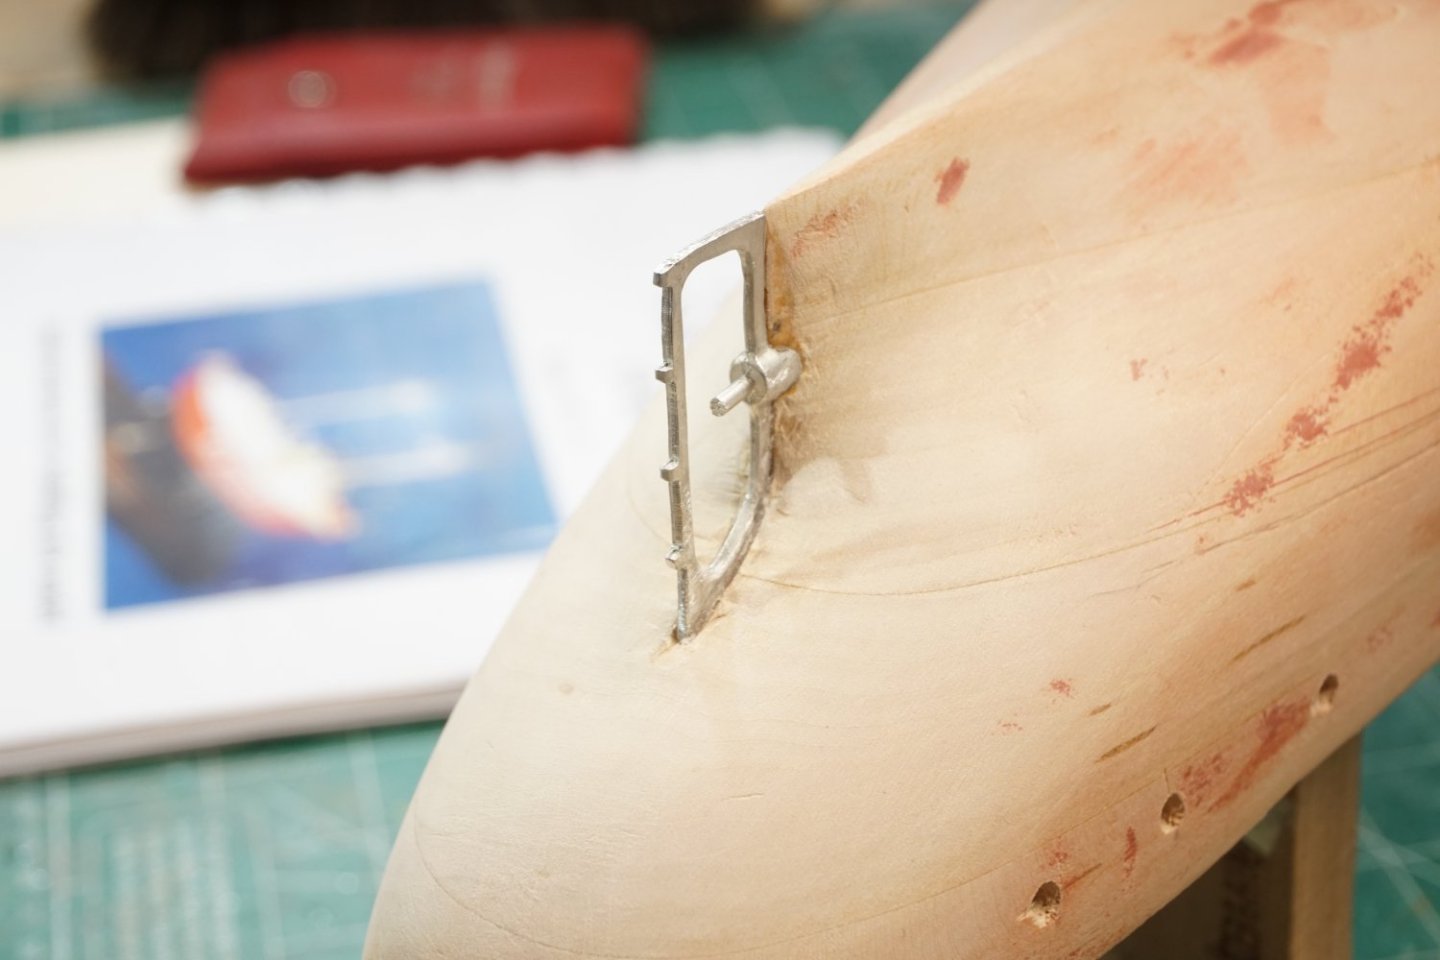
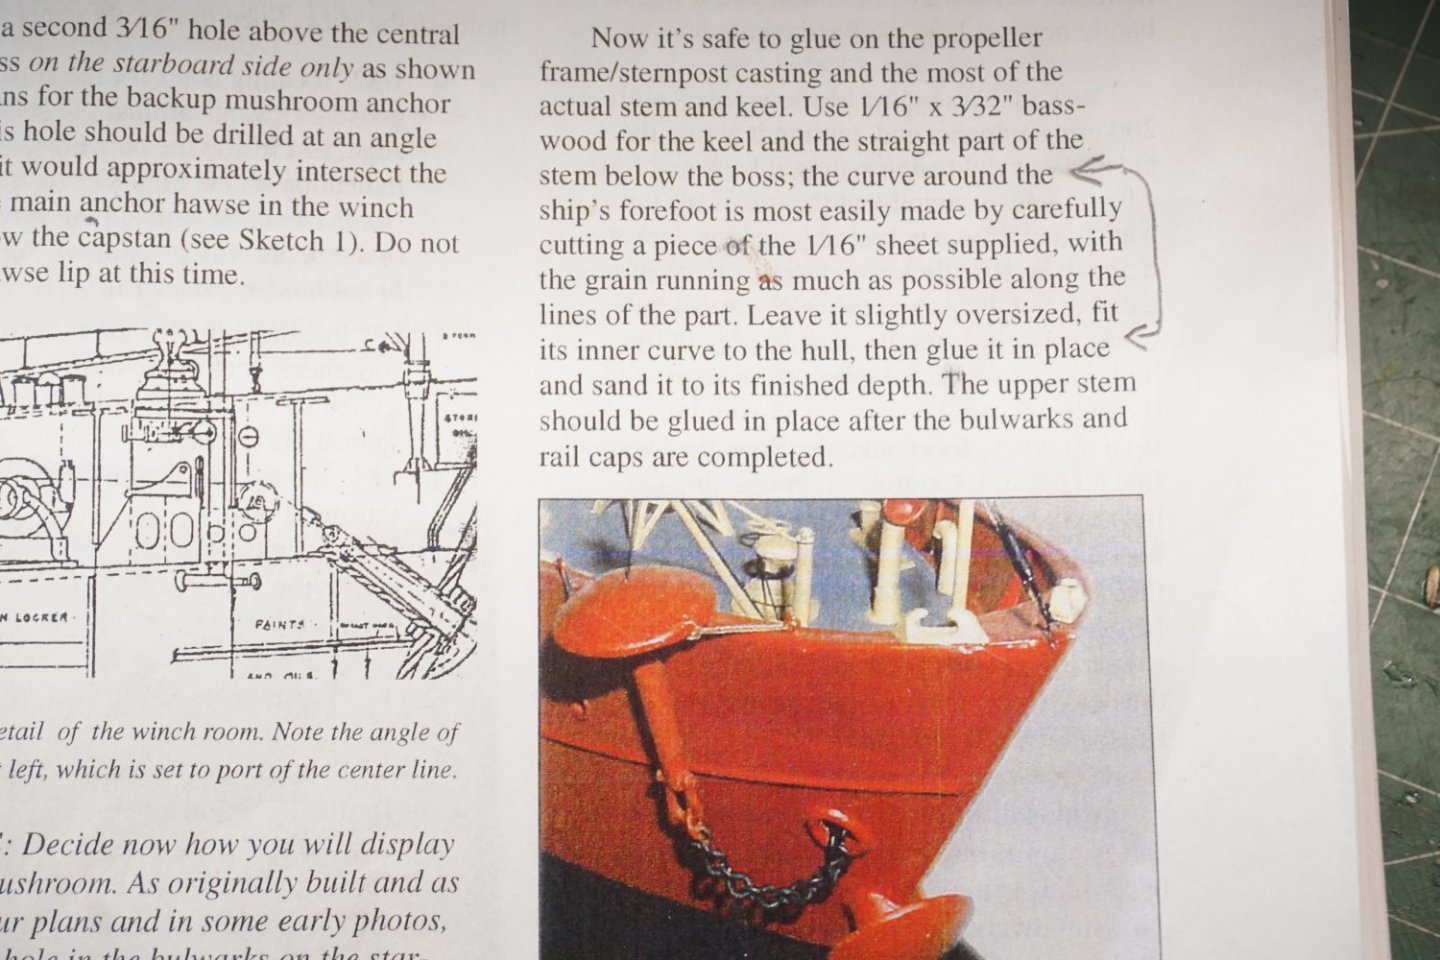
 After the last several months away from ship modeling, I started building Bluejackets Lightship #112 Nantucket from 1936. This was a kit that I purchased at Bluejacket several years ago while vacationing in Maine. After reading through the manual and studying the plans I proceeded to shape the hull. This solid hull was very close to plans and very little wood had to be removed, therefore, according to manual, the use of hull section templates was not needed. At the bow, I drilled out the hole for the central anchor hawsepipe boss and glued it in place. Marked out locations of all portholes and drilled them with an 1/8 drill bit. After gluing in the propeller frame/sternpost casting I proceeded to the next step but I'm a little confused. Unsure of the ship's forefoot construction, the kit gives you a 1/16" x 3" x 6" piece of basswood for this step. My question: Is this supposed to be just a continuation of the keel around the curve of the hull, or is it to simulate an additional plate of steel that was welded to the hull in this area?
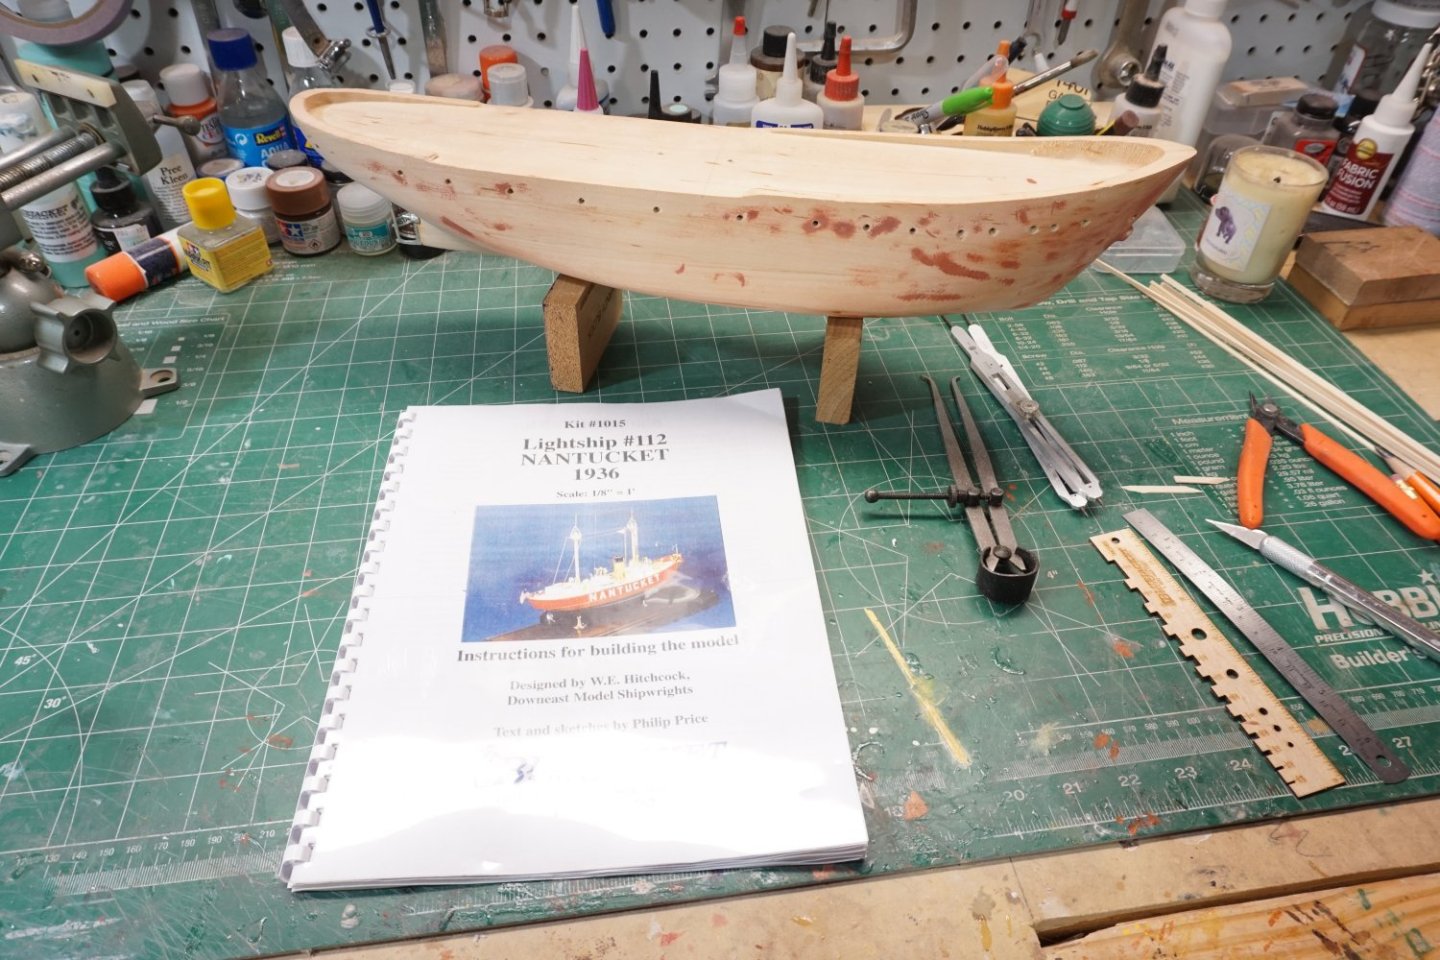
- 29 replies
-
- 9
-
-
- Nantucket Lightship
- BlueJacket Shipcrafters
- (and 1 more)
-
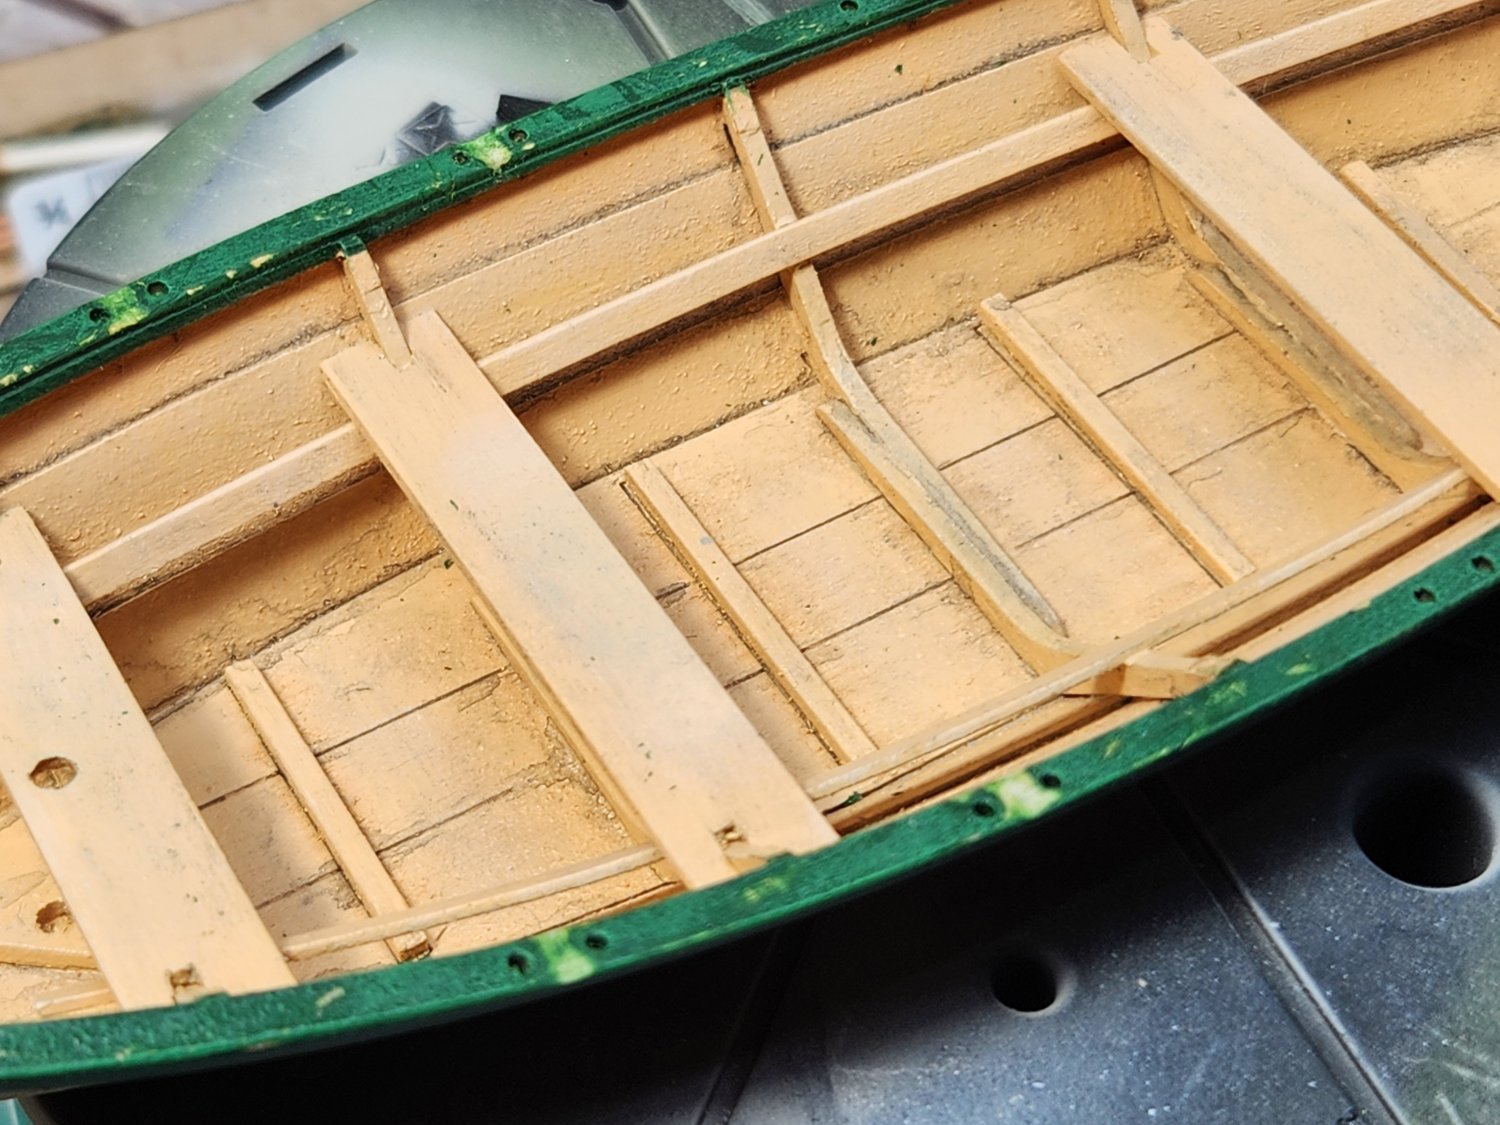
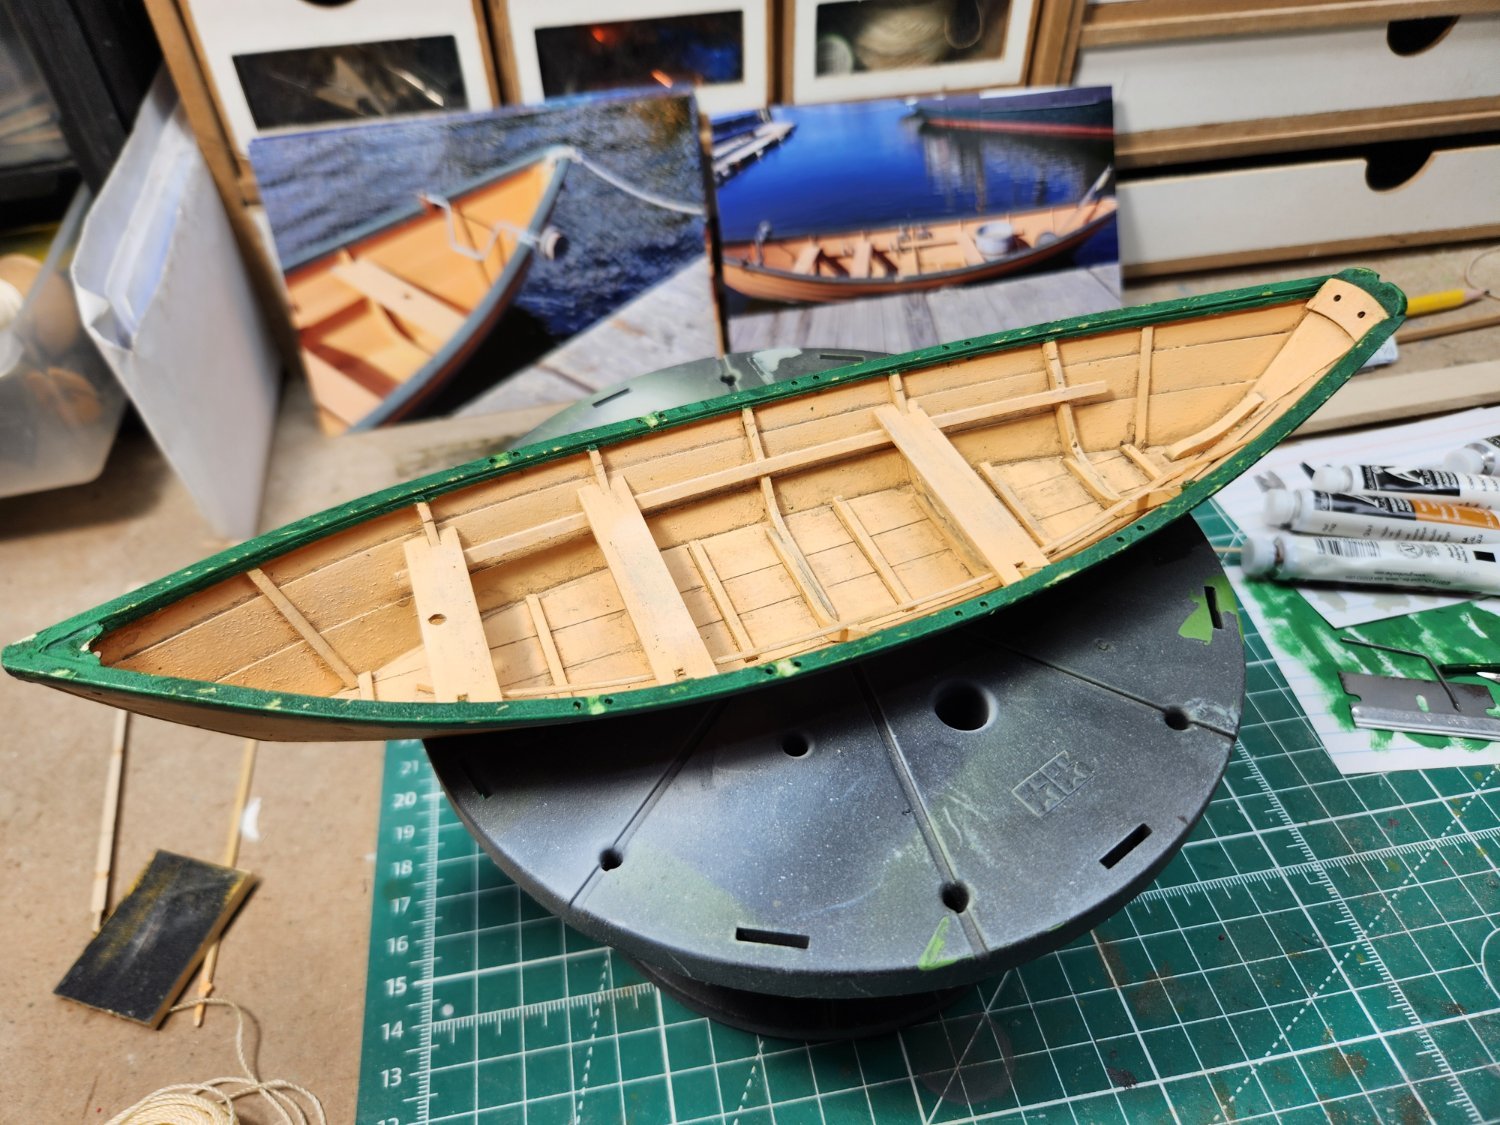
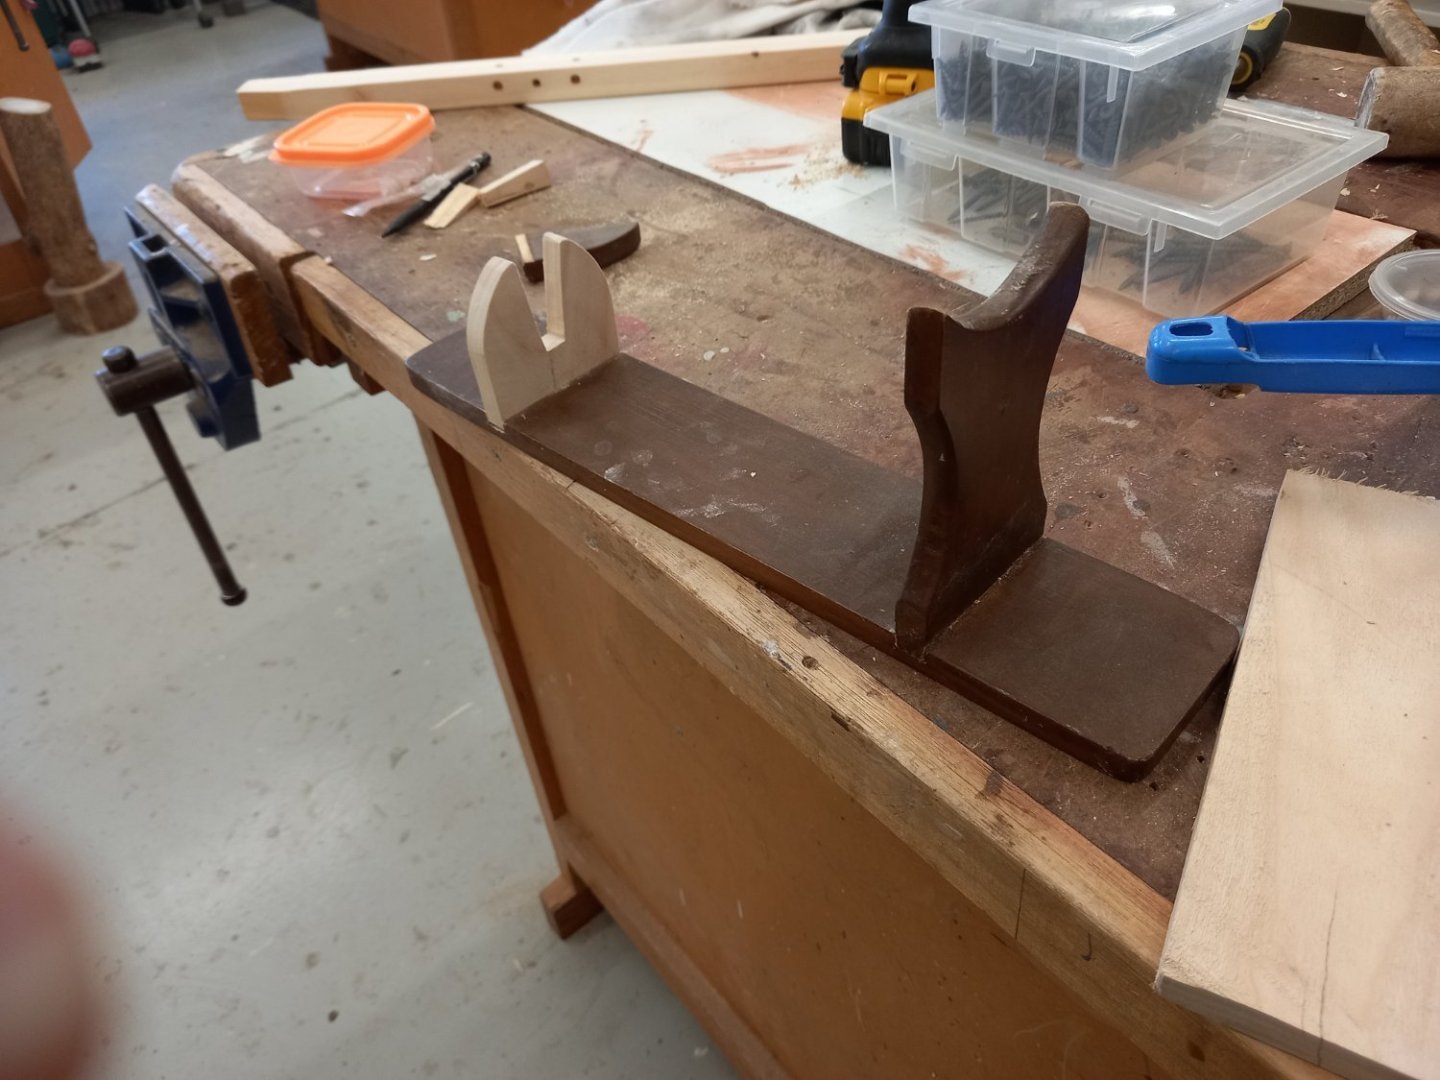
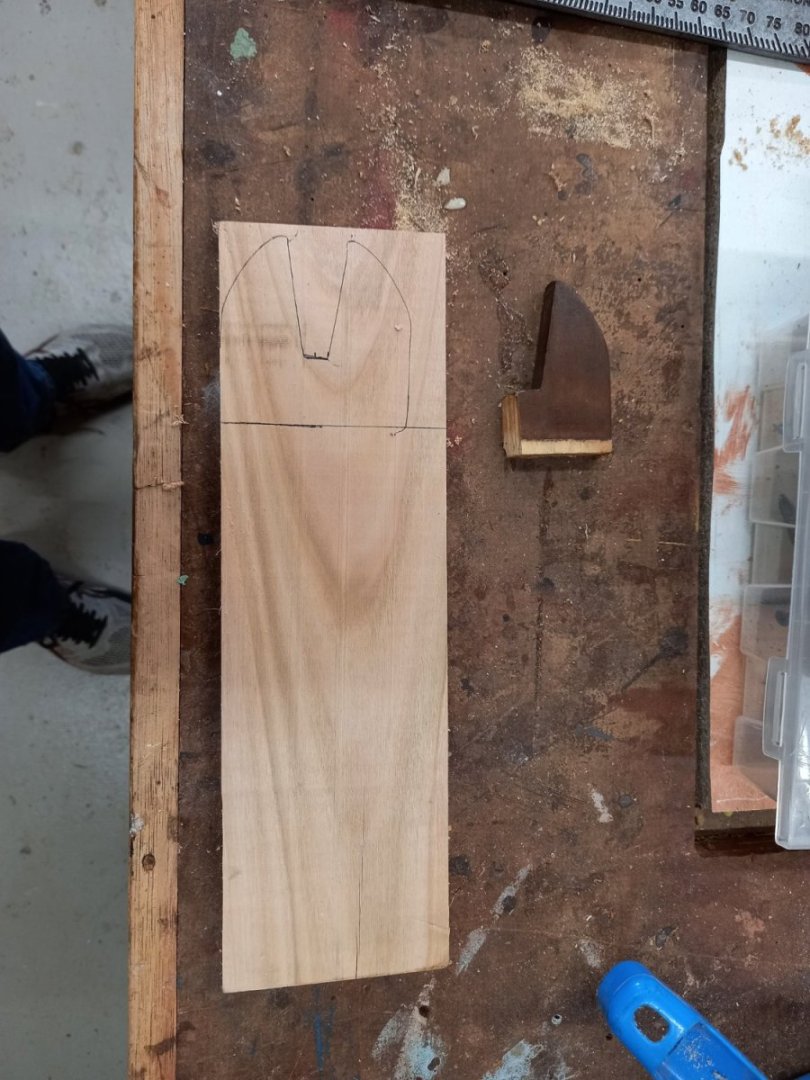
 While staying in hospital early this year as a result of open heart surgery and therefore confronted with the finitude of life, I got the idea to picture a ship that was apparently also at the end of its existence. Some weeks earlier I had started another pinas and I used the unfinished hull for just that purpose. But the only thing I could do was to give it a broken rig. It became soon clear to me that if you really want to build a broken hull, you will not get away with the same building technique used for healthy ships. You will have to take into account the wreckage right from the start. So in future, if time is given me, I might work out a wrecked ship with planks missing, showing frame parts and partly broken decks. This is not a completely new challenge for me, as I have always built my wooden models just like they were built in real life, but as we all know: paper is different. In the mean time you might like the result of this first effort, of which we soon will present a Photoshop composition, showing the ship in its natural and fitting surrounding. Also an impression of my latest 'smalschip', sort of a preview for my soon to come new book: smalschip.mp4 Happy New Year, Ab
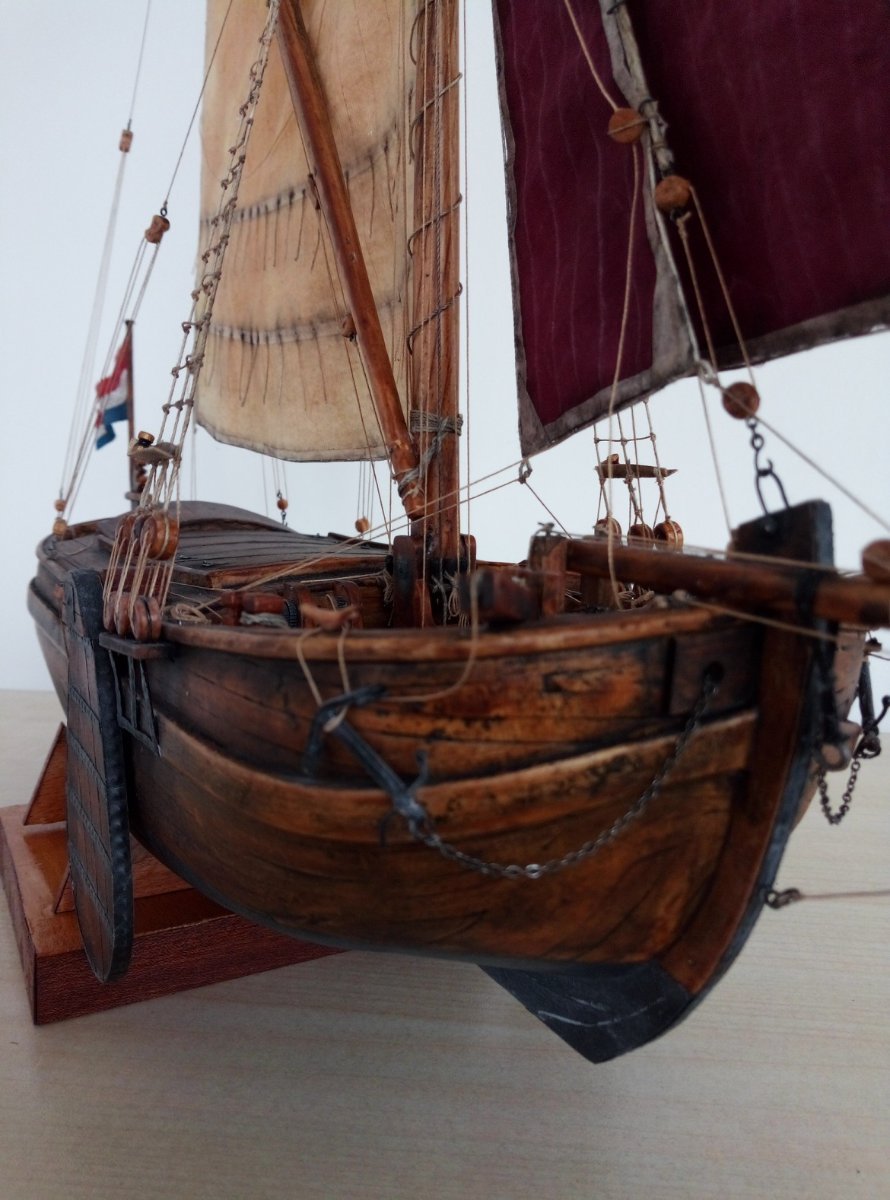

-
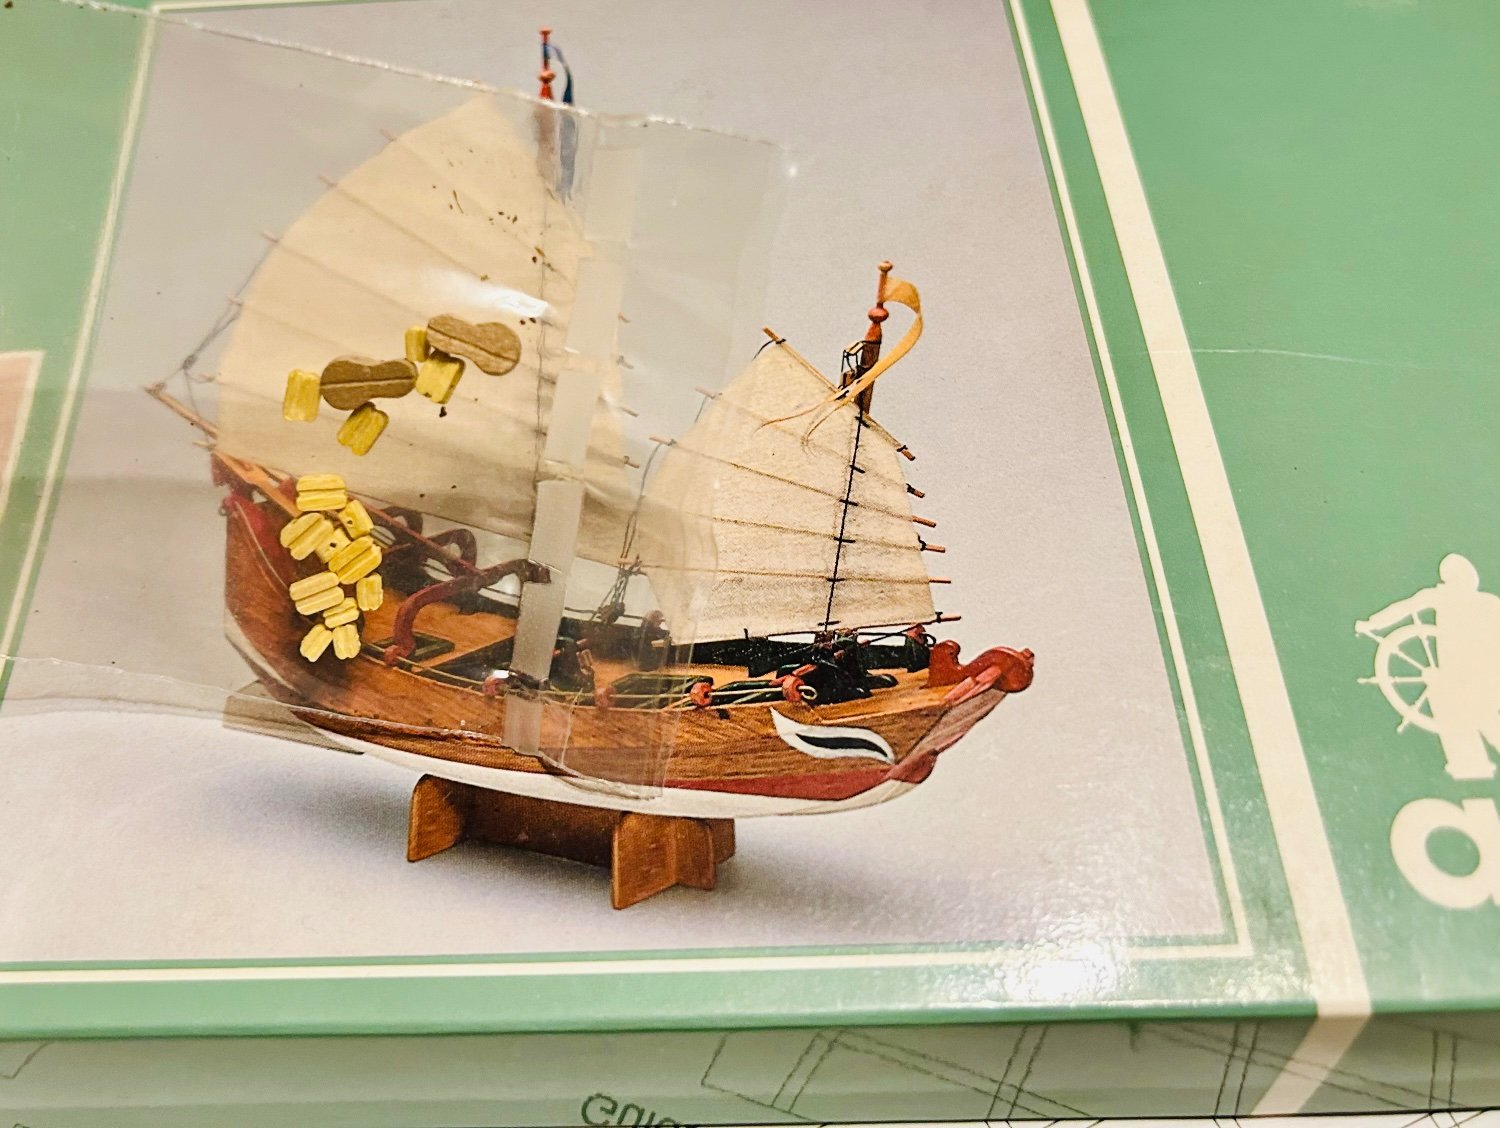
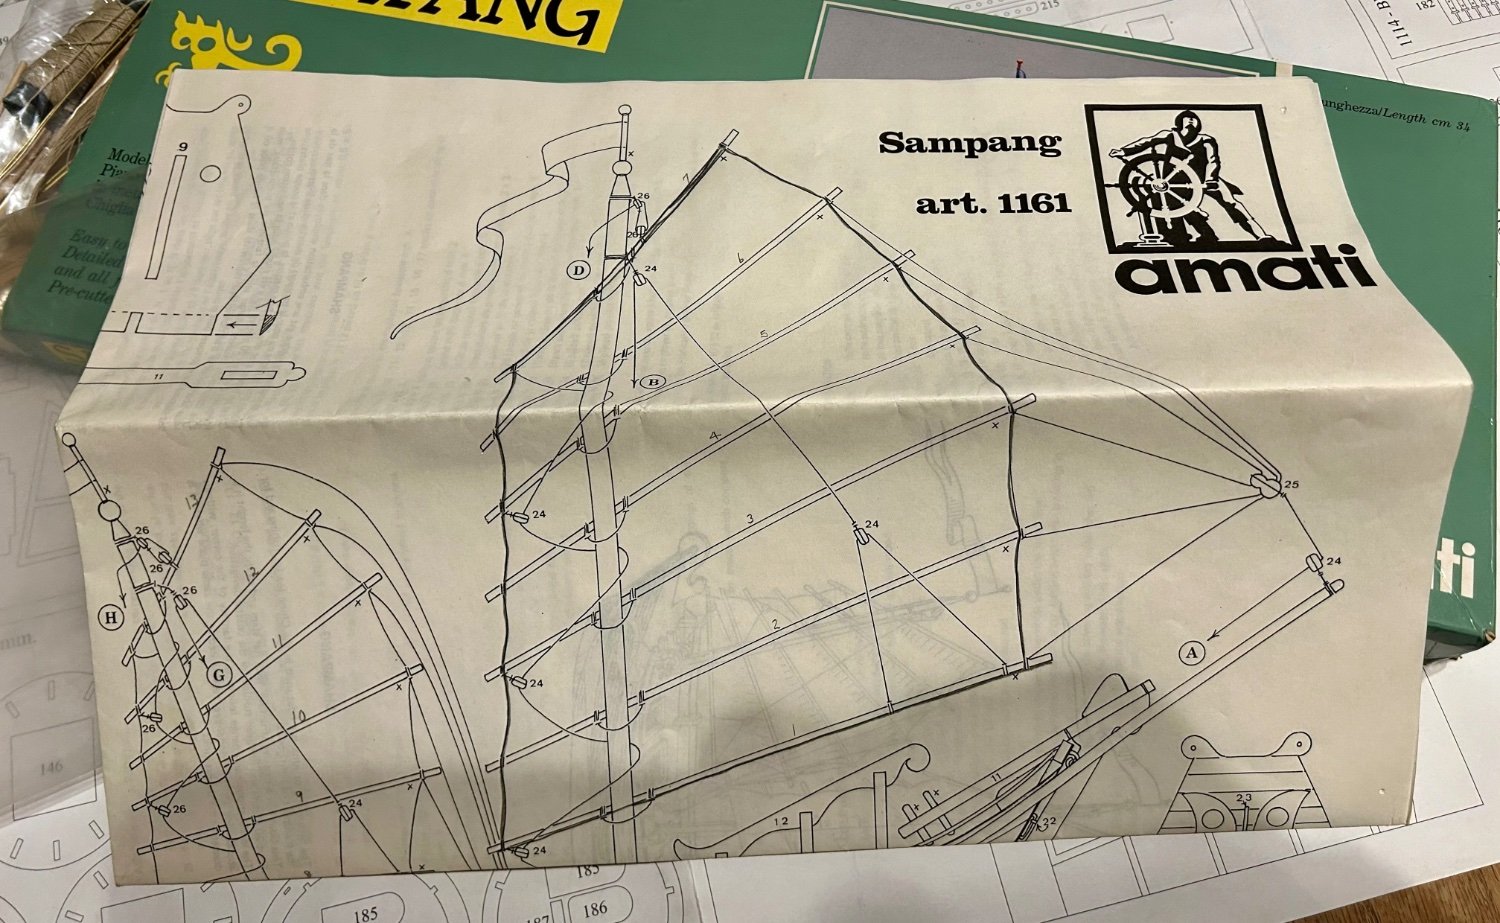
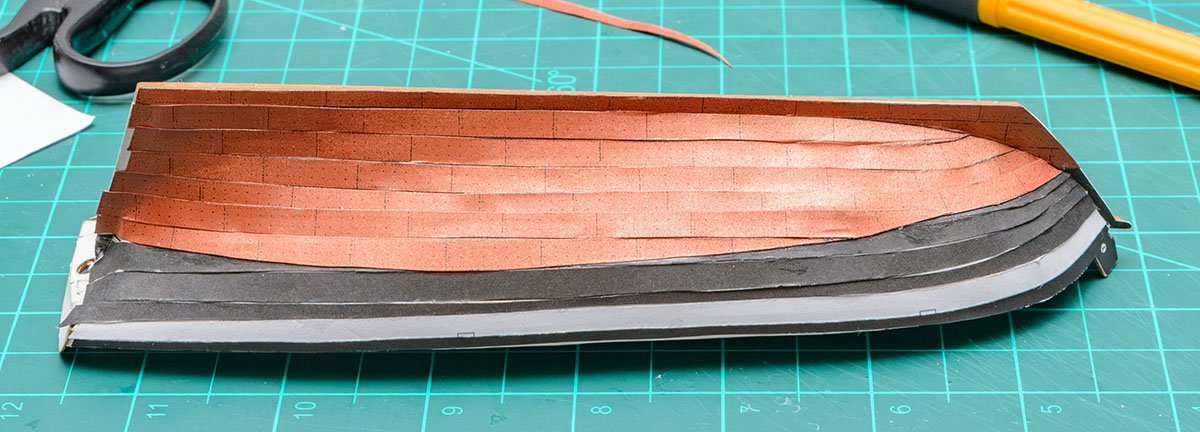
 And now for something completely different! I usually like warships. However, this is an unusual subject that looks like a fairly quick and easy build. The Sampang/Sampan is a traditional boat originally of Chinese origin that is still utilized throughout Asia. I got an Amati Sampang kit off EBay that only had the rigging supplies and the plans. I paid $7.99 for it with free shipping. I decided to build it in card, because I like building in card. I am making it out of a couple of Honeycomb boxes which are about .6mm thick, and a couple of Little Debbie boxes which are .5 mm thick. Most of the pieces are 3mm thick so I copied the plans 5 times. I think there are under a hundred pieces to the entire model. This will be a fun quick build! Here is the start:


-
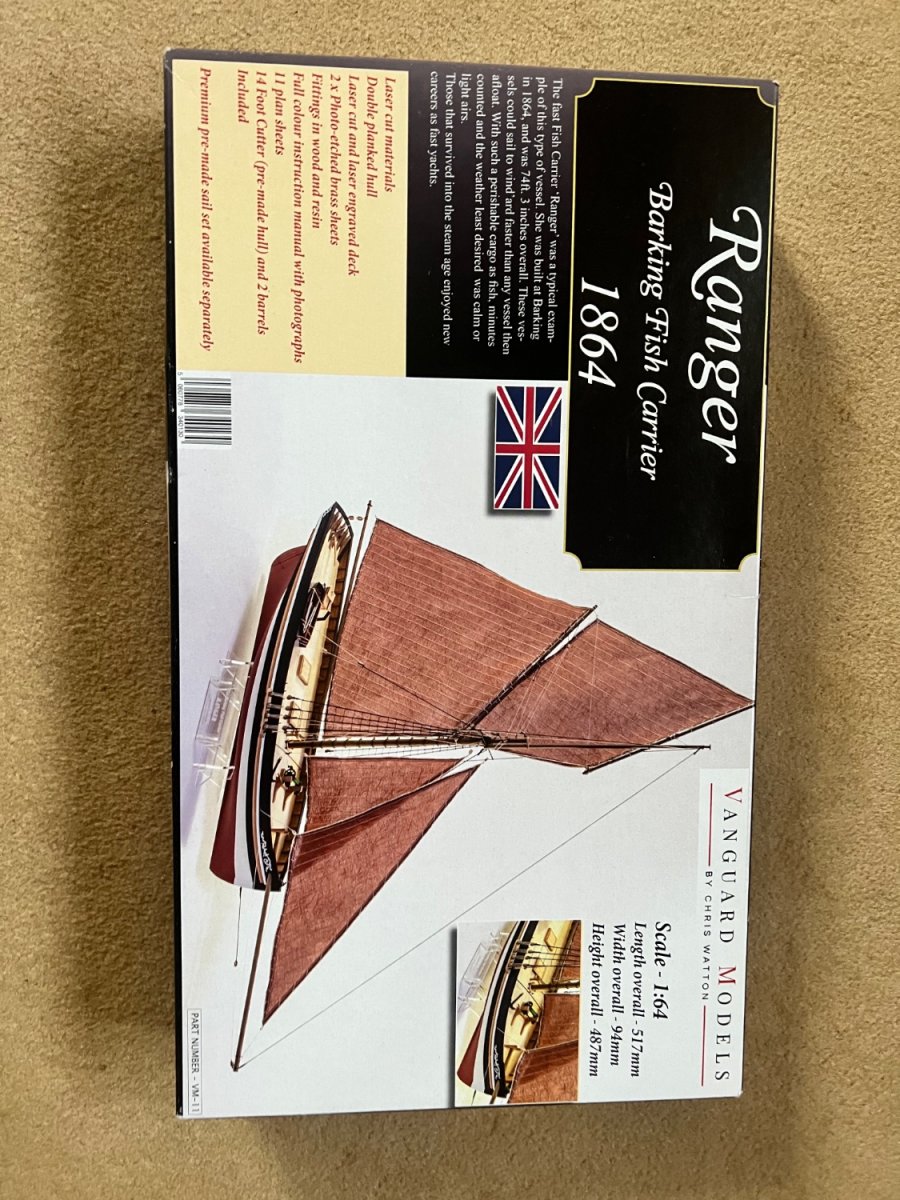
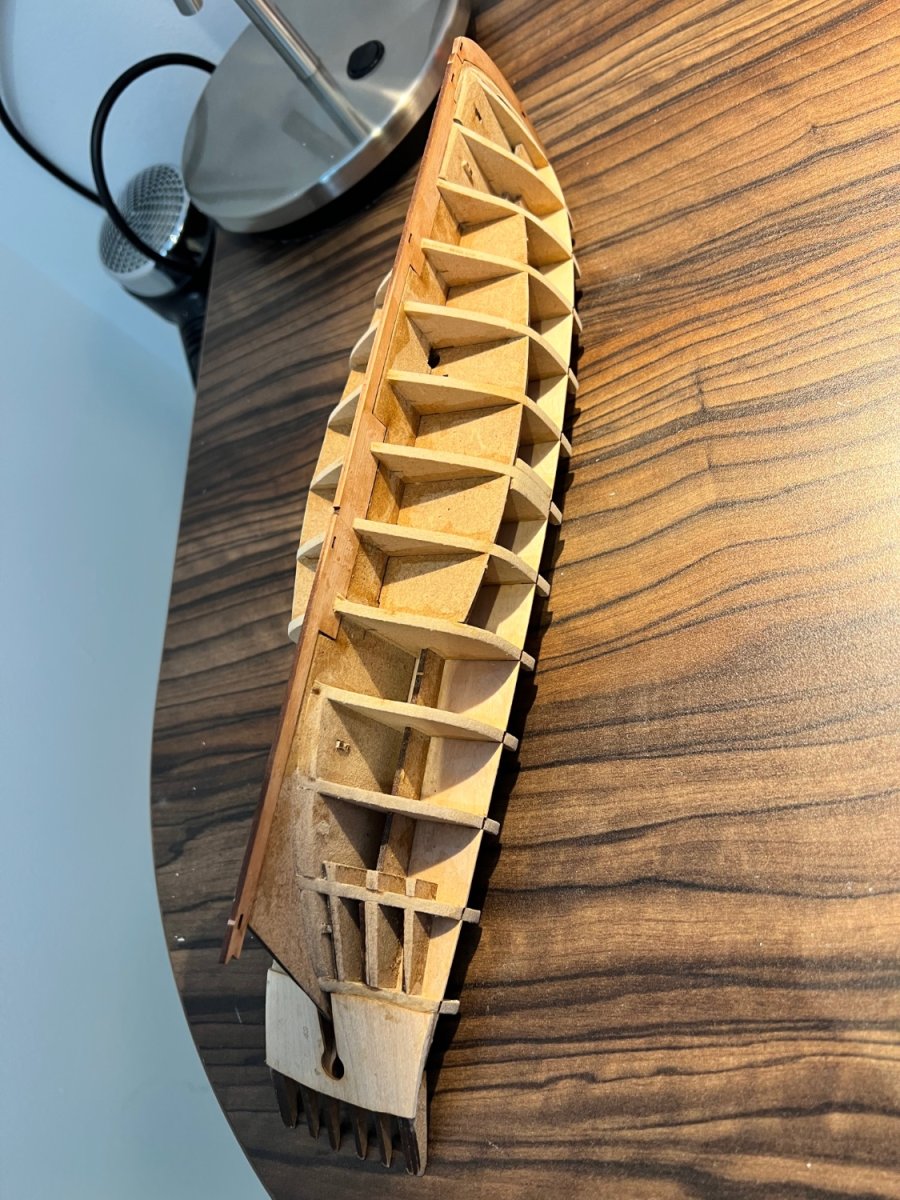
 I started Ranger a month or so ago whilst stuck staying in a hotel for a fortnight’s business trip in one of the UK’s less attractive locations. Made a start, but not a lot of progress and then back on the shelf once home whilst finishing Grecian. This will be my sixth fishing boat from Vanguard and the last of the Vanguard fishing boat range. They are a lovely range of kits. Ranger at first glance seems very similar to the others in terms of being exceptionally high quality, very well designed, superb instructions and an excellent prototype build log on MSW. Ranger is similar in length (both hull and overall) and also width to Erycina, but has a much higher single mast to carry a great deal of sail area as her purpose was not to do the actual fishing but return the catch from the fishing fleet back to port as quickly as possible. Her lines, whilst longer, are not dissimilar to those of Saucy Jack. The MDF skeleton of bulkheads, keel and deck is wonderfully over engineered as usual to give a very robust framework with no risk of warping. Hull was faired, but the curves on this one are very gentle and do not require a lot of sanding. The only thing to note is that the slots in this construction do need a gentle sand to get them to fit properly. I have been spoilt on other Vanguard builds being able to do this initial construction without any sanding, I suspect it’s the norm for most manufacturers. I did, stupidly, try and force a couple of the bulkheads on snapping both a bulkhead and the keel itself - an easily avoidable mistake. They’re all glued back together fine now. Lower stern counter went on well without soaking. Just clamped and glued with PVA. Deck clicks in as usual into the helpful slot at the bottom of each bulkhead ear. Then the bulwarks fitted, as per the instructions with a small nail at the bottom, clamped and glued with PVA, although no glue above deck level as the eats will be removed. Again, no need for soaking due to the gentle shape. Once both sides done, time to start the planking. There’s tapering at the bow but not stern. Only a few planks in, but so far this has been the easiest boat to plank. I think Chris or Jim promised this in the instructions or build log! That’s all I did whilst away. Will restart construction shortly.


- 23 replies
-
- 10
-
-
- Ranger
- Vanguard Models
- (and 1 more)
-
 Photo taken from the building instructions of Chris/James Chris Watton (Vanguard) has some smaller boats in his range which he offers separately and which are also part of some larger kits (Indefatigable, Sphinx). I am currently in the process of building the Sphinx and have noticed that opinions about the boats are divided here in the forum ("torture" versus "fantastic"). I would therefore like to describe the construction of the Launch in more detail. You can also find a clear description in the reports from Blue Ensign. I have of course based my description on these reports. However, I have come up with a few more tricks that - at least from my point of view - make it easier to build these small boats. Perhaps Blue Ensign's and the other reports and/or mine will encourage a few more people to build these beautiful boats. I don't want to discuss whether the model is historically accurate or not. I just want to encourage some to take a look at these boats and share my experience on how to handle these delicate little boats. I don't have any photos of the very beginning, but this can easily be seen from Chris'/James instructions. Photos taken from the building instruction of Chris/James It seems important to me that both the bow and stern transom are well fixed. These are the most sensitive areas. I secured the transom both inboard and outboard. I glued the frames to some points in the base plate with CA glue and marked the points so that I could cut the frames out of the base plate later if necessary. There is enough space on the top of the bulkheads to be able to use a knife or a small saw. I used CA instead of PVA to fix the frames because I want to bend the planks later with a hairdryer and the heat would soften PVA glue. For further sanding, I used sanding sticks (100 grit) and tried to sand three frames at a time (similar to a large ship). The charring from the laser cut is a good guide. As long as there is still a lot of it visible, sanding is usually not enough A first test with a plank shows that the first two frames have not yet been sanded sufficiently (also visible in the remaining charring). After re-sanding, the plank fits better, but the frame still needs to be sanded a little. When adjusting, I also beveled the transom so that the planks fit well here too (photo unfortunately a little out of focus). The assembly was then screwed onto a wooden board and 6 nails were driven into the starboard side and 6 nails into the port side at a distance of approx. 4 cm from the hull. The first plank is not tapered. However, the bow end has been slightly chamfered so that it is flush with the guide slot in the stem. The planks have also been marked to show how far they can be inserted into the slot without obstructing the other side. The planks were soaked in water for about 15 minutes and then fixed to the frames. The pins were guided against the keel side of the plank with very light pressure. Rubber bands were passed around the pins and tension was applied via the nails on the opposite side. The guiding around the pins ensures that the planks are pressed against the frames but do not bend. The fixed planks were heated with a hair dryer for approx. 5 minutes. This time is usually sufficient for the planks to retain their shape and size. In the stern area, the plank is pressed against the transom with tweezers during heating. I did not remove the plank again, but applied PVA directly to the frames or the stem and finished with a slightly damp brush. PVA is only applied to the frames for the first plank, then later between the planks. I only used CA on the transom to fix the planks in place.


- 20 replies
-
- 5
-
-
- 24 ft Launch
- Vanguard Models
- (and 1 more)
-
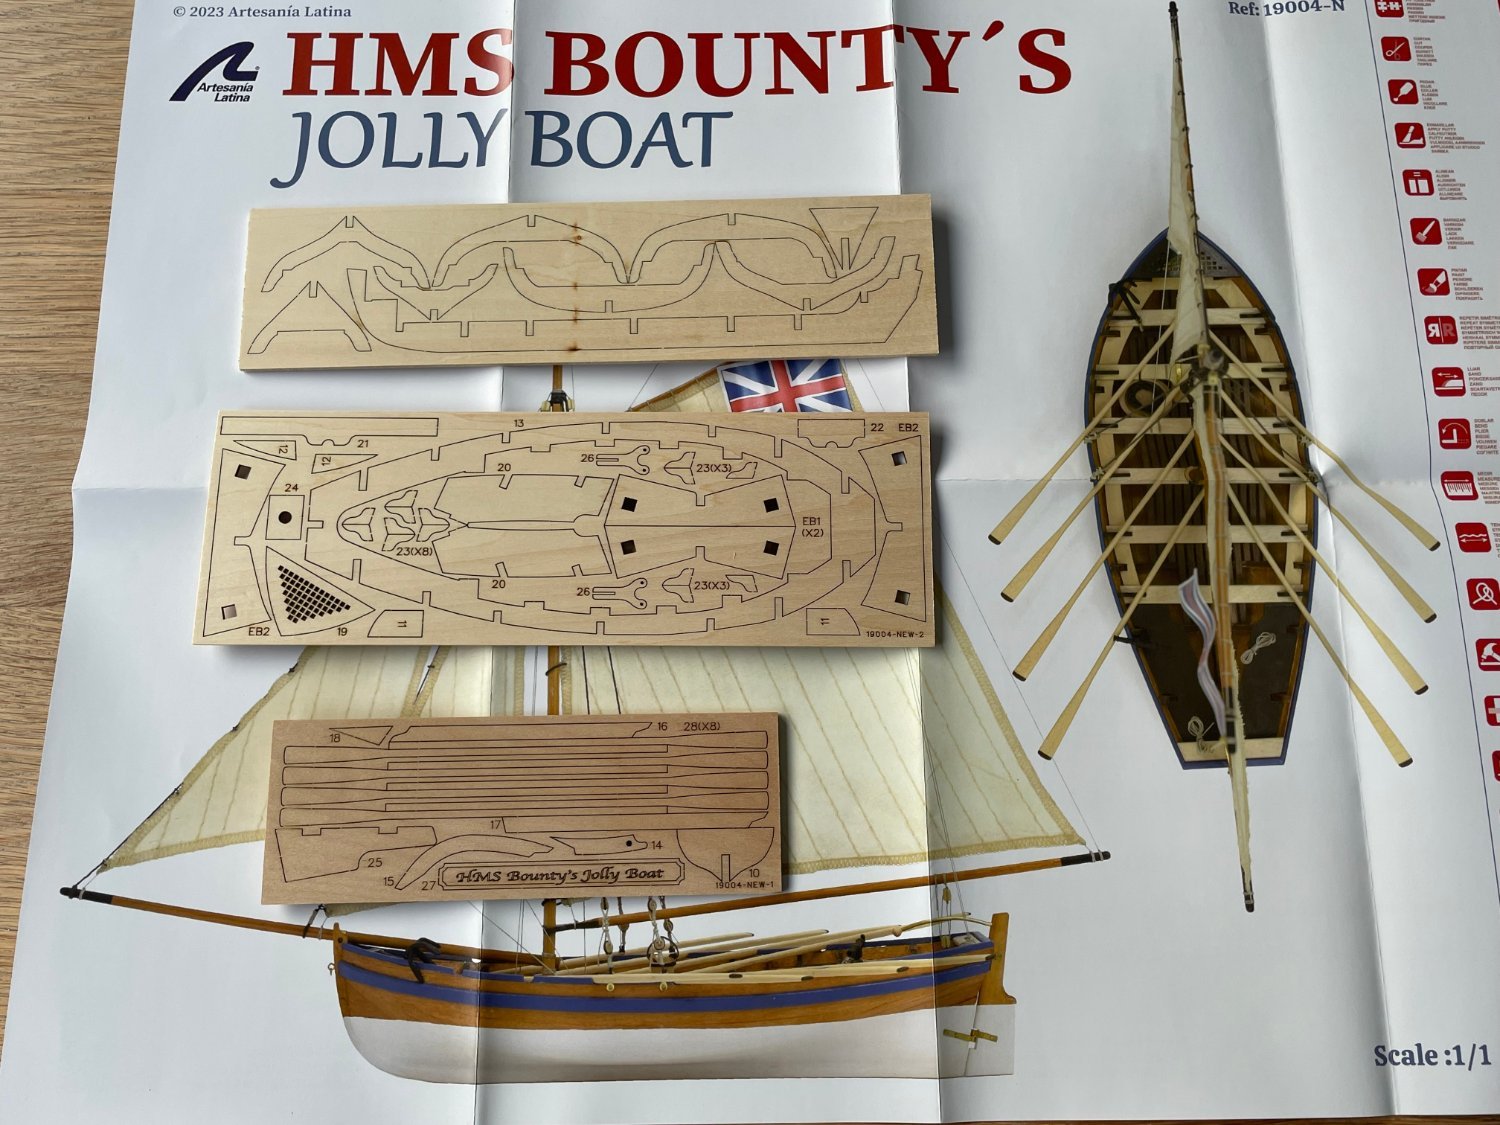
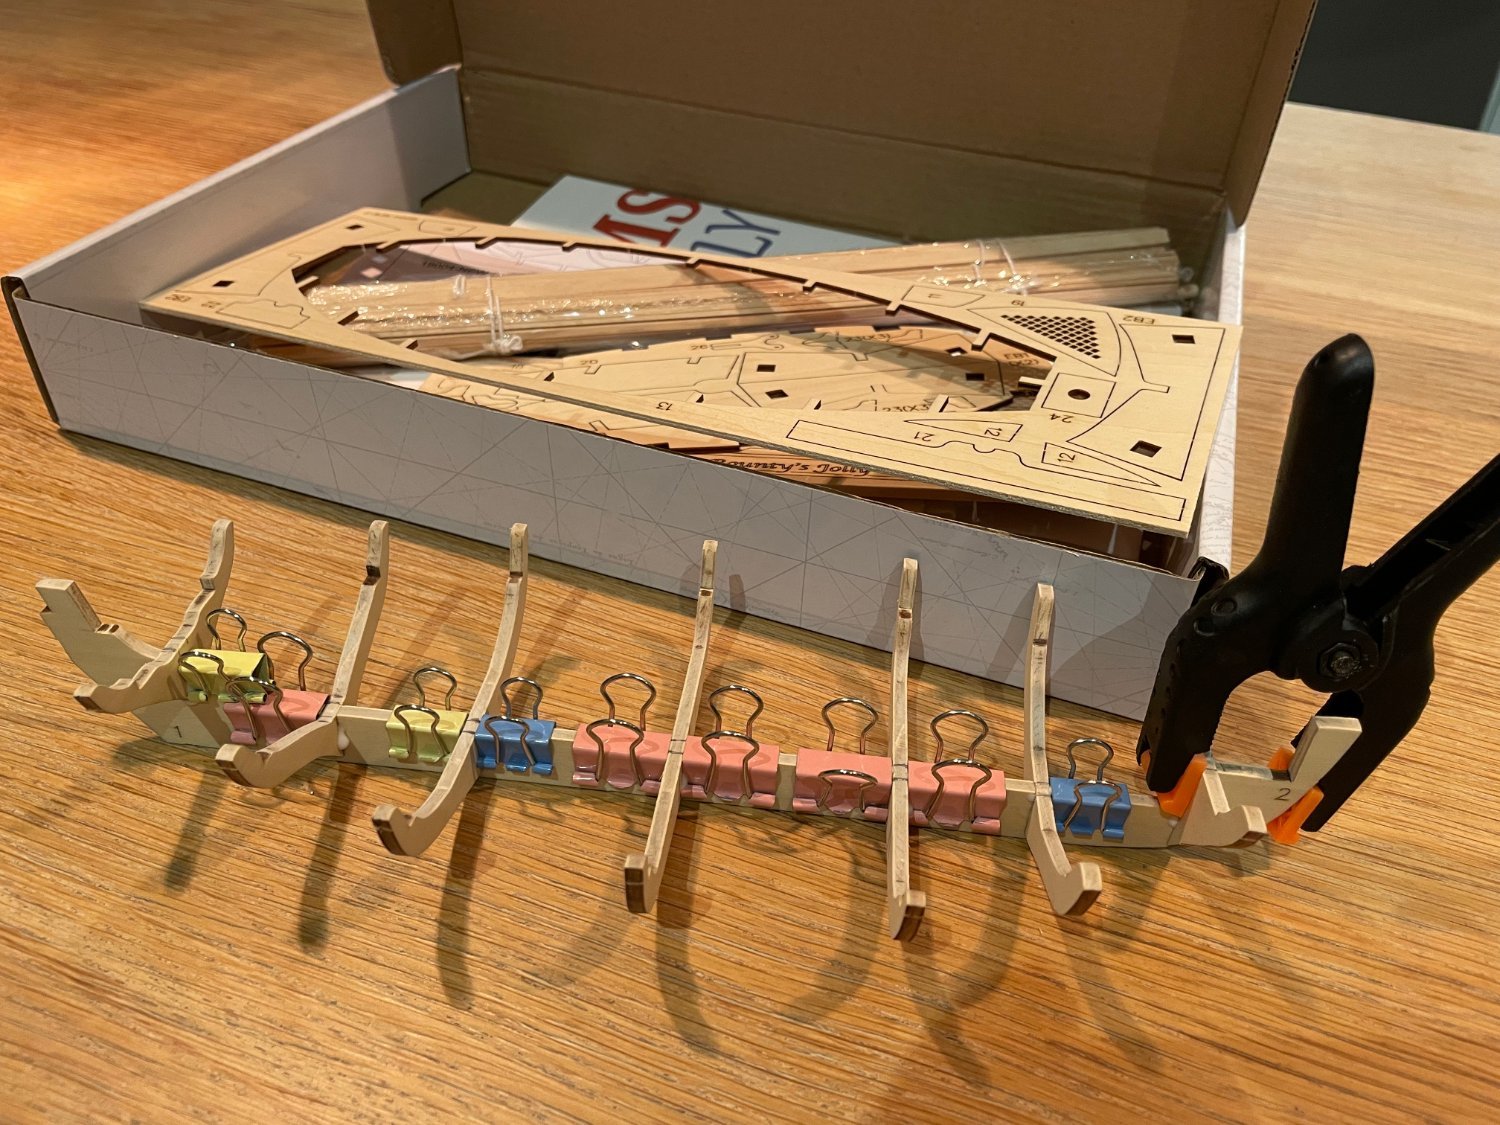
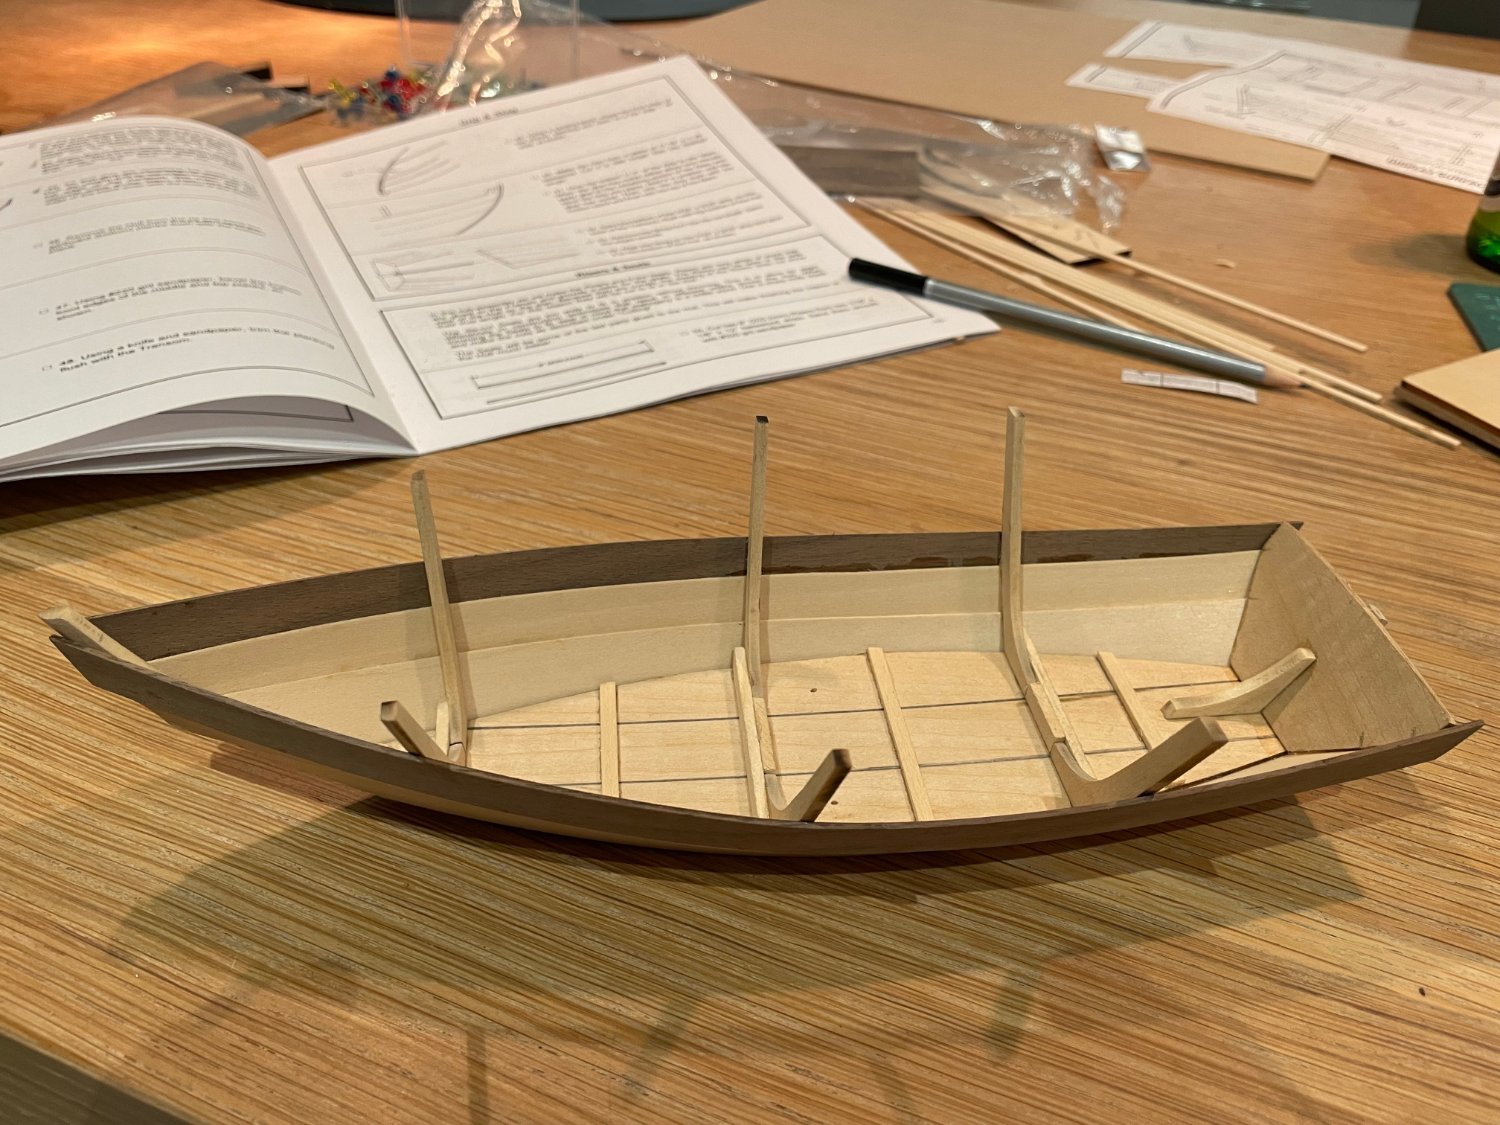
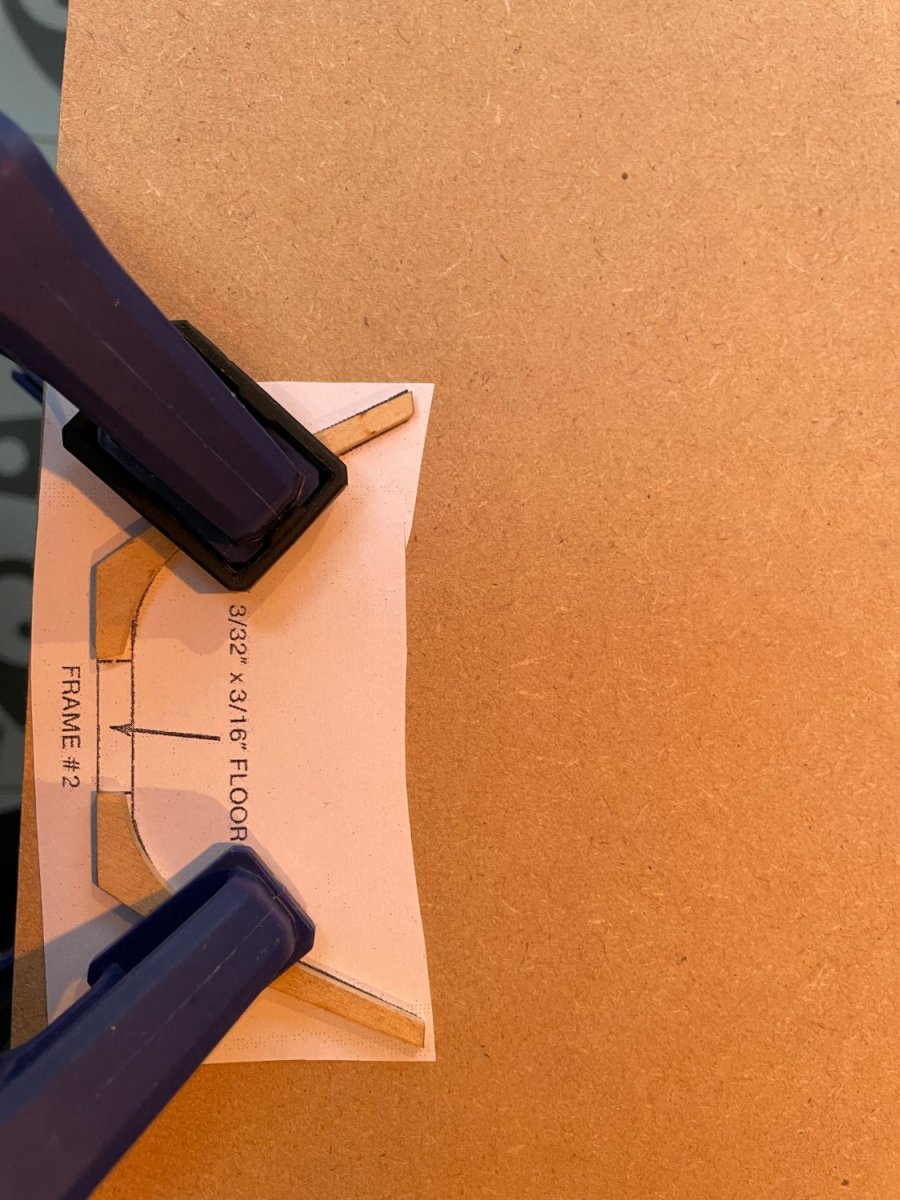
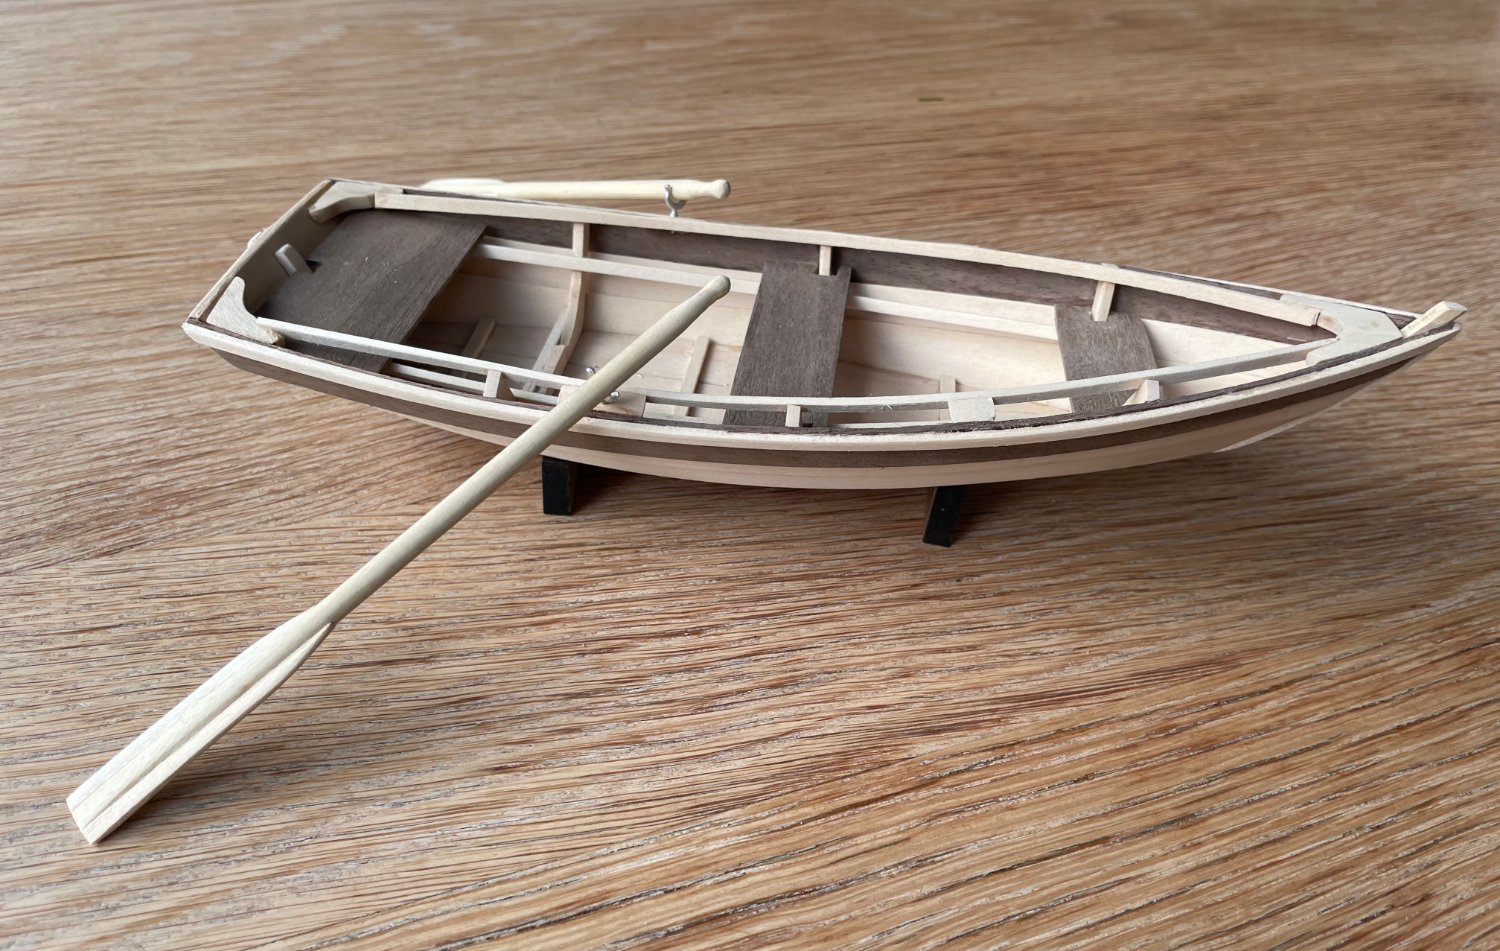
 Having just finished a very simple rowing boat model as my first build, Midwest’s Dinghy, this model will undoubtedly be more challenging. It is single lay plank-on-frame hull, so I am painfully aware that I have little scope for correcting mistakes if the planking goes wrong, unless I decide to fully paint the hull (which I may do, have not decided yet). The Bounty Jolly Boat kit by Artesania Latina has been around for a while, and there are plenty of build logs on this forum, which I have read with great interest and will undoubtedly be very helpful in my own build. However, Artesania Latina has renewed the kit this year, and there is a number of differences to the old kit. This appears to be the first build log for the new kit. A first change in the renewed kit is the box (see image below). The older kit is still available for sale from some retailers, so if you want to make certain you are getting the newer kit, make sure you get the kit with number 19004-N, not the one with number 19004. I have found the instructions for the older kit online, allowing me to compare the old and new kit. The new kit is very similar to the old one but there are some differences. An oft mentioned problem with the old kit was that some of the sails where much larger than on the plans. That problem appears to have been remedied. The new stand, now being of the ‘cradle’ type, is different from the old one. The new kit includes a grapple, which appears not have been included in the older version. The inside front of the boat is now covered by a grid, which is also new. The plywood that the false keel and bulkheads are made of is of a different style than in the past, looking more like solid wood with a thin veneer on it than ‘traditional’ plywood. This makes it less visibly ‘fake’ when seen from the side, which makes for a cleaner build where the plywood sides are visible. The oars are now in one piece, requiring rounding of the shaft; in the old kit, blades and shaft were separate. I am sure there are more differences, but these are the ones I noticed so far. One significant difference is in the instructions: an instruction booklet is no longer provided. Instead, the instructions are provided digitally. This means you either have to print the instruction booklet yourself, or to use the digital document directly. Since the instruction booklet is quite thick, I opted for the latter, meaning I have to make sure to have a charged tablet or laptop near my model shipyard (=my kitchen table). This sounds less convenient than the older, printed, colour instruction booklet and, in some ways, it is. However, the new instructions are truely excellent. They are super detailed and much more extensive than the old ones. Virtually every little step is giving its own photographic explanation, leading to an instruction booklet of eighty A4-sized pages, with on average six photographs per page (see image below for a sample page). It leaves very little to the imagination, which is excellent for a kit aimed squarely at beginners. I was very impressed. No one-to-one scale plan drawings are provided, only a one-to-one scale photograph of the completed model, but that should not be a problem given the excellent instruction booklet. This print, plus all the contents of the kit, can be seen on the photo below. The front of the box mentions multi-media instructions, that is, an online build video. Such online videos do indeed exist for some of the other renewed beginner kits, but not for the Jolly Boat, at least not yet. Maybe Artesiana Latina is in the process of creating it? A six-colour paint set is available as an extra purchase. I started the build today, by removing the false keel and bulkheads from their sheets. All the parts were straight and came out easily. I sanded the laser burn from the edges that would be visible, for aesthetic reasons, but not on invisible edges because I have read elsewhere on this forum that the laser burn does not affect the strength of the glue bond – hope I have understood that correctly. The bulk heads fit easily into the false keel, perhaps even too easily. There is a degree of wiggle room up, down, and sideways. To ensure that the bulkheads were perpendicular to the keel in all relevant directions, I used foldback clips (as shown in the photo below). Will leave the white carpenter’s glue to set overnight and continue with the hull tomorrow.
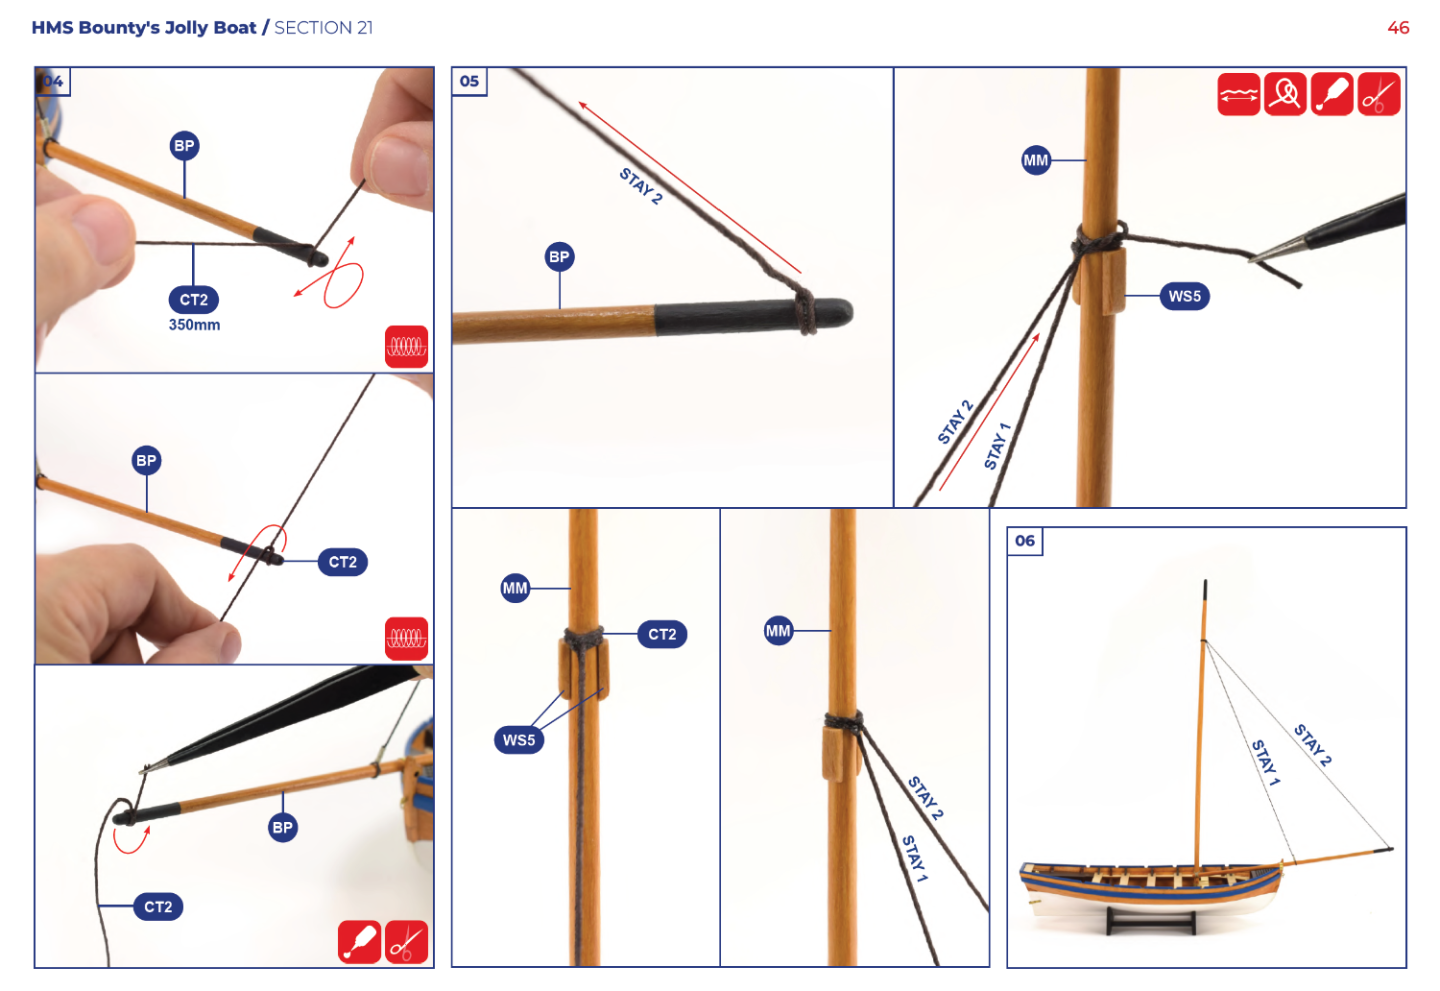


- 32 replies
-
- 6
-
-
- Bounty Jolly Boat
- Artesania Latina
- (and 1 more)
-
As a new member and a newbie to wooden model ship building, I thought this very short build log of a very simple model, Midwest’s Dinghy, could also serve as a means to introduce myself to the community. And, who knows, the build log itself might be useful for another newbie planning this same model. As my username suggest, I am Dutch but I actually live in the UK, in London to be more precise. When I say I am a newbie to wooden models I am lying, albeit it very slightly. I did actually build one wooden model before, when I was a kid, and started another one, which I never finished, in my twenties. Both builds are many decades ago now though, and I hardly remember anything about them, so I definitely feel like a complete novice. I do remember that the model I built as a kid was a solid-hull model of the Bounty, and that I very, very, severely simplified the rigging because I lacked the patience to do it right at that age. The model I built in my twenties was a plank on frame model, but I don’t remember the ship or the kit manufacturer. I did complete the double-planked hull on it, and it actually looked okay, but I was working 60-70 hour weeks at the time, and never got round to the rigging. I moved home many times since, and somewhere along the way, the incomplete model got lost. So, not a great start to this hobby… However, I have much more spare time now, and I have decided to give it another go. To nullify the chance of failing at the rigging stage once more, I chose a beginner model that does not have any rigging – a rowing boat. Smart, is it not? Or simply cowardly, that is for you to decide… The model I chose is a classic: Midwest’s Product Dinghy, now produced and sold by Model Shipways. It is a very simple little boat, but it does have a plank on frame construction, so it does provide a first opportunity to get acquainted with this daunting-for-a-beginner aspect of model ship building. I completed the model in a ten-hour day, so this is not a proper build log, as the actual build was completed before I could even start the log. Still, as I wrote above, perhaps it can be of use to another beginner contemplating the same model, who knows. I myself read several build logs of this model on this forum, and they were very helpful. Thank you, Voyageur, Duanelaker, MaryO, and burgoofj for your clear and instructive building logs! These are the contents of the box (photo below). The planks for the hull are pre-formed, which was one of the reasons I selected this kit, since I am interested in the ‘plank spilling technique’ that I have seen discussed on this forum. In this case, the spilling has already been done for me, making things easy. The instructions consist of text and black-and-white drawings, and they were very clear and easy to follow. They did not mention that one should remove the black burns on the sides of the laser-cut parts though, to ensure that glue/dyes/lacquer can get proper purchase on them, but I had read about that in other builds on this forum, so I knew that I needed to do that. All of the parts were straight, and could be used as is. I have nothing to compare the kit to, but I was quite happy with its quality. For some parts of the build, the instructions ask you to pin the wooden parts to cut-out parts of the plans. I wanted to keep the plans intact for future reference, so copied them beforehand, and used those copies instead. This photo (below) gives an example, in which two halves of a bulkhead are supposed to be affixed to the plans, and subsequently connected with a small wooden section; rather than the suggested pushpins, I used clamps. The instructions tell you to use a pencil to draw two parallel lines on the dinghy bottom, to suggest it consisting of three planks. I did not find the result very convincing, and near the end of the build, decided to largely rub out the pencil mark and replace them by a straight scratch/scribe in the wood. The dinghy bottom is curved, which is achieved by putting it on top of three blocks of different heights, and then affixing it to middle one with pushpins. The manual says you should soften the underside with alcohol first, but I did not do that, and it turned out fine. The two pushpins do leave two holes in the bottom which, despite ending up below a seat, are visible from certain angles in the completed build, so in hindsight I would probably rather have clamped the bottom rather than pin it. But the holes are not very conspicuous. In this photo (below), I have put on the first planks. Since they are pre-spilled, they go on effortlessly. As the manual recommended, I used CA glue (super glue) throughout this build, so I did not require any clamps to keep the planks in place. I used a high-viscosity CA glue, with a set time of 30 seconds, as I have seen recommended on this forum. This worked well, but despite the glue not being at all runny, I did manage to leave some visible traces on the inside of the boat, mainly where I had to move planks up and down during the fitting process. I was largely able to remove these later, by simply sanding them off, but careful inspection would still show up some glue blemishes in the completed model. In hindsight, I should perhaps simply have used PVA instead. The CA did make for a quick build, but even the high viscosity, relatively slow-setting variant I used clearly introduces the risk of staining the wood. A lesson learnt. In the photo below all planks are on (yes, I know, ‘all’ is only three on each side, but I had to start somewhere), and the pushpins have been taken out. The dinghy bottom kept its form nicely. When removing the side-plank overhang from the dinghy bottom, I used a knife, as suggested by the instructions. That was a mistake, as the knife ripped some to the planks, even though it was sharp, resulting in some gaps between side planks and bottom. I filled these with a mixture of wood glue and saw dust, and they are not problematic because they are at the bottom of the boat and not visible, but in hindsight I should have just sanded rather than cut the side planks down. These are the oars I made. I found the instructions unclear about how to ensure that the decorative (?) rounded ends were similar, and the oars ended up a bit uneven as a result, but the bottom of the oars, the bit with the blades, looked alright, so I am focusing on that in this photo. And, finally, this is the completed dinghy (photo below). I made the mistake of installing the inwales to high at the back, and could not move them down because I had used CA glue (again, will switch to PVA in next build), so the back seat is positioned too high. But overall, I am quite happy with the result. I can recommend this boat to other novices. It is simple, looks quite nice, and can be finished in a single day, if pushed, so you get a quick return on time invested. I know that that is not particularly important, since this a hobby, not a job, but it is much better than biting off too much, getting frustrated along the way, and never finishing a build, which is what happened to me in my more youthful exploits in model shipbuilding. I really enjoyed building this little boat, and it has given me the confidence to take a slightly more ambitious model for my next build. I am awaiting delivery of the NRG half hull planking tutorial kit, and have also already purchased a kit on which I want to apply the lessons that I will undoubtedly learn in that tutorial, namely Artisania Latina’s Bounty Jolly Boat. Will start new build logs for these two projects once I have started them. Thank you for reading and greetings from London, Seb.
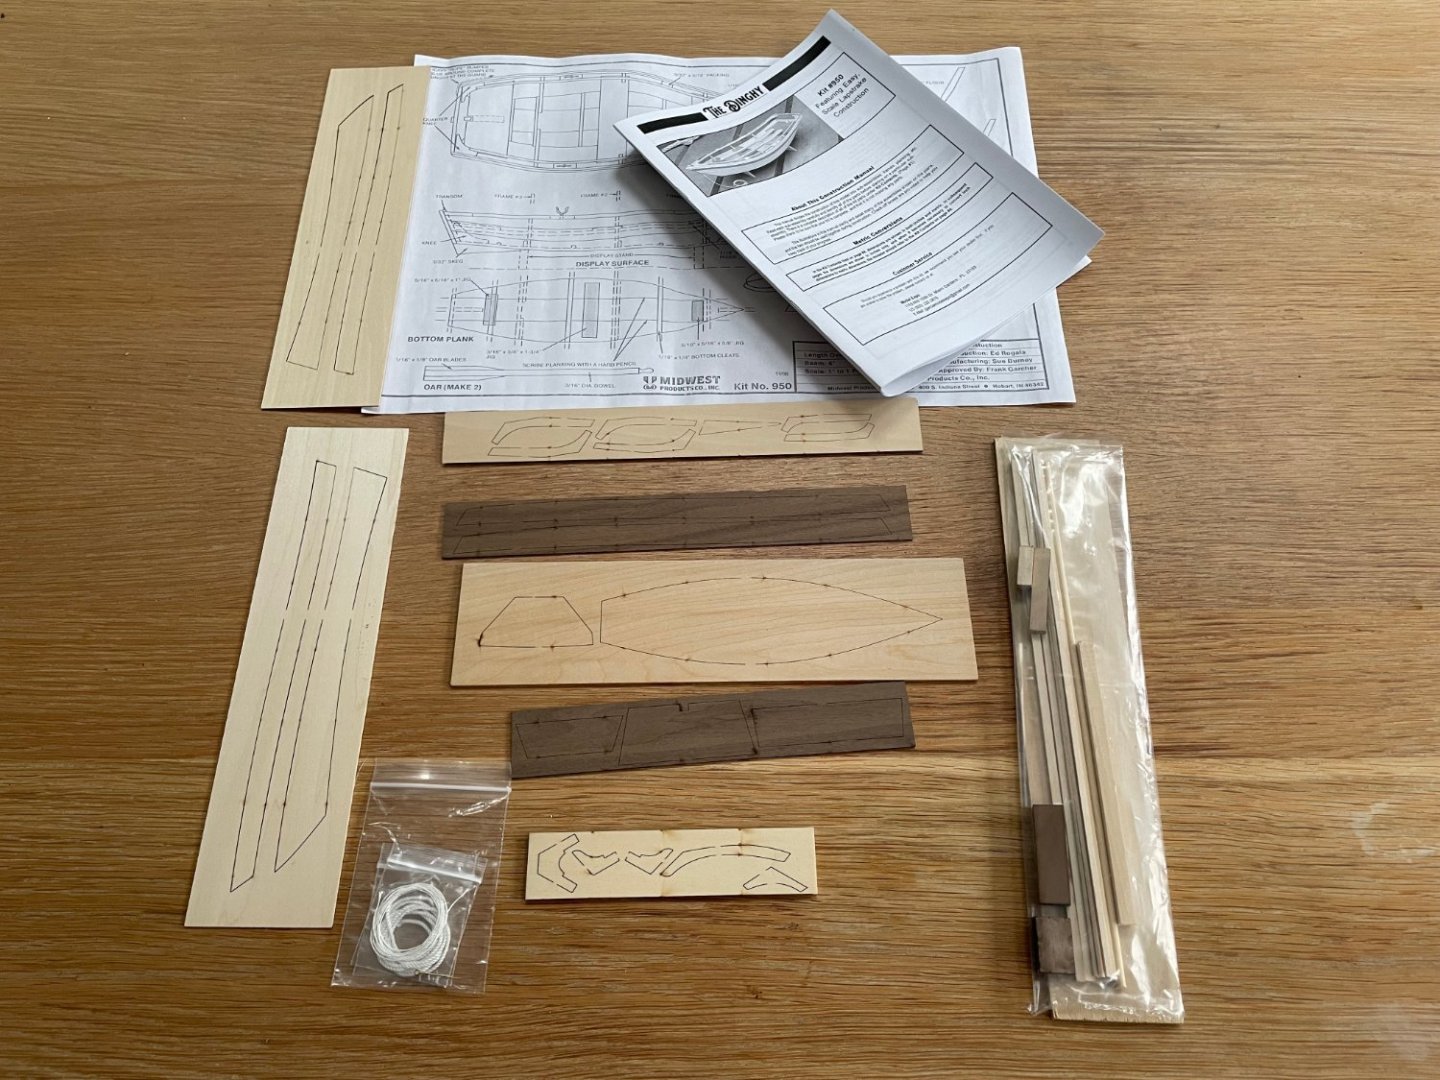
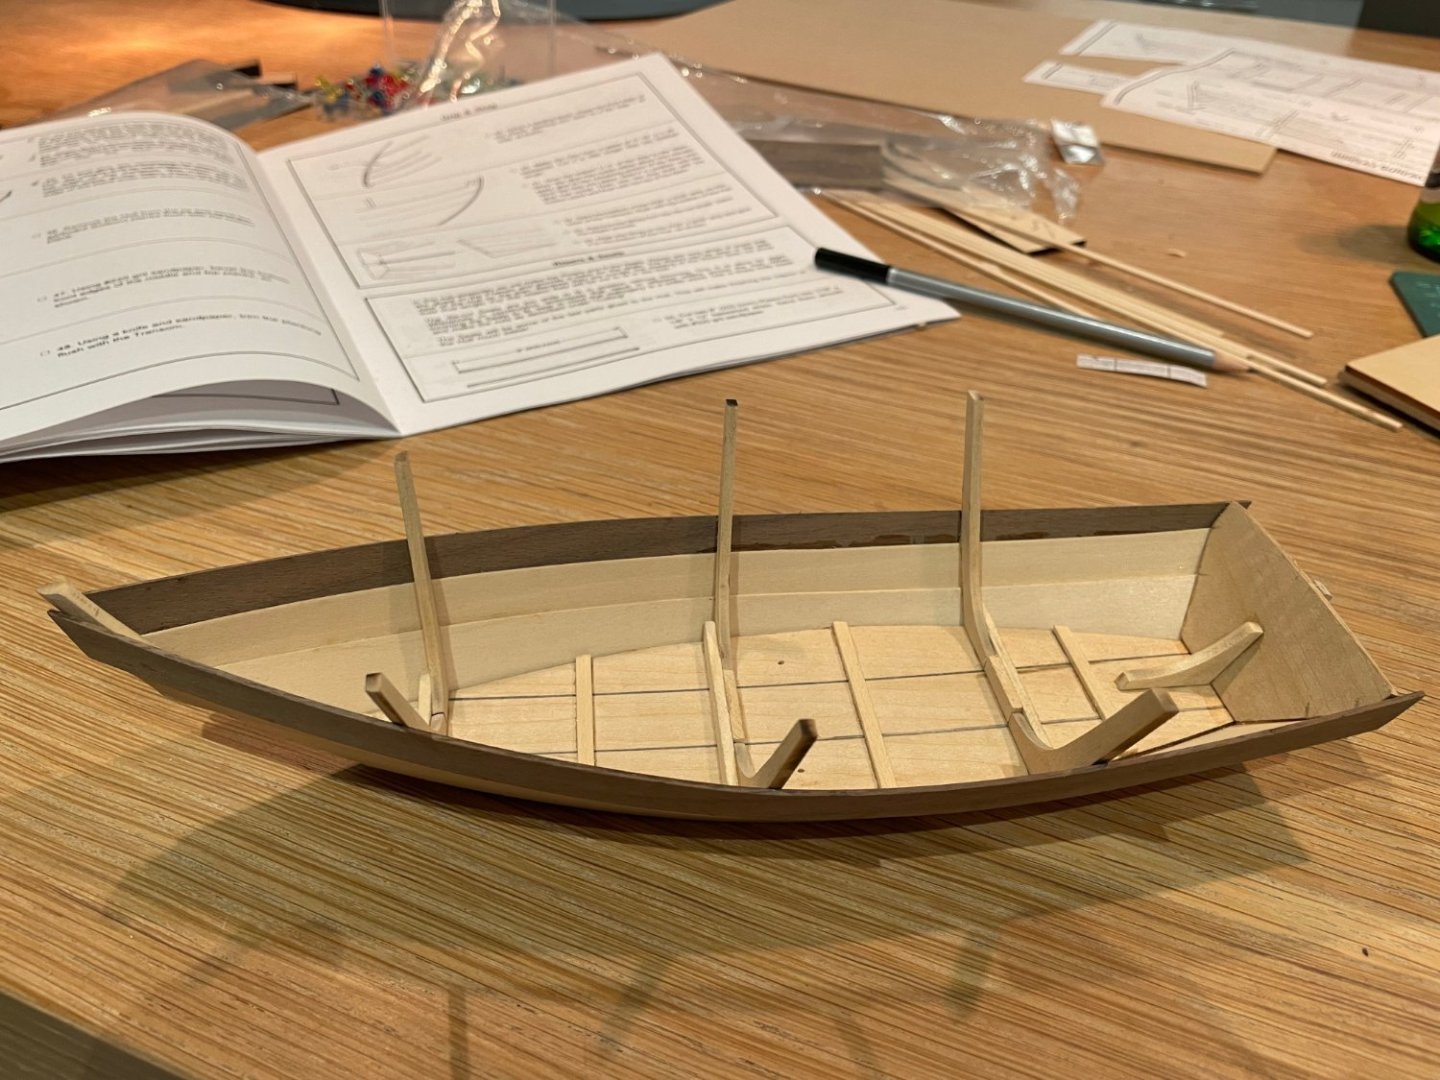
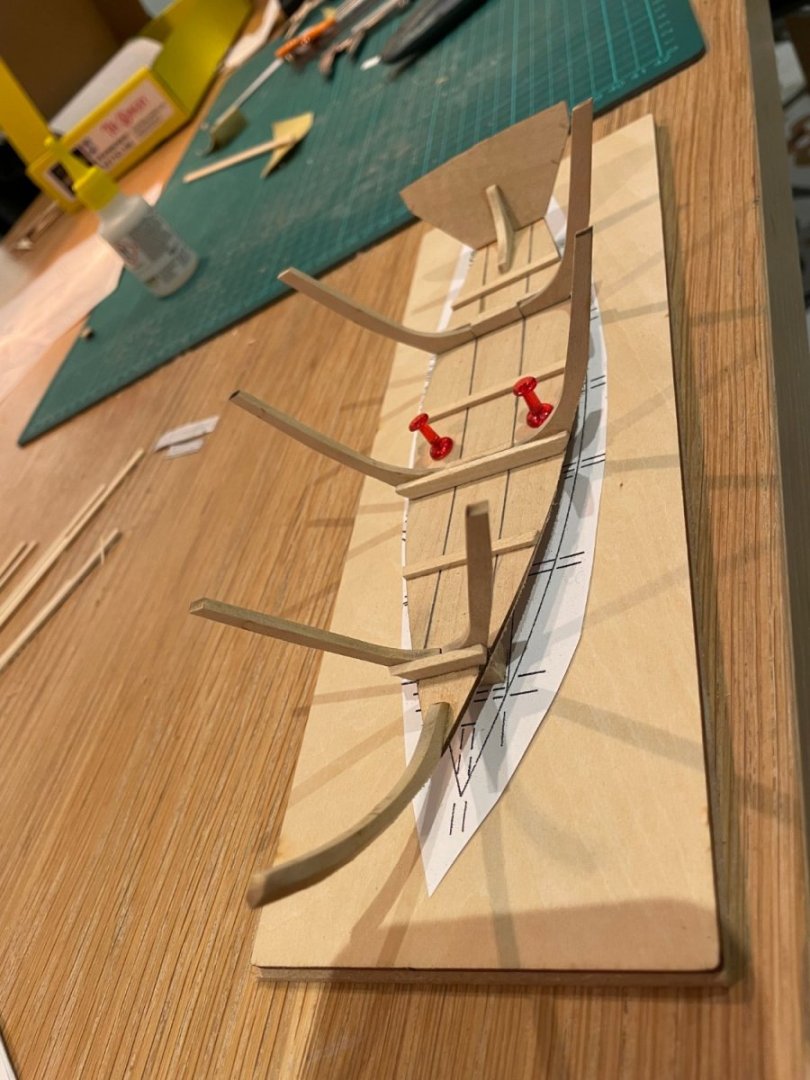
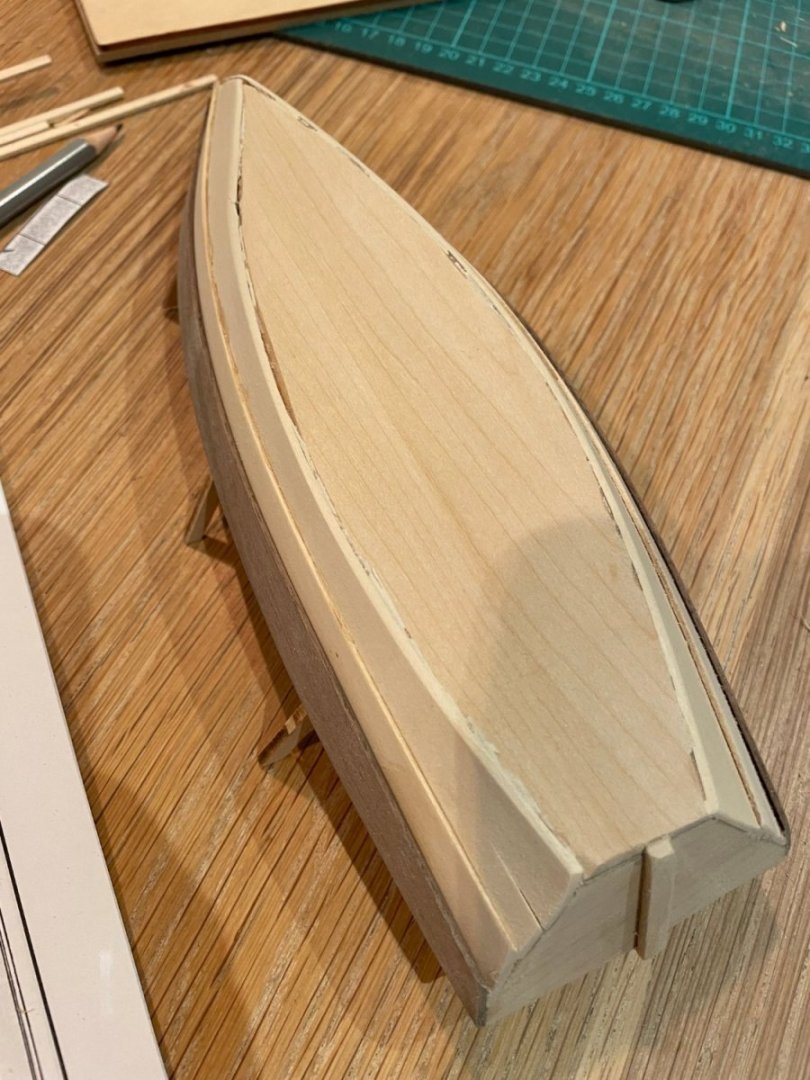

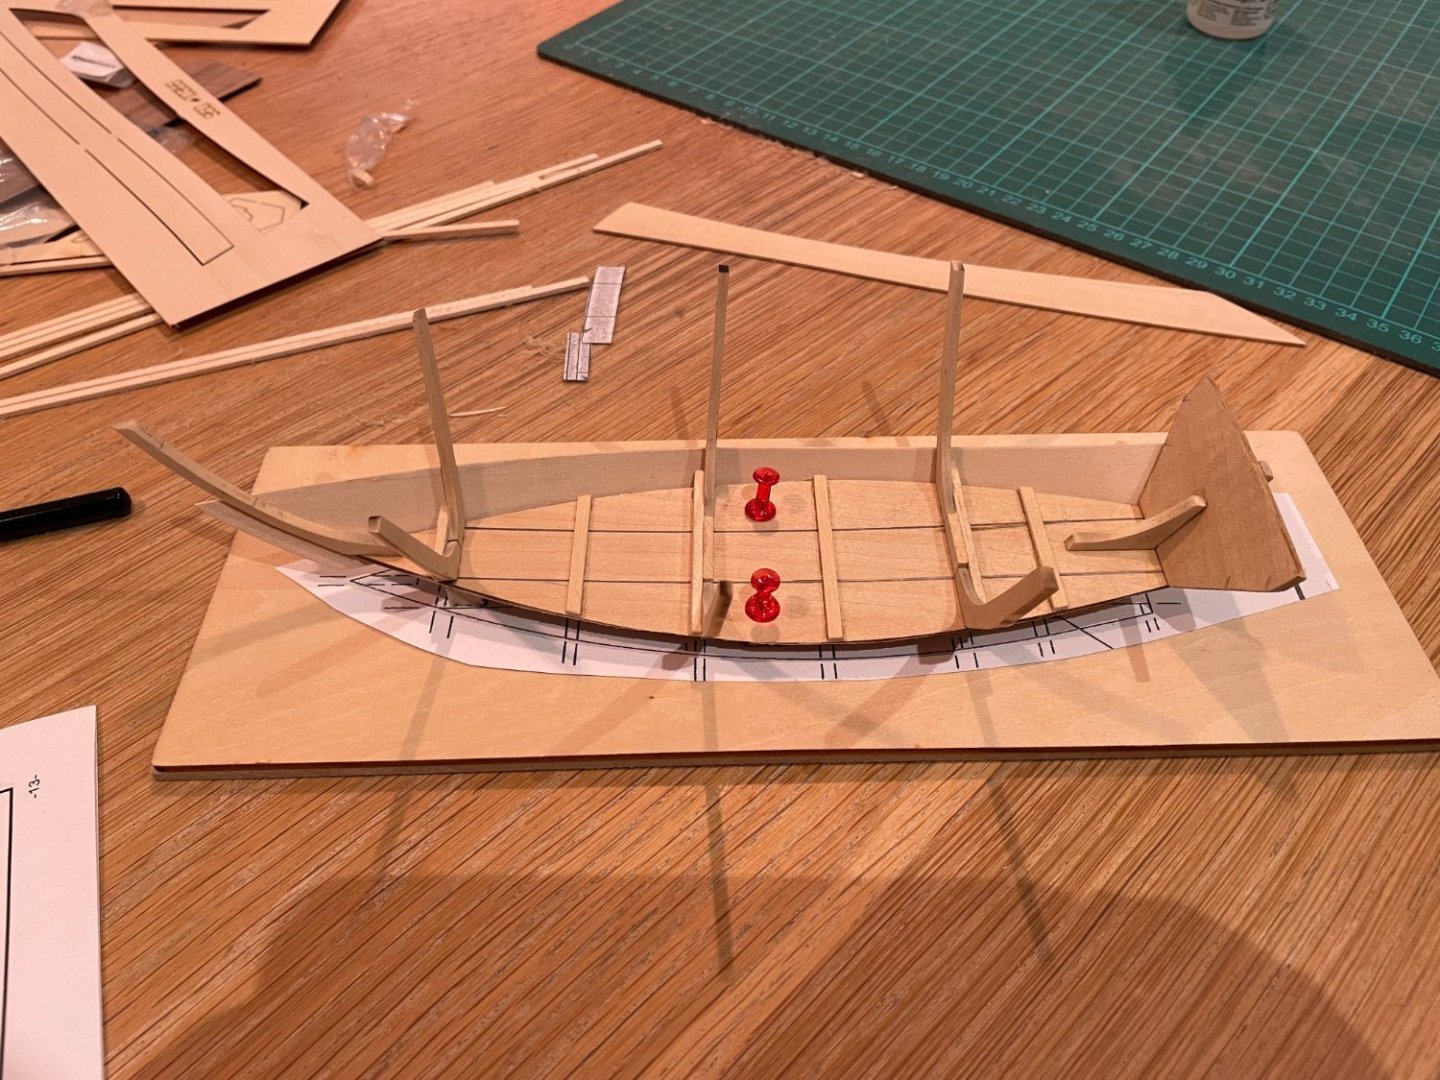
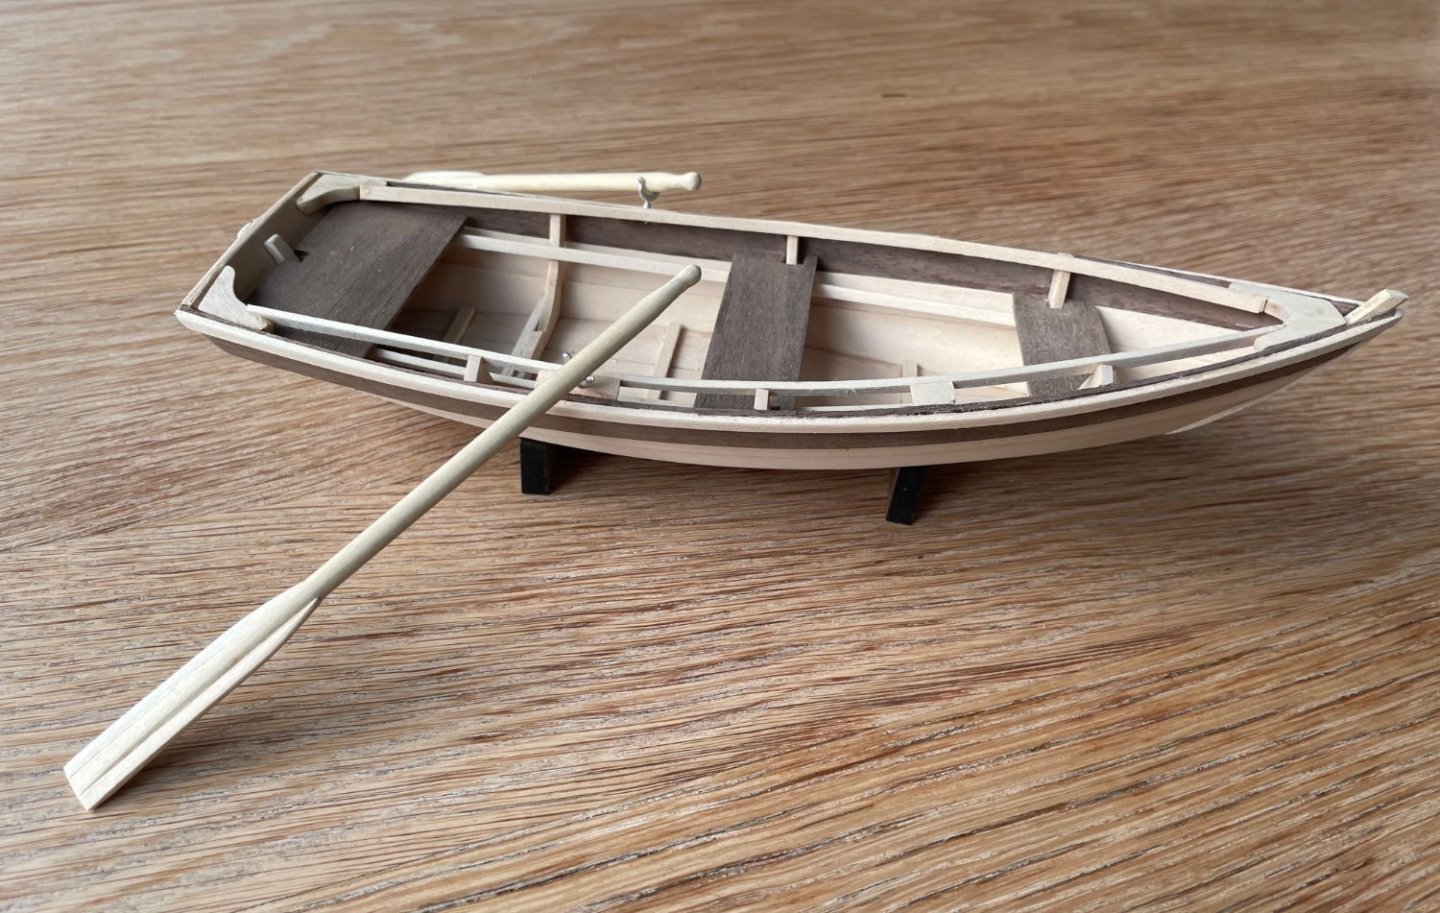
- 8 replies
-
- 5
-
-
-
- Dinghy
- Midwest Products
- (and 1 more)
-
 This will be the first time in more than 60 years that I will be building a model of a ship NOT built in the 1800s. It comes about because I am just finishing up a 1:15 radio-controlled model of the Norwegian designer/builder Colin Archer's prototype rescue vessel notably called 'Colin Archer' (a Billings Boat kit). In looking forward to my next project, I told my wife that I was thinking of a radio-controlled paddle wheeler. She said, "Why not do Columbus' ships and we'll put them on top of the book case - all lined up." A most interesting idea since it sort of implies long term display and I have never kept any model for more than 2 or 3 years. So I thought about it and decided that it was a great idea with two conditions. 1-- I would use a plastic kit as a starting point because I do not want to commit a huge amount of time to this project and 2-- I would use the 1966 book Columbus' Ships by Jose Maria Martinez-Hidalgo and edited by Howard I. Chapelle as my exclusive source. My intention is to modify the kit to match Hidalgo's informtion where-ever practical and use the kit's intrinsic information everywhere else. The second posting will describe how well the three hulls in Heller's kit match the hulls described by Hidalgo.
- 18 replies
-
- 1
-
-
- Santa Maria
- Pinta
- (and 3 more)

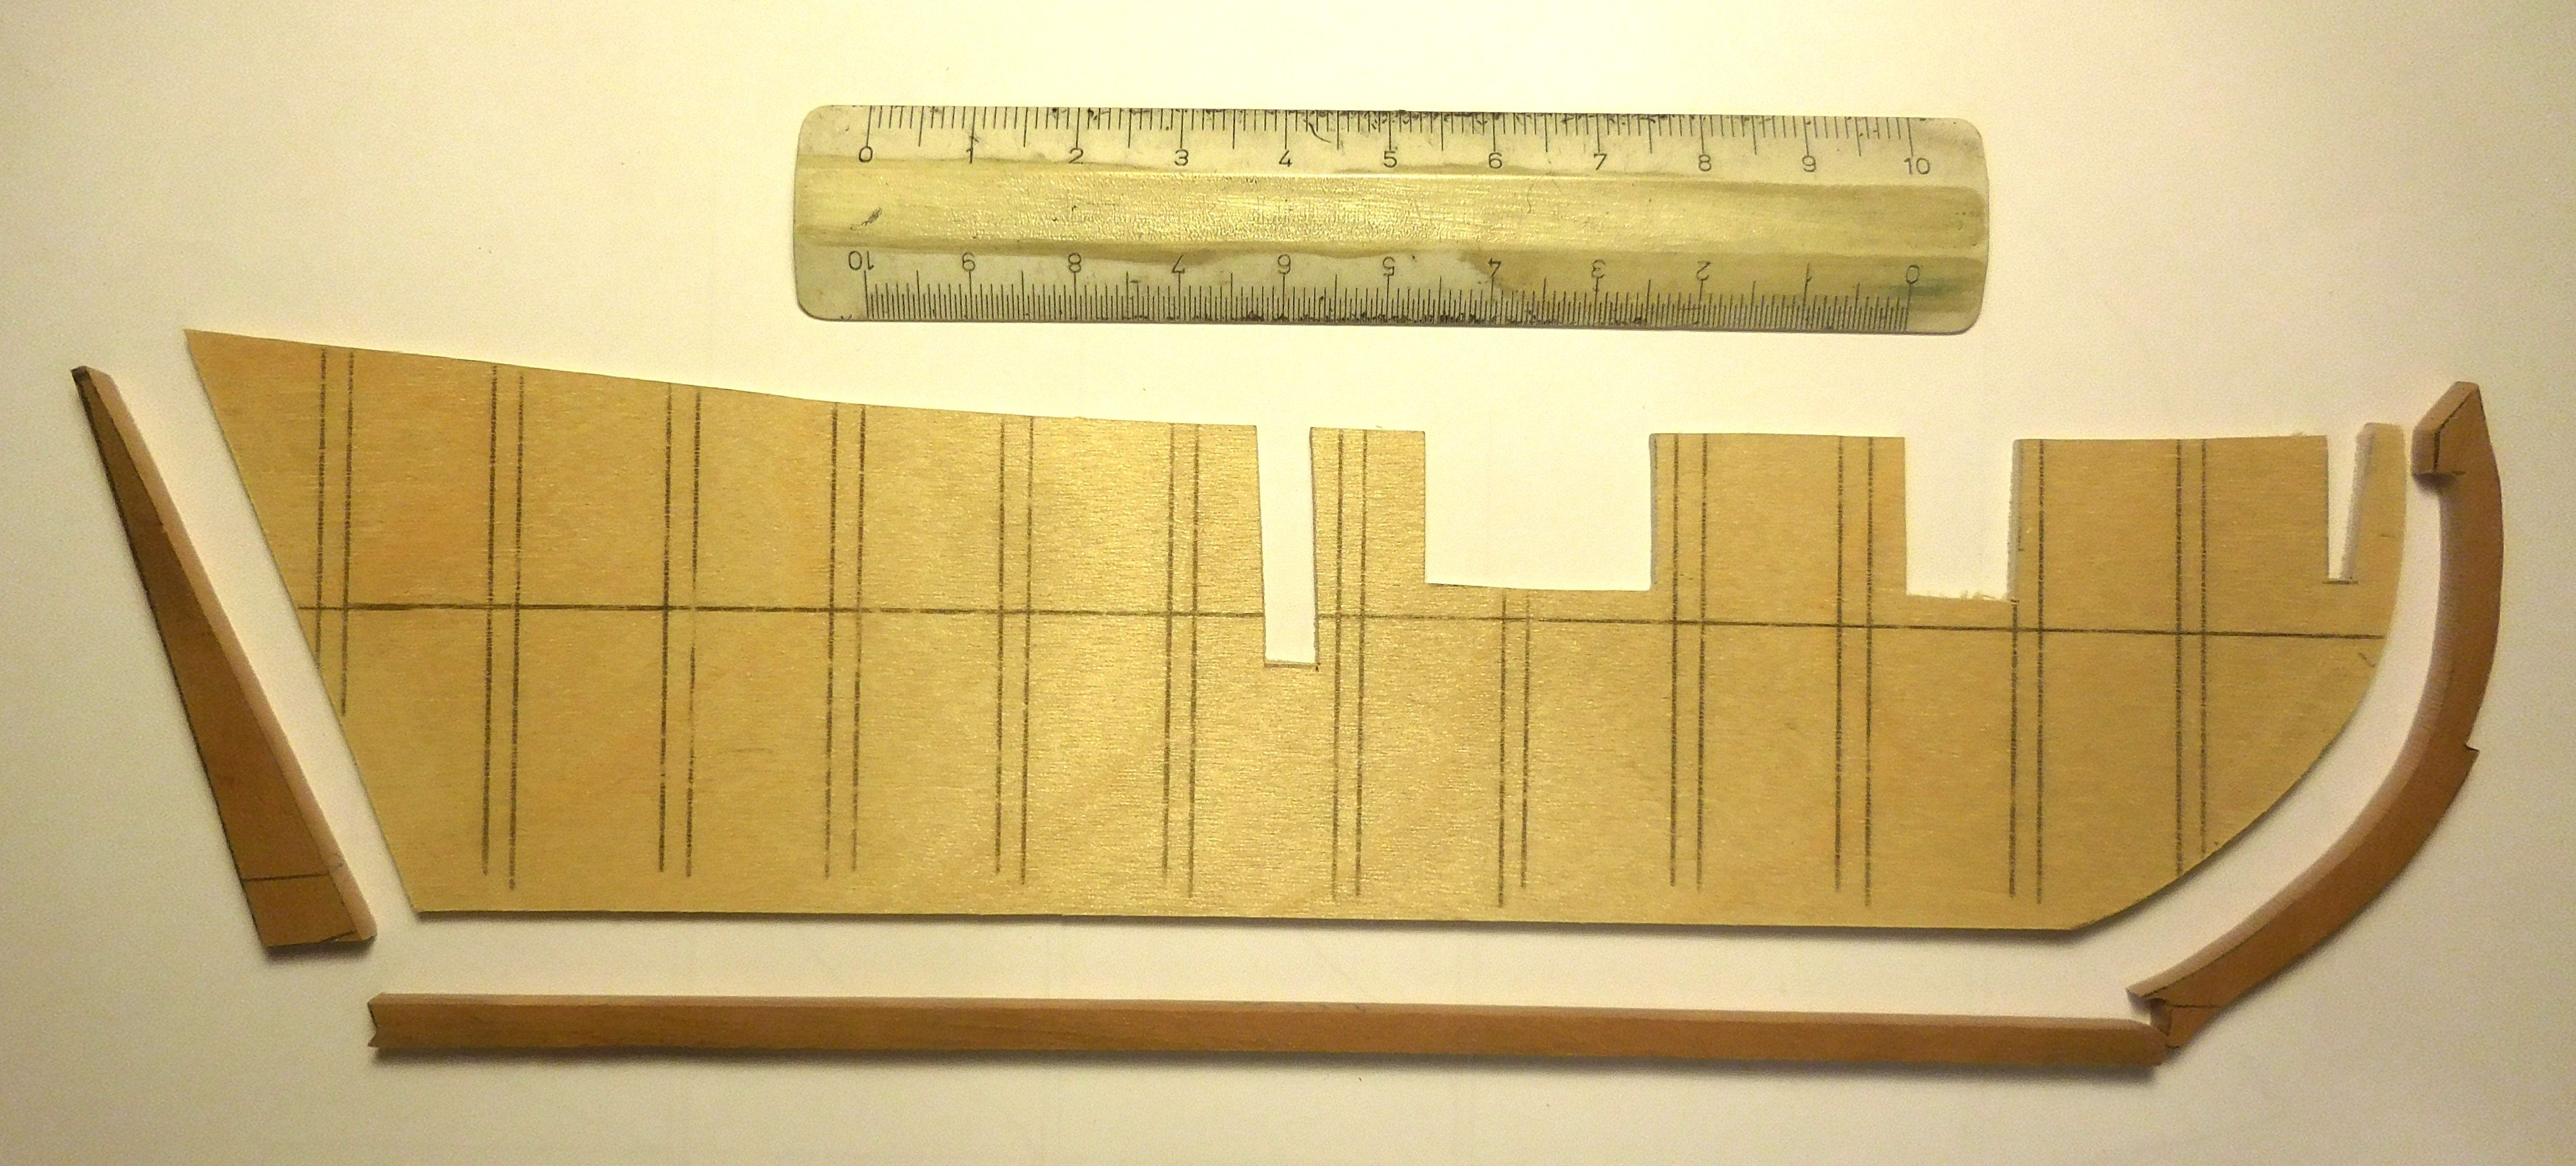
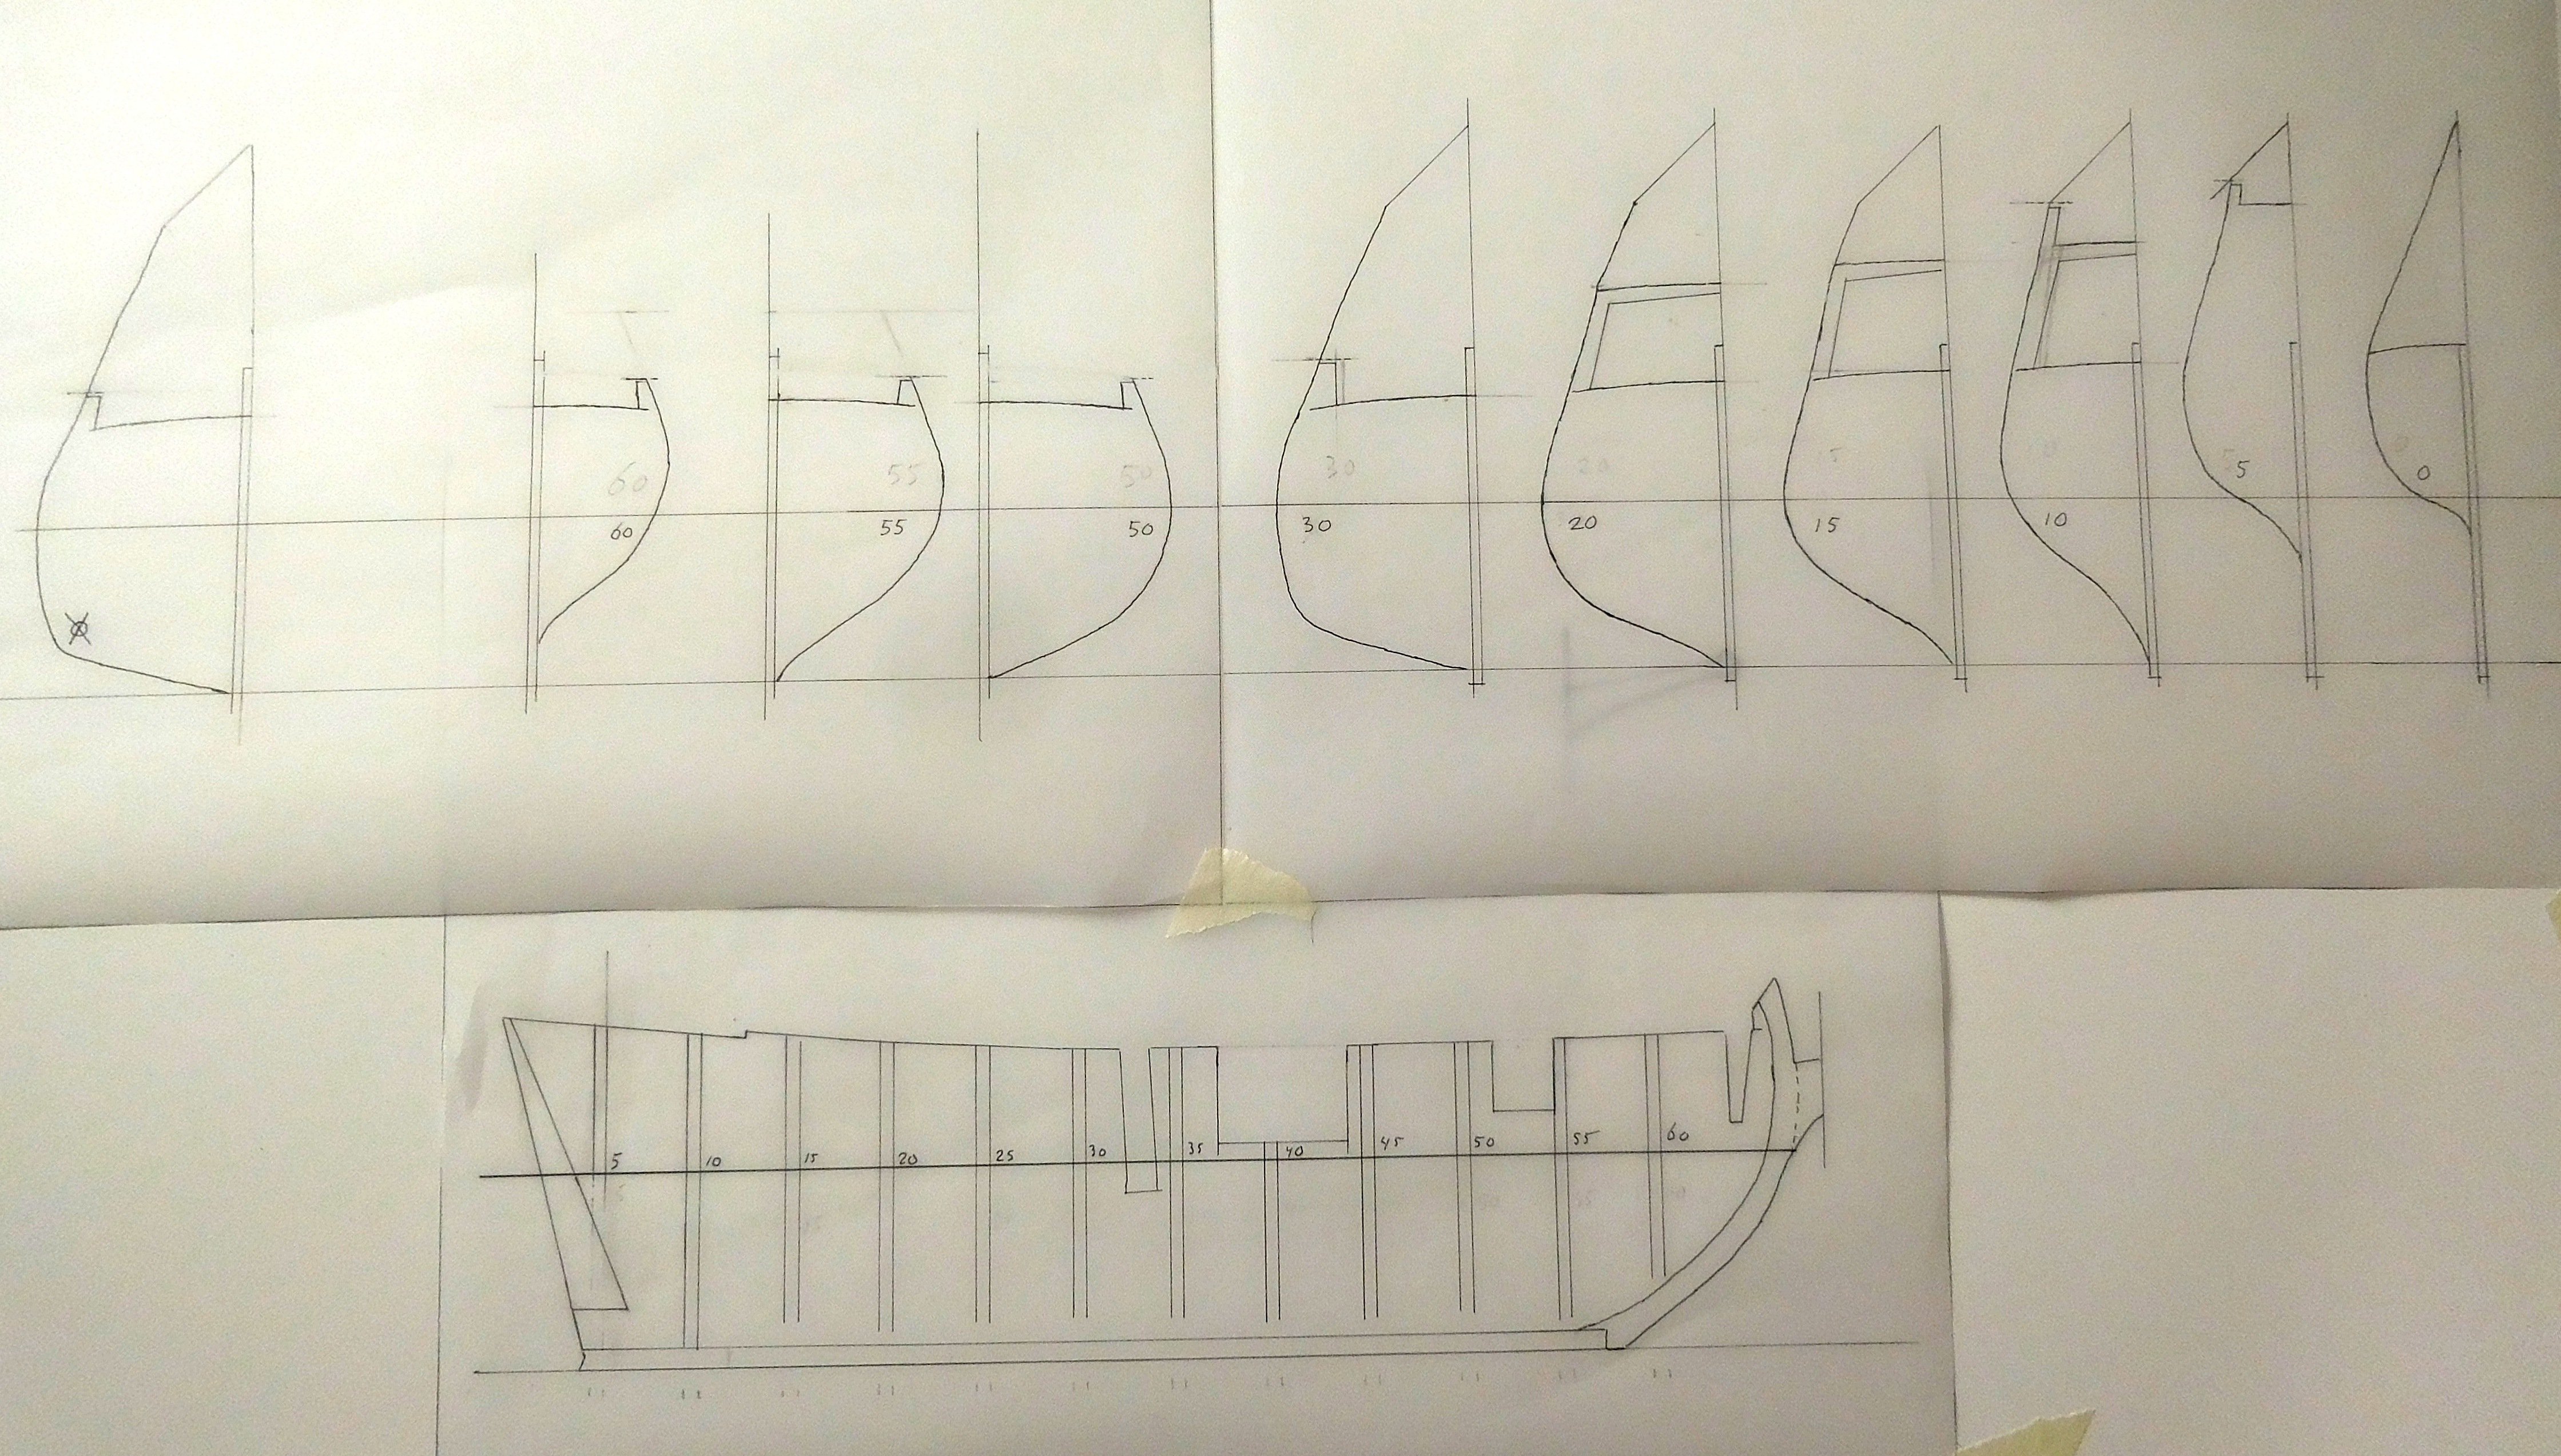

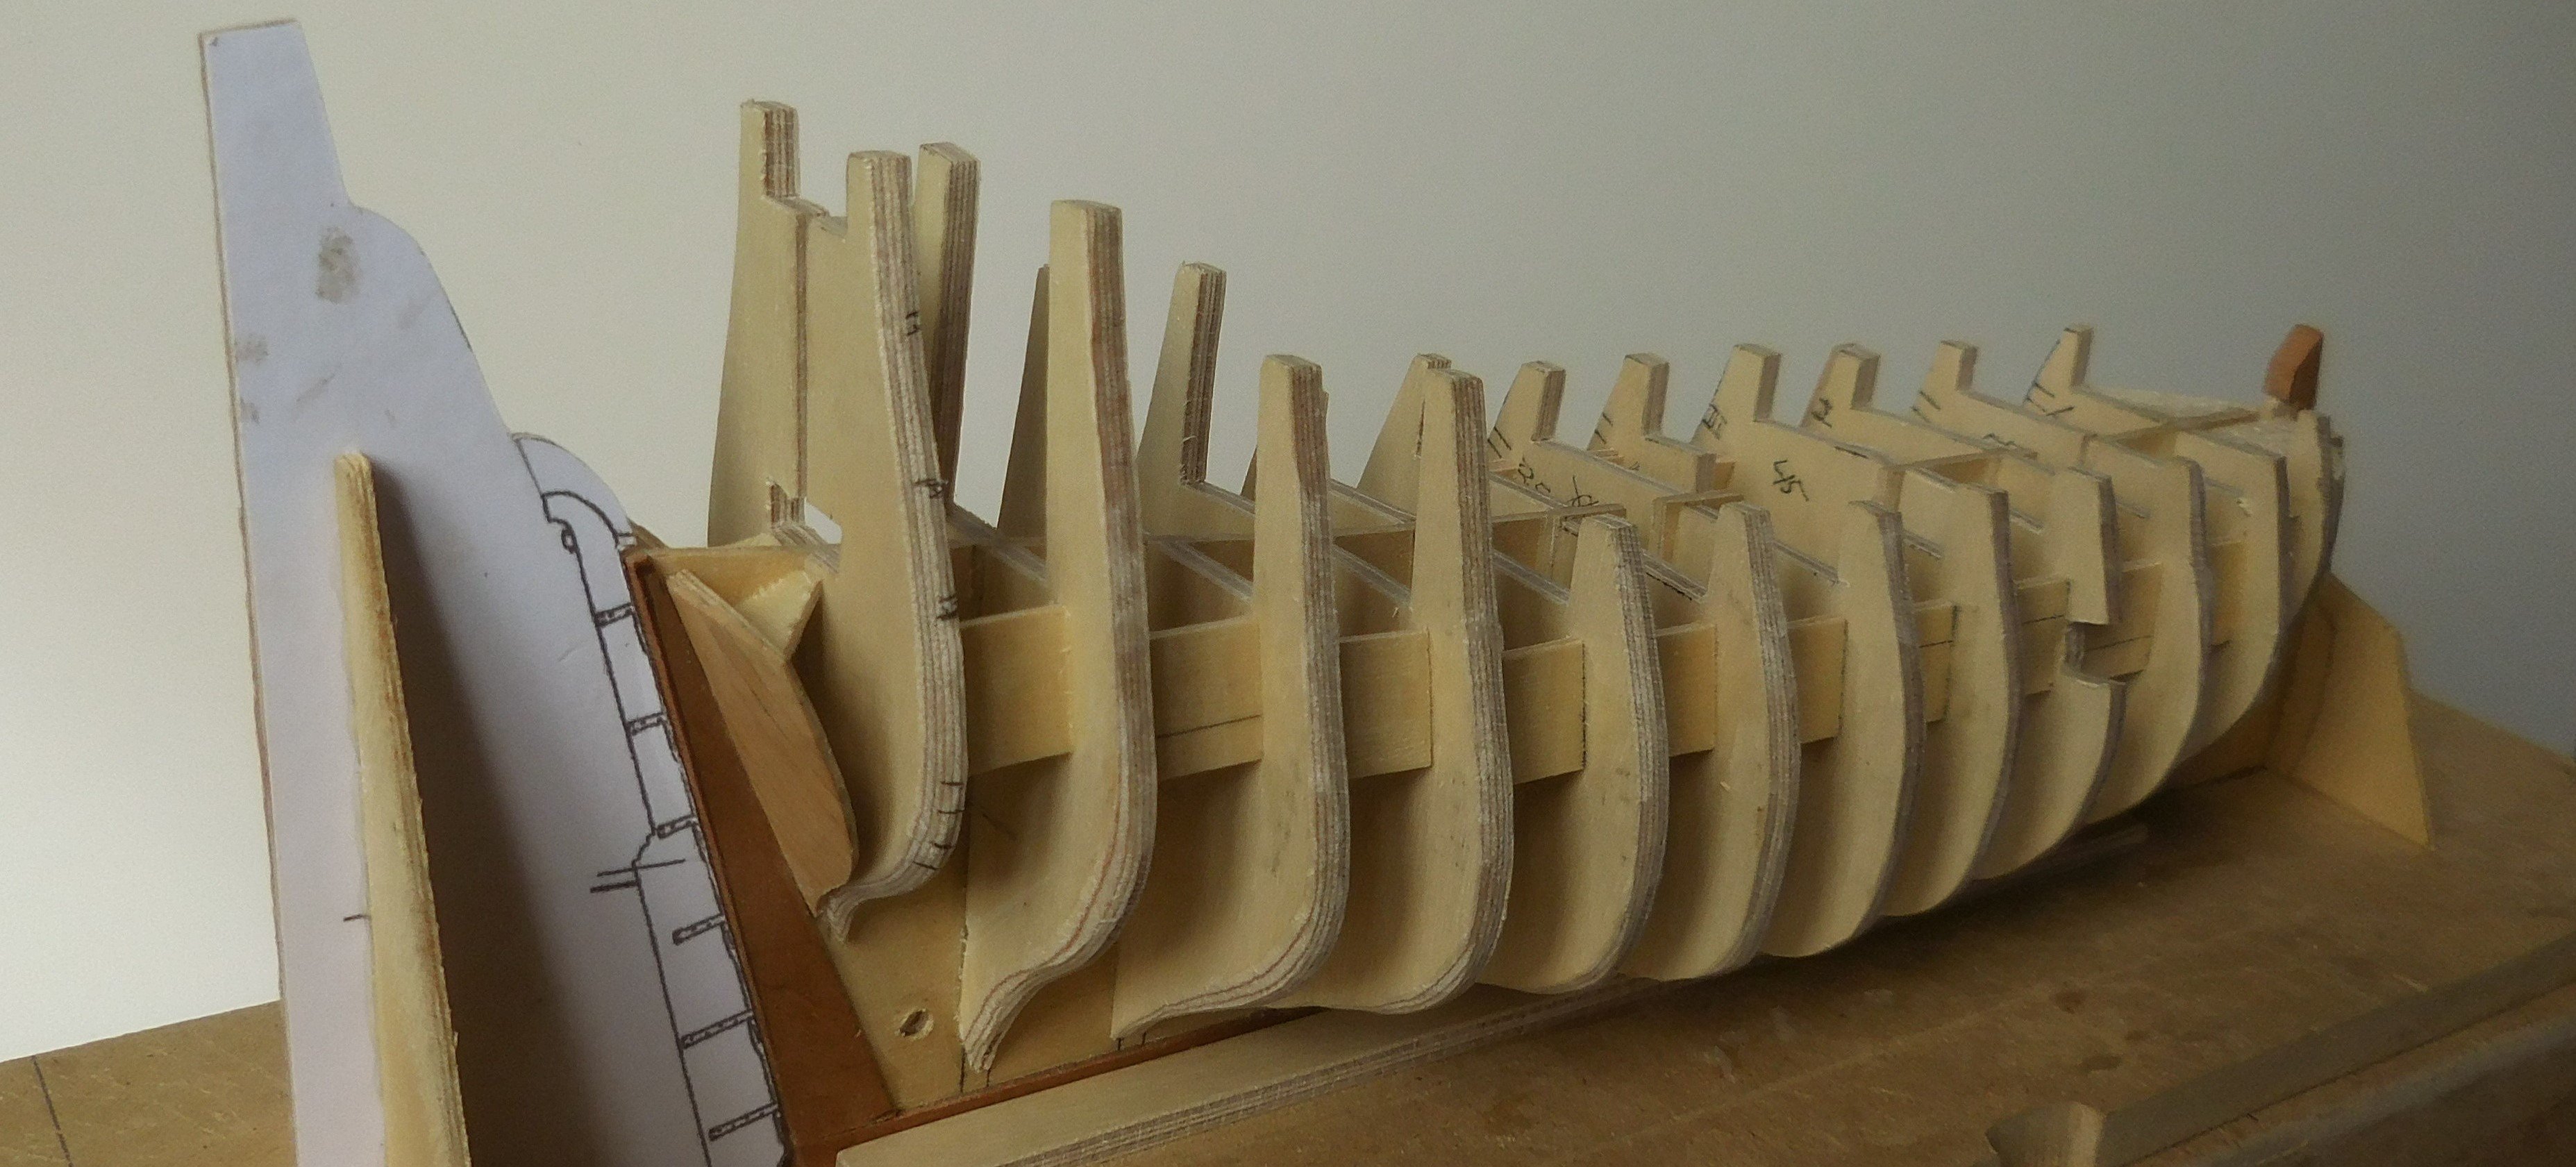
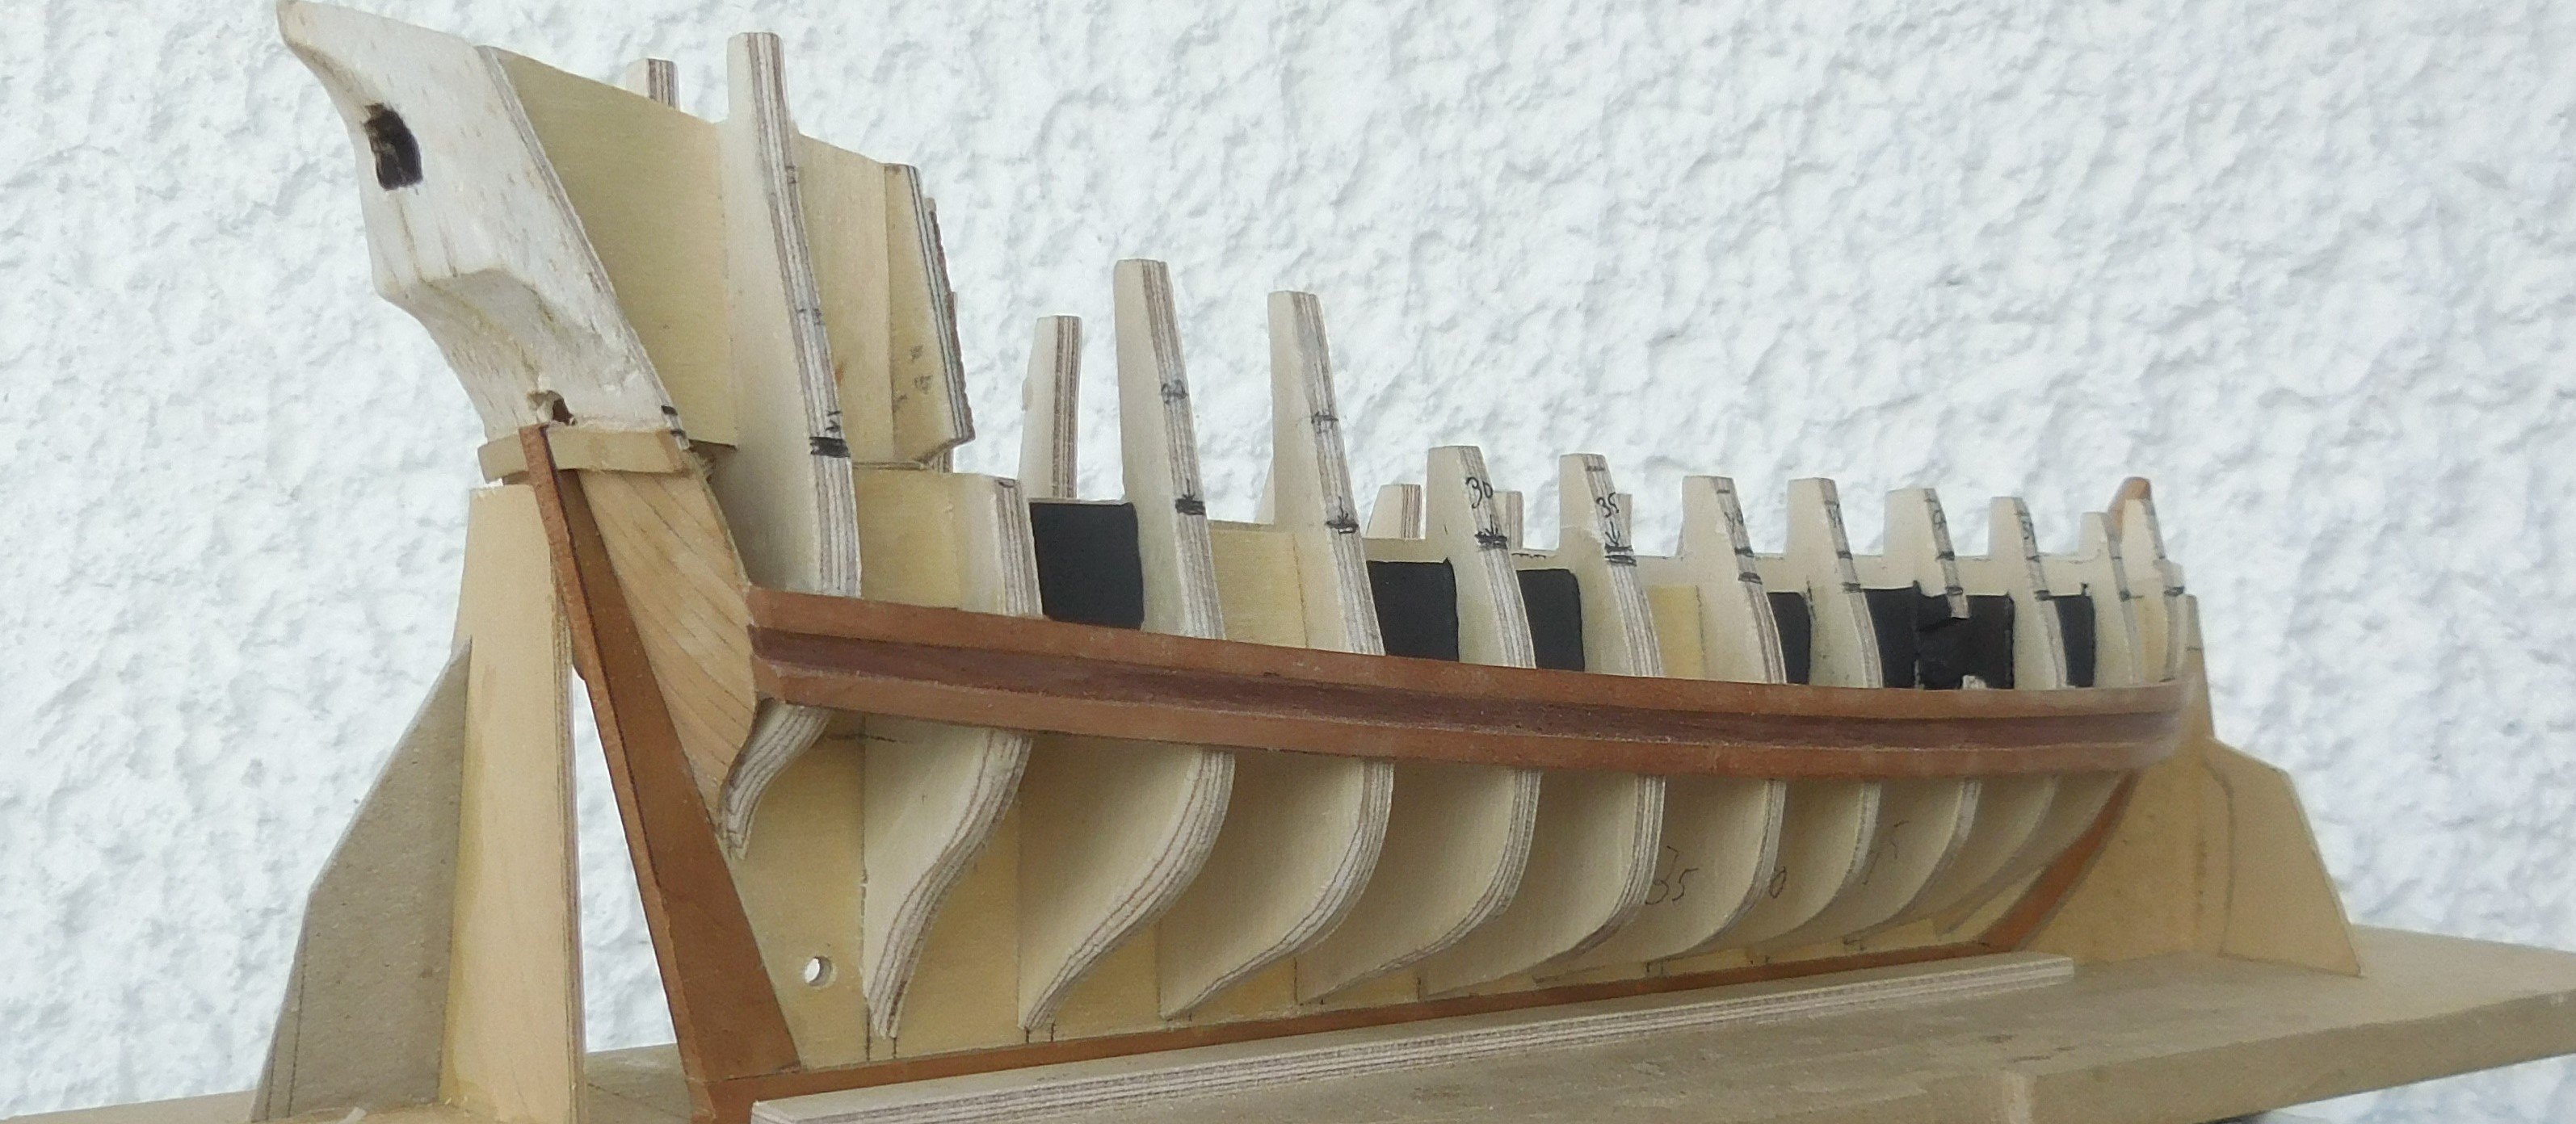


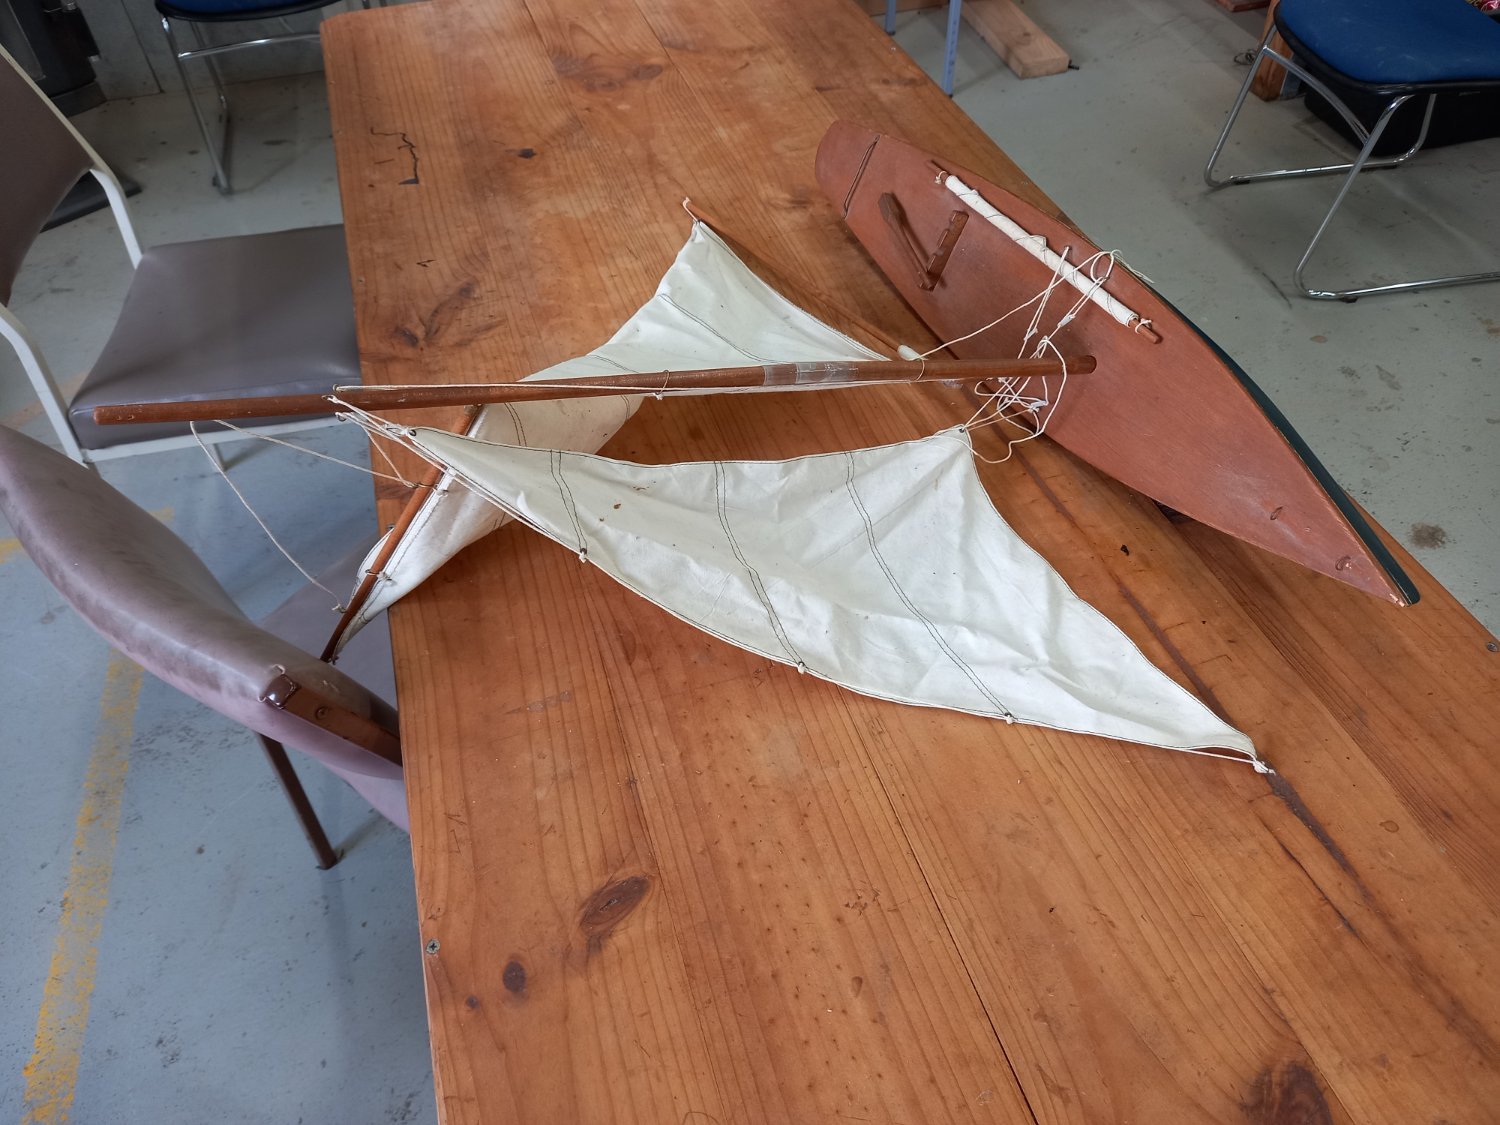
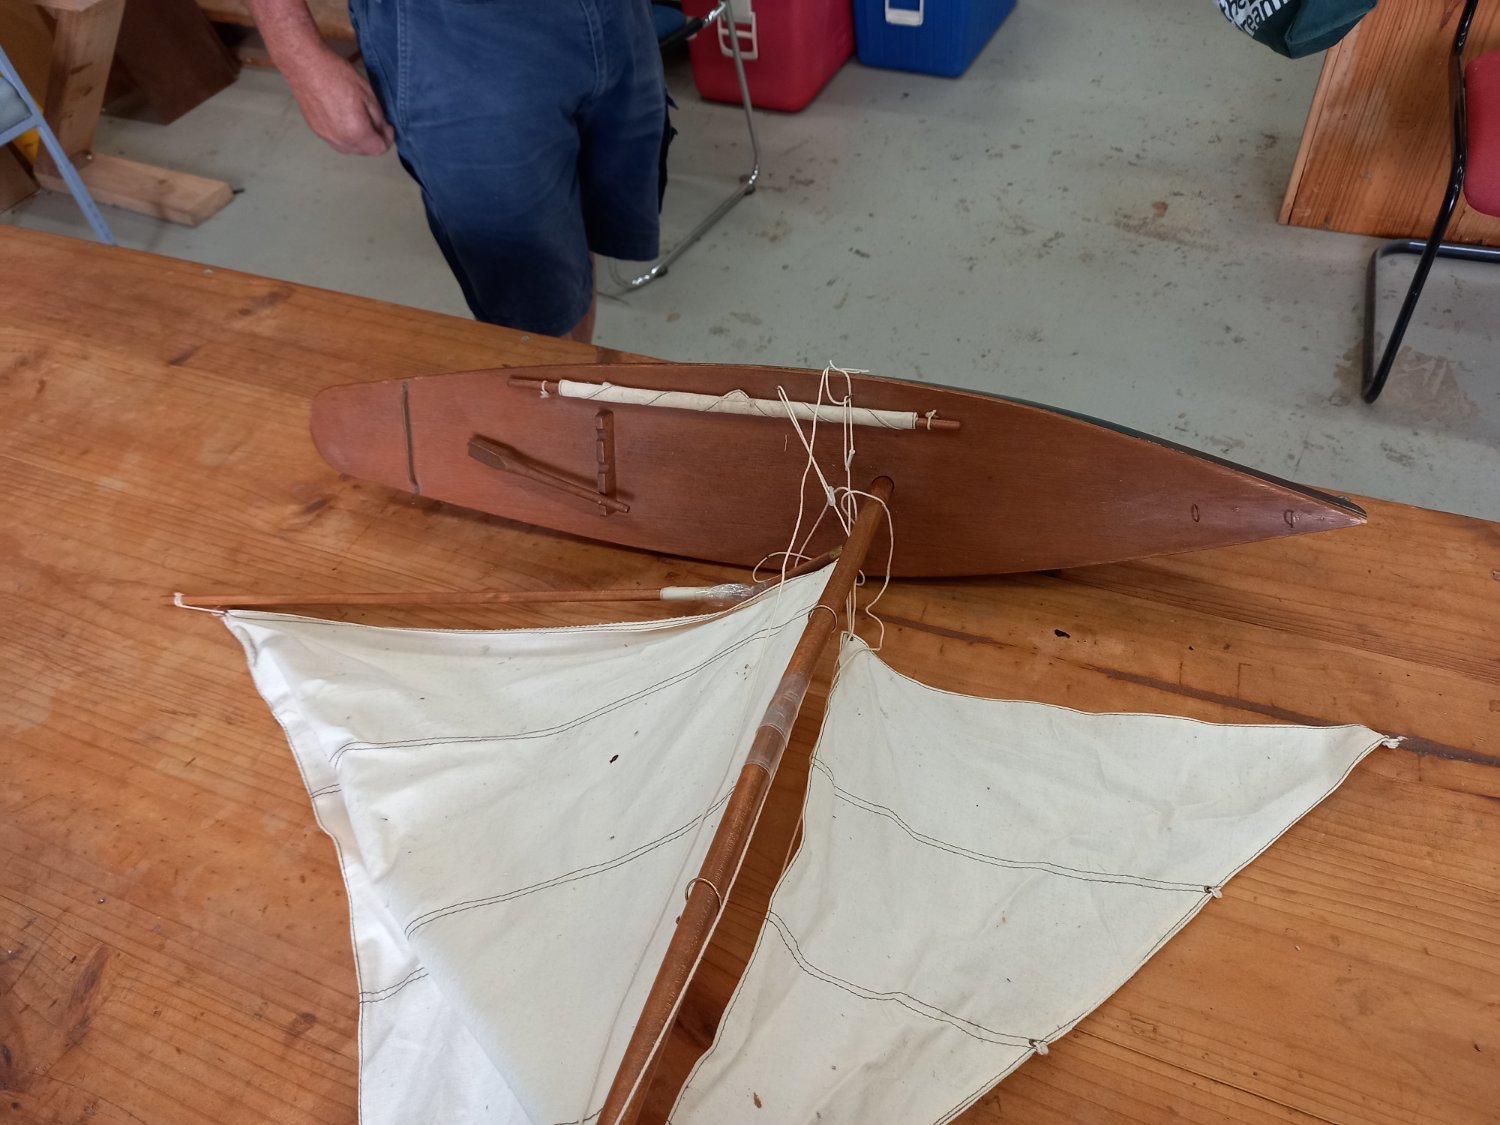

.JPG.3ad771c5470d08fe3808dfe220ff4a23.JPG)
.JPG.5d3c6d4527d140b7174615be8ee48df8.JPG)
.JPG.8bdffdbaf118a0adace7a4683be30924.JPG)

.JPG.f882fd2a06aa97fd46627cfe206d3d51.JPG)