TBlack
-
Posts
1,285 -
Joined
-
Last visited
Content Type
Profiles
Forums
Gallery
Events
Everything posted by TBlack
-
 Pete, Will you tell us how you fabricated the turnbuckles? Tom
- 296 replies
-
- 1
-

-
- herreshoff
- buzzards bay
- (and 1 more)
-
I'm assuming you shaped the funnel by eye? Came out damn good! And the way you're knocking this pilot house together w/o plans is amazing. If you were a piano player, you'd be one of those who can just sit down, without sheet music, and create a symphony! Tom
-
SS Vinal Haven by TBlack - FINISHED
TBlack replied to TBlack's topic in - Build logs for subjects built 1851 - 1900
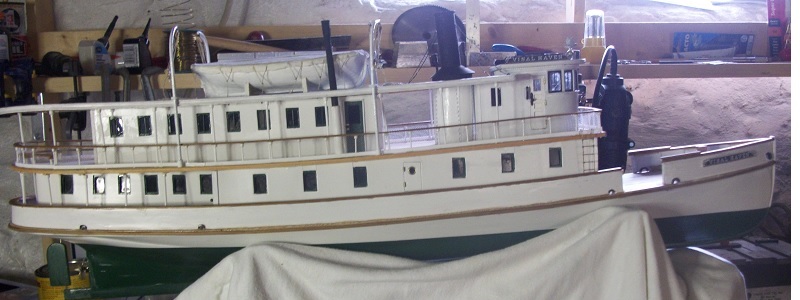
You guys are all too nice to me. This site has the most inspiring and encouraging group of people. Bless you all! The model is good, but it's not that good, but I'm getting better! Tom- 326 replies
-
- 1
-
-
- vinal haven
- steam ship
- (and 1 more)
-
SS Vinal Haven by TBlack - FINISHED
TBlack replied to TBlack's topic in - Build logs for subjects built 1851 - 1900
Michael, You get part of the credit for this build. Pilot house windows, smoke stack, and running lights. Did I forget anything? Pete, Size is the main consideration. I can work down to 1:64 and the final product has to fit in a normal sized house. I've been following Alex's build of Sphynx in the scratch builds. The advantage is that the hull is only just over 100' long, and Alex makes plans available through Chuck Passaro at Syren. Tom.- 326 replies
-
- 1
-
-
- vinal haven
- steam ship
- (and 1 more)
-
Pete, She looks really nice! I told you earlier that my aunt has one of these (Zephyr) and that I've had the good fortune to sail her many times. There's a bizarre jib sheet arrangement that only uses one line reeved through a block on the aft end of the club. I guess that's better than two sheets? Anyway, you're doing a great job Tom PS Weren't you about to move to Oregon? Are you still at CdA?
- 296 replies
-
- 1
-
-
- herreshoff
- buzzards bay
- (and 1 more)
-
SS Vinal Haven by TBlack - FINISHED
TBlack replied to TBlack's topic in - Build logs for subjects built 1851 - 1900
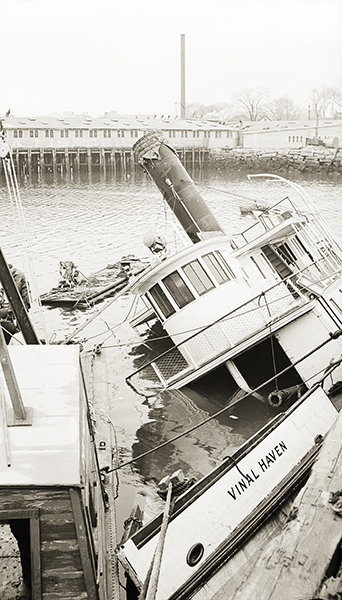
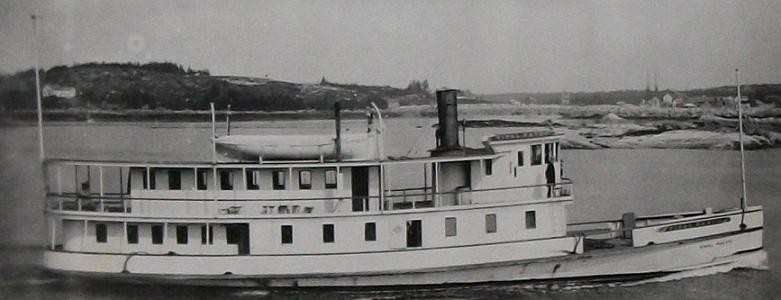
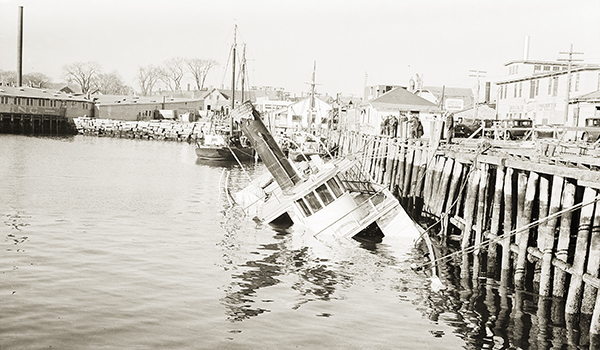
Crackers, Your photo is from the fall of 1938. Here are a couple of others just prior to yours: She was refloated but never used again. Instead she was towed to another berth and left. Ultimately, she was towed out to deeper water and scuttled. All pictures are thanks to the Searsport Maritime Museum. Tom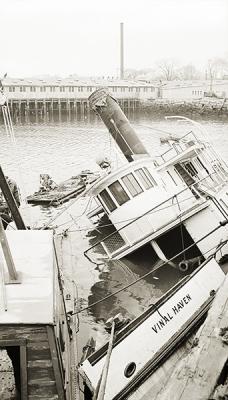
- 326 replies
-
- 5
-
-
- vinal haven
- steam ship
- (and 1 more)
-
SS Vinal Haven by TBlack - FINISHED
TBlack replied to TBlack's topic in - Build logs for subjects built 1851 - 1900
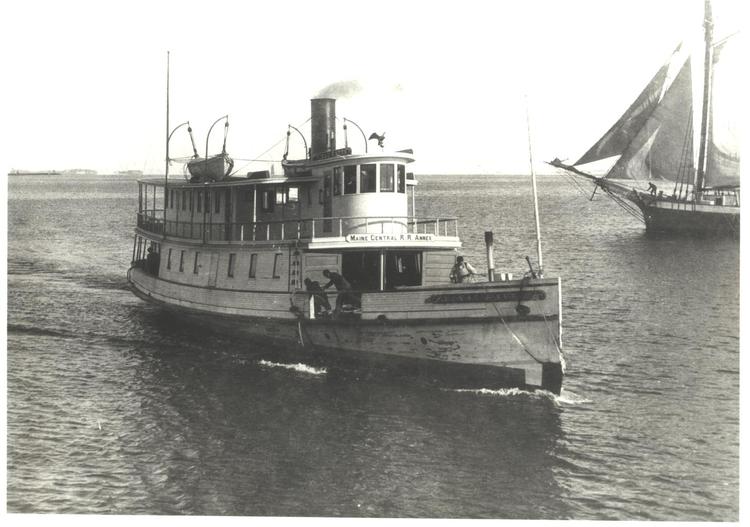
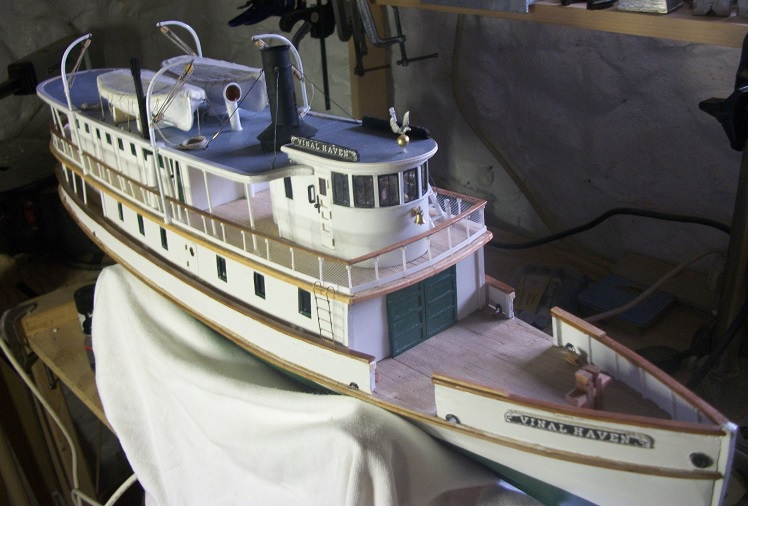
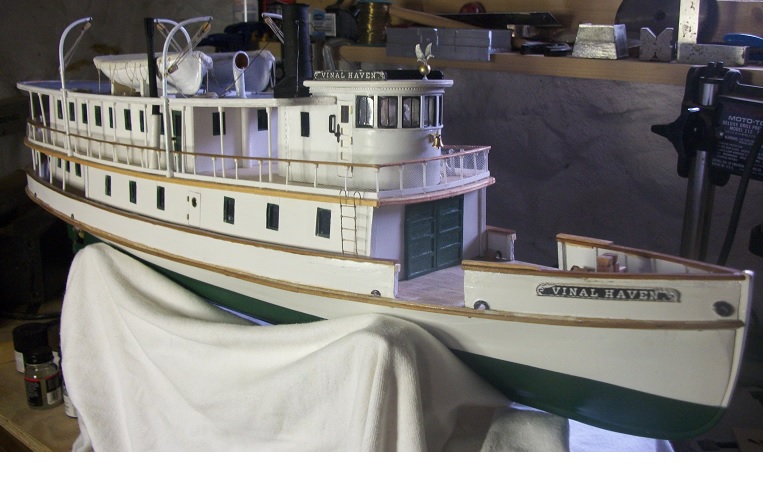
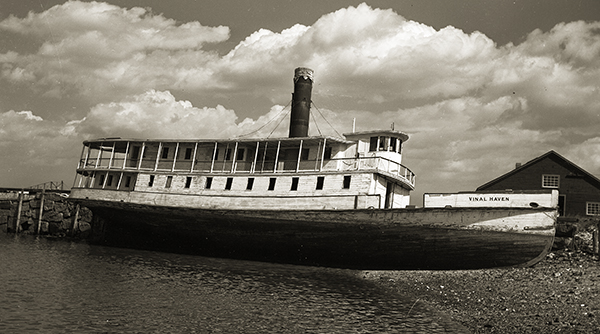
OK. Next comparison; this time with flags flying and anchor installed on the bow in the same position as in the real photo. The bow nameplate moves around in different photos, as does the stove pipe. The bell on the front of the pilot house was on the boat early and then removed. I suspect it hindered traffic, although it shows up again after 1905. I had to make the anchor twice; the first time it was too big. And I made the 45 star American flag 3 times before I got it right. Both flags are pictures off the internet, sized for the model and stuck on brass sheet.

- 326 replies
-
- 9
-
-
- vinal haven
- steam ship
- (and 1 more)
-
Richard, Thanks for the reply. The rig is simple, which is a benefit, and no ratlines! I made my own blocks, as I think the kit supplied stuff looks pretty clunky. If that isn't a possibility for you, check out Chuck Passaro's offerings at the Syrene link on the home page. Tom
- 78 replies
-
- 1
-
-
- dallas
- artesania latina
- (and 1 more)
-
Richard, I'm enjoying your log, but a question: did the pedestals come with the kit, or did you purchase them separately? A couple of years ago my dentist gave me the same kit and asked me to build it, as it was too complicated for him. I did it, but there were no pedestals with my kit. So it just sits there: Tom
- 78 replies
-
- 4
-
-
- dallas
- artesania latina
- (and 1 more)
-
Setting flags - which way does the wind blow?
TBlack replied to rodgerdodger's topic in Masting, rigging and sails
Rodger, I think you got the wind direction right. What had me puzzled was this sentence: -
Omega, Sorry to be late to this log, but I'll add my kudos to the others. I think it's particularly difficult to recreate the lines around the stern which are so fine, and at a scale of 1:192 is even more remarkable. You mentioned earlier that the completion of the full sized boat would require a lot of money, which is certainly true, but then to sail it would require a pretty good sized crew as well. Any volunteers? Tom
-
SS Vinal Haven by TBlack - FINISHED
TBlack replied to TBlack's topic in - Build logs for subjects built 1851 - 1900
Green!? You mean they're not supposed to be the same color? Damn! Michael, coach, Thanks. John, If there was a house flag it's design has long been lost. So I was thinking of flying a 45 star Union Jack (not to be confused with the British Union Jack). The US Union Jack is white stars on a blue field and can be flown at the bow when the ship is NOT underway. Inasmuch as the ship will be sitting on pedestals, I guess that's ok. Tom- 326 replies
-
- 1
-
-
- vinal haven
- steam ship
- (and 1 more)
-
SS Vinal Haven by TBlack - FINISHED
TBlack replied to TBlack's topic in - Build logs for subjects built 1851 - 1900
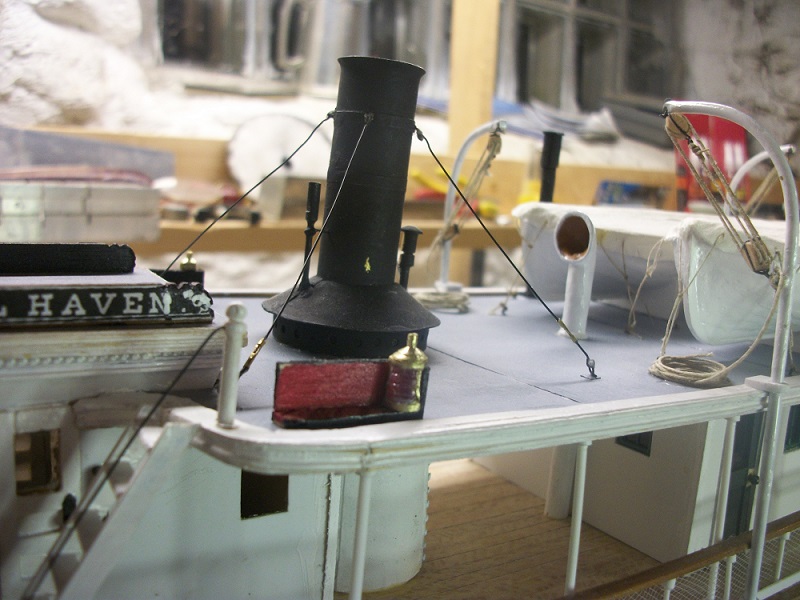
John, I think, given the height of these flagpoles, that they would look bizarre without flags flying. The appropriate flag is a 45 star item that Loyalhanna stocks. I'll have to make the jack for the bow. The following picture is for Michael Mott who helped me through the construction. The starboard light looks the same. I notice I need to do some touch-up paint. Tom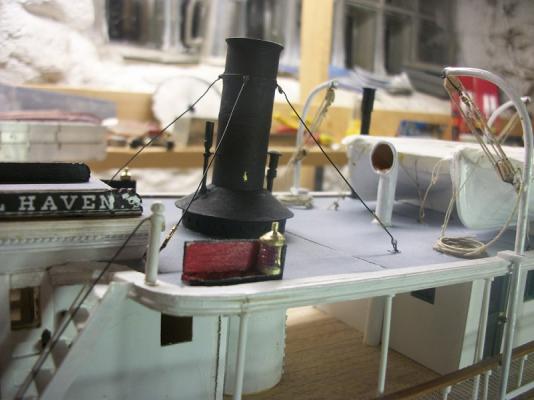
- 326 replies
-
- 8
-
-
- vinal haven
- steam ship
- (and 1 more)
-
SS Vinal Haven by TBlack - FINISHED
TBlack replied to TBlack's topic in - Build logs for subjects built 1851 - 1900
John, As you can see the flag staffs are quite long and thin. I thought I'd turn them out of brass rod; I thought that might be easier and stronger. The other observation is that of all the pictures I have of this craft at various times in her career, they have never flown a flag from these poles. So what do I do? Go for the dressier look and put on flags, or be historically accurate and leave them bare? Tom -
SS Vinal Haven by TBlack - FINISHED
TBlack replied to TBlack's topic in - Build logs for subjects built 1851 - 1900
Bob, Don't forget the woman on the bench at the stern! I know some of us put figures on our models, but I haven't gotten that creative yet. I've got the Vinal Haven Historical Society interested in perhaps giving her a home. Tom- 326 replies
-
- 2
-
-
- vinal haven
- steam ship
- (and 1 more)
-
SS Vinal Haven by TBlack - FINISHED
TBlack replied to TBlack's topic in - Build logs for subjects built 1851 - 1900
Nils, That's a great tip, thanks. I guess I'll start going to flea markets, too. And the rest of you guys, thanks for tuning in. I consider all of you much more accomplished than me. Tom- 326 replies
-
- 1
-
-
- vinal haven
- steam ship
- (and 1 more)
-
SS Vinal Haven by TBlack - FINISHED
TBlack replied to TBlack's topic in - Build logs for subjects built 1851 - 1900
Yup, the water thing has me stumped. I've got the fore and aft flag poles and the running lights and then the case. Tom- 326 replies
-
- 1
-
-
- vinal haven
- steam ship
- (and 1 more)
-
SS Vinal Haven by TBlack - FINISHED
TBlack replied to TBlack's topic in - Build logs for subjects built 1851 - 1900
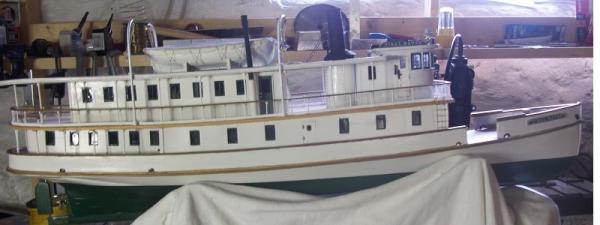
I'm feeling bold enough to put you to the comparison test: The real thing: The copy: And a couple of extras: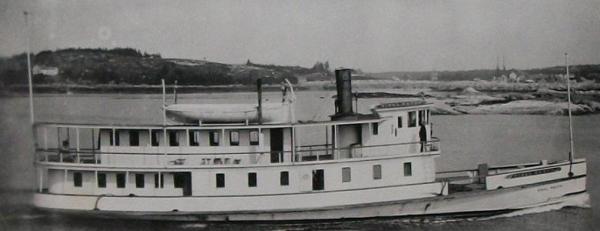


- 326 replies
-
- 10
-
-
- vinal haven
- steam ship
- (and 1 more)
-
Jason (AKA BW)' I think your work looks fantastic! You are too humble about your accomplishments. Great having lunch with you the other day. Tom
-
Pete, Of course that counts. Is there a garage that can be converted to a shipyard? Tom PS I'm sorry to lose my CdA connection, but I'd guess the Oregon climate is moe temperate.
- 153 replies
-
- 1
-
-
- musongus bay
- sloop
- (and 1 more)
-
Pete, The new rules because of the new house? No sanding inside! Tough on shipbuilders! Bet you can build these things in your sleep! Tom
- 153 replies
-
- 1
-
-
- musongus bay
- sloop
- (and 1 more)
-
SS Vinal Haven by TBlack - FINISHED
TBlack replied to TBlack's topic in - Build logs for subjects built 1851 - 1900
Pete, It's coming along. I'm pleased, although there are elements I'd do differently. I love your Muscongus Bay boats; you certainly know how to put those together. How was the move? I hope you didn't have to go too far. Nils, Thanks, but your Bohuslan is the standard; a truly beautiful piece of work. I loved your use of plumbing fixtures for ventilators. I saw it too late to try it myself. Sometimes I wish I had more stuff on the deck like you do. It makes things more interesting to look at. From my model railroad days I remember the old saying, "the clutter is the clincher". Tom- 326 replies
-
- 2
-
-
- vinal haven
- steam ship
- (and 1 more)
-
Bob, it looks to me like you've got plenty of talent and no need to be humble. Looking back at your initial entry in this log wherein you were hesitant to post and awed by some of the talent here, I hope some of your fears have been allayed and that not only is this a friendly, helpful bunch, but you have quite a bit to add as well. Stick your chest out and keep taking pictures! Tom
- 86 replies
-
- 2
-
-
- muscongus bay lobster smack
- Midwest Products
- (and 1 more)