


popeye2sea
-
Posts
1,934 -
Joined
-
Last visited
Content Type
Profiles
Forums
Gallery
Events
Posts posted by popeye2sea
-
-
Harold Underhill has a book called Masting and Rigging the Clipper Ship and Ocean Carrier. He describes the standard and usual method of rigging for civilian ships. Also included is a fold out diagram of the belaying locations with a comprehensive and cross referenced index.
I think it is a great resource.
Regards,
- BETAQDAVE, paulsutcliffe, CDR_Ret and 1 other
-
 4
4
-
The photos posted above by Captain Poison show the bentinck shrouds aboard USS Constitution. The legs of the shroud consist of a length of line with an eye at both ends. The legs are wormed, parcelled, and served their entire length. The shroud legs are doubled and passed through a thimble spliced into the end of the bentinck shroud. The ends of the legs are seized to the lower shrouds at the futtock stave. If you look closely at the pic you will see that the innermost pair of legs go the middle shroud and are seized one above the other. The remaining pairs are seized to each successive shroud moving out from the center.
The bentinck shroud itself leads down to the opposite waterway where it has a heart turned in. It sets up with a laniard rove through the two hearts. The lower heart is shackled to an eyebolt in the waterway.
The number of legs for your bentinck shrouds usually equals the number of futtock shrouds and should splice to the same lower shrouds as the futtock shrouds.
Regards,
-
In Steel's Art of Rigging he desribes the method of hoisting up and rigging the top mast. According to this method the top mast is hoisted up using a hawser rigged in the old manner (pre 1640 or so) as has been described in posts above. The hawser was used to hoist the top mast high enough to pass through the lower mast cap where at the topmast cross tress and head rigging were fitted over the top mast head. The top mast was then held in place by tackles from the lower mast head while the hawser is un-rove. The top rope pendant is then rove in the method described by Lees (1640 on).
So, everyone is correct here. The top rope, after 1640, as described by Lees was never intended to allow the top mast to be lowered to or hoisted from the deck. That job was accomplished by a separate line. Which also sort of explains the differences in whether the top rope was un-reeved or left rigged during different time periods.
Regards,
-
-
The studding sail guy is a rope used to help support and steady the studding sail boom. When the boom is swung out into position for spreading the foot of the lower studding sail the guy ropes run from near the outer end of the boom to points on the hull to steady it in position. You could simply fit an eyebolt into the hull to take the end of the guy. Or you could lead it onto the channel to belay there.
Regards
-
Here is what I used, based upon R.C. Anderson The Rigging of Ships in the Days of the Sprtisail Topmast 1600 - 1720:
The rigging sizes all are figured relative to the main stay which has a circumference equal to half the maximum diameter of the main mast, so
42.76 inches mast diameter x 1/100 scale gives 0.43 in. scale mast diameter
.043 / 2 gives a main stay circumference of 0.215 inches
0.215 / 3.14 gives a main stay diameter of 0.068 inches.
The closest line I had available is 0.08 inches (which may be a bit too large. 0.06 may be a better choice)
The following rules of thumb then apply (in order of size):
Fore stay = 4/5 of the main stay
Main shrouds and Main topmast stay = 1/2
Fore Shrouds, Fore topmast stay, Mizzen stay = 2/5
Main topmast and Mizzen shrouds = 1/4
Fore topmast shrouds, Mizzen Topmast stay and the two Topgallant stays 1/5
Shrouds for the last 3 = 1/6
These following rules apply to the rest of the rigging but they are relative to their respective lines (this should become clear in the table below):
Mast tackle pendants = shrouds (i.e Main mast tackle pendants = the Main mast shroud diameter)
Shroud deadeye laniards = 1/2 the shroud
Stay collars = 3/4 of the stay
Tackle runners = 2/3 of their pendant
Tackle falls = 1/2 of their runner or pendant
Backstays = Shrouds
Tyes = Shrouds
Halyards = 2/3 of the Tye
Lifts = 3/8 of the shroud
Lift pendants = 1/2 shroud
Braces = 3/4 of the Brace pendant
Brace Pendant = 1/2 shroud
Deadeyes = 1/2 the diameter of the mast
Tacks = shroud
Sheet = 3/4 shroud
Clews = 1/2 of the sheet
Bowlines = 1/2 shroud
Leech lines = 1/3 shroud
Bunt lines = 1/3 shroud
Block length should be about 12 times the diameter of the rope and their sheeves should be about 9x the diameter of the rope
Hope that helps some.
Regards,
- rybakov, aviaamator, mtaylor and 3 others
-
6
-
13 minutes ago, DSiemens said:
There is little historical evidence for a lot of the flags that are attributed to pirates. Historians traced the appearance of the common flags to the 1950's.
http://www.piratesurgeon.com/pages/surgeon_pages/memento_mori6.html
That is an interesting article. It does state that the common images of the flags as shown are probably from a more modern source , however it later states that some of them depict images as described in period sources.
Regards,
- thibaultron and mtaylor
-
2
-
You have to remember the purpose of a pirate ship. It was to make money by looting or taking other vessels. It was not sensible to extensively damage or sink the other vessel unless they absolutely did not need it. To that end most pirates actively cultivated a fierce persona and reputation to cow their prey into submission without having to fire a shot. Gunpowder and shot was also a large expense item. To that end many of them adopted their own flags so that they would be recognized and feared on first sighting.
The 'golden age' of piracy was in the early 1700's. Some notable pirates of the time flew versions of the "Jolly Roger" The first skull and crossbones motif appeared in 1700 when the French pirate Emanuel Wynne hoisted a black flag with a skull and crossbones over an hourglass to show his prey that time was running out. Thomas Tew flew a black flag with an arm holding a sword. Jack Rackam had a skull and crossed swords. Bartholomew Roberts' showed a pirate and a skeleton holding a spear supporting an cup between them, drinking a toast to death. Another flag of his showed himself standing on two skulls. One labeled ABH (A Barbadian's Head) and the other AMH (A Martinican's Head). Blackbeard, Edward Teach flew a black flag with a skeleton holding a a glass in one hand and a spear in the other which was aimed at a bleeding red heart. Edward Low flew a black flag with a red skeleton.
Regards,
- thibaultron and mtaylor
-
2
-
19 minutes ago, Jim Rogers said:
I do the backstays last and use them to tighten everything up.
That is how it was done on the actual ships.
Regards,
- el cid, mtaylor and thibaultron
-
3
-
-
A fascinating and relatively unknown piece of history.
Regards,
- druxey, thibaultron, trippwj and 5 others
-
8
-
-
-
For your consideration. The garrison flag flown over Fort McHenry in 1814 was 30 x 42 feet. It was intended to be the largest flag ever yet flown. The next size down from that one was the 'storm flag' at 17 x 25 feet.
Not the same thing as a ships battle ensign, I know, but it just shows that they were making them this size.
The battle ensign for the Spanish San Idelphonso at the battle of Trafalgar was 32 x 47 ft.
The one from the French Genereaux in 1800 was 27 x 52 ft.
Battle ensigns in the British Royal Navy during the 17th and 18th centuries were about 20 x 40 ft.
Regards,
- mtaylor, jchbeiner, paulsutcliffe and 2 others
-
5
-
Spare spars are usually stored bare. They could be used in other contingencies when required. For example, fishiing a sprung mast or yard.
Regards,
- mtaylor, paulsutcliffe, druxey and 2 others
-
5
-
-
-
-
What about actual thatching?
- Piet, thibaultron, Canute and 2 others
-
5
-
8 hours ago, glennreader said:
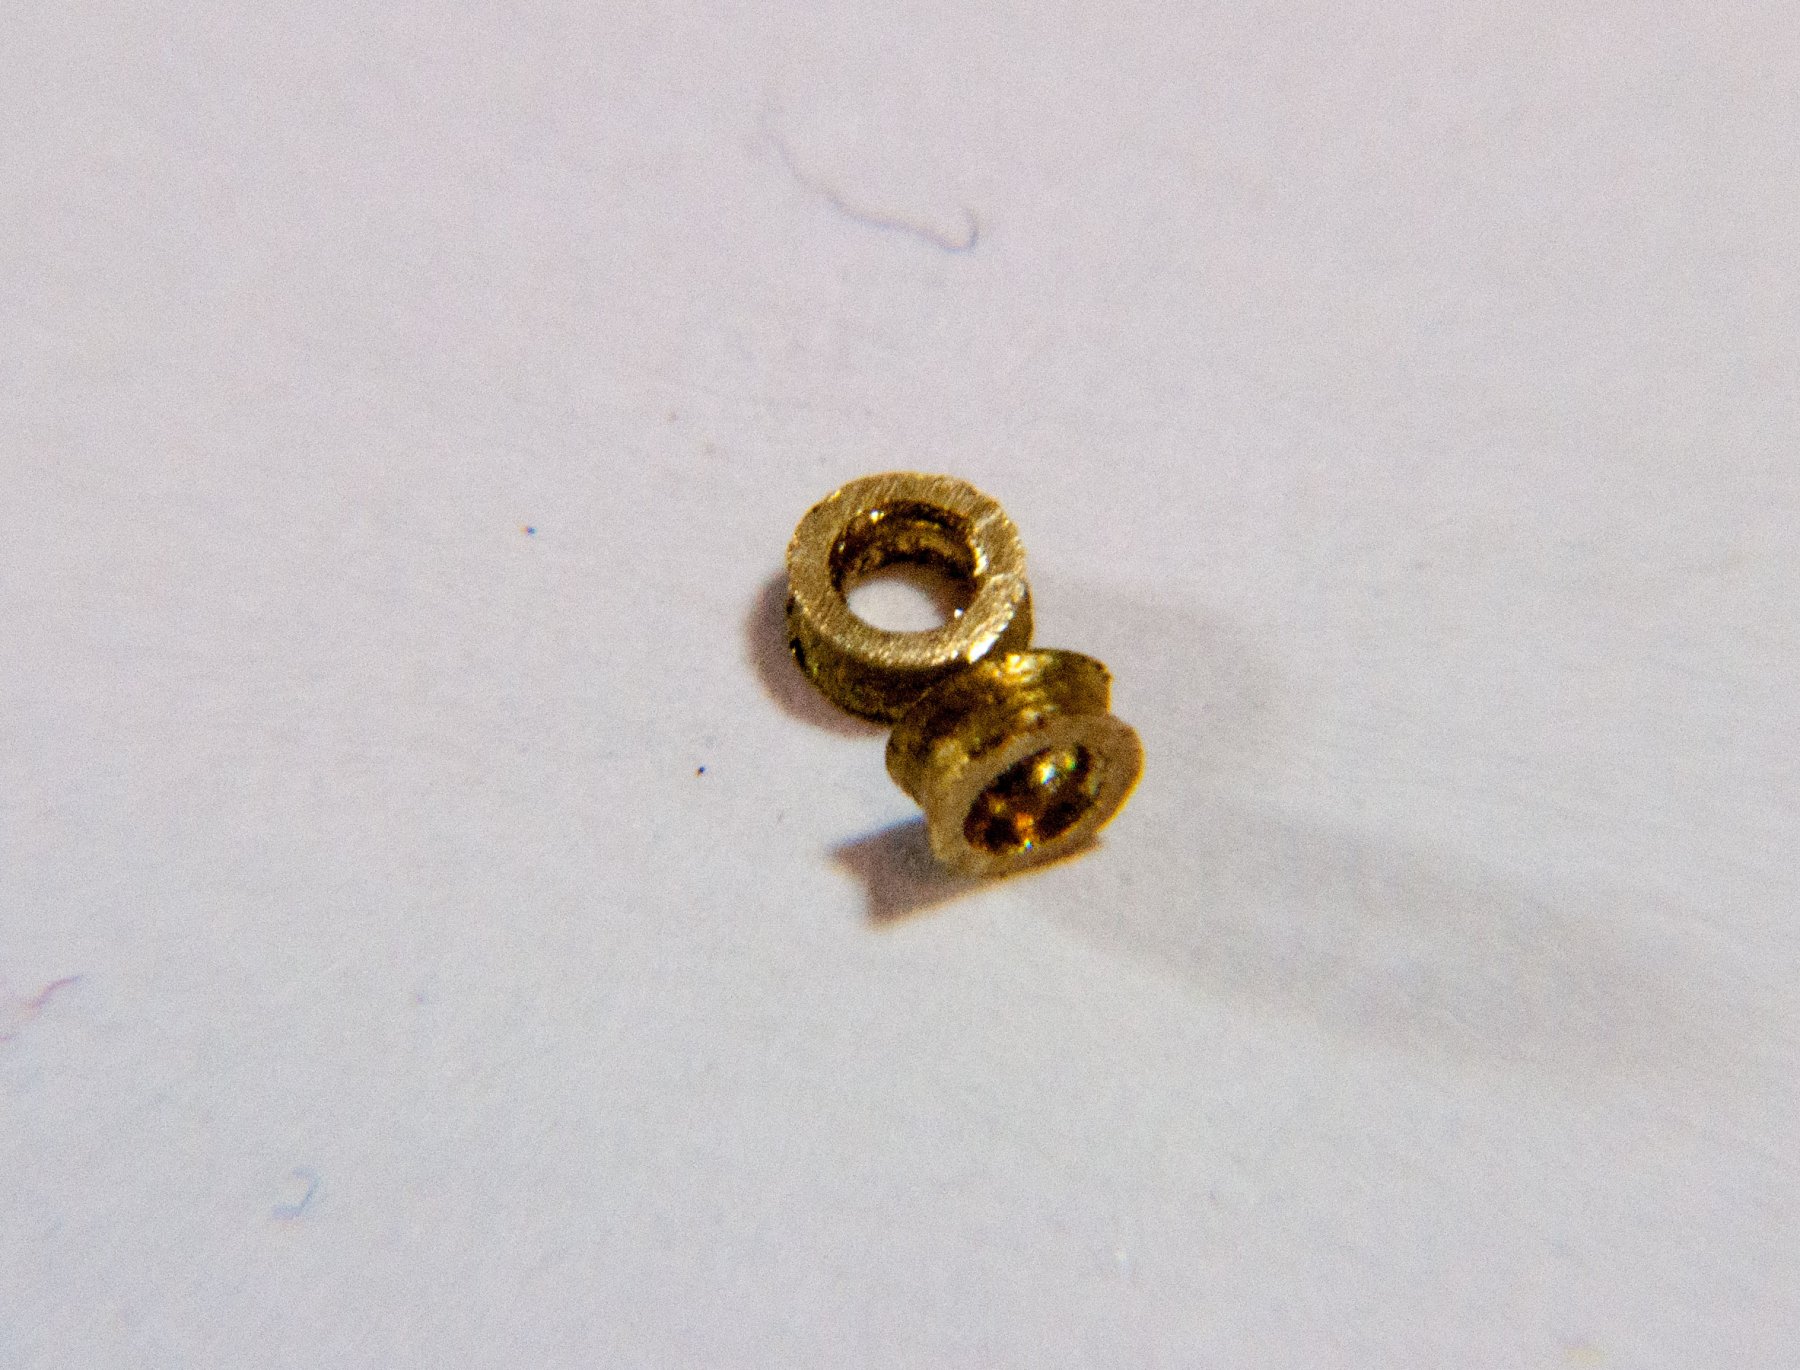
Just to mention I make thimbles in a similar way using tubing with a 0.1mm wall. Care is required. I find I cannot open 1 side fully and then turn it over and try to do the other side, it just opens the first side more. Turning frequently is required. Also I get some cracking, but most of the time this can only bee seen using x10 magnification.
How do you cut your 1mm lengths? I use a jewellers saw but with the wall thickness being only 0.1mm the teeth catch so I have to cut by drawing the blade backwards after starting the cut.
Glenn
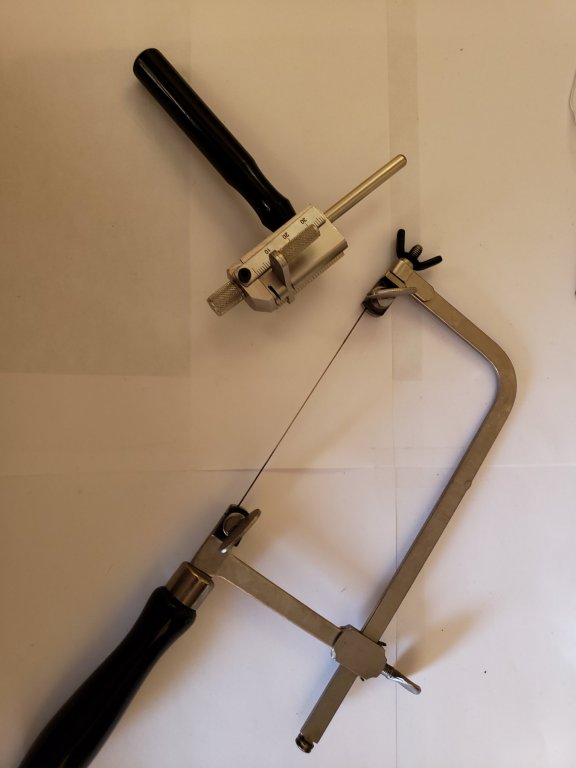
I use a jewelers saw also, the blade I am using is about 32 teeth per inch. I also use a the tubing cutter vise shown below. The distance between the adjustable head and the blade guide is just over 1 mm. It is the shortest length capable on this tool. The blade does have a tendency to bind halfway through the cut. I too found that frequent turning is required while swaging the ends of the tubing.
Regards,
- keelhauled, Hubac's Historian, EJ_L and 2 others
-
5
-
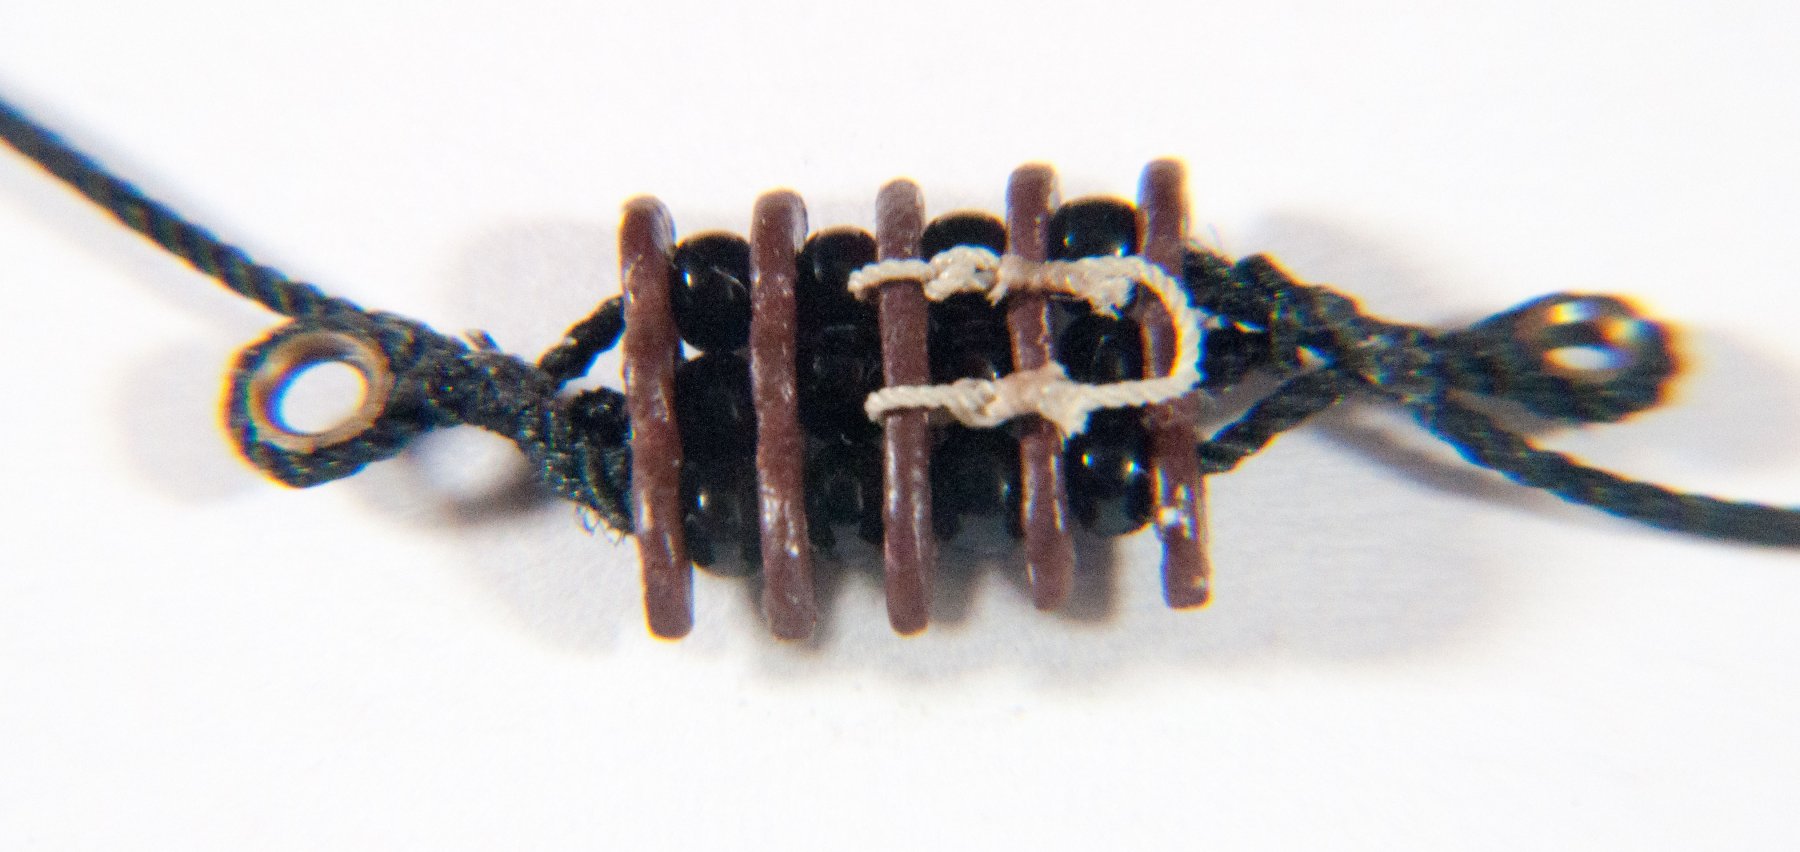
Well, either no one is interested in this build anymore because of the glacial pace of the build, or no one wants to surmise what these are.
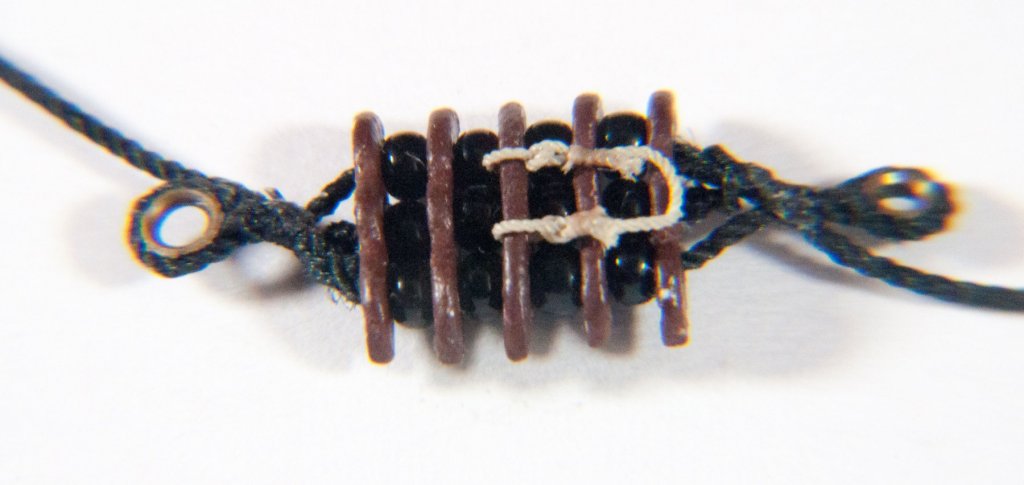
So, they are the stirrups that suspend the horses (foot ropes) from the yard. The braided portion wraps around the yard and is nailed in place. They are evenly spaced along the yard, three to a side on the main and fore yards. As soon as I make a few more I will mount them and provide a photo. I may want to buy some thinner wall tubing to improve the performance of the thimbles. The thick wall may not allow a fair lead for ropes and hooks.
Regards,
-
Progress in very small increments, but progress nontheless.
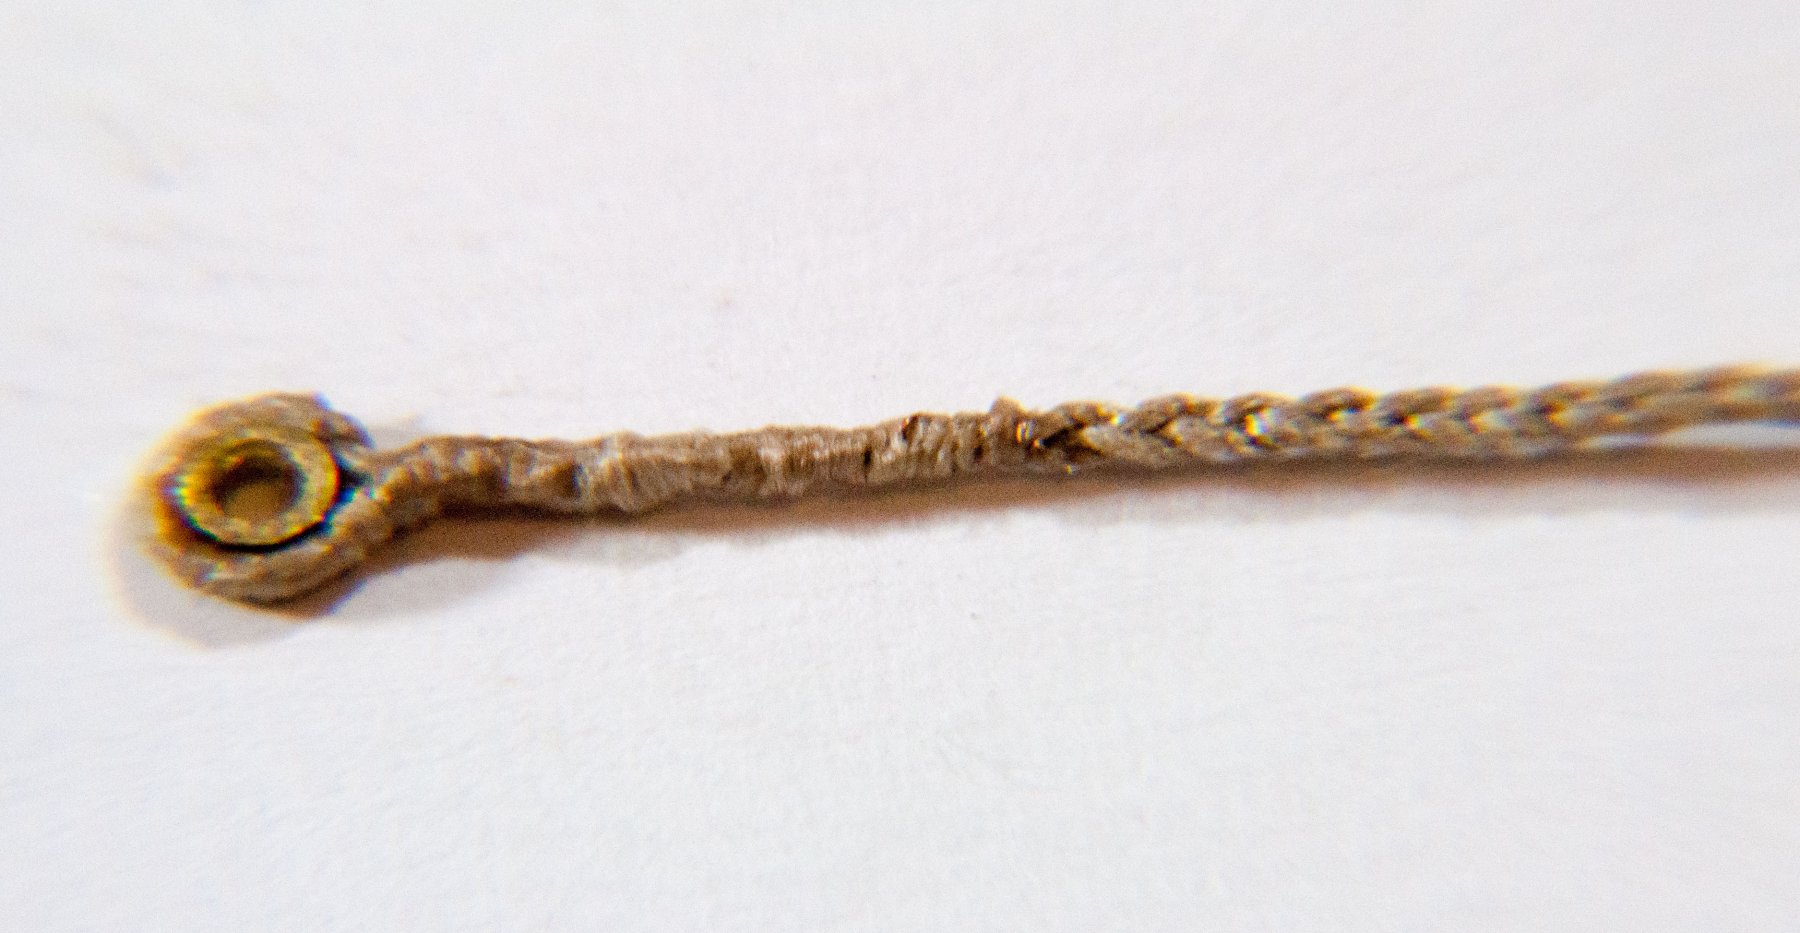
Here is the finished main yard parrel. The length of the parrel has been cut to four sets of trucks. The center rope that holds it all together is stoppered, and the tackle trusses are seized to their eyes. This parrel actually works. The ends of the truss are passed around the yard and then through the thimbles before leading to a tackle at the deck. The span spliced into the center rib takes the nave line which helps lift the parrel over obstructions on the mast as it is lowered.
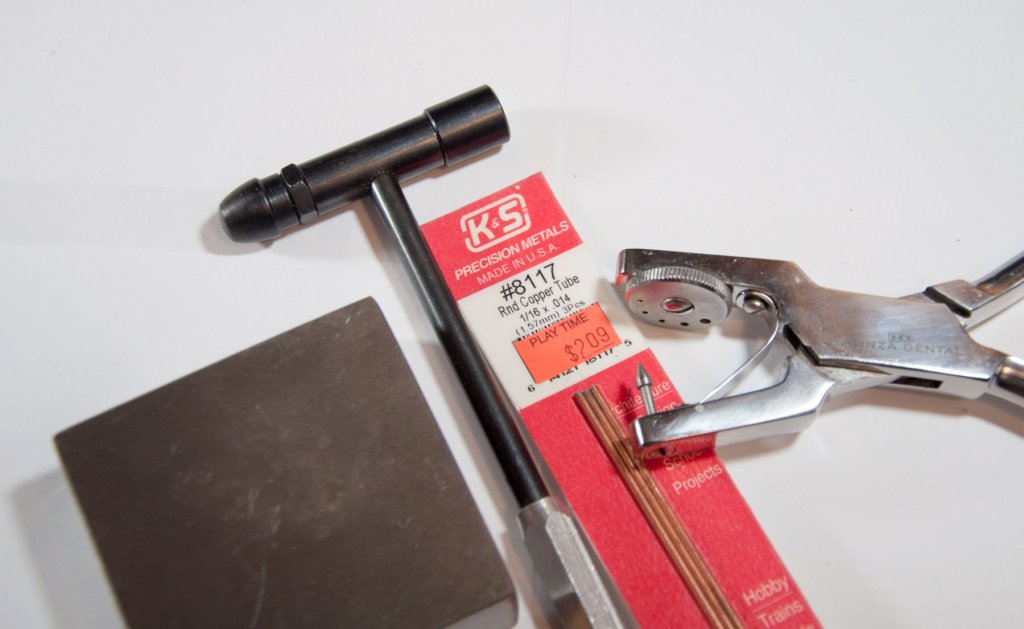
Next up are the materials and tools I used to make thimbles out of brass tubing 1.6 mm o.d. The tubing is from K&S Precision metals and is stocked at my local hobby store. I use the punch to start opening out the ends of the tubing. The tubing is cut into @ 1mm lengths. Once the edges have been opened out and the inside diameter of the hole has been opened to about 1mm I hammer the thimbles on the bench block to reduce the thickness a bit and further spread the edges. These thimbles are just over 2mm diameter

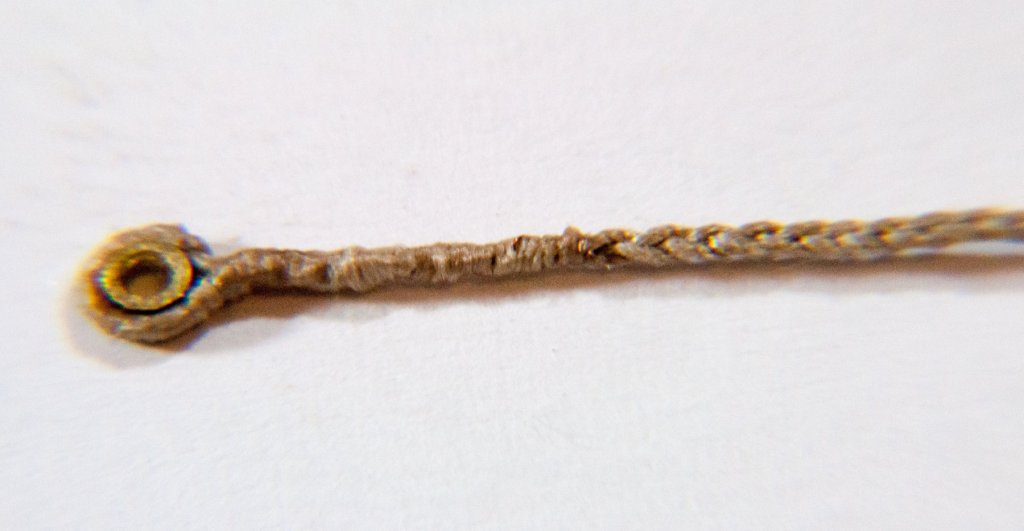
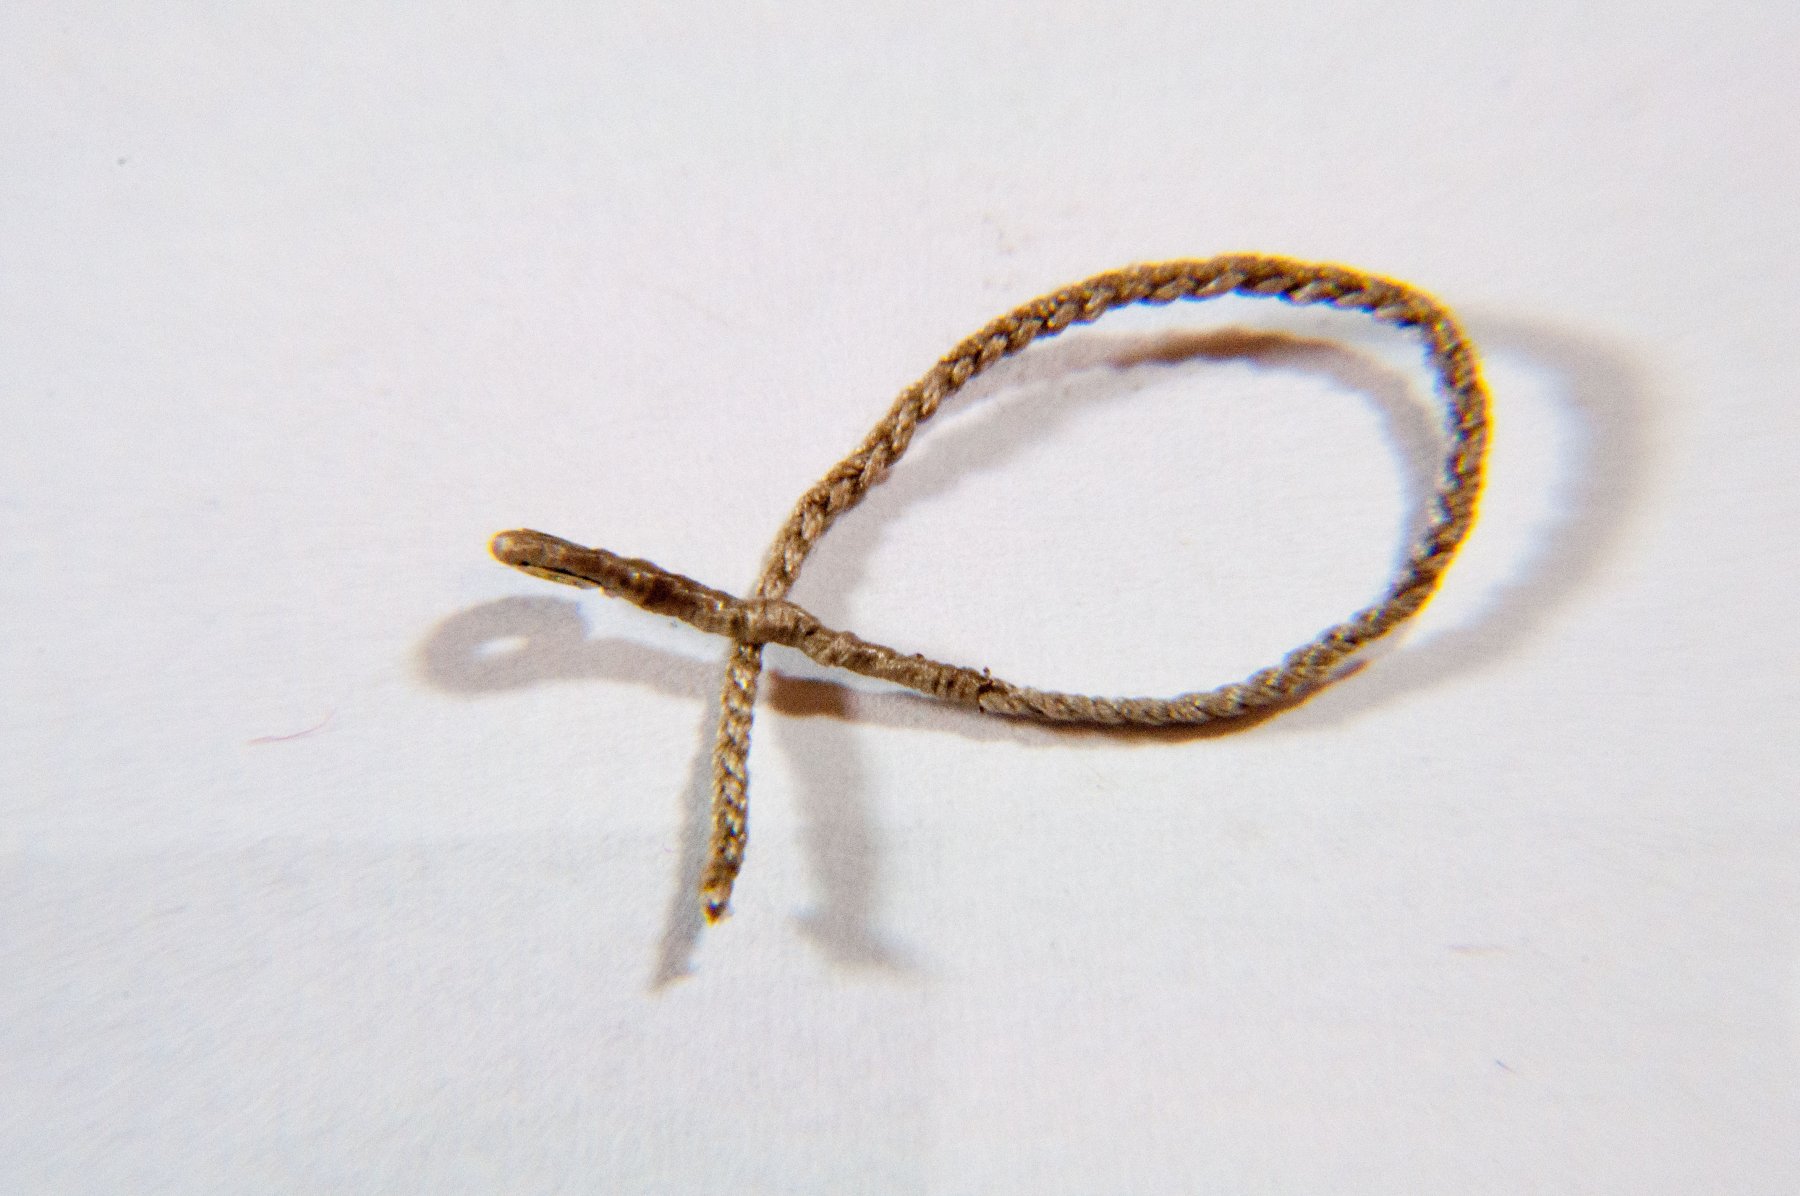
Here is another item I am working on. I will let you guess what they are, but I will give you a description of how they are made. An eye is spliced around a thimble at one end. The eye is served over and the service extends form the eye a scale 30 inches along the length. The remaining length is unlayed and then made up into a flat sennit braid. The end is whipped to secure the braid.
The one addition I made to this is that under the serving I have wormed the rope with some thin wire to make this section stiffer. BTW this work would be impossible using the Morope I have for the main rigging. I purchased some rope from Chuck Passaro. It will hold together beautifully while making these eye splices and sennits.
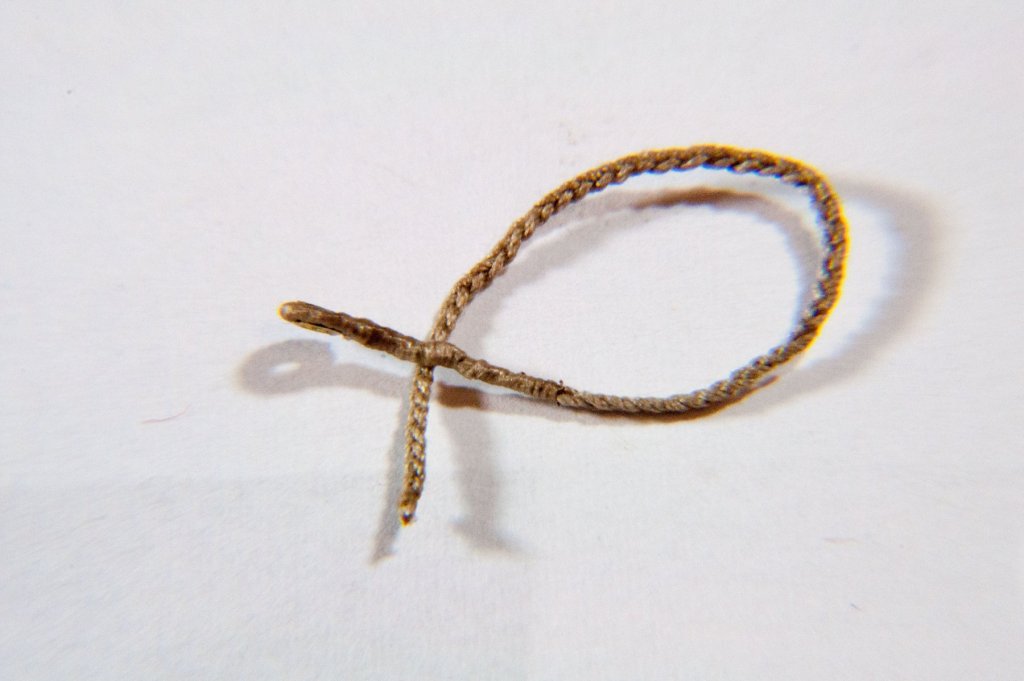
Crazy? Probably!!
Let me know your guesses!
Regards,
- egkb, BLACK VIKING, Fright and 4 others
-
7
-
Shoal water? Might need to put out an anchor!
Henry
- popeye the sailor and EJ_L
-
2
-
There is also a series of thicker planks interlocked along the length of, and near, the centerline that form part of the stiffening for the ship. King planks I think they are called. I have also heard them referred to as just thick planks.
Henry
- mtaylor and paulsutcliffe
-
2


Merchant Pinrail Diagrams
in Masting, rigging and sails
Posted
I bought my copy on Amazon about a month ago.
Regards,