


popeye2sea
-
Posts
1,934 -
Joined
-
Last visited
Content Type
Profiles
Forums
Gallery
Events
Posts posted by popeye2sea
-
-
Are all of those buildings in one village? That's quite a bit of history there.
Regards,
- popeye the sailor, mtaylor, Canute and 2 others
-
 5
5
-
On 7/16/2020 at 8:49 AM, Hubac's Historian said:
Above, after much careful fitting, the figurehead is secured, and I have filled the hole for the fore-course tack lines. Instead, I will be making a block for these that attaches to the leading edge of the stem. I will probably also represent the through-bolting of the stem, on its leading edge. It’s a simple thing to do and adds a nice touch of realism to the model.
I would reconsider removing the fairlead holes for the tacks. In fact you may have to add a second. The tacks pass through these holes and belay on the opposite side. A block on the fore edge of the stem will not work.
Regards,
- EJ_L, mtaylor and Hubac's Historian
-
3
-
On 7/14/2020 at 1:00 PM, Ekis said:
Where I think it's going to get a little tougher is the upgrade of the facade... (knowing that I have 2 or 3 things to add for the other sides too !) I'm starting from this:
Just adding two or three things????? 😲
It will look fantastic when completed. Looking forward to watching the changes.
Regards,
- Ekis, Egilman, Old Collingwood and 5 others
-
8
-
All the ships I served in had the deck painted haze grey with a wide portion in the center of nonskid. This was deck grey(a darker grey) with sand added. It was always a bear to remove for repainting. You had to use a needle gun. On the main deck abreast the superstructure you ended up with about 6 inches of haze grey on either side of the deck grey nonskid.
Regards,
-
13 hours ago, ClipperFan said:
Here's a more clear image of the same Quarter Gallery illustration. The Fairy on the left side is coming out from behind the roof, her left hand supports the Crown. It's anatomically impossible for the lower fish to be her. It's actually another fish, possibly a dolphin, you can see two eyes but the mouth is hidden by what appears to be sea leaves. Now it's more clear that the lady on the right is a full human form with butterfly wings, her right arm, foreshortened also supports the Crown.
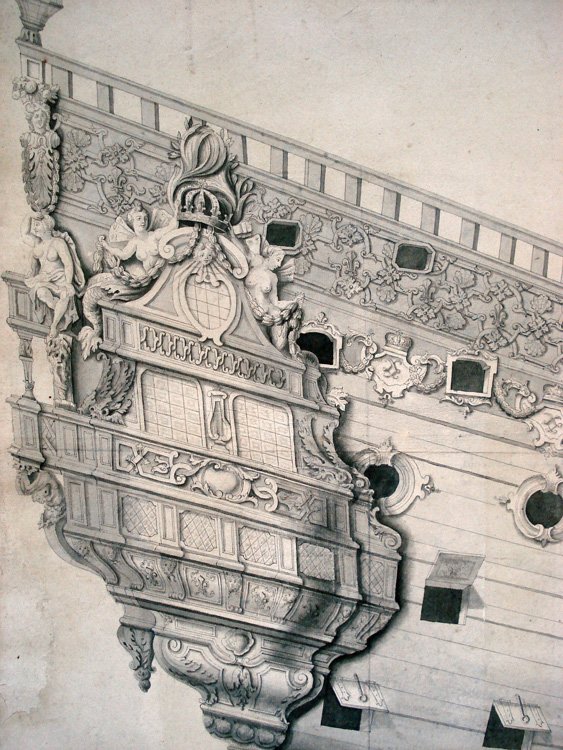
Your interpretation of this image got me intrigued so I loaded it into photoshop and zoomed in to the details. I agree with your interpretation except for the dolphins/fish. They both appear to be disappearing/diving behind the gable roof of the quarter gallery. Neither has a head visible. On the left dolphin all you can see is the feathery pectoral fin. What you took for the mouth of the right dolphin looks to me like the end of the garland. The garland that the pixies are holding is a continuation from the base of the crown.
Regards,
- Archi, Hubac's Historian, shipmodel and 2 others
-
5
-
It seems that the people who make these plans have very little clew😉 about how a ship rig works. They see a line that passes down the front of the sail and figure that it must attach to something that happens to be in the same area in the back.
Of course, not knowing any better they do not even think about bunt lines or leech lines. I wonder if those lines are anywhere in your rigging plan, Mike.
Regards,
-
Clew lines rig on the back side of the sail only. The standing end is timber hitched to the yard a little outboard of the block. I then runs down to the clew garnet block at the lower corner of the sail and and back up to the clew block on the yard. The hauling end is then often rove through another leading block closer to the mast before being led down to the deck and belayed.
Think about how that line would work if it was rigged as per the diagram. It would bind on the sail at the clew garnet block and get fouled.
Bunt lines, leech lines, and bowlines are rigged in front of the sail.
Regards,
-
I think what you are experiencing is very common to scale modelling. Aesthetically, the proper size rope can appear too heavy for the model. Although you use the exact right size for the rigging the overall look of the rig will appear to be overpowering. It is often said to err on the small side if you have to make a choice.
If you look at the rigging of a real ship it appears to be almost delicate with plenty of space between each element. On the model everything is compressed together and that delicate feeling can be lost.
Regards,
- justsayrow, Bob Cleek, mtaylor and 1 other
-
4
-
-
To operate davits like these you would hook the falls to the boats and hoist them up so that they are suspended. You then rotate the davits in towards each other. One davit leading the other so that one end of the boat is able to pass between the davits followed by the other end as the second davit is rotated. Once the boat has passed between the davits you can square them up again with the boat hanging parallel to the hull above the water. Lower away and unhook the falls when the boat swims.
The chain attached to the rudder is there for steering emergencies. In the event that the steering gear is disabled you can rig tackles to the end of the chains and run them inboard in order to operate the rudder.
Regards,
-
What is happening here is that the boats are being stored on skids so that the falls that would be used to hoist them out are temporarily hooked onto the davits. The lower blocks normally have a hook on the block that hooks into a ring on the boat for lowering into the water. You can rig the falls either up and down on the davits or diagonally across to the opposite davit. Either way they are not actually doing anything with respect to the boats when they are on the boat skids. The hauling end of the falls sometimes belay to a cleat on the davit.
That extra bit that appears to go to the boat (labelled B?) in the first photo is totally wrong and should not be rigged. What would actually be holding the boats down to the skid are two ropes called gripes, which would be attached to the skids on either side of the boat and pass over the boat holding it firmly down.
Regards,
-
8 hours ago, druxey said:
The round up (not camber*) of hatches varied. At certain eras and nationalities, the round up could be considerably more than that of the deck. Do you have a specific time and nationality in mind?
* The word camber, very often seen in reference to the round up of decks or deck beams is actually incorrect! In marine dictionaries the word refers to a downward curve of a deck as seen from the side. Normally decks curve up towards the end of a ship, but in some cases the forward end of a deck curves down to allow the cables to come in above the deck when the hawse holes are low. This condition is camber!
Incorrect. The camber of a deck is its athwartships arching. The pitch or sheer of a deck is its slope fore and aft.
The Mirriam Webster definition of camber is:
To curve upward in the middle.
To arch slightly.
A slight convexity, arching, or curvature (as of a beam ,deck, or road)
The main point in common with all the references I have seen is that camber is a description of arching upwards in the middle of something.
Comes from the old French chambre and Latin camur meaning bent, crooked, or arched.
Regards,
-
Will there be a balcony in front to get access to the pie cooling rack?
Regards,
- lmagna, popeye the sailor, mtaylor and 2 others
-
5
-
-
-
Single tyes would be more appropriate for your upper yards. I would think that a notch in the center of the timber batten truss would allow room for the tye sling. You could either notch the side nearest the yard so that the sling would appear to pass through the batten or notch the side nearest the mast. Passing the sling closest to the yard would negate the possibility of friction against the mast when hoisting the yard.
Hope that makes sense.
Regards,
-
You are talking about two different things.
One is the halyard. The other is the truss/sling.
Allans photo above is for the truss/sling which will hold the yard in close to the mast.
The halyard hoists the yard. Your instructions call for the halyard tye to be seized in a bight at the center of the yard. If you look at my build log for the soleil royale and scroll back a few pages (post #154 last few photos ) you will see a photo of how this should look. In that photo the only part that is missing is the seizing of the two parts together just above where the hitch crosses the standing part of the tye. On mine there are two tyes because it is a lower yard.
Regards,
-
On 6/1/2020 at 6:52 AM, Michelnou said:
Thanks for all.
About the mast's collars, there are none available in the kit's box. I am expected tu add them on the masts.
I make them with rope and glue. Is it the right method ?
About the level of the topsail yard lift blocks I had put them above the foremast cap, at 0,60 time the cap to uppermost collar distance.
When I write piton, it is similar to eyepin.
These deadeyes are they the same than those used for shrouds ?
This block is it a single or double to make backstay tackle ?
Wood hearts could they be used to attach different front stays on bowsprit elements ?
About the shrouds and stays diameters, your reasoning is right, but do you think honestly that ship builders took into account the different strengths depending of the mast's height to differentiate rope diameters ?
I have at my disposal in dark colors 0,90 and 0,50 mm. In natural color I have 0,75, 0,65 and 0,30 mm.
About shrouds, which diameter for laniards ?
To finish with yards rigging, the "classical" rule require halyard+lifts+braces+ parrel elements.
Knowing that I have fitted the yards with an "opened yoke", and that I wish to reduce aloft rigging, I consider to apply the set-up below ,
Lower yard : halyard+lifts+braces+ parrel
Topsail yard : halyard+lifts+braces
Topgallant yard : halyard+braces
What is your opinion about this rigging for a Baltimore topsail schooner knowing that, in my opinion, it is not an exact science and that there is certainly not just the right configuration.
Take care
Mike
I will try to answer your questions, but you must realize that my answers are only generalities, you should do some research for what is appropriate for your particular ship/situation.
1. Building up your mast collars with thread wrappings glued around the mast should work.
2. Yes, the deadeyes for the backstays can be the same as the shrouds.
3. The backstay tackle should be at least double blocks. Treble is good too.
4. Wood hearts were sometimes used on the fore stays.
5. Ship riggers always take into account the loads that each part of the rig must bear. The height of the mast was not the important part. Rigging diameter was calculated based on the weight of the yards and sails and those numbers decrease as you go further aloft.
6. Laniards for shrouds should be half, or a bit less, than their respective shrouds. The same goes for stays.
7. In my opinion if you are going to set up your yards in the normal manner (not set flying) then you need to have halyards, lifts, braces, and parrels for all.
I hope that helps.
Regards,
-
I'm really liking this build. Such great character to all the buildings.
Regards,
- Egilman, popeye the sailor, mtaylor and 6 others
-
9
-
My guess is that it is rigged this way because the treble block at the mast head is fixed. As the gaff is lowered to the boom the peak halyard will have to extend, be payed out, along with it. At some point the upper block of the tackle on the port side will jamb up against the treble block. At this point the hauling end can be payed out to give more length to the peak halyard.
The reverse should be true for raising the gaff. Haul away on the hauling end at the same time as the throat halyard while tending the tackle on the port side so that it does not jamb. When the gaff nears the top the upper tackle block on the port side should be nearer the top, which would give you the needed room to haul the gaff the remaining distance and top up the gaff as necessary to fully extend the sail. The tackle blocks would be getting closer together during this final haul.
Again this is all a guess on my part, but that is what I would do if saw something like that.
Of course, all of those complications could be avoided by simply rigging the peak halyard so that the standing end starts from a becket on the treble block (actually, I think you would only need a double block). Then the hauling end would be coming down singly on one side only.
My two cents.
Regards,
-
-
5 hours ago, bruce d said:
What good pieces of history, you must be happy to know they are in safe hands. It is possible the 'GENOVA' in the text of the plans refers to the city of that name, but I don't speak Italian so someone else will have to comment on that.
There was a ship named GENOVA but at a glance the dates don't line up:
"Empire Swan
Empire Swan was a 7,965 GRT cargo ship which was built by Merchant Shipbuilding Corp, Chester, Pennsylvania. Completed in June 1925 as Missourian for American Hawaiian Steamship Co. To MoWT in 1940 and renamed Empire Swan. Allocated in 1942 to the Belgian Government and renamed Belgian Freighter. Sold in 1946 to Compagnie Maritime Belge and renamed Capitaine Potie. Sold in 1948 to Compagnia Genovese di Navigazione a Vapore SA, Genoa and renamed Genova. Sold in 1955 to Compagnia Genovese di Armamento and renamed Flaminia. Now 8,791 GRT. Sold in 1963 to Compra Vendita Covena, Genoa. Sold in 1965 to Bakhashab Mohammed Abubakur, Saudi Arabia and renamed King Abdelaziz. Arrived on 23 April 1970 at Kaohsiung, Taiwan for scrapping. "
HTH,
Bruce
The date on the legend for the drawing does not allow this to be that ship Genova. It is dated 1928. The plan looks to be from the Society of Electromechanical Foundries Liguria, which is the region where Genoa is located. The legend at the top shows that this is schematic diagram for the electric cable runs to some cabins and to the machinery spaces on the secondo ponte (second deck). Also looking at the legend for the side elevation drawing she had cabins for first, second, and third class passengers. Under dimensioni principali (principal dimensions) it looks like her length p/p was 87.6 m and her maximum beam was 12.2 m. The height of the covered deck is 6.5 m and that of the second deck is 4.1 m. Maximum draft(?) is 4.5 m.
Looks like a passenger ship to me.
Was he assigned as a radio operator on a convoy ship?
Regards,
-
Mike,
My question back to you is this, are those collars on the mast already there or are they something you are expected to add to the masts yourself?
The reason for this is that those collars are what is going to support your rigging. For instance, the topgallant stay, backstay, and topgallant yard lift blocks should all be supported by that uppermost collar.
There are other collars depicted on the masts that to me are superfluous and in fact would impede the raising and lowering of the yards. For example, that first one above the mast cap and the small one depicted just above the level of the topgallant yard.
As for the level of the topsail yard lift blocks, since the topmast and topgallant mast are combined here as a single stick, it is up to you to decide the exact point to put the collar that represents the separation of the two. you could arbitrarily locate it midway between the cap and the topgallant mast head collar. Or you could determine where to place it based on how deep you want to make your topsail.
The other way to determine all of the above would be to do some research into mast lengths for this type of schooner.
Yes, the fore yard halyard or jeer blocks hanging at or just below the level of the trestle trees sounds right.
I am assuming that when you mention a piton for the backstays you are referring to some sort of ringbolt or padeye?. Backstays should be set up with deadeyes or multiple sheave blocks at least. I would seize, or hook, a deadeye or block to the ring bolt and turn another in on the end of the backstay. Connect the two with a laniard or tackle fall.
For the thickness of the stays, shrouds, and backstays, no you do not have to use the same diameter line. Generally, the stay will be the largest diameter because it runs single. Since there are multiple shrouds to spread the load they can be smaller than the stay. For any given mast, the shrouds and backstays are going to be about the same diameter. But, the diameters for the shrouds and backstays will get smaller as you go further aloft, i.e the topmast shrouds will be smaller than the lower shrouds and the topgallant shrouds will be smaller still. This is due to there being less load on those lines from the smaller spars and sails.
I believe there are tables available in various sources that will give you the dimensions for all the rigging
I hope this helps.
Regards,
-
I can't imagine ever having the time to do such detailed carving. My SR has already been 40 years in the making. I would never finish it.
Your work is incredible!!
Regards,
- EJ_L, Hubac's Historian and mtaylor
-
3
Soleil Royal by Hubac's Historian - Heller - An Extensive Modification and Partial Scratch-Build
in - Kit build logs for subjects built from 1501 - 1750
Posted
I like the look of your tack fairlead. Looks like a perfectly reasonable holdover from an older style.
Regards,