fnkershner
-
Posts
1,595 -
Joined
-
Last visited
Content Type
Profiles
Forums
Gallery
Events
Everything posted by fnkershner
-
Have you thought about the impact to the performance of your topsails with this rigging? Or are you not going to have topsails? Also what happens to all that loose sail cloth when the sail is lowered? Do you know what a sea anchor is? You are going to need a very heavy gaff.
-
Can you tell us more about the spiling jig? I am interested in improving my process.
- 2,191 replies
-
- 1
-

-
- confederacy
- Model Shipways
- (and 1 more)
-
Practice does make for better sails! If you do try again. Use the same line you plan to use for sheets and lay it in the groove created by folding the hem over. at the corners give it a 1/2 twist. then you will have a small loop in each corner that can be used to attach blocks etc. The ends of this line can be buried in one of the hems and no one will know.
-
Thanks Rusty! Jeff should be giving you a kickback for all the biz you are creating. By the way, Chuck, did you and Rusty come up with a location on the forum for the Wood list for the Syren. You would not believe the number of PMs I have received after mentioning in a build log. since it does not belong to me and I am not an admin. I feel it is better to leave this to the 2 of you.
-
Chuck - On Jeff's web site he mentions that you used mostly Boxwood from him for this model. Do you have a list of the woods you used? Is there a timbering set similar to the Pinance?
-
I agree, that is why I asked. The larger model should be easier to plank. I would also expect that larger scale planks would be easier to taper correctly.
-
I thought you were only going to do 1 layer. And so you only had 6 planks to go on each side. And since you don't have cut your planks from a sheet you should finish before me. I am about 2/3 of the way thru cutting my Starboard Planks. We are going out tonight so I will have to install tomorrow. PS After seeing the results on my Port side. I will always replace any wood that is not painted and visible with wood from Jeff. It is just that good! I wish I had done the whole hull with his wood. It is going to take one heck of a sanding job to get the other wood close to how nice his wood looks. As they say you get what you pay for. It might cost a bit more but is very much worth it.
-
Richard - It doesn't look like you used any filler. Did you just sand the first layer and then lay on the 2nd? Also did you cover over the slot for the drop keel? And finally since you plan to paint her do you really need the 2nd layer of planking? Last question, can you offer some feedback on the difference between planking at 1:48 or 1:64 and 1:35. Is it easier to taper the planks? By the way she look beautiful. You are tempting me very much.
-
Don - I will start by apologizing. I should have mentioned this in my previous post. There is one additional trick. If you lay some line in the groove that is made when you fold the sails over for the seam you will have the bolt rope that is needed for the Luff edge of the sail. Also with careful planning you can run the line along all the edges and have a small loop at each corner. This is handy to attach blocks, Halyards, & sheets.
-
Per - Its neck and neck. Who will finish first? I am close. I hope to finish the planking on both sides tomorrow.
-
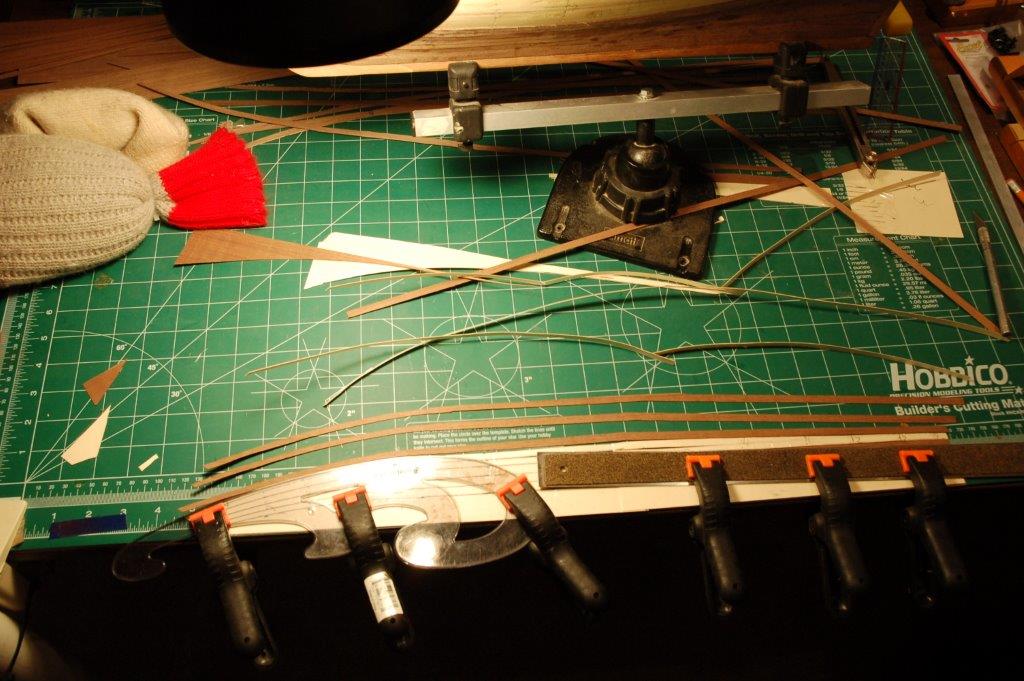
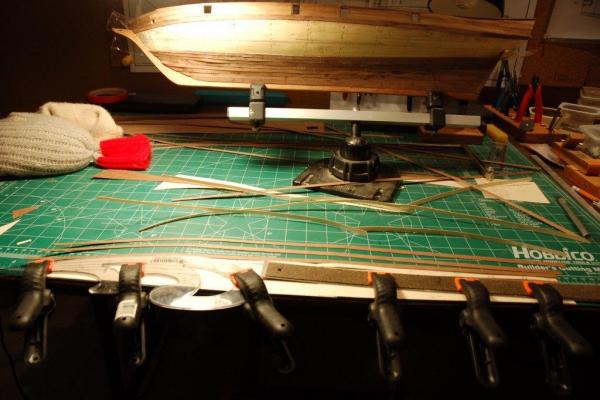
Man that is one high tech waterline tool! Must have cost a bunch.
-
Lynx by Basic – Panart
fnkershner replied to Basic's topic in - Kit build logs for subjects built from 1801 - 1850
Now I understand about the nails. Remember you can't use nails on the 2nd layer. You don't want the holes to show unless you plan on treenailing. But it won't be a problem since you will have the first layer to use for clamping. When I do 2 layers I use Push pins on the edge of the plank. Also there is the CA glue Spot welding technique many modelers use. Once you have the first layer done and shaped the hull. when you begin the 2nd layer use mostly PVA glue. But at critical points use just a very small drop of CA. The CA will set in the count of 10 and hold until the PVA sets. In fact the moisture of the PVA will make the CA set even faster than normal. I created a thread in the tools section that show how to use binder clips to make hull clamps for the first layer. I find that works even better than the pins. Also if you plan on painting. you could consider not even bothering with the 2nd layer of planking. Unless you want more practice. I think from now on I will only build ships that are painted or have copper bottoms. -
Lynx by Basic – Panart
fnkershner replied to Basic's topic in - Kit build logs for subjects built from 1801 - 1850
Basic - I am the last person to offer help on planking. I am currently about to exit planking hell on my current project. See the link in my signature. But let me offer a couple ideas. First off since you are double planking. You can get away with lots of flubs on the first layer as long as it is a smooth run. I try to use the first layer as an opportunity to practice so that the 2nd looks good. In your current case I would use filler all over. I did this on my first kit and the results were great. You really can't use too much putty. if you do all you have to do is a bit more sanding. I personally think the manufacturers came up with the idea of double planking so they could cut the cost of shipping a solid hull that you will plank once. I think a solid hull is easier to plank than 2 layers. So with a mind to your 2nd layer there are a couple rules you should be aware of. No pointy planks. Look at your 3rd pic. On a real ship this would be a point of stress and instant leak. A tapered plank should never get to less than 1/2 of its original width. Looking at your pictures I would also suggest that you plank from the top and bottom and meet in the middle. The reason for this is you want a real clean garboard strake next to the keel. You will also find that the first few planks from the keel are pretty straight and need very little adjustment. I would also not use any nails. If you use them just leave them in long enough for the glue to set and then remove them. They are going to give you fits when it comes to the 2nd layer. -
Well Shaz as you can see I use mine a lot. The picture above is after I cleaned it up. Awhile ago I bought a box of 100 blades. So it is not too much of a problem. did you know that you can turn the blades around? Since most of my cutting is on the front half of the blade. When it gets dull I turn it around.
-
Thanks Dave. I hope your holidays have been fun. I an sure you and the boys have been outside. If you mean well done like cooked than yes!
-
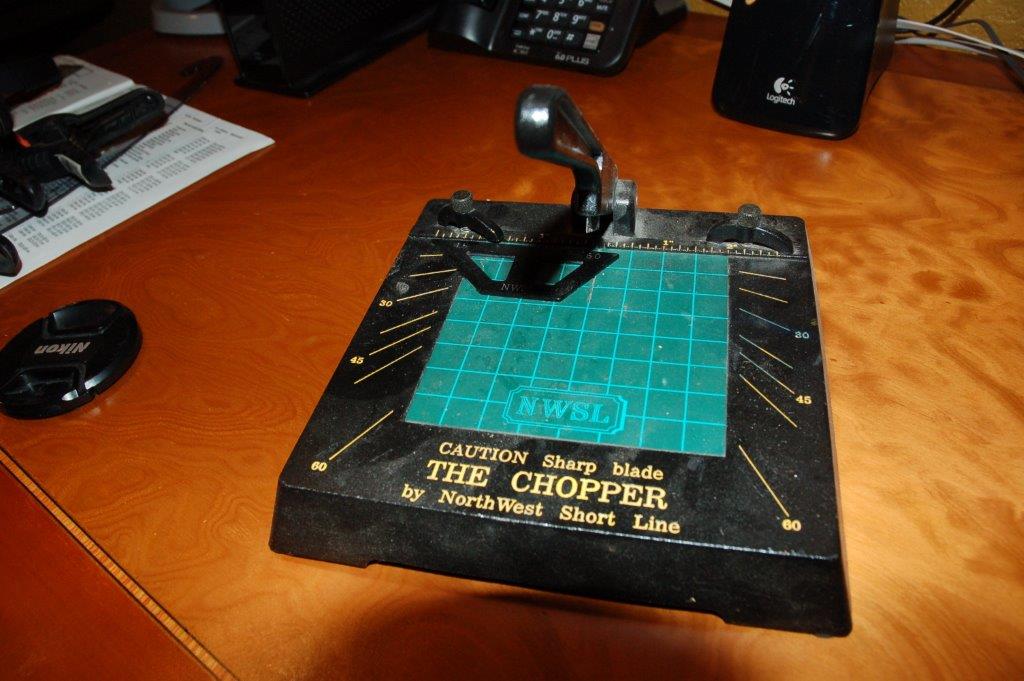
MicroMark has something similar. Let me post a pic for you. If you go to NWSL .com you can get it from them.

-
So Like most of us. I spend much of my time thinking about up coming steps. I still need to plank the ships boat. I don't want to use the same walnut strips for this. I think I would like to switch to Pear or Holly or something like that. what I would like to know is what is the best light colored wood for this planking. Needs to bend well etc. Ideas?
-
Lou - No chance of that. In my house I am the football widow. I would rather be modeling. So dare I say it? I might just have all the planks on by Monday. I do have to work tomorrow and Friday . But I expect to have light duty so I might sneak home early. All 8 planks for the port side are now cut and soaking. I think I am getting to like spiling! Did I really say that!! :o
-
Can you believe it? It was a week ago that I was going to cut out the spiled planks for the Port side hull. I wish real life would get out of the way of my modeling. Well as mentioned above. I had had my fill of mistakes so I was going to use heavy paper instead of wood until I was satisfied. Well obviously I had plenty of time to think about it while going out to dinner with friends and entertaining house guests. (don't tell them what I was really thinking about). anyway I decided that since the lines came out so nice on the paper. I would just this as a guide and cut both paper & wood at the same time. I carefully clamped everything down along with a metal ruler and French curve. I put a new #11 in the knife, and off I went. Here are the first 2 planks. I am pretty happy. Now time to cut the remaining 6 planks and get them on the hull. Hopefully today!

-
ROYAL CAROLINE 1749 by Doris - 1:40 - CARD
fnkershner replied to DORIS's topic in - Build logs for subjects built 1501 - 1750
Doris - All I can say is which member of MSW has more than 1 picture in the 2014 calendar? YOU!! Does that tell you what we all think of your work? I can't wait to see what you contribute to the 2015 calendar. You have raised the bar in quality art on this site.- 883 replies
-
- 2
-
-
- royal caroline
- ship of the line
- (and 1 more)
-
Don - if you go to almost any fabric store you will find one of 2 items - Seam tape and a bottle of Fray Check. I use both very often. The seam tape is approx. 1/4" wide and all you do is iron it in between two layers of cloth and it bonds nicely. I cut my sails out using the patterns in the kit and folded the seams and then ironed them. In some cases I used the fray check liquid. It works as both an adhesive and edge bonding tool. I am no good at sewing. but this worked for me.
-
Have you seen The Chopper? it is used for model railroading. Like you I am horrible at cutting things square. Now I use my chopper for almost all cuts.
-
Lynx by Basic – Panart
fnkershner replied to Basic's topic in - Kit build logs for subjects built from 1801 - 1850
Basic - If you are still out there. I too am a fan of the Baltimore clipper. So I look forward to this build. two comments: 1. On the plank bender. Like you when I first started I bought the same bender. I must confess that I have planked 2 models and have found that I prefer not to use it. I simply soak my planks that be patient. That seems to be sufficient. 2. You are a very lucky man. Since you are in Montreal. There are several very good modelers there. -
Rusty - You may have mentioned it before and I can't find it. What woods did you use for your hatch in the last picture above?
-
ROYAL CAROLINE 1749 by Doris - 1:40 - CARD
fnkershner replied to DORIS's topic in - Build logs for subjects built 1501 - 1750
Doris - I just showed my wife your latest updates. She wanted to see every picture. She has also insisted that I tell you that what she sees is absolutely amazing. My wife is supportive of my hobby but she tires quickly of "just another picture of ships". But not your work she wants to see every bit, and wants me to let her know when you have posted anything.- 883 replies
-
- 1
-
-
- royal caroline
- ship of the line
- (and 1 more)