


fnkershner
-
Posts
1,595 -
Joined
-
Last visited
Content Type
Profiles
Forums
Gallery
Events
Everything posted by fnkershner
-
ROYAL CAROLINE 1749 by Doris - 1:40 - CARD
fnkershner replied to DORIS's topic in - Build logs for subjects built 1501 - 1750
Caroline - Every time I think there cannot be any more detail you come up with more. Wow! Love this.- 883 replies
-
- 1
-

-
- royal caroline
- ship of the line
- (and 1 more)
-
Augie - Are those decorations truly white metal? I had given up on making them look like wood. Maybe you have convinced me otherwise. Please tell me more.
- 2,191 replies
-
- 1
-
-
- confederacy
- Model Shipways
- (and 1 more)
-
Mike - I am tempted. but then I would have to messing with Epoxy etc. And the admiral would not let it in the house.
- 80 replies
-
- 2
-
-
- Americas Cup
- Endeavour
- (and 1 more)
-
Blackie - The best part about this one is I am going to paint her so only 1 layer of planking. I expect to have all of the planking done in the next 2 weeks. Then it will be lots of sanding.
- 80 replies
-
- 2
-
-
- Americas Cup
- Endeavour
- (and 1 more)
-
Lynx by Basic – Panart
fnkershner replied to Basic's topic in - Kit build logs for subjects built from 1801 - 1850
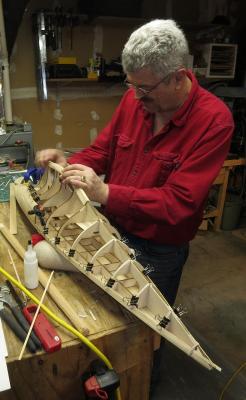
Have you seen the binder clip clamps? Search the site. I created a topic on this. you can use binder clips to create clamps for almost nothing. I find they work even better than pins. Also have you heard about CA "spot welding"? this is what I use for 2nd planking. I prefer to use PVA (wood glue) for most of my work. it is much more forgiving when you have issues. But CA does have its uses. For "Spot welding" I use a very small drop of CA to hold the plank in place while the PVA sets. So for example I will put a drop on each end and at points where there is a significant curve. you can hold it for 15 seconds and the CA will set. If you have humps or hollows on your first layer use the paste. It is wonderful. You can really get a nice surface with the right shape. Just remember that the 2nd layer is pretty thin so you want the 2nd layer to be just right. Take time with the first layer and you should be ok. Also remember this is coming from the guy who has spent 6 months working on the 2nd layer of his current project and in frustration has switched projects for now. I am 6 planks for finishing the 2nd layer on my Harvey. One more thing - I suggest you do first 1 belt from the keel then 1 belt from the deck. after that it is up to you. -
Lynx by Basic – Panart
fnkershner replied to Basic's topic in - Kit build logs for subjects built from 1801 - 1850
Basic - If you read some of my posts elsewhere on this forum you will see that Planking and I are not very good friends. But I will still do my best to try to offer some suggestions and answers to your questions. I am sure you have read this before but let me start from the beginning. you have done a great job on the first layer now you are ready for the 2nd layer. Step 1. Measure the distance from keel to wale at each bulkhead or approx. at each bulkhead. Divide that distance by 5 or 4 and mark that off on the hull. the result should be tick marks at each bulkhead that evenly divide that bulkhead. at the widest point those tick marks should be between 4 and 6 hill planks wide. Step 2. Now draw a line connecting each tick mark. The result will be belts running the full length of the hull. there are many approaches to get to this point. The goal is to define belts that divide the area to be planked into even amounts. One advantage is that any errors will not accumulate from 1 belt to the other. Step 3. Taper your planks to fit into these belts. You will find that in some cases the bow is so narrow you will need a drop plank. and conversely in the stern you will need a stealer. Also, when gluing these planks you should not use pins or nails since this is your final layer of planking and these holes will show. -
Jim Byrnes Model Machines
fnkershner replied to Mahuna's topic in Modeling tools and Workshop Equipment
Isn't that the reason there is a tilt table upgrade? you still get the precision of a solid 90 degrees. I have enjoyed using my tilt table. -
Jim Byrnes Model Machines
fnkershner replied to Mahuna's topic in Modeling tools and Workshop Equipment
Ok Richard Let me explain. Several years ago after I had bought the Byrnes Table saw. A relative bought me the feather board for Microlux as a Xmas gift. Of course it didn't fit. I sent Jim a note about my problem and he offered to custom adapt my feather board to his saw. So for the cost of postage. I sent it to him and he shipped back the result as part of his next order from me. I will dig it up and add pictures later. -
Mike - I understand. But in this case the kit is designed for this. There is a double frame in the middle. The hull is so long it takes 2 planks to reach from bow to stern.
- 80 replies
-
- 1
-
-
- Americas Cup
- Endeavour
- (and 1 more)
-
Jim Byrnes Model Machines
fnkershner replied to Mahuna's topic in Modeling tools and Workshop Equipment
I promised Jim I wouldn't say that I have one. oops. -
Ok so here is a progress report and a couple of questions. Just so you don't think I am not working on her.

- 80 replies
-
- 10
-
-
- Americas Cup
- Endeavour
- (and 1 more)
-
Like those above I just found your restart. Now you are a veteran. This should be easier. Good Luck! PS there is no profession more important or valuable than Teaching! Thank you for your dedication.
-
Looks good, now I am tempted to build mine with sails. I think I may compromise and have them furled.
-
I am several months for this point in my build (and currently working on another project) but yes please. Nice work!
-
Announcing the Model Ship World Ship Kit Database Project
fnkershner replied to SkerryAmp's topic in Wood ship model kits
Wow this is a full time job! Great work. and Thanks! -
Blackie! It is so good to see you back! I have been doing some dreaming about the correct diameter of the various rigging. yours looks so much better than the plans.
-
Doris - I am a mere mortal compared to your excellent work! Thanks for stopping by.
- 80 replies
-
- 1
-
-
- Americas Cup
- Endeavour
- (and 1 more)
-
Yes Gil, I hope to see you leading the fleet thru the cut. Then you can head north.
-
Very nice job! But you didn't finish the planking on my Harvey. That was why you made the house call wasn't it?
-
Such fine work!
-
Thanks Per! Good pictures except for that grey haired guy. When did he get so old? Do let me know when you are up for another house call. We accomplished a lot and had some great music. It was a wonderful weekend! For the rest of my viewers. I was assigned a very demanding project the day Dr. Per left. So the planking has slowed. But I do at least 4 planks a day. The new project if successful will create over 1000 jobs in many countries for my company. So I am working 12 hr. days and 7 days a week for a couple of weeks. I will post pics as soon as there is something significant to report. Also look who just achieved the rank of Captain. I think that extra stripe look pretty good.
- 80 replies
-
- 4
-
-
- Americas Cup
- Endeavour
- (and 1 more)
-
ROYAL CAROLINE 1749 by Doris - 1:40 - CARD
fnkershner replied to DORIS's topic in - Build logs for subjects built 1501 - 1750
Doris I have made cleats before and they look ok until I blow them up. But yours look real even under the unforgiving eye of the camera.- 883 replies
-
- 1
-
-
- royal caroline
- ship of the line
- (and 1 more)
-
Richard - So here are more questions. Its so nice you have blaised the trail for me. On Bulkhead #14 when you are switching from planking B to A. Near the bottom of the Keel. there is a fairly abrupt transition from the bulkhead to the False keel (part #35). did you use a filler? Or just clamp it down flat? On the first layer of planking going from the double bulkhead to the bow. How did you terminate the planks at the bow? Did you taper the false keel to a sharp point so that the planks would terminate on each side or did you try to get them to lay flat like a herring bone? I hope this makes sense. it is hard to describe.
-
LOL I am in tears with laughter! boy have I been there. You know there are times when you know you should just get up and walk away before you make it worse.
-
Since I only use CA for spot welding. it goes slow. But I am ok with that. While I wait for the glue and planks to dry out. I focus on other stuff. Still it is about 5 planks every 30 min or so.
- 80 replies
-
- 2
-
-
- Americas Cup
- Endeavour
- (and 1 more)

