.JPG.ca33079f5815b861e67b9c2cccd37982.JPG)

Blue Ensign
-
Posts
4,571 -
Joined
-
Last visited
Content Type
Profiles
Forums
Gallery
Events
Everything posted by Blue Ensign
-
 Beautifully constructed cabin Bob, and those overhead shots show her off the great advantage. 👍 B.E.
- 359 replies
-
- 5
-

-
- prince de neufchatel
- model shipways
- (and 1 more)
-
I like what you're doing Martin, and it will all come good in the end. I am a bit surprised that you couldn't find anything to simulate the window glass, Railway and Aircraft modellers tend to use these products regularly, but success in their application is another story.🙄 To my eye unglazed windows can look a bit dead, and even opaque ones look better than nothing. Wishing you joy in your post pre-retirement year.☺️ B.E.
- 467 replies
-
- 1
-
-
- fly
- victory models
- (and 1 more)
-
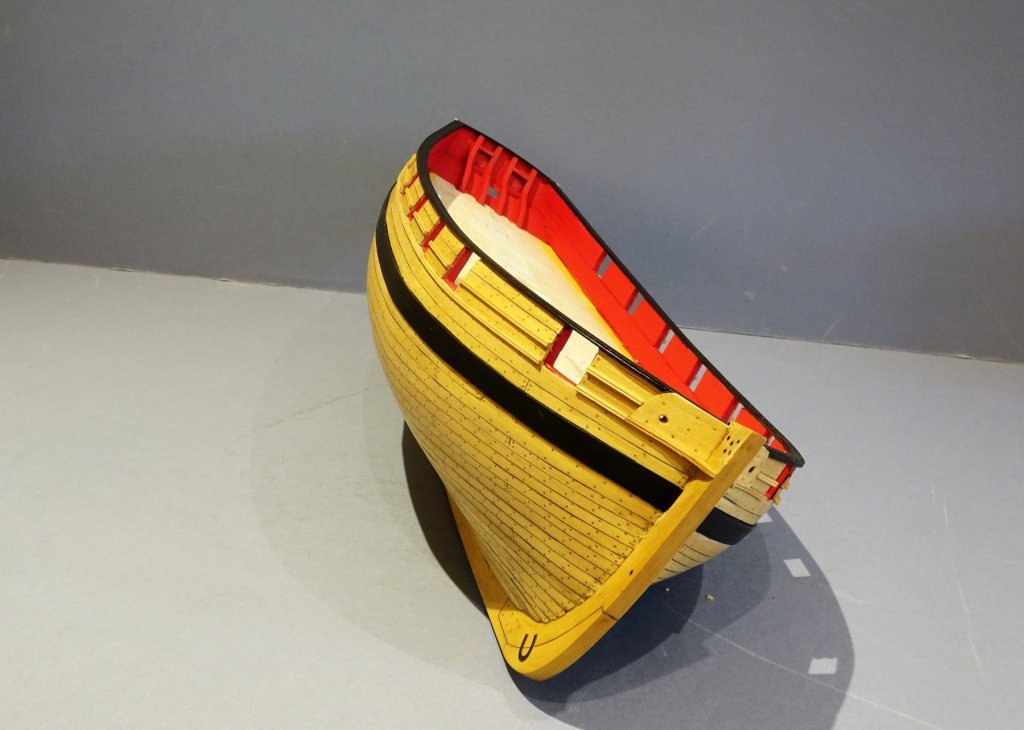
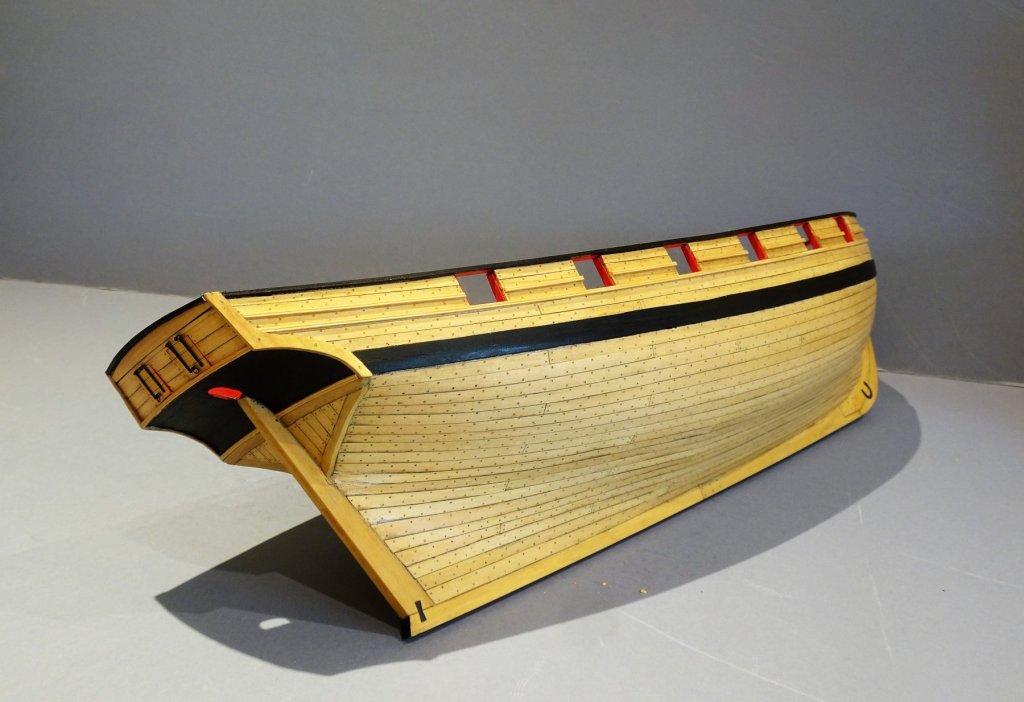
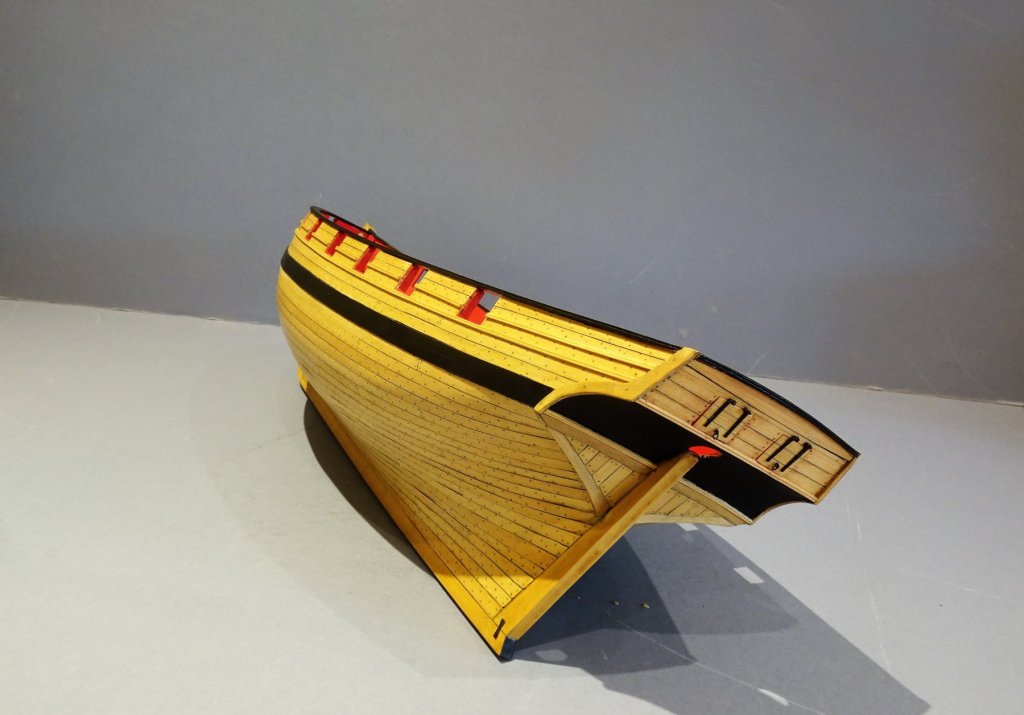
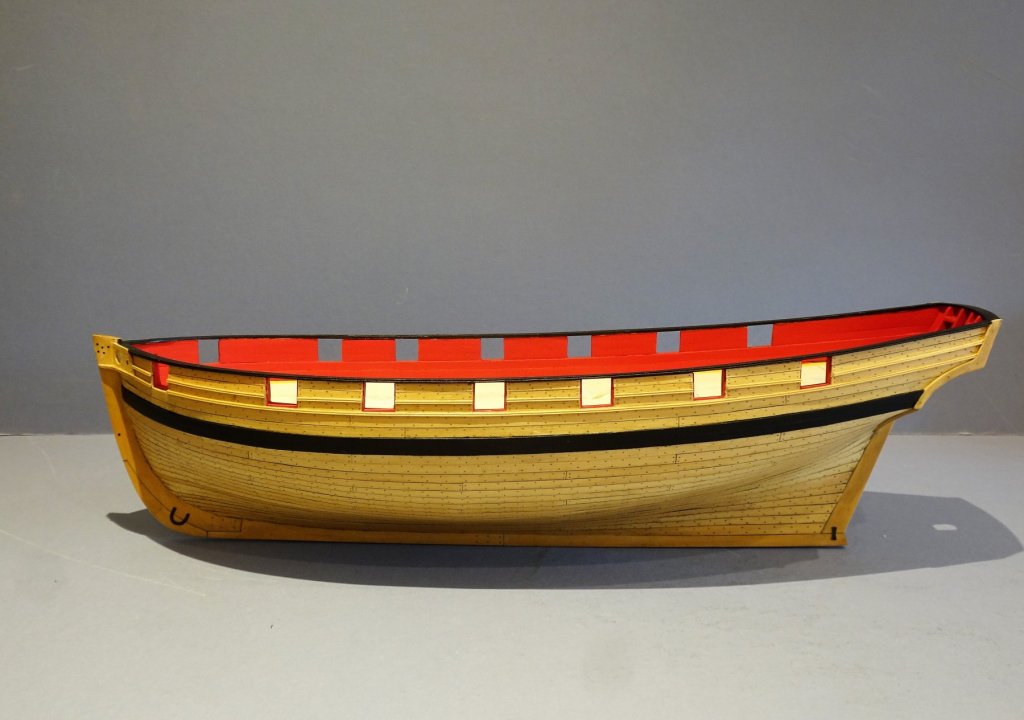
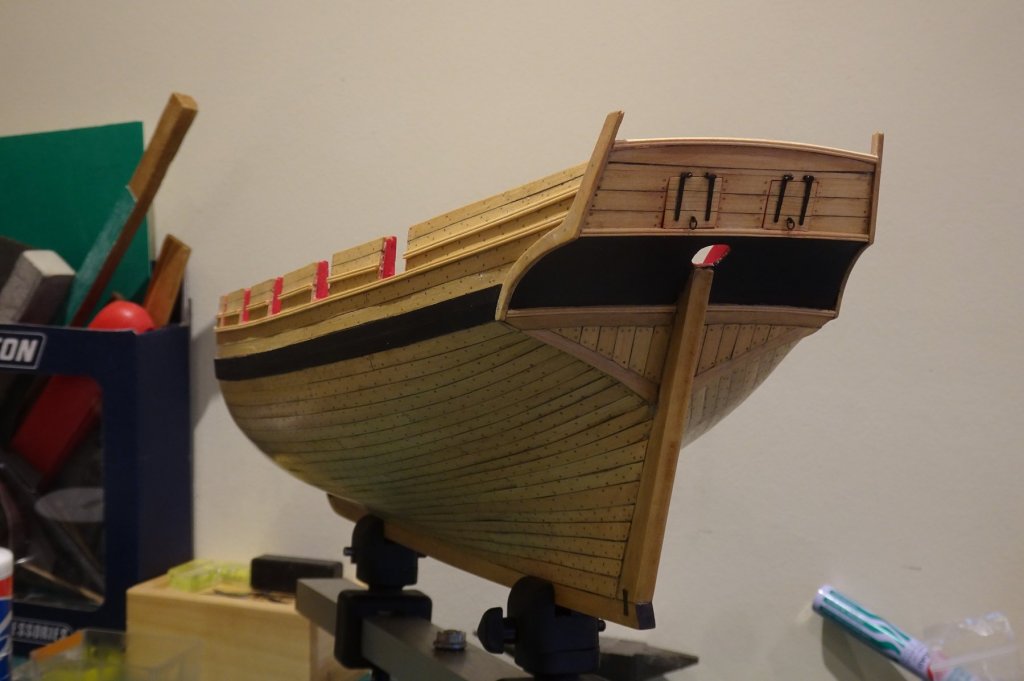
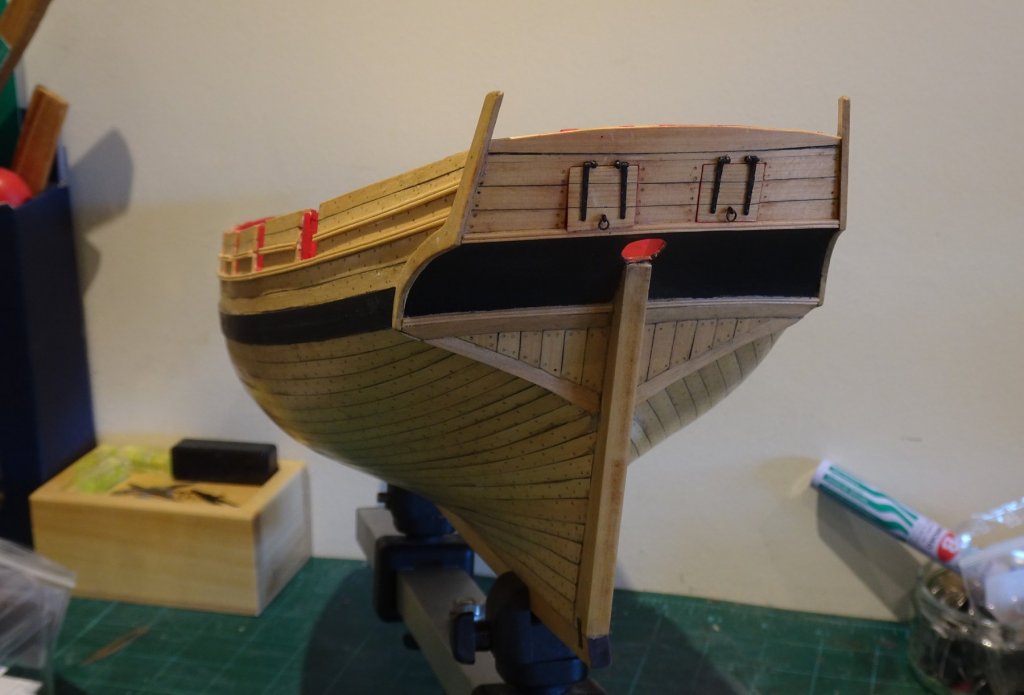
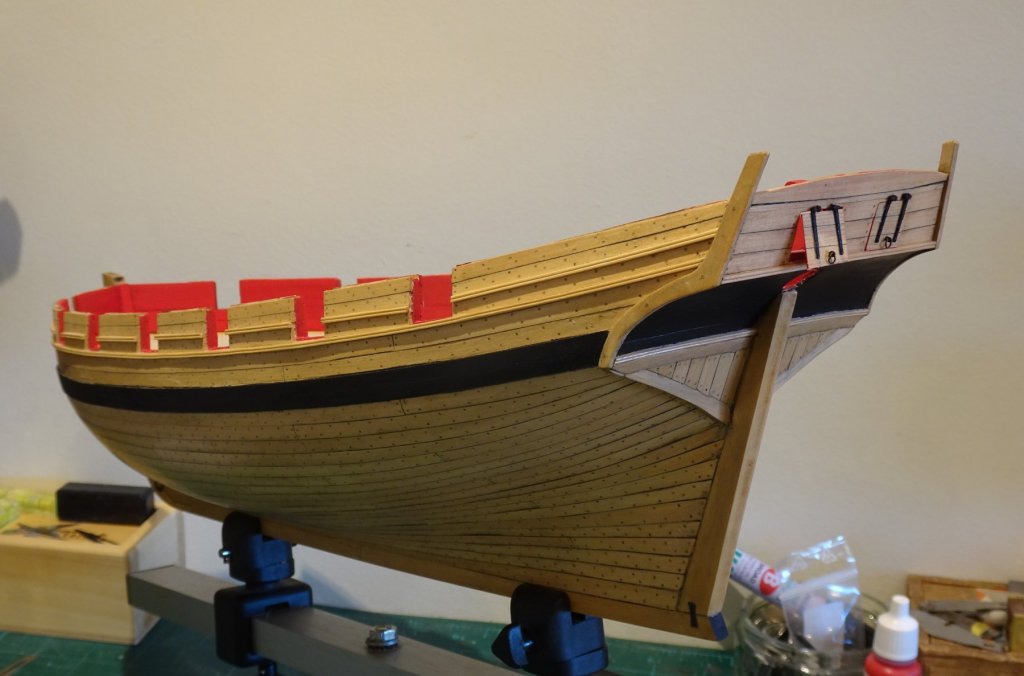
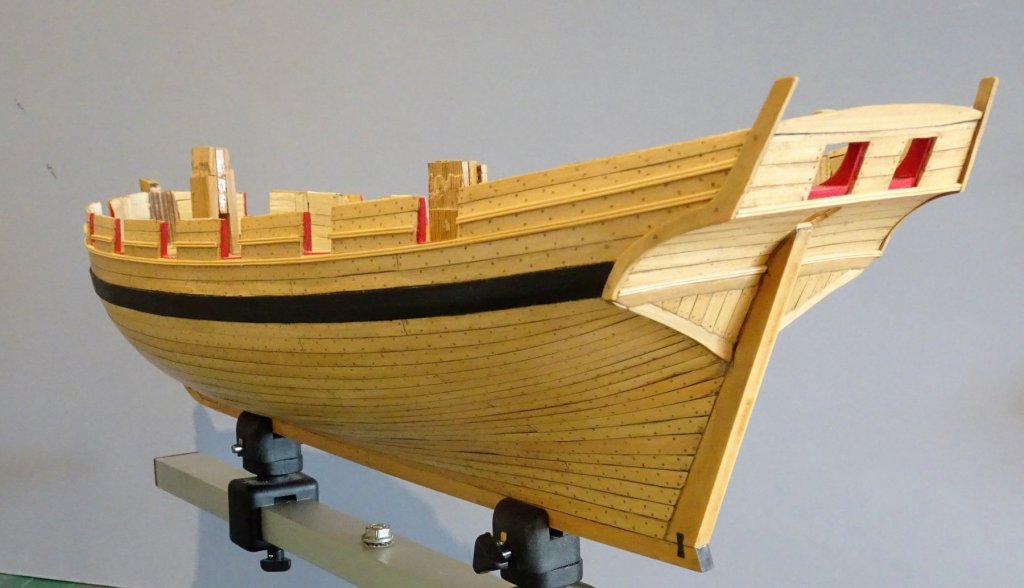
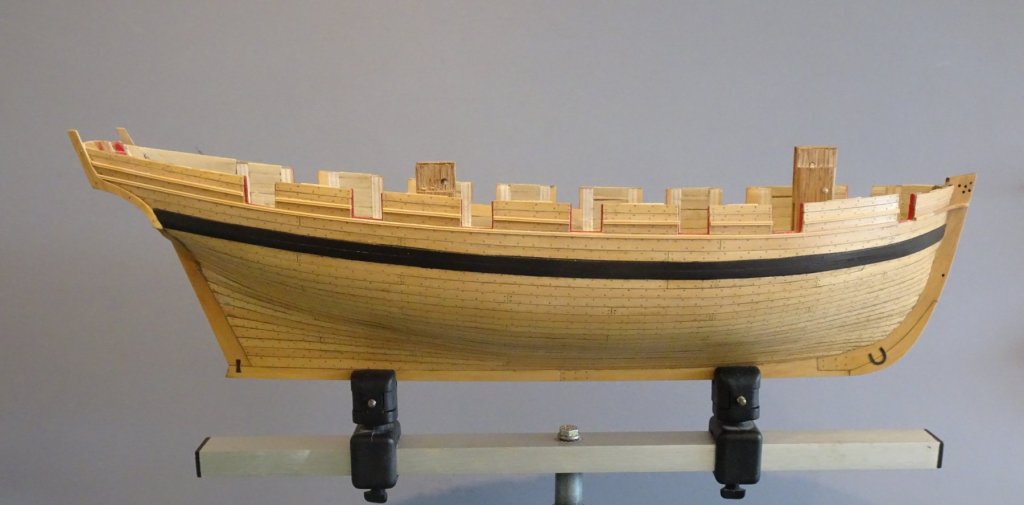
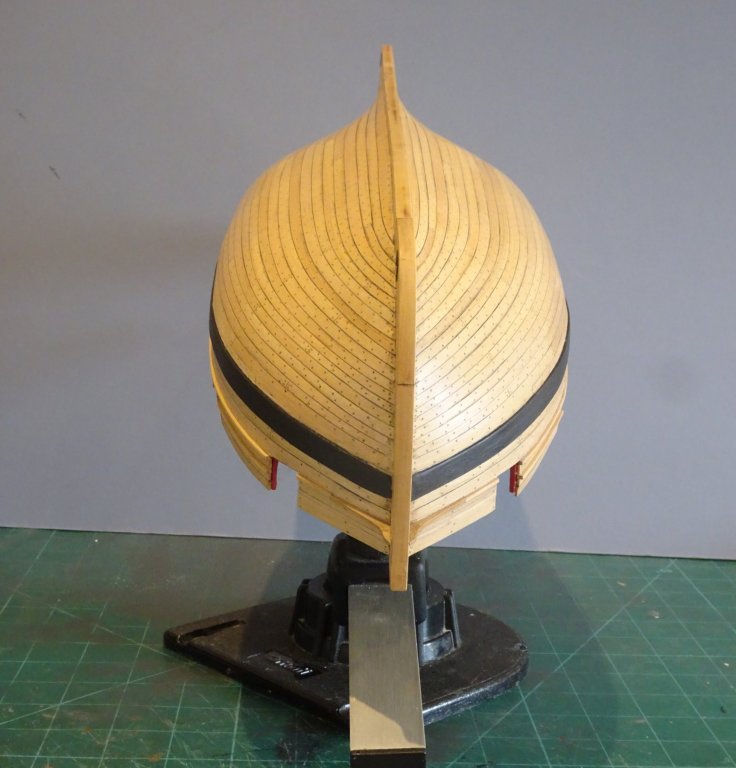
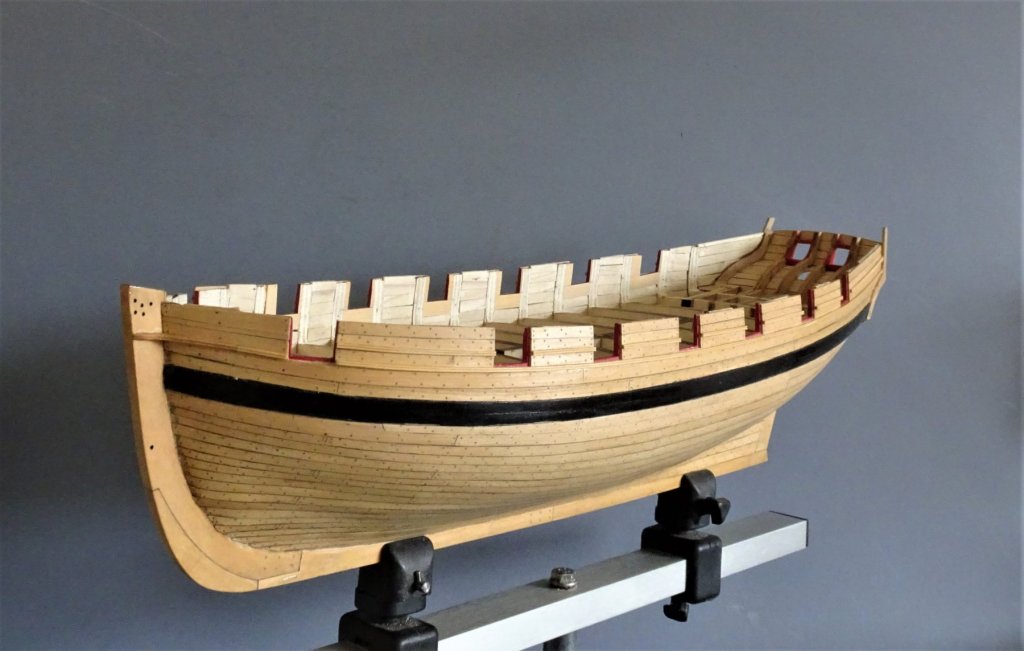
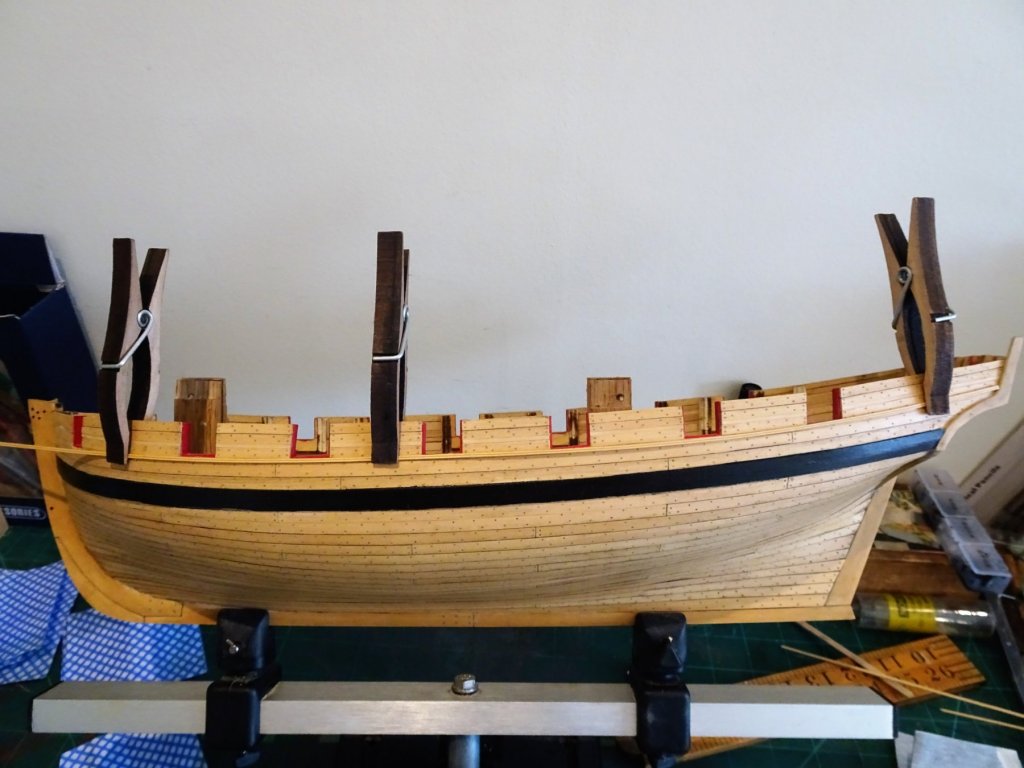
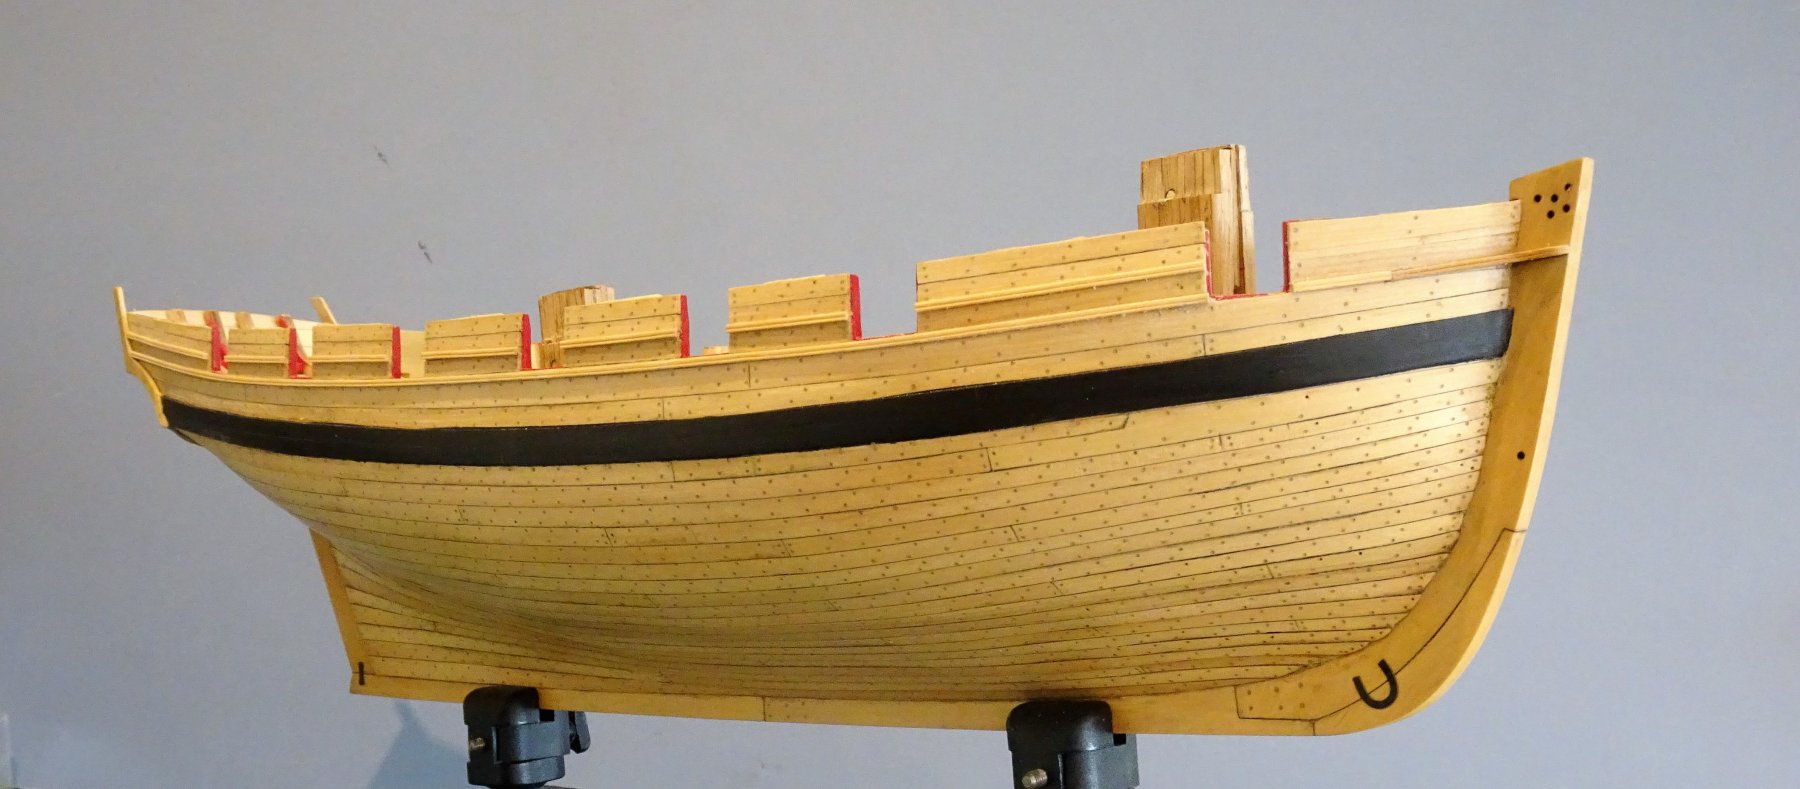
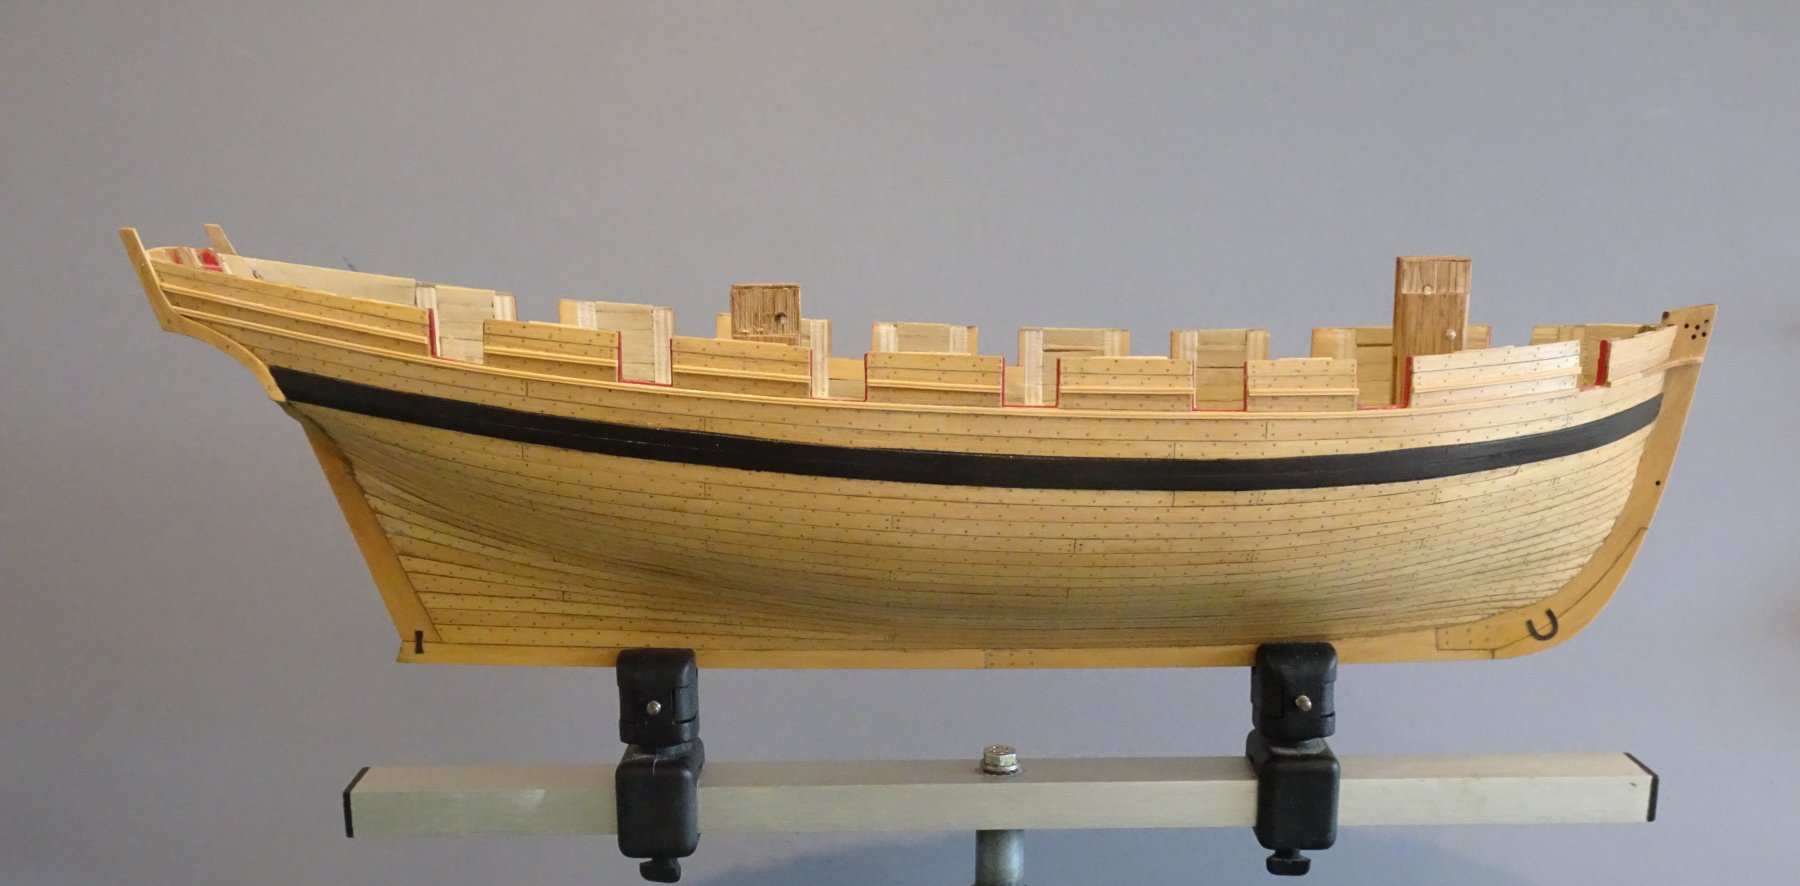
Post 44 A milestone of sorts. The basic hull is now complete, which is not to say that I won't be fussing and fiddling with the paintwork for some time yet. 3149(2) I'm a lot happier now with how she's looking than a few weeks ago. 3161(2) On the other hand my assistant seems far more sniffy about progress. 3108 3109 3110 3113 3115 3121 Can't quite make my mind up whether to paint the fashion pieces black or leave them natural. 3122 3124 So after some ten months I can set the hull aside and start looking at the deck fittings. B.E. 07/10/2018


.thumb.JPG.76709ae6747aaaa0b06b651acfa91acf.JPG)
.thumb.JPG.a4fc4f489f6c5067c7bae3c463ca0e02.JPG)
- 574 replies
-
- 32
-
-
- cheerful
- Syren Ship Model Company
- (and 1 more)
-
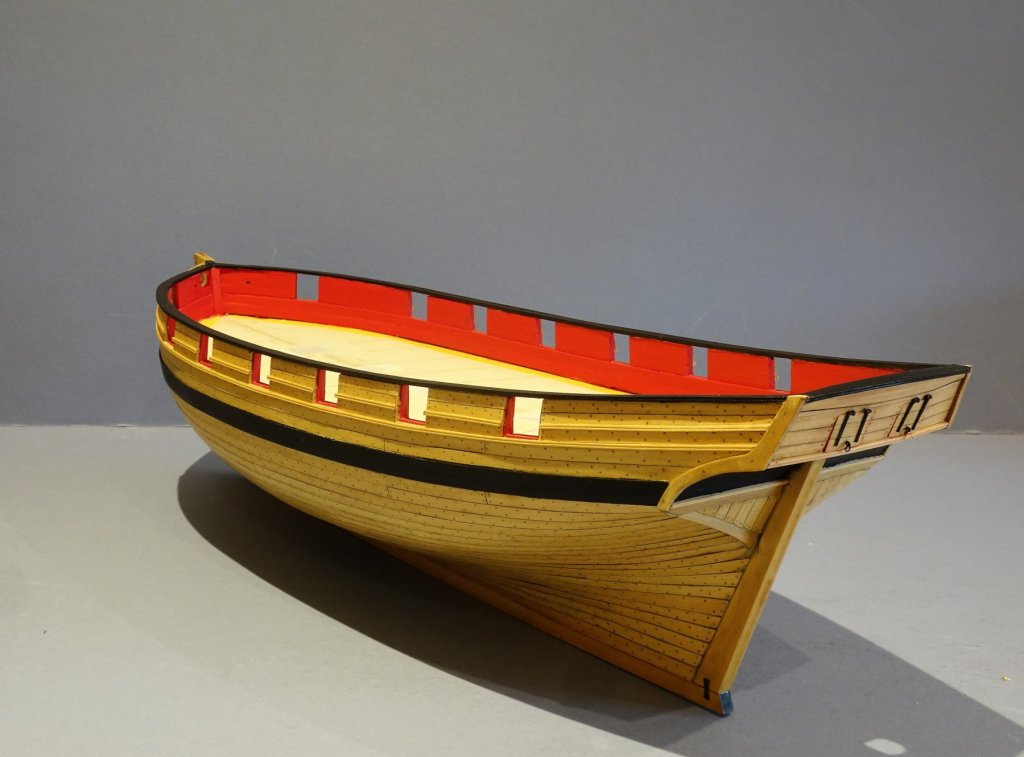
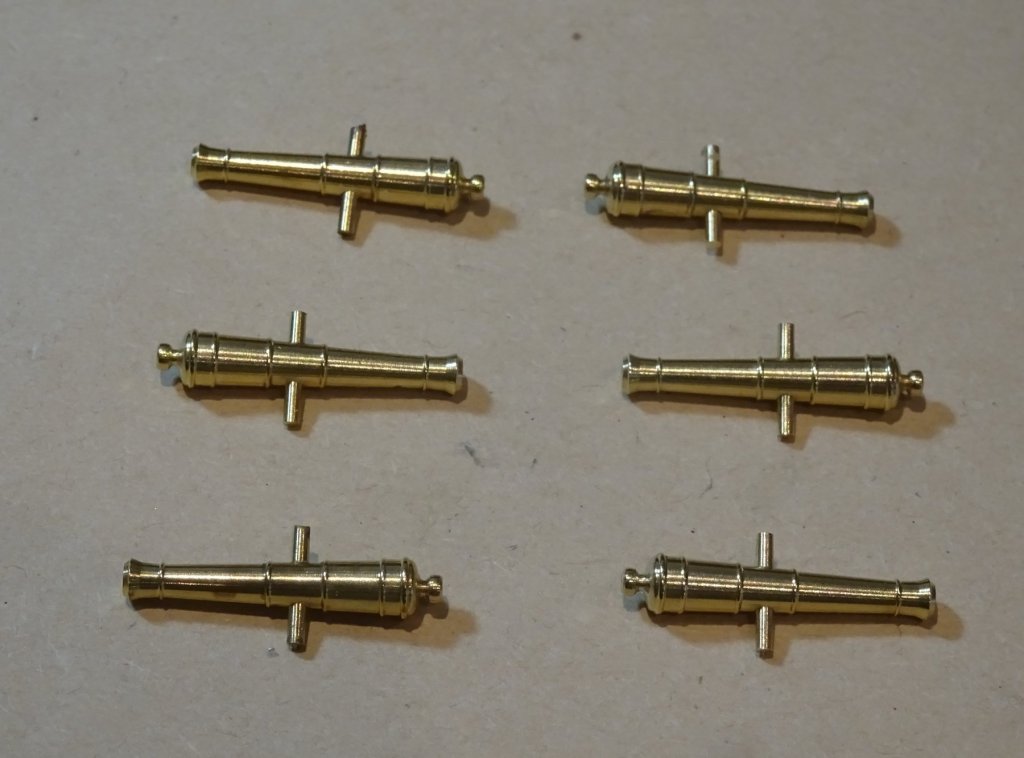
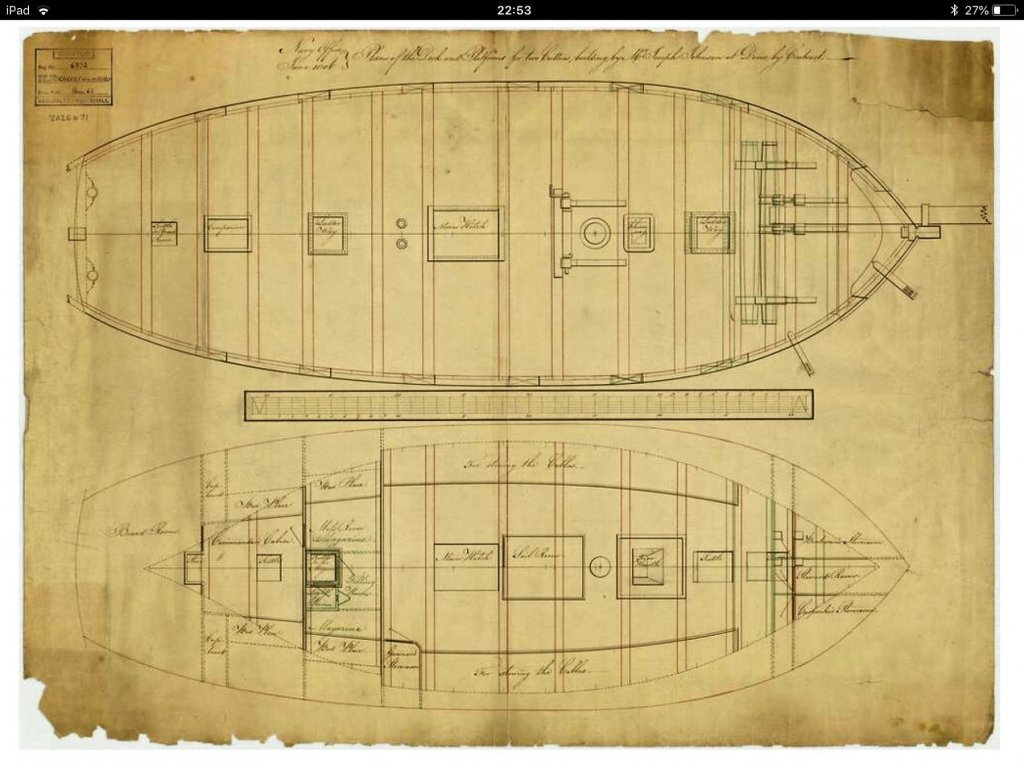
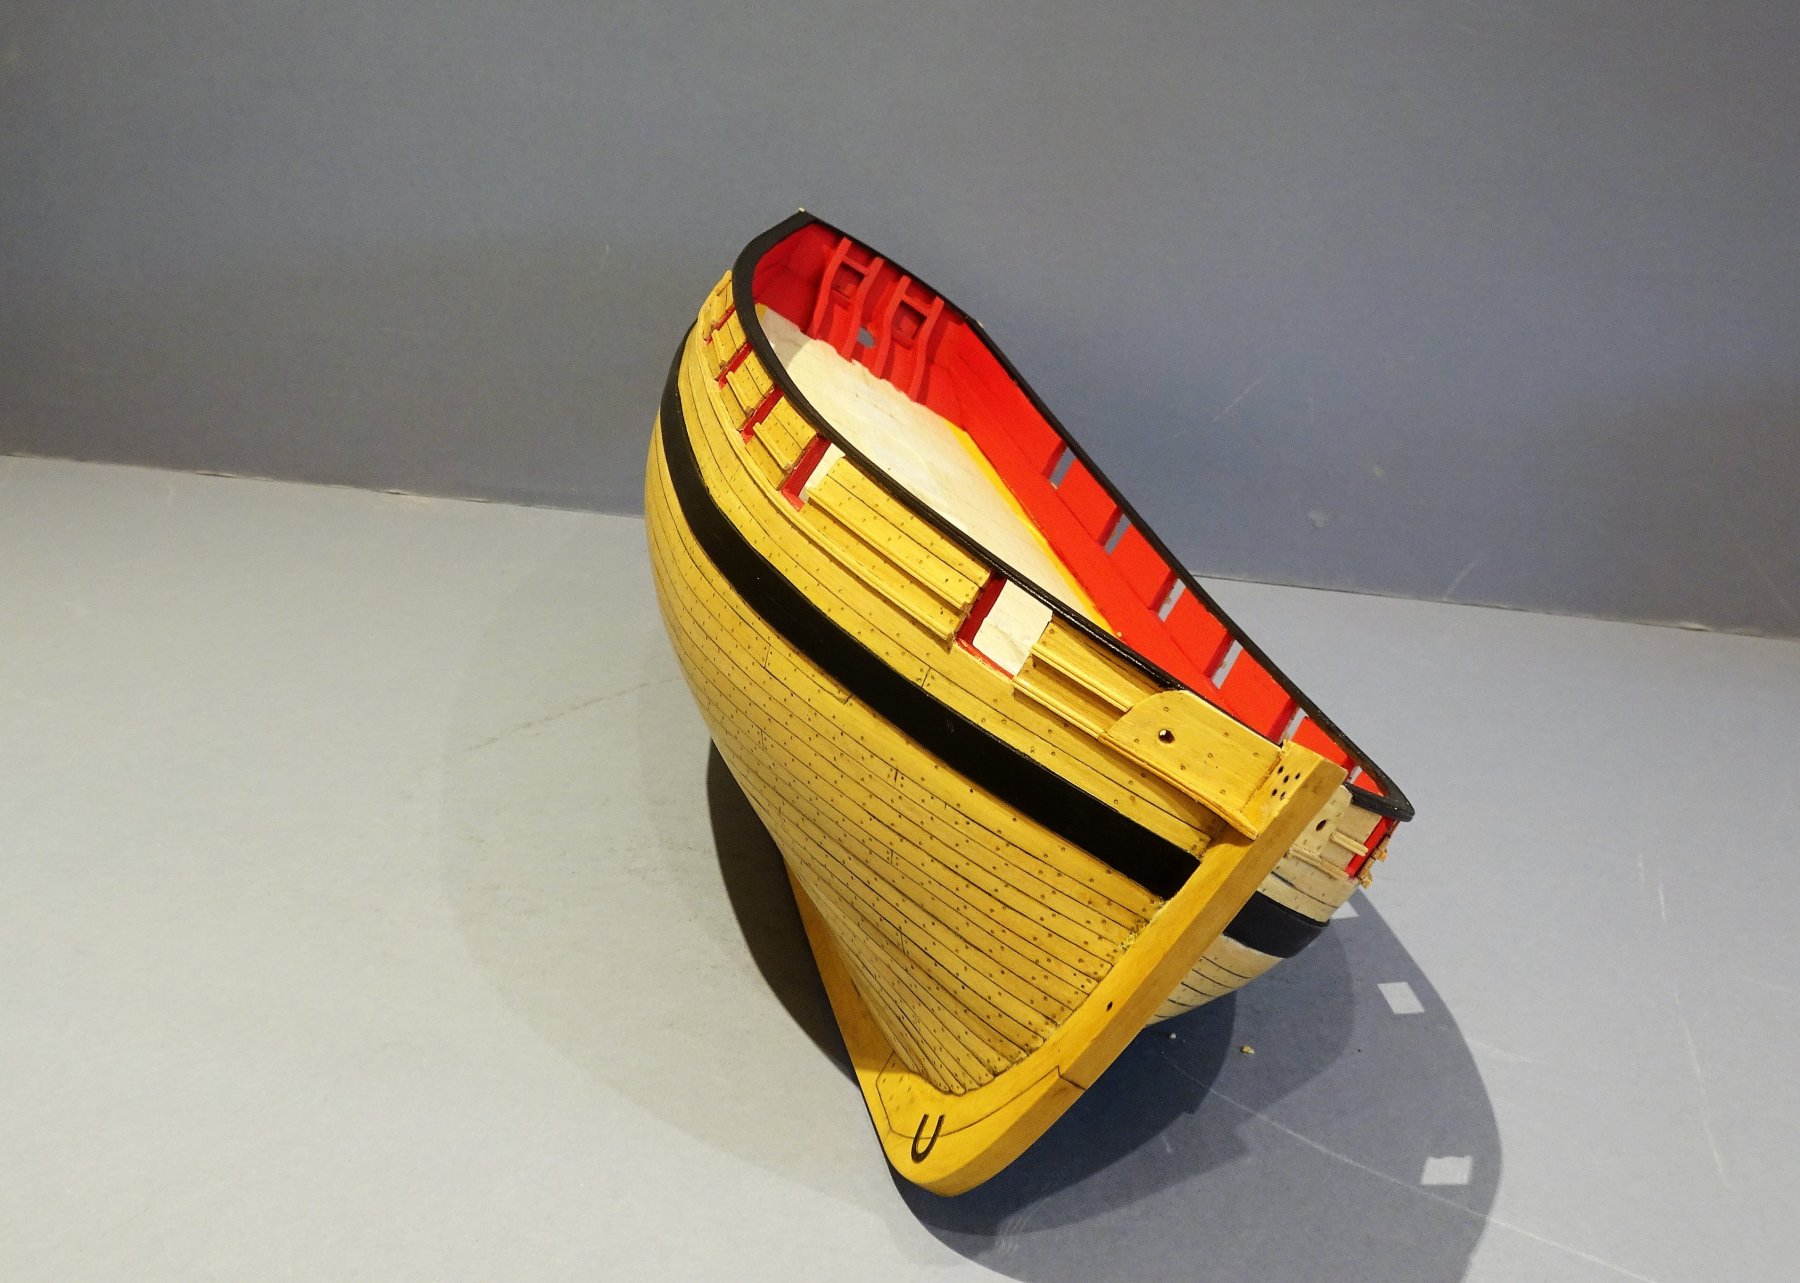
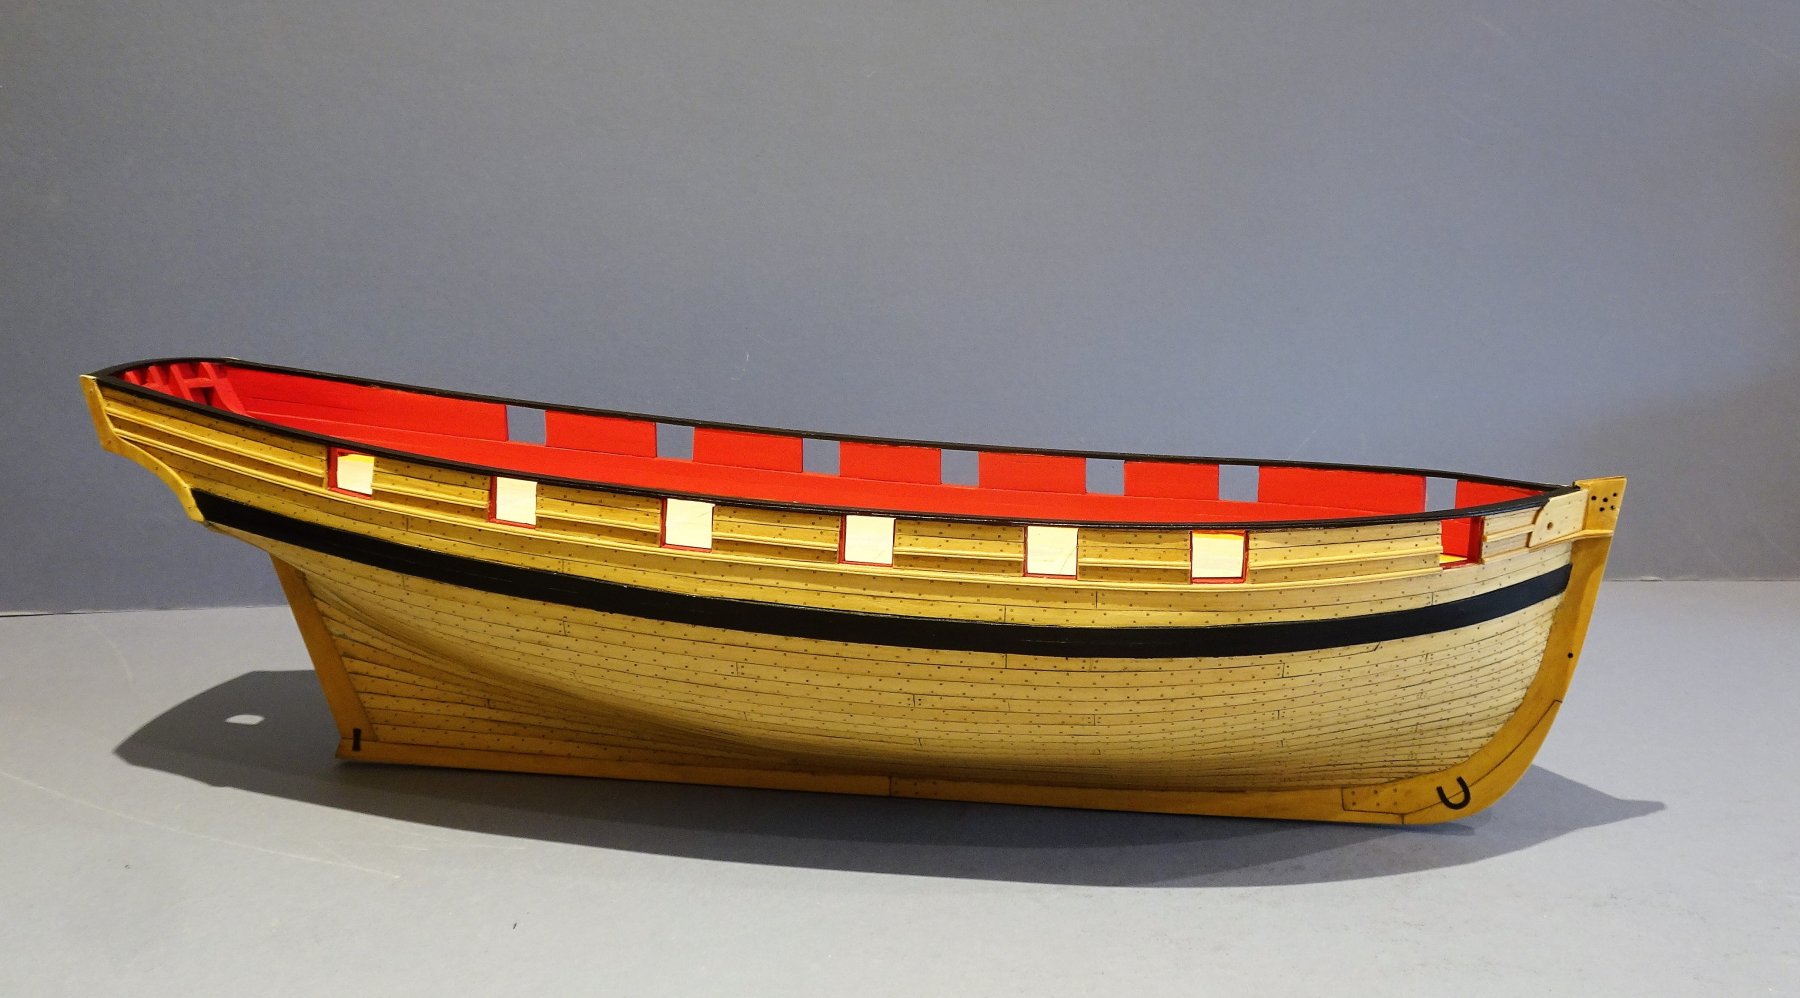
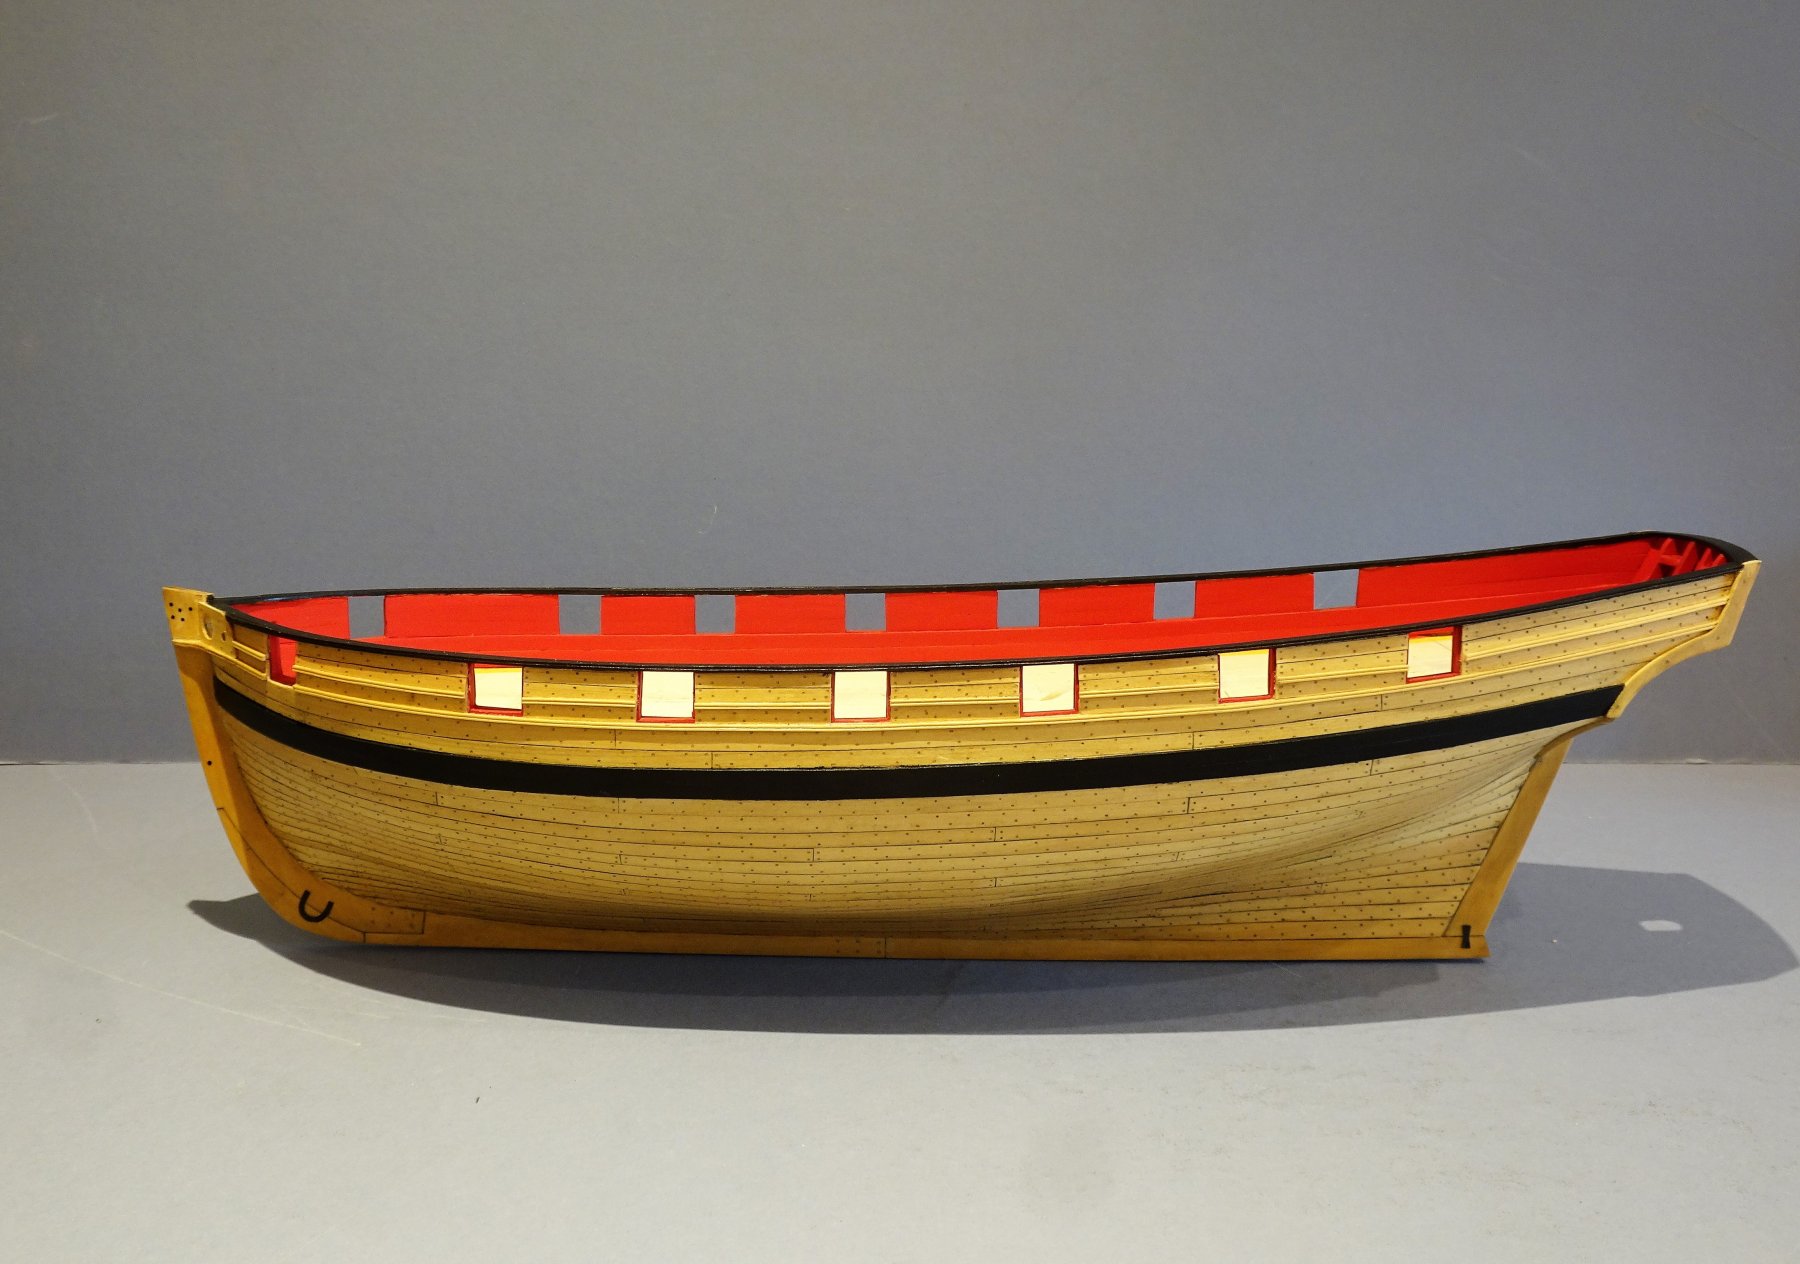
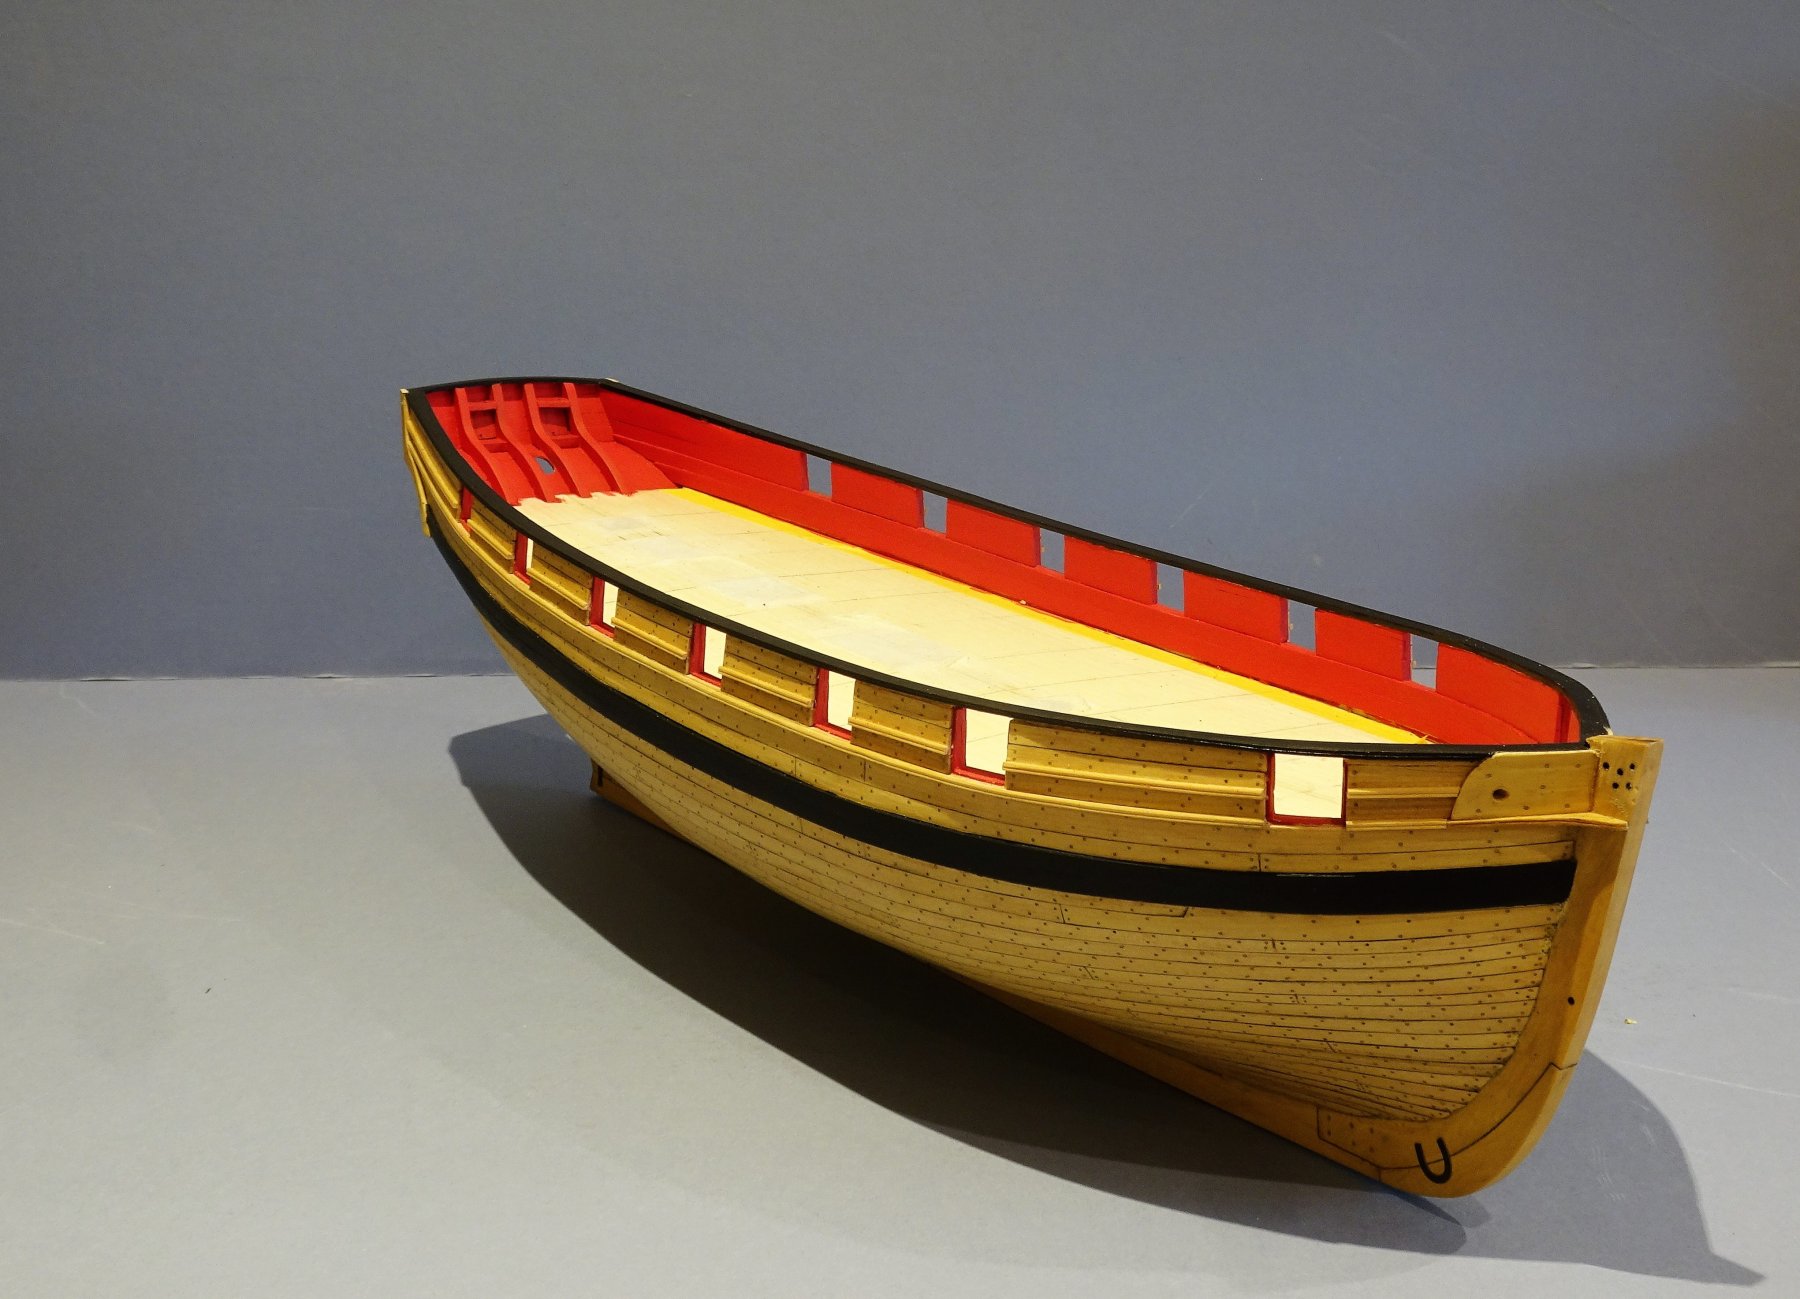
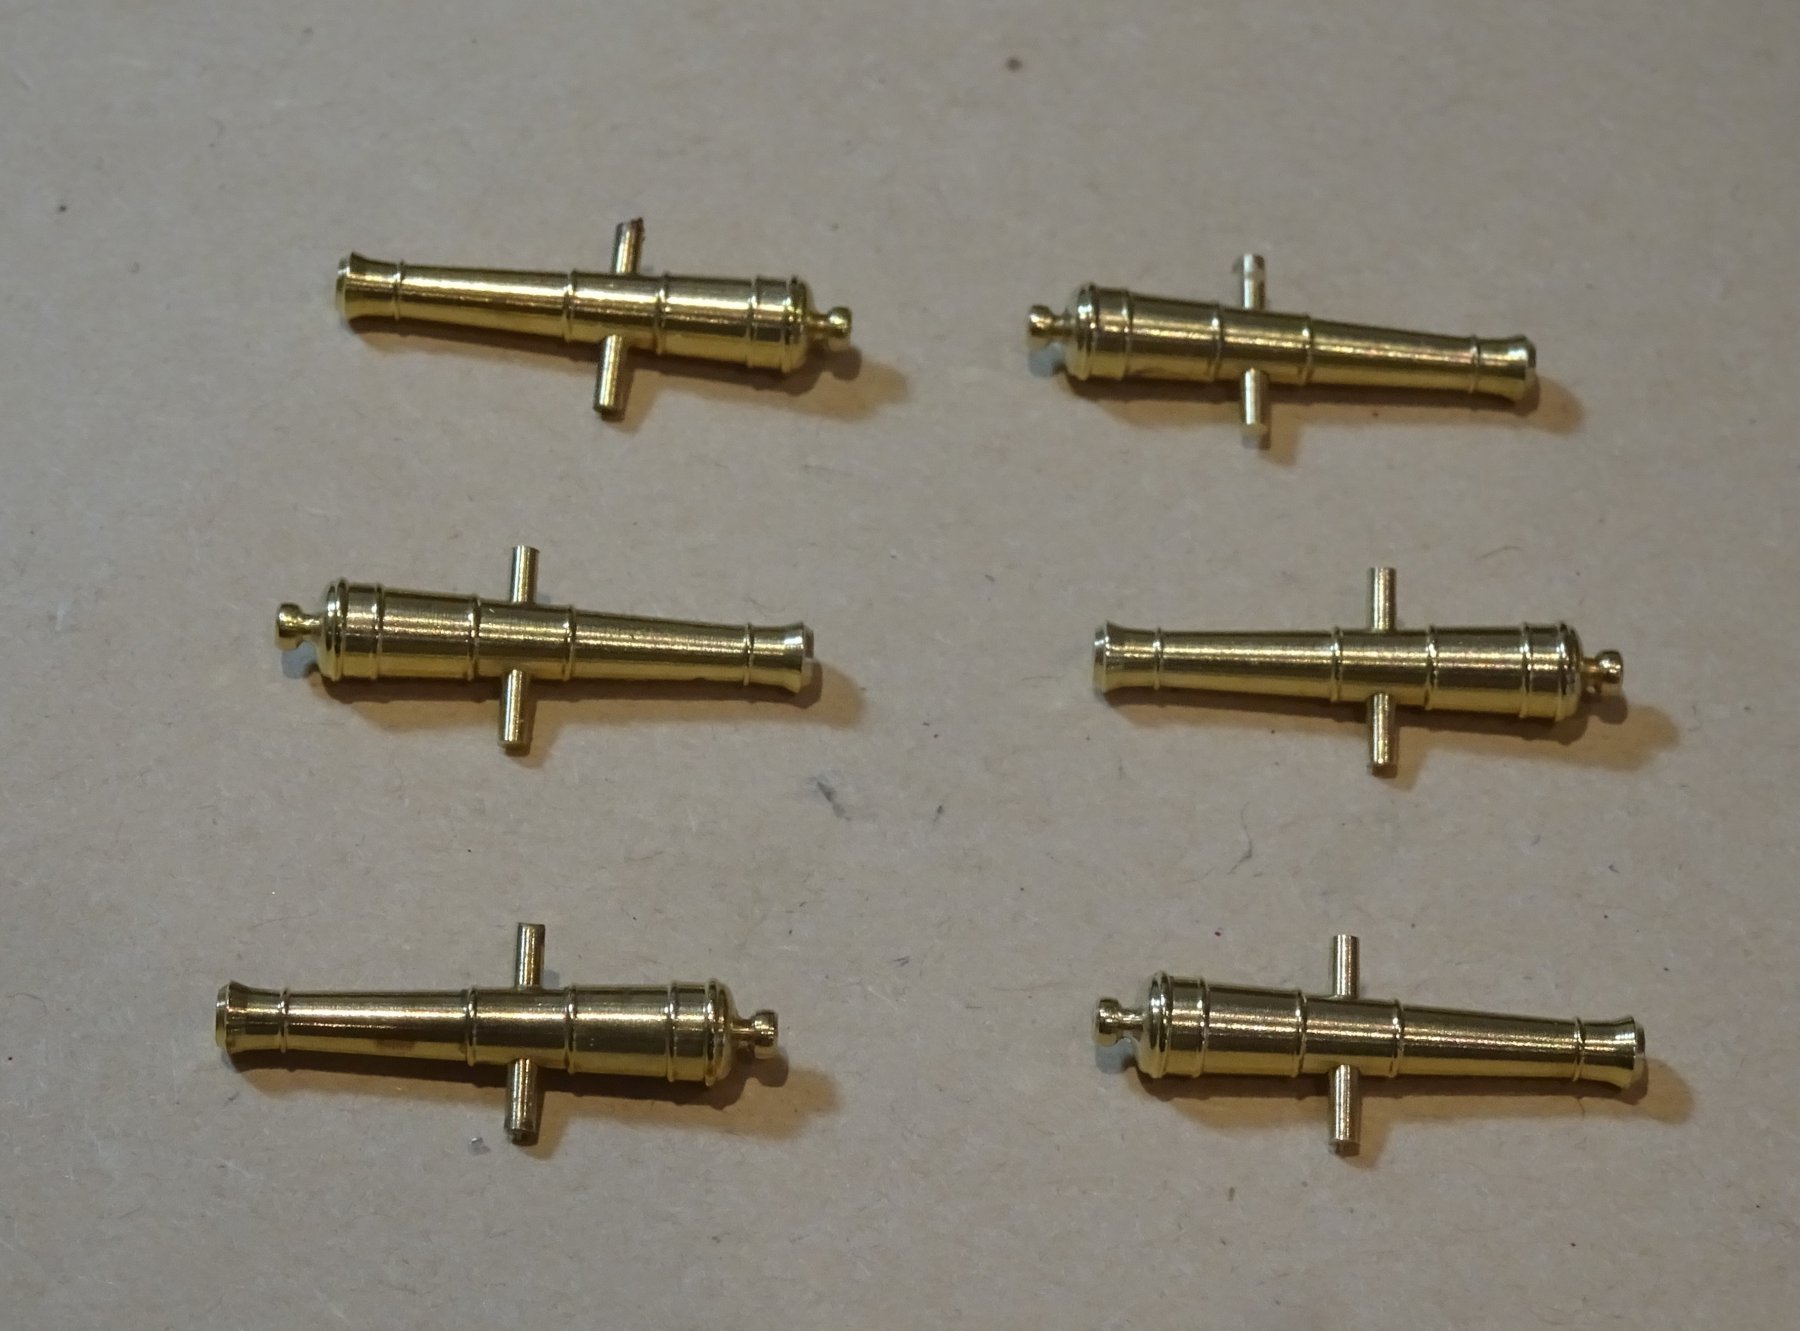
Thanks Jason and Dave, Those stern ports are a mystery, cutters were amongst the fastest vessels afloat and the need for stern guns doesn't seem great, but those models fitted with them do seem to have a continuous platform across the stern over the rudder head. I presume that any adjustment made to the windlass position is already reflected in the layout we have, I've certainly no intention of fiddling about with it at this stage 🙂 Yes I was referring to the hand winch Dave, - it fits between the jeer bitts 😉 I've plenty of time to fret about the gun positions, before I have to make a decision, but seeing something that doesn't really seem to fit is annoying. Perhaps I'll think about siting one on the Starboard side forward port only. Regarding the ships boat I think they were generally stowed on board unless action was imminent when they would be towed to allow more space to work the guns and reduce damage risk to the boat. I've looked at all the contemporary cutter models I could find online, some show the boat stowed on the port side of the deck which is a practical option; the deck space on the centre line of Cheerful would only allow for a boat of 10' 6" length. My own view is that a 14' - 18' cutter would be appropriate. I do rather fancy having a cutter on the cutter, we shall see 🤔 3093 I have obtained some swivels from RB Models in Poland, they are 20mm long which is spot on for scale for a 3' swivel gun. Cheers, B.E.
- 574 replies
-
- 8
-
-
- cheerful
- Syren Ship Model Company
- (and 1 more)
-
Thanks Dave, I read the discussion on Chuck's log about the seemingly awkward position of the Bow chaser long guns. Some contemporary models do show guns in that position, and there is a written note on the Cheerful plans concerning moving the windlass a little aft to accommodate the working of the guns, which gives credence to the use of those ports for bow chasers. There are several other puzzlements I have around the layout and fittings of Cheerful. As I mentioned in my previous post - why have stern chaser ports when the guns can't use them? No apparent provision for half pounder swivel guns, which I'm sure she would have. I think I will add four of these. Where would the ships boat be stowed - there is not enough room between the Jeer Bitts and the pumps for a centre line position even for a modest 16' cutter. There are always more questions than answers in the world of period ship modelling.🙄 Regards, B.E.
- 574 replies
-
- 3
-
-
- cheerful
- Syren Ship Model Company
- (and 1 more)
-
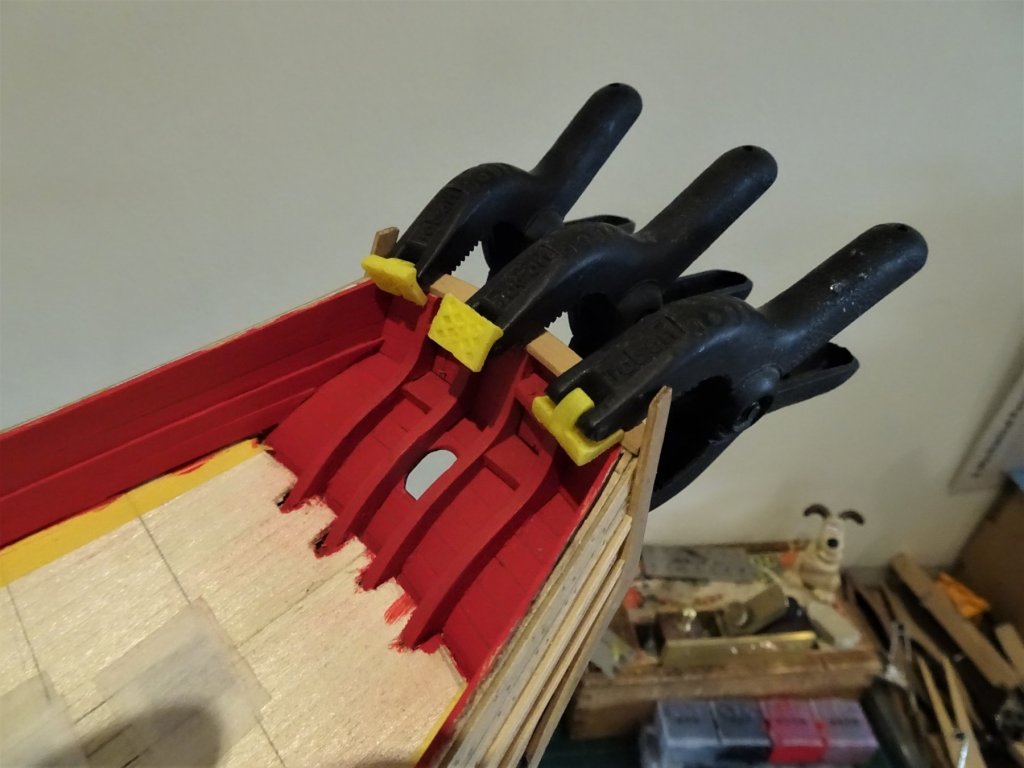
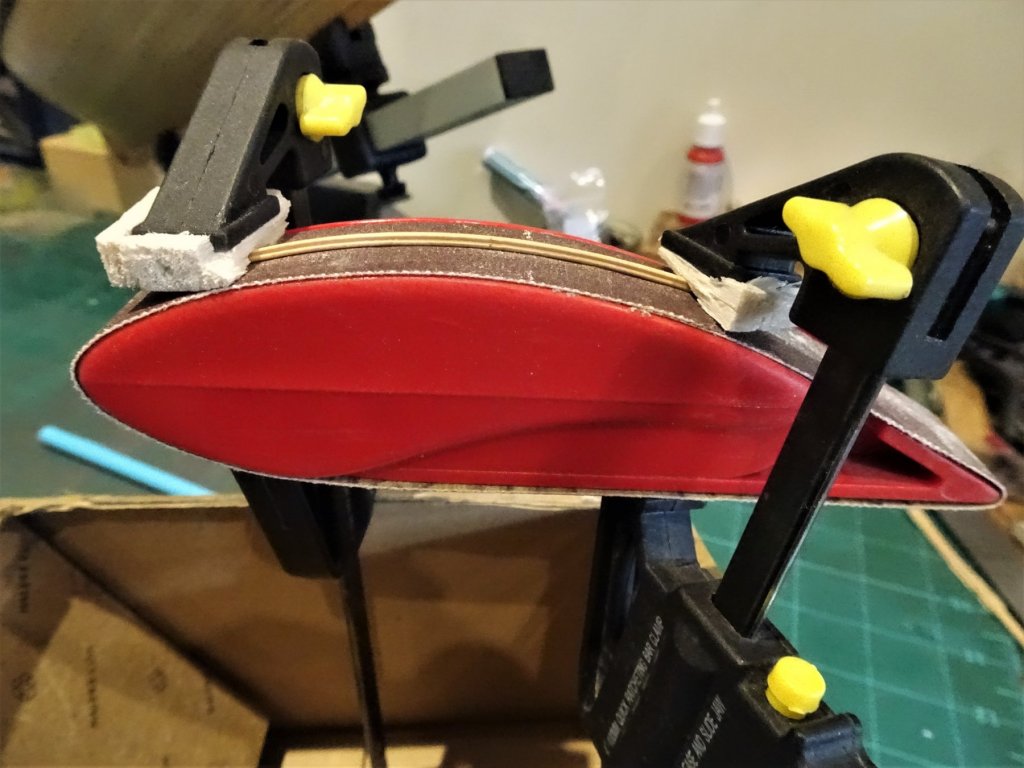
Thanks for looking in guys and for the 'likes' Post 43 Cap rails 2955 With the inboard painting of the bulwarks completed (at least for the moment) I turn my attention to the Capping rails. 2960 Starting with the tafferal rail I shaped to size from a card template, and cut out from some 1/16" sheet. 2962 The moulding strip was made in the same manner as the other mouldings, and some curve imparted to follow the line of the tafferal. 2978 Applying heat to form the curve removes a lot of the stress of holding in place during gluing. 2972 The completed rail in place. Turning to the rails along the bulwarks a card template was made and glued to a 1/16" boxwood sheet for cutting out. That in turn provided a template for the other side. Before gluing the rails to the bulwarks a final check on the level of the bulwark tops so the rail will sit flat. I decided to cut the rails in complete length each side rather than split them into sections, and I allowed myself a margin for error, but which also involved extra sanding down to finish. Some toll taken on the inboard painting. 2993(2) To reduce the width down to finished size I used a combination of scalpel blades and sanding sticks. 3054 The Hawse plates and the final upper moulding strips at the bow were added. 3063 I decided to drill the holes for the Bowsprit and anchor cables before I added the edging moulding to the cap rail. The hole is not at present the full size and final enlargement will be done later. 3049 3052 Final action of this section, to add the fancy moulding along the cap rail edge. B.E. 05/10/2018.

.thumb.JPG.c67ab74f7a0618ef8384be055b4c7543.JPG)
- 574 replies
-
- 24
-
-
- cheerful
- Syren Ship Model Company
- (and 1 more)
-
Congratulations Jack, that is a very fine model, well done. 🙂 B.E.
-
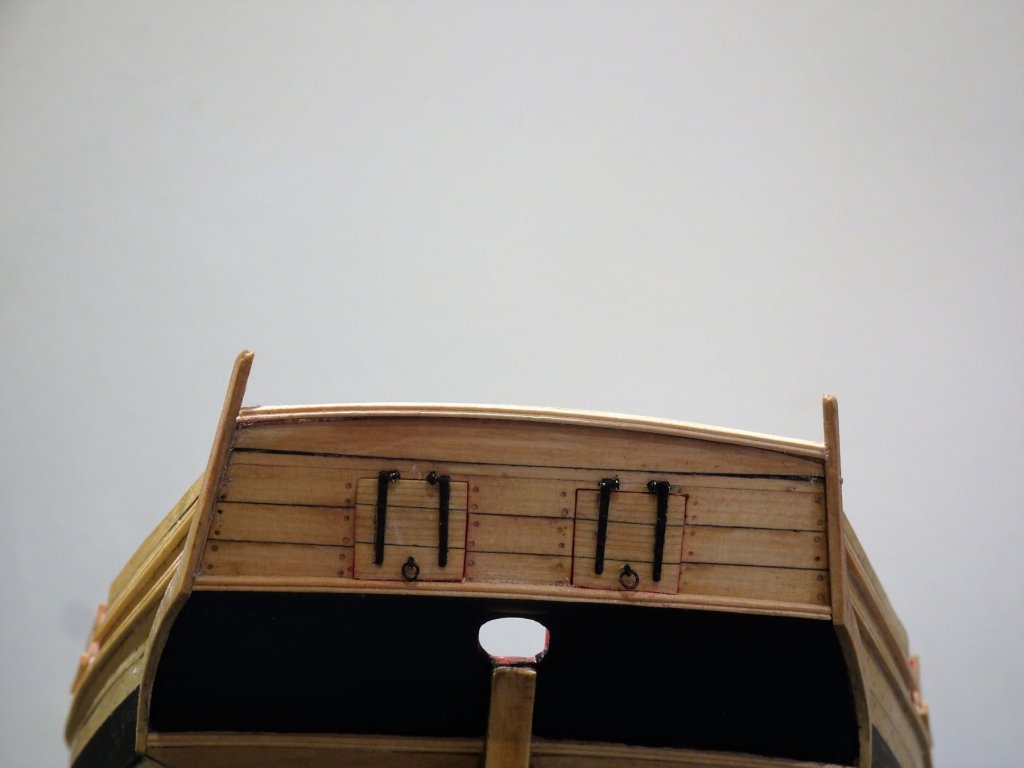
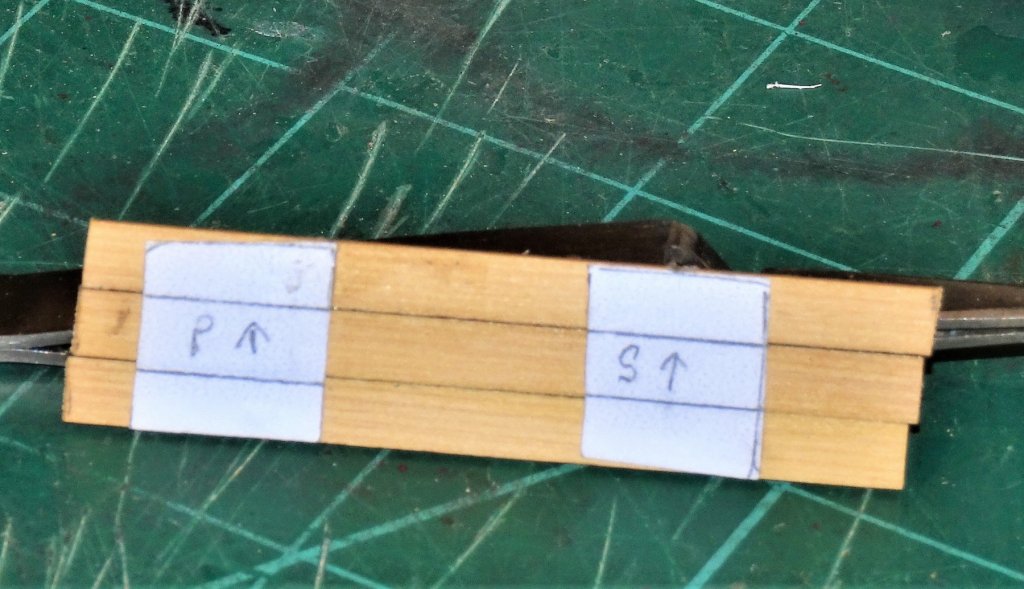
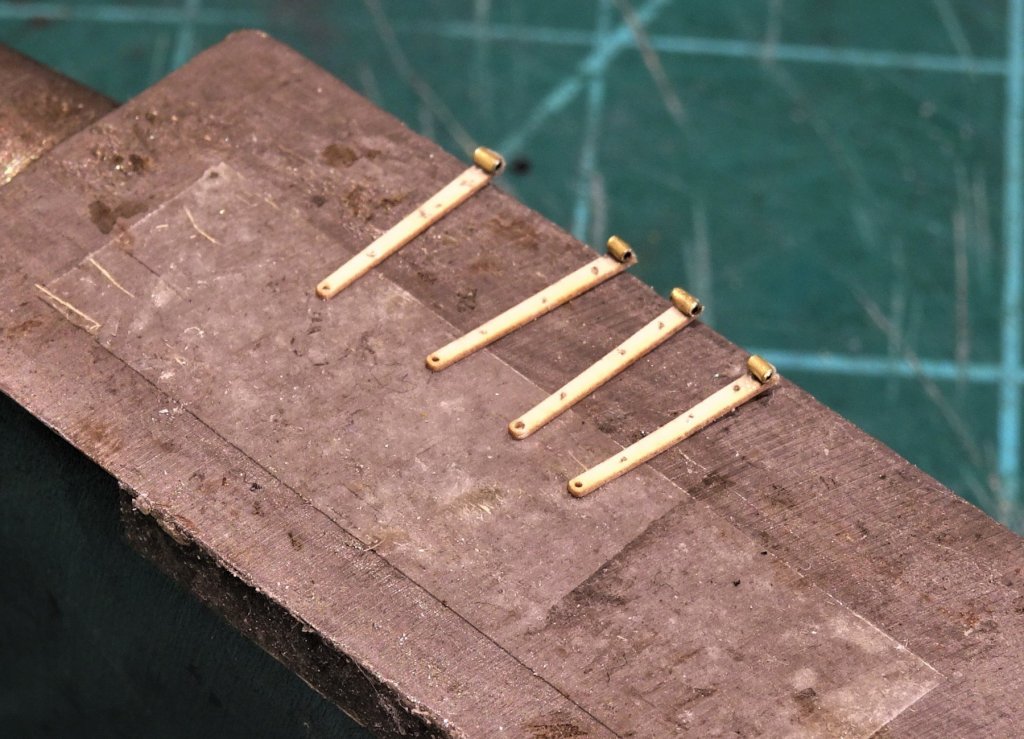
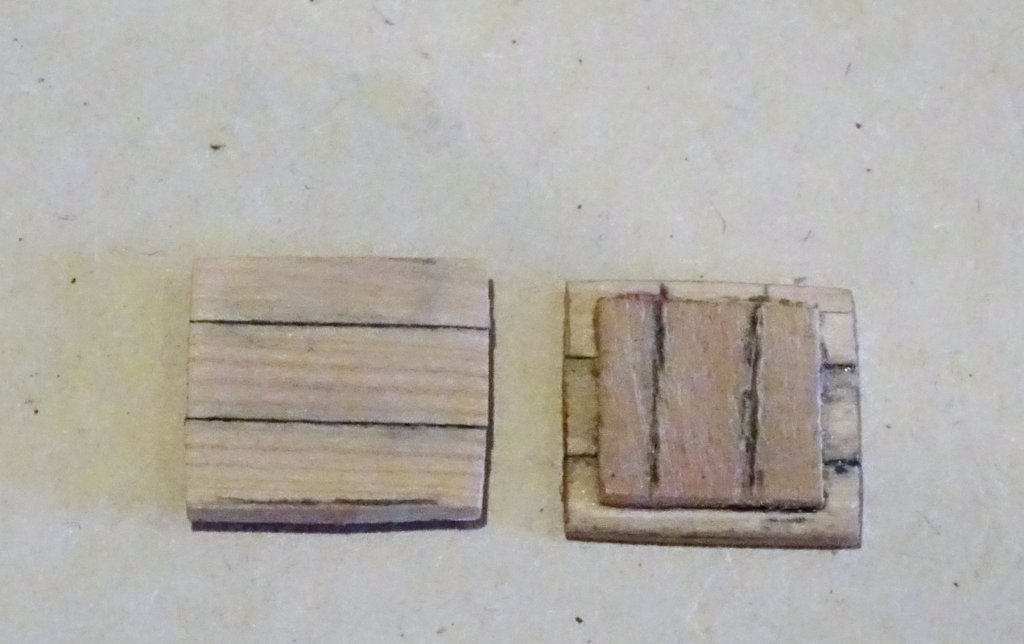
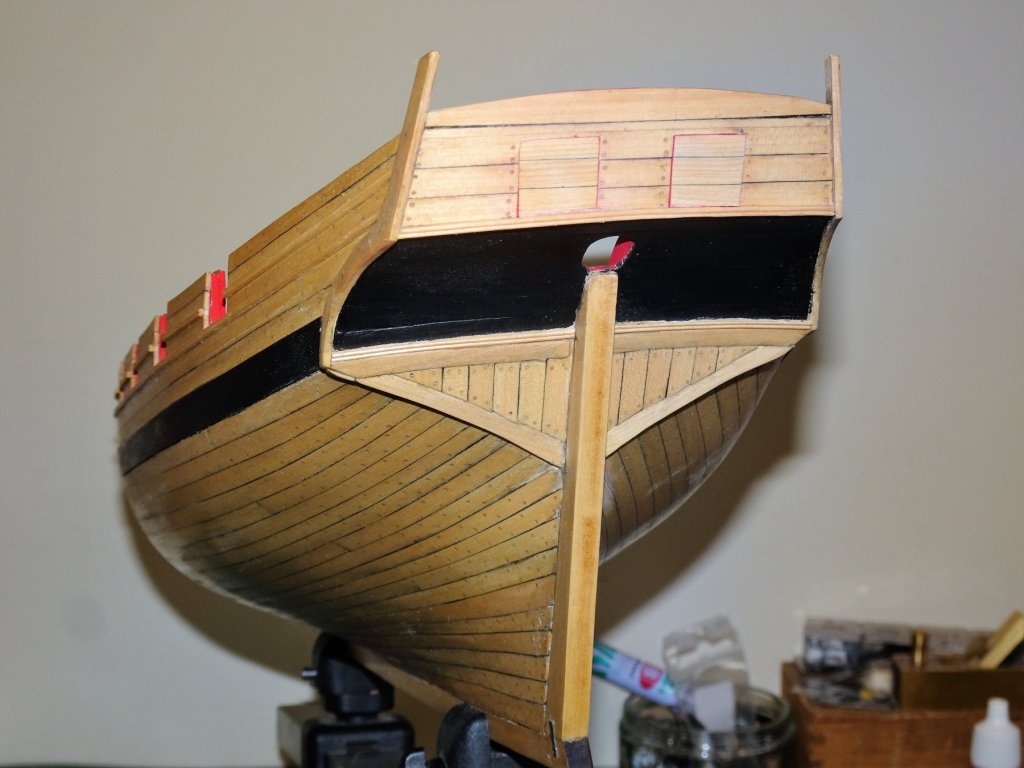
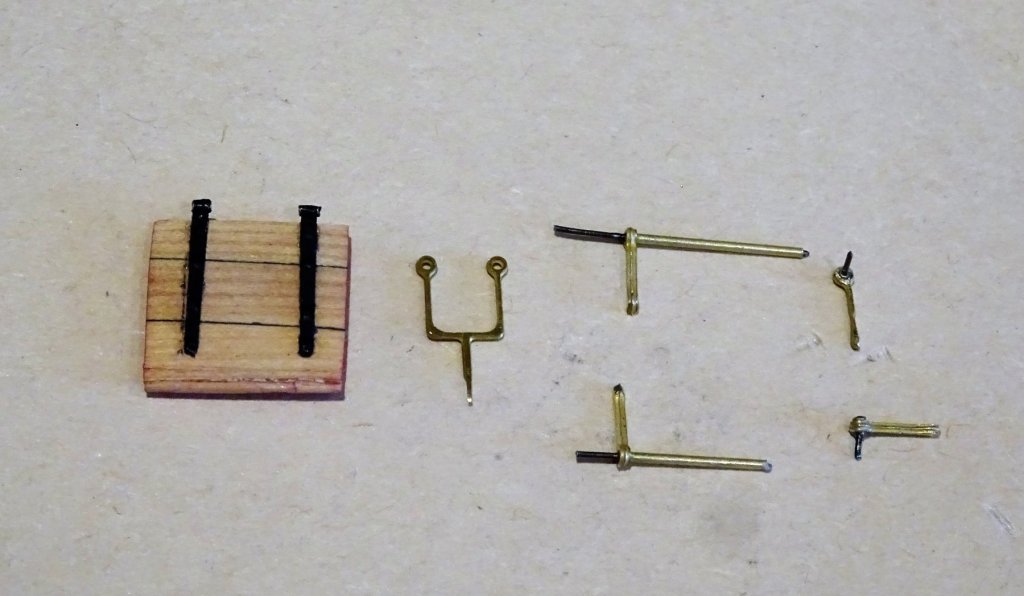
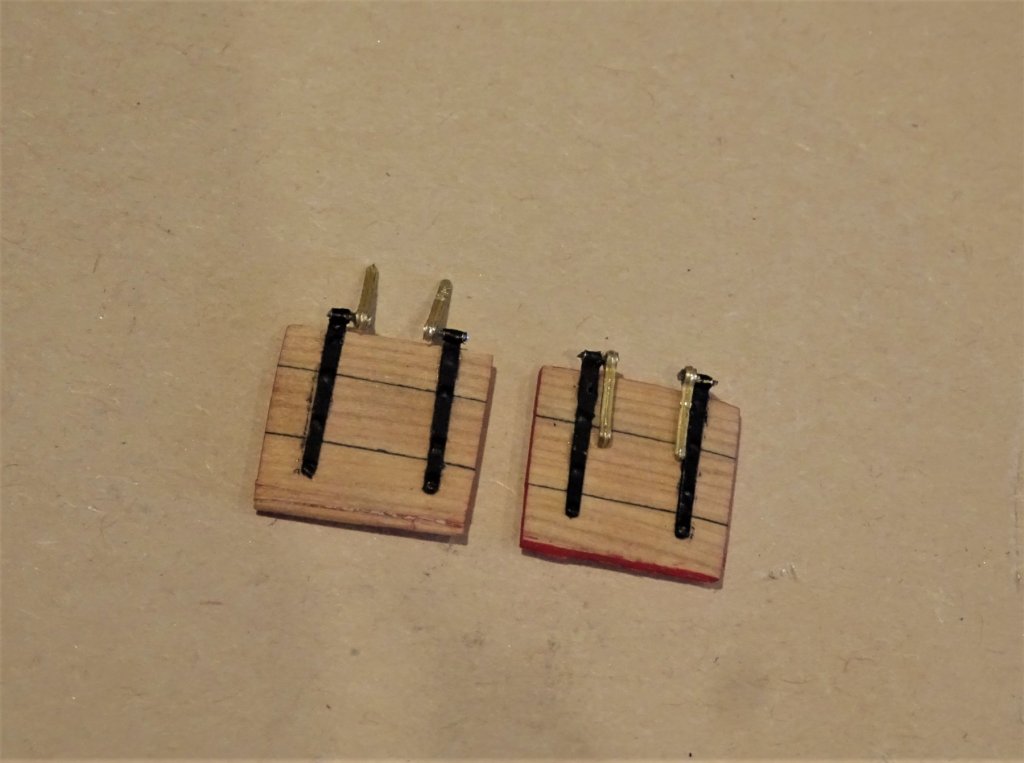
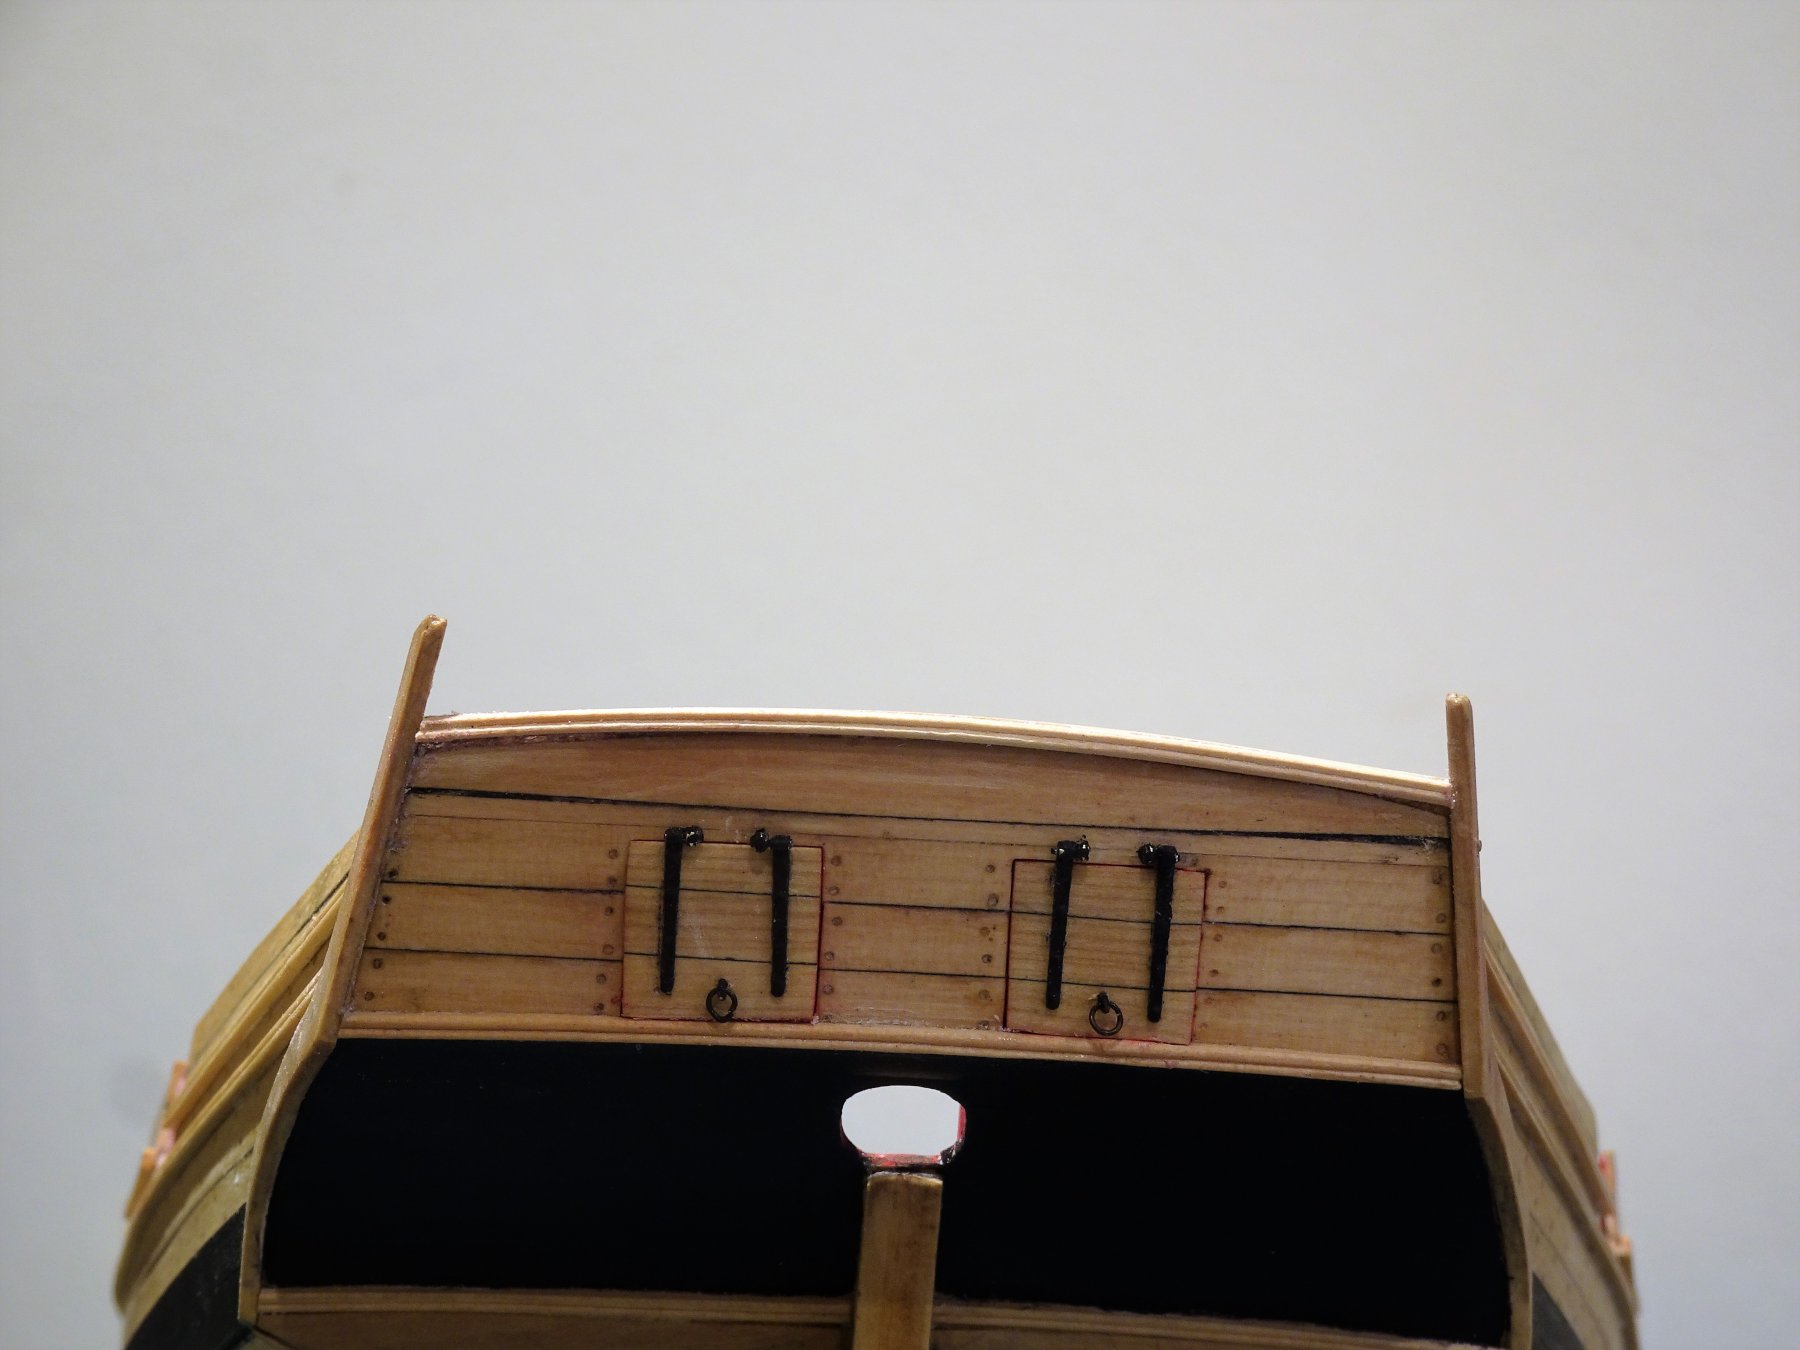
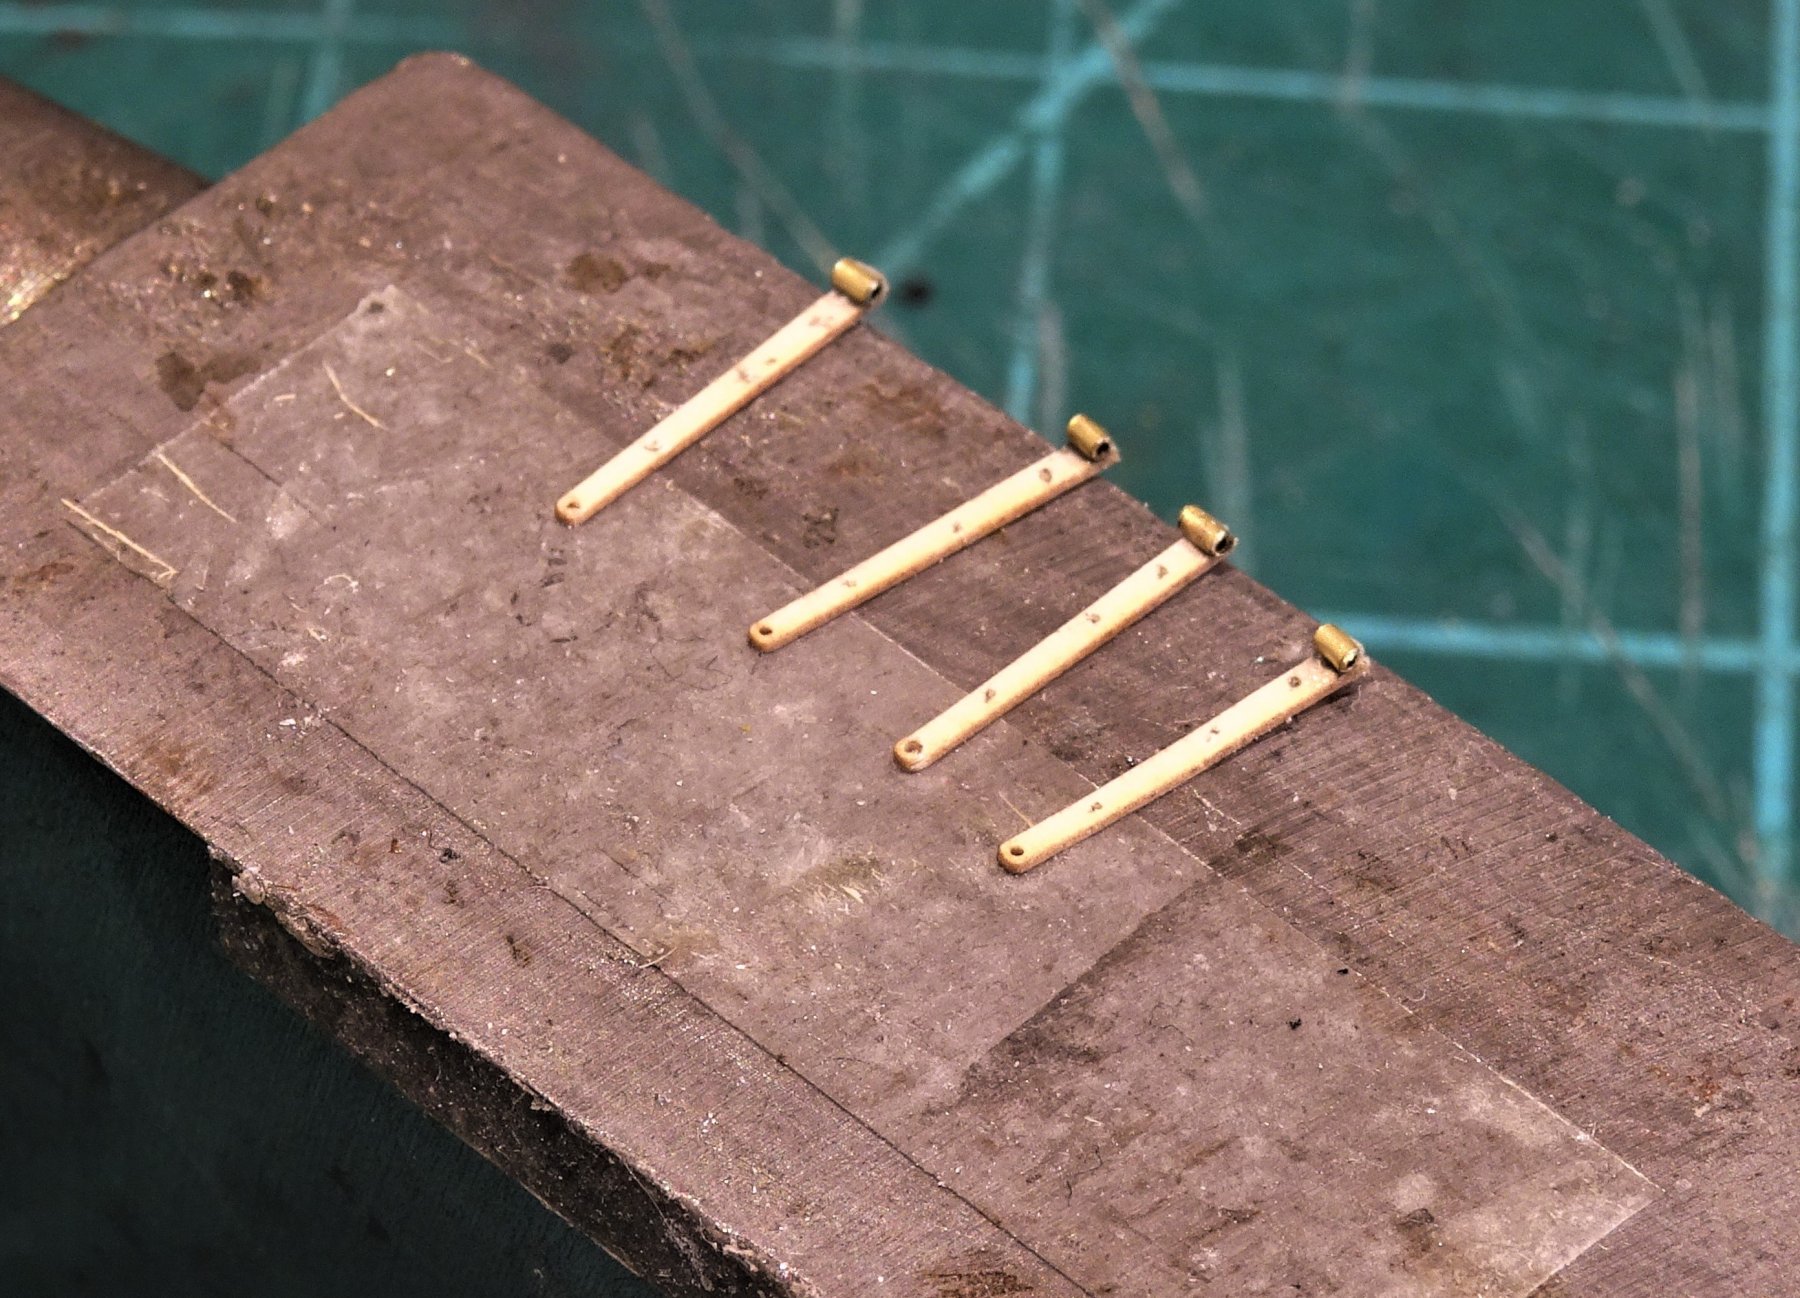
Cheers Guys, @ Dowmer - Well I had planked it but fortunately they were only short lengths, and pva is quite easily removed with the careful application of water. @ Martin - No tenons, and a little over size for this scale, but it does make for a decent weight. @ Lou - I borrowed them from the Galley, we use two weight systems over here and they are representatives of both imperial and metric systems. 🙂 @ Ferit - Thank you Ferit, Chuck has excelled with this model altho' there are always questions around boats of this era.😉 Post 42 Port lids - an interesting exercise. As a small diversion I turn my attention to the stern port lids. 2730 The first very necessary job is to make a card template onto which the plank lines can be marked. 2728 Three boards are glued together onto which the template is transferred - then cut out and fine sanded to fit. Gunport lids of Warships of this period consisted of two layers of board. An inboard vertical layer fitted within the port area, and a horizontal layer which fitted into the port rabbet. 2907 This the approach I have taken, as shown on these reject lids. During the initial versions I noticed that the port side lid looked a tad smaller than the Starboard side. Much as I tried to ignore this it was sufficiently noticeable to irk my eye, and I couldn't let it go. 2881 Rectifying the matter entailed enlarging the rabbet on the port side, very carefully using a scalpel and micro chisel. A case of some earlier error coming back to haunt me. It took me three goes to get the lids right with the board lines matching those of the transom, and that fitted snugly within the rabbet. 2914 Fairly content with the end result. For the lid straps and hinges I used Chuck's little kit rather than thin brass strip which would entail a spot of silver soldering and blackening, an even more fiddly job that may have no better result. 2879 A bit of a test for my tired old eyes. To represent the bolt heads on the straps I use a spot of pva on a needle point. They were then painted with Admiralty Metal black paint. The 28 gauge wire indicated for the hull mount seemed very flimsy to me and I scouted around for something a little more robust, and slightly more authentic. An alternative came in the form of brass etched hammock crane arms left over from my Pegasus build. 2917 0.7mm ø brass tubing was ca'd into the ring and filed flush and a short length of the 28 gauge wire ca'd into the tube. 2918 This gave a solid right angle onto which to hang the strap rings. 2938 This is quite a strong arrangement but in fitting the lids to the transom the tiny tube sections attached to the laser board straps gave way several times much to my irritation. 2937 What started as small diversion turned out to be a time consuming and somewhat frustrating exercise in fiddliness, at least there are only two lids and not a full set along the broadside. Whilst on the subject of stern ports, I have puzzled just what are they for on Cheerful ? They are positioned far too high for any normal carriage gun to use. On some cutter models I have seen there is a platform, which in the case of Cheerful would also cover the area between the seats of ease, allowing a gun to be sited at the correct level. This is the arrangement shown on the deck plan of The Naval Cutter Alert by Peter Goodwin, described as 'platform deck over counter'. Time to move on.... B.E. 01/10/2018


- 574 replies
-
- 23
-
-
- cheerful
- Syren Ship Model Company
- (and 1 more)
-
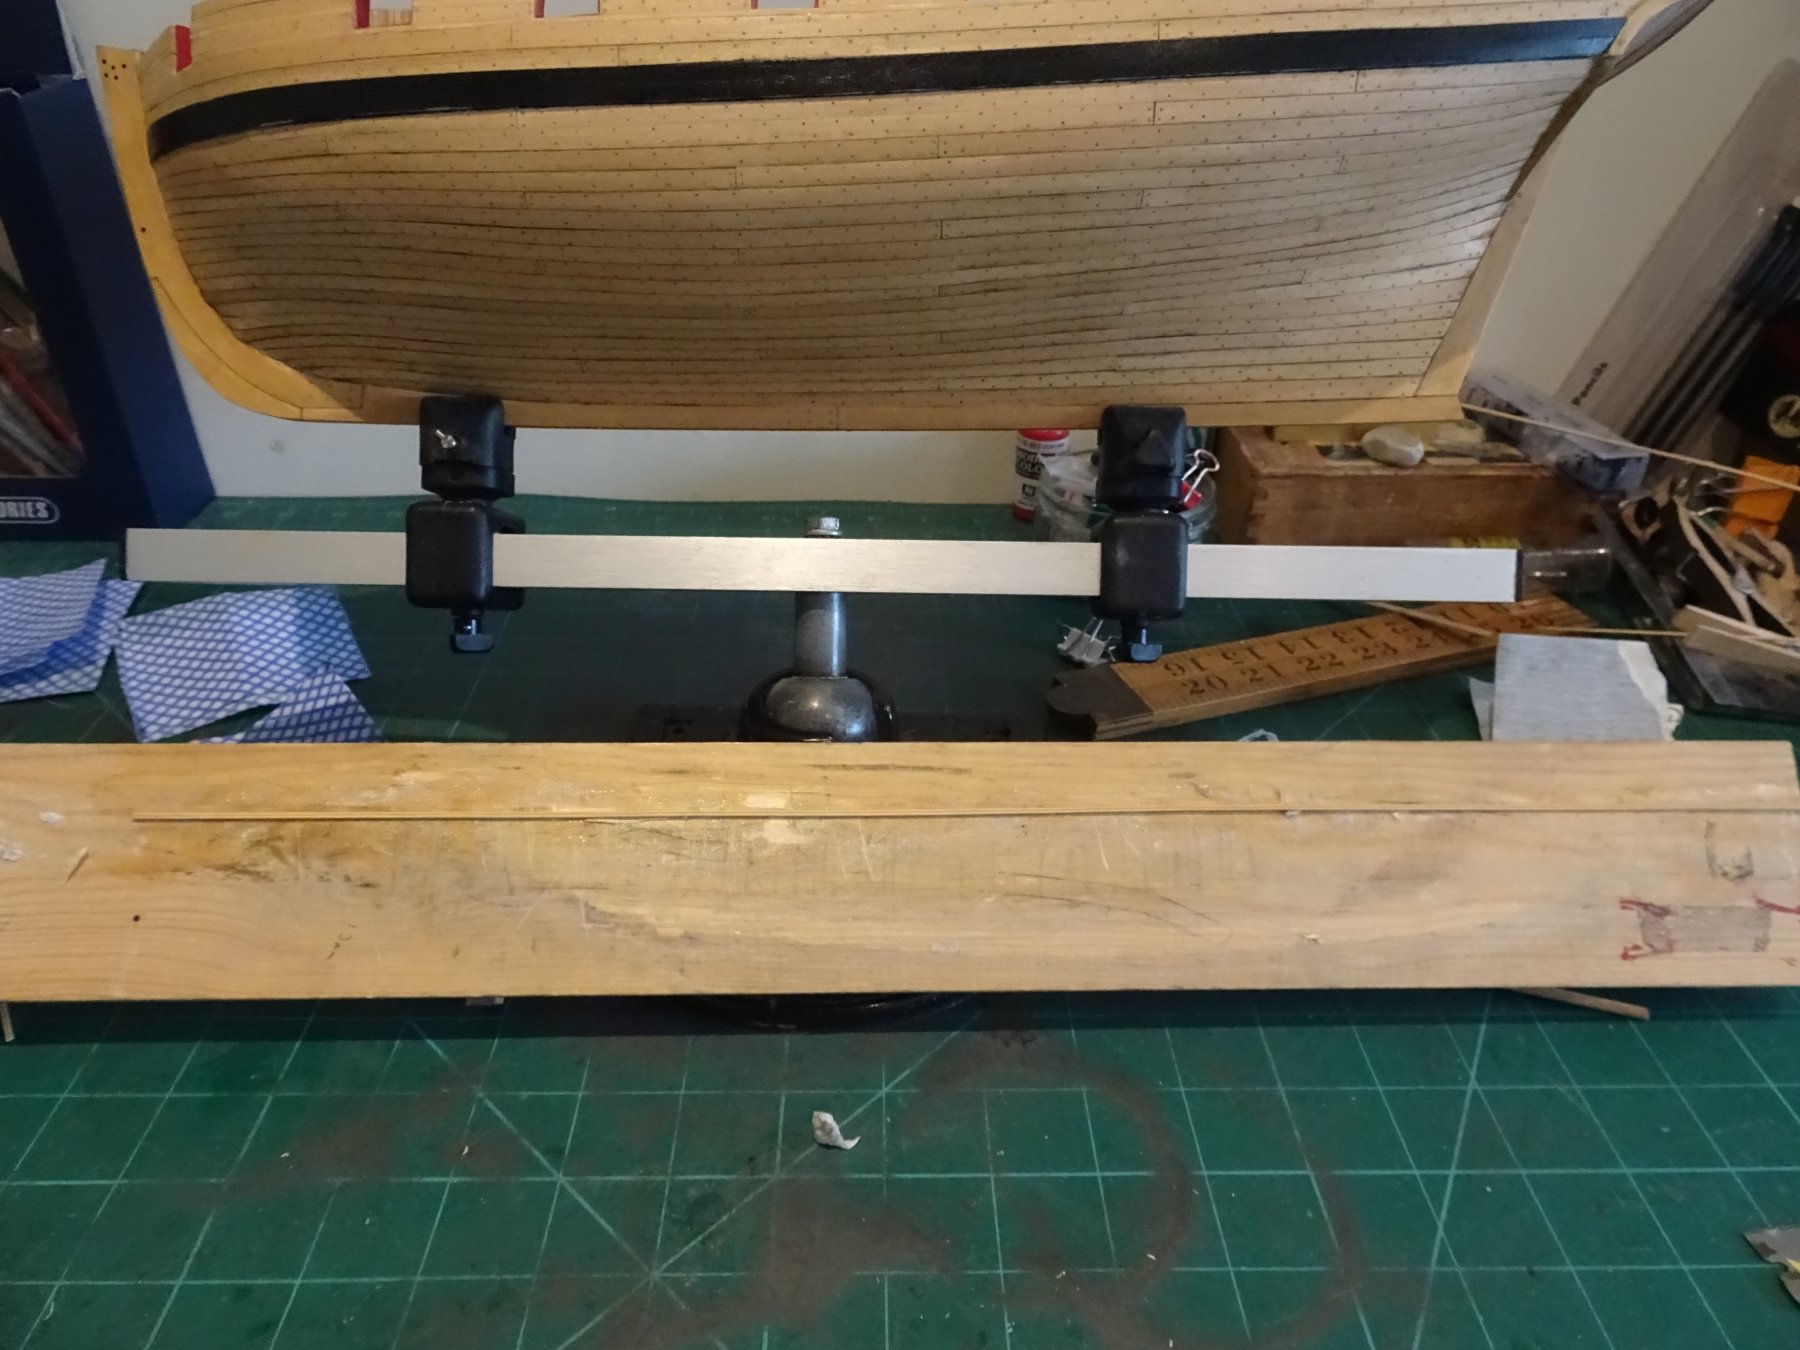
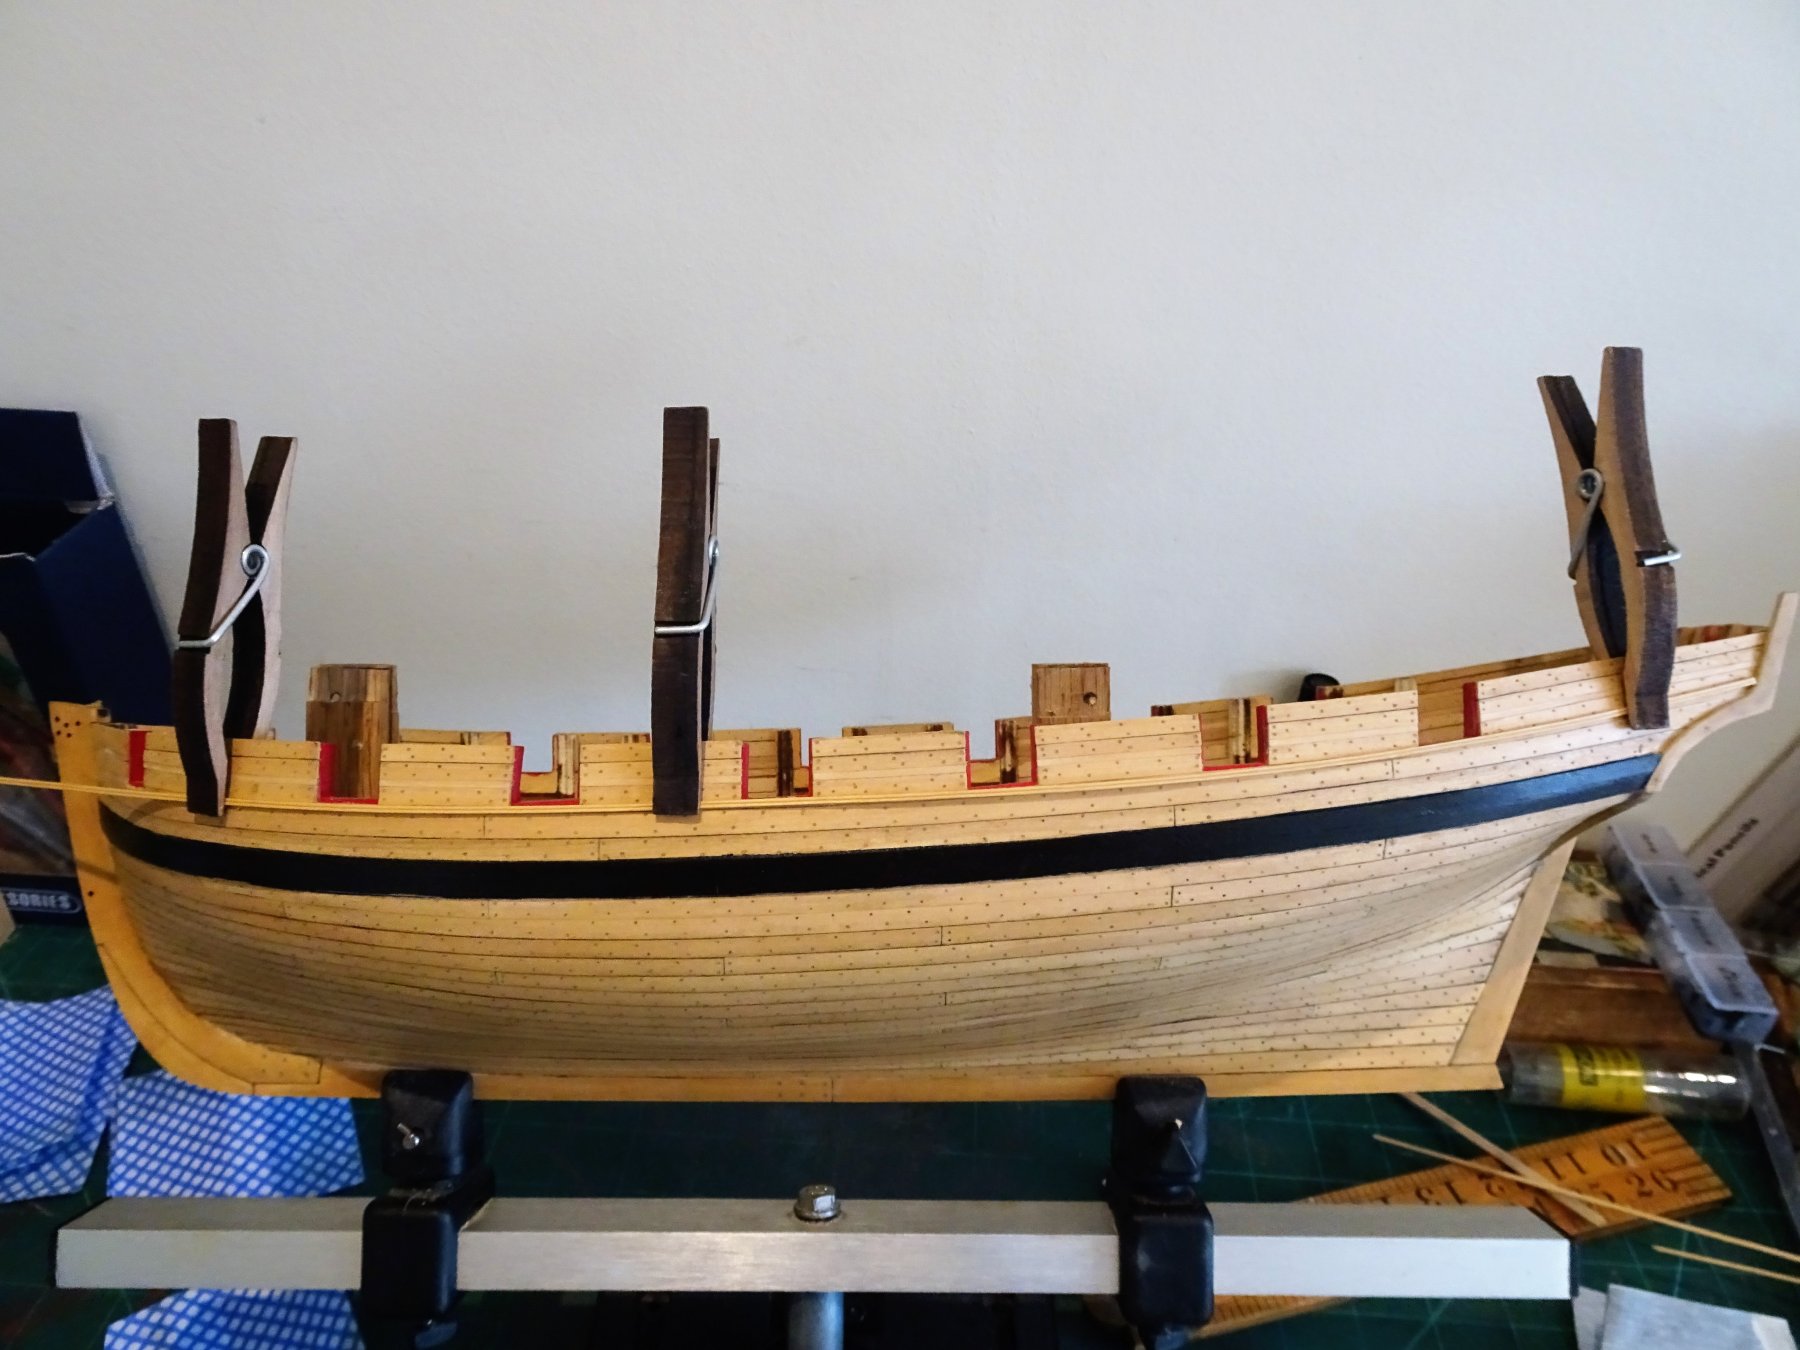
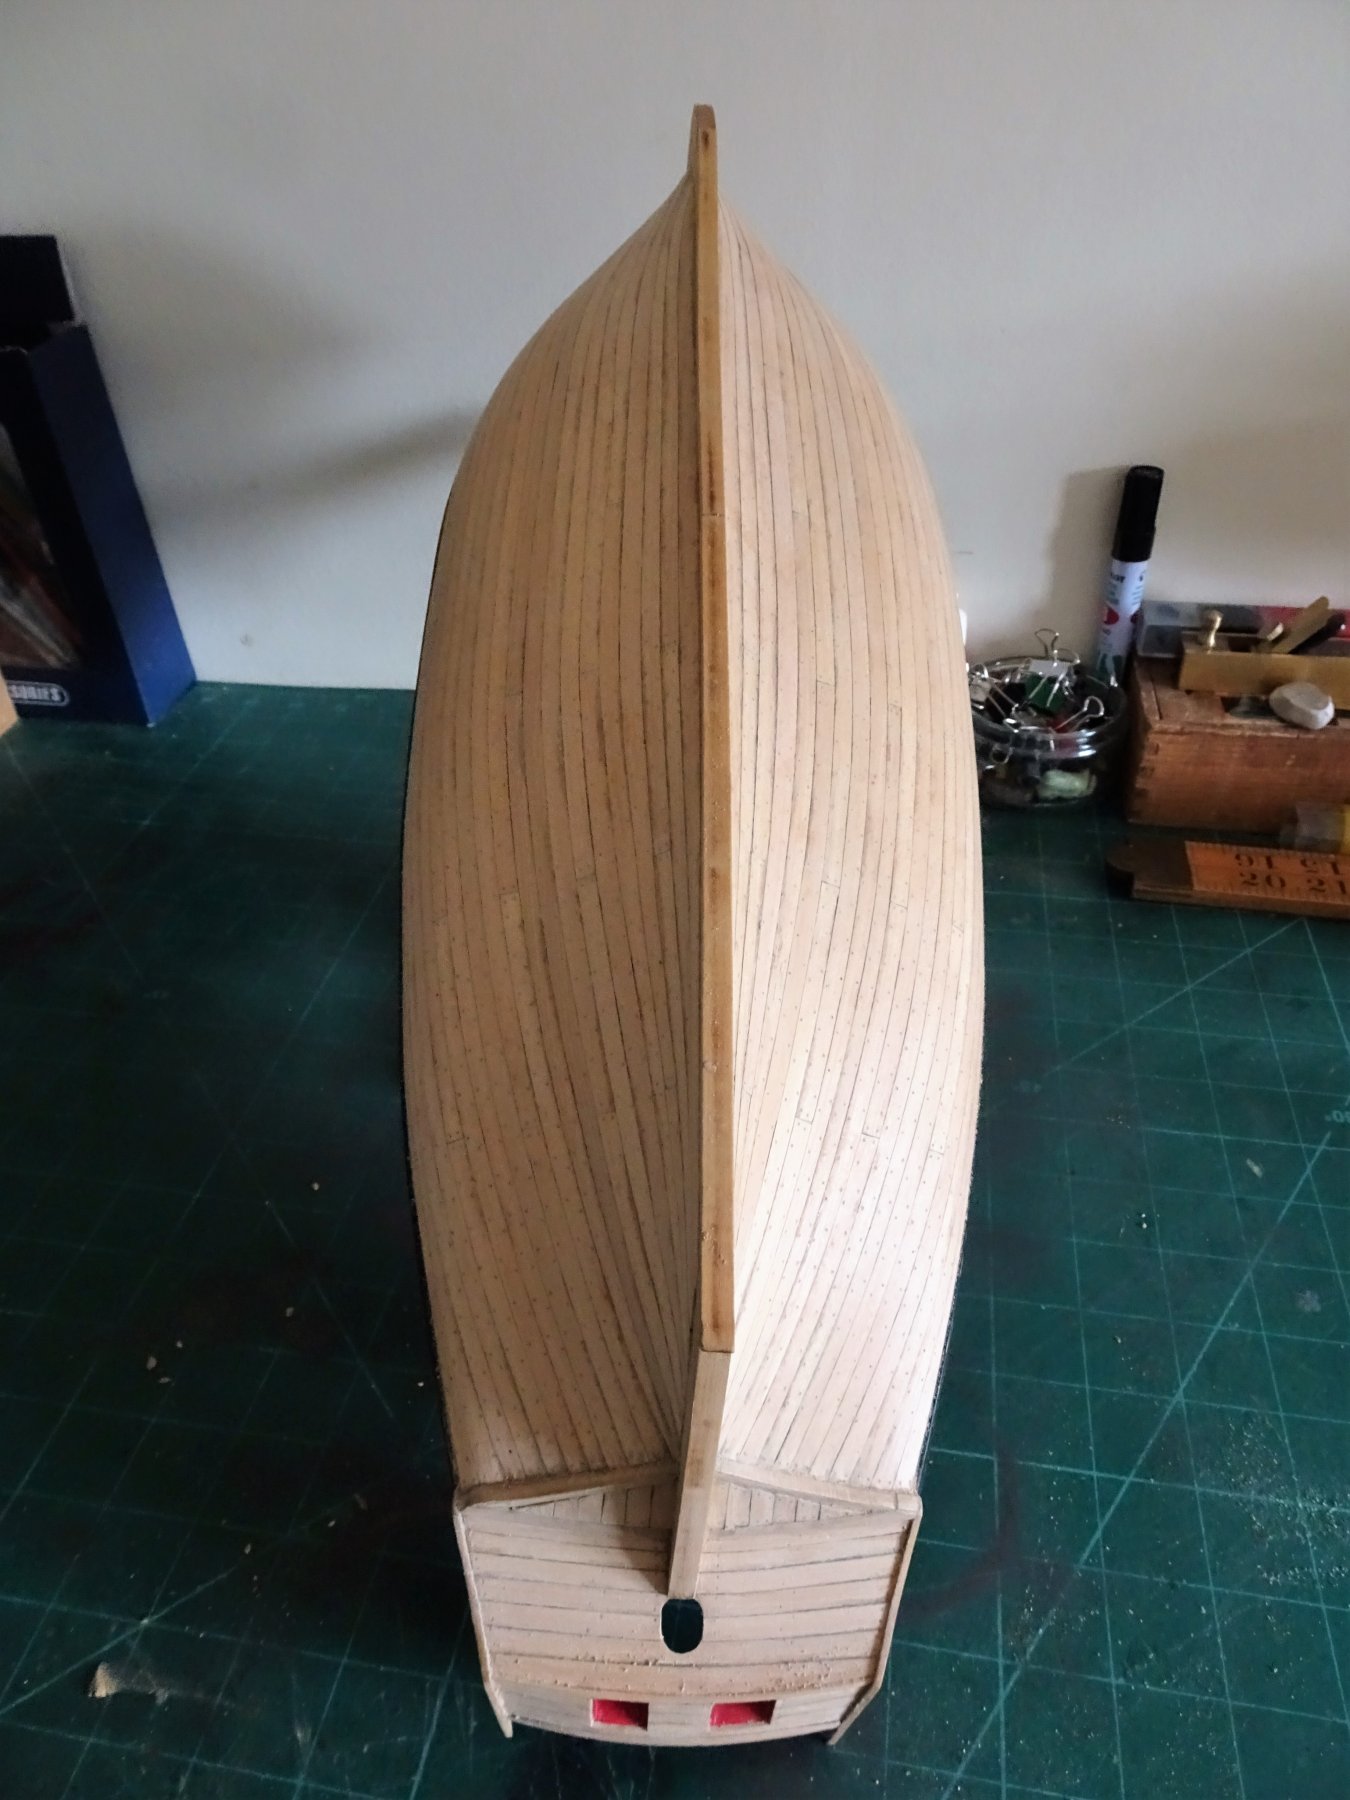
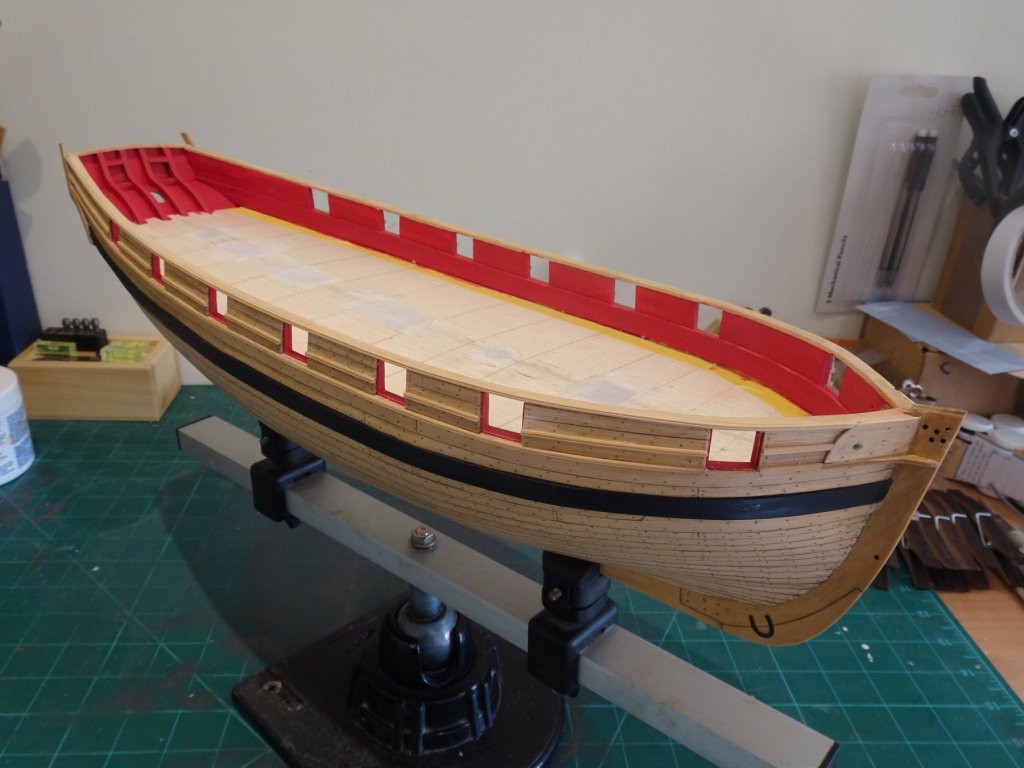
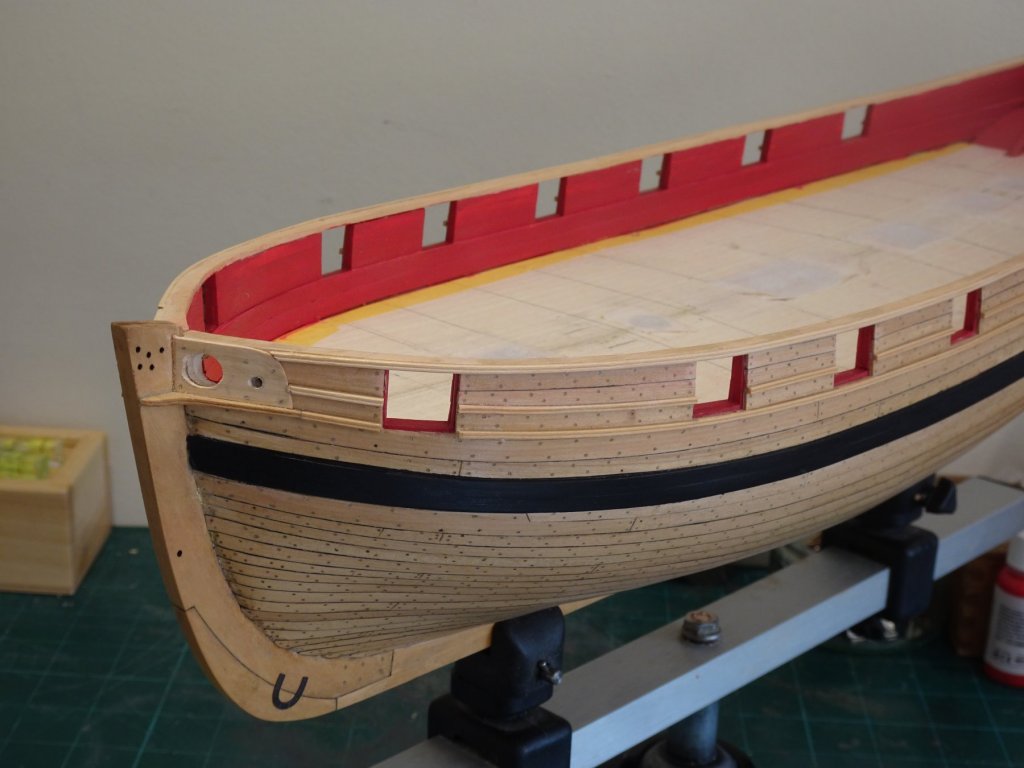
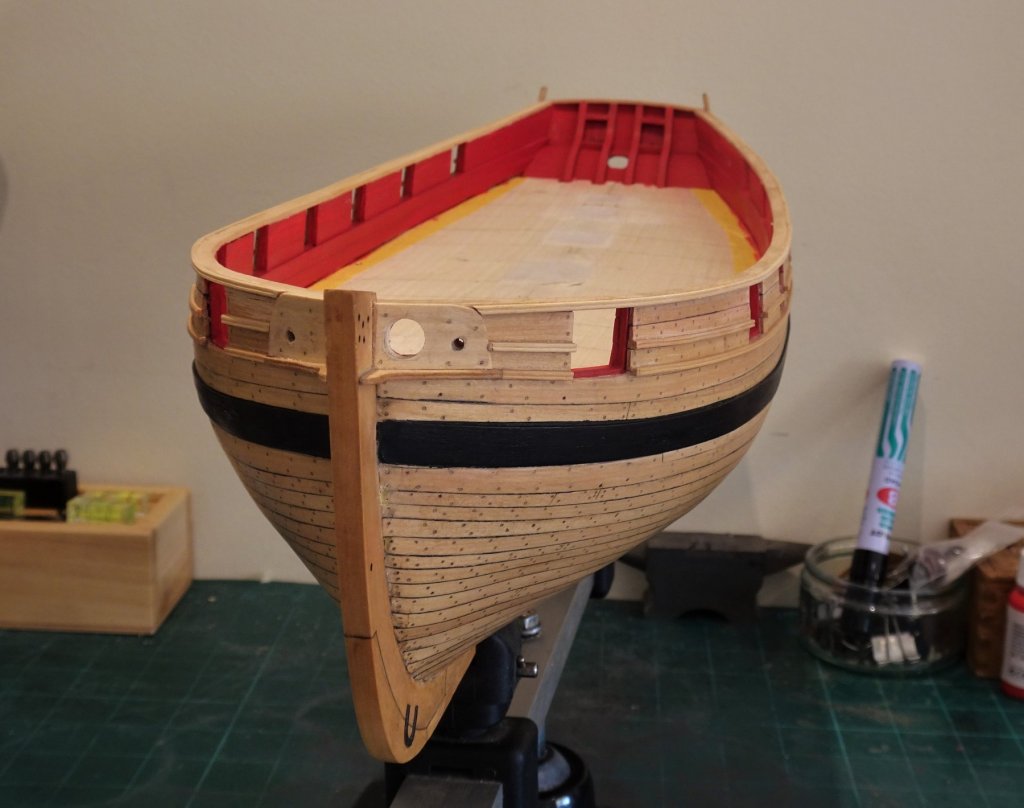
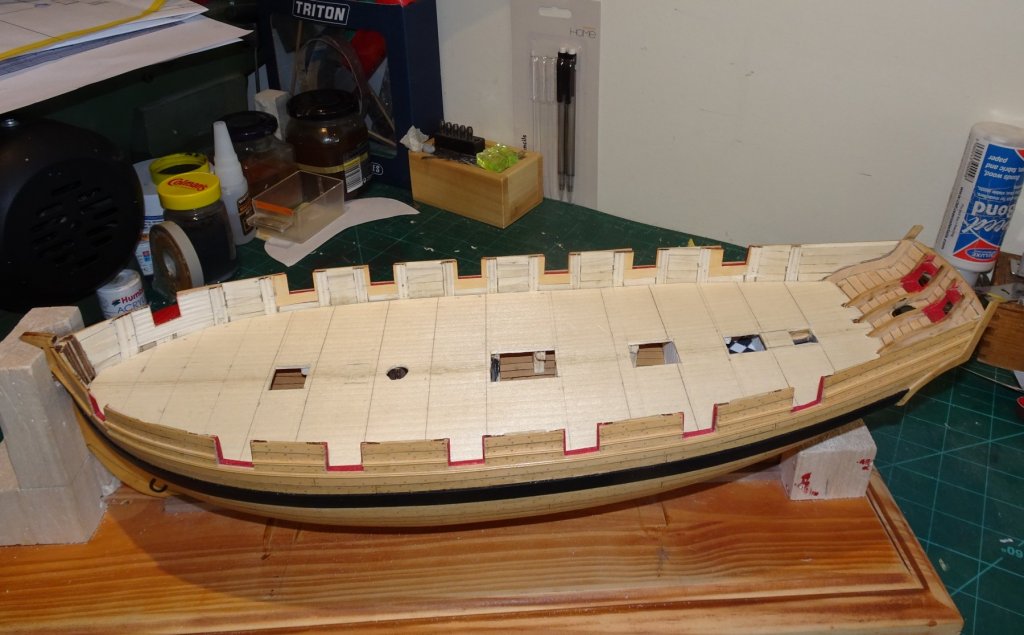
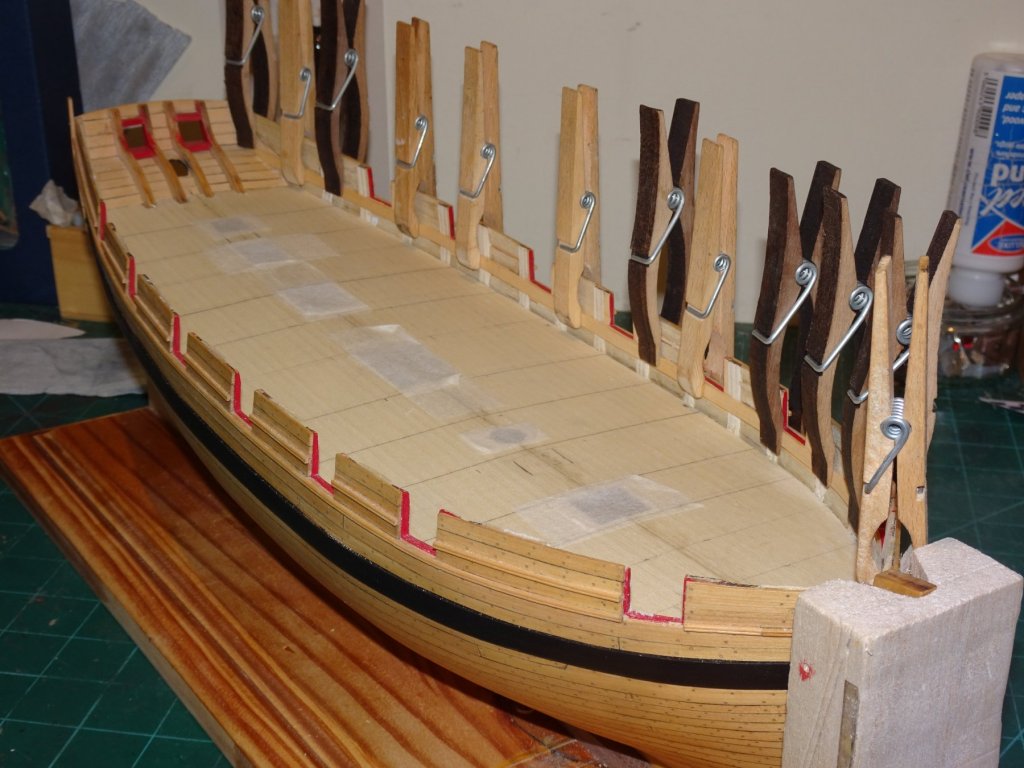
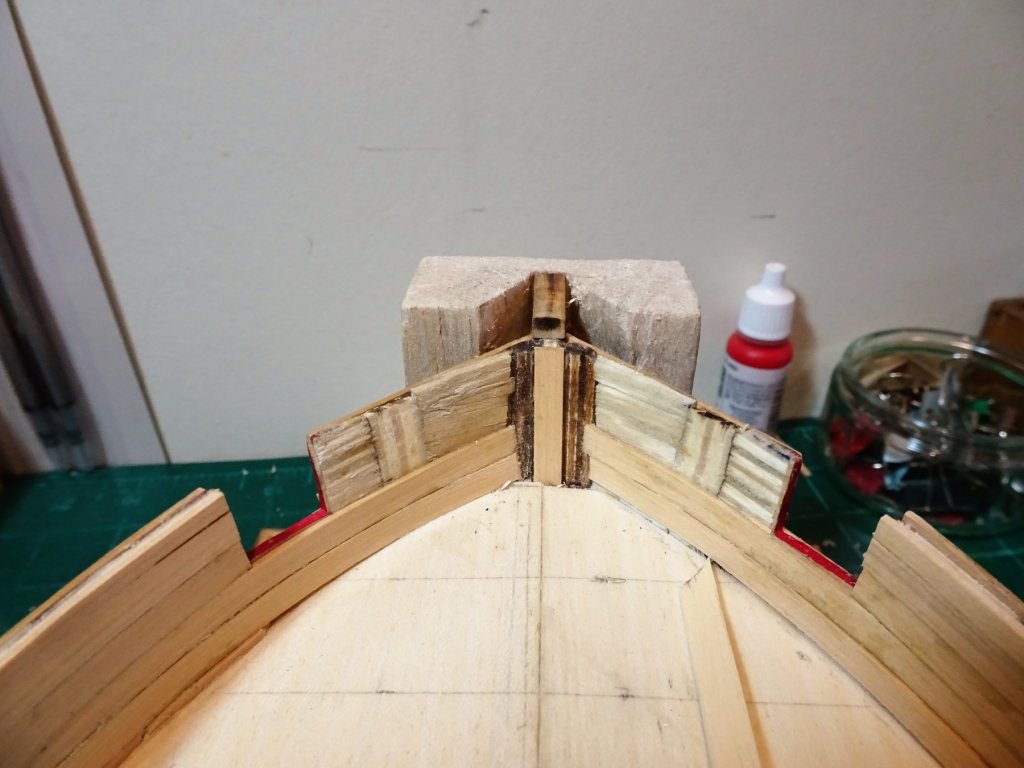
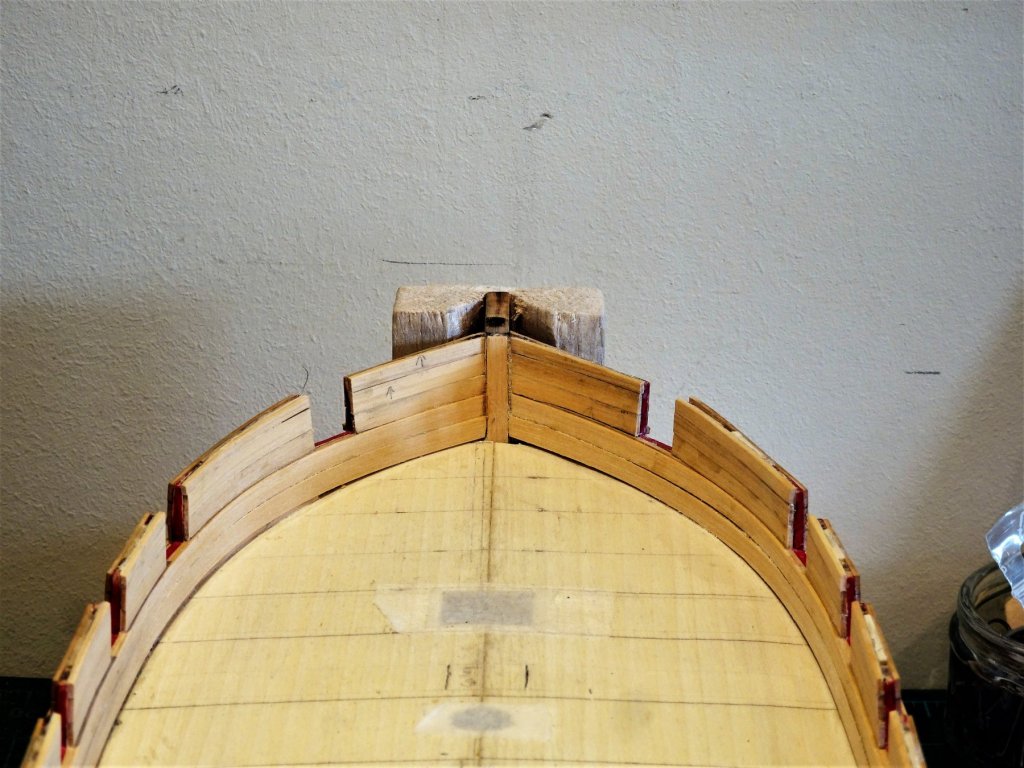
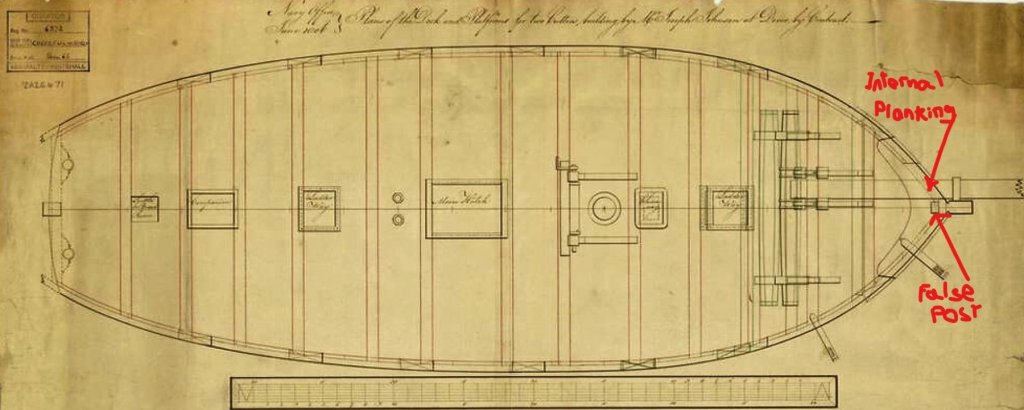
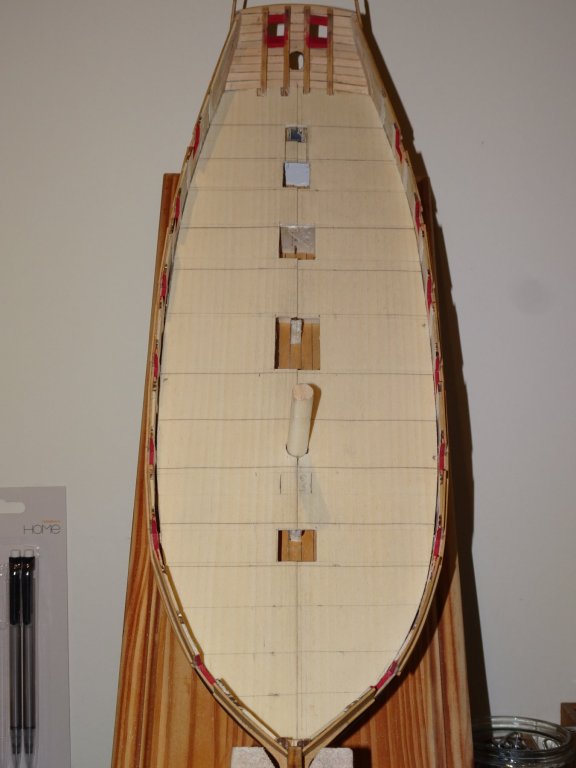
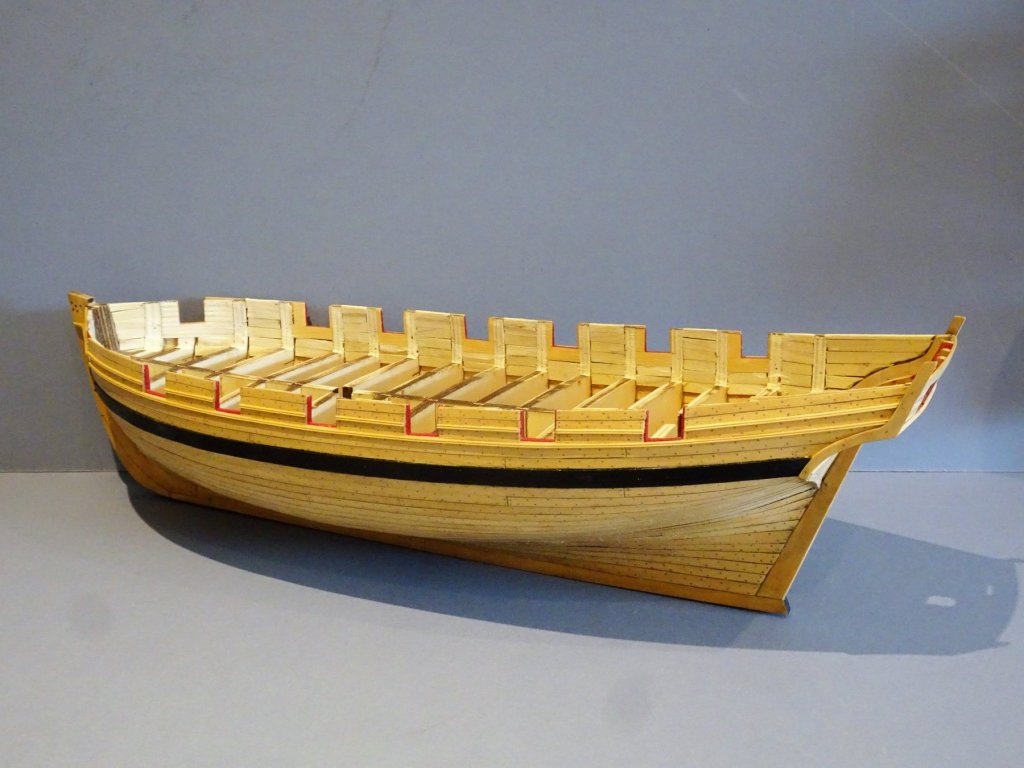
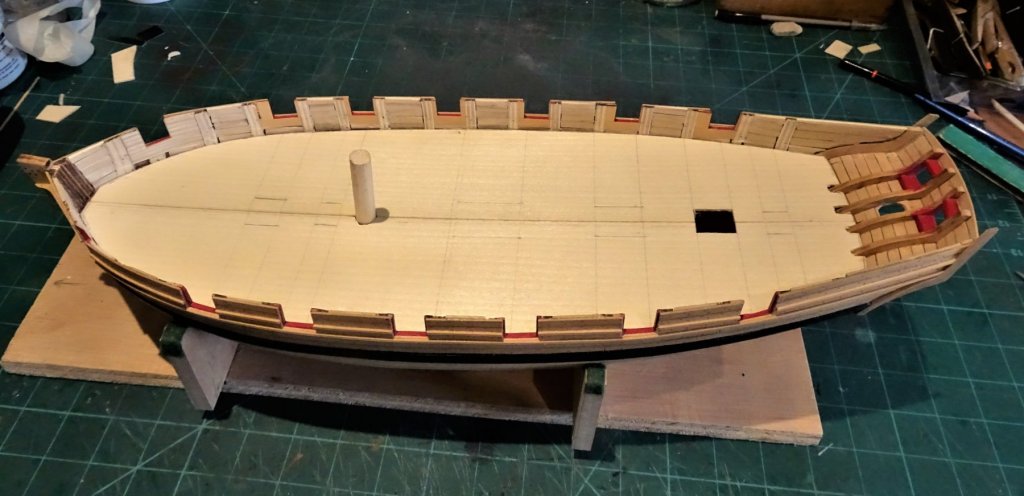
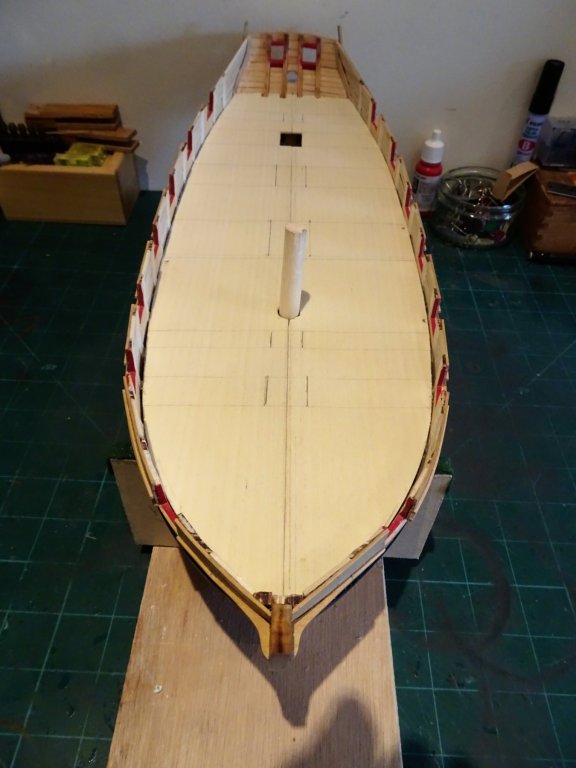
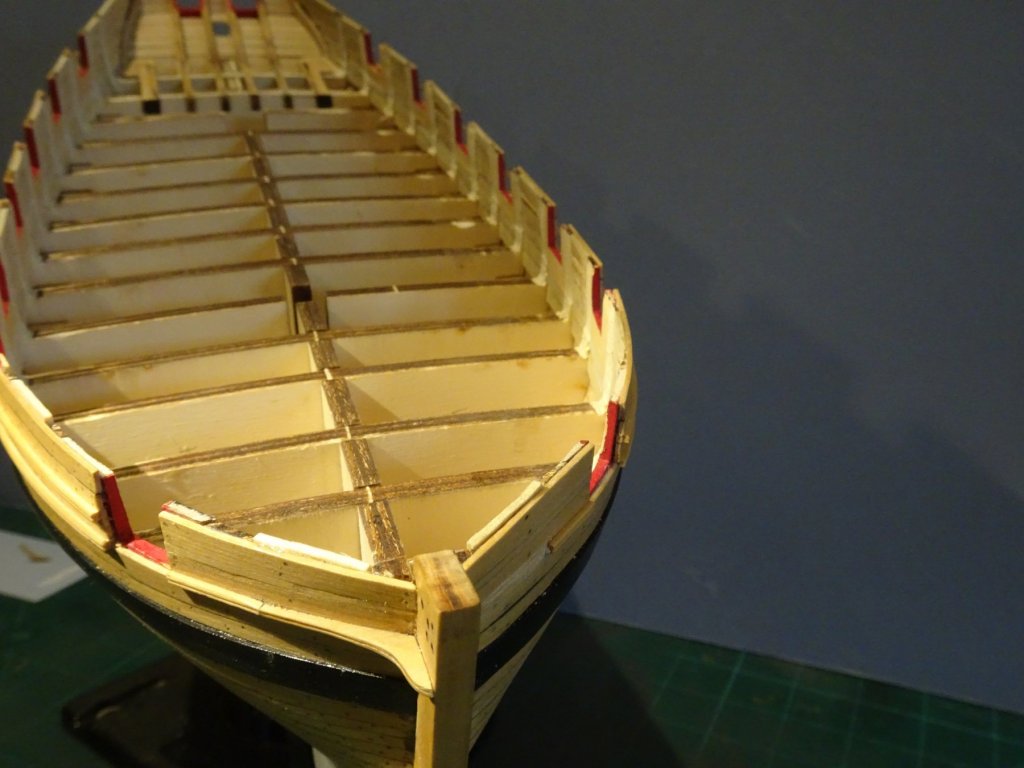
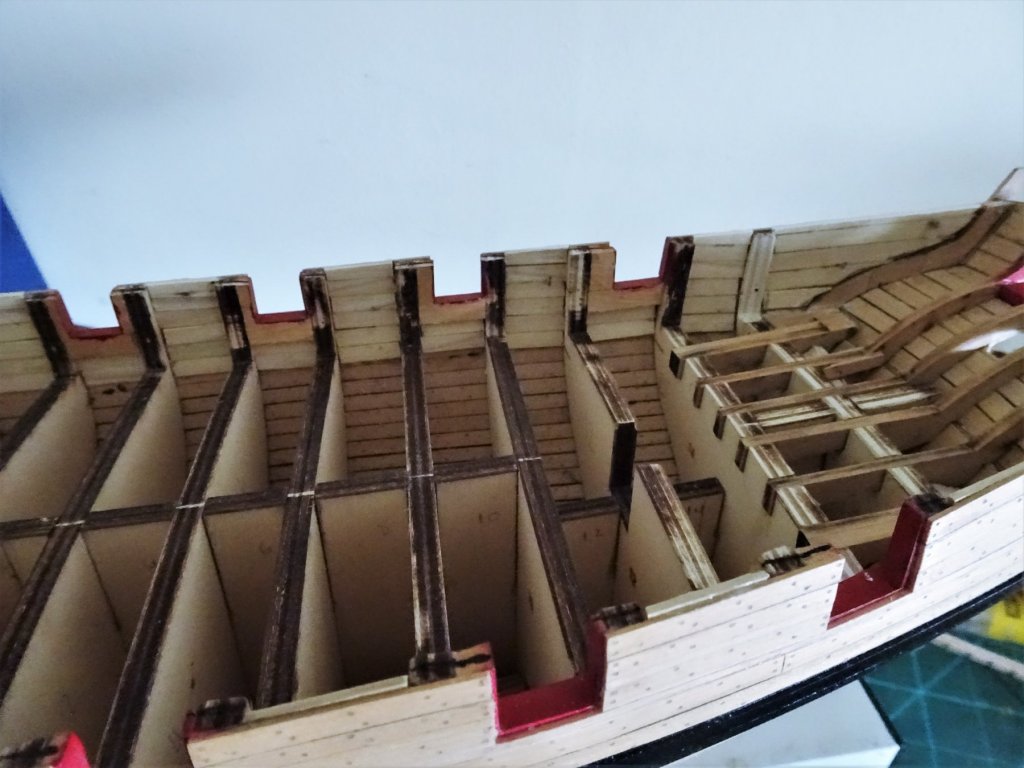
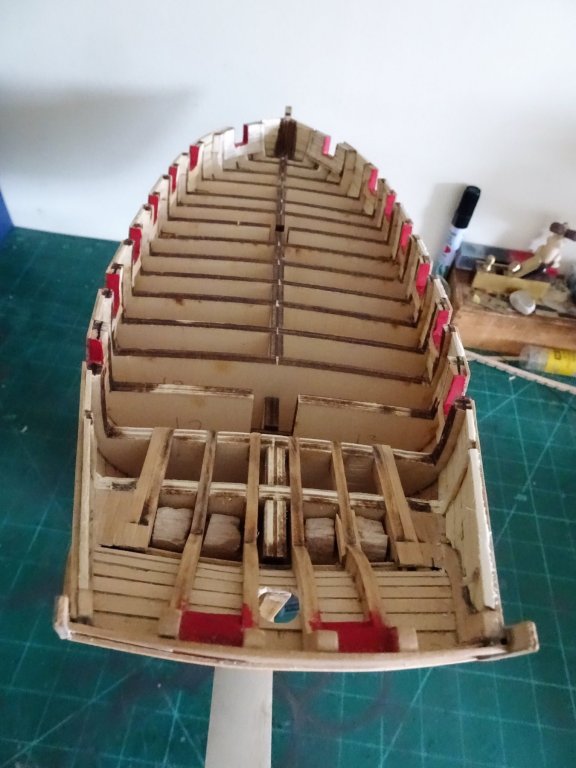
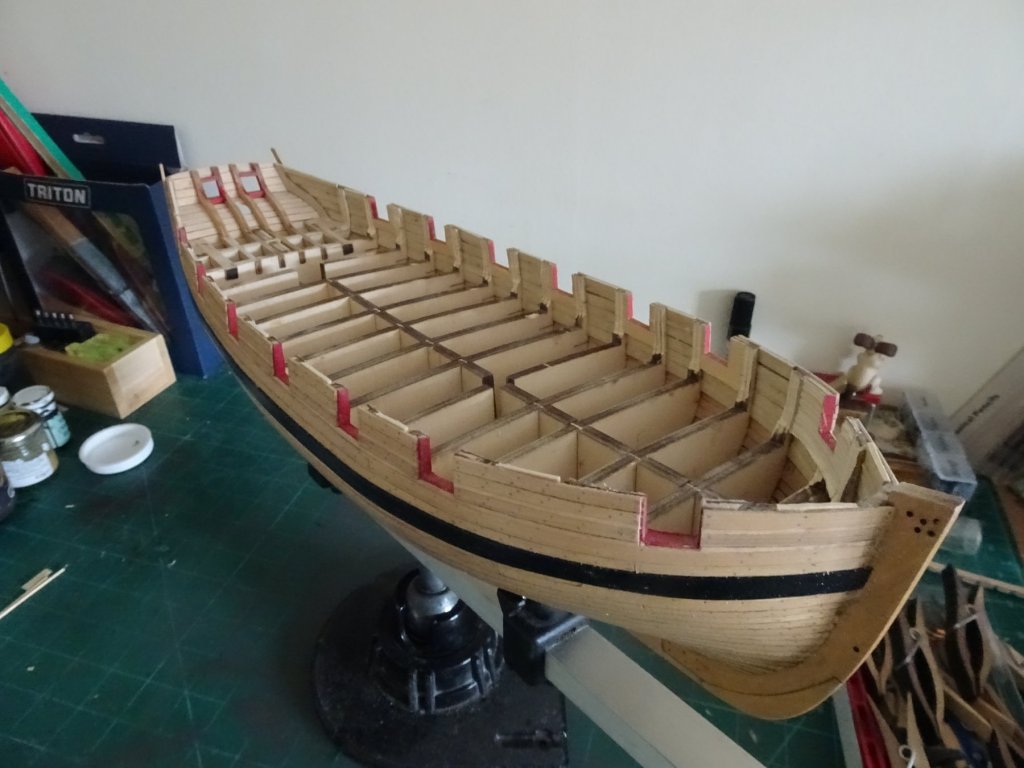
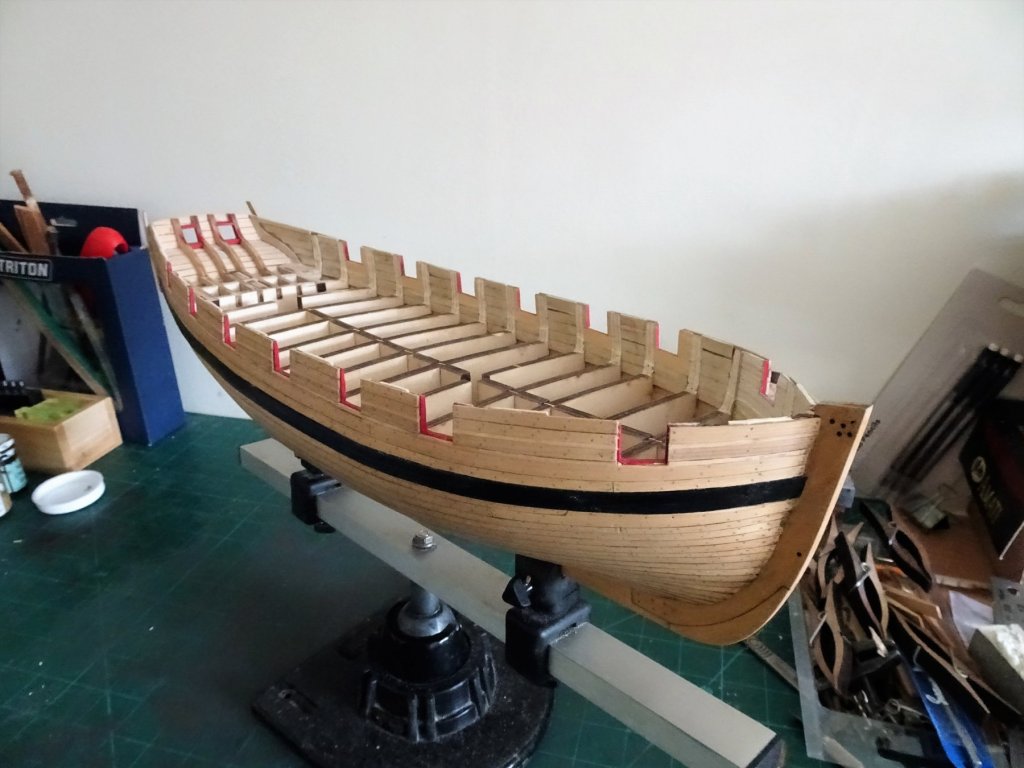
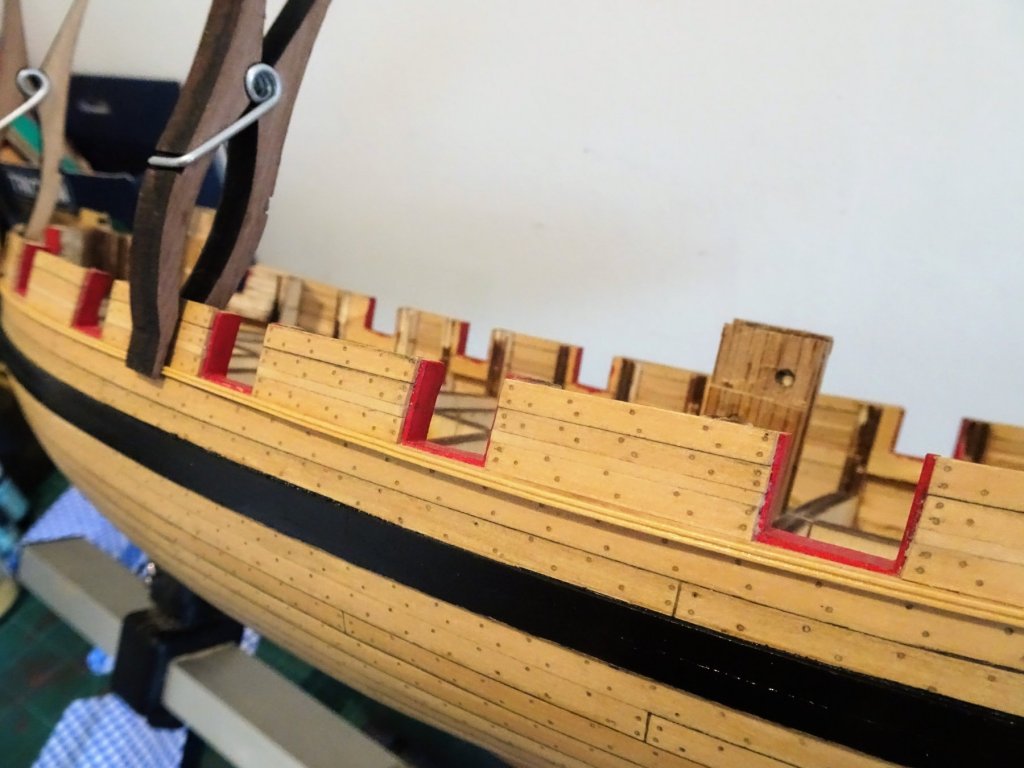
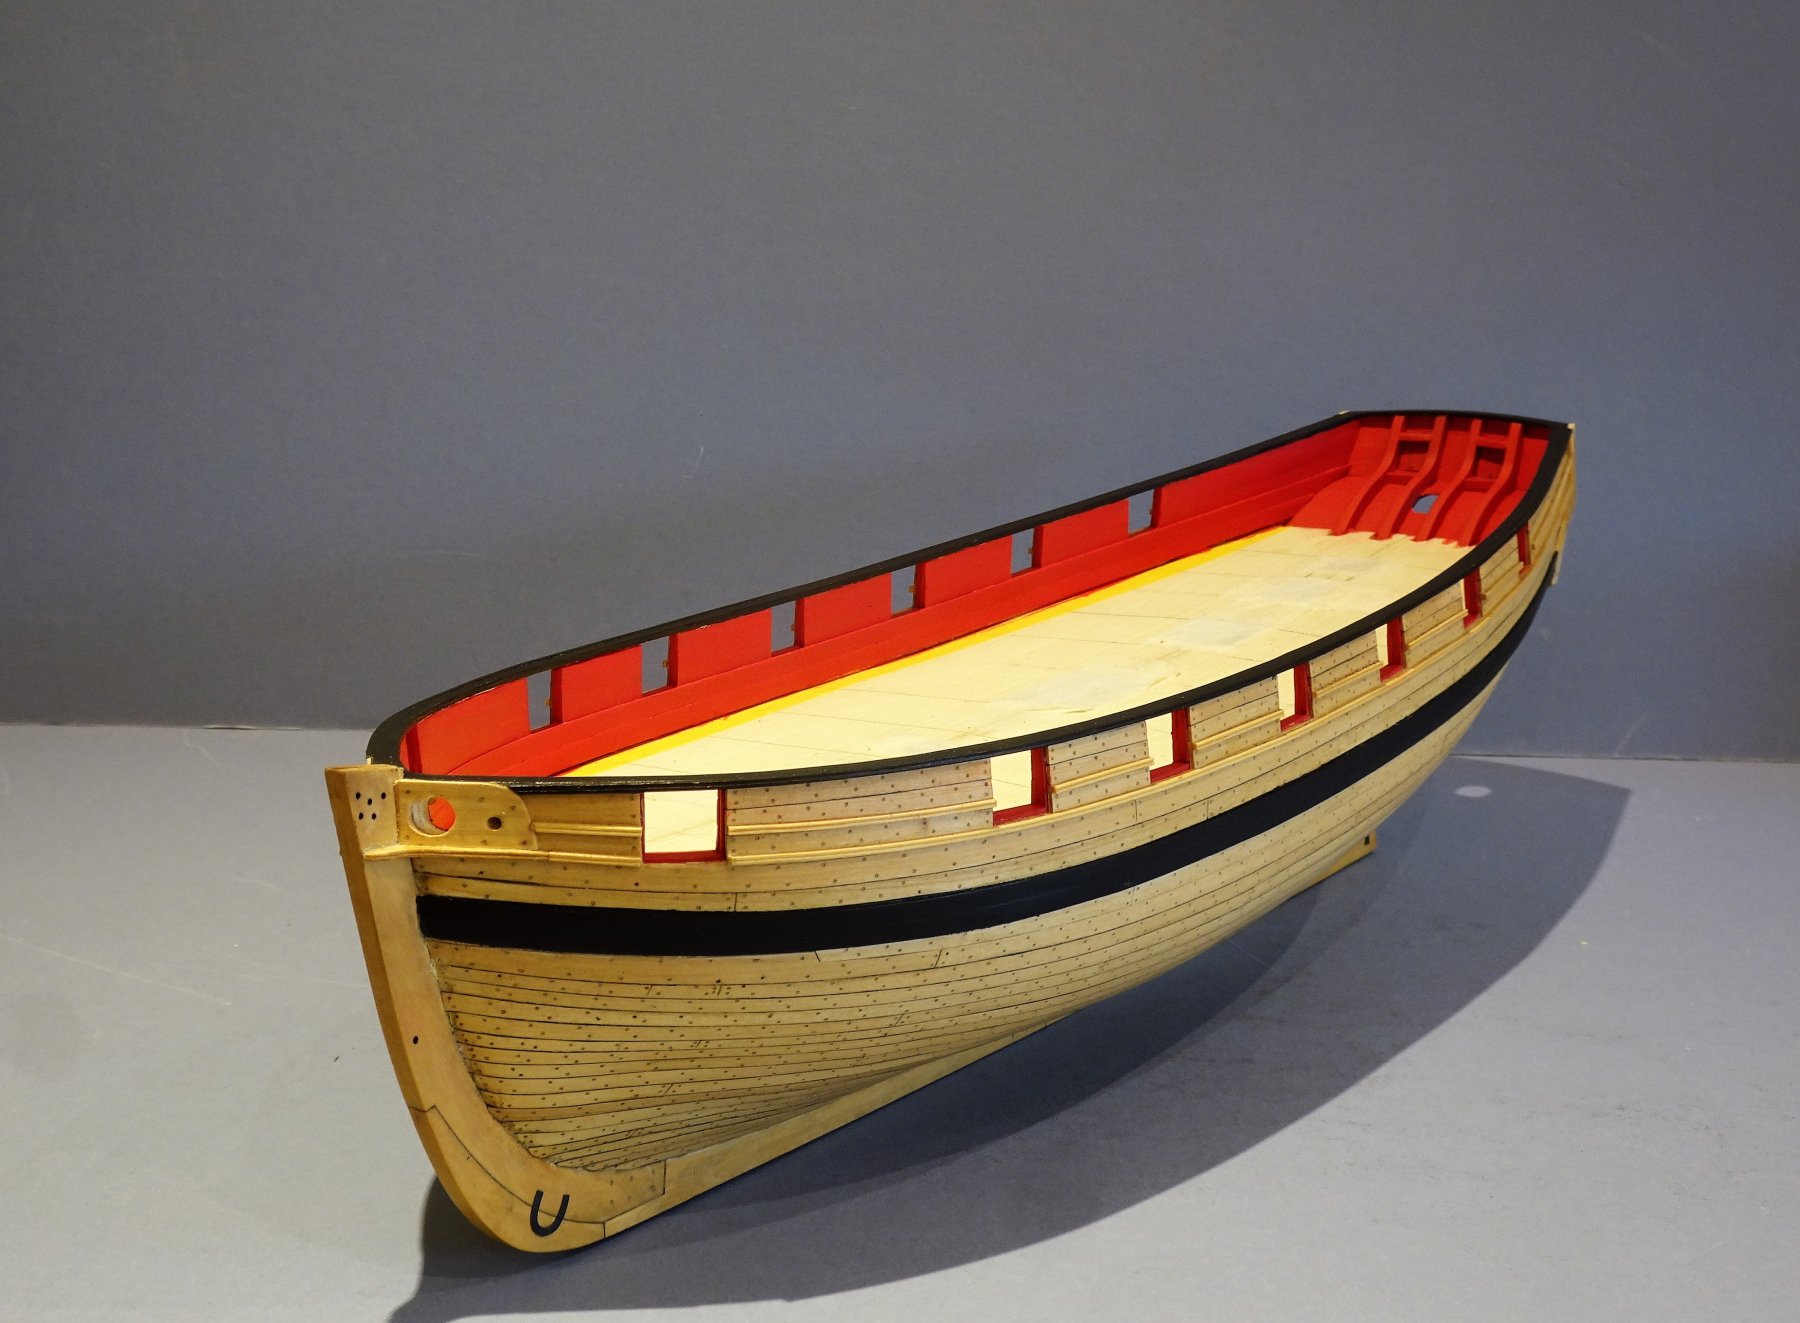
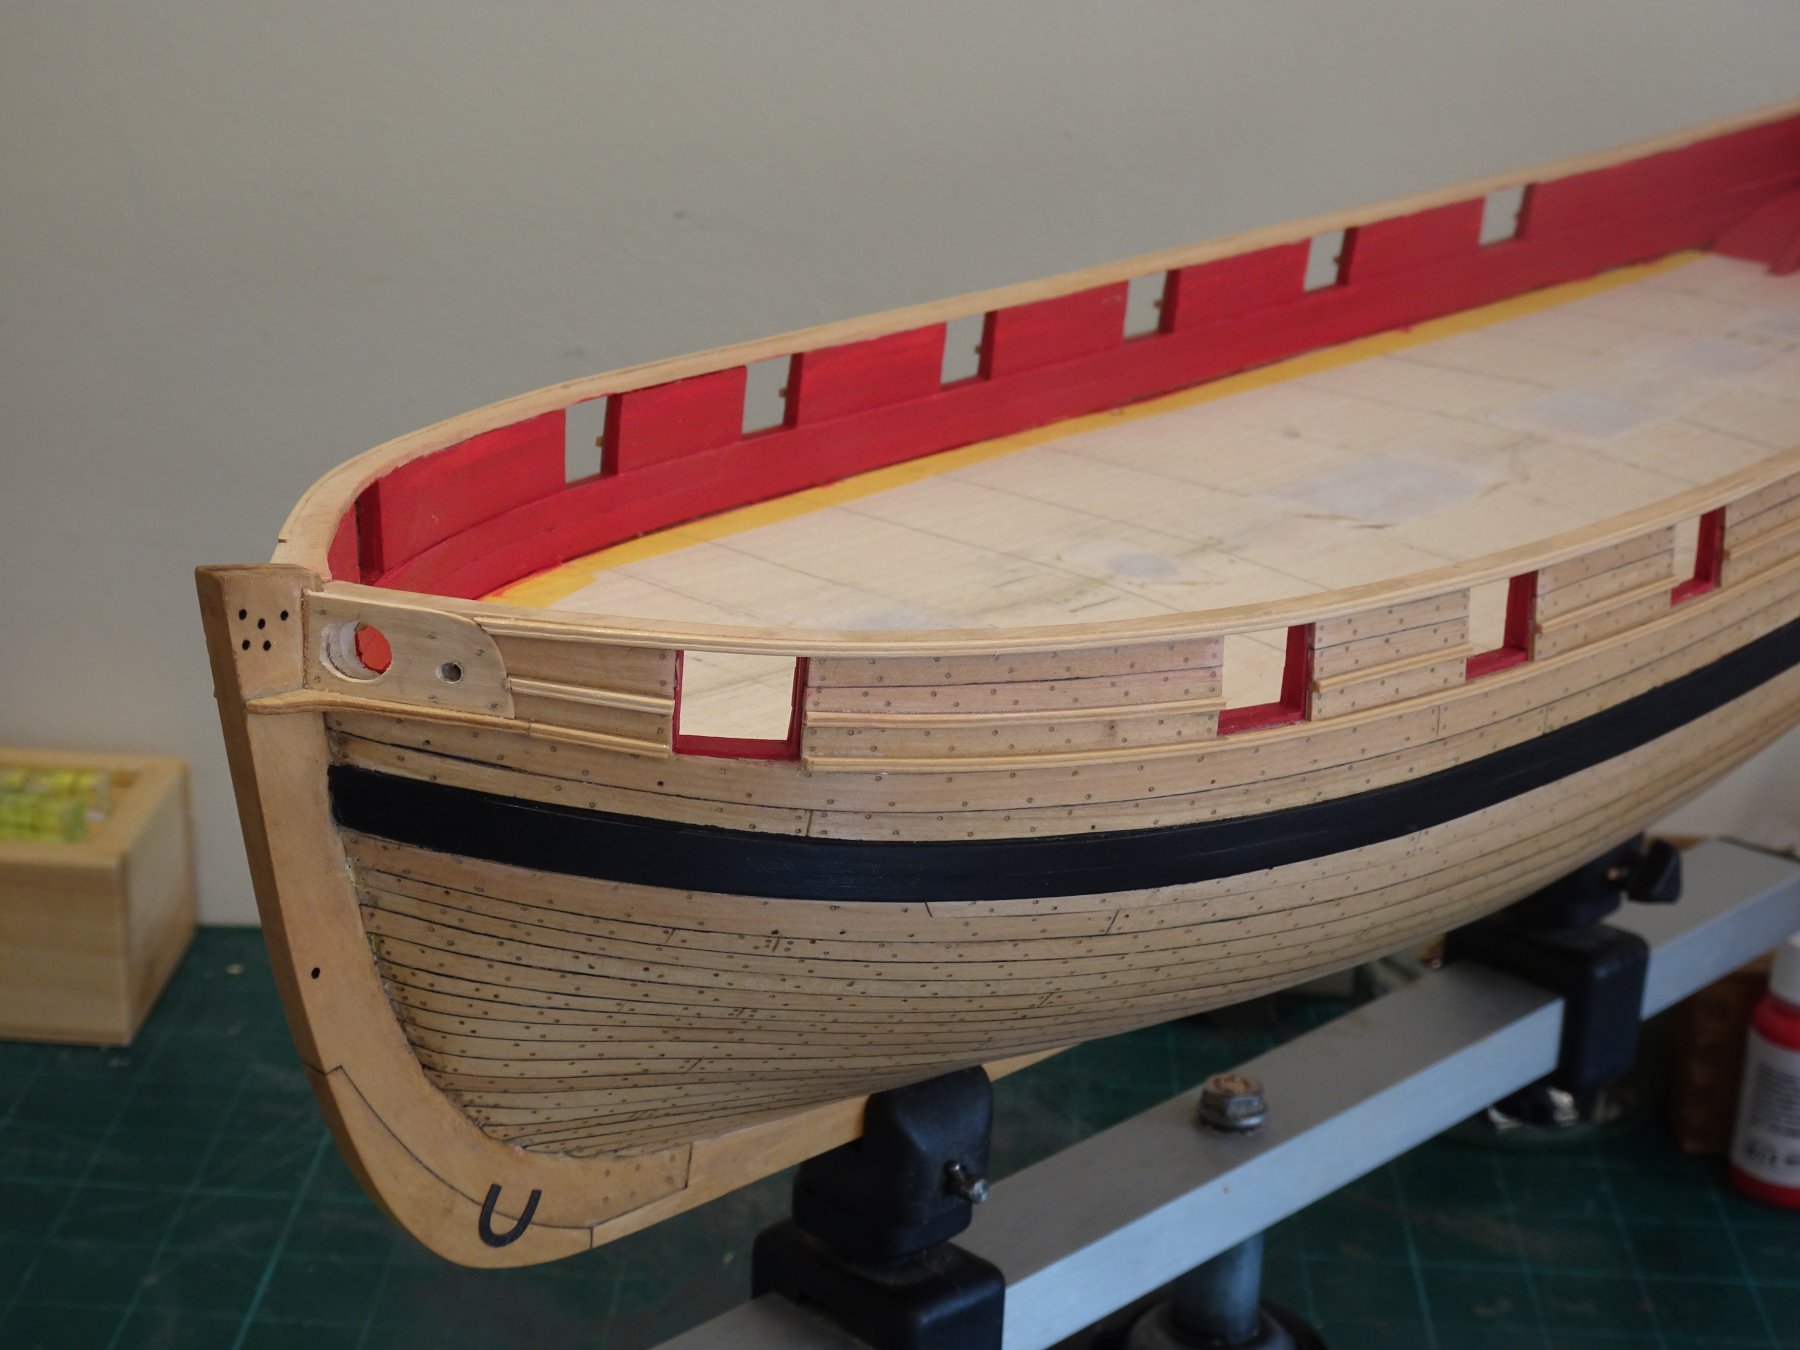
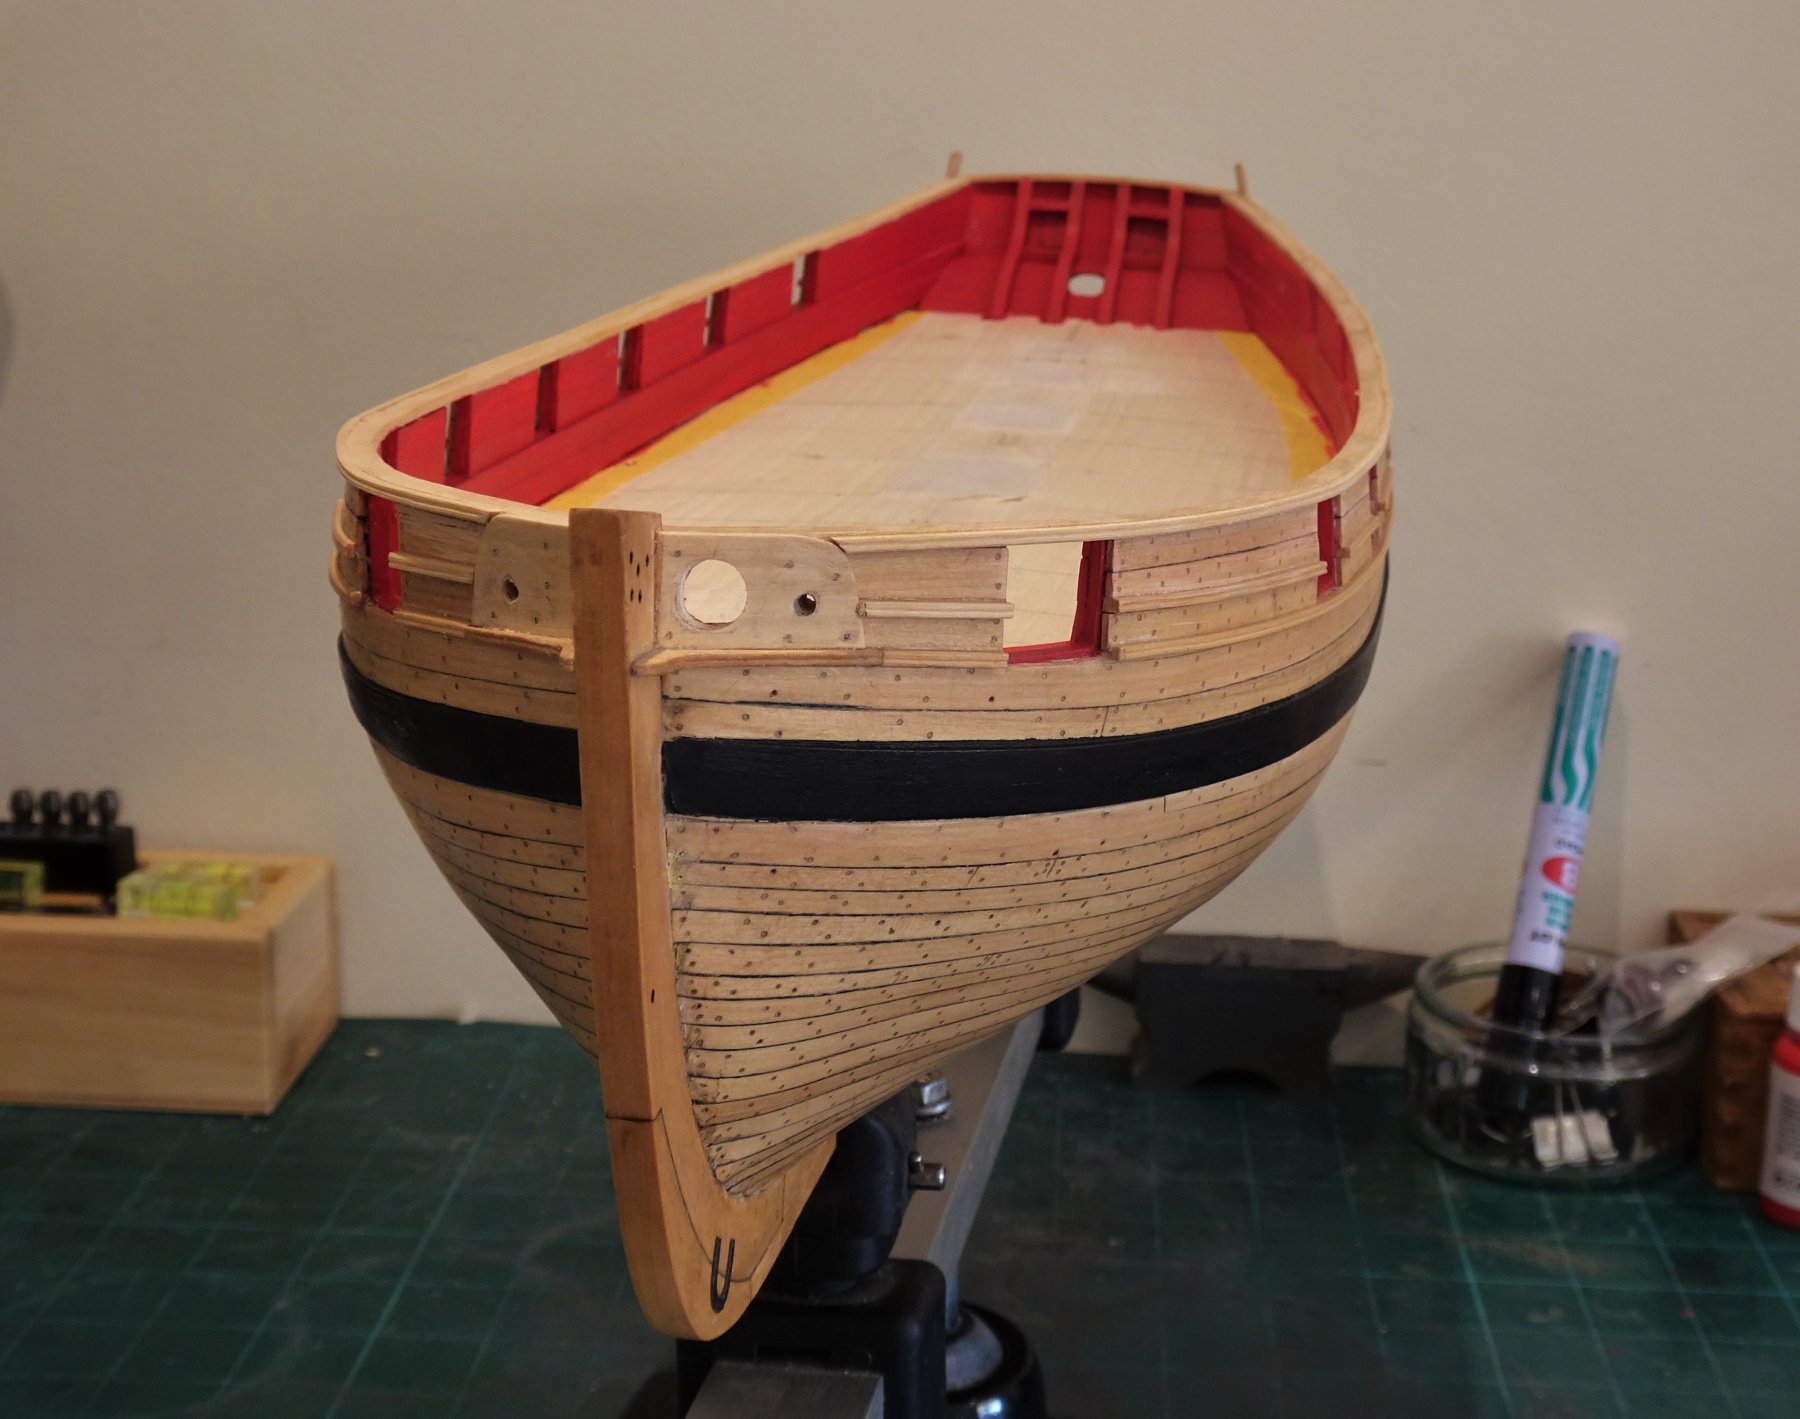
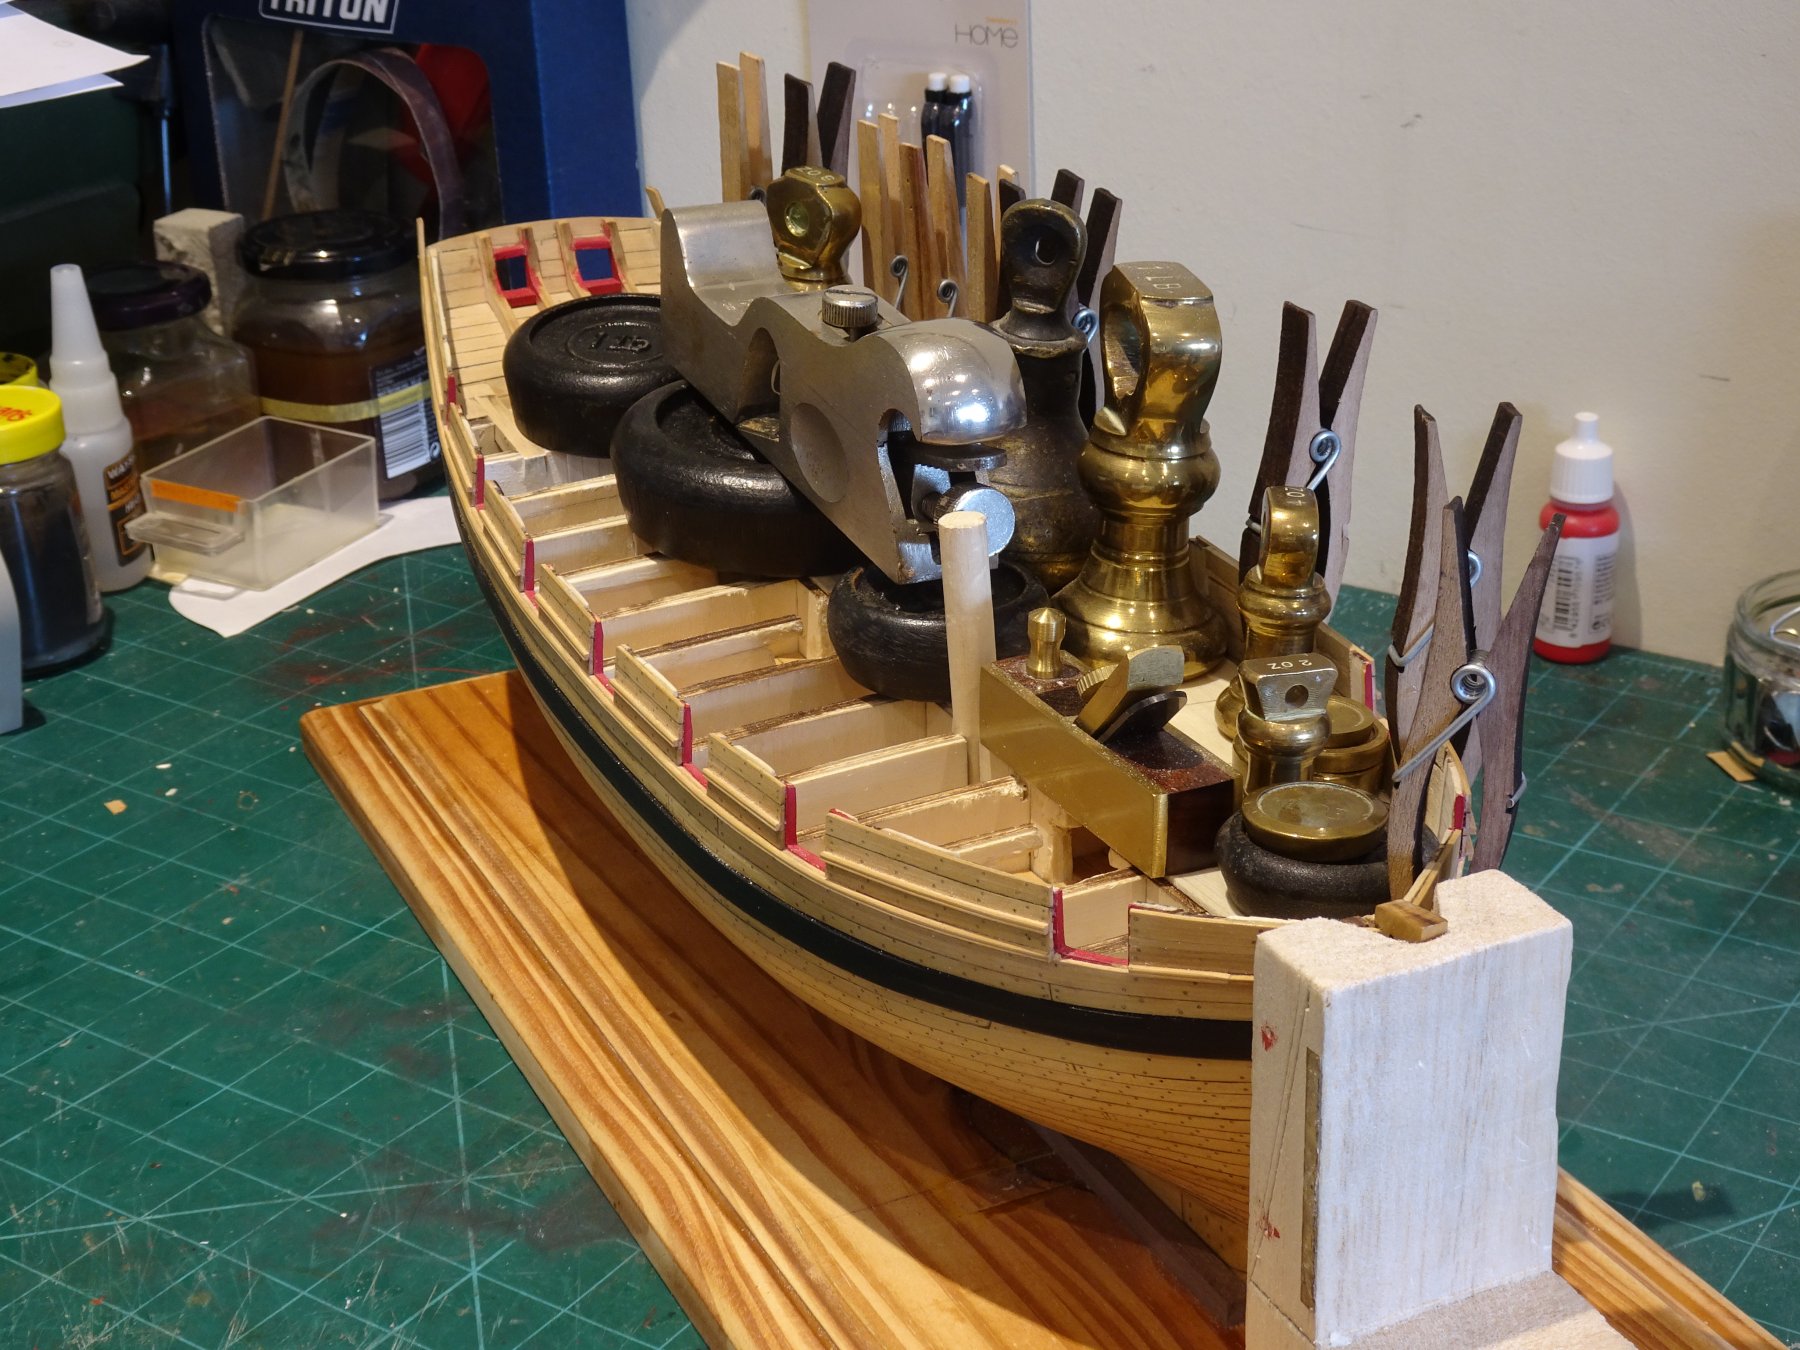
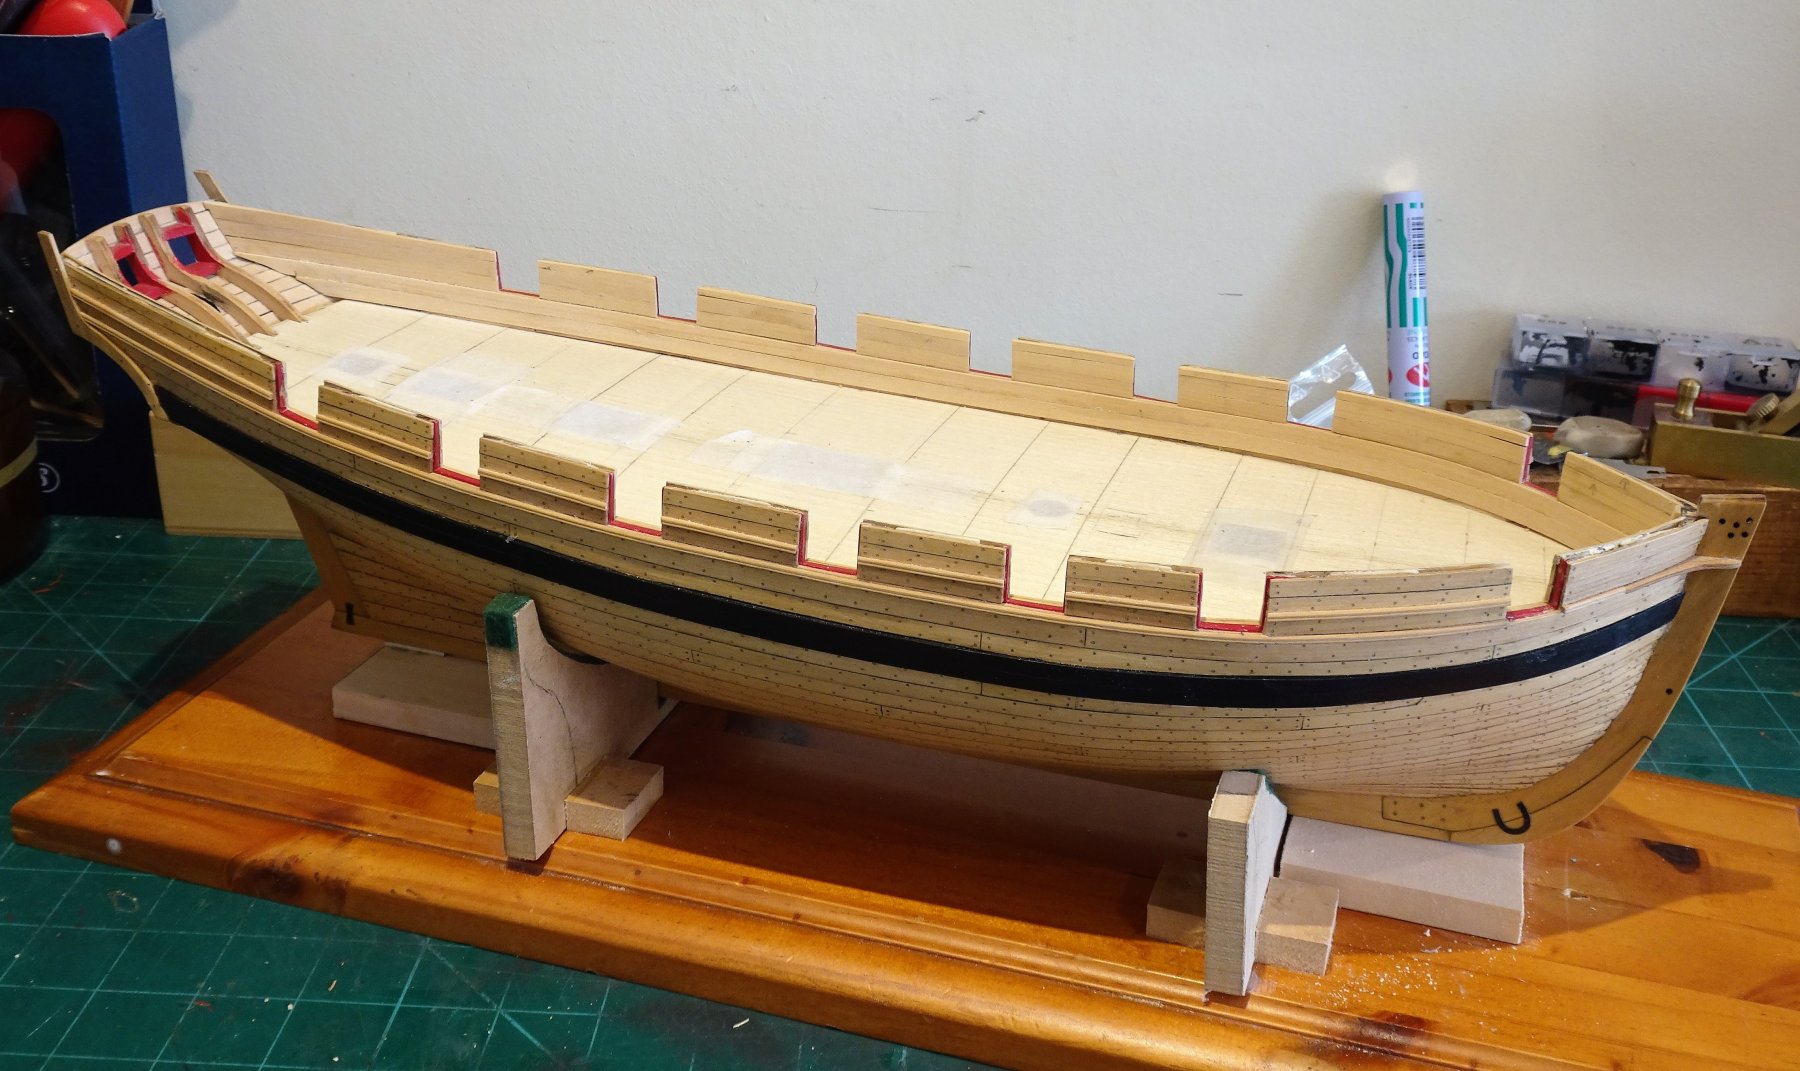
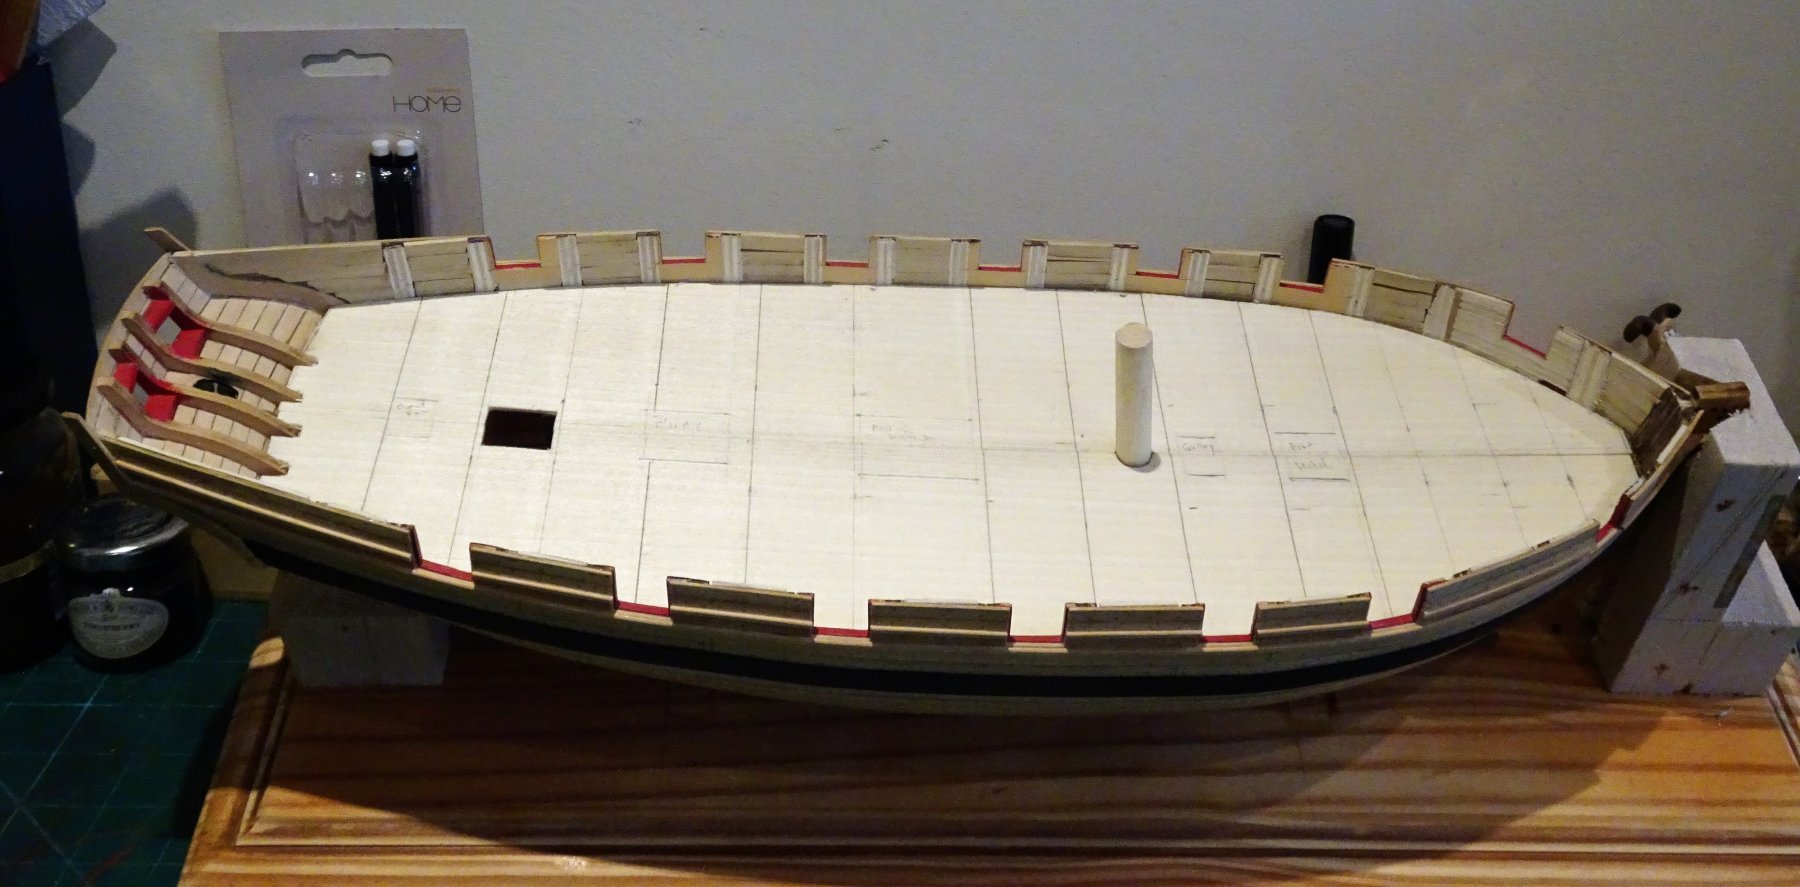
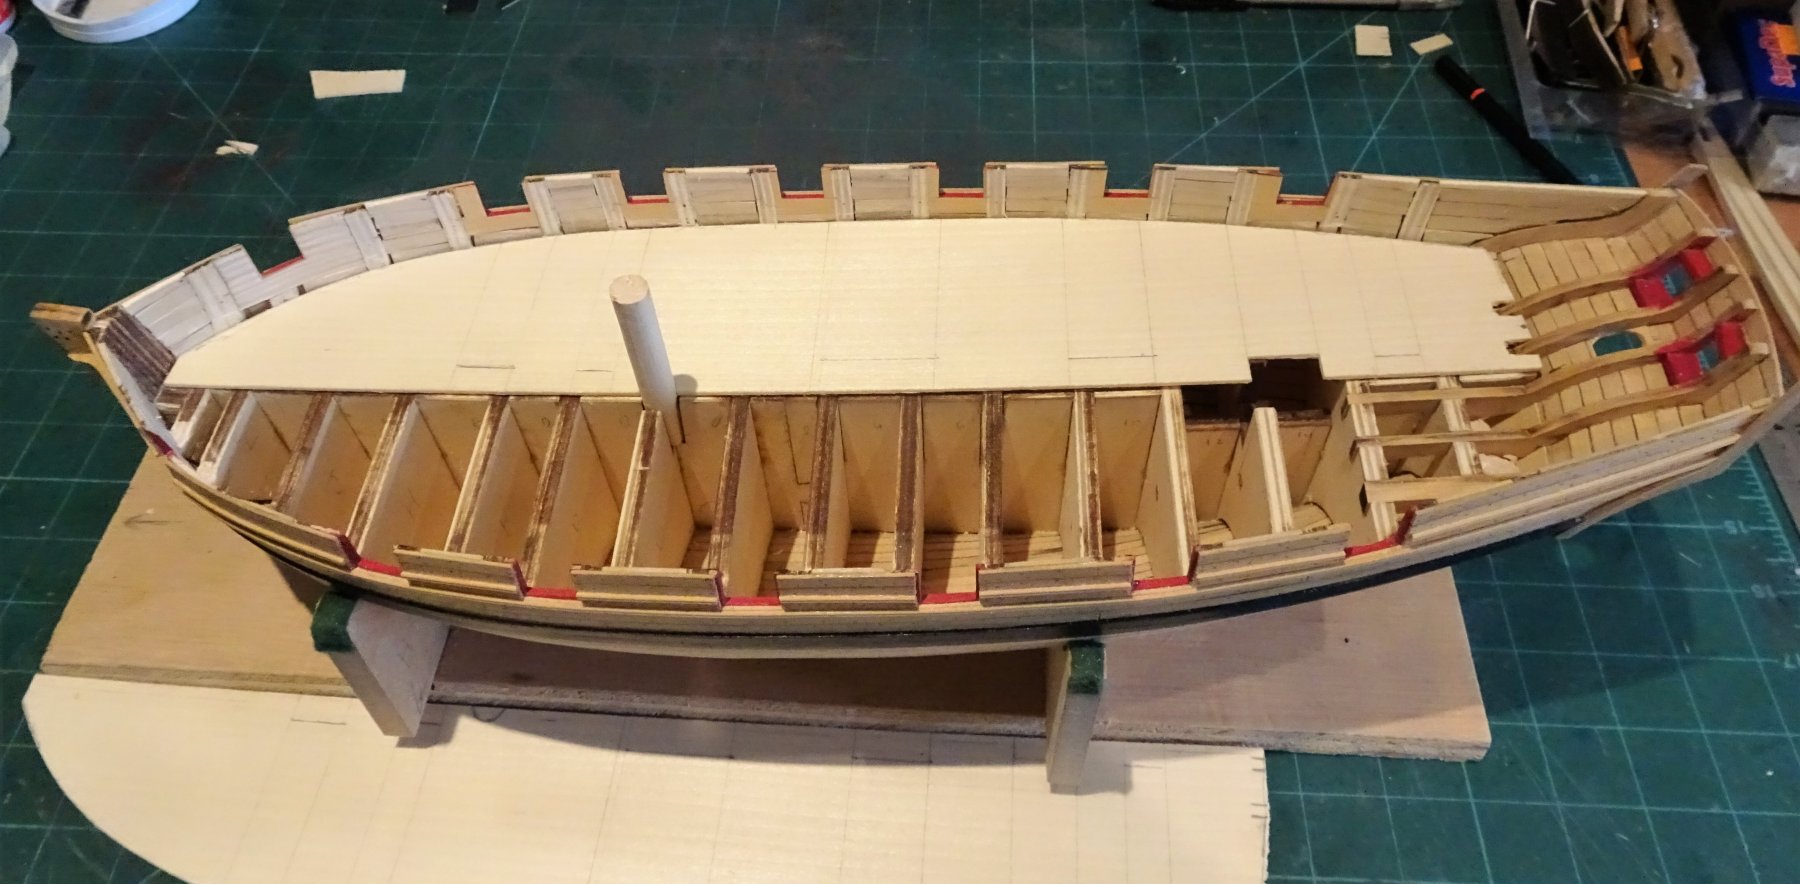
Post 41 Inboard stuff With my lower deck mods completed the two halves of the Upper deck are glued into place using pva. 2628 Fairly straightforward with a touch of minor tweaking, and the use of all the kitchen weights I could get my hands on. 2634 Detailing of the lower deck areas comprising deck planking and board panelling will suffice for what will be seen. I added a painted sail cloth covering for the Commanders cabin below the Skylight, in reality probably too much of a 'luxury' for a humble cutter, but it serves the purpose of enhancing the view thro' the skylight. 2649 I can now move onto a not very exciting part of the build -planking the bulwarks. A final sanding of the bulwarks and a check at the sheer of the overall width including the internal planking. The first strip of planking fits along the bulwark beneath the ports. Not much to do apart from shaping the stern end where it fits over the counter. 2676 Testing the fit the plank before fitting, I have temporarily sealed the deck openings to keep the dust out. Cutting the planks between the ports is both testing and tedious and represented several days work. The only area that caused me some head scratching was how to finish the internal planking at the bows. Does the planking butt against at the internal edges of the stem or carry around and meet in the centre in front of the stem? There is no specific mention of this in the guide that I could find although there is one photo that suggests the planking meets a board running down the internal edge of the stem. 2708 However, having already fitted the planking I realised I hadn't carried it far enough into the bow which entailed removing and replacing the planks forward of the first port. Fortunately the two lowest planks below the ports are covered by the spirketing so I left those insitu. Belatedly checking the Admiralty Plan it appears that the internal planking butts against the stem sides, in front of which is the Apron (or false post). 1972 Belatedly checking the Admiralty Plan This arrangement is also shown in the upper deck plan drawing in The Naval Cutter Alert by Peter Goodwin. 2713 Re-planked and now meeting the False post, and the spirketing covers the previous 'shortcoming' 2721 This phase is now complete, but there is a lot of cleaning up before some red paint is laid down. B.E. 23/09/2018


- 574 replies
-
- 21
-
-
- cheerful
- Syren Ship Model Company
- (and 1 more)
-
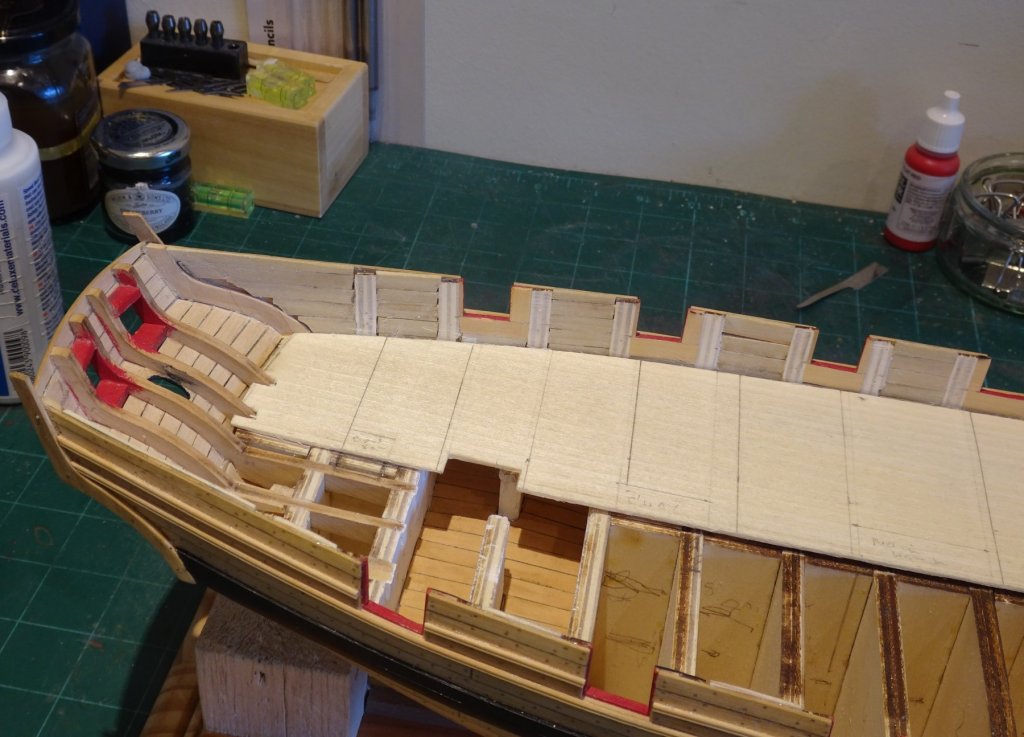
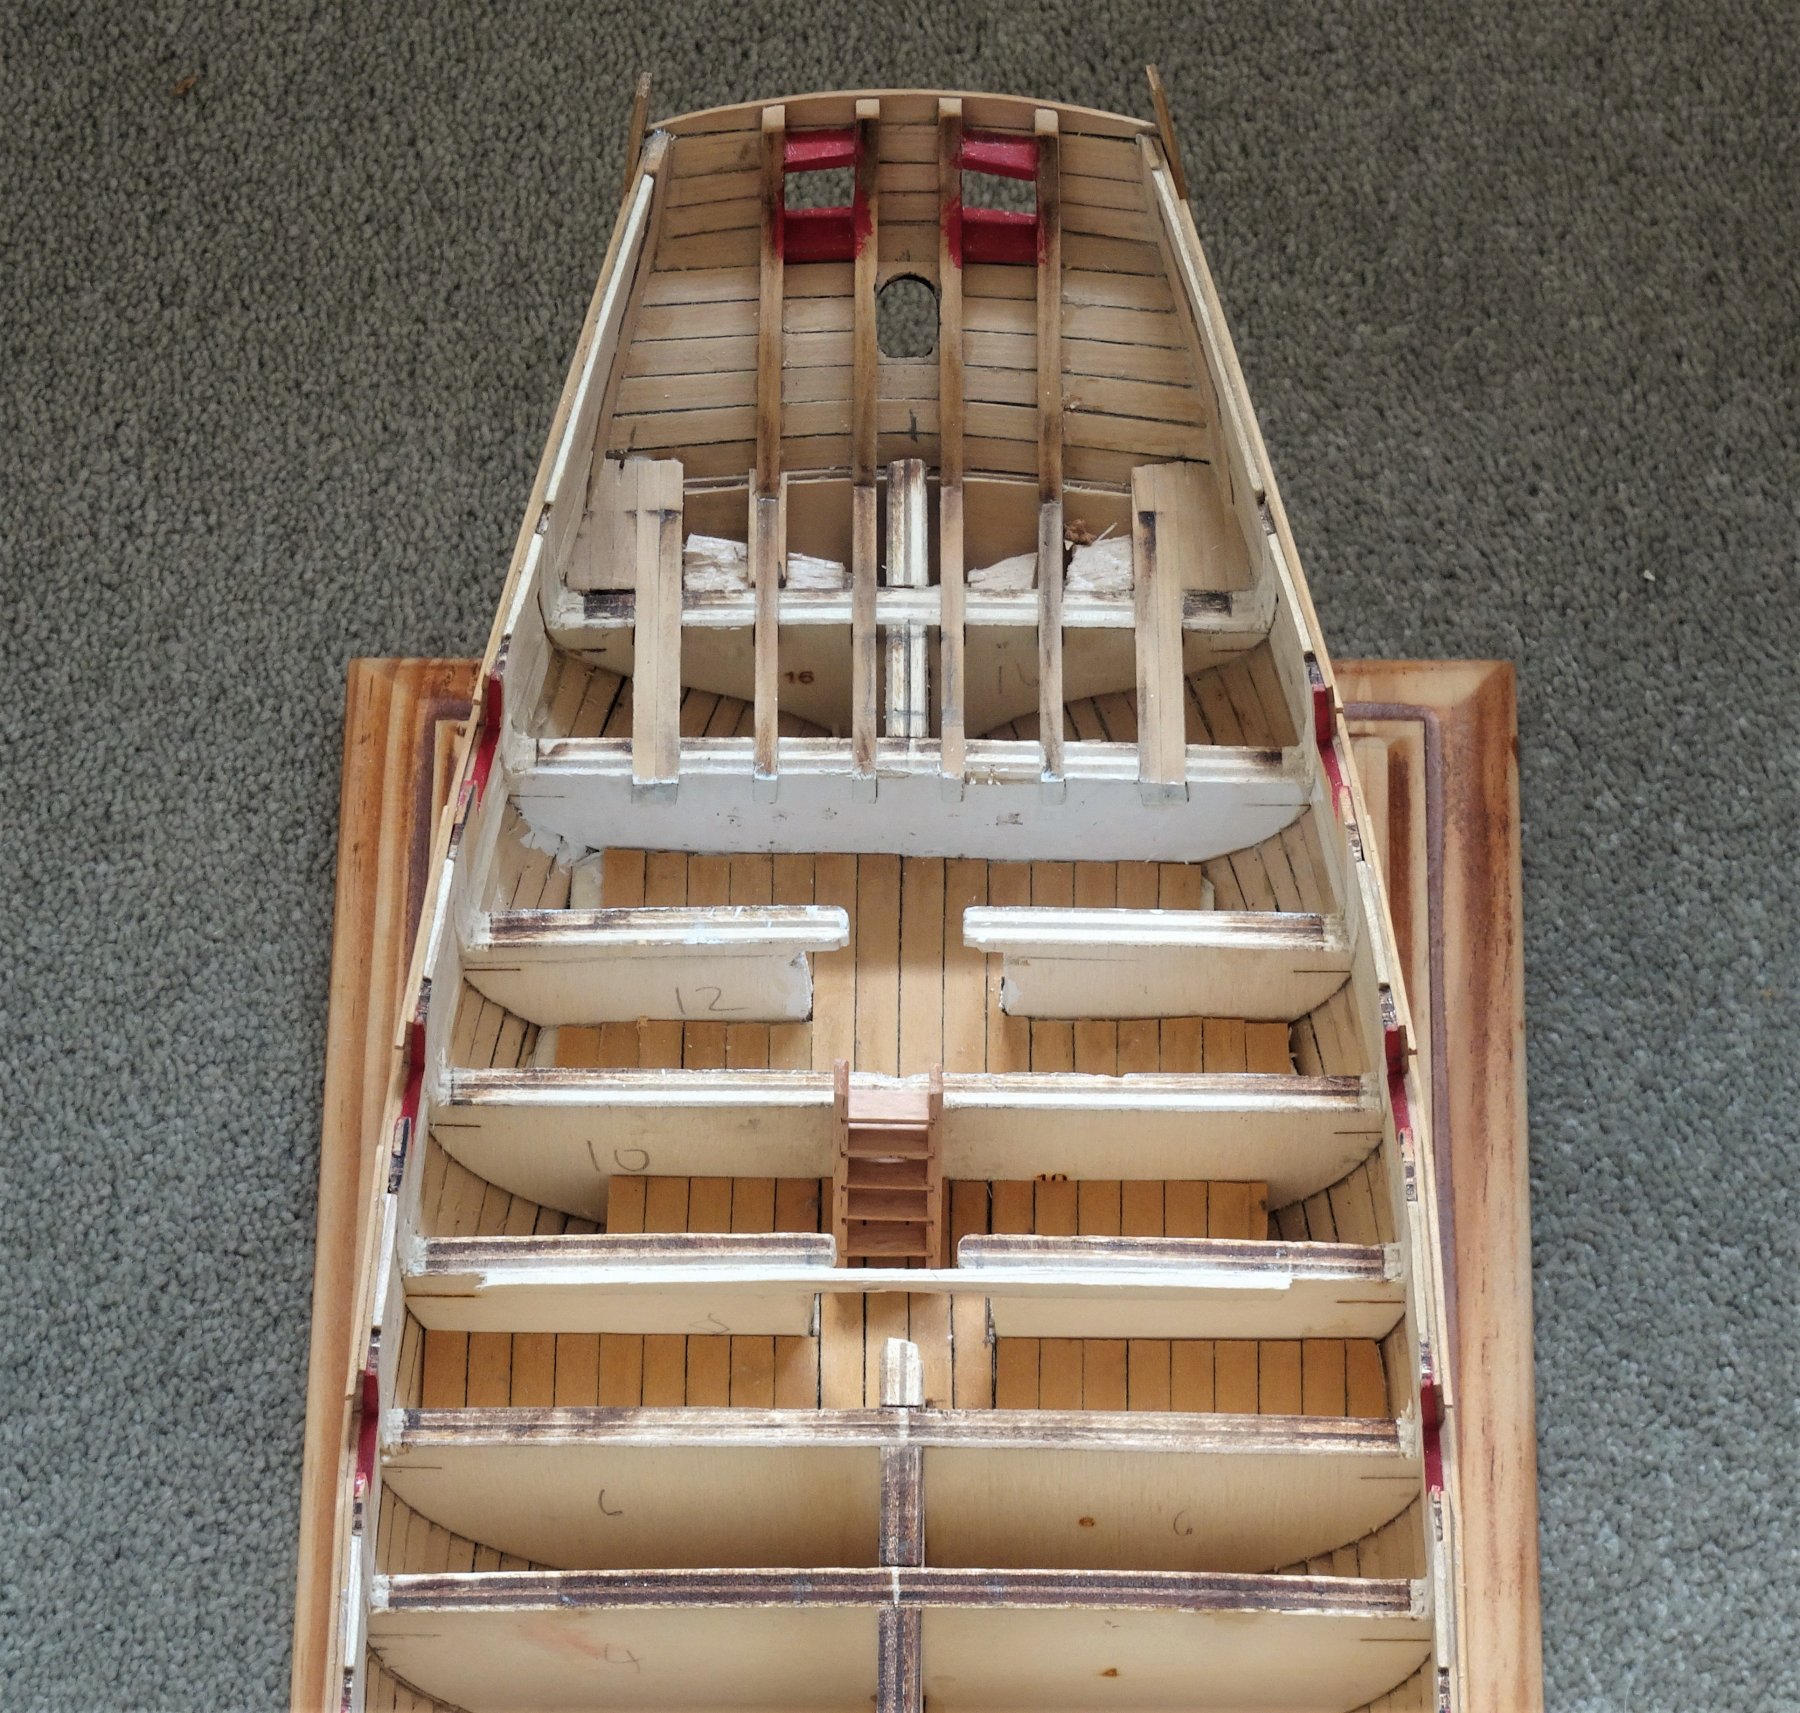
Thanks guys for the 'likes' and comments. Thanks Martin you express my thought process exactly. So back refreshed from my week in Dorsetshire. 0613 Two of my non ship modelling interests in one place. Post 40 Modifications continued Having started with the Skylight and Ladderway, I carried on and made deck space below the Main/ Fore hatches. 2618(2) This is a completely unnecessary diversion from the plans and involves cutting out the false deck areas which are marked as 'not to be cut out'. 2612 It is important to only cut to the area defined which will allow the coamings/ head ledges to still sit on the false deck. 2627 This will give me the option to leave the Fore hatch/ ladderway open. 2621 Similarly I will have the Companionway hatch lid in the open position. Enough messing about time to fix the false deck. B.E 16/09/2018.

.thumb.JPG.8faba1dace45f4738651fdca9807bba1.JPG)
- 574 replies
-
- 16
-
-
- cheerful
- Syren Ship Model Company
- (and 1 more)
-
Once again brilliant attention to detail, and one of the finest examples of stowed hammocks I think I have seen. 😊 👍 Well done Thomas. B.E.
-
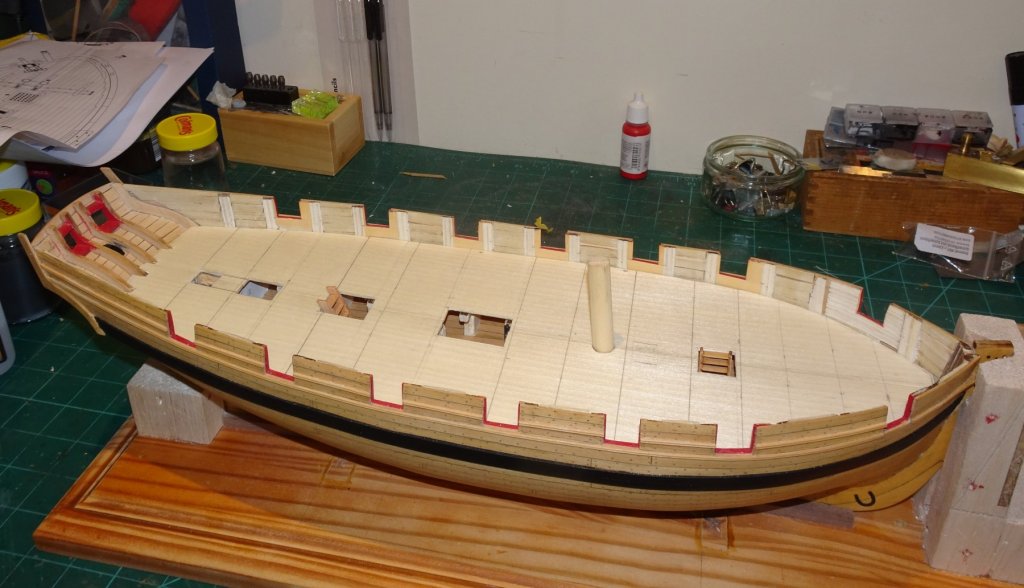
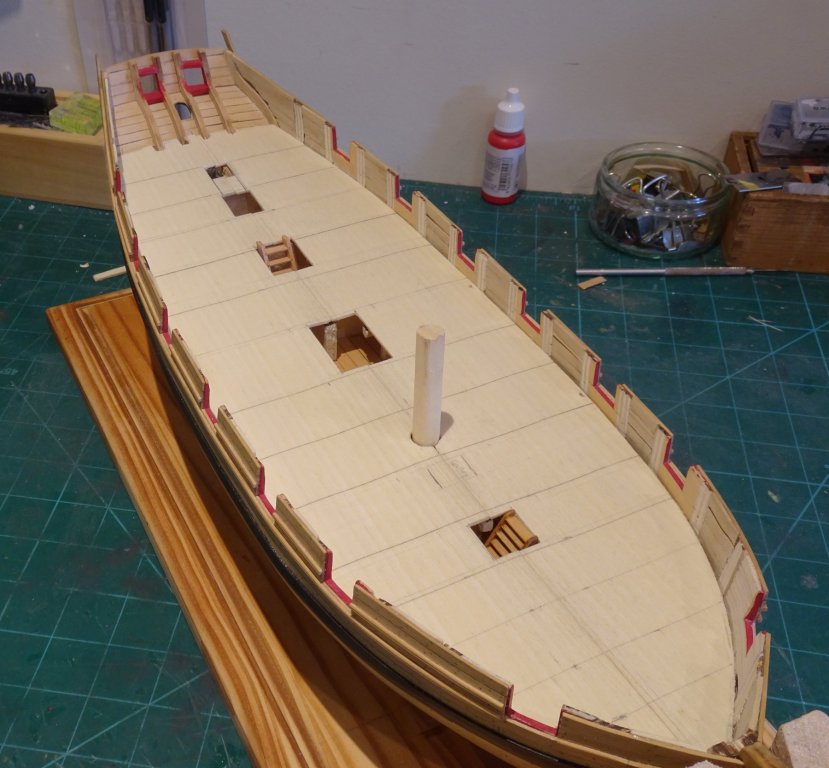
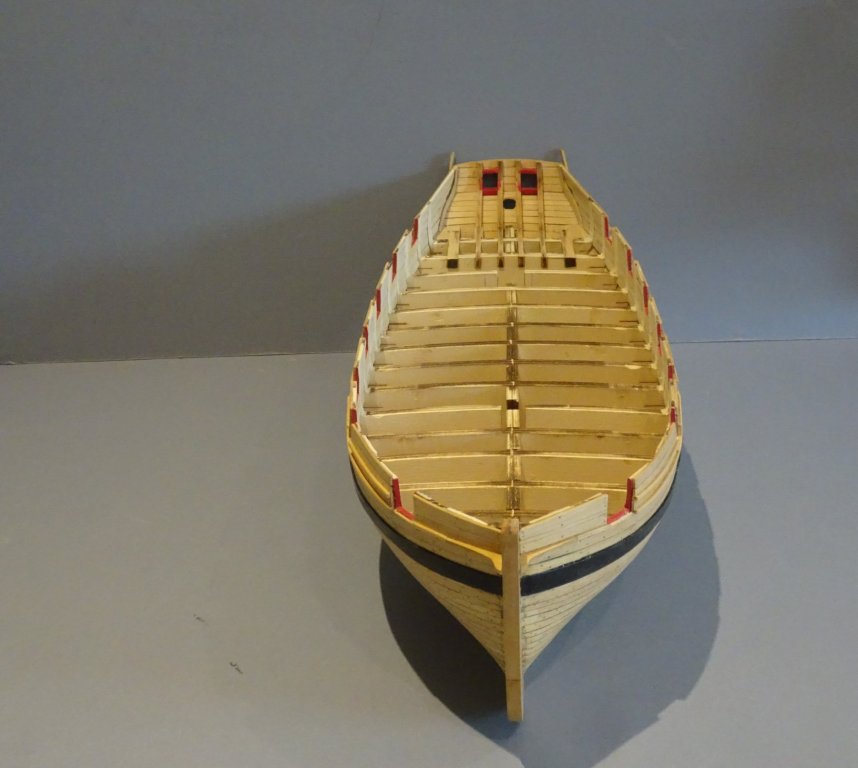
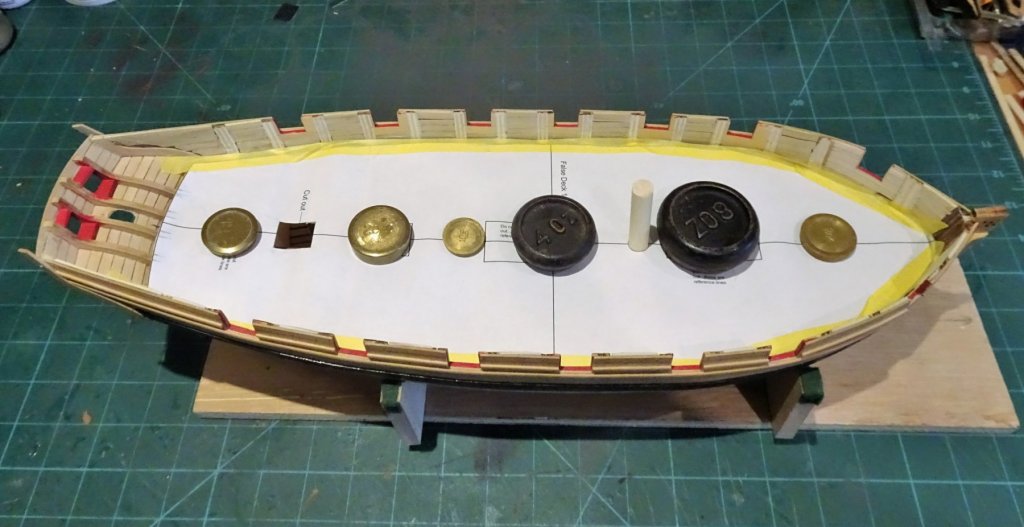
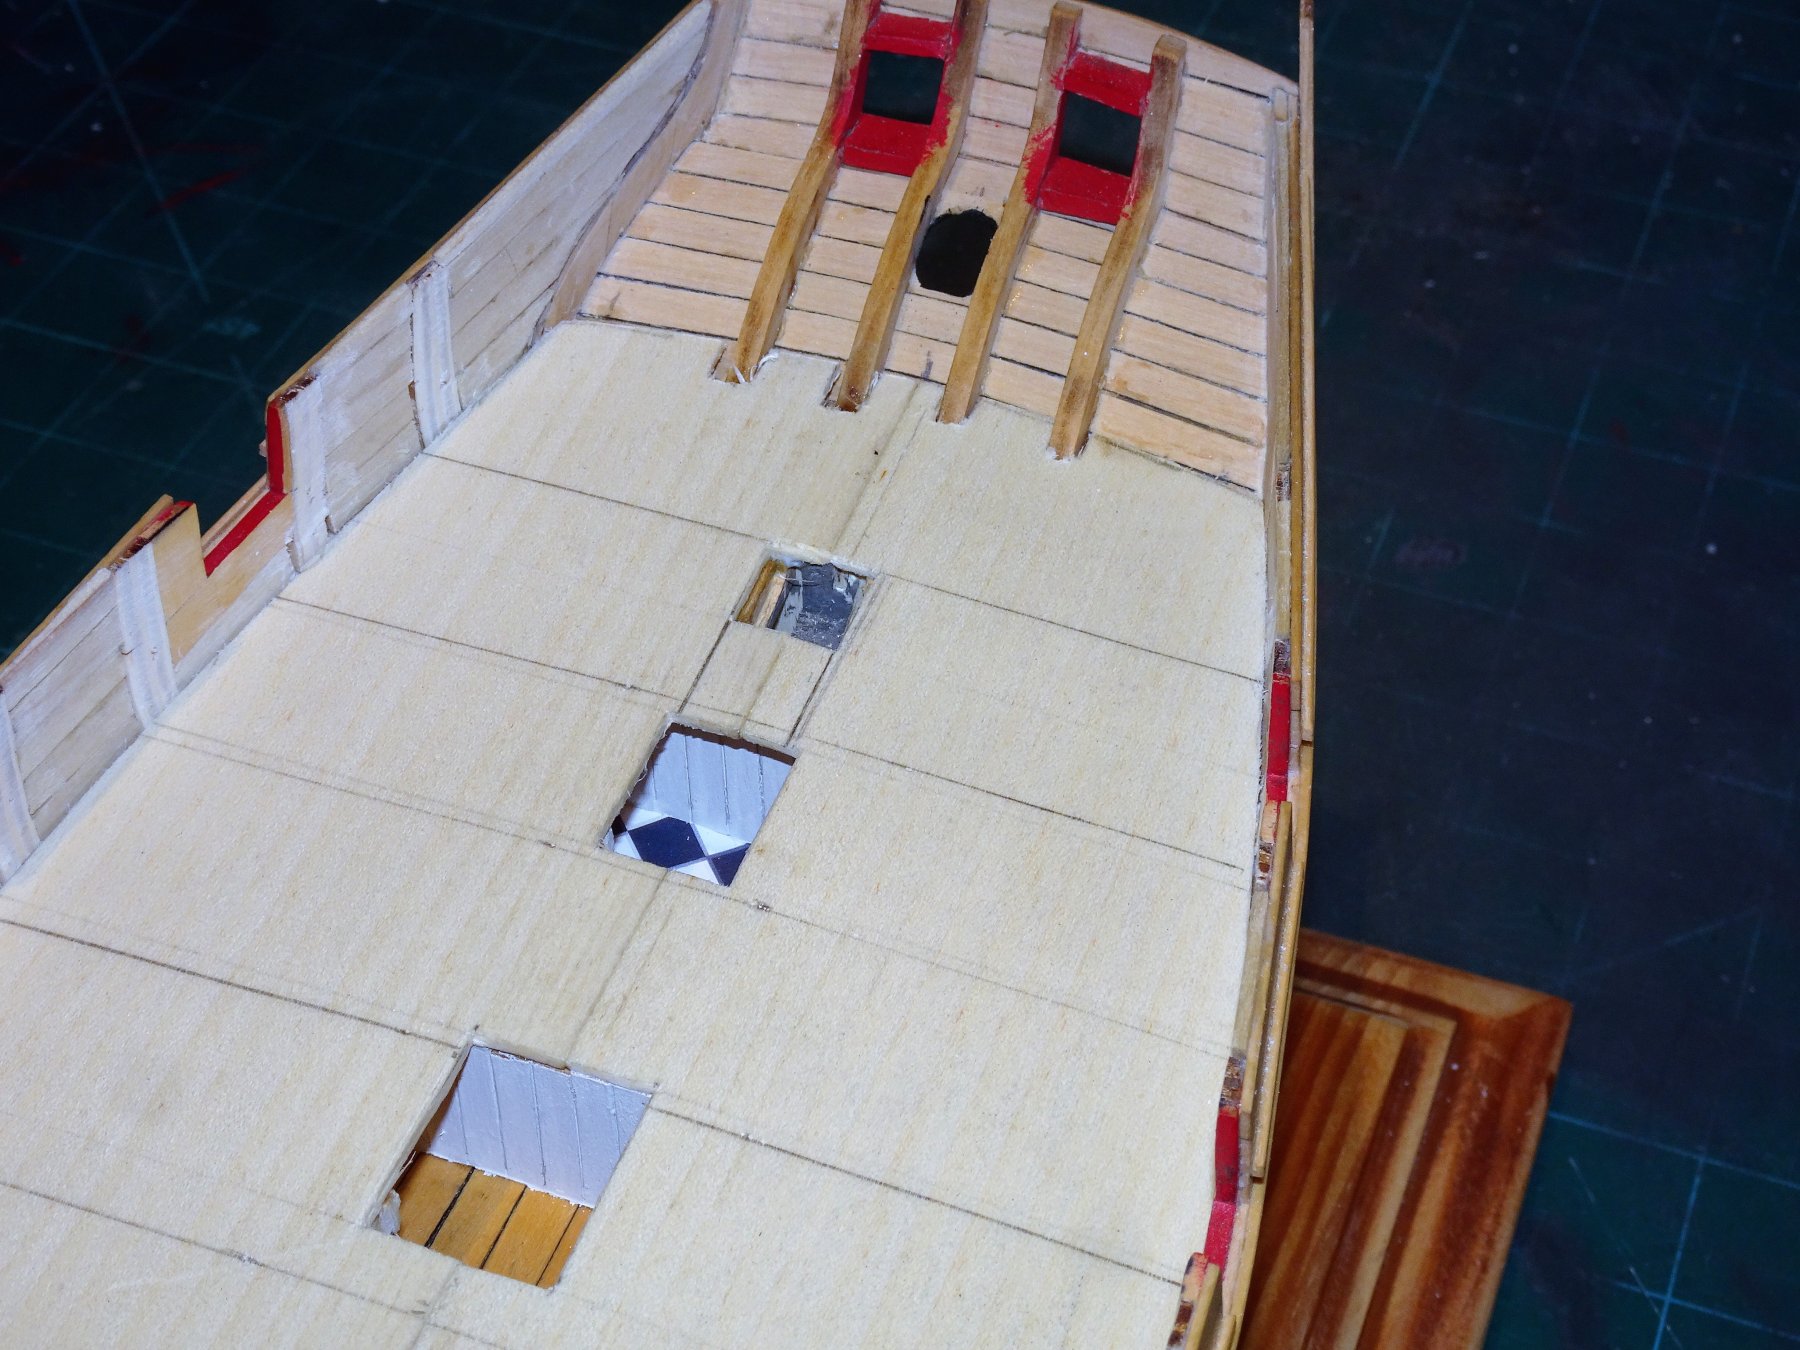
Post 39 A return to the inboard - Fitting the False Deck The False Deck has been formed as detailed in Post 37, but before fitting it is useful to mark the deck beam positions which of course don't follow the bulkheads but relate closely to the centre line fittings where in reality carlings' ledges, and framing would be involved. 2517 I have taken the 'beam' positions from the kit deck plan where they are marked. 1972 They follow fairly closely the deck beams as shown on the Admiralty plans for Cheerful. 2518 You will note they do not butt to the edges of the centre line fittings template marks but allow for the coamings etc. 2519 A final bit of tweaking to ensure both halves fitted together without buckling and that the reference lines matched. 2537 But before gluing into place... One of my little foibles is that I like to have a realistic view below decks where lights or openings are concerned. I made a small modification below the skylight to give the impression of a lower deck. The bulkhead was cut away to form false deck beams and create a space. A false deck was fitted which was then planked over. 2545 I followed this up with a similar modification for the Ladder way; I am thinking of having the lid cover/doors open. 2550 I will probably end up also creating space beneath the gratings, I don't really like sticking them on solid board. A short break now while I adjourn to enjoy the delights of Dorsetshire. 🙂 2549 William also looks like he's ready for a break from the shipyard. Cheers, B.E. 05/09/2018


- 574 replies
-
- 20
-
-
- cheerful
- Syren Ship Model Company
- (and 1 more)
-
Thank you Jim for taking an interest in my build. 🙂 I will glue the false deck first and then plank. I really don't think this build lends itself to pre planking, appealing as that may first appear, with clear access to the deck for marking and fitting. There is the issue of the deck camber, and getting the margin plank relationship correct, let alone accurate cutting around the centre line fittings. I think Chuck's approach is the way to go. Regards, B.E.
- 574 replies
-
- 2
-
-
- cheerful
- Syren Ship Model Company
- (and 1 more)
-
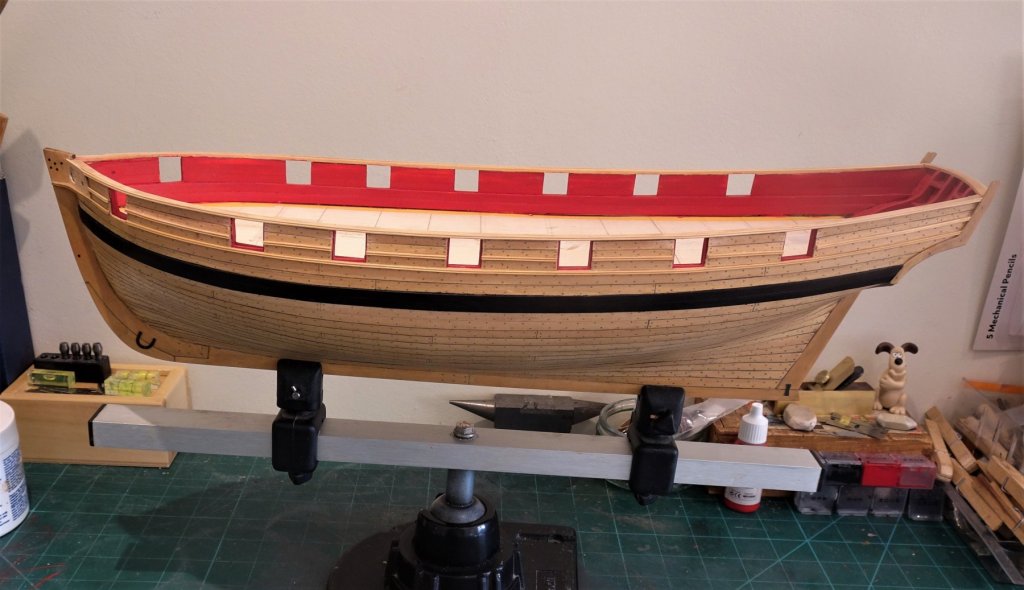
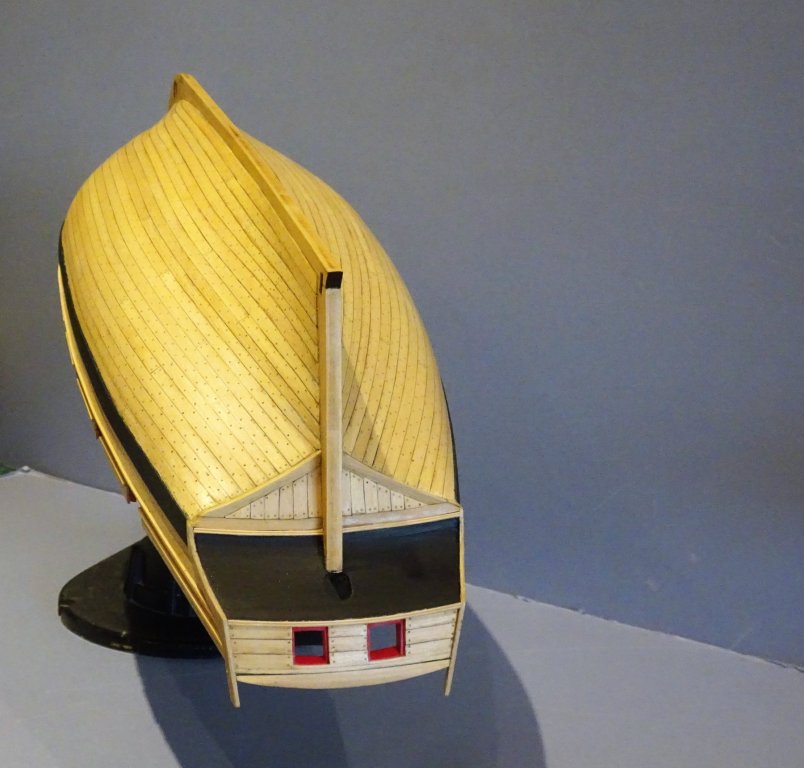
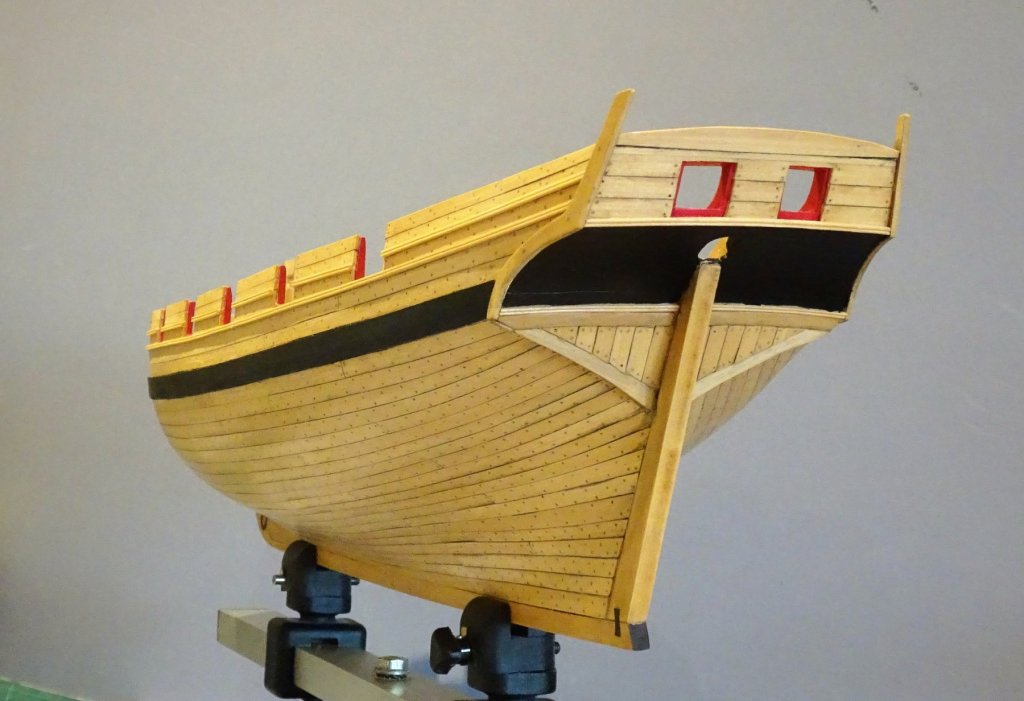
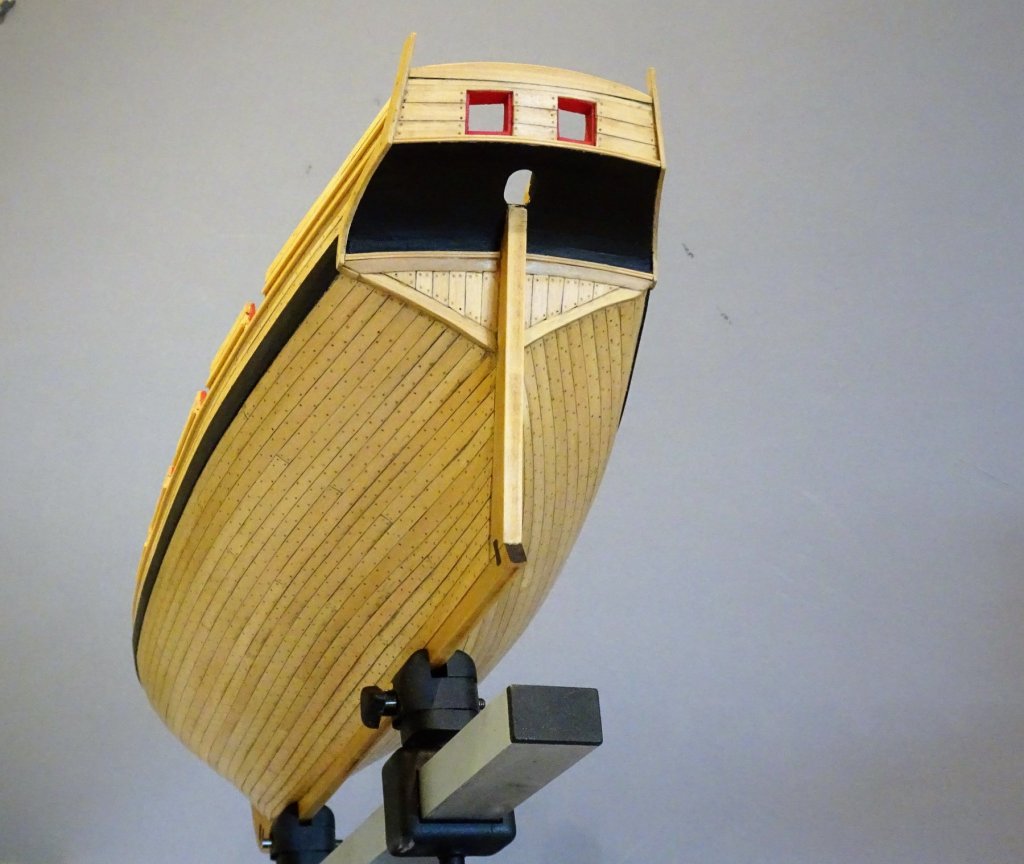
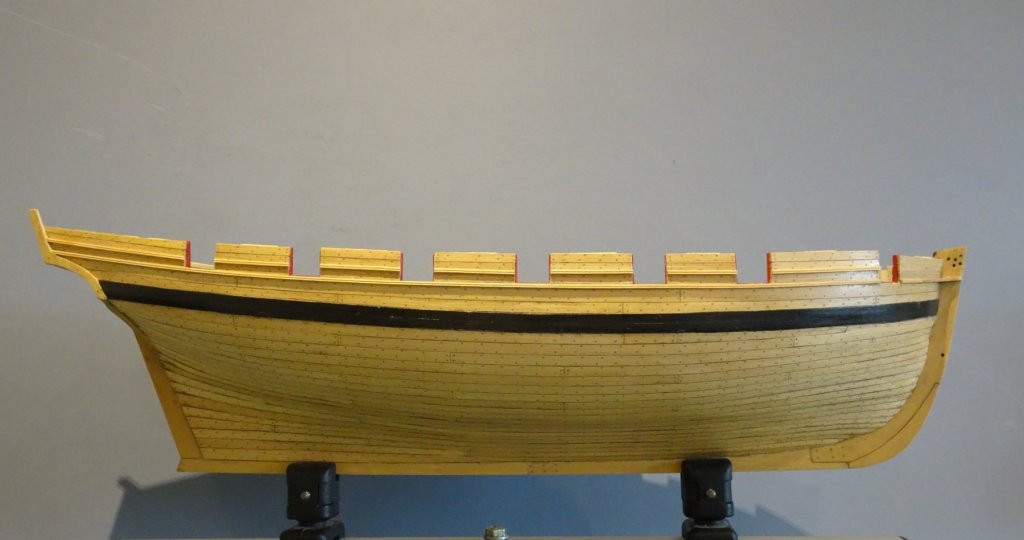
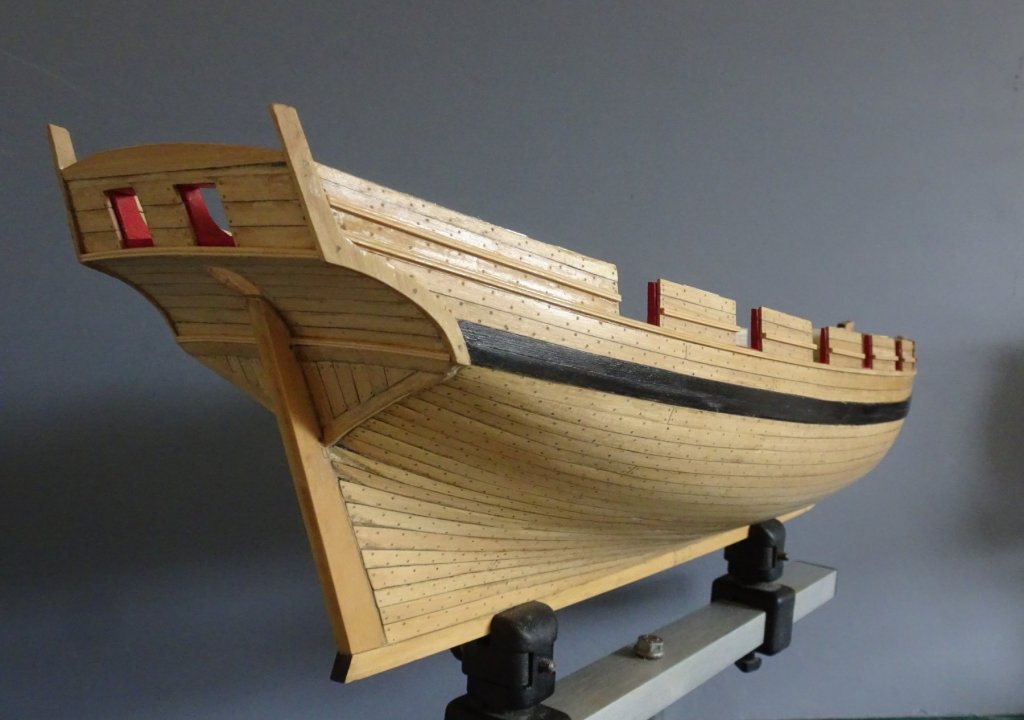
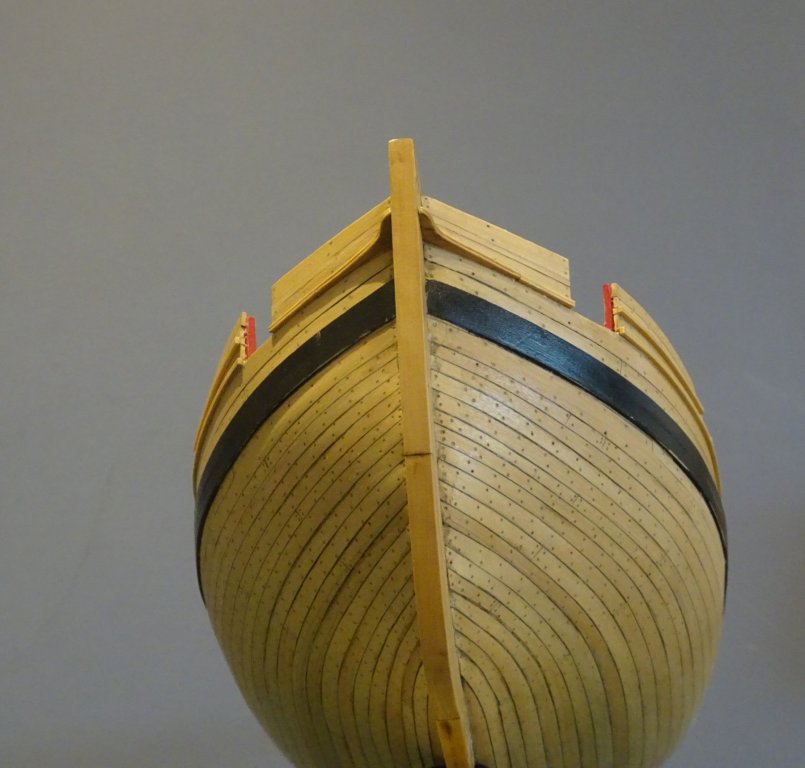
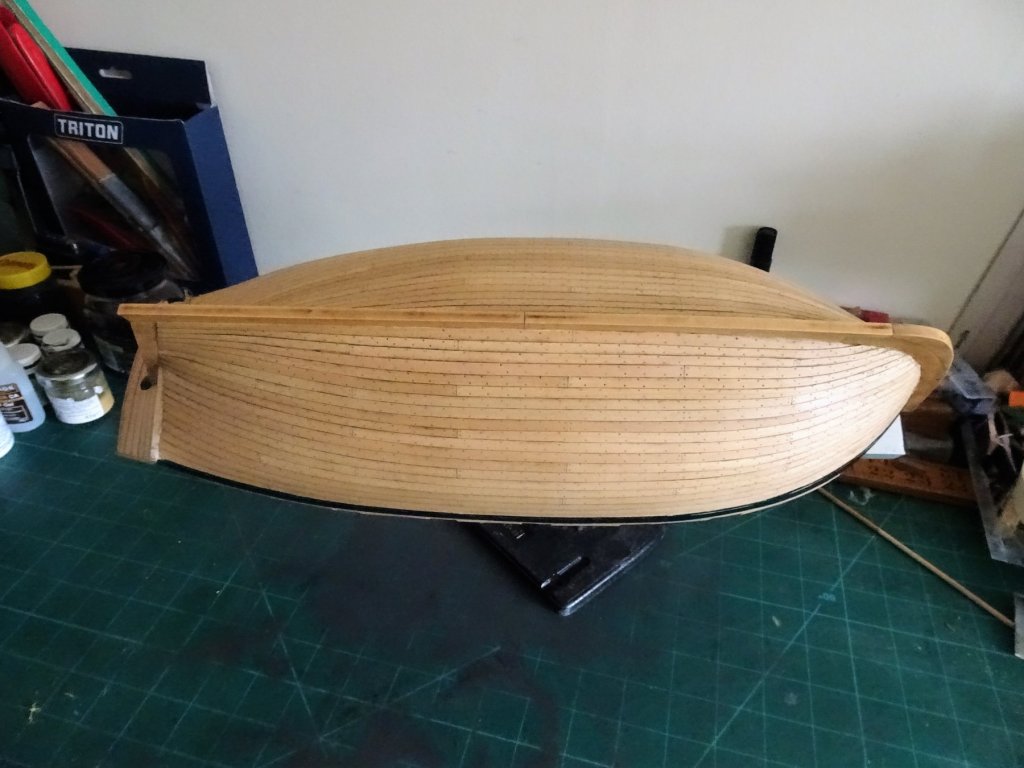
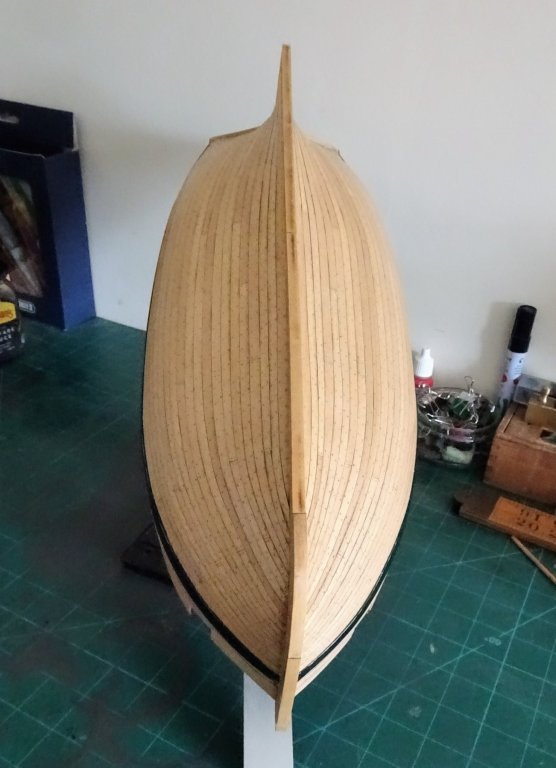
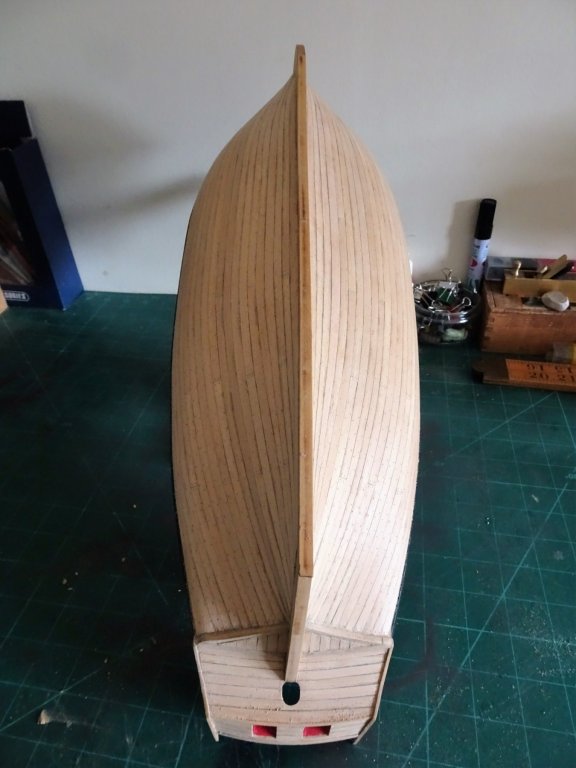
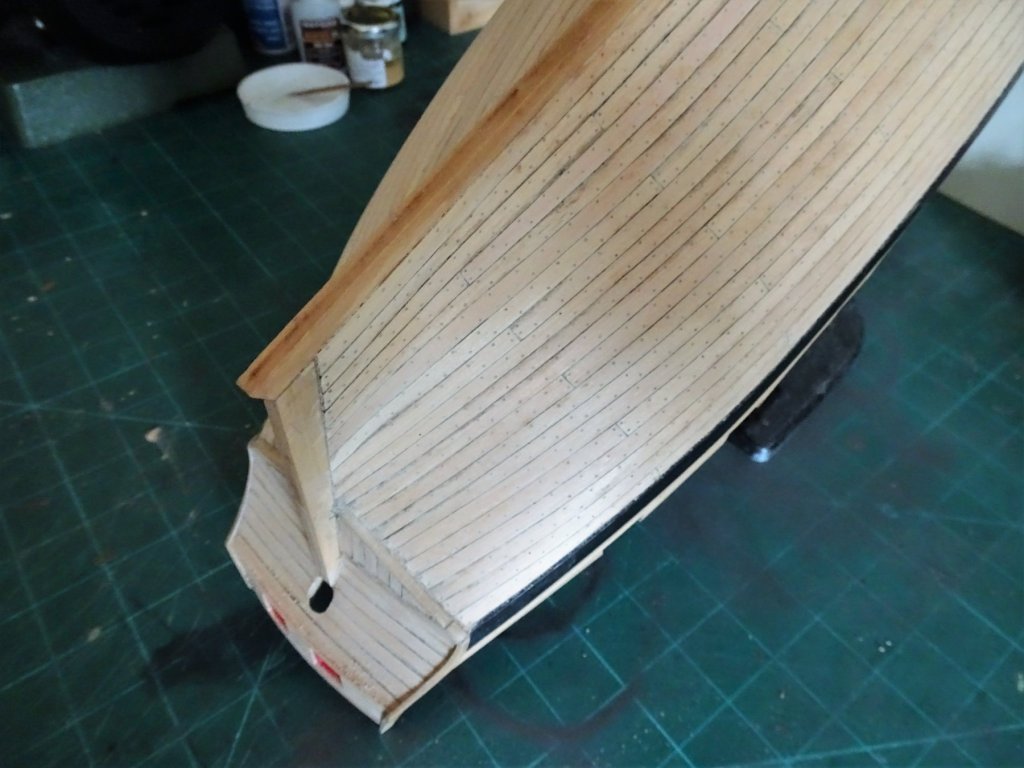
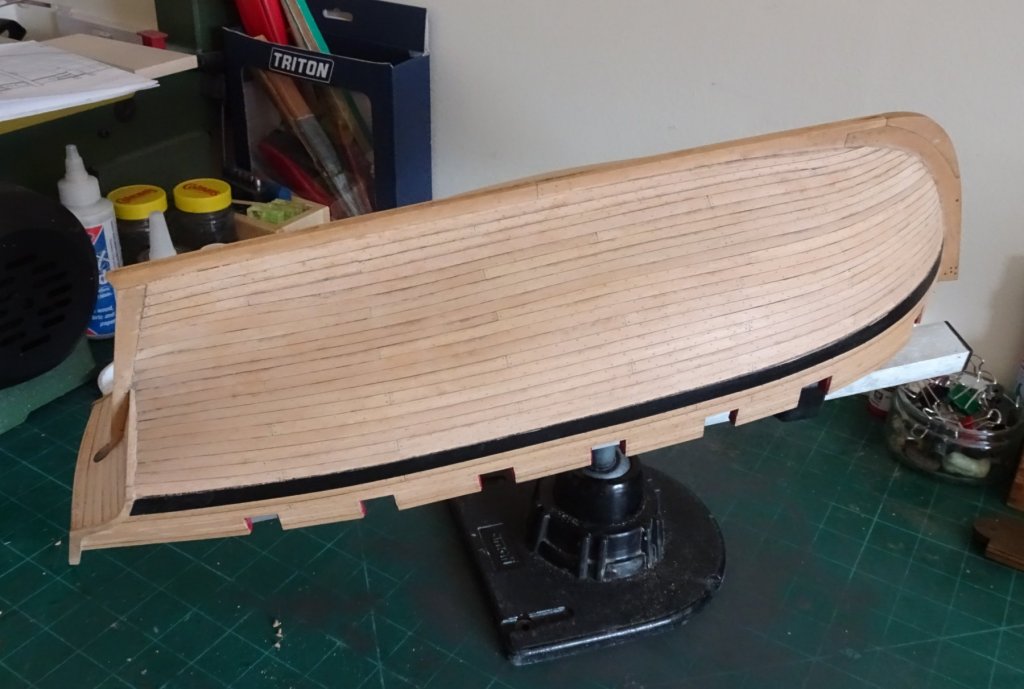
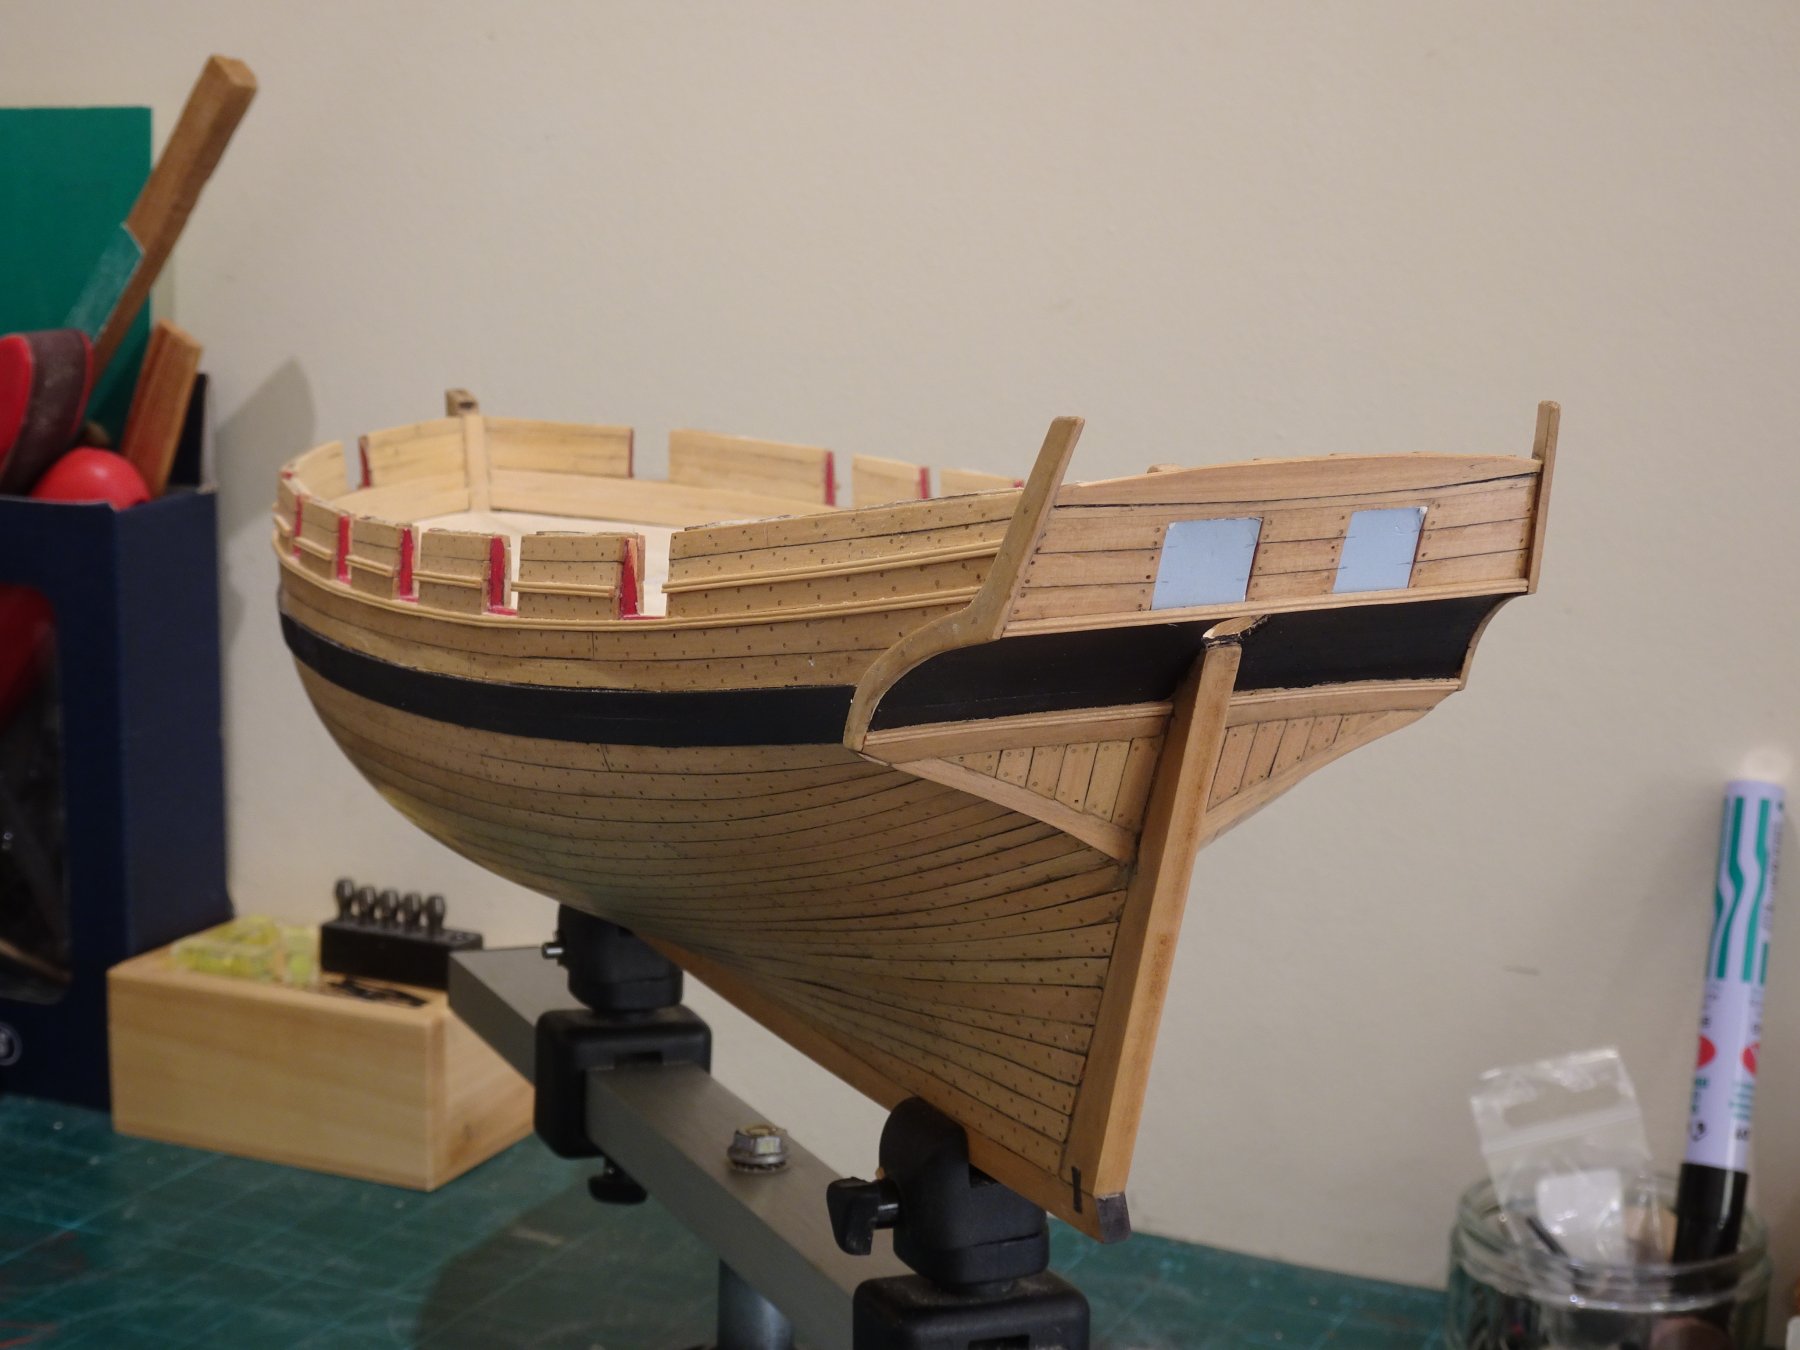
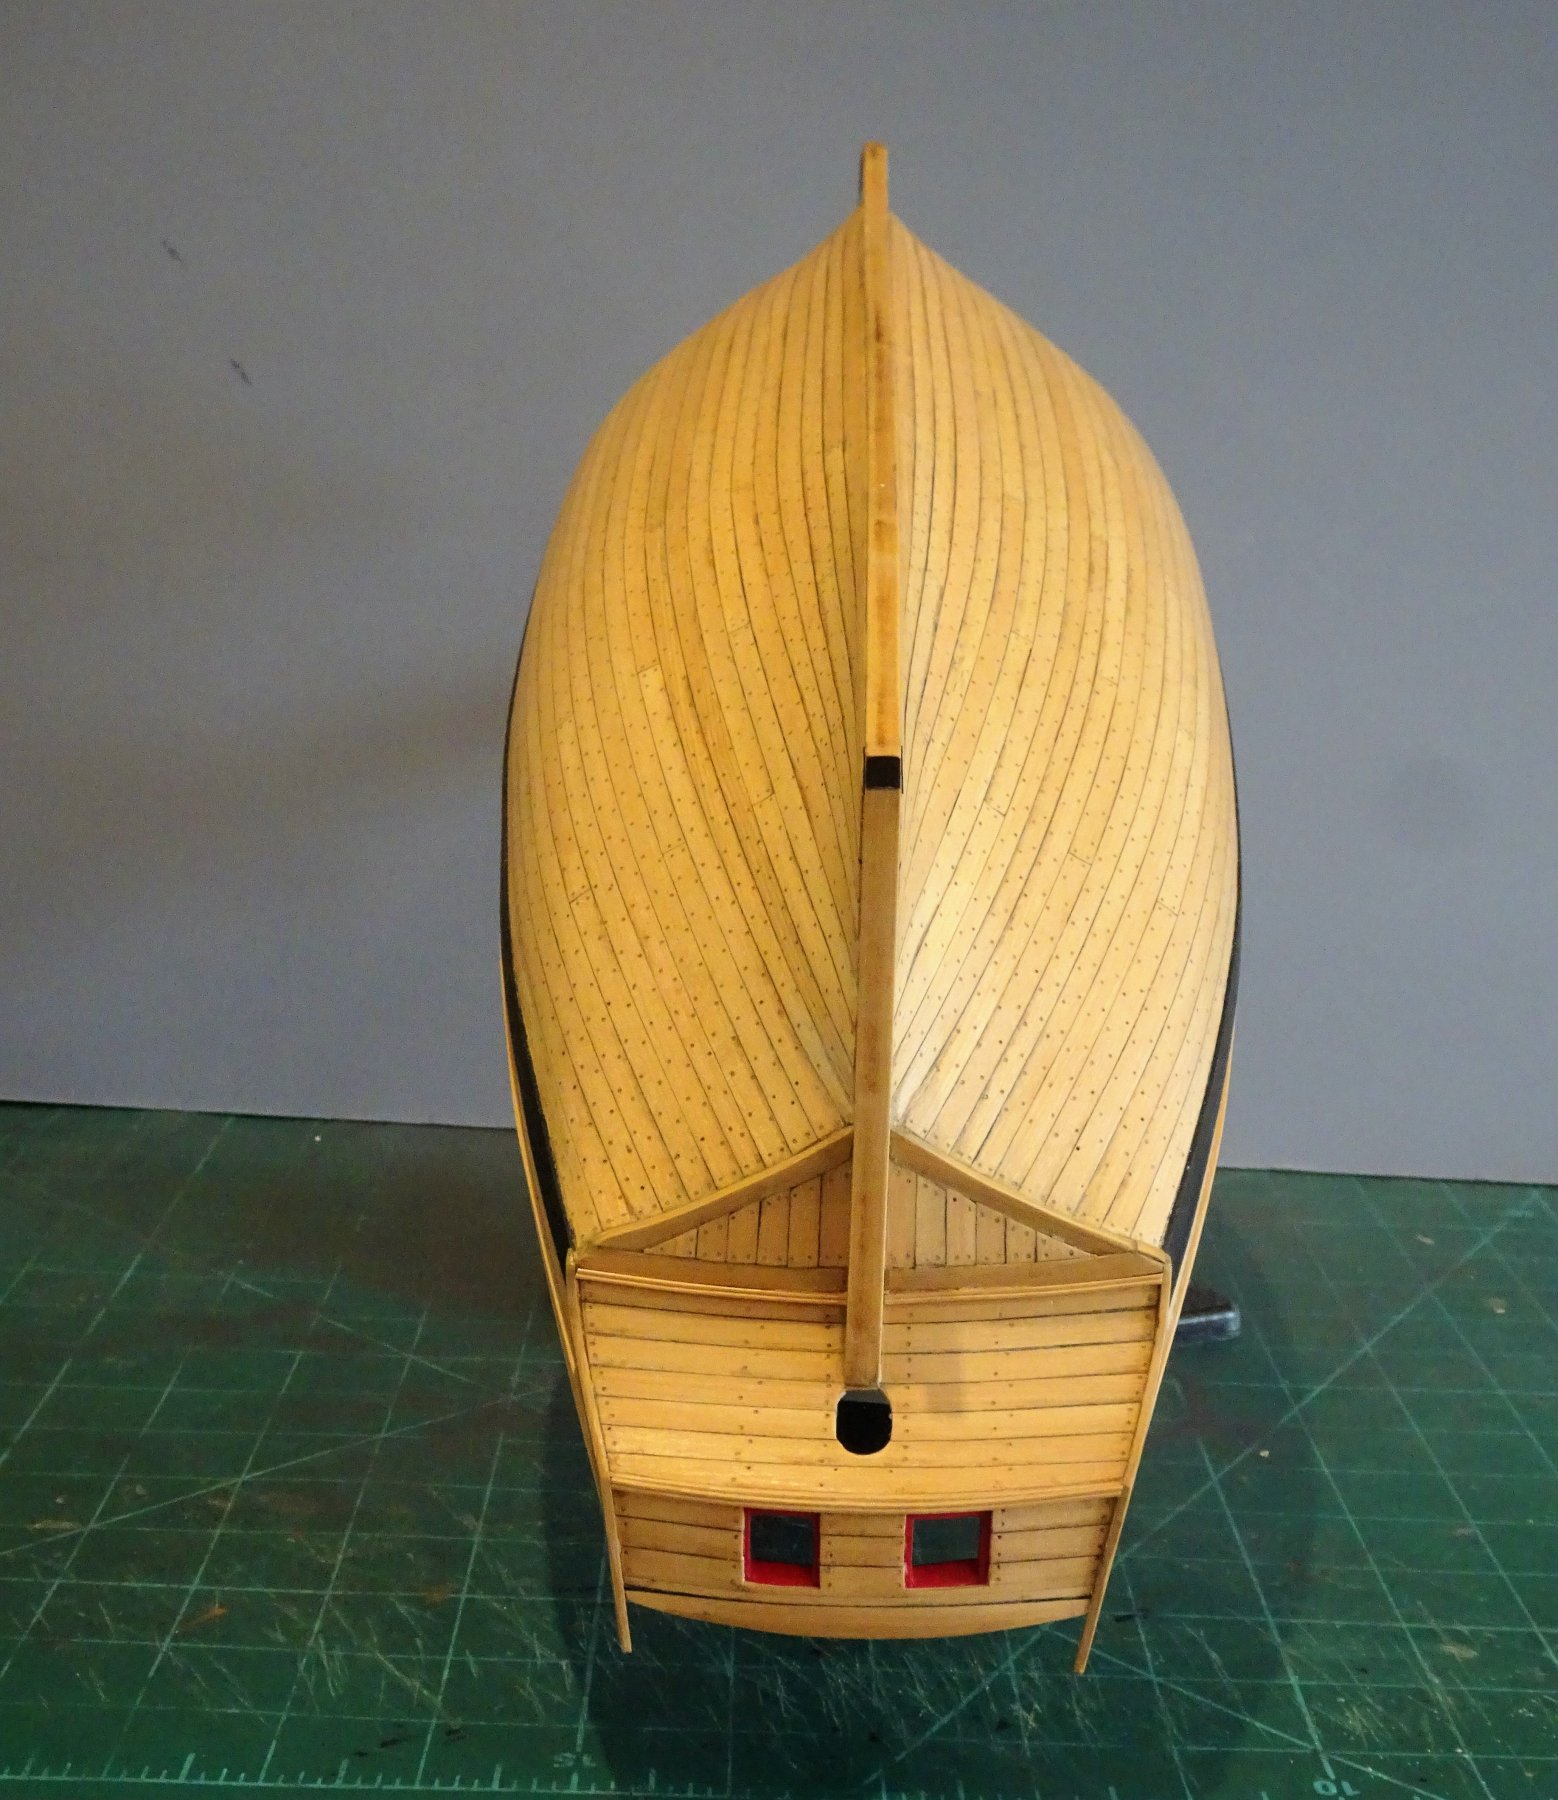
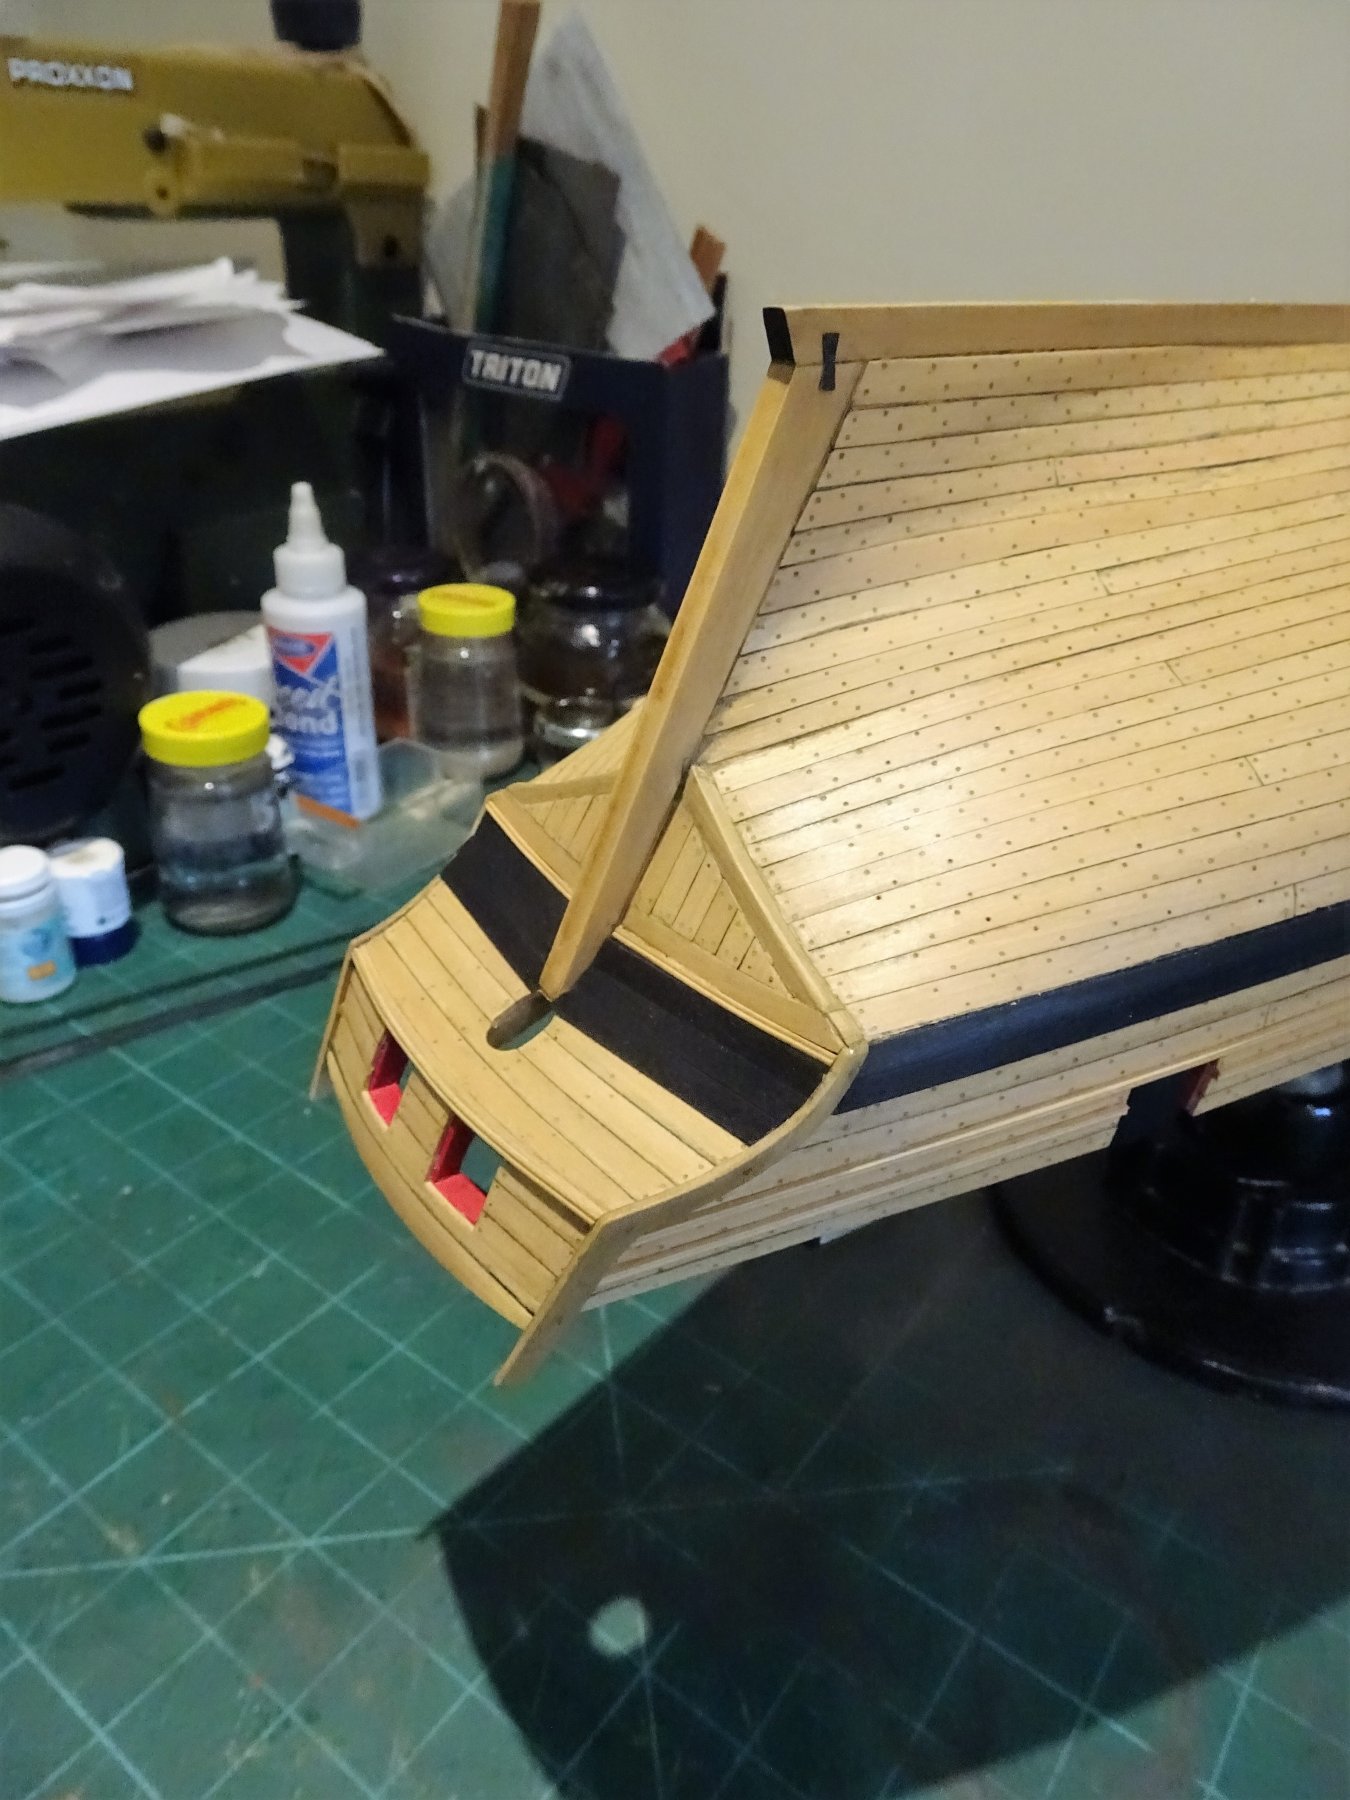
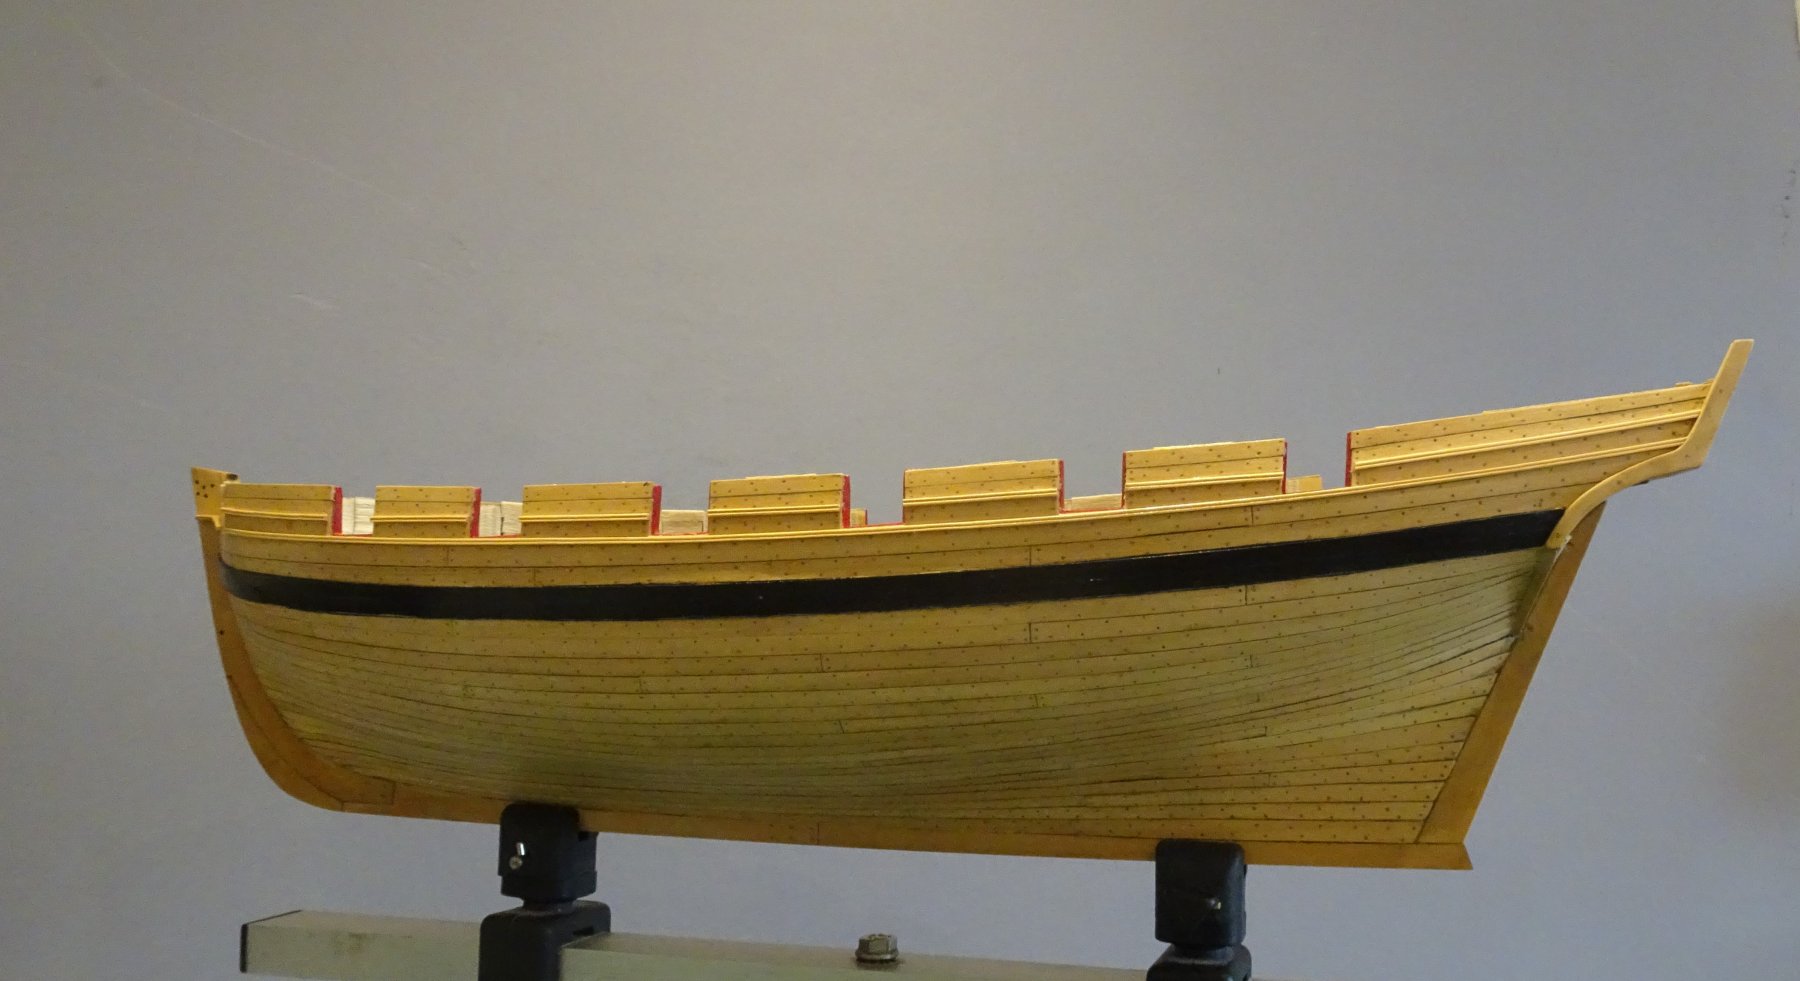
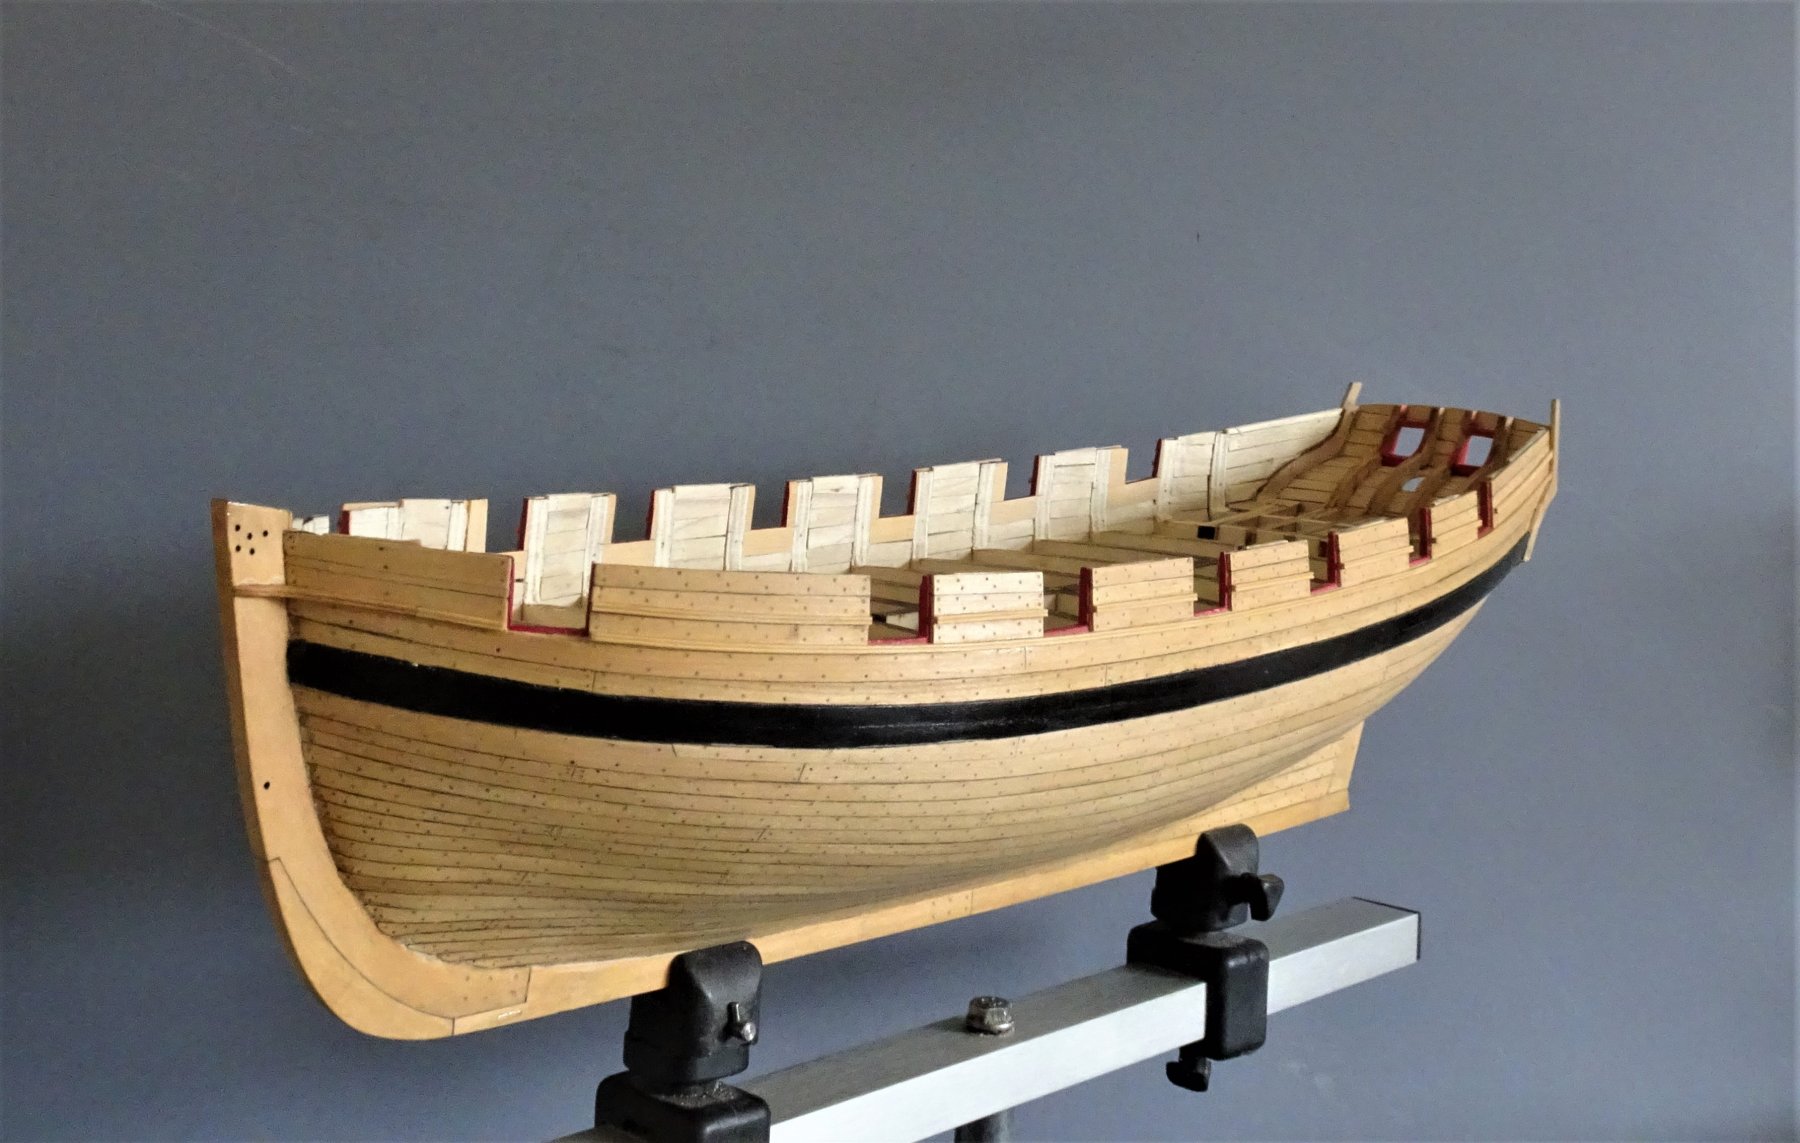
Thanks Guys for your comments and likes. much appreciated. 🙂 @ Dave - I'm not averse to a bit of scratch building but if one of Chuck's mini marvels will do the job I am more than happy to go with that; I do have the set. Thanks for the heads up on the yard dimensions, not sure yet if I am going to fully rig her (space issues) but that decision is a way off yet. @ Martin - I do have steady hands, it's the eye sight that's my issue, but with this sort of item gentle hands are certainly required. Post 38 A check around the exterior hull. The wale has again been recoated using Admiralty Metal Black, hopefully for the last time. 2454 2458 2459 A very light sanding to the hull followed, and a further coat of wipe-on poly applied. 2448 The Horse shoe and Keel plates were added to complete my action on the outer hull for the present. 2450 Still having thoughts about the counter and whether to paint it. The older I get the more indecisive I seem to get! 🙄 I wonder how the real Cheerful would have been painted. Built post Trafalgar with the war grinding on, navy under pressure with patrol and blockade duties, and now in an era of austerity where elaborate decoration had given way to plain paintwork . By 1780 the 'approved' colour for British Naval ships was Black wales, yellow painted sides, with a black ground to the topsides. Inboard Red Ochre was the order of the day, had been since 1715 but shortly after the start of the new century yellow ochre which had been used unofficially for some years became officially approved. My own inclination is that Cheerful would have had painted yellow sides, black wales with the counter and capping rails painted black, and red inboard works throughout. She may also have had her topsides painted black. Cheerful was a small unrated vessel and as such I doubt any Commander would have put his hand in pocket to 'personalise' the scheme. In naval circles of the time to be appointed to the Cutter Service was not something to be particularly desired especially by those with ambition. Still I am not trying to reproduce a working appearance, otherwise I would have painted or coppered her bottom and there was a fair bit of licence taken by even model makers of the day when it came to decoration. I don't want an excess of paint to cover the natural wood but I have come to feel that the expanse of the counter did require something. To my conservative eye Red was too much, and Blue too fancy for this small working vessel. 2466 I overlaid the counter with some black planks to gauge the look, and know what I like it. So decision made black it is. 2475 Not particularly obvious on this shot I was also concerned that the plank lines showed thro' the paint I'm not really a fan of the solid sheet look. 2487 Thinned coats of Admiralty Metal Black were applied with sanding between coats. 2478 Moving on...…………. B.E. 03/09/2018


- 574 replies
-
- 26
-
-
- cheerful
- Syren Ship Model Company
- (and 1 more)
-
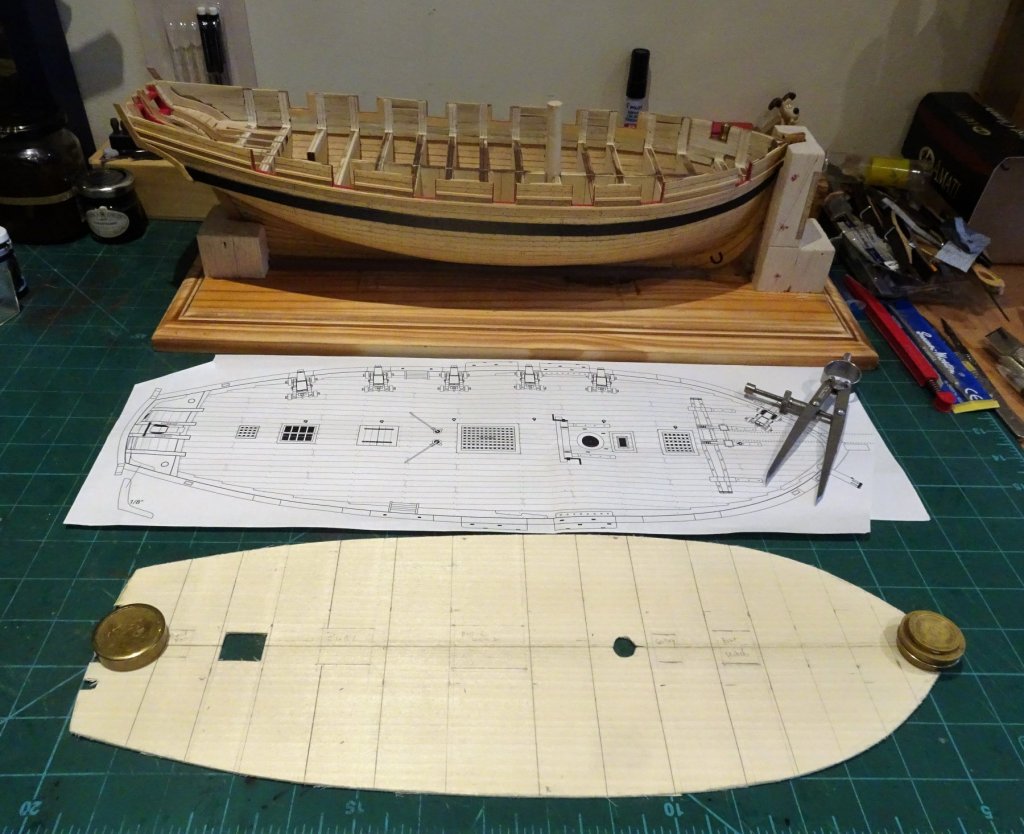
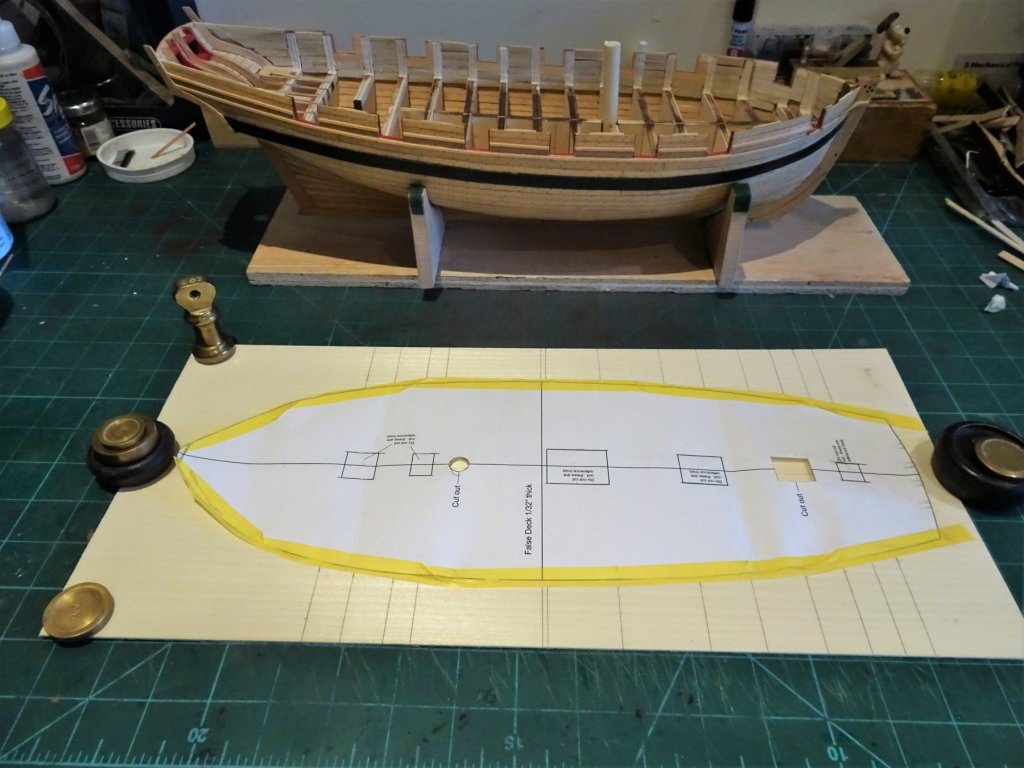
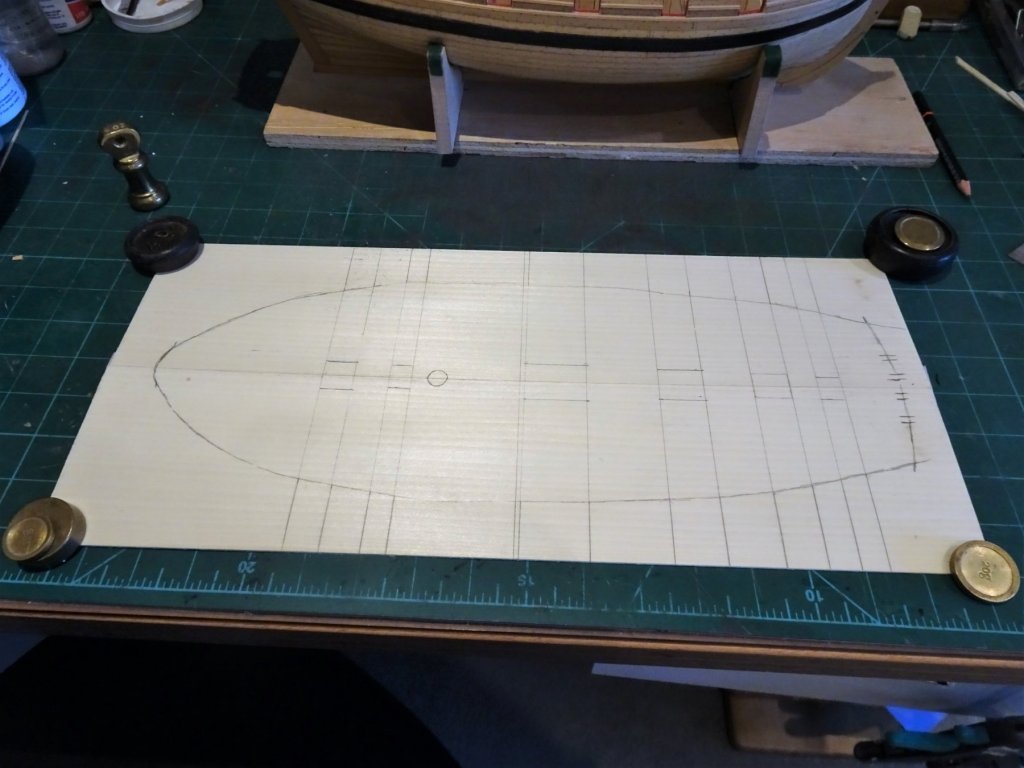
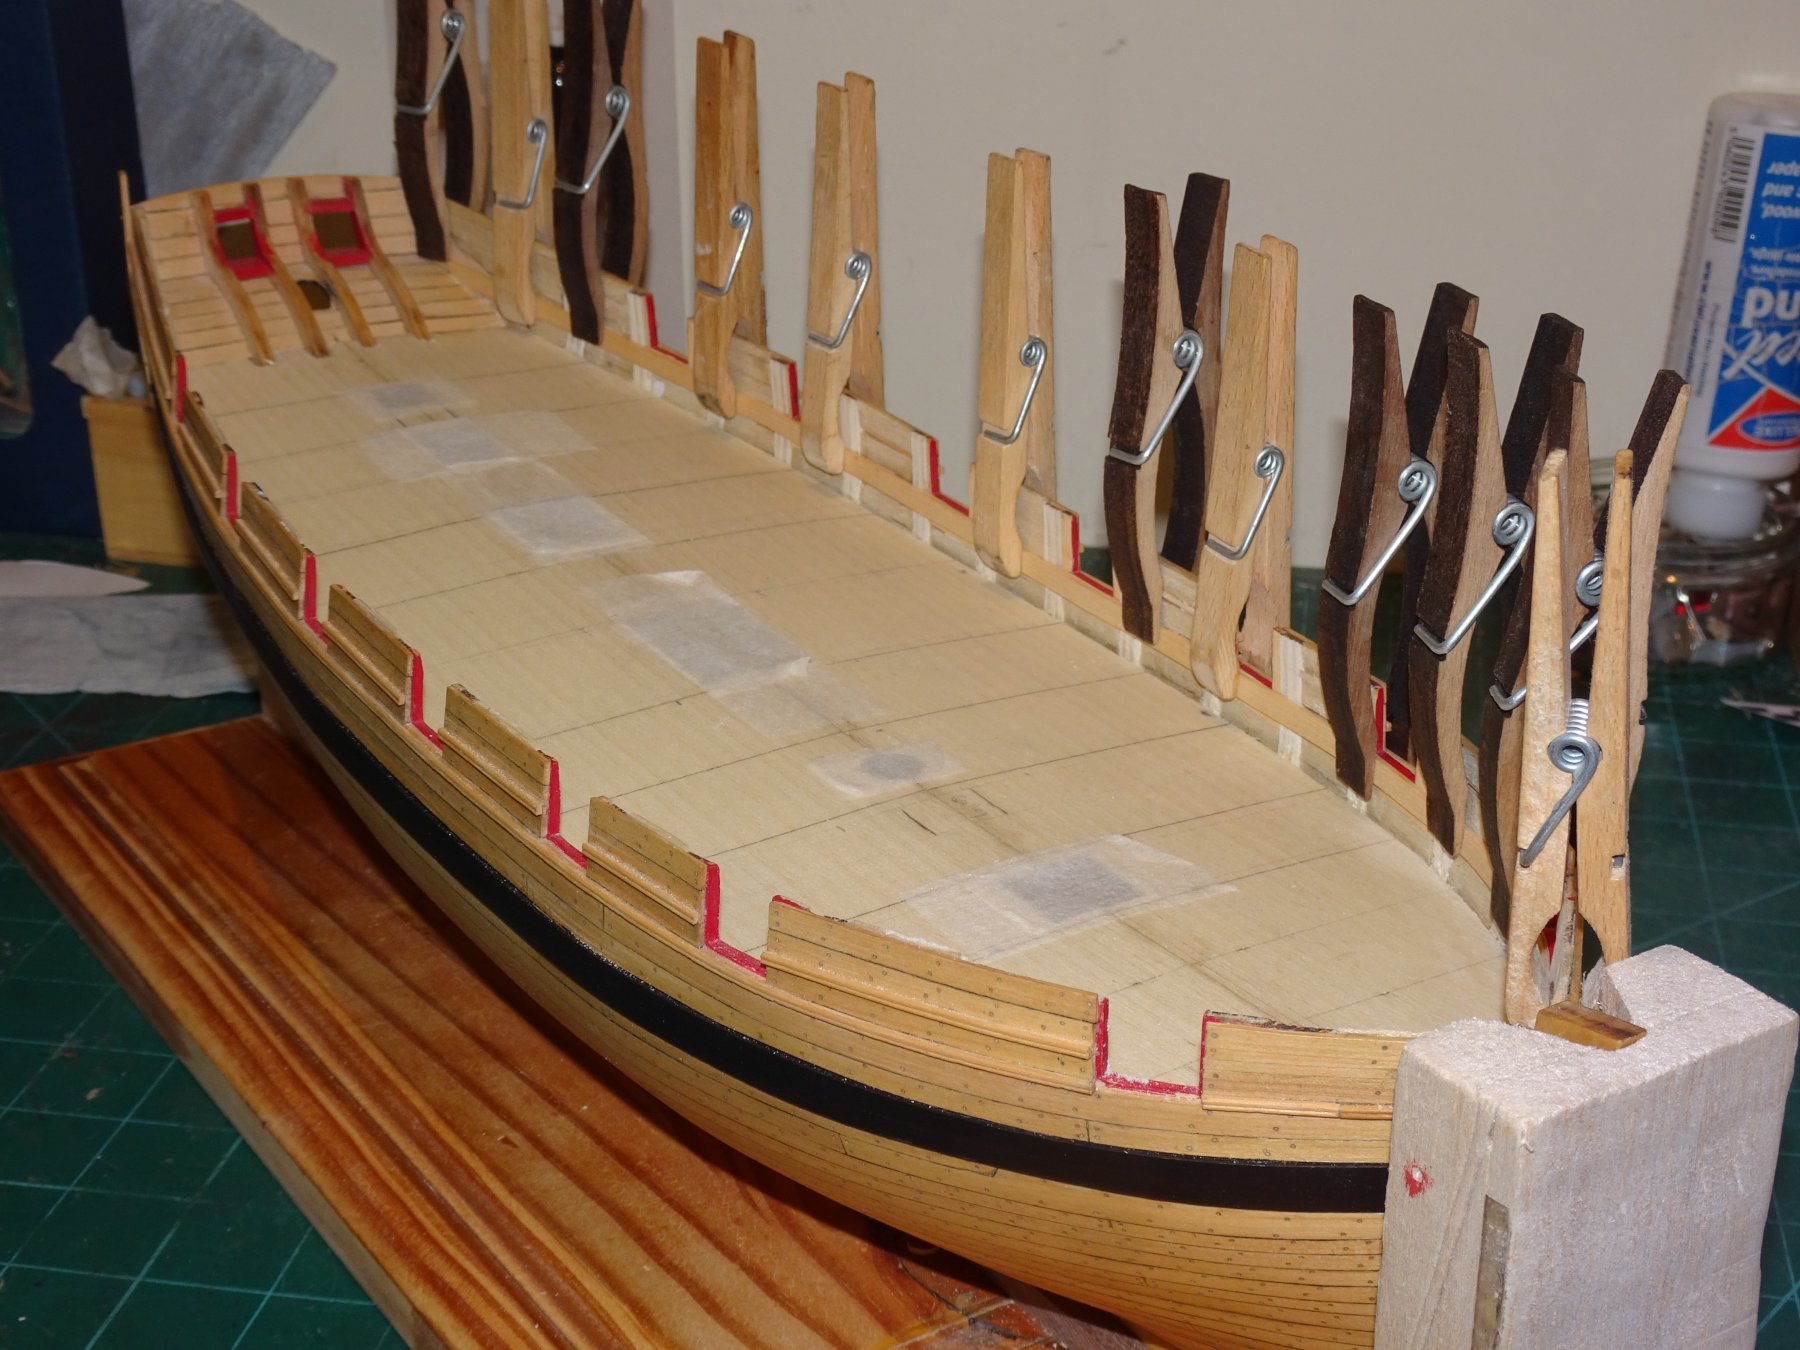
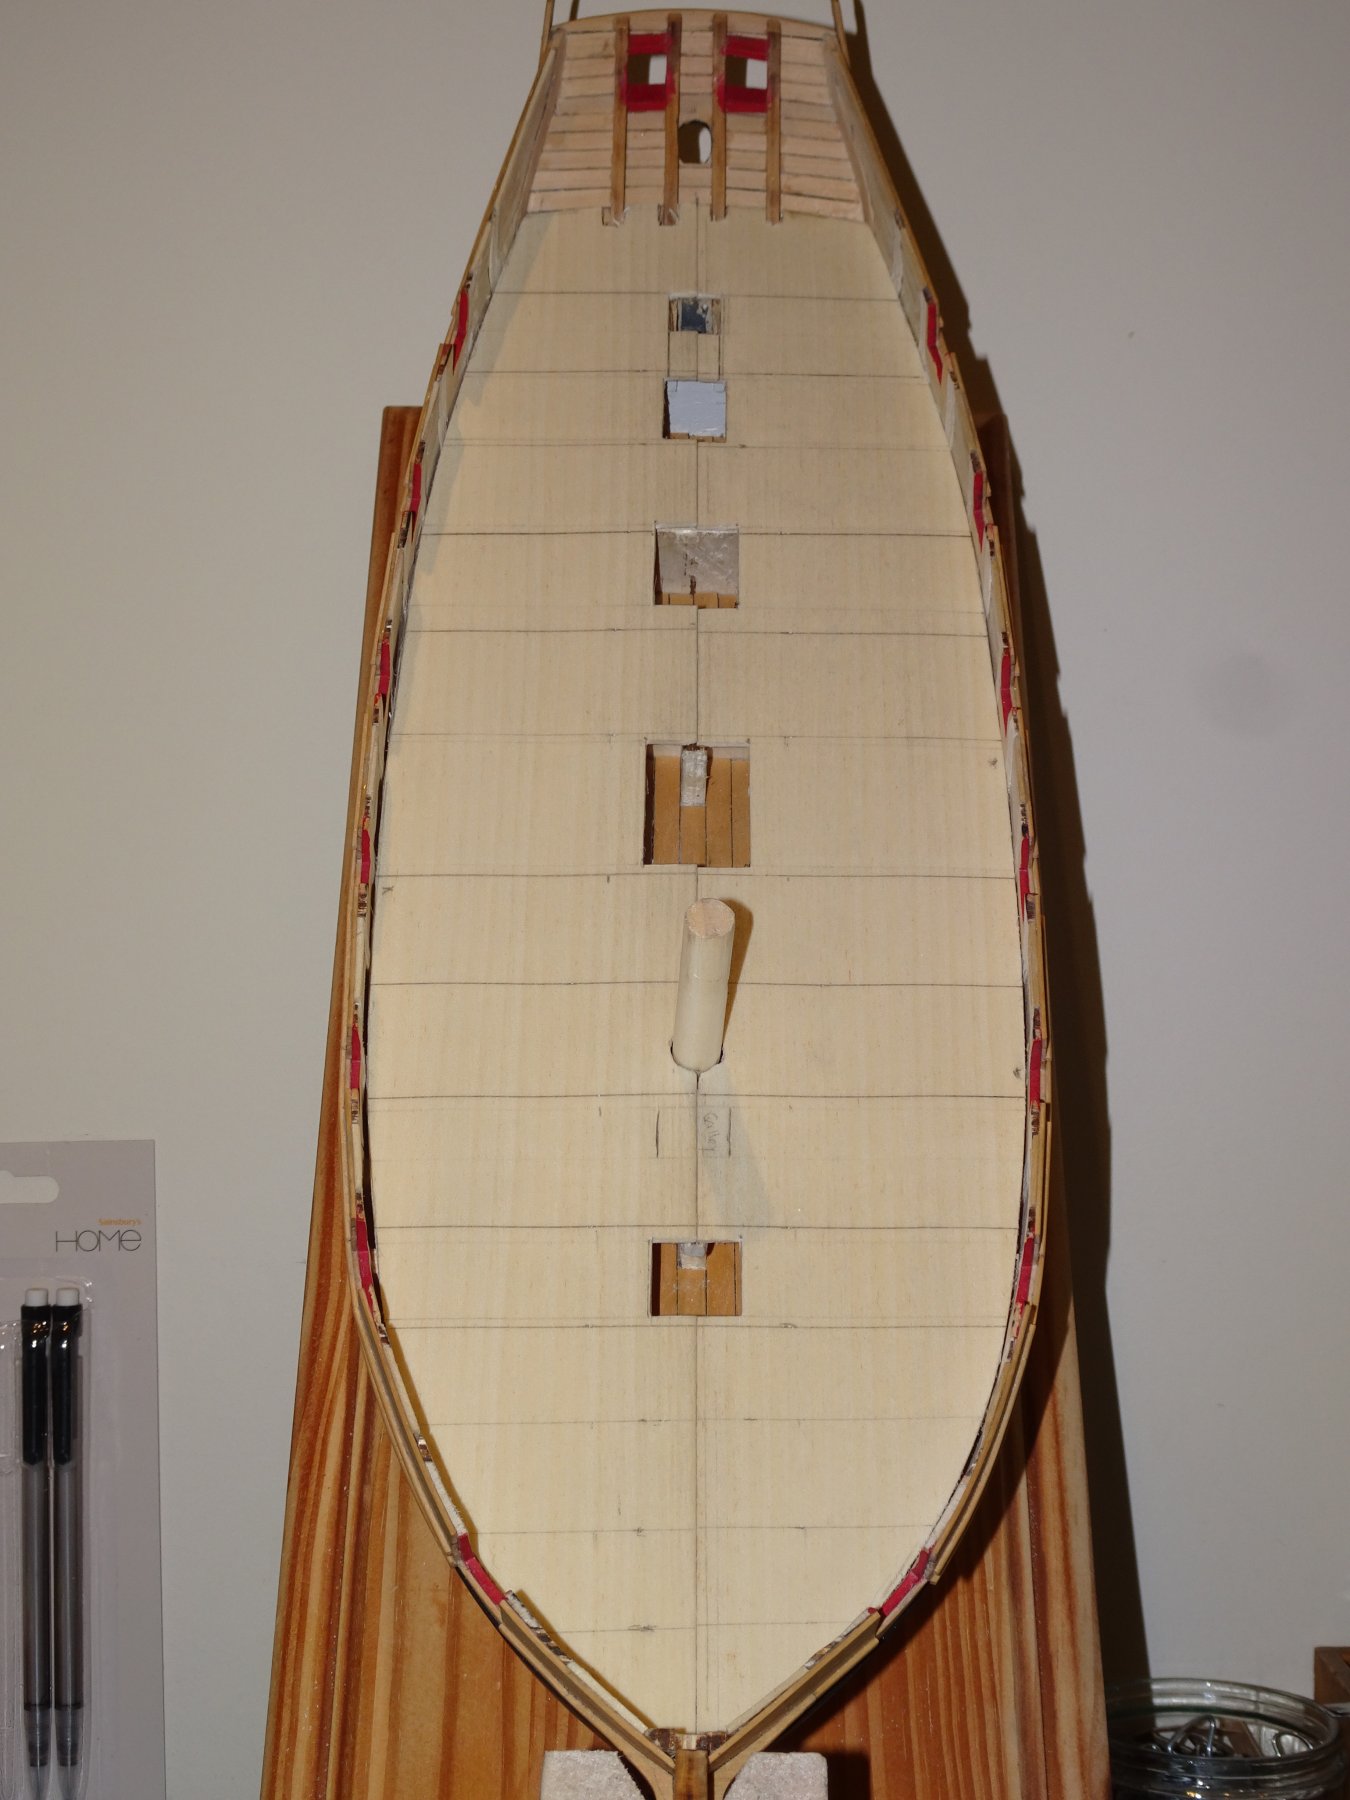
Cheers Dave, I have more or less decided to restrict the paintwork to the wale and inboard . I enjoy the rigging and fitting element of a build far more than basic building stages, do you have any photo's of your progress to date? Thanks, Bob, Thomas, and Al, I'd almost forgotten the mind numbing hours of treenailing, but I have to admit I am quite pleased with the look. 🙂 Post 37 Tidying up inboard and installing the false deck. This involves final smoothing down inside the bulwarks and fairing the deck beams prior to getting the deck down. 2296 All this handling, sanding and chiseling has taken its toll on the paintwork, both the inner surfaces of the ports, and the already re-painted wales. I will leave all red paintwork now until I line the inner bulwarks. 2298 I have got the thickness of the inner bulwarks close to finish. Almost forgot the outer stern frames also need fining down. 2301 Using Limewood strip to check the clean run of planking along the bulwarks. 2303 Limewood strips also used to check the fairing of the bulkhead tops. The False deck To aid alignment of the template I fitted a length of dowel in the mast hole which also helps to hold it position. Weights were also used to keep it in position while I added Tamiya tape around the edges. 2306 For the false deck I am using (2) 1.5mm x 100mm sheets temporarily held together down the centre line. 2308 Reference lines extended across boards. 2311 Transfer completed. 2316 Fitting the False deck; I found it useful to cut out the mast hole and Skylight opening to assist aligning the two halves. 2320 Trial fitting completed, a five hour job to get the fit. 2322 Before I install the deck I will return to the outer hull to complete the finish. Onwards...….. B.E. 30/08/2018


- 574 replies
-
- 17
-
-
- cheerful
- Syren Ship Model Company
- (and 1 more)
-
Beautiful work Ian, a very fine model - care to swap 😉 B.E.
- 51 replies
-
- 2
-
-
- cheerful
- Syren Ship Model Company
- (and 1 more)
-
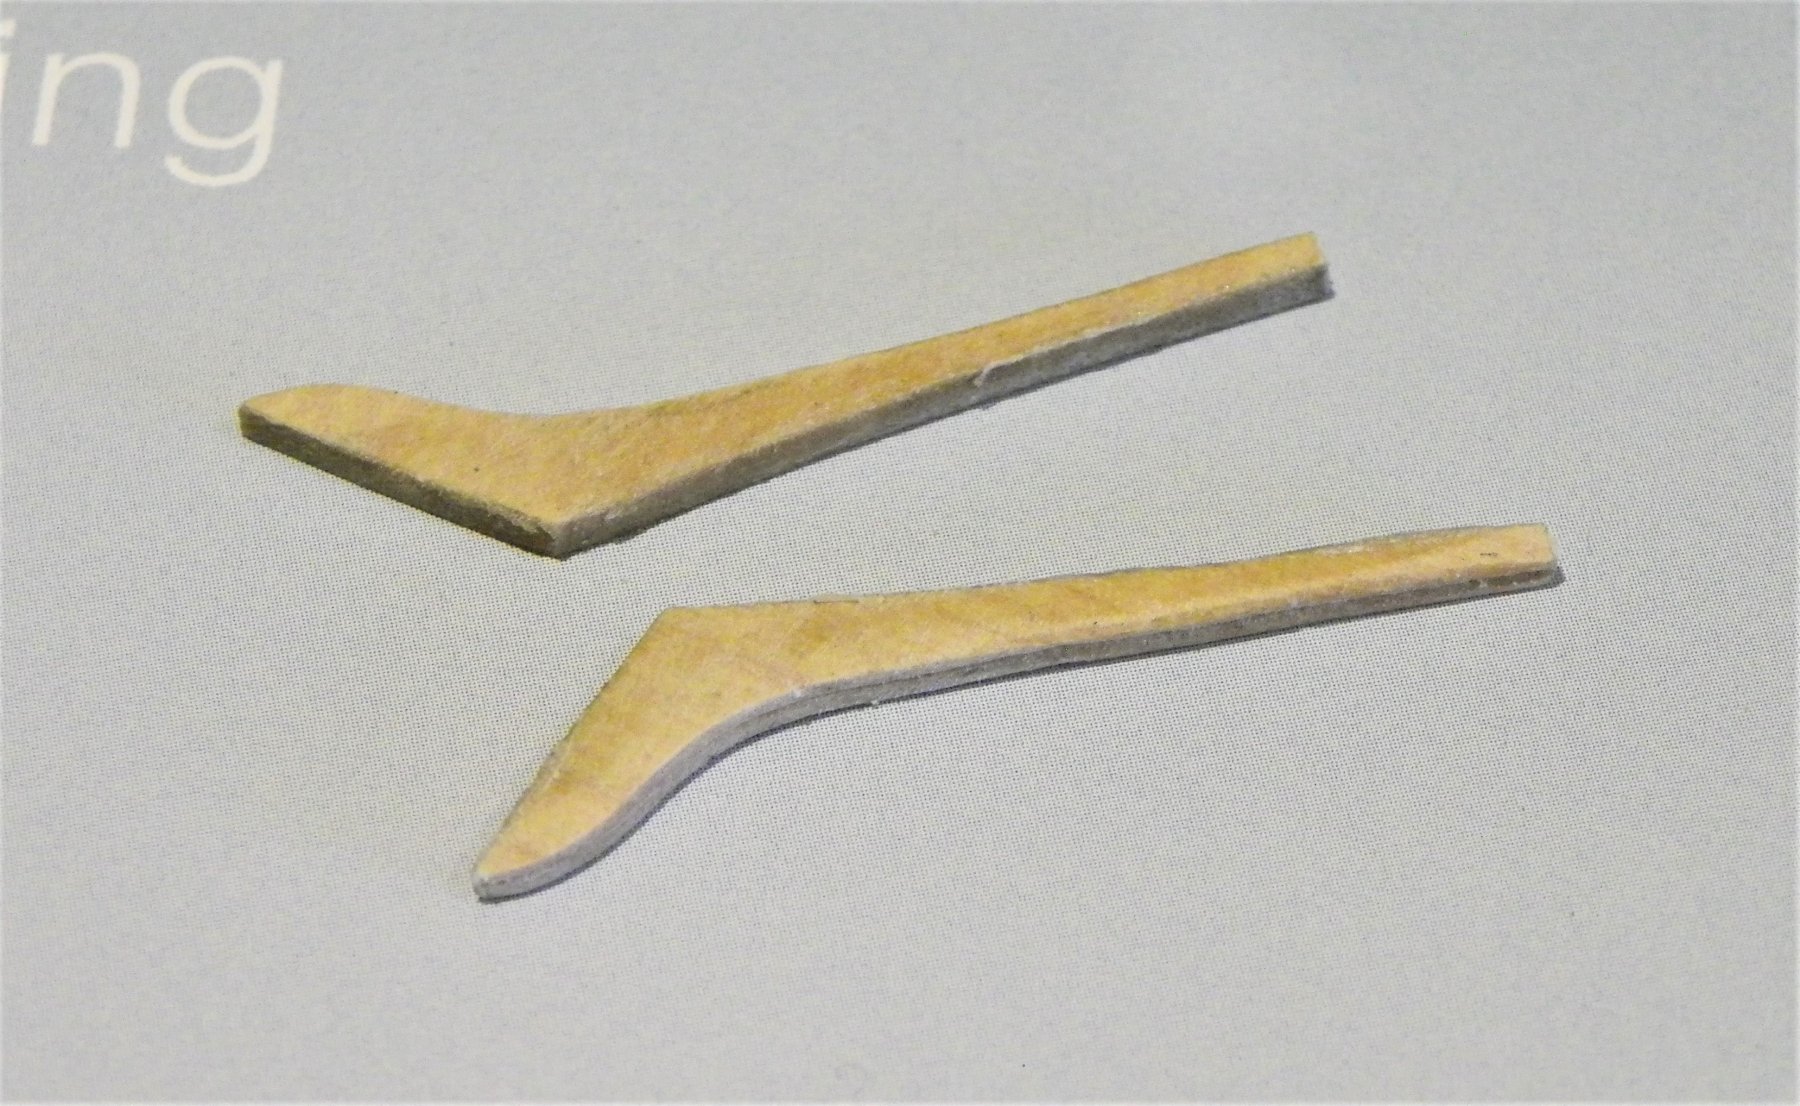
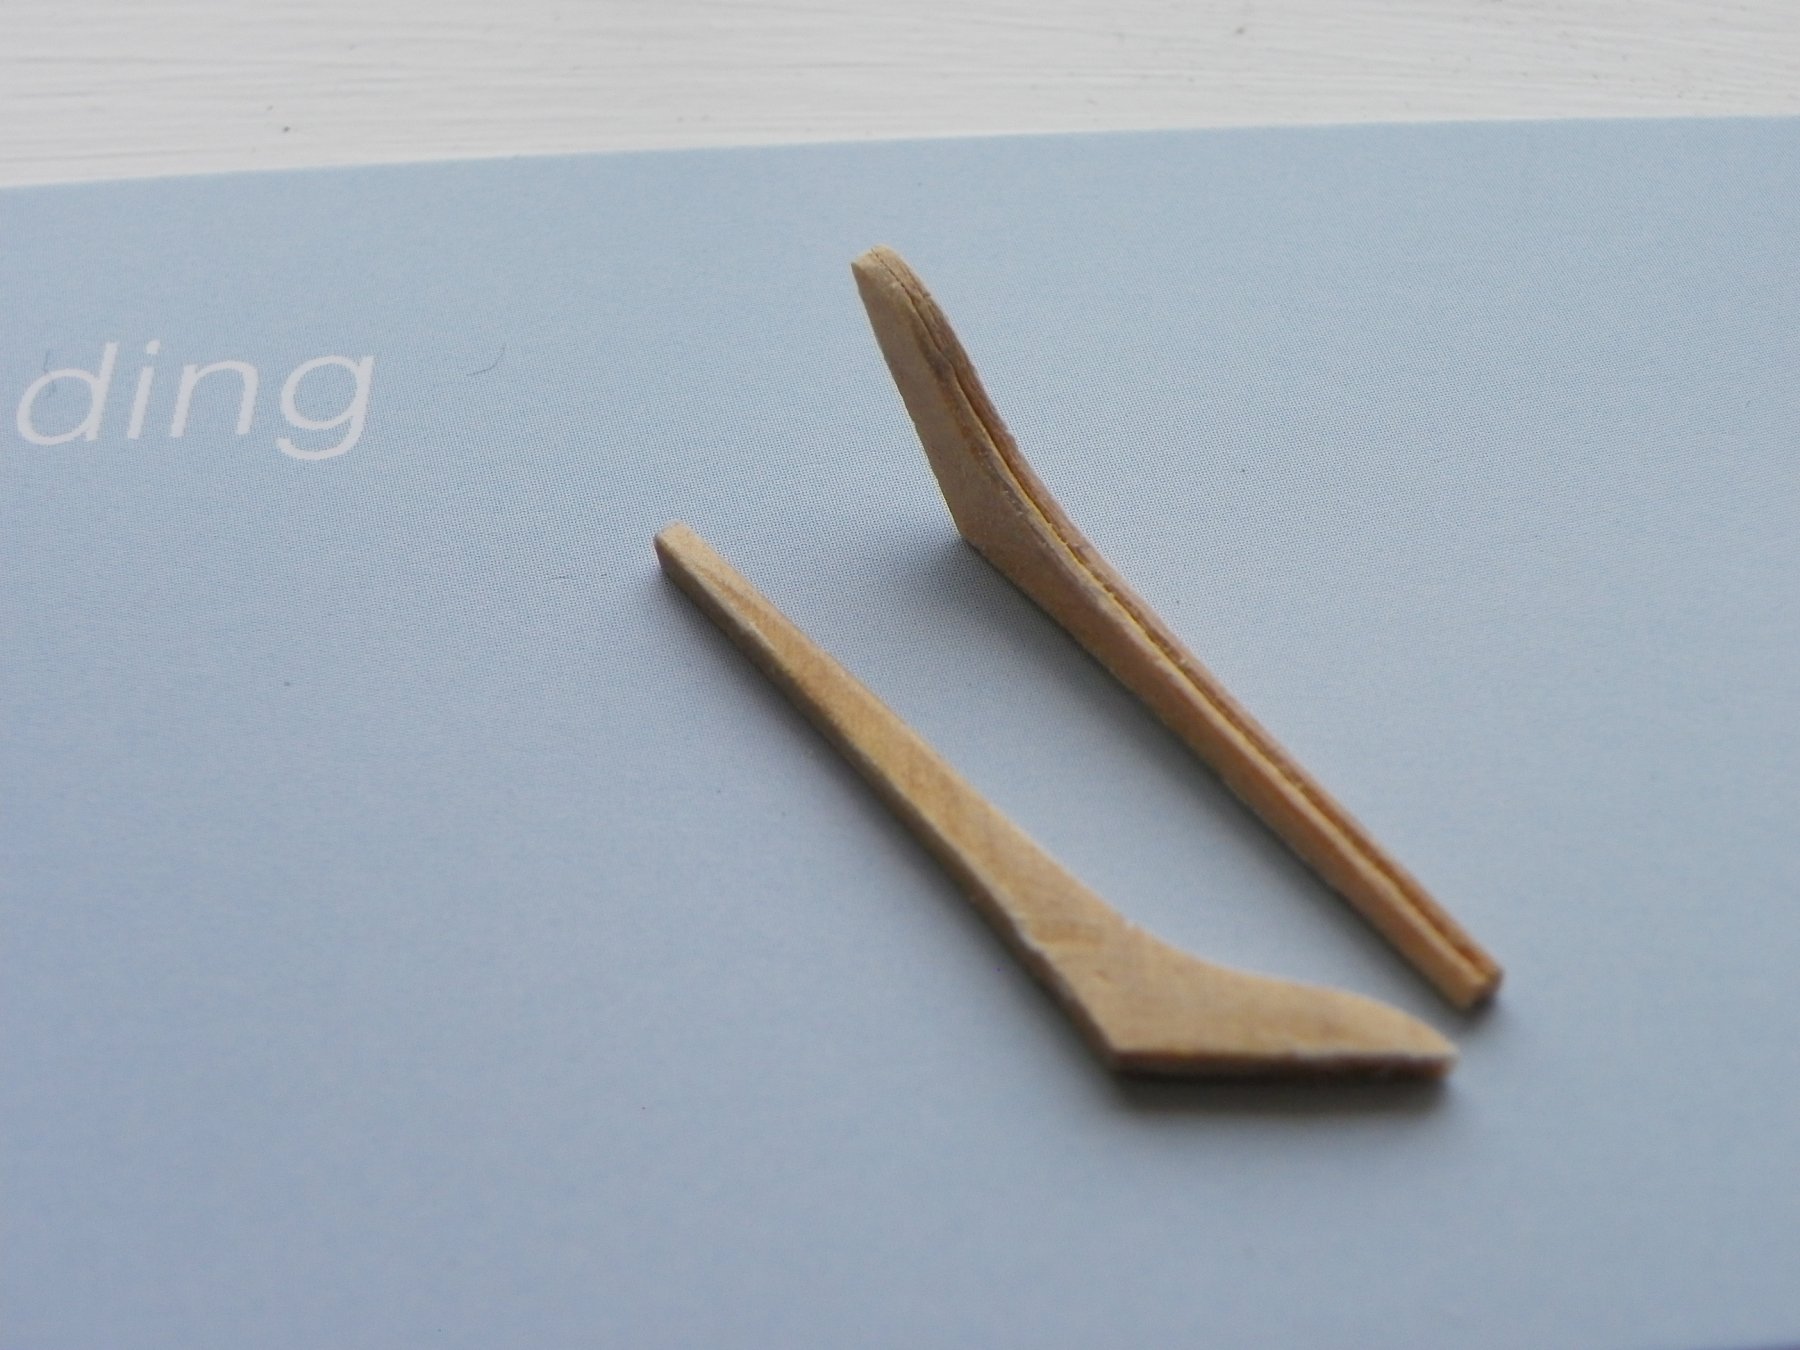
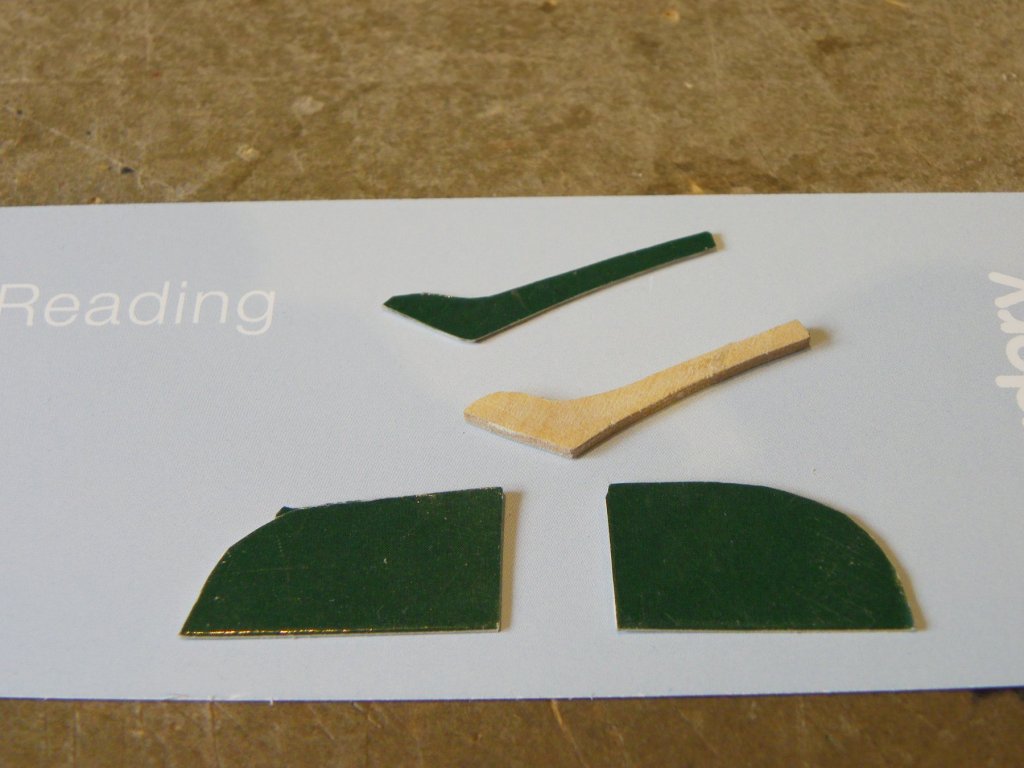
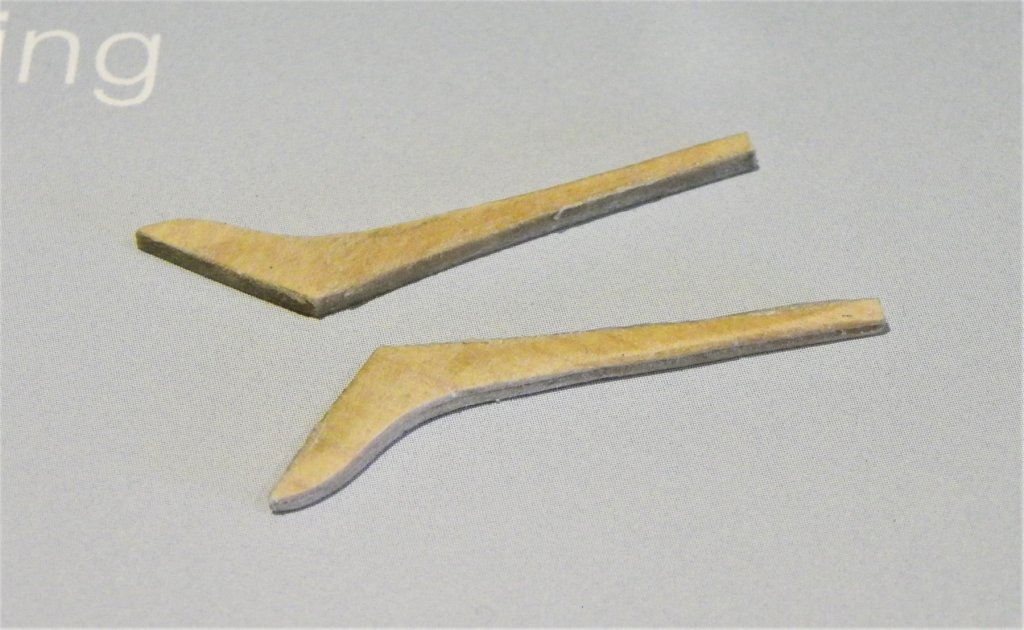
Post 36 Fixing the decorative mouldings. These went on without too much trouble, but at the bow end an extension of the moulding onto the stem, referred to as 'ears', is required to be scratched. I couldn't find a drawing of these items on the plans to use as a working template so it was a case of trial and error. The ear extends to the fore end of the stem and is shaped to run into the fancy moulding running back to the fore side of the bow port. The hawse plate governs the length of the ear onto the hull; I firstly drew the ear shape onto card freehand using the hawse plate length and stem width as reference points. 4402 Once happy with the shape and fit, it was transferred onto 1/16th" Boxwood sheet,(I made several copies) cut out on the jig saw, and given the final shape using scalpel and sandpaper. 4424 The latter stages need soft hands as the stems are quite delicate where they extend back to meet the other moulding, and I did snap one just as I neared completion. 4433 The last job was to scrape the profile into the outer edge. The macro image is not very flattering. 2201 Positioning the ears is a little tricky, they have a slightly upwards angle as they run across the stem, it took me three goes to get them to look right to my eye. They came off ok with water but with the high risk of snapping the tail off the 'ear' 2220(2) With the ears glued into place the lower moulding strip can be completed. 2222(2) 2222 2211 2213 2199 I've yet to decide whether to paint the counter or not, I quite like the natural look, and it is a large expanse of red. 2195 I will leave the outer hull now for a while to concentrate on the inner works, but I will return to do a final fettlin' on the outer works before I install the false deck. B.E 28/08/2108

.thumb.JPG.79aeb17189a0eb0cf3eb2ef7d278c9d6.JPG)
.thumb.JPG.3468ca2e8d7a344226e958ed93ce8b8a.JPG)

- 574 replies
-
- 27
-
-
- cheerful
- Syren Ship Model Company
- (and 1 more)
-
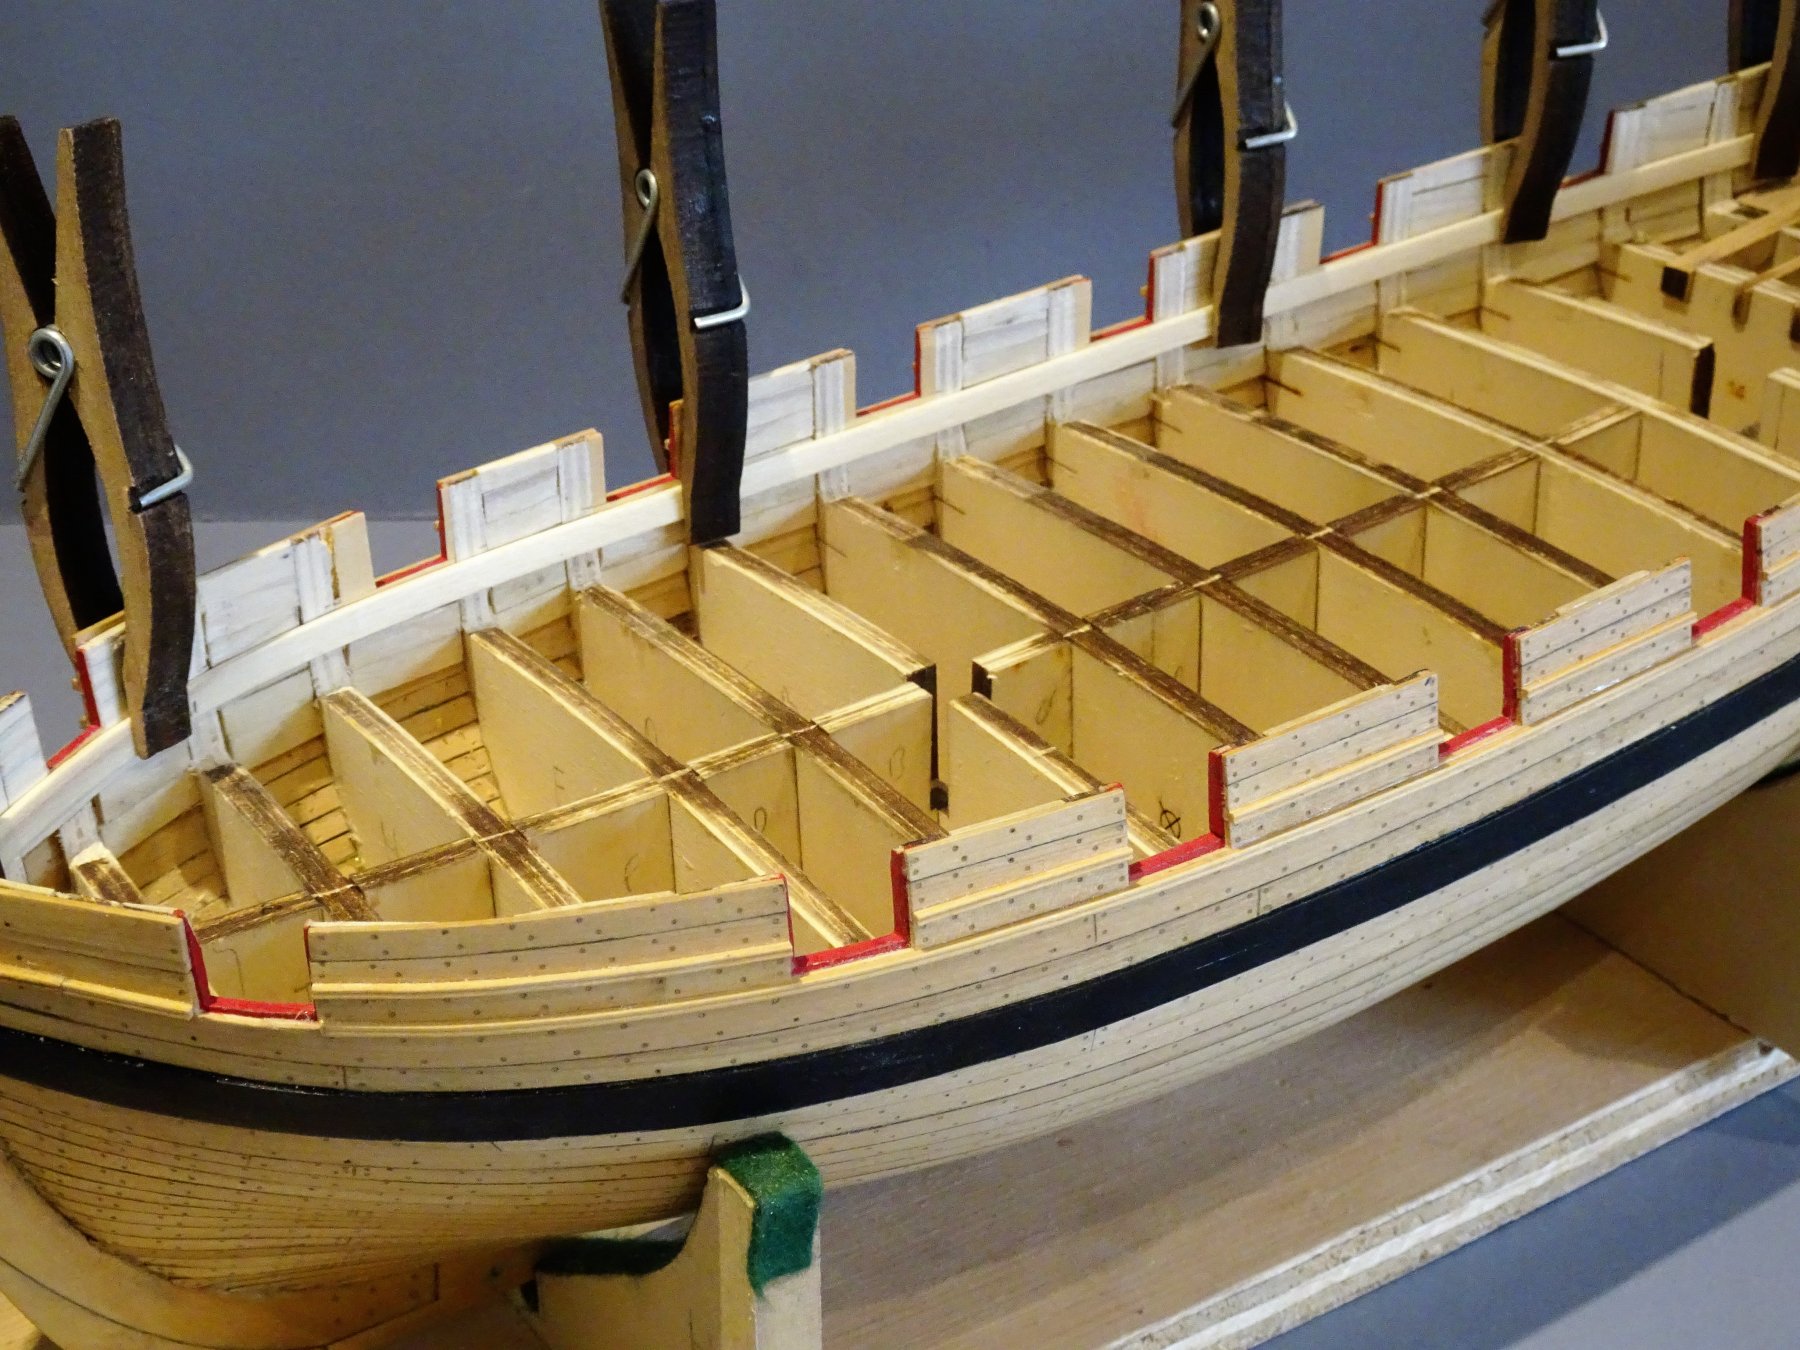
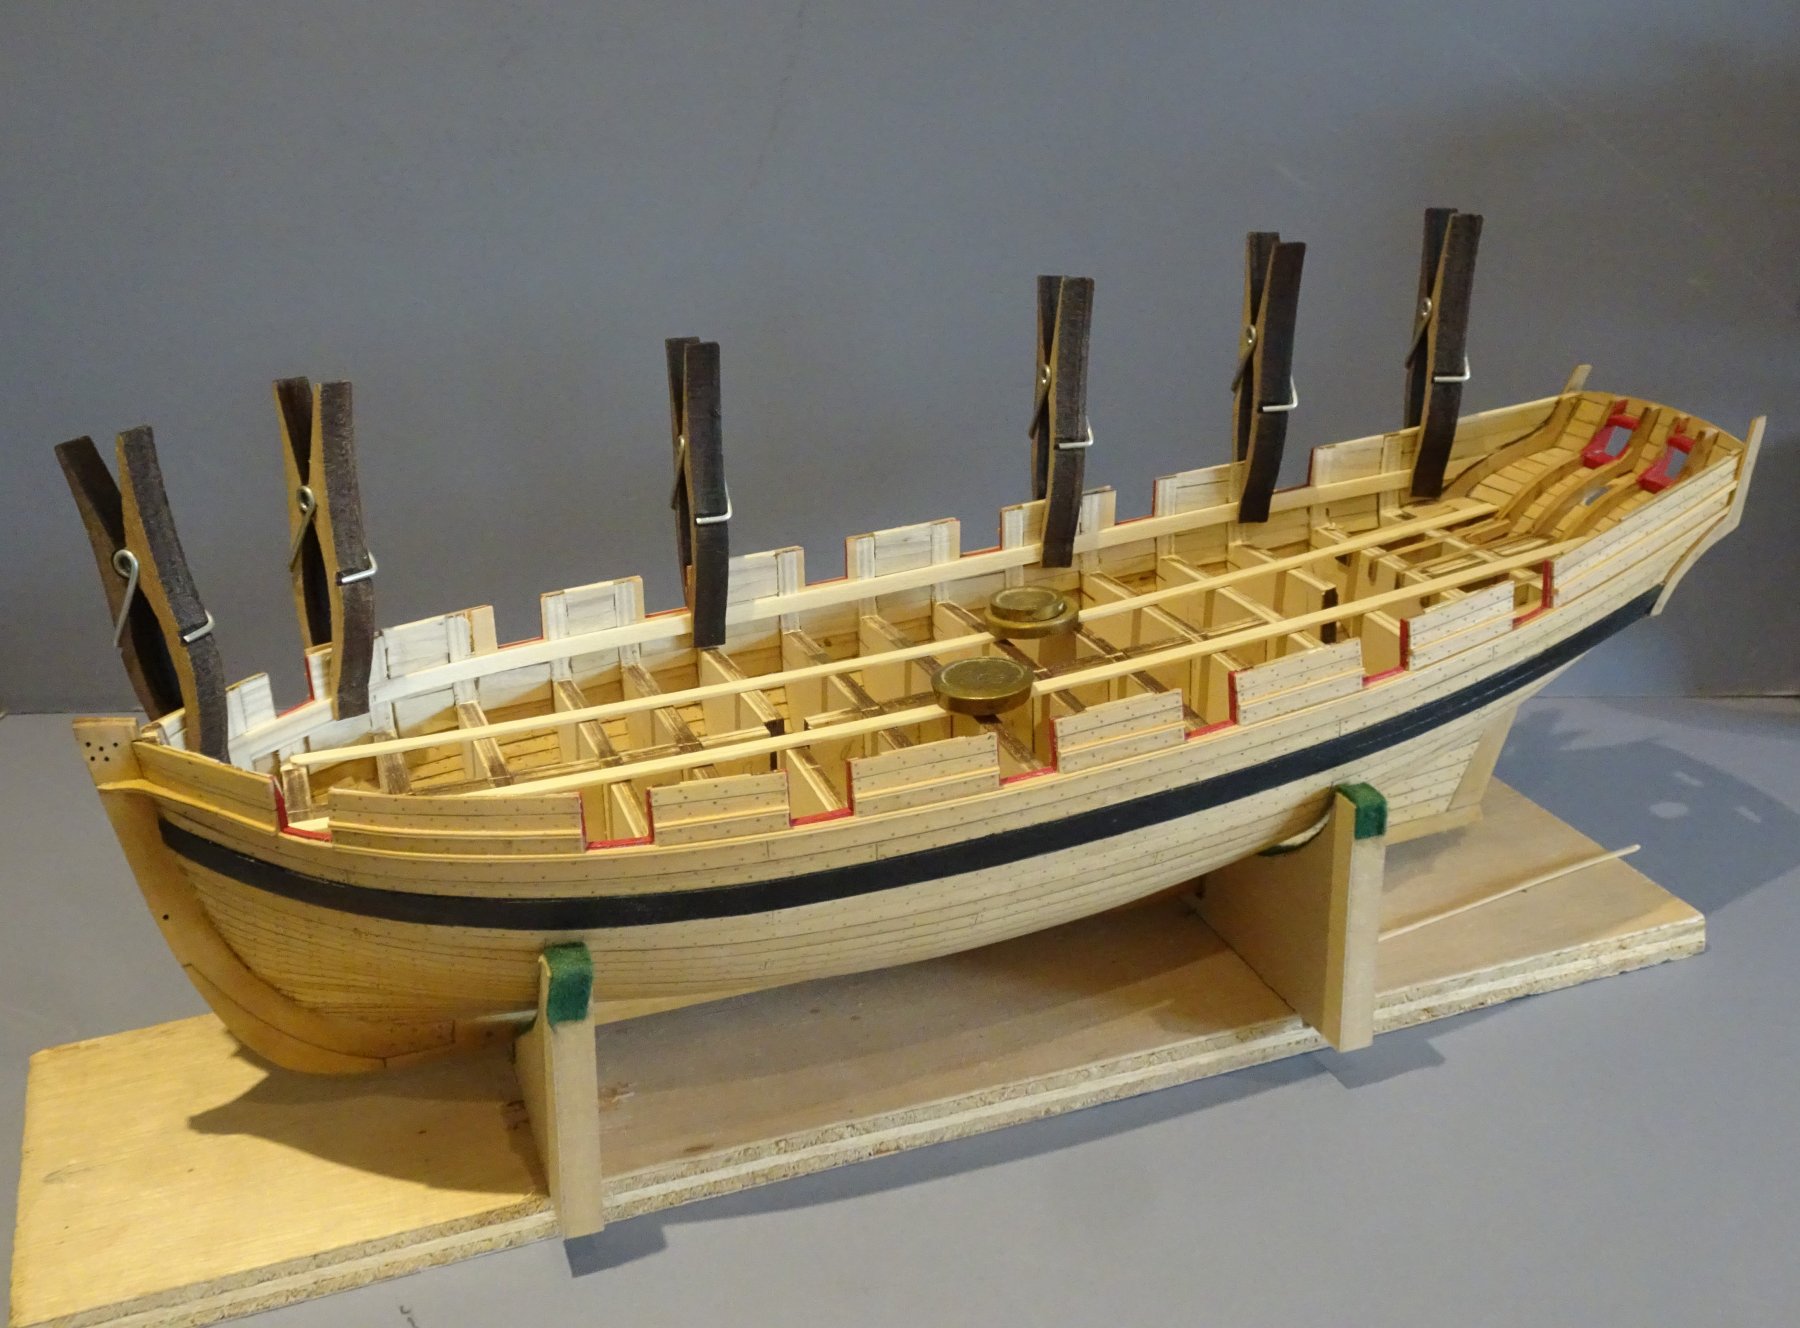
Thanks Peter and Jason, the safety razor blade does make for a stable scraper, and I'm pleased with the outcome. A simple profile but one I think that is appropriate for a humble Cutter. I agree Jason, a model is more than the sum of its parts and the eye is drawn to the overall effect. The eye registers that the moulding has a profile detail, which really is sufficient at this size of model at this scale. Once completed we don't spend our time looking at it thro' a macro lens. 🙂 Post 35 Moving inboard - lining the bulwarks. I am planking between the bulkhead extensions with 1.5 x 5mm Lime wood strip, and will then reduce the extensions to be flush. I don't really trust myself to get going with the Dremel without this sort of guide. Straightforward but tedious stuff this, measure, chop and fit, from just below deck level to bulwark top. 2013 The addition of this inner layer does firm up the outer bulwark planking particularly along the top and in the stern area where the top edges may be vulnerable to splitting. 2014 So to start with the Dremel, I drew guide lines across the top of the bulwarks and got to work. 2016 The Dremel can only go so far down to the deck level so there is some chisel work to be done. 2075 Working at low revs the Dremel soon reduced the excess and I went as close as I dare. 2076 2079 At this stage the bulwarks have been reduced to a tad over 1.5mm (excluding the outer planking). 2083 2084 Some fine adjustments and tidying up now required before I return to fixing the decorative mouldings along the topsides. B.E. 24/08/2018
- 574 replies
-
- 15
-
-
- cheerful
- Syren Ship Model Company
- (and 1 more)
-
Thank you Chuck, I surely am enjoying the project, testing as it is at times. Your well thought out plans and instructions, excellent materials and great fittings combine to make your kits such a joy to build.🙂 B.E.
- 574 replies
-
- 3
-
-
- cheerful
- Syren Ship Model Company
- (and 1 more)
-
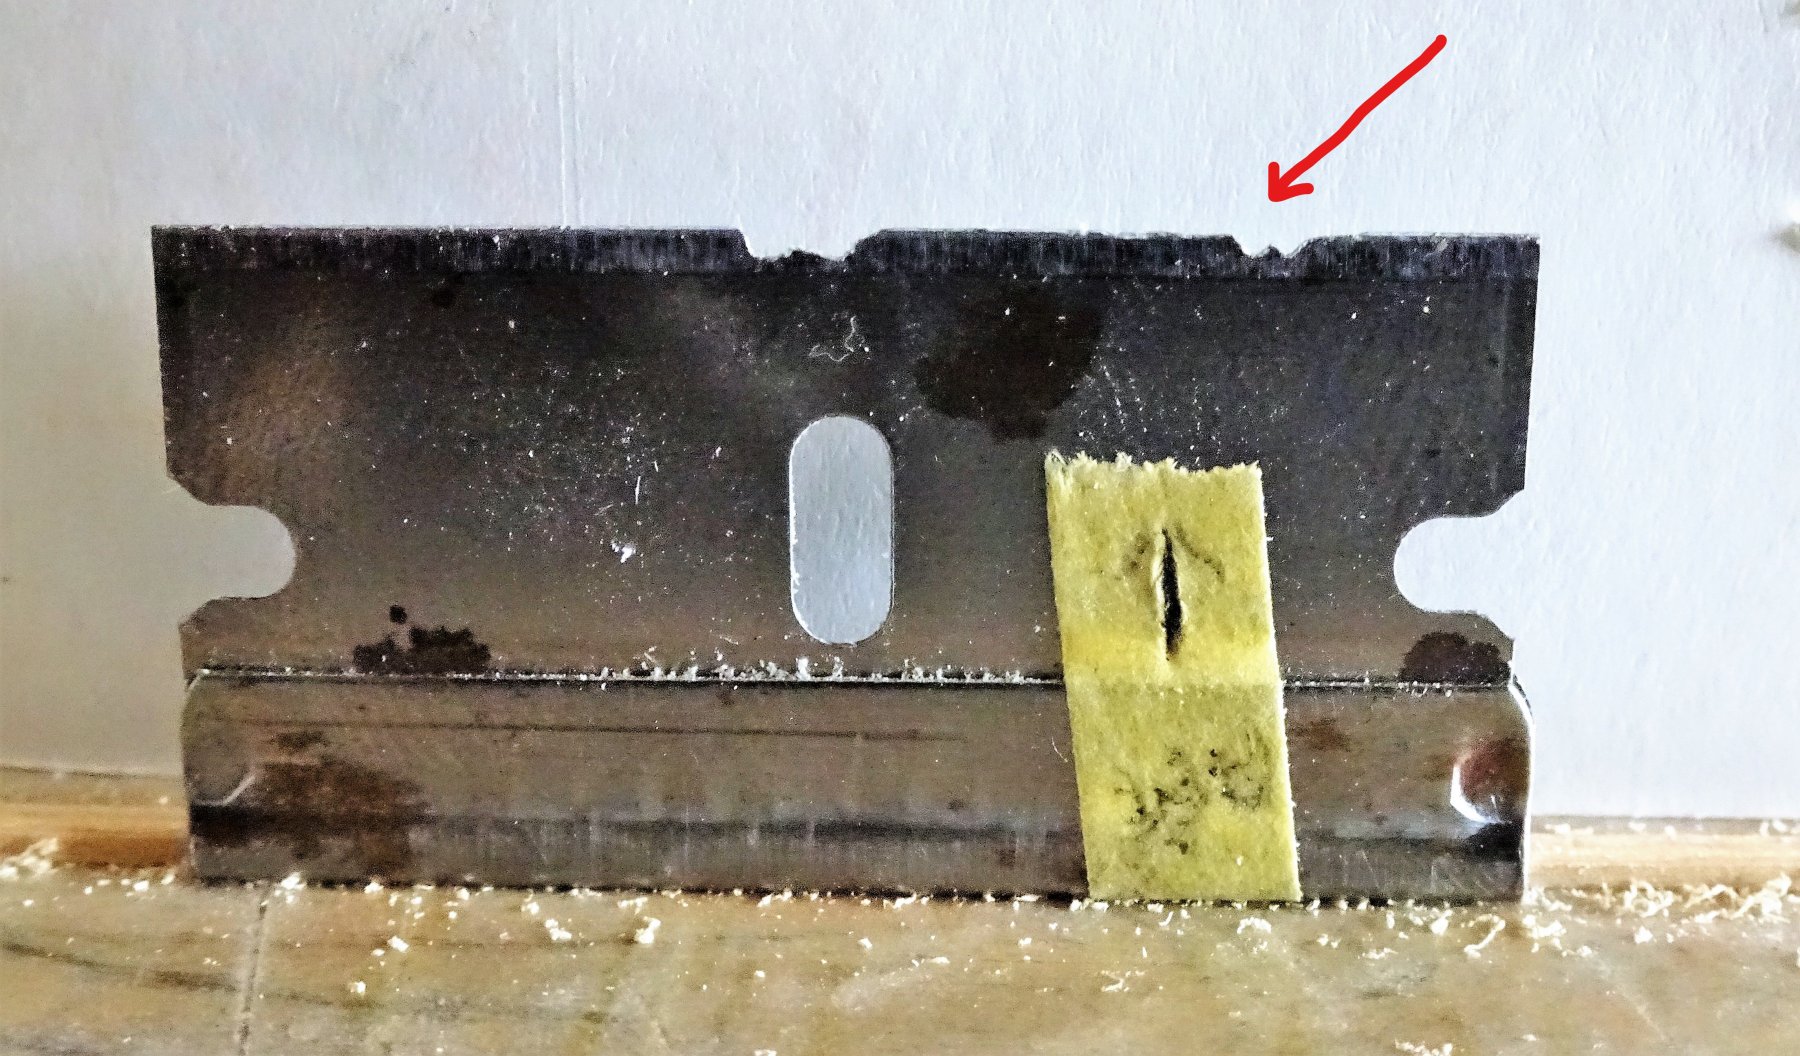
Post 34 A spot of wiping and a bit of scribing. I had intended to start lining the bulwarks today but CMB have sent me 1.5 x 1.0mm strip rather than 5mm stuff I ordered, so while I wait for the correct stuff to arrive I turn my attention to scribing a pattern into the moulding strips. Before I start I gave the hull the wipe-on-poly treatment to protect the surface. 1829 1830 It surely does enhance the look and I am now starting to feel a little better about the hull finish. So onto the moulding strips. Looks simple enough to cut a pattern into a bit of thin metal and draw it across the strip to impart the design. Well maybe... I am using Boxwood strip 3/64"x 1/16" (1.19 x 1.59mm) The first problem is the pattern is incredibly small and has to be contained within only 1.59mm width. 1838 I chose to use a single edged safety razor blade as the medium, and the fine edge of a needle file to cut the simple pattern. At this size a simple groove along the centre of the strip is about the most I can achieve, and the secret is to use light passes along the strip; press too hard and the groove goes off line. The lower strip has a continuous run from aft of the first port to the stern and is ideally scribed in a single run. 1845 To avoid flexing during the process I used double sided tape to secure the strip and keep it true. 1844 The system seems to work. 1852 1854 So this is the look with the strip temporarily secured to the hull. I think I can live with that. 🙂 Cheers, B.E. 21/08/2018


- 574 replies
-
- 28
-
-
- cheerful
- Syren Ship Model Company
- (and 1 more)
-
Hi Martin, I used the brass etched window frames supplied with my Pegasus, and used clear acetate for the glass. To fix the glass I used epoxy resin - very, very, carefully and sparsely applied. Ca is a no, no, for this purpose as it tends to fog the acetate. I have used Clearfix at times and it can work very well. It gives a sort of old fashioned glass look that can look good on period models. I would suggest you trial some on a spare frame to gauge the effect. Those decorative figures are incredibly small at 1:64 scale, have you tried a No 11 scalpel blade point to assist with detailing facial features. Have to handle them carefully to avoid snapping them, but that probably isn't a bad thing when doing fine work. B.E.
- 467 replies
-
- 2
-
-
- fly
- victory models
- (and 1 more)
-
Nice work on the Tafferal Martin, I admire your approach to scratch as much as you can, particularly the carving which I mostly dodged on my Pegasus build. How do you intend to glaze the stern lights - acetate or perhaps clearfill ? Very much looking forward to seeing the stern decoration develop. B.E.
- 467 replies
-
- 1
-
-
- fly
- victory models
- (and 1 more)
-
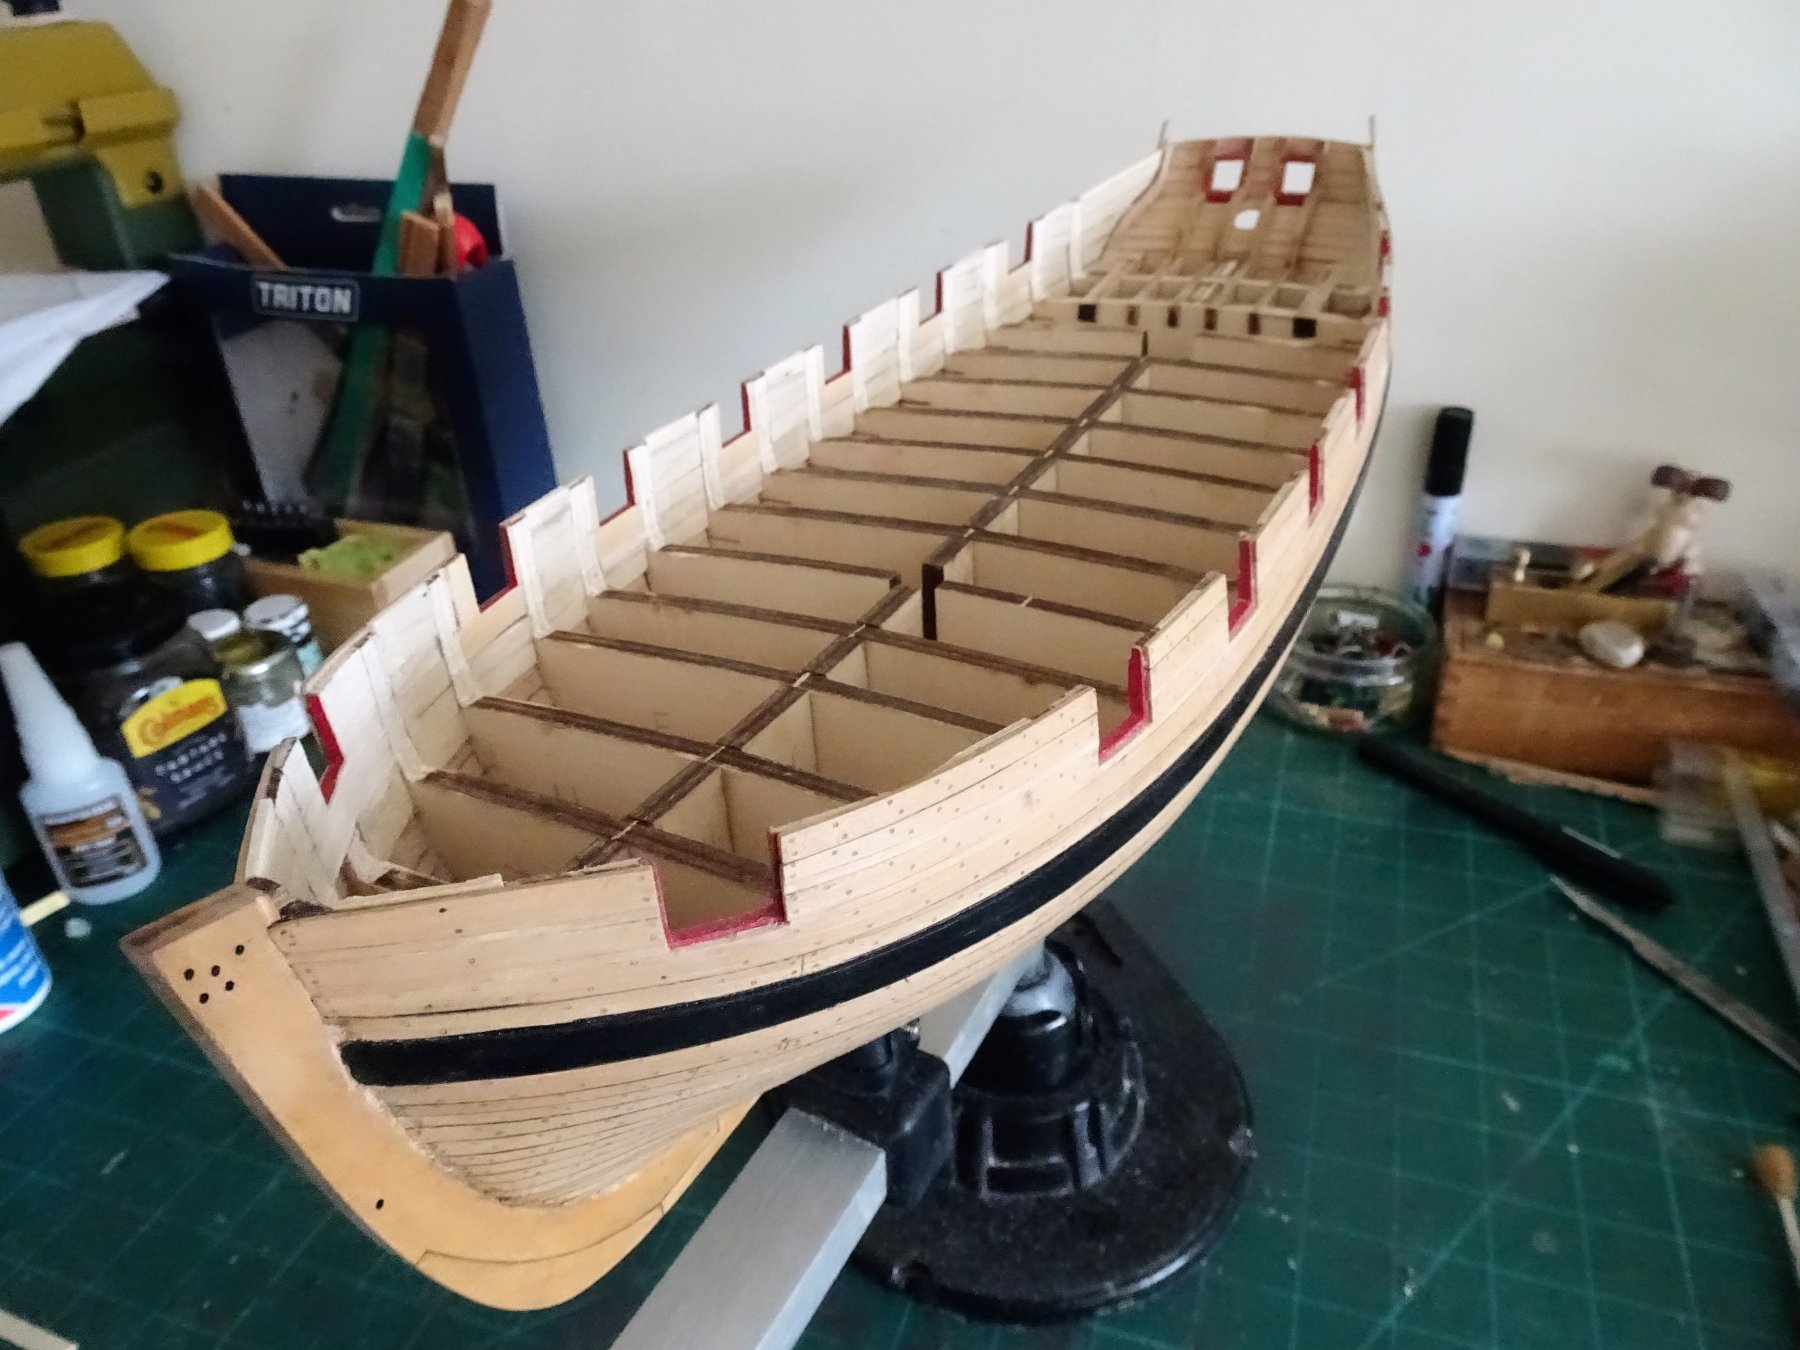
Post 33 Treenail completion So after nearly three weeks the hull treenailing is completed, having drilled several thousand holes and got thro' twelve 0.45mm drill bits. 1811 I still think on balance the drill and fill method is the least hard on the fingers and gives a result I am happy with. 1814 It doesn't look too spotty, to my eye at least. 1810 The next suggested stage is to add the topside mouldings, but I am going to digress and first move onto the inboard bulwarks. I intend to plank inboard between the bulkheads and use this a guide to then thin them down to suit. B.E. 19/08/2018
- 574 replies
-
- 14
-
-
- cheerful
- Syren Ship Model Company
- (and 1 more)


.JPG.ab06e7d6474118b9105f20ee788920d7.JPG)
.JPG.bafcd4764305949d4ce24c2e53fa2eed.JPG)


.JPG.912cf07e9069ac36695c6c398a14a7ad.JPG)


.JPG.50c1feae4350ff899fb85669edcddcde.JPG)


.JPG.4d4c84e90fb93f882073ac972b474214.JPG)
.JPG.419ea641bce2e1e6c915497b9e980283.JPG)