


Landlubber Mike
-
Posts
4,543 -
Joined
-
Last visited
Content Type
Profiles
Forums
Gallery
Events
Everything posted by Landlubber Mike
-
 Fantastic work on the sea - looks fantastic! Hope you don't mind me following your log. I have this kit (I think I might have the Platinum edition which includes a wooden deck and some PE upgrades) along with the Parkins upgrades. I also have the Revell 1:144 version with the Pontos upgrade. Was thinking of doing the 1:144 as the Snowberry and the 1:72 as the USS Saucy just to mix it up a bit. Interestingly, I found an electronic copy of the old Matchbox kit instructions which covered the Saucy along with the Snowberry and Bluebell. Seems that the Revell kit -- which my version only includes the Snowberry and Campanula -- might include the Saucy pieces, which I think were only a few minor differences in the bridge and then a different rear gun platform (putting aside numbering and other decal-type differences). Otherwise, I might try to build both as USS ships. There are some cool ships like the USS Fury, USS Restless, and USS Tenacity. Just a matter of doing the research and trying to figure out what the differences are, which is probably easier said than done.
 -
Thanks for the warning Kevin, really appreciate it! Good timing on your post too - last few days I've been working on the model. Ended up getting some additional a la carte upgrade pieces from Five Star and Alliance Model Works and ended up replacing the kit capstan and bollards with brass ones. Looking a lot crisper now. I'm just about to the stage to paint the hull. It's a bit of a planning exercise to figure out how much to put on the model before painting the IJN gray, given that this ship has linoleum sections as well. Want to put as much as I can now so I don't have to paint them separately and add them later, but want to be careful not to install parts at this stage that might get broken off later in my hands.
-
Can I ask which outfit has those drawings? Would be an awesome ship to build in a larger scale from scratch. I have the 1/700 and 1/350, maybe 1/200 would be fun. 1/72 seems way too big, though I don't think this ship is very big so maybe it won't top out at 5' like the 1/200 Bismarck.
- 127 replies
-
- 6
-

-
- Akitsushima
- Pit Road
- (and 2 more)
-
Hey Craig, good choice of subject! That was the first 1/700 kit I bought due to the quirkiness of the design. Of course it then spiraled from there and now I have too many 1/700 kits. I'm going to do a few more before I tackle this one though. I have some of the Model Art japanese mags in case you need additional pictures. In terms of aftermarket, Artist Hobby makes a really nice super upgrade set under set number AH 670003. I bought mine from this seller in China - have ordered multiple times from them to pimp out my 1/700 kits, and never had a problem. It might have a little more detail than the Tetra Model set you have. https://www.ebay.com/itm/172860032487 I have the 1/350 Snowman Models resin kit. I got it for a good deal last year, but saw how pricey it is now. It's interesting in that it comes in a wooden box. The resin is very nice, and it has resin and PE parts as you mentioned. I believe it's a re-pop of a Hasegawa resin kit from 2009: http://resin-model-kit.com/snow_man_resin_kit_1_350_ijn_seaplane_tender_akitsushima_1942_sr_3501.htm https://www.1999.co.jp/eng/10508022 http://www.modelwarships.com/reviews/ships/ijn/cv/hsg-350-akit/hsg-review.html There is also a 1/72 Airfix kit of the Akitsushima. Have never seen it on eBay though or anywhere else. I did come across this log of someone who scratch built one (I can't tell if he actually bought the Airfix kit or was just noting it was out there): Start of build log: https://inchhighguy.wordpress.com/2018/12/09/1-72-akitsushima-秋津洲-ijn-seaplane-tender-scratchbuild-part-i/ Final: https://inchhighguy.wordpress.com/2018/12/28/ijn-seaplane-tender-akitsushima-秋津洲-1-72-scale-scratchbuilt-pictures-1-of-3/
- 127 replies
-
- 8
-
-
- Akitsushima
- Pit Road
- (and 2 more)
-
Awesome job man, congratulations! Love the name and the colors. Thanks for sharing the journey!
-
I didn’t think Gator’s Glue would have a good enough grab on such a tiny surface area, will have to try it, thanks! First time I tried it I didn’t know what I was doing, but have used it a few times on my 1/350 build and really like it - until I spilled half the bottle on my desk 🤬
- 168 replies
-
- 6
-

-
-

-
- Scharnhorst
- Flyhawk
- (and 1 more)
-
Are you using CA or clear to attach the railings? I used CA on my destroyer, but am considering whether the clear approach would be easier.
- 168 replies
-
- 6
-
-
- Scharnhorst
- Flyhawk
- (and 1 more)
-
Great suggestion Craig, thanks for passing that along. My guess is it would be close to impossible to shape the rails once installed. Looking good!
- 168 replies
-
- 7
-
-
- Scharnhorst
- Flyhawk
- (and 1 more)
-
Eamonn, well done! One of the nicest models on this board. Congratulations! Sorry if I missed it, but did you say what you’re building next?
- 1,039 replies
-
- 2
-
-

-
- ballahoo
- caldercraft
- (and 2 more)
-
Craig, do all the kits come with wooden decks, PE, brass barrels, etc.? I like the idea of getting an all in one kit with everything already in the box, rather than have to hunt down the aftermarket.
- 168 replies
-
- 6
-
-
- Scharnhorst
- Flyhawk
- (and 1 more)
-
Spectacular work Ulises! Well done! Looking forward to your SOS!
- 786 replies
-
- 3
-
-
- Royal Louis
- Finished
- (and 1 more)
-
Really nicely done Craig. Fantastic job! Are you going to put it in a water diorama?
- 168 replies
-
- 6
-
-
- Scharnhorst
- Flyhawk
- (and 1 more)
-
Upgrade kit for 1/200 scale Mikasa pre-dreadnought model
Landlubber Mike replied to Cal123's topic in Plastic model kits
I've ordered more than a few times from Freetime Hobbies and never had an issue. With the postal issues from Covid, etc., I'm not surprised that international orders are having issues (likely not a Freetime issue). -
Nice work Mark!
-
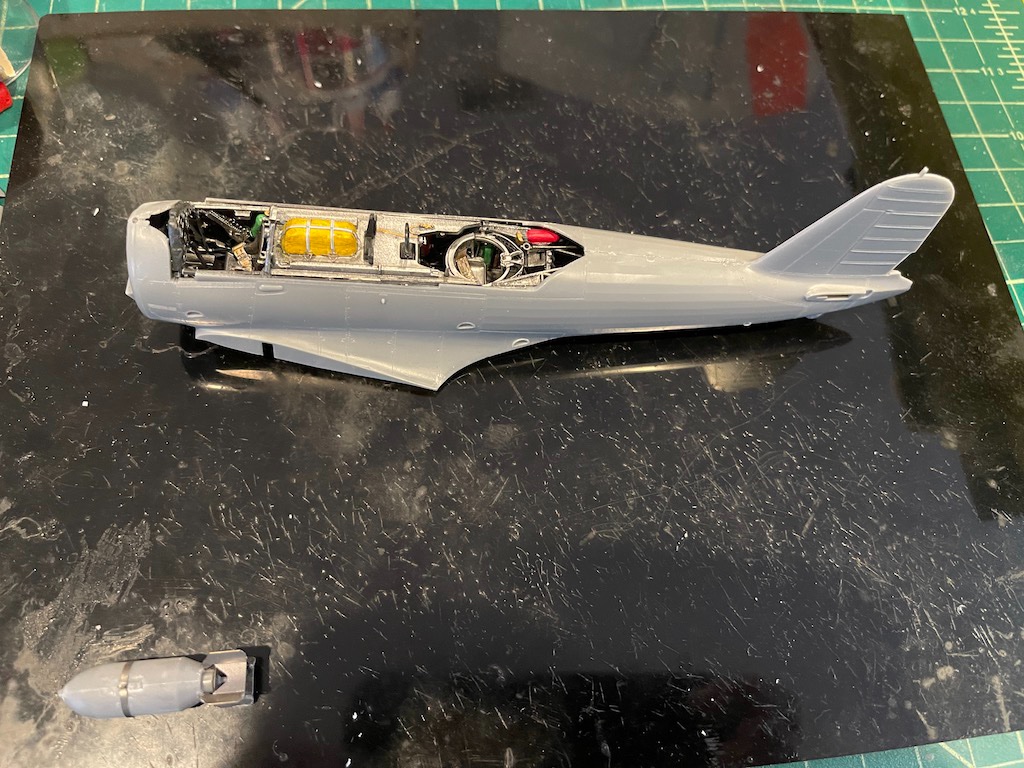
Thanks, I'll have to check that out! The problem was that the rear cockpit was probably close to 2mm too wide. So, it was endless test fitting so that I could get the rear portion of the fuselage halves to close. Even resorting to a thick bead of 2-part epoxy on the underside of the rear seam of the two halves it was splitting a bit right near the rear cockpit. I probably ended up with a 0.5mm gap in the first few millimeters near the rear cockpit, but that will be easily filled and in the end, will be too small to really notice. The IP essentially sits on two tiny shelves of the front cockpit, but doesn't lock into place. And it was impossible to fit it after front cockpit was inserted into the fuselage unless you cut it into two pieces which is probably what I should have done. Just poor design of the whole thing. A bit surprising given how good my experience has been with other Accurate Miniatures kits. Not to mention, the instructions have a bunch of typos with wrong part numbers shown, and in some instances, aren't very clear on what to do.
-
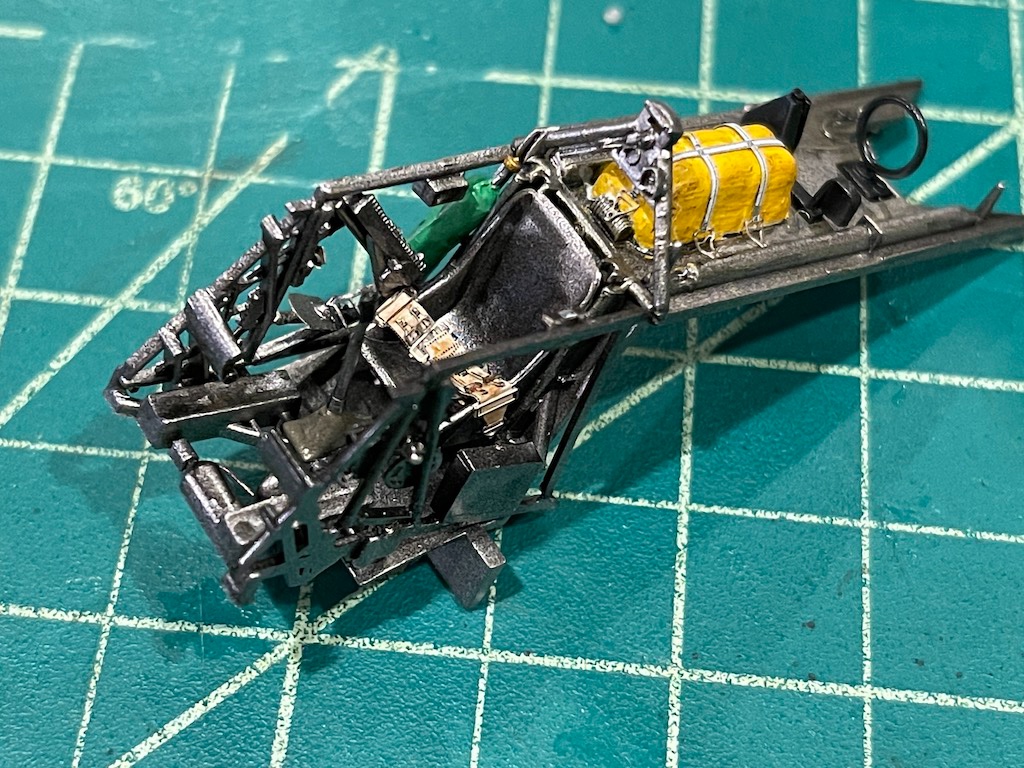
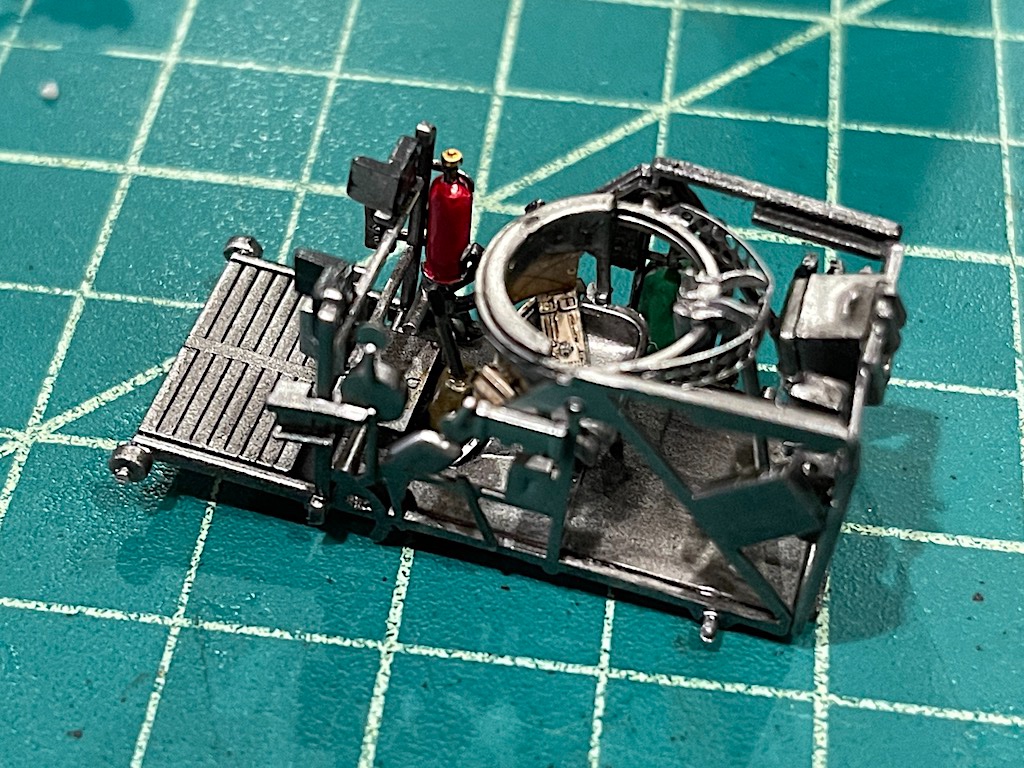
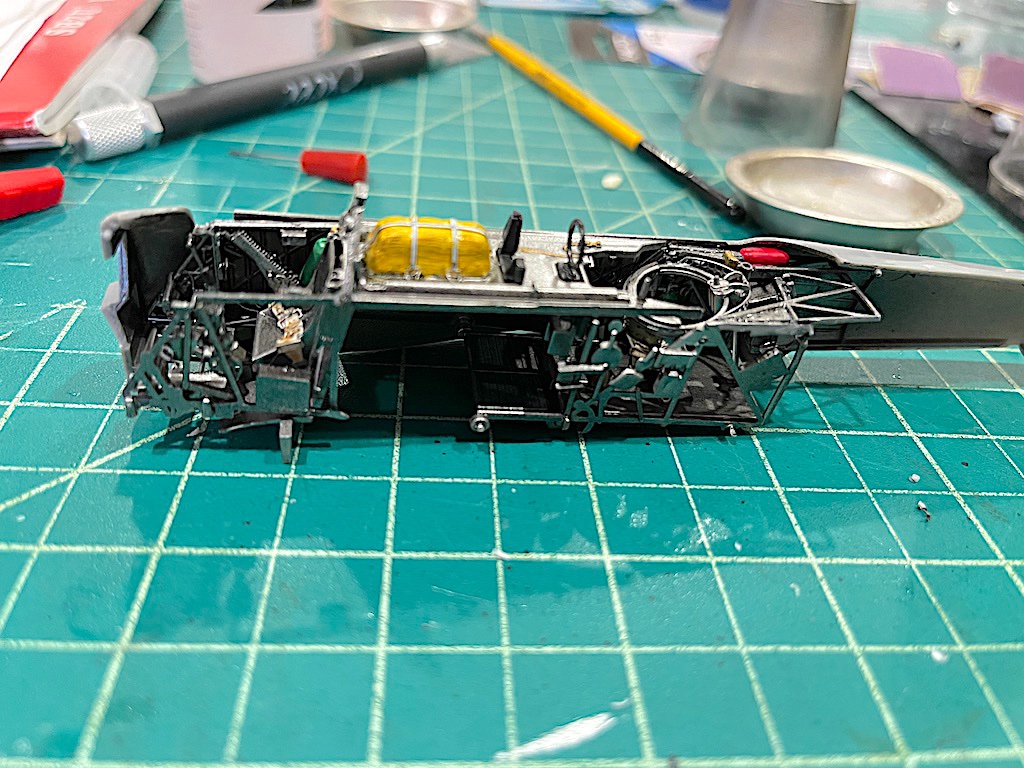
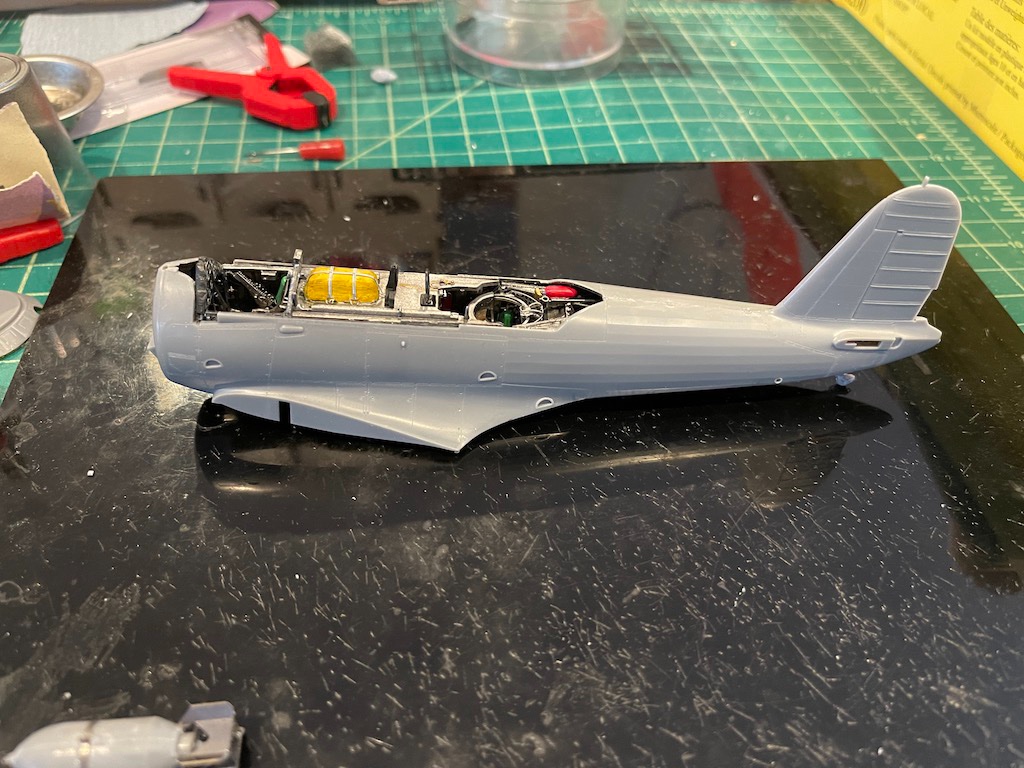
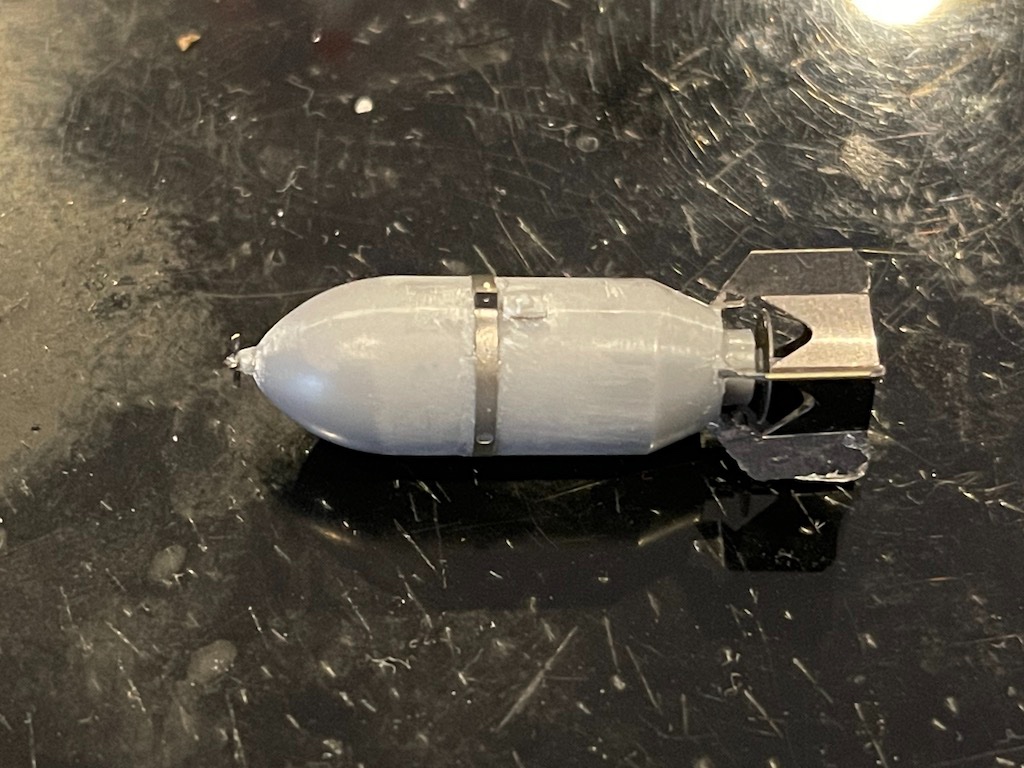
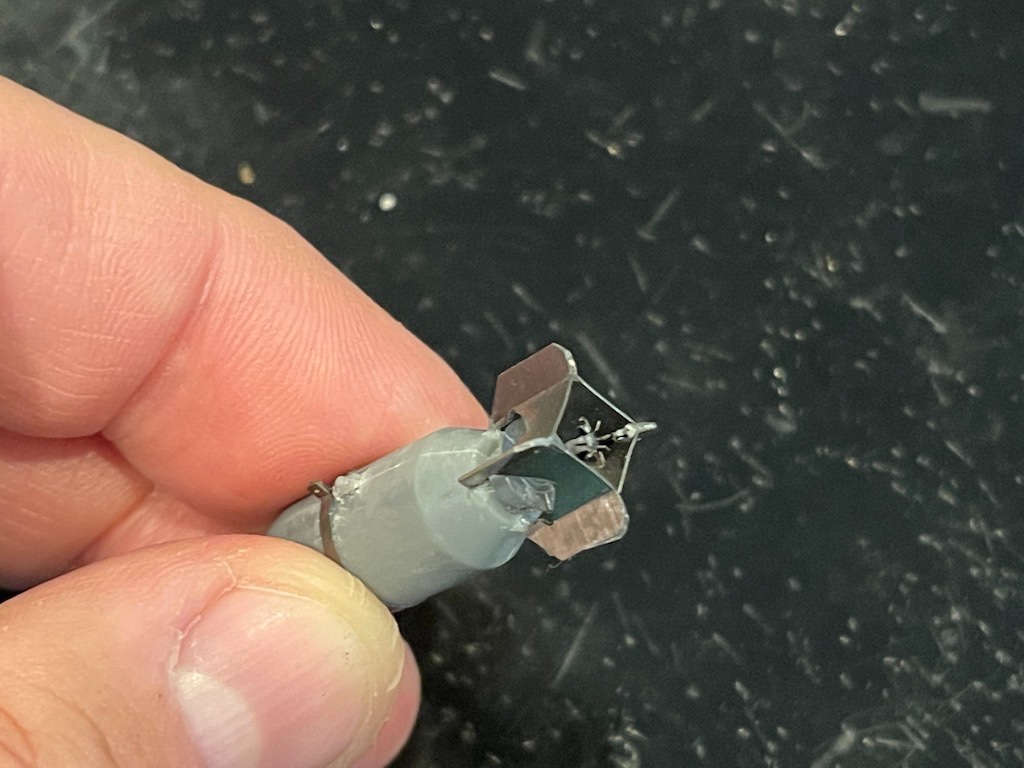
Made some progress on the Vindicator the last couple of weeks. Put together both the front and rear cockpits. Lots of nice little details from the kit, especially when enhanced by the Eduard PE set. Quoting myself here as the next stretch of the build -- assembling the cockpit and fuselage -- has not been fun at all! I probably had a good five or six hours to slowly shave back material to get the fuselage halves to close. The rear cockpit essentially is too wide so you can't close the fuselage halves in the rear, and if you try to squeeze things together, you run the risk of bending and breaking some of the cross pieces in the cockpit. Had to use a combination of two-part epoxy, plastic cement, and CA. Managed to get it together finally, just need to fill and sand in a few spots. Apparently others have had similar issues. Definitely not the quality of the F3F kits for sure. What made it more complicated was you had to fit the two cockpits into the fuselage halves, and also fit the instrument panel on the front cockpit -- yet the front cockpit doesn't have a good way to secure the IP in the proper place. Looking at the cockpit, the IP is a touch crooked so I'm going to have to figure out if I can actually rework it in place. So literally you're trying to hold about five pieces in place at once to glue everything, and that doesn't include the bottom of the fuselage which is a separate piece. I also worked on the 1000lb bomb, enhancing it with the Eduard PE. Looks a touch nicer than had I built it from the box. Required cutting or sanding off a bunch of the kit details to add the PE. Next up, I'm going to work on the wings. I'll be doing two things - cutting out the flaps and adding the Eduard PE for open flaps, and then cutting the wings to display the model in the partially folded position. Will need a stiff drink or three to get through that part I'm sure. Thanks for looking in!
- 38 replies
-
- 14
-
-
Ho203, thanks for looking in. And thanks for making me your first post on MSW, welcome! I hear what you mean on the water based primers. I would never try to sand Vallejo, that's for sure. For models where I need to sand down things, I usually go with Mr. Surfacer or sometimes Tamiya (rattle cans). Those are my base primers for car and plane models. And then once the body or fuselage are done, I often use Vallejo primers and paints on top. On my F3F builds with the aluminum bodies, after getting the bodies primed and prepped using Mr. Surfacer, I used Vallejo Gloss Black Primer before spraying their Metal Color line of paints and it worked perfectly. For my 1/700 Hatsuzakura build, I just went with Vallejo as there was no need to sand primed areas. For this 1/350 Shimakaze build, I used Tamiya primer (rust I think) for the lower hull. I have Mr. Surfacer in black and will probably use that for the upper hull. For metal, I used the Mr. Surfacer for PE from the rattle can to spray down the PE frets for the railings on my 1/700 build (like you to pre-paint before installing them on the model), then used Vallejo after it. Worked nicely. For colors, I have a few of the IJN specific colors from Tamiya - Kure, Saisebo, Maizuru arsenals, etc. I couldn't source them from Mr. Color so went with Tamiya. I'll probably use them for the upper hull on the Shimakaze. Vallejo takes a lot of grief, particular on their primers. Funny thing, I was just on some FB groups last night and one had a very angry thread on Vallejo primers. If you're not going to sand, I think Vallejo is perfectly fine. I use Vallejo primers on most of the smaller detail items on my models without any issue. Clean up is much easier and you have no smell issues as with Mr. Surfacer, Tamiya, etc. That makes them very worth using in the right circumstances - i.e., when one doesn't have to sand. Post your Shimakaze when you start working on it. I've been focusing on a couple of plane models I have going at the moment, but otherwise have most of the deck structures completed. I wanted to get as many of the deck items completed so I can paint in one big session. With the linoleum deck on the Shimakaze, you can't just paint the whole ship in one pass unless you are ok with masking off the linoleum areas which I didn't really want to do.
-
That came out fantastic! The diorama really brings the model to life. Well done!
-
That's really looking sharp Kevin - nice job with the build, the colors, etc.
- 273 replies
-
- 2
-
-
- panart
- amerigo vespucci
- (and 1 more)
-
I'm in too Edward, this is going to be a goodie
-
I'd probably build the AV-3 over the CV-1. I love the seaplane tenders, and the 3/4 deck won't hide as many details near the bow as the CV-1 version. How do the support girders look? Just curious about your impressions of those and other details as to scale. The PE set for the AV-3 doesn't seem to include a wood deck like the CV-1, but not sure if the AV-3 had a wooden deck. Looks like the Trumpeter upgrade set has more PE than typical for kits, but I think I would be more inclined to buy it if Pontos or Infini or some of the other guys came out with a set for it. For whatever reason, the kit manufacturers seem to be a bit skimpy when it comes to adding PE. It's a welcome development that folks like Pontos are coming out with full kits/PE -- as they did with their Soya kit -1/250 - so you can have a one stop shop and not need to cobble together upgrade packages, have multiple sets of instructions to wade through, etc.
- 1,090 replies
-
- 6
-
-
- showcase models
- vendetta
- (and 2 more)
-
I haven't had too many problems on my Charles Morgan. It's not the easiest to work with, but looks fantastic.