


Piet
-
Posts
3,568 -
Joined
-
Last visited
Content Type
Profiles
Forums
Gallery
Events
Everything posted by Piet
-
 Caught up with all youn's work. Really terrific job on your model Greg. Denis also, nice work on the cammo and superstructure. Not many added pics from Carl to admire since my last visit but I'm sure she's looking real nice Oh yeah, congrets on the new job Carl. Cheers,
- 1,090 replies
-
- 8
-

-
- showcase models
- vendetta
- (and 2 more)
-
Just caught up with your beautiful Chebec Nils. She is an inspiration to all of us who have followed your build. Many lessons learned and very much enjoyment on the journey to completion. Congratulations Nils. Cheers,
- 692 replies
-
- 4
-
-
- eagle of algier
- chebec
- (and 2 more)
-
Hey Carl, thanks for dropping in. Glass, plexiglass, perspex, lexan, all the same to me - when I can see through it - it is glass Yeah, it's going to be plexiglass. It's lighter then silica kind of glass and easier too for a DIY. I also want to stay with the "as simple as possible" kinda case. If I had the space in my house I would probably make a big case with real glass, tempered too. But alas, I'll have to go the cheap and simple route. Hi Lawrence, my pick for that large model would be tempered glass, provided you have the budget and room for it. Bernadette is right, plexiglass may discolor in time if you don't protect it from UV light. Lexan could be good alternative though. Cheers,
- 378 replies
-
- 8
-
-
- java
- pacific crossroads
- (and 2 more)
-
Thank you all dropping in and your very kind comments. I'll be calling the plexiglass place next week to find out what the cost will be for them to cut the pieces I need and the cement. While I'm at it I'll also ask for the glass for the O19. I hope it's not going to break the bank. Gwen still not asking for Musi? No Jan, Gwen says whenever you get around to it. Cheers,
- 378 replies
-
- 8
-
-
- java
- pacific crossroads
- (and 2 more)
-
Just check'n in with you Lou. Great news on that ship's boat, saves you some time. Cheers,
-
Awesome work you guys. Just caught up with youns, been busy around the homestead and various doctors. Fortunately everything is A okay. Oh yah, I cooked chicken Pad Thai for Gwen and me, awesome. Gwen liked it! Cheers,
- 1,090 replies
-
- 7
-
-
- showcase models
- vendetta
- (and 2 more)
-
Hello everyone and wow, I'm overwhelmed by all your kind words, thank you all from the bottom of my heart. I am very happy to hear your endorsement for me to go ahead and permanently secure the smoke. I still need to slant them athwart a little to indicate her 29 knot speed. No Jan, there will be no more tweaking, I'm tweaked out Even though my father hated this tired old rust bucket, this project is not only for him but for all who lost their lives in this struggle. Thanks to one survivor I now I also know how my father died and I have a grave marker too. Now I'll have to contact the plastic place and see what they can do for me and at what cost. I'll make a place for the diorama above my drawing table, next to the O19. When its all done I'll report back with all of you with my final words and pictures. So, don't go too far away now and forget me, I'll be back. It's not finished till it's finished. My next project is getting back to the VOC ship Surabaya and my attempt to the 1:3,000 scale Young America. But first I have to complete two or three paintings to submit to the International Colored Pencil Society of America. Gwen has also been asking for me to cook dinner more often, so that'll be coming up soon. She has been very patient and encouraging, knowing how much this model means to me. I also want to start baking sour dough bread for health reasons and then there is always the outside work to be done. Cheers,
- 378 replies
-
- 12
-
-
- java
- pacific crossroads
- (and 2 more)
-
That hull shape looks rather nice Lou. I'm surprised at the sharp entrance though, not expected to see for a ship of the mid 18th century. Planking hull first or deck first is a toss up. Some do deck first others do hull first. I planked my VOC ship "Surabaya" hull first op to deck level. I needed many false frames above deck level because it is a frame on bulkhead model and the hull planking gave me the extra support. Good to see you making progress. Cheers,
-
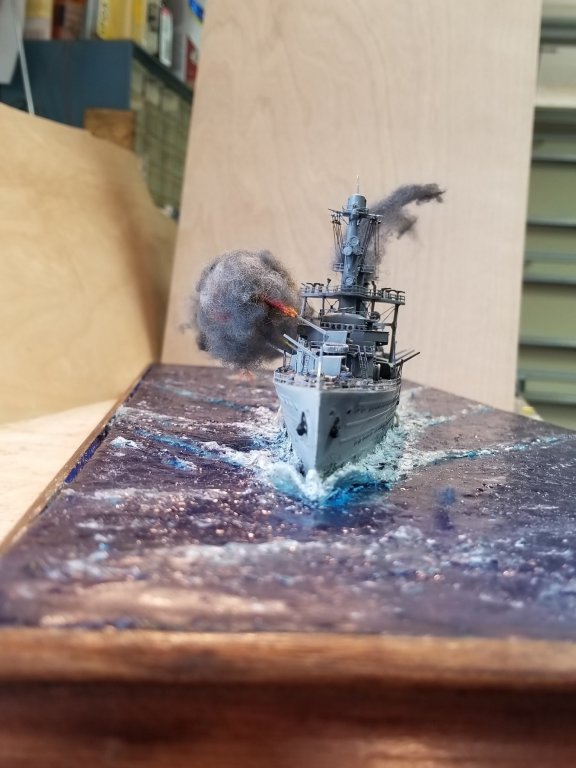
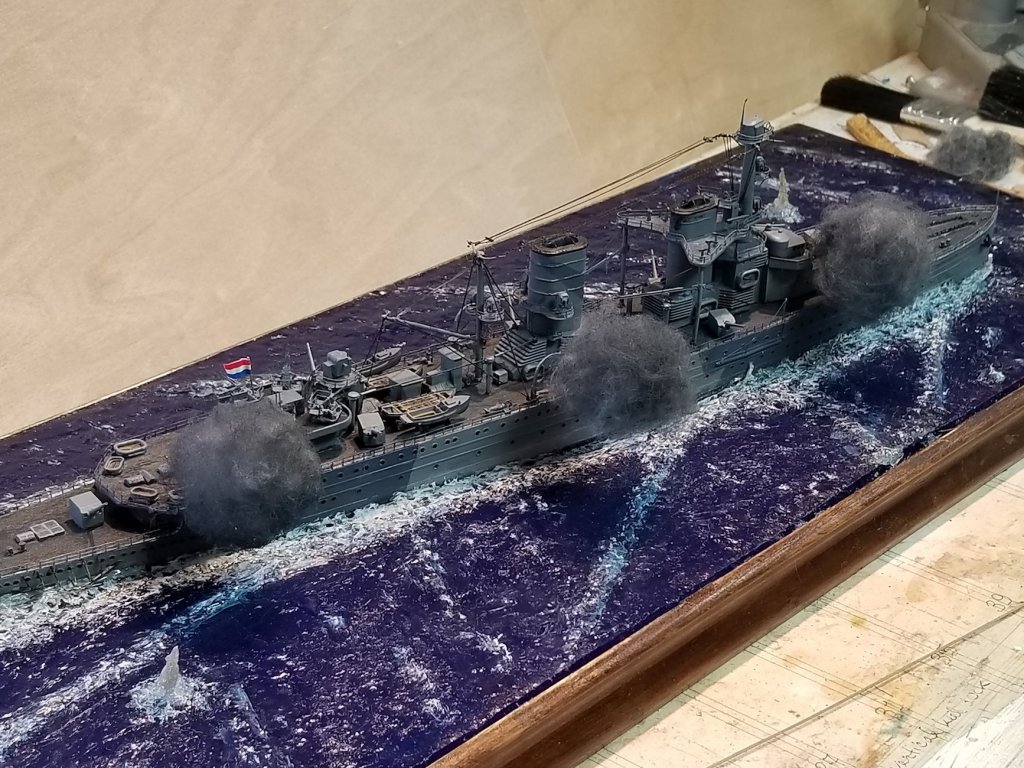
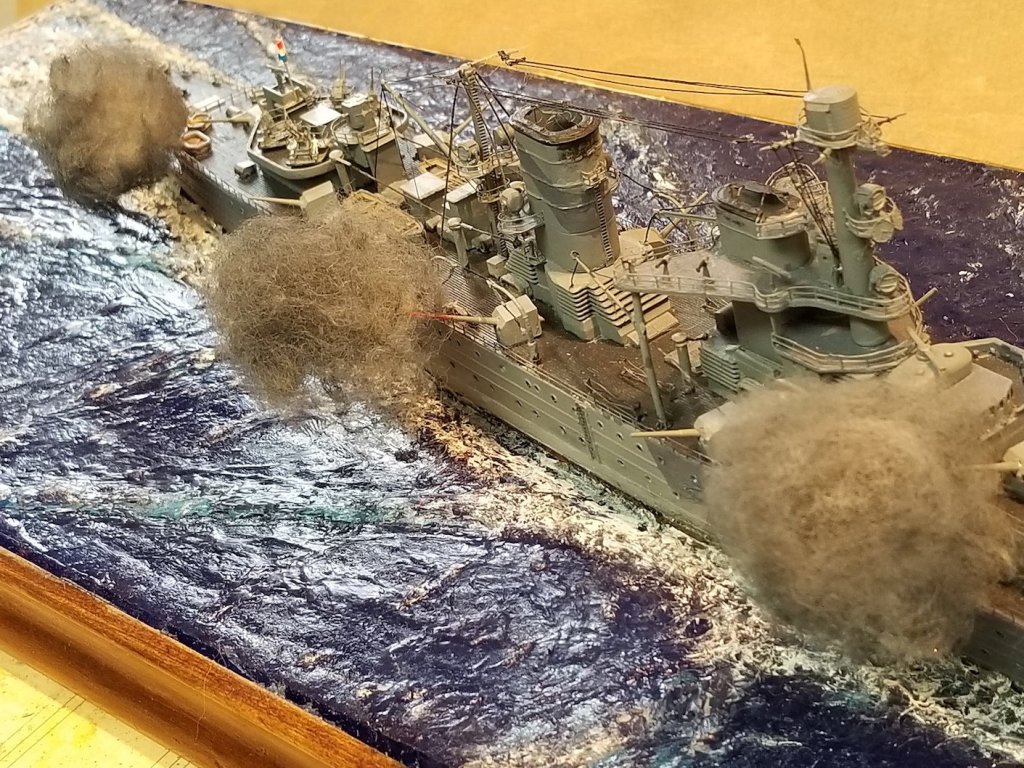
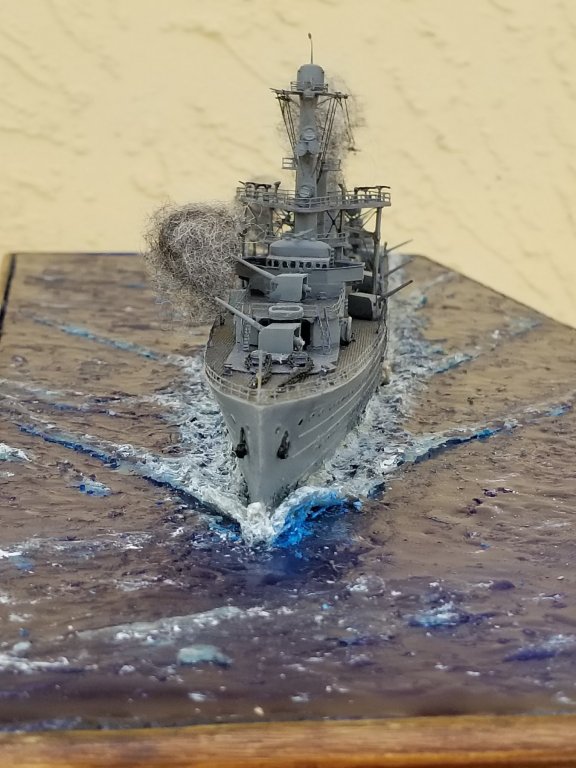
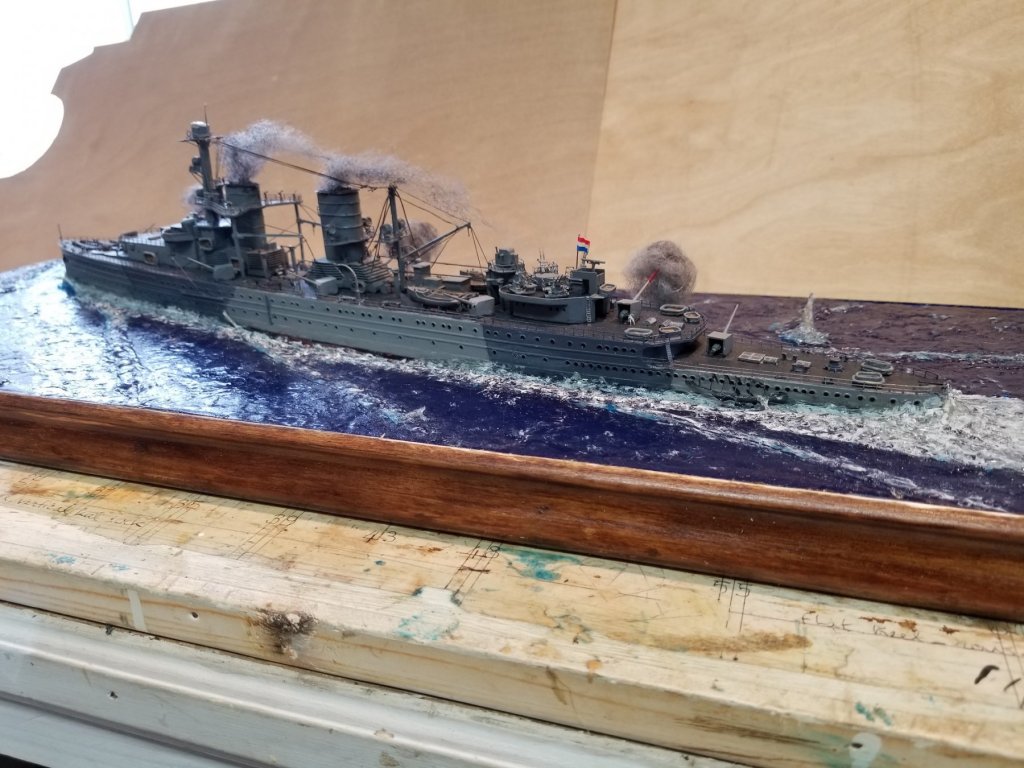
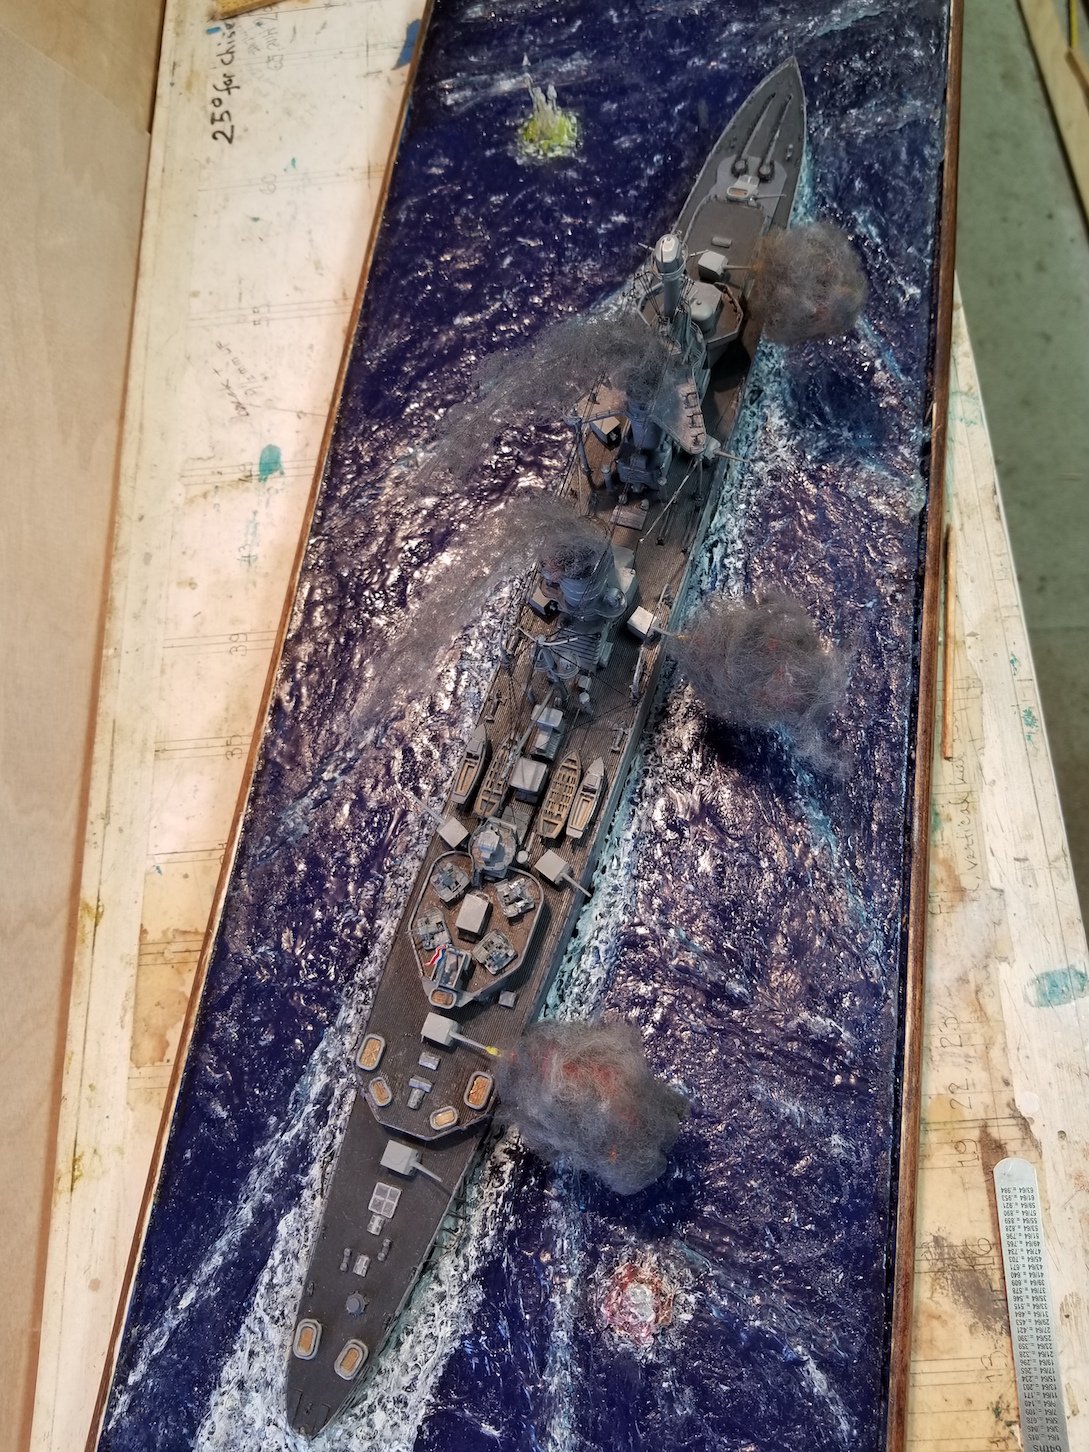
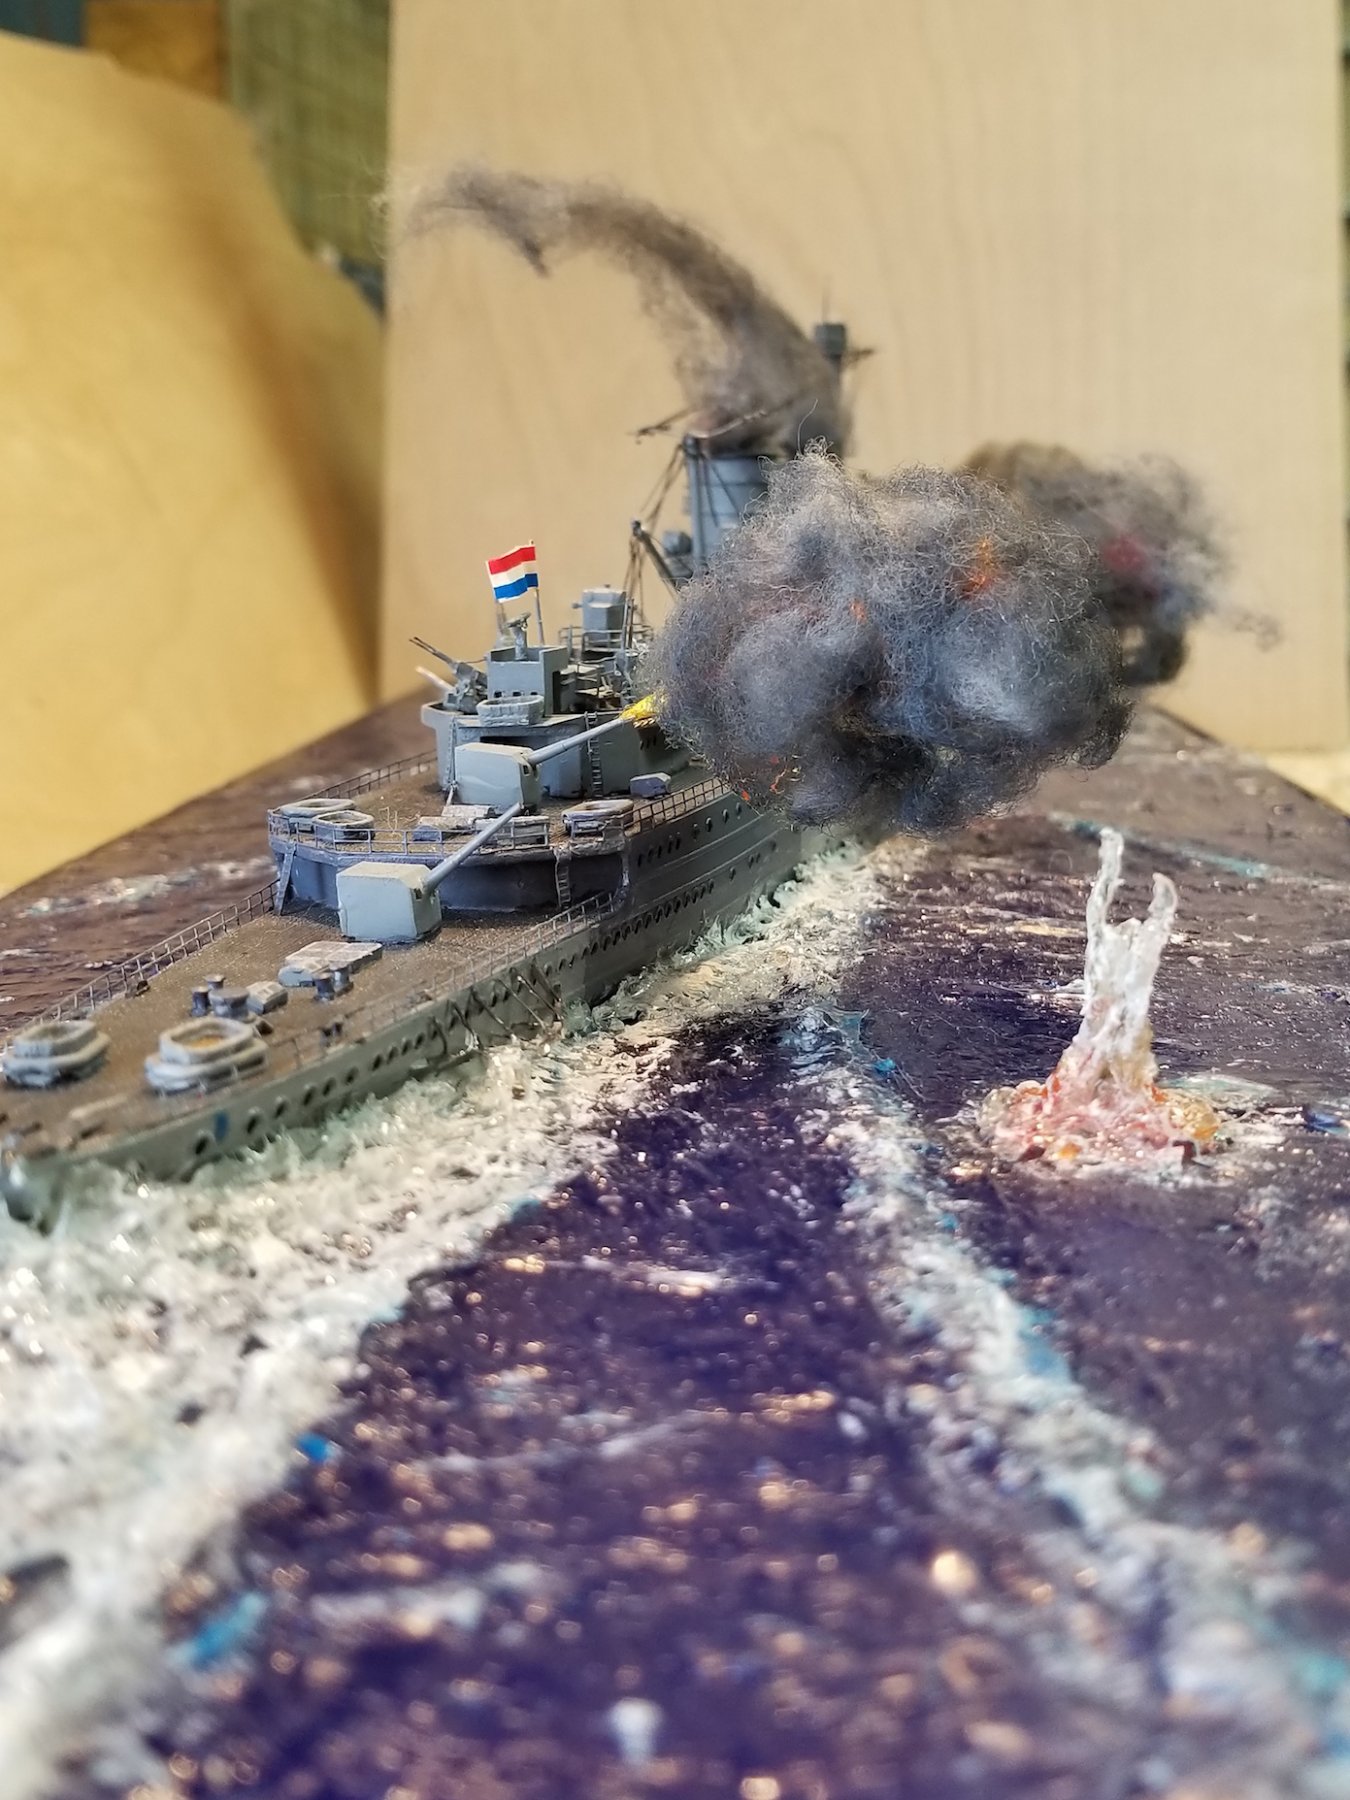
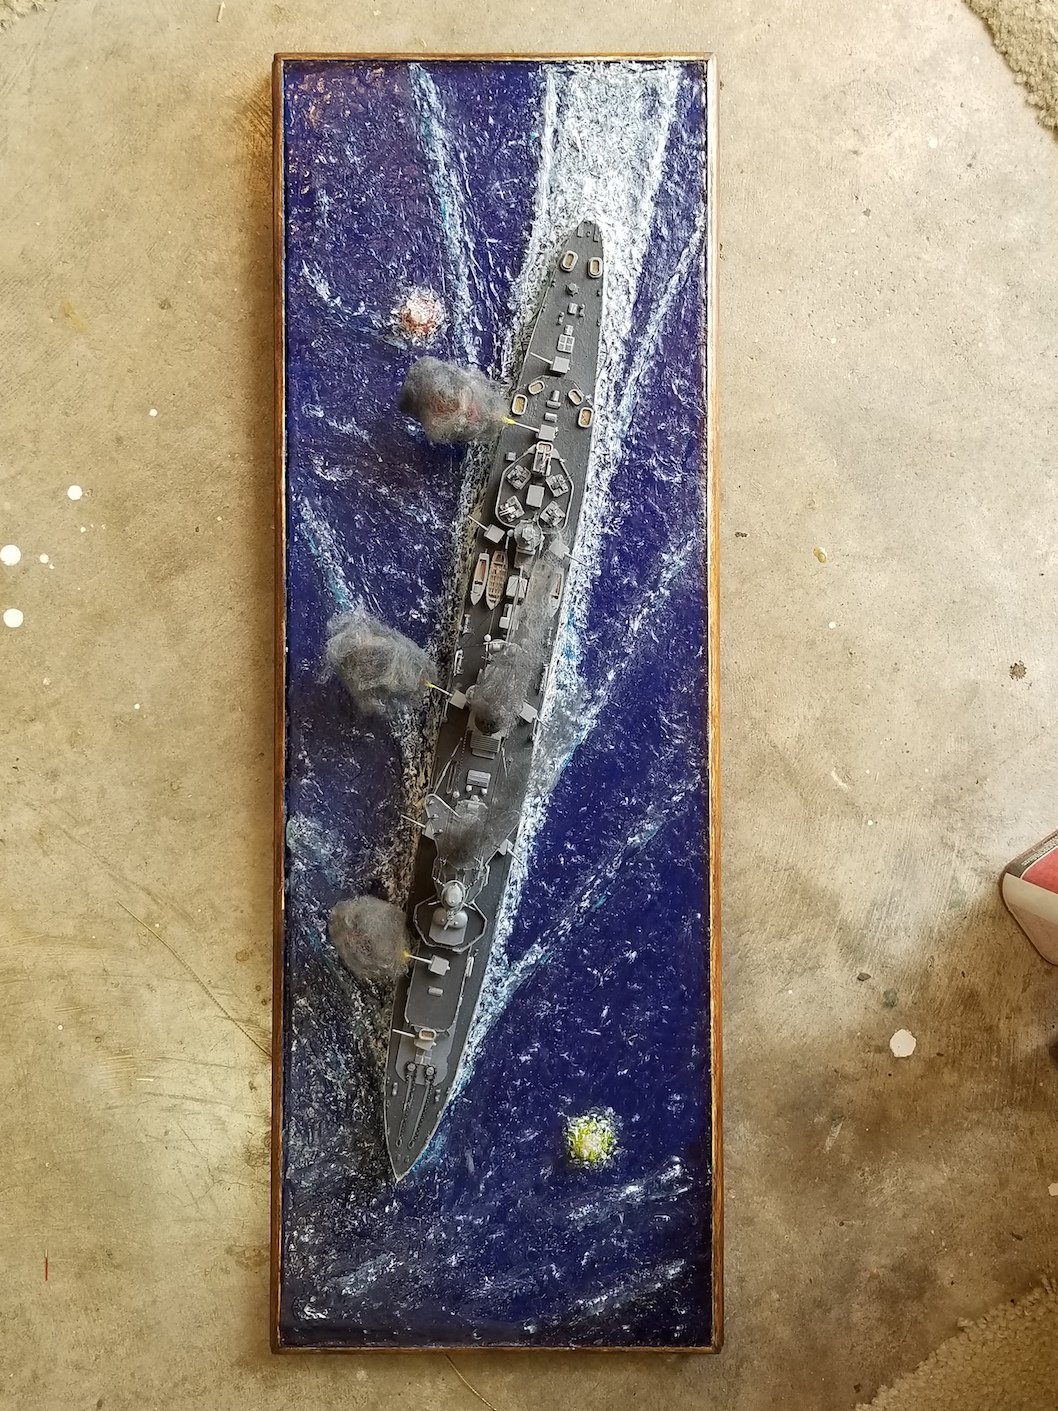
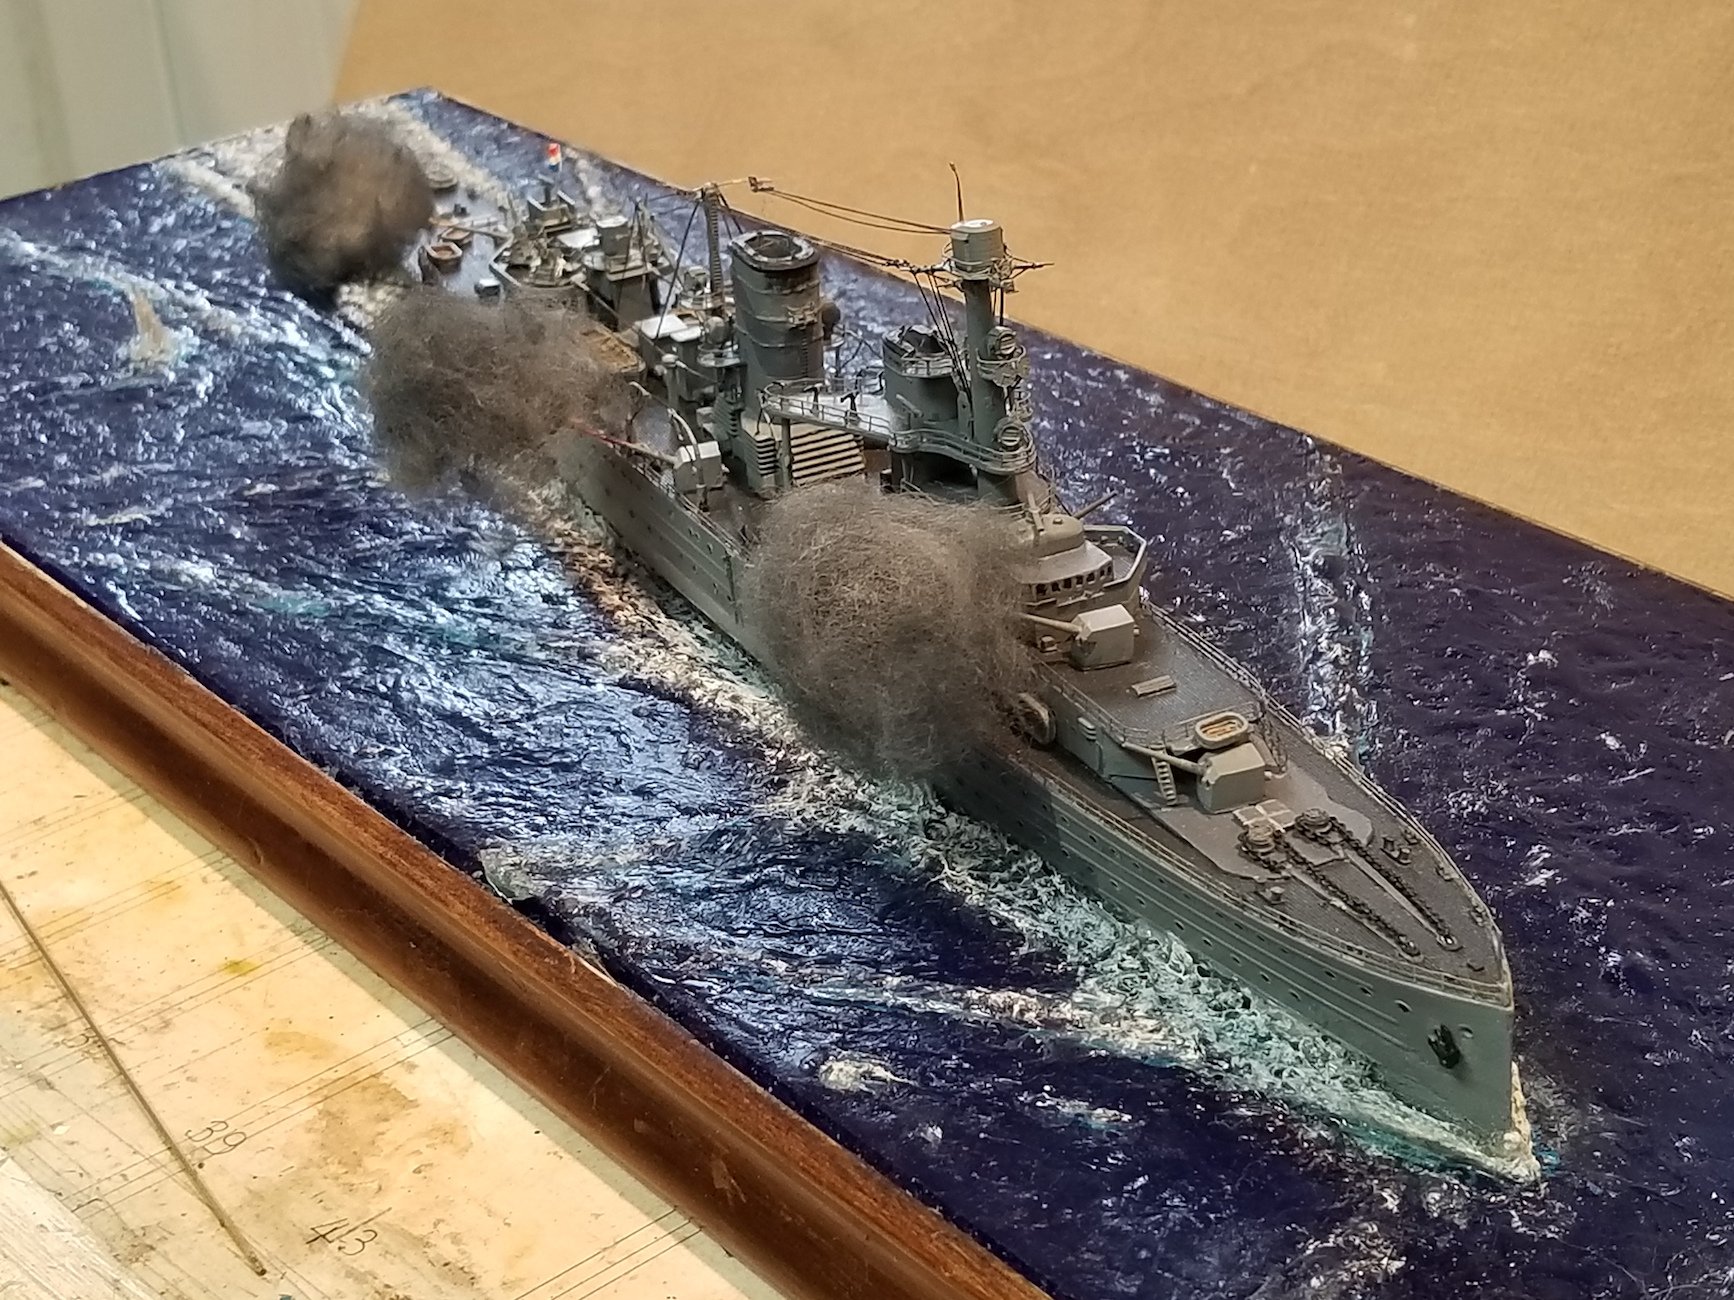
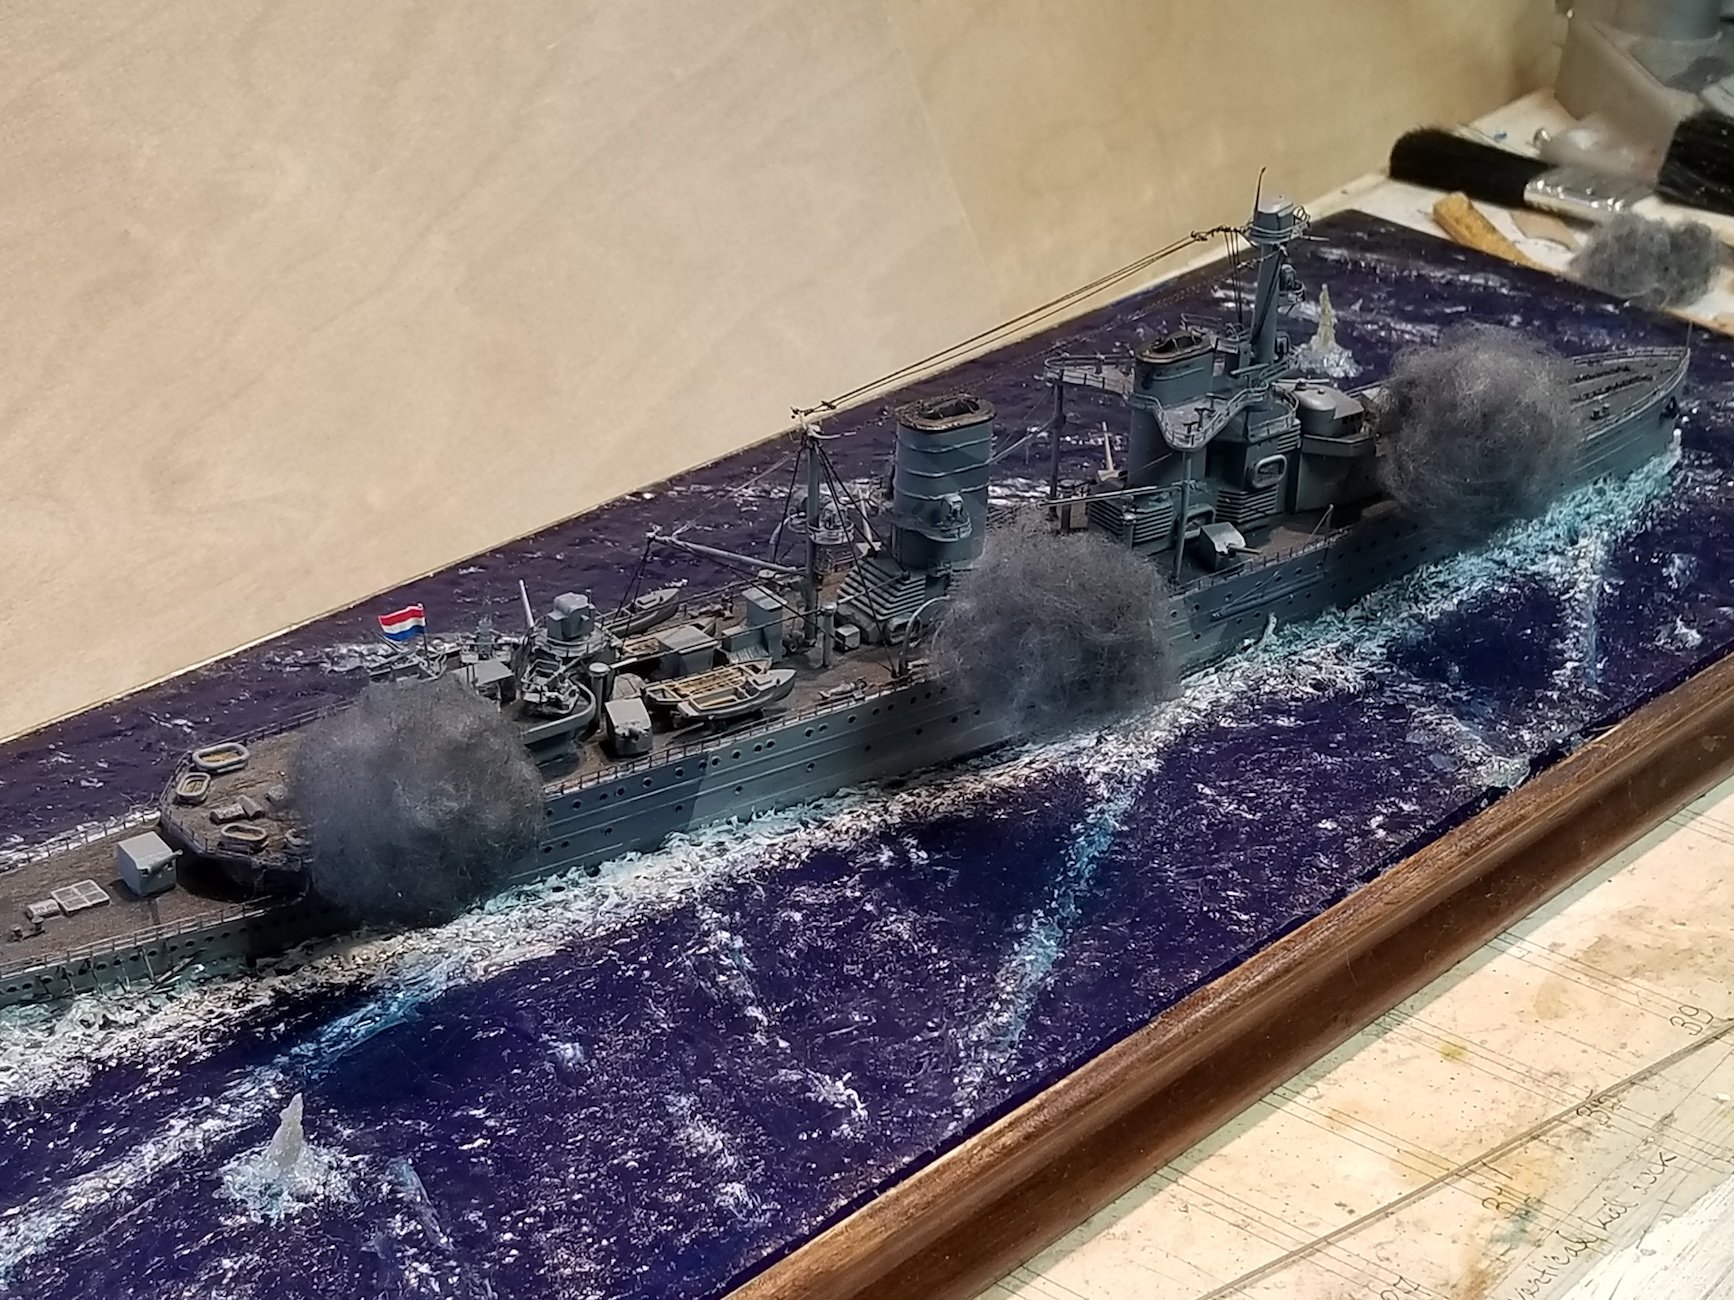
Hello Everyone, and thanks for visiting Carl and Greg and your very kind comments. Also my thanks to all who clicked the like button. I know, it's kinda late for me to be posting a progress report but I just showed Gwen the pics I made this morning. I tweaked some more and mixed some red and yellow paint to put inside the smoke clouds - thanks to Jud's comment. Gwen really liked the results, even when looking at the model from all angles. Her reaction was "life like, like it's real." Coming from her, Mrs. critical observer, is a real compliment. I haven't glued the smoke to their supports yet so pending on a thumbs up from all of youns I can finally proceed in gluing then down so I can complete with sculpting the smoke a little better. Right now that's practically impossible because they rotate and tend to droop. This sure was a long and trying process I must say but in the end it didn't come out too shabby. I also added a few more vertical water spouts on the missed 8 inch shell bursts and the dye. The sea was an experiment for me, never done one before. I read a lot about the how to's but in the end I went with what was available in the local HobbyLoggy. The material for the waves didn't really satisfy my that much. I didn't do what the instructions promised it is expected to do but in the end, only thanks to a rater calm sea, it worked out okay. In retrospect, I should have used some very thin plastic, like the stuff used in packaging LED lamps, for the bow wave as support. This would have saved me a lot of trouble in trying to make them thin enough and not to droop. However, they came out okay in the long run. I may do some more tweaking here and there like adding some more very light green in areas where the sea becomes transparent, but that'll be for later, if at all. This coming week I plan to call a plastics place, www.eplastics.com for material to build the enclosure. I may also ask them for a price for the O19 enclosure. I may have mentioned on my O19 build log that I planned to make it with a rounded top rather then square. Okay, here is "Jave" as of this morning. Cheers,

.thumb.jpg.b0550fa2c780c0cd911fd5f2f733a9bd.jpg)


- 378 replies
-
- 20
-
-
- java
- pacific crossroads
- (and 2 more)
-
Good to see you easing back into your build Lou, I have been missing your progress reports. Cheers,
-
Thanks again for the input gents, VERY much appreciated. I like your suggestions Jud. I'll give it a bloody go tomorrow. Don't know if I can come close to what I think you have seen in real life. The only smoke I have seen is when a R-2800 fires up Hmmm, orange glow inside, light grey and whitish things, sounds really nice but executing it is a whole other thing. Handsome young man you were, um - - - sorry - are, with a very handsome ship. Between some other chores I have been fiddling with the funnel smoke and getting somewhere with it. A few more tweaks I think. Well, back to the workbench with some more tweaking on the gunsmoke. Cheers,
- 378 replies
-
- 8
-
-
- java
- pacific crossroads
- (and 2 more)
-
Enjoyed catching up with yuns. Nice going on the paint Greg. Your paint job looks nice Carl. Congrats on receiving your ship Denis, am looking forward to your version. Cheers,
- 1,090 replies
-
- 7
-
-
- showcase models
- vendetta
- (and 2 more)
-
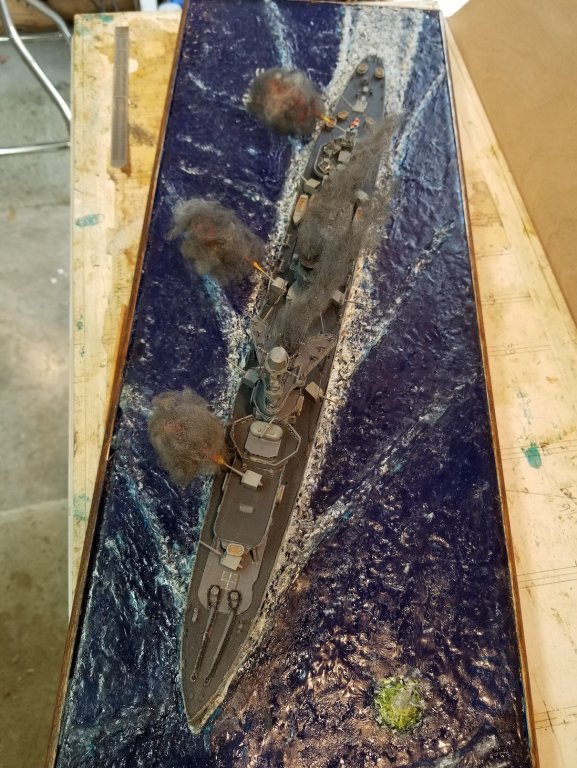
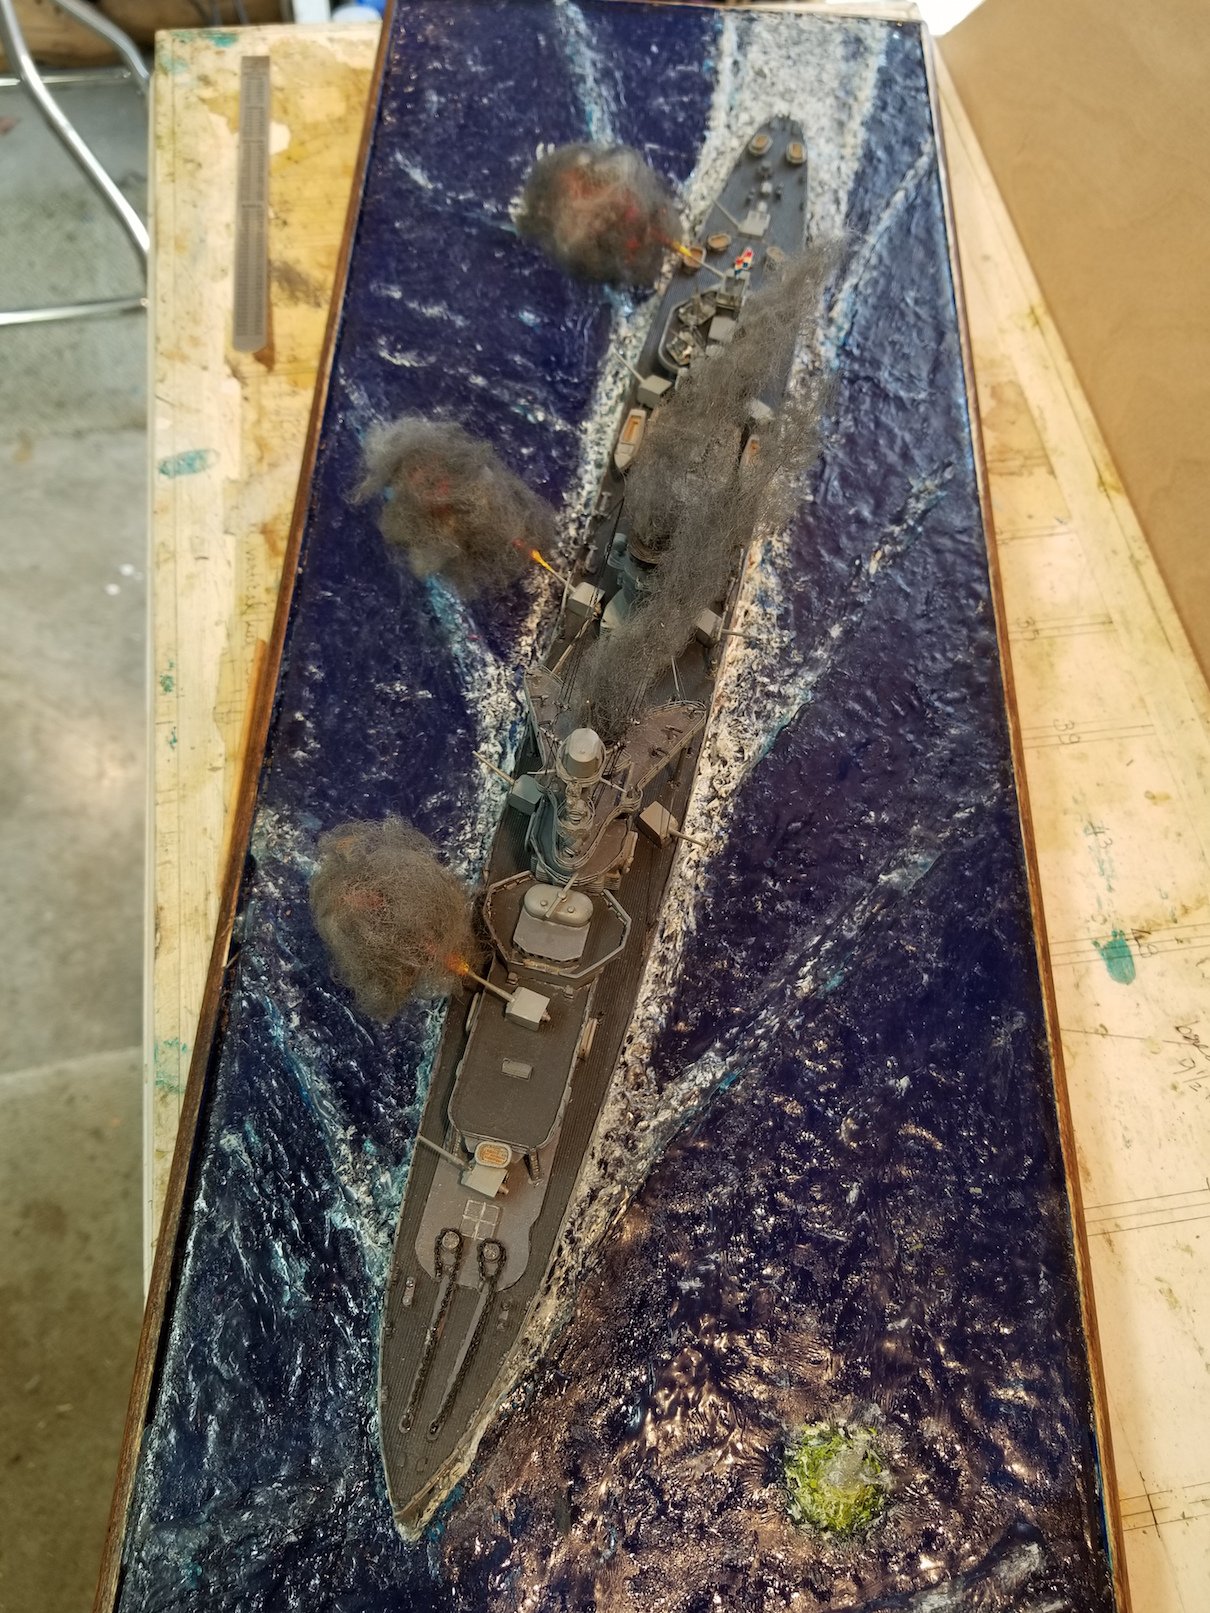
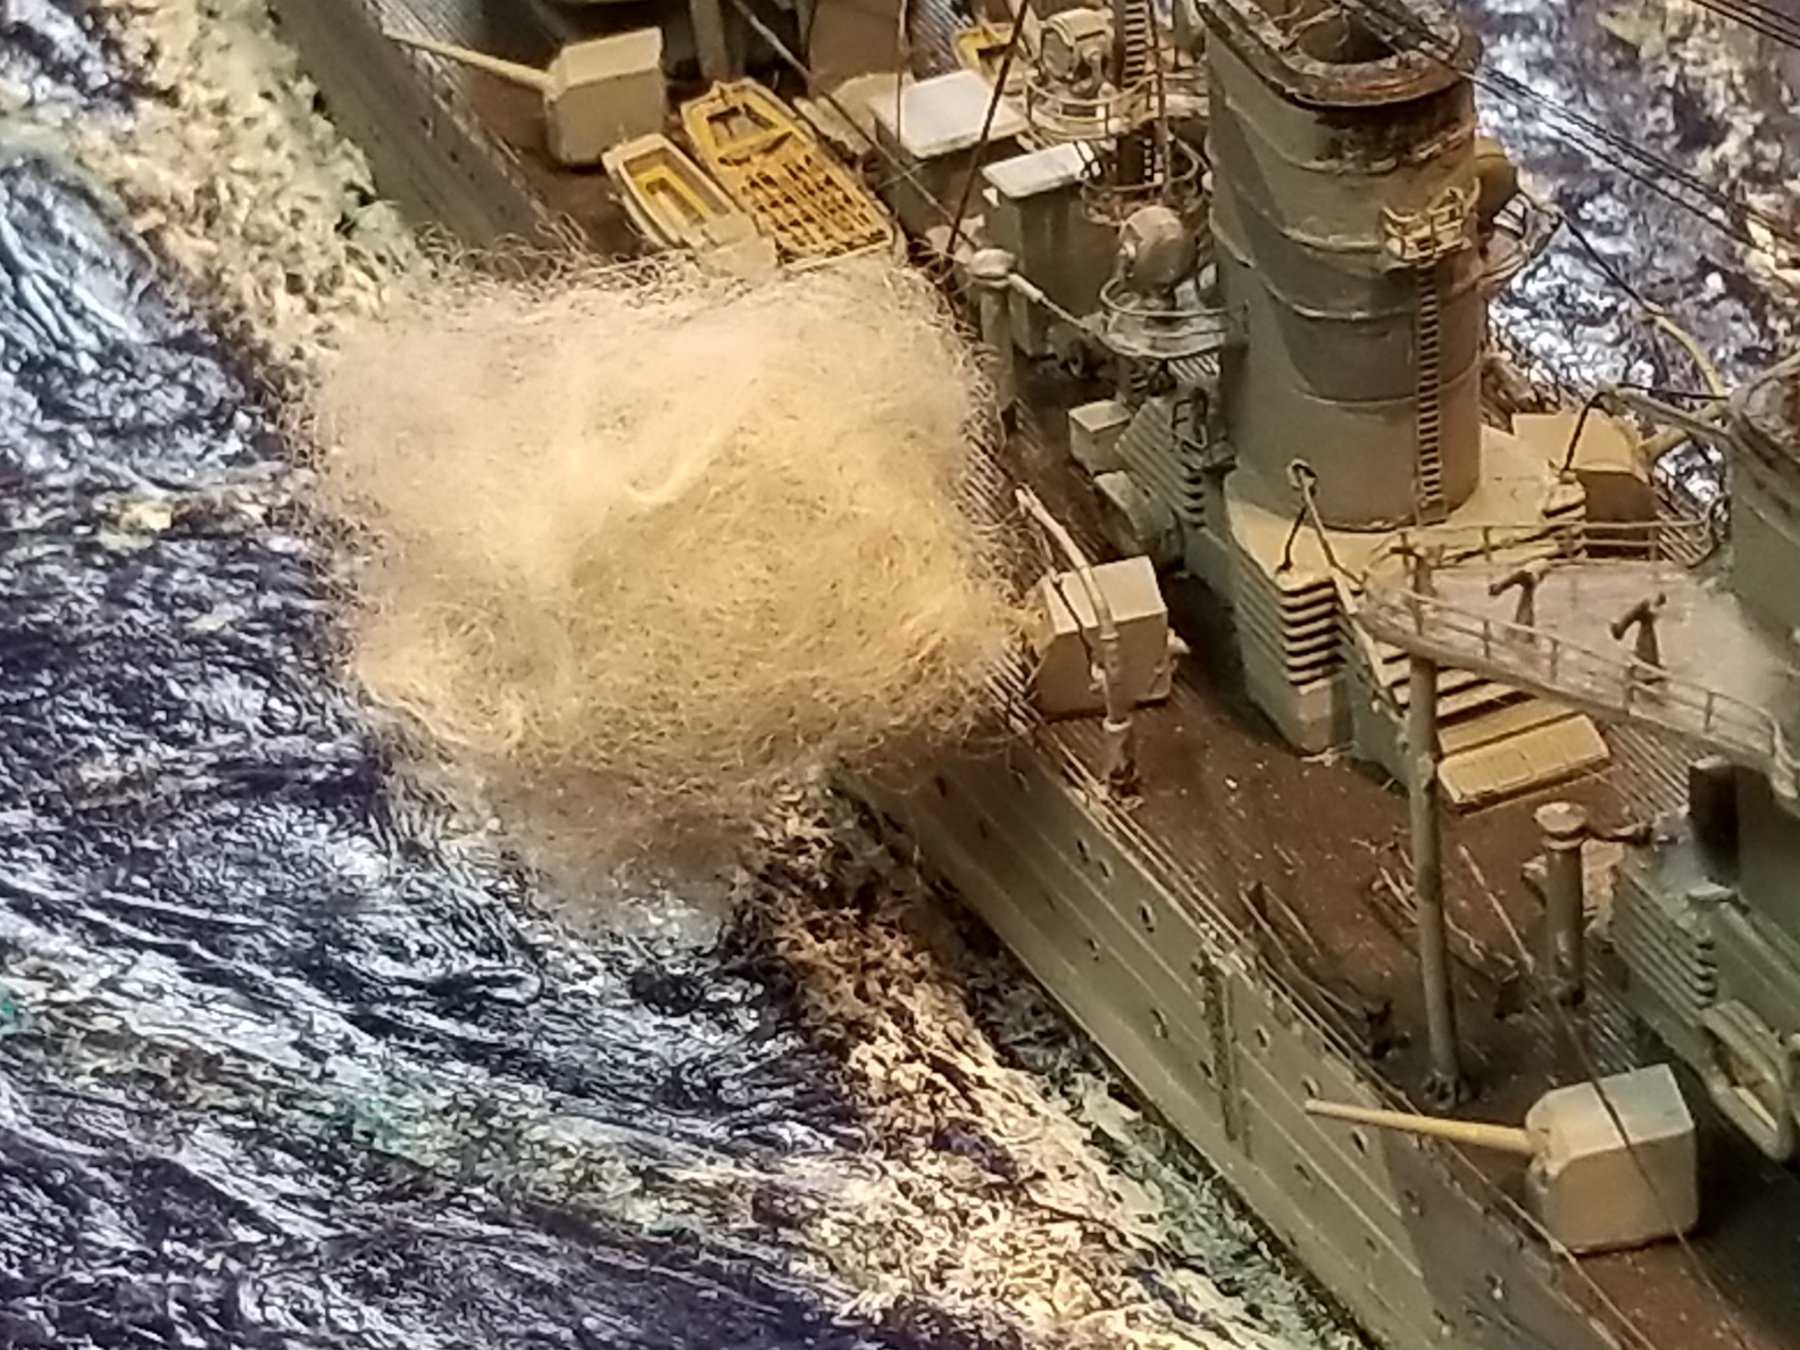
Good evening everyone and thanks to all for your very encouraging comments, so very much appreciated. Also thanks to all who clicked the like button. Yes, Lou, I looked at steel wool but the cotton was finer and easier to work with. I think I have come up with a method I think will produce a more realistic smoke. I wish you good luck with your wife's Titanic, not an easy scale but you'll do okay with it, I'm sure. Hey Mark, good seeing you here again. Yup, I looked into the model railroaders but not much on gunsmoke, just chimney smoke using cotton. Looks good at viewing distance. Hello OC, yes, I looked at those marvelous dioramas of aircraft and tanks exploding, a hard act to follow, especially at my scale of 1:350. Thank you Jud for your very helpful info, looks like you have naval gunnery experience, like Amateur Jan with field artillery. Now that you mentioned the Japanese used die marker shells I did read about that in the several books I have on the Battle in the Java Sea. Hmmm, food for though adding some red in one and yellow in the other. I could still make the splashes a little higher too. All I plan to do with the gun flashes is some red and perhaps light yellow coming out of the barrel. Yes, they had a fire control system for distance, direction and elevation. As far as I can determine from reading about the actions there were no broadsides. The photo I posted of "Java" with a broadside was the contest winner's "hurray." Thank you Nils and no, it's rather difficult depicting smoke at this scale but I tried something yesterday and I may be on the right track with that. Thank you Marcus for you kudos. Back from Holland? How was your mother's birthday? All's well over there? Hi John, good to see you again and thanks for your approvals. Hello Lawrence, thank you as well. I think I lucked out with the bow waves, I'm still tweaking them as we speak. After I walk away from it for a day or so and scrutinize it again I find little things to work on. Well, no matter what spray gun I use, the paint still seems to make the cotton smoke look unrealistic enough to keep trying. This morning I started to pull one of the pre painted funnel smoke pieces apart and made an irregular ball from it. This seems to come closer to what I think the cordite smoke could look. I have temporarily put them on wooden pins that I cemented to the barrels. These pins serve as the support as well as painting the gun flash on them. When I get additional input from the experts, when I get a yay I can cement them to the wooden pins and shape them into some realistic form. Working with these fluffy balls without support doesn't work too well. Below I post a few pics I took this morning before my dental appointment. The light above the workbench made the dark grey of the smoke kinda washed out. The intend is for constructive criticism as far as form and shape. The one on the left still needs a redo. Hmmm, the overhead light did cast a nice shadow though. Next is the funnel smoke. Cheers,

- 378 replies
-
- 18
-
-
- java
- pacific crossroads
- (and 2 more)
-
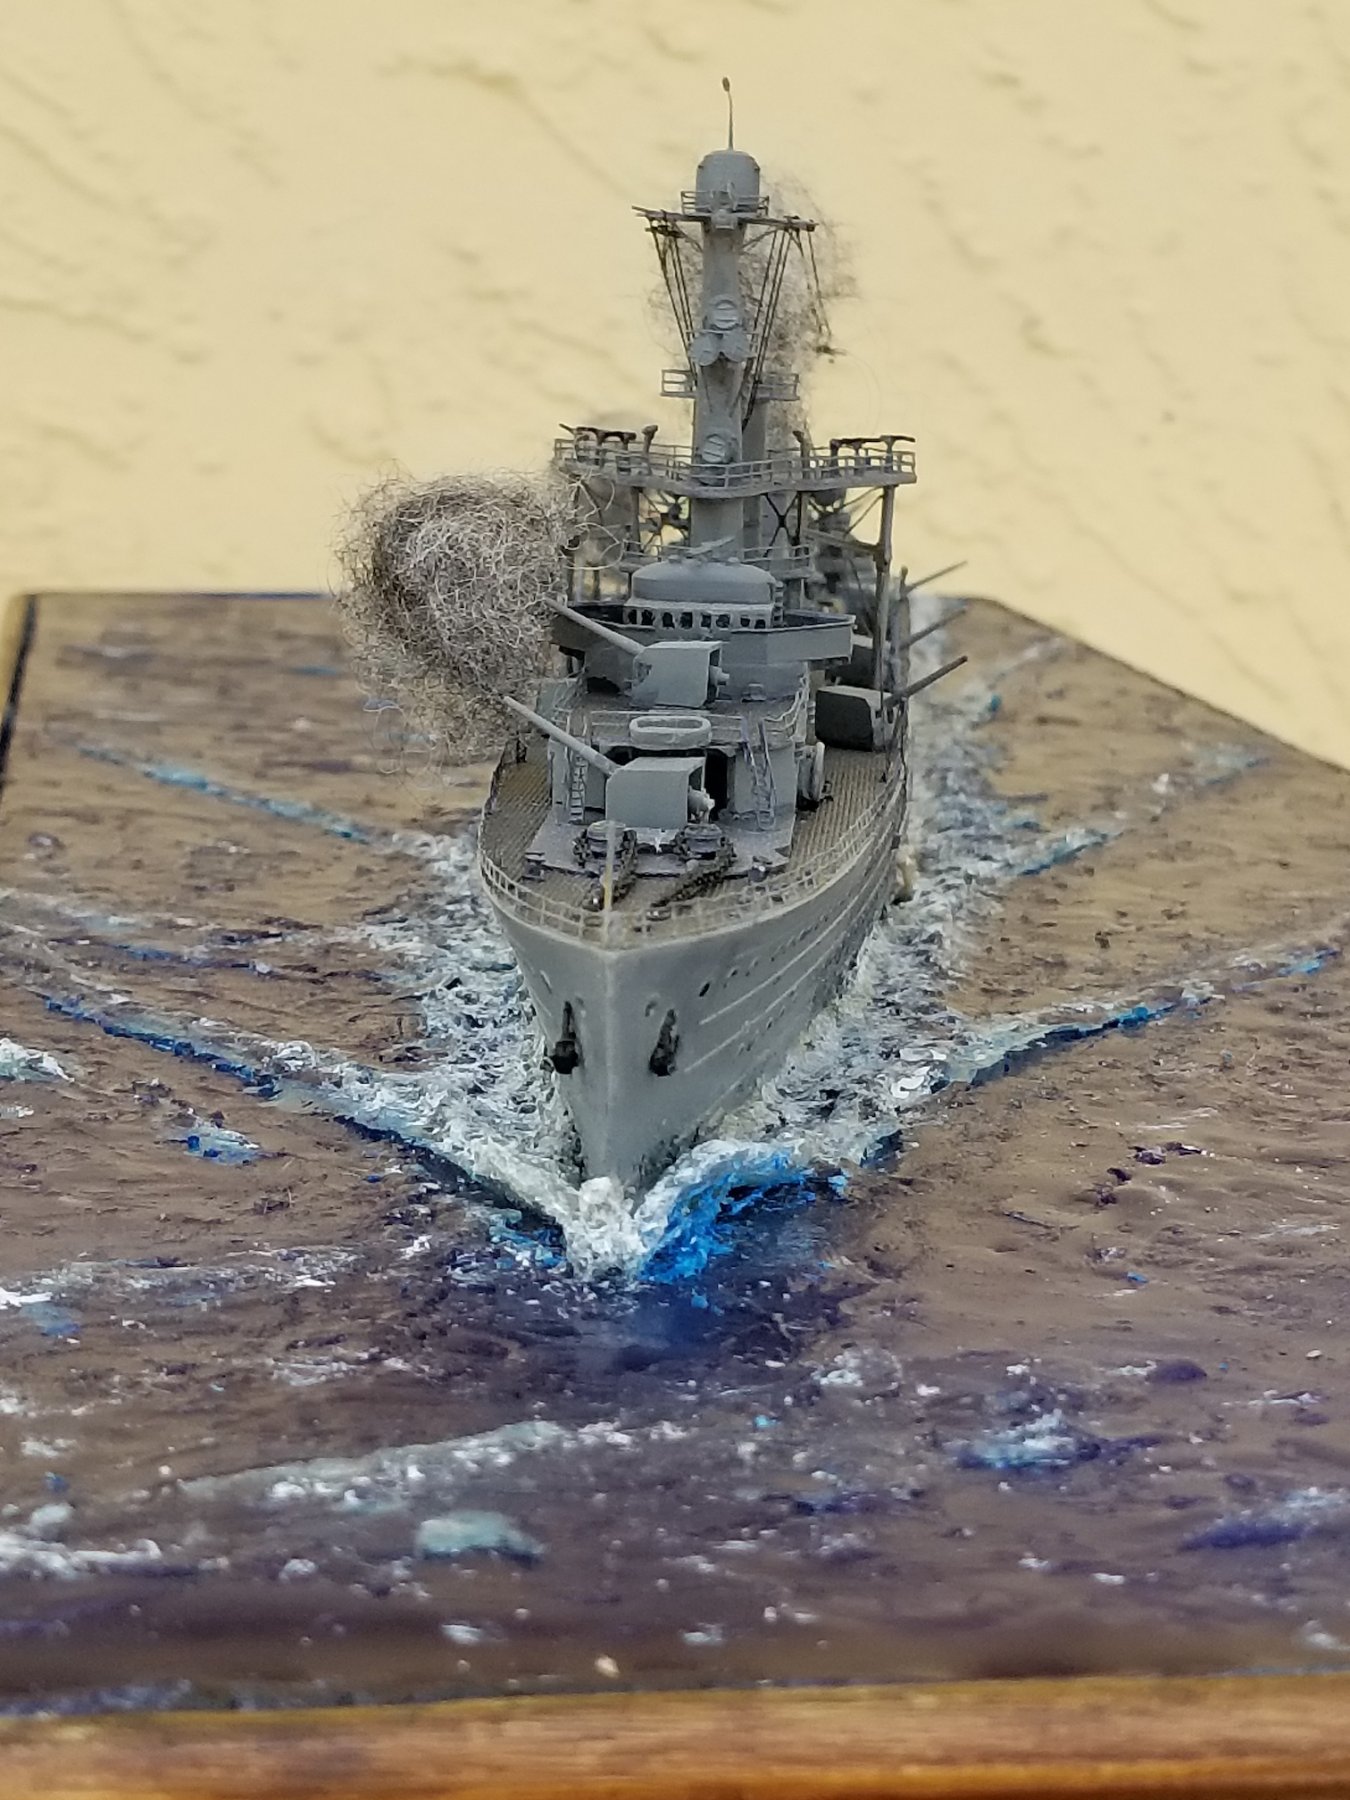
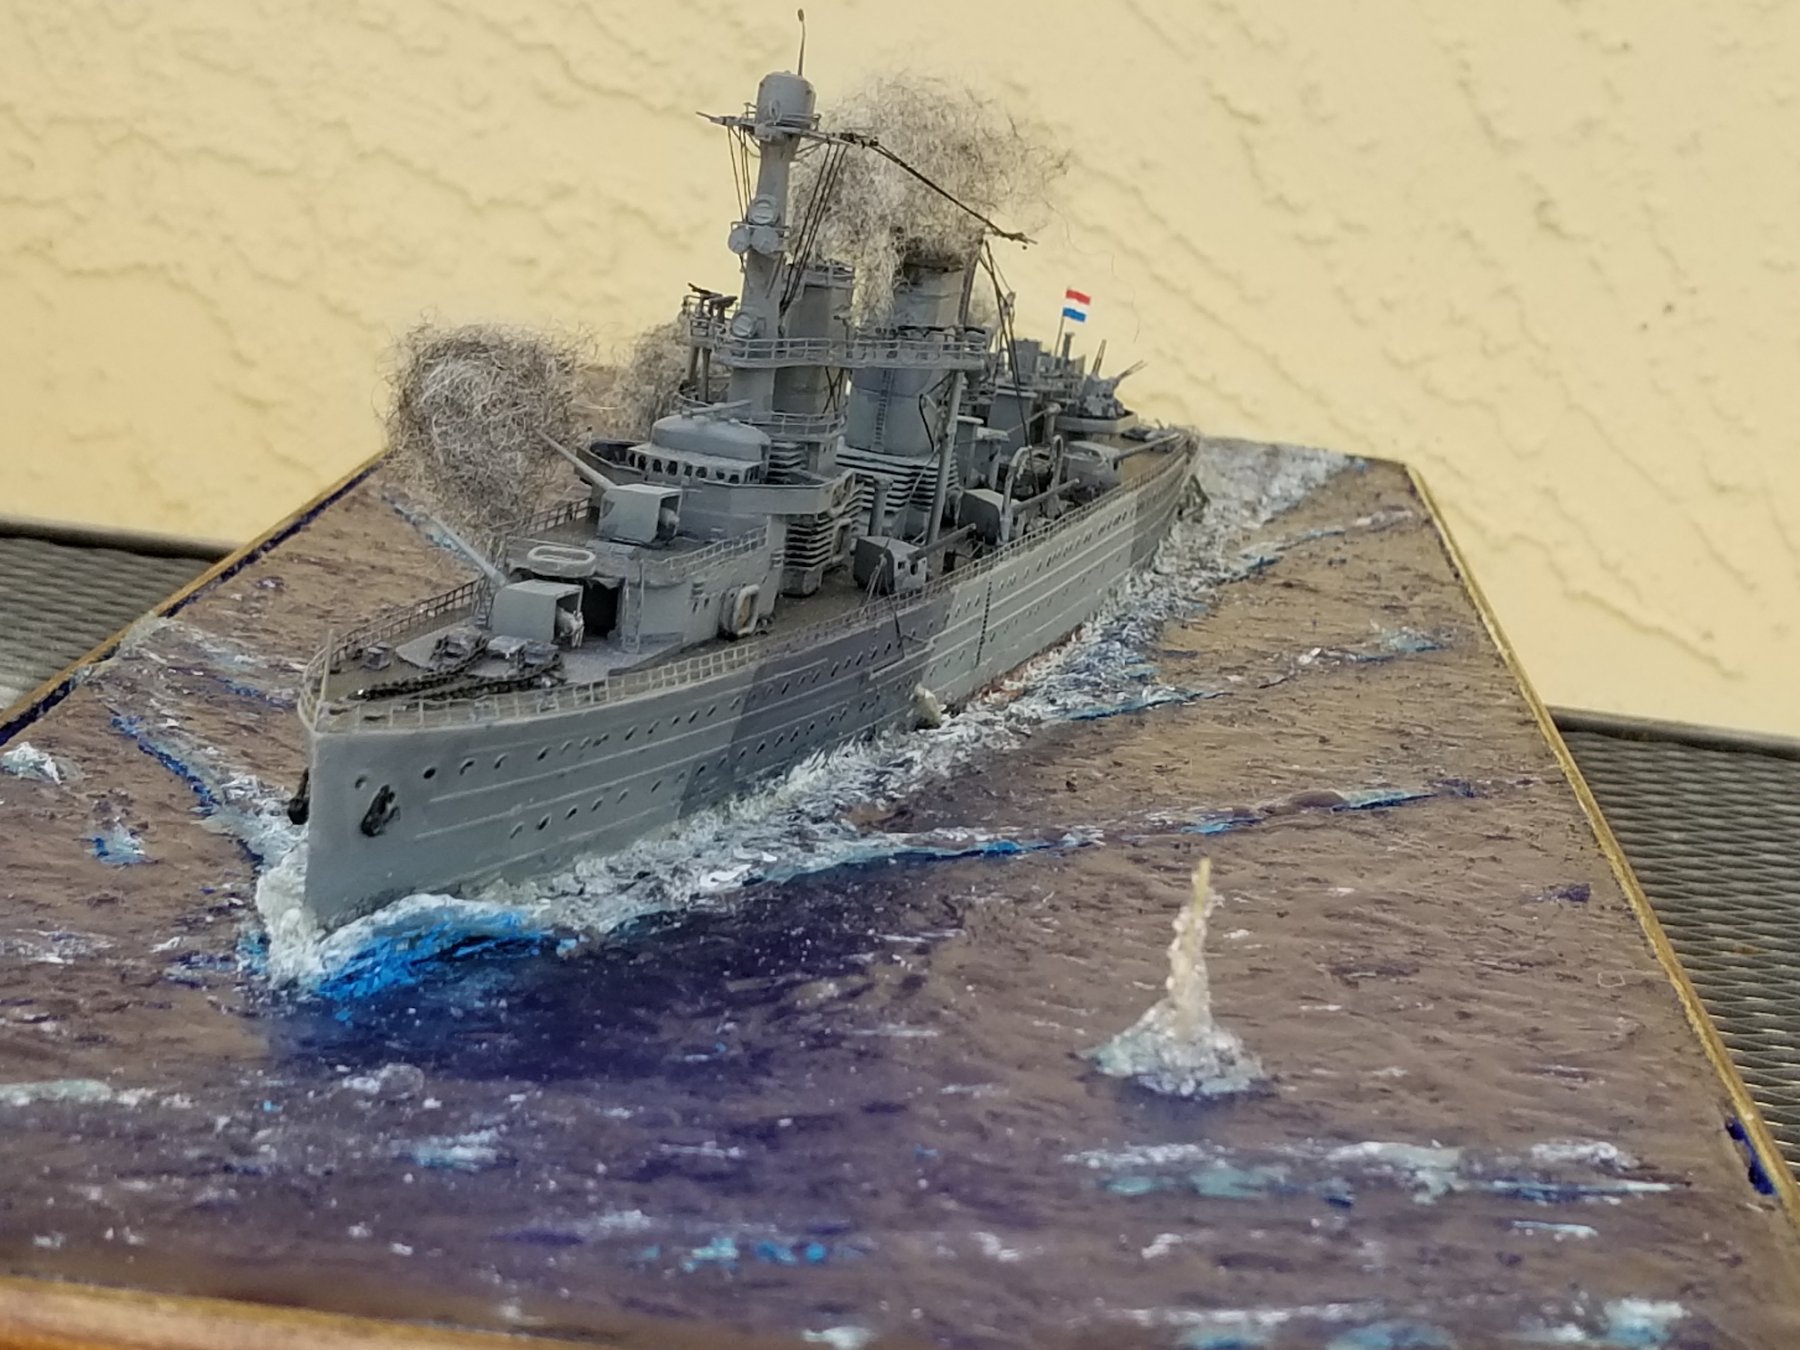
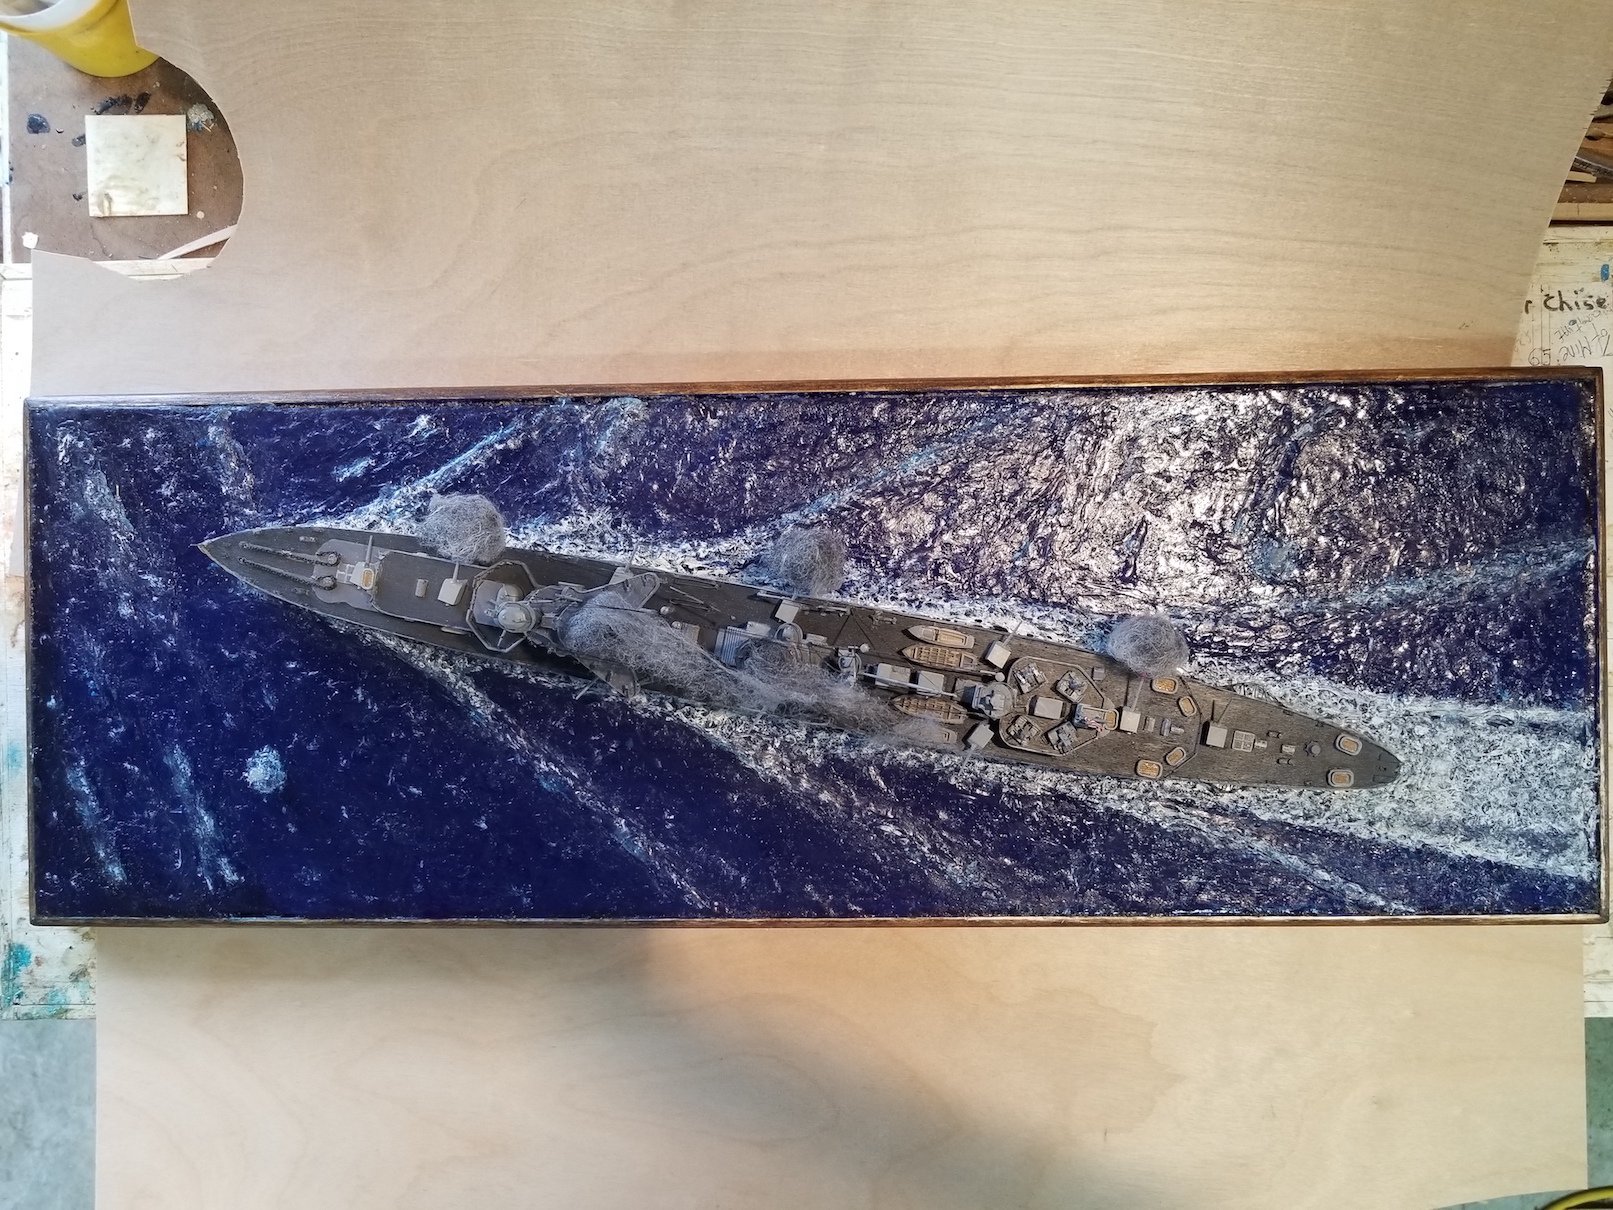
Hello everyone and my thanks to all who came to visit and clicked the like button, much appreciated. After doing some shopping and mowing the backyard I took some time to try making gun smoke and funnel smoke from cotton. This is turning out more difficult then expected. No matter what I do it still looks stringy or hairy. I did buy Testor's Battle Ship Grey rattle can paint but using that in the mister mode it made the cotton clump too much making it look like a ball again. I'm not giving up and continue experimenting. I made a photo of the second try in a closeup. From a standard viewing distance it looks really good, perhaps a little too large but I think I'm on the right track. Now I have to give it a couple of dustings of the grey paint and hope it can hold this shape. As mentioned yesterday I did a lot of tweaking on the sea. The first area I tackled was the bow wave. It was too small to my liking so I cut some material away to make it thinner and then put a support under it and added more wave making material to make it higher, then let it cure overnight. The next day I trimmed it again and came close to being happy with it, not quite, but close. So I added some stuff to it and let that cure. In the meantime i also monked with the shell splashes and am happy with them. Another day later I checked how the bow waves came out and think it's okay. I did add a little blue to the inside as Carl suggested which improved it. I also removed some of the sea along the port side of the hull, repainted the red and the waterline black stripe, then refilled the hole some. After the stuff cured I added the white highlights. Difficult to make out what the original bow wave looked like but this is how I made the form. I used baking parchment paper for the non-stick. The completed bow wave Another look of the port side bow wave and the shell splash. The reworked hull and sea port side. Oh yeah, I also added the spend steam water coming out the sides. Overhead shot. The smoke is still to be redone yet. Cheers,


- 378 replies
-
- 18
-
-
- java
- pacific crossroads
- (and 2 more)
-
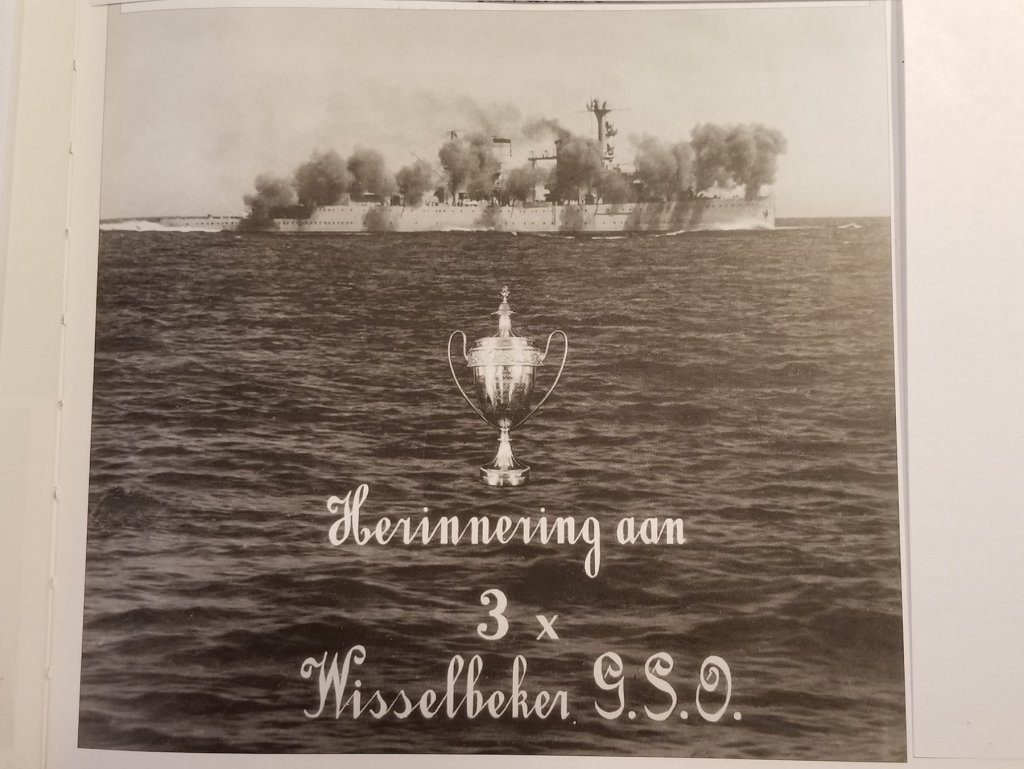
Hello everyone and thanks so very much for your very helpful input. As usual, I have been very busy with other things around the house preventing me from doing much on the model, except some tweaking here and there. It's too late now to add a few pics of the tweaking stuff I've done but rest assured that I'm still working on the smoke issue. I did read the tutorials on the URL Louie da Fly send me - thank you Louie - , very impressive and realistic. Question is, what scale? Looks like large enough to use chicken wire and EDs. In a scale of 1:350 that'll be nearly impossible. I did try using cotton day before yesterday but during the airbrush spraying my brush clogged up sending me into the fix it mode and ran out of time. I had to leave things be as is, till I have some time to unclog the brush/gun. I was using acrylic paint, thinned down with water. I get air but no suction and will have to completely disassemble the gun. I have another one but no hose to connect to the compressor. Thank you Jan for that detailed explanation of gun smoke and nice pic of the artillery shot, impressive. The closest I got to shooting a gun was during my service in the Royal Air Force (KL) shooting rifles. I don't have the one shot of "Java" shooting but do have the one of "deRuyter." I think I have now enough ammo (pun intended), including the pic below, to create some believable smoke. One of the problems are in keeping the funnel smoke stiff enough to remain horizontal or a little angling upwards and widening further aft. I am using a 1 mm wooden pin to attach the gun smoke to the barrels so that's a plus, I think. I may even resort to buying a small rattle can of Testor's dark grey paint to play with, experiment with. This will be an ongoing task till we have it close to believable. Most of my tweaking was with the sea and have improved on it, I think. I even dug some of the water away next to the hull on the starboard side, painted some red below the black waterline and redid the water there. At least Gwen likes the improvements. I found a photo of "Java" doing a broadside. This was the last gunnery competition just before the hostilities with Japan, early part of 1941, where "Java" won the Challenge Cop for the third time. My father was just then transferred to "Java" from the O19 and I heard him talk about it. Apparently he was in charge of the #9 gun. There is even a short film about the actual shooting showing him in it but the film was taken off YouTube due to pirating and I don't have it. In any case, this is what prompted me in starting with more roundish smoke balls. Looking at it closely we can see very irregularly shaped smoke but still more or less close to the barrels of the guns. I'll go with Jan's suggestions and try to shape the smoke ball more like these. Translated as "Remembrance of 3 times Challenge Cup. G.S.O. Cheers.
- 378 replies
-
- 8
-
-
- java
- pacific crossroads
- (and 2 more)
-
Hello folks, I just caught up - again - with your builds. Lovely work Greg and Carl, looking very spiffy. Love the banter between all youns too, very entertaining Cheers,
- 1,090 replies
-
- 7
-
-
- showcase models
- vendetta
- (and 2 more)
-
Just caught up OC, so sorry to hear about your brother's medical problem. Sure hope the docs find what the cause is and fix it. In the meantime be assured that I'll keep you and your brother in my prayers. Be strong and of good courage. Cheers,
- 455 replies
-
- 6
-
-
- slightly modified
- greyhound
- (and 1 more)
-
Beautiful work on the splice JesseLee. Yeah, stuff happens sometimes but - they say it builds character Cheers,
- 1,306 replies
-
- 6
-
-
- syren
- model shipways
- (and 1 more)
-
Scratch building at its best, one step back and two forward. Looking very impressive Kevin, sitting on them trash barrels. Cheers,
-
Thank you all for your input, much appreciated. Ref the smoke, yes, I have first used some cotton, which is actually a man-made material, from one of my supplement bottles. It's were fine and dense. Looks good but the white coloring has to be painted with either a very thin acrylic or an ink, which I didn't do. The problem I foresee in the paint spraying procedure is the most likely clumping, making it look more like wet hair. I abandoned it for the time being and tried this already died wool, just being lazy and hoping it would work. I am still tweaking here and there and will go back to the cotton and use the airbrush. In general, I think we are on the same sheet of music regarding the smoke issue. Even though it looks acceptable at arms length does not mean we shouldn't try to improve the looks. The main thing with my request for feedback is whether youns like like smoke added to the display or not and it appears you find no objections I and Gwen would like to see the ship in action, so I'll forge ahead with the smoke. Ref the bow wave, it looks like you and I are reading our minds Carl. This morning I started on some more modeling on the bow wave. I took my resharpened #11 Execto knife to it and removed some material between the wave and the hull, then added some more material to the top of the wave and further back of it to blend more with the following wave in the water. I had to leave the added material cure before adding more to the wave. This modeling will take a few days because of the curing intervals but I can see a lot of improvements already. Ref adding blue coloring to the bow wave. Yes, here too I thought about it this morning and will attempt to mix some of the powder die I used for the sea with white to make it light-blue. After I'm happy with the way it comes out then I'll apply the blue and white. It already has a curl but not pronounced enough. Ref. the 8 inch Jap shell splashes, I also started with two new ones. I used a bunch of unraveled cotton thread and stiffened them up with very diluted acrylic medium. A few more applications and then into the sea for the finalization. I found a painting of the Dutch light cruise Hr. Ms. Tromp surrounded by these shells. I'll try to use that as a guide. Youns see there is still a lot more detail work involved before we can attach the name plates to the base and put a plexiglass dome over it, which I need to find the materials for yet. Oh by the way, this word youns or yuns is what the folks in Pittsburgh, PA use for "all y'all" in the south Just thought youns may be wondering Hey Carl, the wipwatermolen will have to wait a while. We have had some major expenses to work on. Being on a rather small government pension and Social Security we have to keep our extra curricular activities to a minimum. However, I will be making a material list and start pricing stuff. Oh yeah, the roofers left a 5/8 inch piece of 4 X 8 exterior plywood. Yeah, we had our roof re-shingled that costs us $30,000 smakkers, ouch Then Gwen's Buick needs new engine mounts and possibly transmission work and my Chevy S110 needed a new ignition system. Ouch, ouch and double ouch. Hr. Ms. Tromp Cheers,
.thumb.jpg.2f36ae86c5ae1eaf47c16dedfba249b7.jpg)
- 378 replies
-
- 8
-
-
- java
- pacific crossroads
- (and 2 more)
-
Great progress Denis, the deck planking looks good and you can always scribe the plank buts into them. Cheers,
- 171 replies
-
- 6
-
-
- krabbenkutter
- authentic models
- (and 1 more)
-
Magnificent Nils and a nice touch with the Arabic name in the banner. Cheers,
- 692 replies
-
- 7
-
-
- eagle of algier
- chebec
- (and 2 more)
.jpg.6a7ce54a6f0bd169cffc730449cf89dd.jpg)


.jpg.bc921cc02eccbc46db9fa4a3b25897d0.jpg)