MORE HANDBOOKS ARE ON THEIR WAY! We will let you know when they get here.
×


Piet
-
Posts
3,568 -
Joined
-
Last visited
Content Type
Profiles
Forums
Gallery
Events
Everything posted by Piet
-
 Thank you Lou and Jan for dropping in. I'm still sorting out the photo problem, it looks promising for a download but not tonight. The eye procedure is postponed and set for May 17 for the right eye and May 24 for the left eye. Right now I'm heavily dependent on my optiviser over a 2.5X reading glasses. Just been extremely busy with other things and seem to have only one hour in the late evening to log on MSW Cheers,
- 378 replies
-
- 7
-

-
- java
- pacific crossroads
- (and 2 more)
-
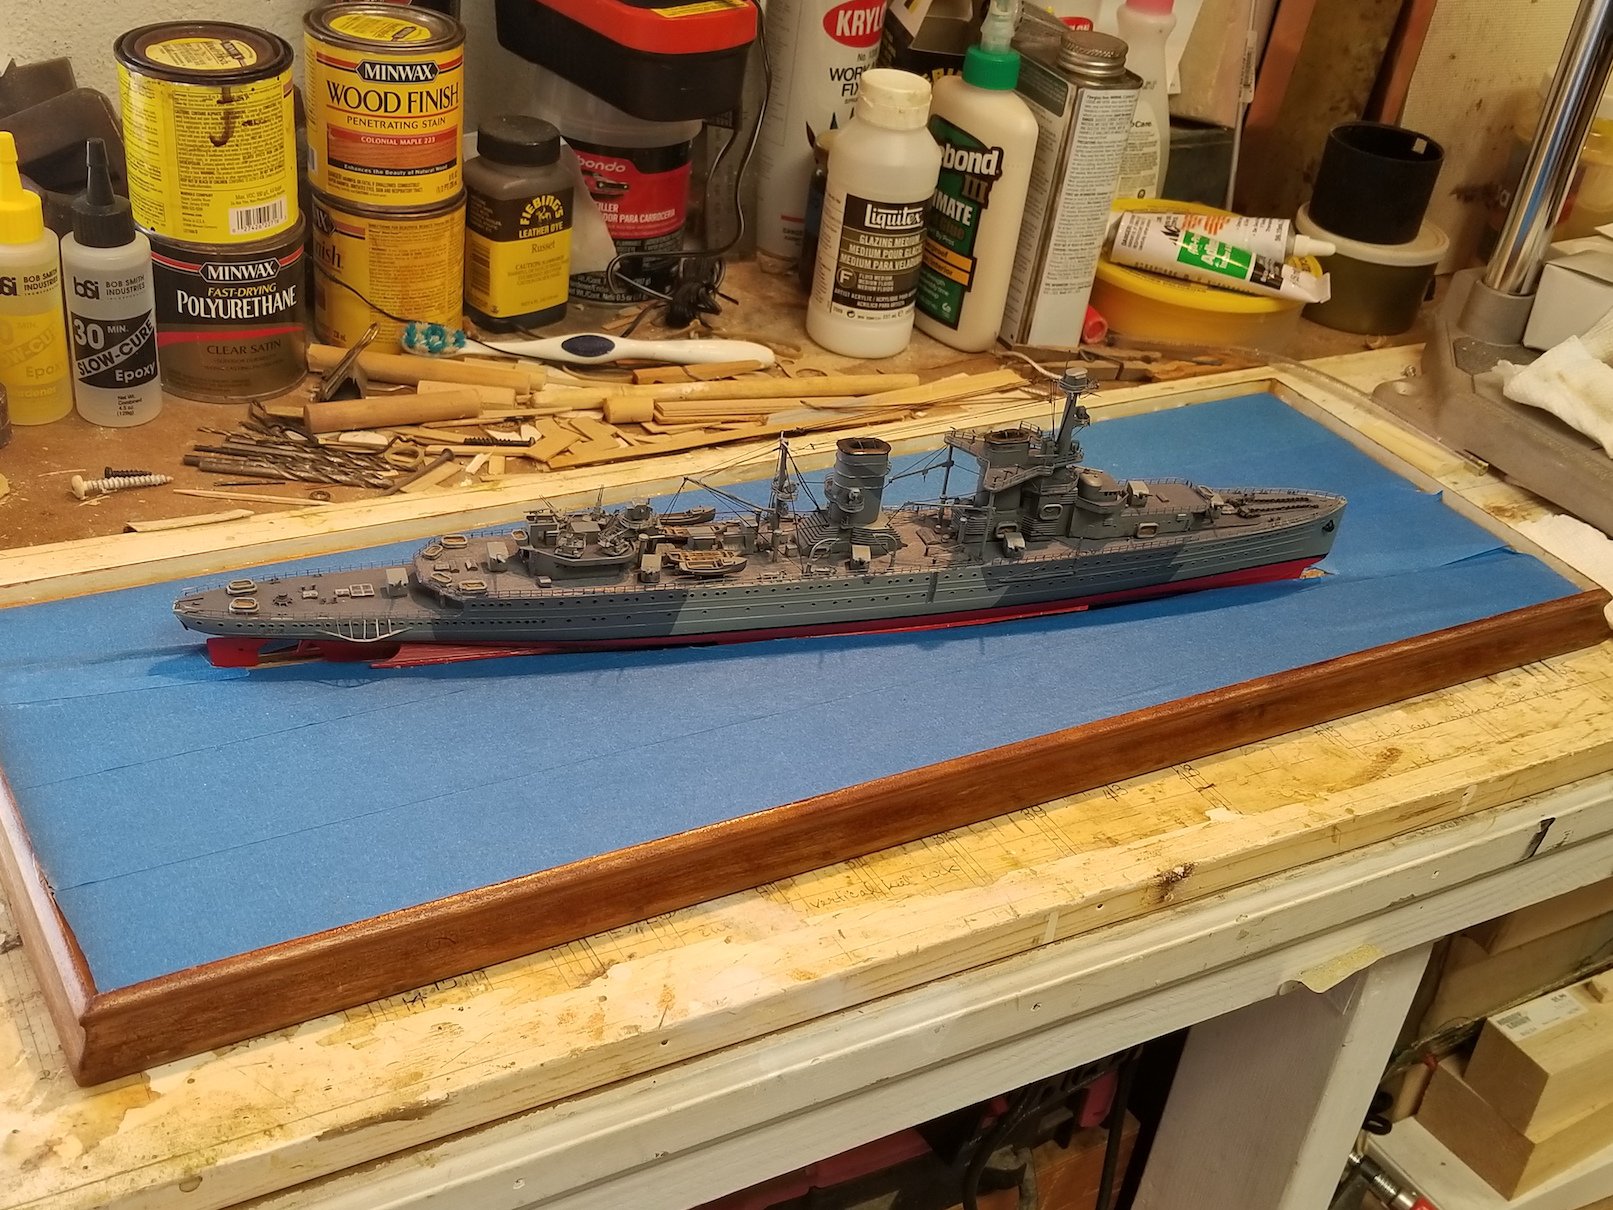
Thanks for the wake-up calls fellows. Yes, it's about 6 hours difference between youns and ussens so I'm half an hour away from beddy time - again I have an eye doctor appointment tomorrow morning, he is going to blow the "moss' from my right eye lens, with laser power. It's called "YAG capsulotomy. That seems to be a standard problem after cataract surgery. It's really been bothersome, the right eye looks through a fog and the left eye is trying to compensate, causing some confusion. Not that that's so remarkable, I'm a rather confused old fart anyhow Yeah, it's been very noticeable doing this small scale work. Okay, for some reason by new cell phone seems to have a problem downloading my photos to the DropBox storage app and consequently I can't download it to my confuser. I am now in the progress of e-mailing the pics to myself, even that is taking its own sweet time. Hopefully I have the pics tomorrow to show all youns what I have been doing. Yup, I poured the sea and it worked pretty good. I am glad that I used the cling wrap around the ship though. I had to deepen the groove another 16th of an inch to lower the ship some more. I'm happy with the results so far. Next comes the removal of some sea around the hull where it makes a dip and when that's done to my satisfaction I'll go ahead and cement the hull in place and pour some poly around it and then form the waves. Cheers,
- 378 replies
-
- 11
-
-
- java
- pacific crossroads
- (and 2 more)
-
Those ratlines look magnificent JesseLee, masterfully done. Cheers,
- 1,306 replies
-
- 4
-
-
- syren
- model shipways
- (and 1 more)
-
Looks like you got it pretty well under control Lou - so far. In my humble opinion I find kit building a lot more difficult then scratch, especially when bashing the kits as you do. The pore power to you my friend. Cheers,
-
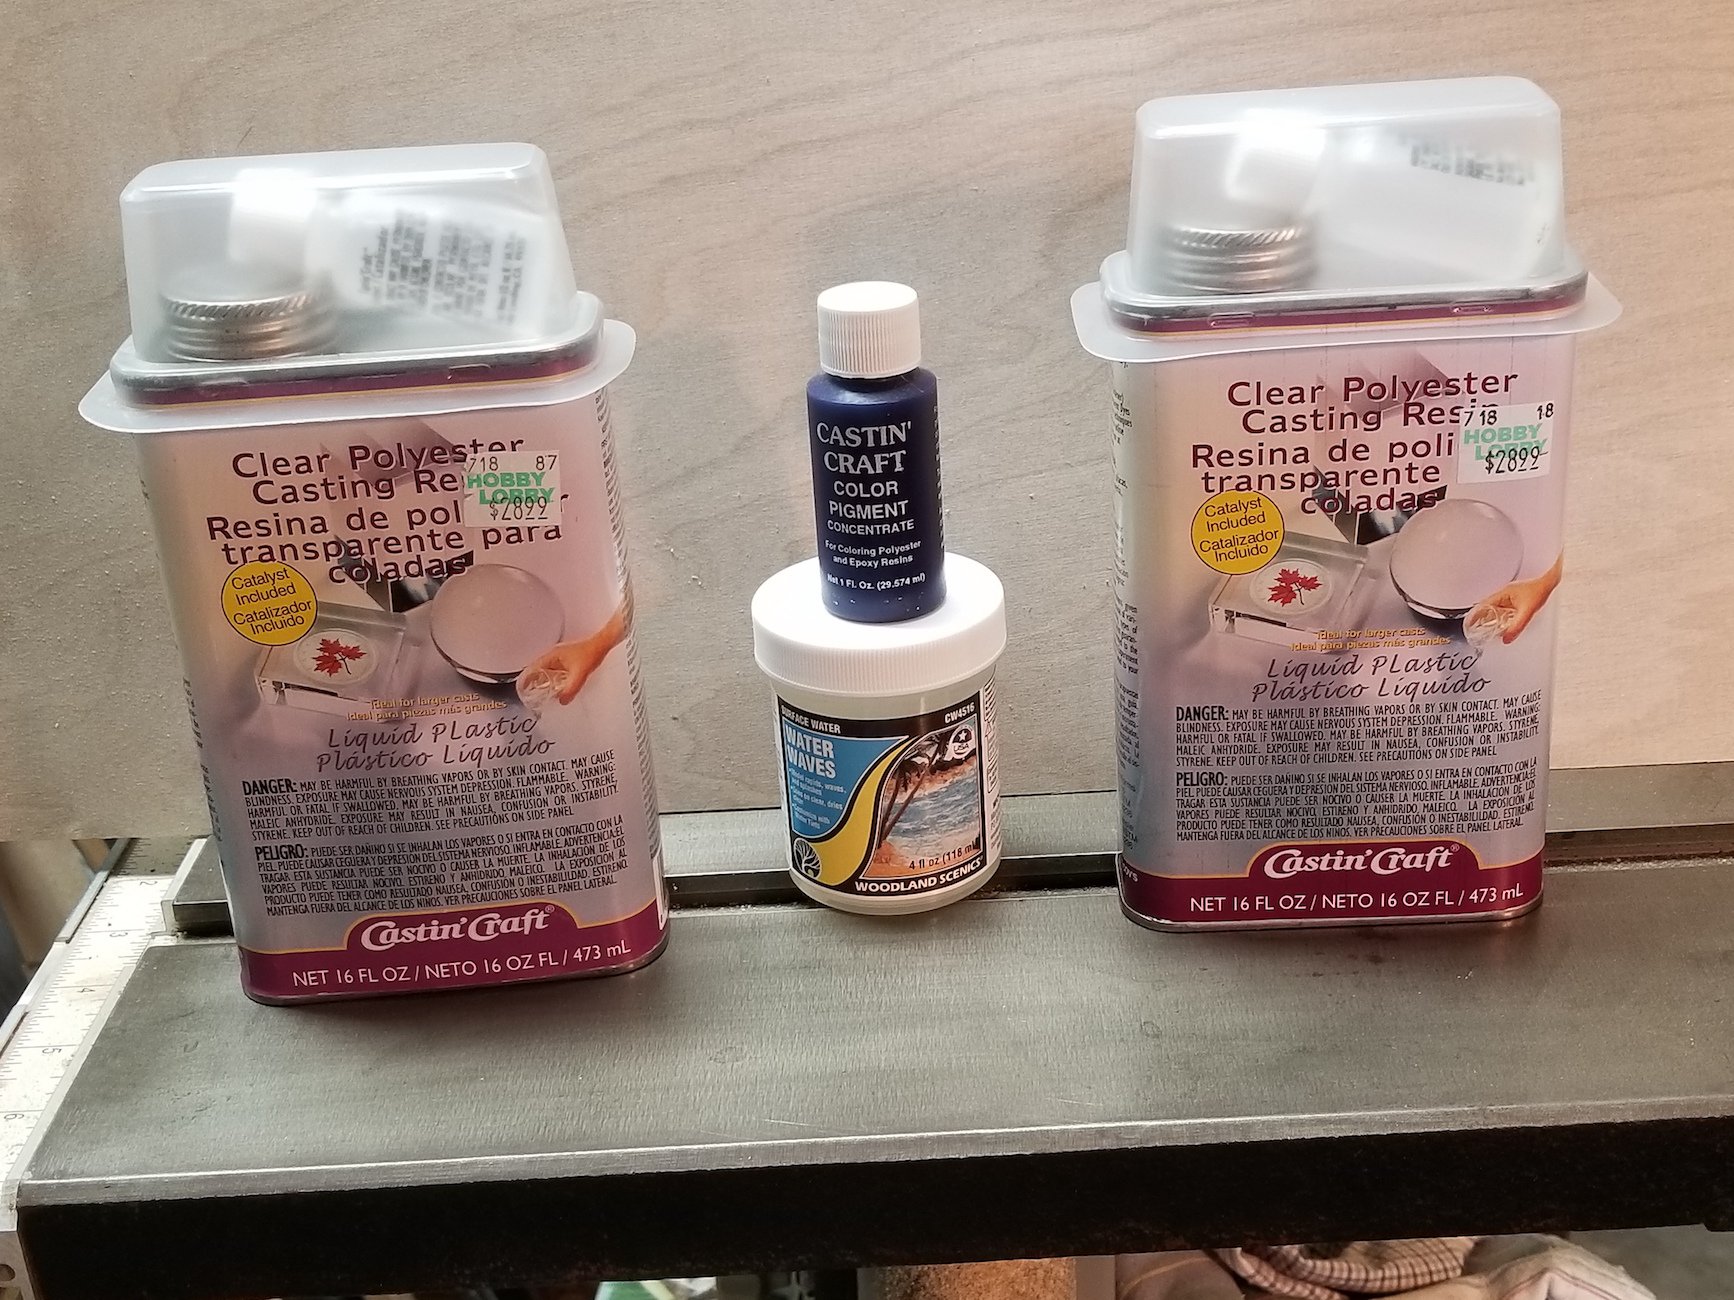
Thank you friends for looking in and your concerns and suggestions. So very true, it's a big step into the unknown, for me at least. I understand there are several ways to depict a sea and picking the right one is a toss up. Actually, no matter what material is used it's still a rendering and not the real thing so we must use what may possibly give me the most realistic effect. I don't mind working with polymers or epoxies, have done that when I part owned an aircraft repair facility. One builder on the NRG showed his method by using clear caulking compound that one may use to seal bathtubs with. He first painted the bottom blue and then proceeded to lay in the caulking compound. When it started to set he dabbed waves into it and let the blue under-paint give the effect of a blue sea. The photos made it look really good. In the meantime I have made a small mock up and think I should just go ahead and use the polymer stuff. I will however follow Lou's suggestion to use cling wrap around the model and place it that way into the groove I had made for it. That way I can still lift it out and forget the diorama idea (after having spend $100 on it ) Lifting it out gives me another advantages - to be able to remove some of the polymer around the hull where the water makes a dip. The third benefit is that I can raise the model about 1 mm higher. if needed for the effect i am looking for.. And Jan, I have left the props off the model and even the rudder could have been left off because it won't be visible. From what Jan mentioned that people have been painting the sea with acrylic paints anyway. That's what I will most likely wind up doing. So then, having said all that, I have talked myself into going ahead with it. The first pour will be 3 mm thick with a blue tinted layer. This will be tucked along the sides and somewhat under the hull - that's wrapped in cling wrap. This layer must gel up to the sticky state before pouring the next 3 mm layer, also tinted in blue. These two layers must completely cure before the "wave making" compound can be put in top. According to the directions it's more like sculpting procedure using water-wet pop sickle sticks and paint brushes. The paint colors I may need are thee colors of blue, one yellow in case i want to tint a breaking wave with green and some very light grey or white. The light grey is to simulate the reflection of the hull, may look better then stark white. After I'm happy with the results I can then lift the model out, remove the cling wrap, replace the model and finish with some more poly around the hull and sculpting the water around it. That to me may be the most difficult part. No time to show the mock up tonight, it's my bed time and you know that's very important for old men, they need plenty of sleep Cheers,
- 378 replies
-
- 11
-
-
- java
- pacific crossroads
- (and 2 more)
-
Ah, finally caught up with you OC. Very nice work, impressive. Cheers,
- 455 replies
-
- 5
-
-
- slightly modified
- greyhound
- (and 1 more)
-
Your ship is coming along real nice and the pics look great. Yeah man, I also had problems with posting pics but as Denis said, you'll get the hang of it. Looking forward to how you are tackling this project, looks promising though. Cheers,
-
Thank you Lou, Mark and Denis for your good advice. Yes, that has crossed my mind as well but there is that famous saying "boldly go where no one has gone before," or something like it. No, seriously though, I will pour some that expensive stuff out into a wooden mock-up and see what happens. Yes, it can get warm, depending on the thickness of the layer. I plan to have 2 layers of 3 mm each, which will not produce much heat, also depending how much activator/hardener I use. The coloring stuff also reduces the heat generated by reducing the cure time. This does't mean I will just go ahead and start pouring this stuff. Yes, it also shrinks a little but the gap (if any) will be filled with that other stuff to make the "white water" along the ship's side and screw foam. To be really on the side of caution I could "grease" the hull with Vaseline and lift it out of the mold if it doesn't work to my satisfaction. Then, when it looks like it's a go, I can replace the ship in the void and finish the surrounding sea with that wave making stuff. So all in all, I'm looking at 2 thin layers with a third on top sculpting the actual surface of the sea. I'm sure that I will need to do the final coloring with artist paints, which is not a big problem for me. Being a self taught artist I have made paintings in oil, acrylic, tempera and colored pencils. For this project the acrylic paints would be the right choice. I think I can produce a more believable sea surface then only relying on the polymer coloring. Does it sound like I'm talking myself diving off the high board? Hmmm, no, I'll be first playing with it and see what falls out. So, I'll make a small wooden tray and do a small pour into it, let it cure and then use some of that wave making stuff. Nothing but fun, eh what? Don't stay awake on my account though On another note, I send a few pics of "Java" with her decks painted in dark grey to Boris. He send me a message back with PERFECT in capitol letters. Makes me feel good. Cheers,
- 378 replies
-
- 11
-
-
- java
- pacific crossroads
- (and 2 more)
-
Nice going Marcus and thanks for the sawdust/Titebond III mixture. I am contemplating a wipwatermolen for next to my fish pond. Cheers,
-
Fokker Dr.I by Mike Dowling - FINISHED - Artesania Latina
Piet replied to Mike Dowling's topic in Non-ship/categorised builds
Nicely done Mike in the plane and a super display in flight, love it. Cheers, -
Hey Lou, Popeye the sailor Denis loves bashing kits but this looks like the bashingest of all the kit bashing builds so far Ambitious to the max, which will prove a very interesting build. I am so looking forward to the wood dust flying, bring it on man. Cheers,
-
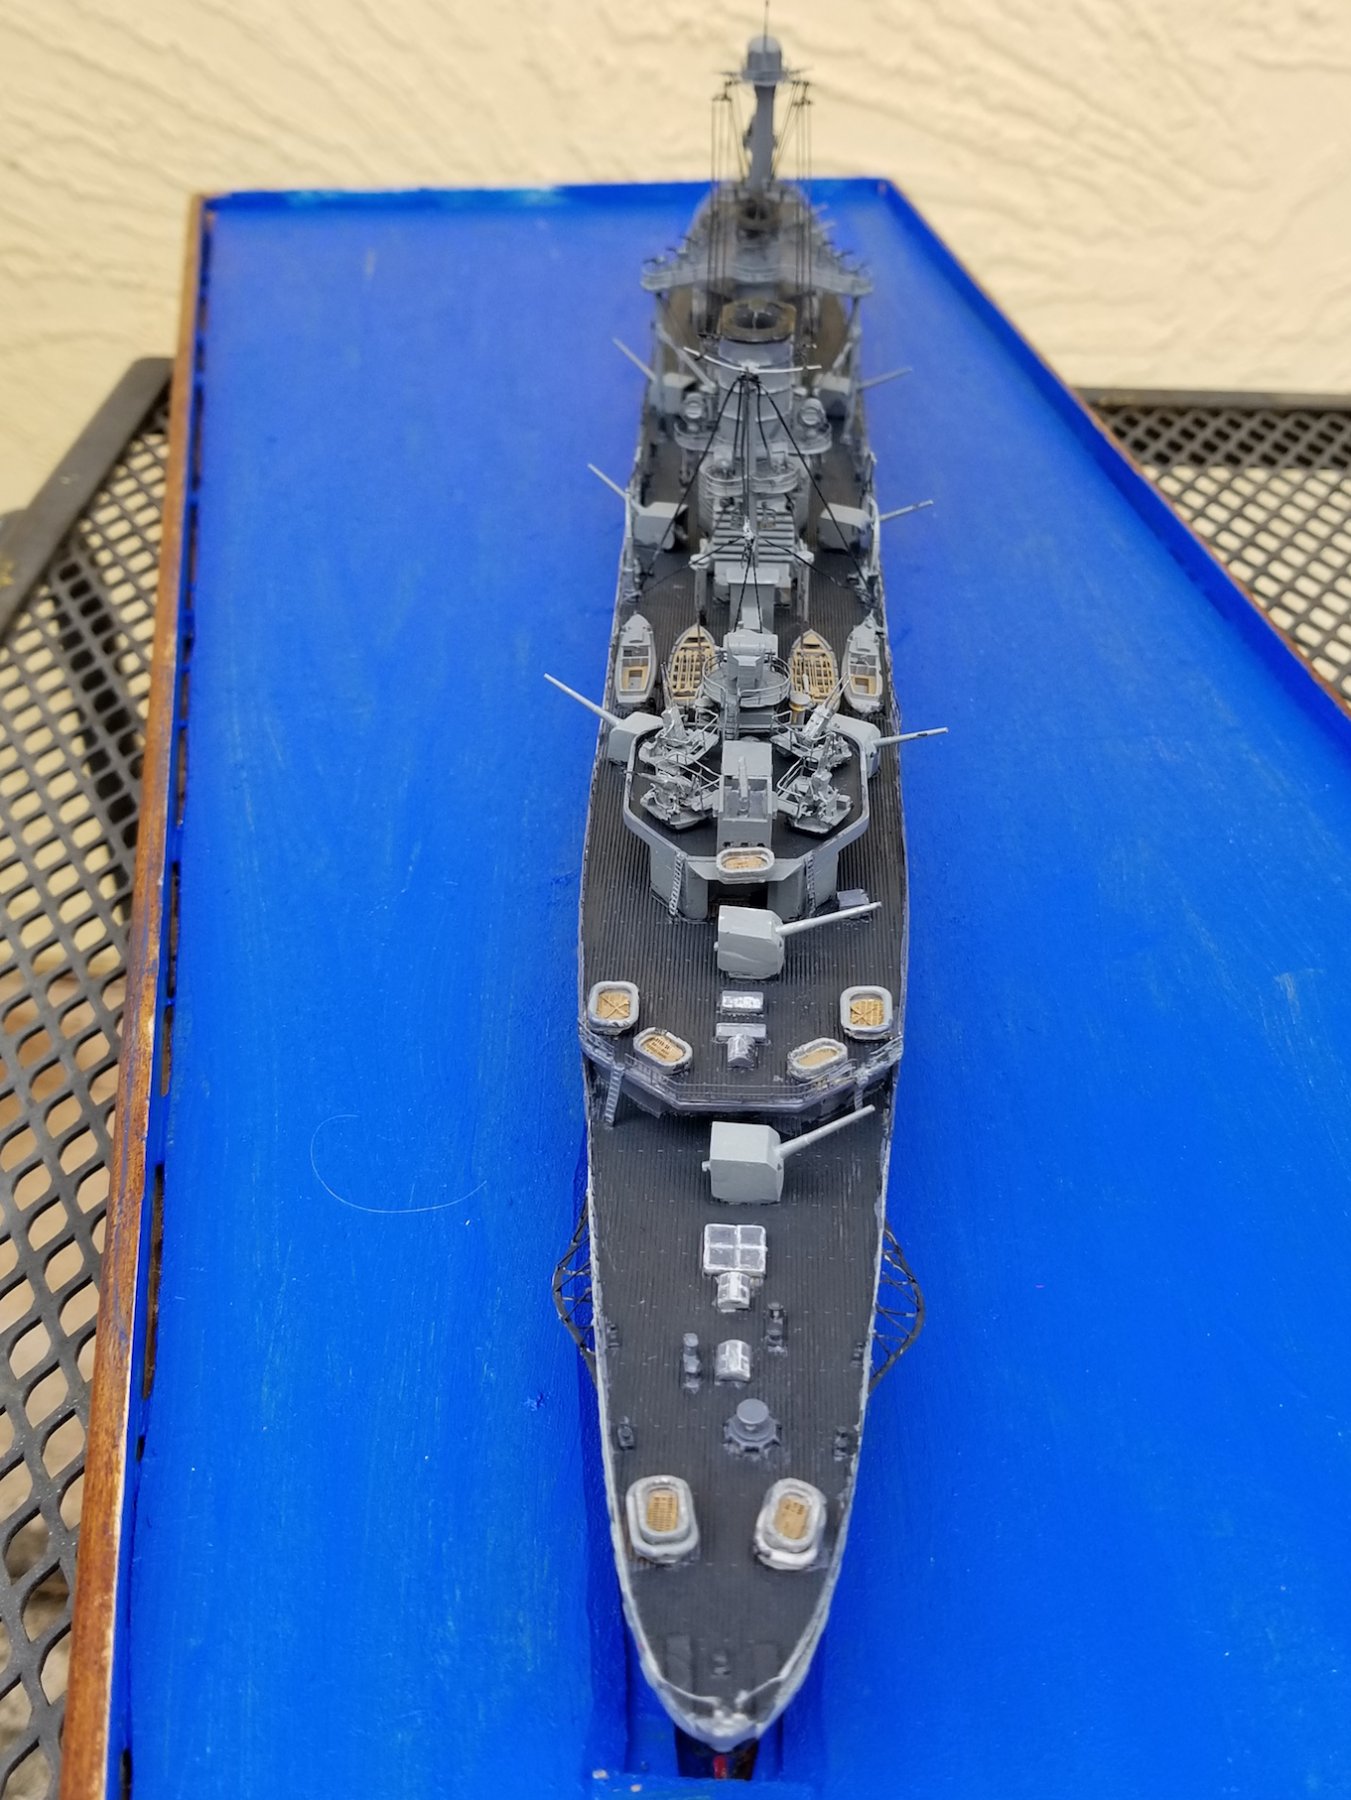
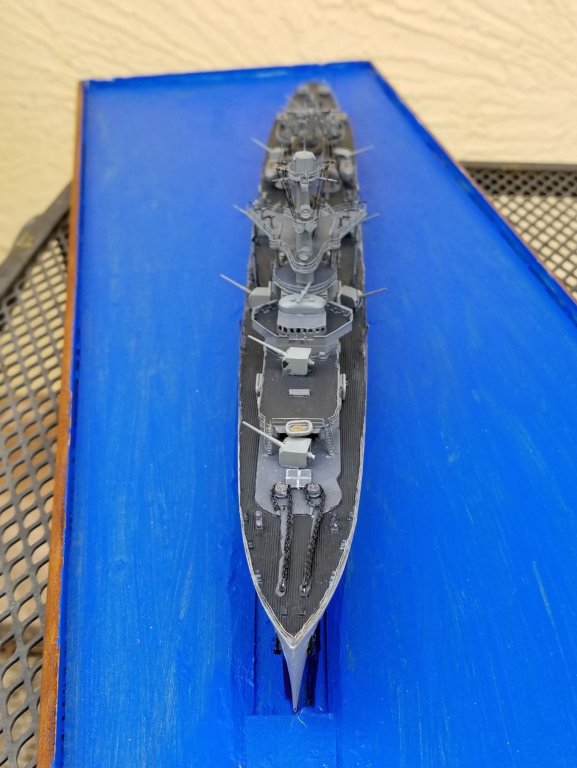
Thank you Lawrence for the best wishes. We have done nothing special for the "big" day, I'm just happy to be on the smelly side of the flowers Yup, I know all about that kind of home work, done plenty of it in times past. Now it's just maintaining the yard and a few other things. I can't wait for the start on your new model though. "Java" is coming along slowly right now. Boris Mulenko told me to paint the deck dark grey so that I did yesterday. I also bought the polymer of the sea and a blue coloring to add into the polymer that'll make it opaque. In order to make waves I bought some special stuff the diorama makers and model railroaders use. It also can make splashes and other water features. All this is new to me but have read up on the how to's. I have filled the gaps in the base plate with some more of the filler material and then painted it blue with an acrylic paint. It may not be needed because the polymer will be opaque but one never knows. In any case, it wont hurt. Here is how it looks now. Cheers,
- 378 replies
-
- 13
-
-
- java
- pacific crossroads
- (and 2 more)
-
Hot diggidy dog Nils, she's looking awesome with all fancy scroll work. The sweeps on the outside, saves space inboard where it's sorely needed, smart folks. Cheers,
- 692 replies
-
- 5
-
-
- eagle of algier
- chebec
- (and 2 more)
-
Hello Louis, now that sounds interesting, a concept build of a 1775 ship and a sloop no less. That's one of my favorite ships to build. Don't mind if I pull up a stump and have a front row place to watch your progress. I have been in Everett several times but unfortunately no sight seeing. Government business at Boeing. Nice area when flying over it though. Cheers,
-
Stairs are looking good Denis - you see - - perseverance pays off in the long run. Cheers,
-
Congrats with a very fine build Denis. You had fun building her and we had fun watching. Cheers,
- 378 replies
-
- 5
-
-
- t78 norden
- billing boats
- (and 1 more)
-
Beautiful kids Dave.What a nice gesture letting them help with the build, they'll remember these moments with you forever. Cheers,
- 742 replies
-
- 7
-
-
- constitution
- frigate
- (and 1 more)
-
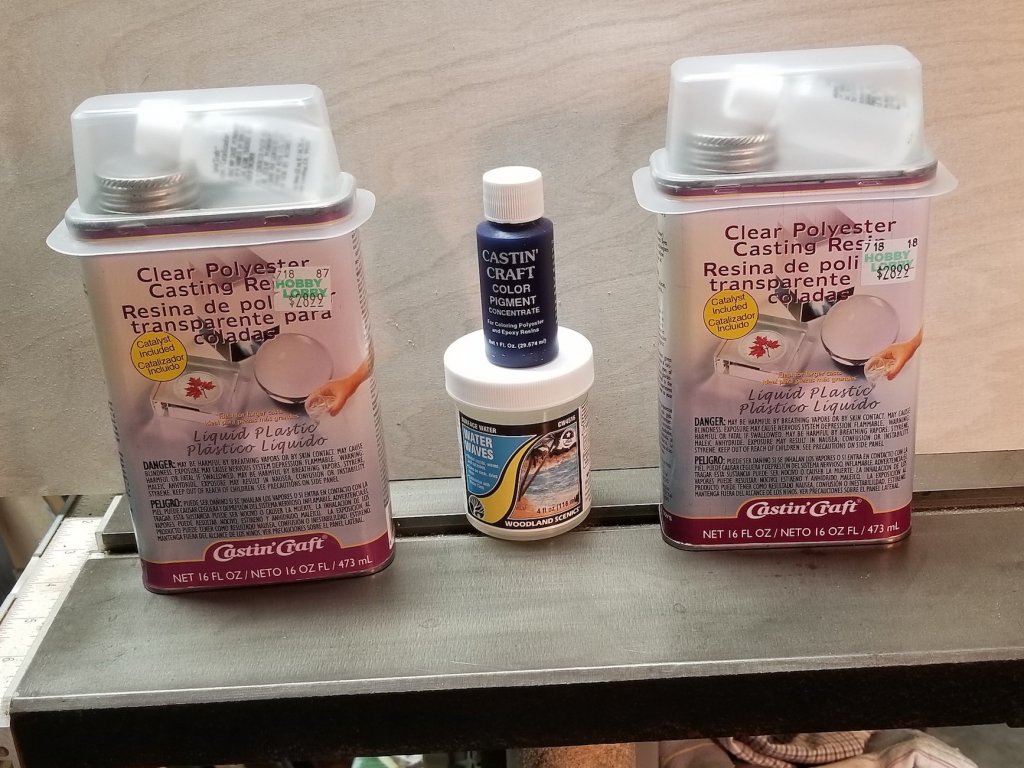
Ah yes, Jan and Carl, now I understand what Carl meant. Okay, rest assured that the sea will be opaque, or as opaque as i can get. Perhaps using the word "translucent" threw you off, for which I used it as reflecting back up from the surface. I have tried to clarify it by mentioning the word "opaque" several times, I think. So, my apologies for the confusion, me bad boy So then, it does not matter about the edges or any other possible imperfections there may be in or on the base. I am however, still some what concerned about the coloring material that will make the polymer really opaque. The store person assured me it will, but - - - All I can do at this time is to trust the instructions that come with all this polymer stuff and go ahead with it. I can always add regular artists acrylic paint to the surface of the sea but wont know till the "sea" is poured in. I also count on the whitish water around the ship that'll hide the red lower hull but wont do much good for those sharp edges of the filler pieces. Based on the comments about the sharp edges though I plan to cover the cut pieces in front and rear of the ship, where it may be visible, with Dacron and resin and paint the bottom dark blue. This can only help. Thanks for the input. Jan also thanks for your thoughts on the gun smoke thing. I'll try it on one gun and not overly do it. I am thinking of a wisp of smoke, at this scale that should be enough. I don't want to make it into a caricature. After I have what looks believable I'll post it here for your thoughts. Like I said, this is new to me and finding my way through it. It's easier to make a painting on canvas then a diorama. Thanks for the good words Patrick and your happy birthday wishes, 84 today and counting Yes, the Japanese cruisers were actively shooting at them with there 8 inch guns. These splashes are not very big though, not from 8 inch shells, but should lend a little drama to the piece and that's what I had in mind with a few smoking guns. I measured the amount of polymer I need for the sea, which will be a little over 36 fluid ounces. Now I have to see how many ounces of that stuff comes in the can at HobbyLobby.
- 378 replies
-
- 5
-
-
- java
- pacific crossroads
- (and 2 more)
-
Congrats Patrick for a masterful miniature model. It's mindboggling to see the quantity of the detail pieces at that scale. My hat's off for your patience and craftsmanship. A BIG well done. Cheers,
-
De Zeven Provinciën 1665 by Dražen - Scale 1:45
Piet replied to Drazen's topic in - Build logs for subjects built 1501 - 1750
The banner and letter carving is exceptional Drazen. Yes, high quality oil paints are expensive. For all my oil paint canvasses I have used Grumbacher. For painting on parts at this scale with oil based paints you may want to use the glazing method. Don't thin the paint with oil though, maybe a very small amount but use a natural thinner like turpentine or, to speed the drying time, use a modern fast drying thinner. This way you can layer the paint faster without it looking "globby." Experimentation is your best guide in how to approach it to give the best results. Cheers,- 487 replies
-
- 1
-
-
- ship of the line
- 80 guns
- (and 1 more)
-
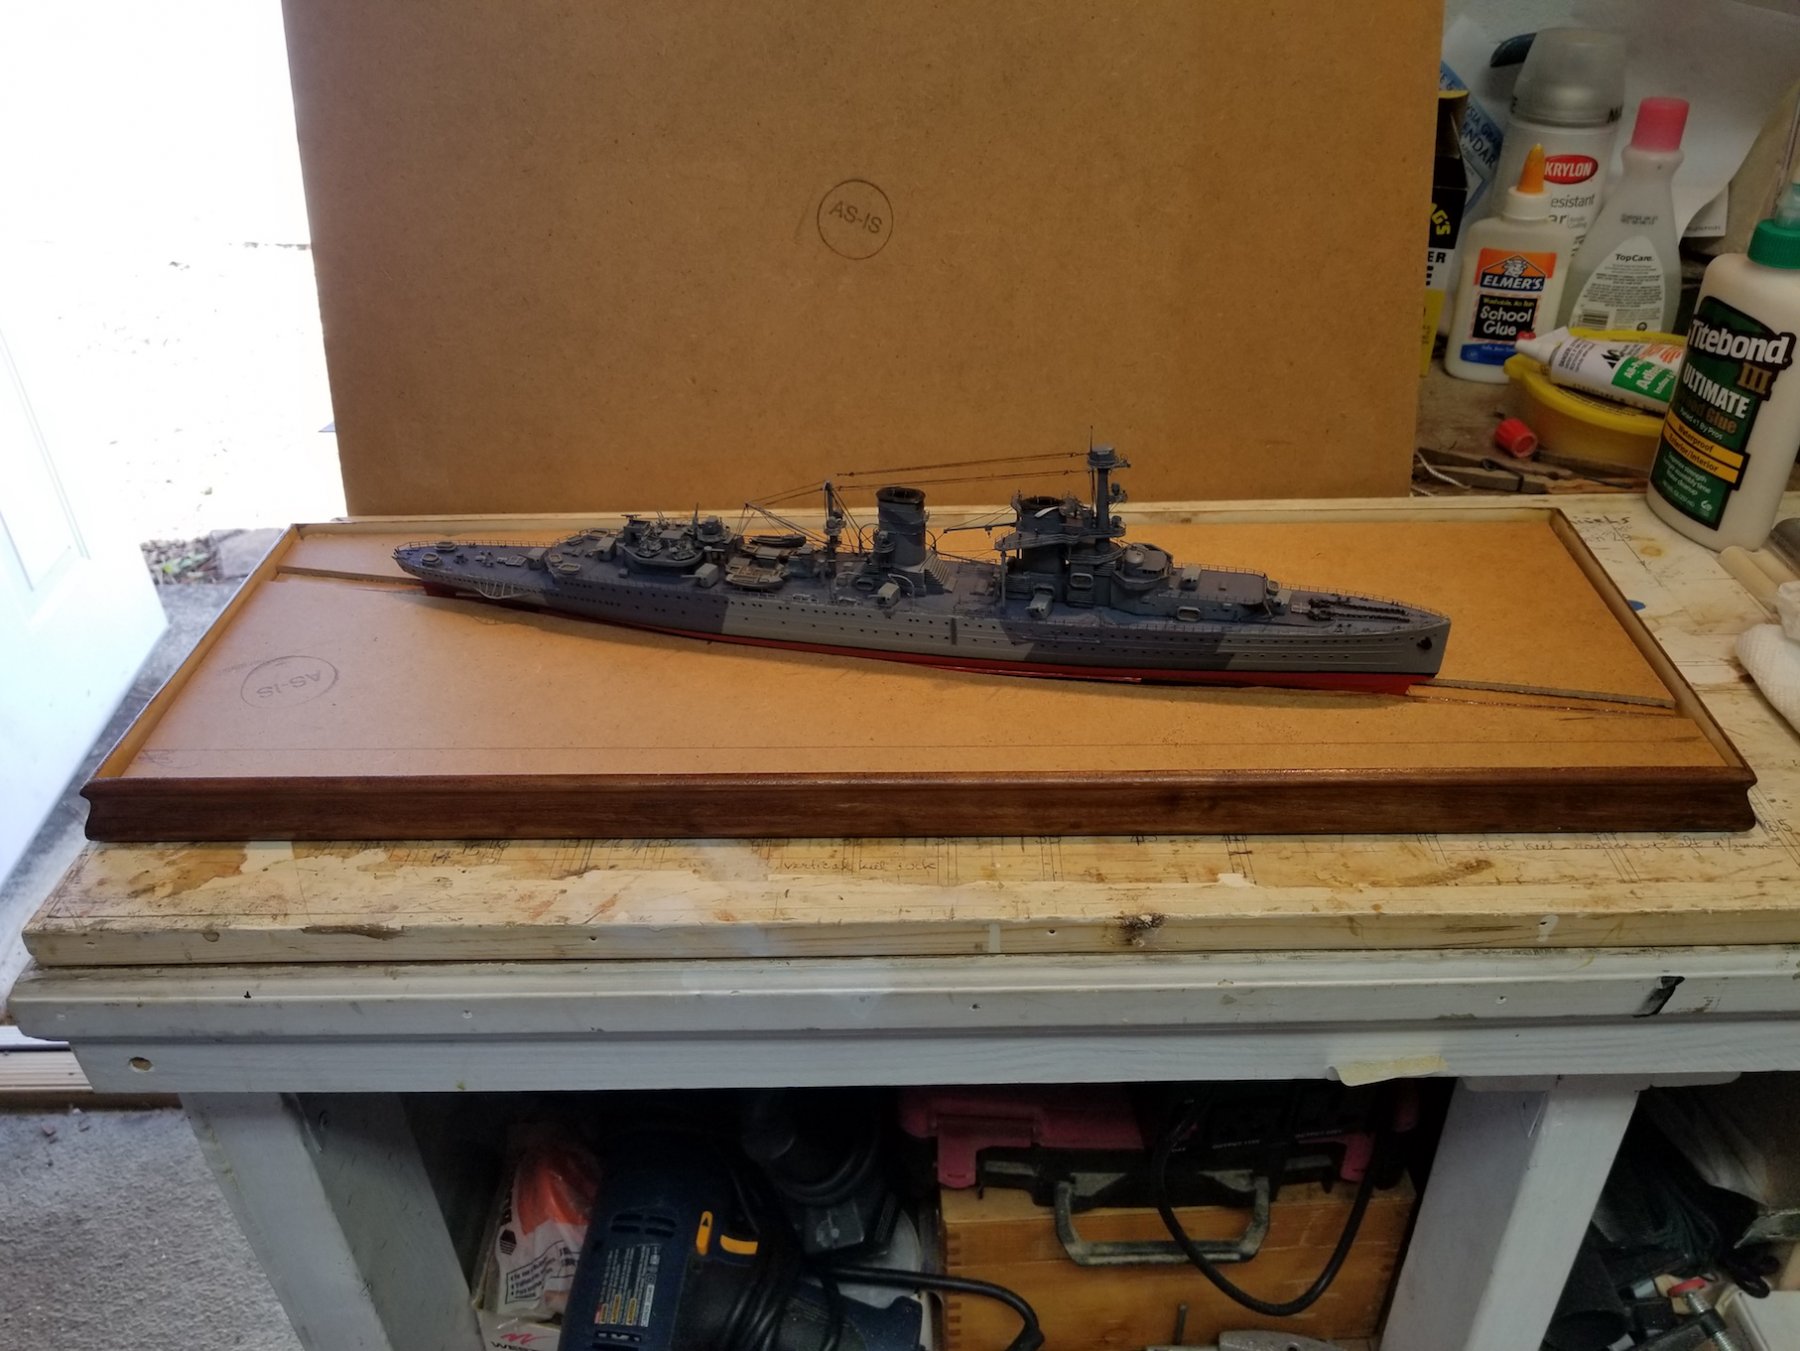
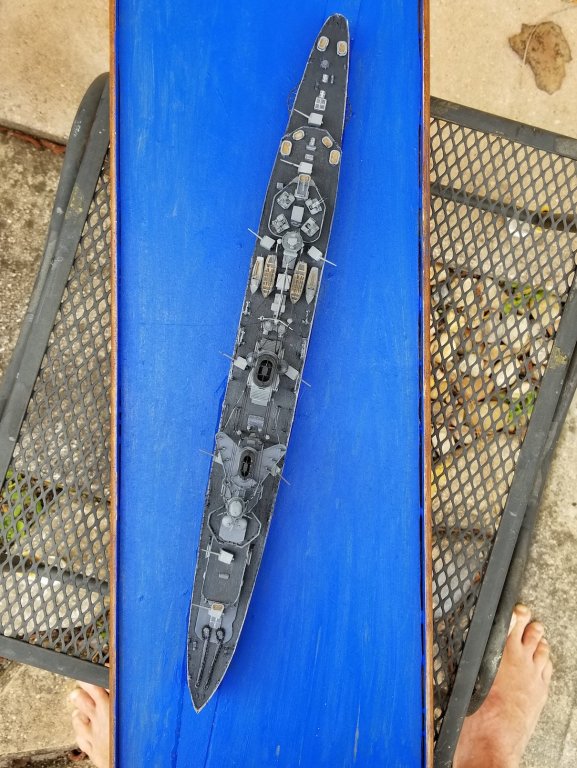
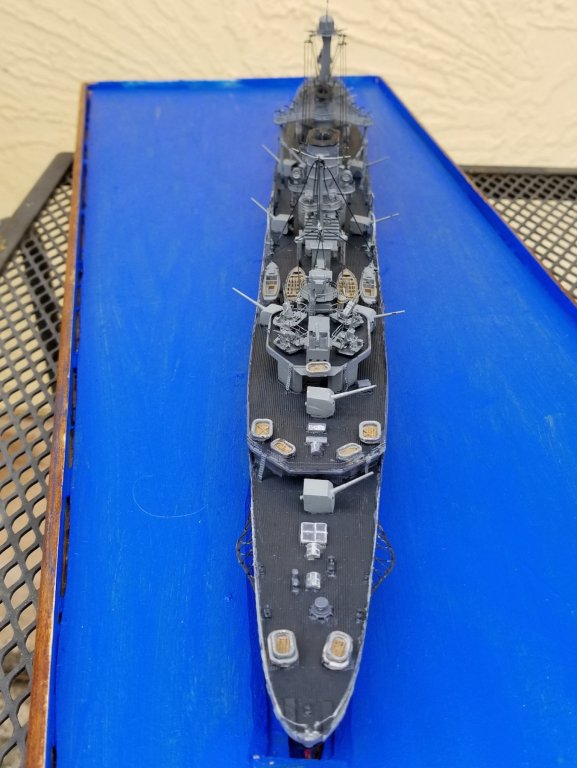
Hey Carl, thanks for the visit and suggestions - however, I don't understand what you mean. I purposely want the ship placed in a diagonal position in the diorama to get away from the standard center line method. This will also give me the space in the large areas for the missed Japanese shell spouts. The blue masking tape will obviously be removed and the tan colored filler pieces will be covered by the opaque polymer sea and not visible. Please explain your suggestions, things can still be changed in the next day or so, If I feel it's warranted - no offense meant. Thanks Wallace and Nils for your kind words. Yes, Denis I agree with your comment about the deck but - - - If the "Java" had her deck painted a very dark grey, bordering on the black, during the war time period, which is also in accordance with the British camouflage method, who am I to argue? I want to show the model as close to how she was when my father served on her. If the "experts" tell us it was very dark grey, bordering on the black then that's what I need to do. Actually I preferred the teak deck but again, I must go with reality above my wants The paint colors are the least of my concern though, I must now model the "sea" as a 16 mph wind would look. From the actual reports i read that was about the wind strength on February 27, 1942 with scattered cumulus clouds. A nice for sailing. Then how to depict shell splashes and firing guns and smoke out of the stacks. Everything will mean experimenting. Oh, I have some ideas but am open to suggestions, the more the better. Cheers,
- 378 replies
-
- 10
-
-
- java
- pacific crossroads
- (and 2 more)
-
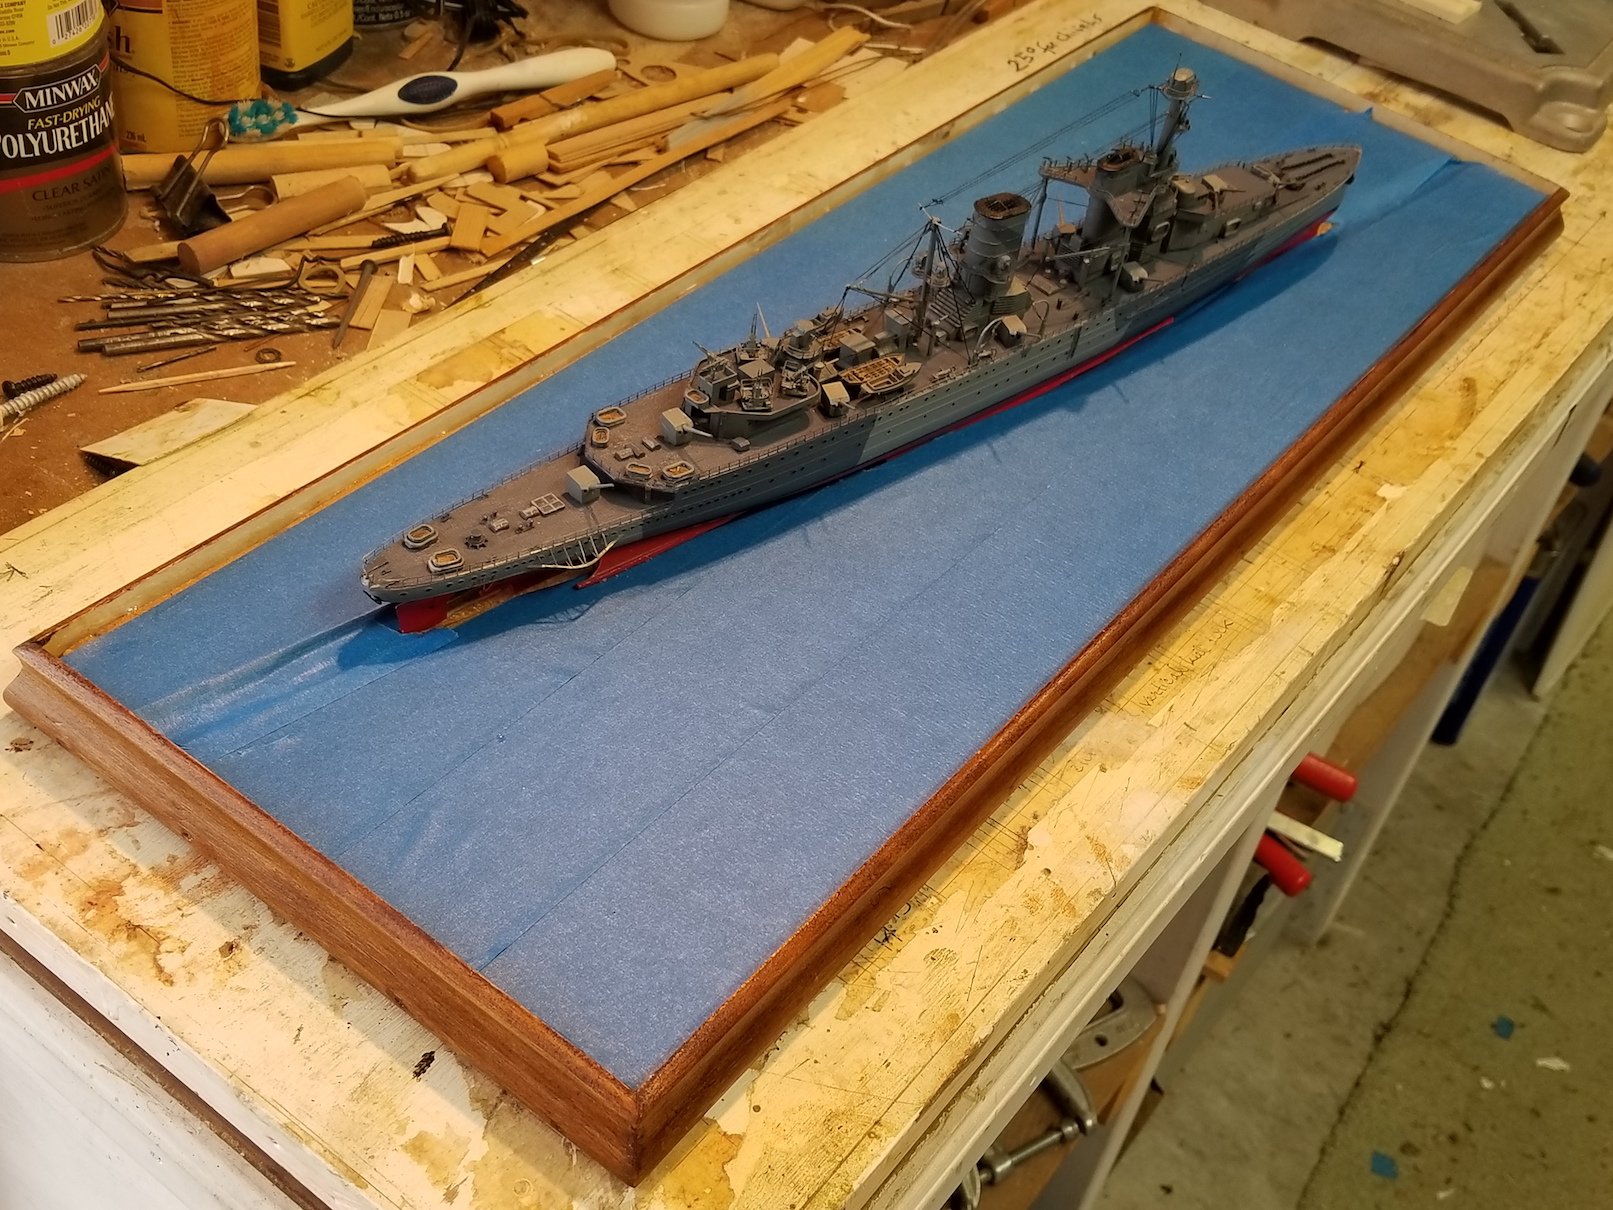
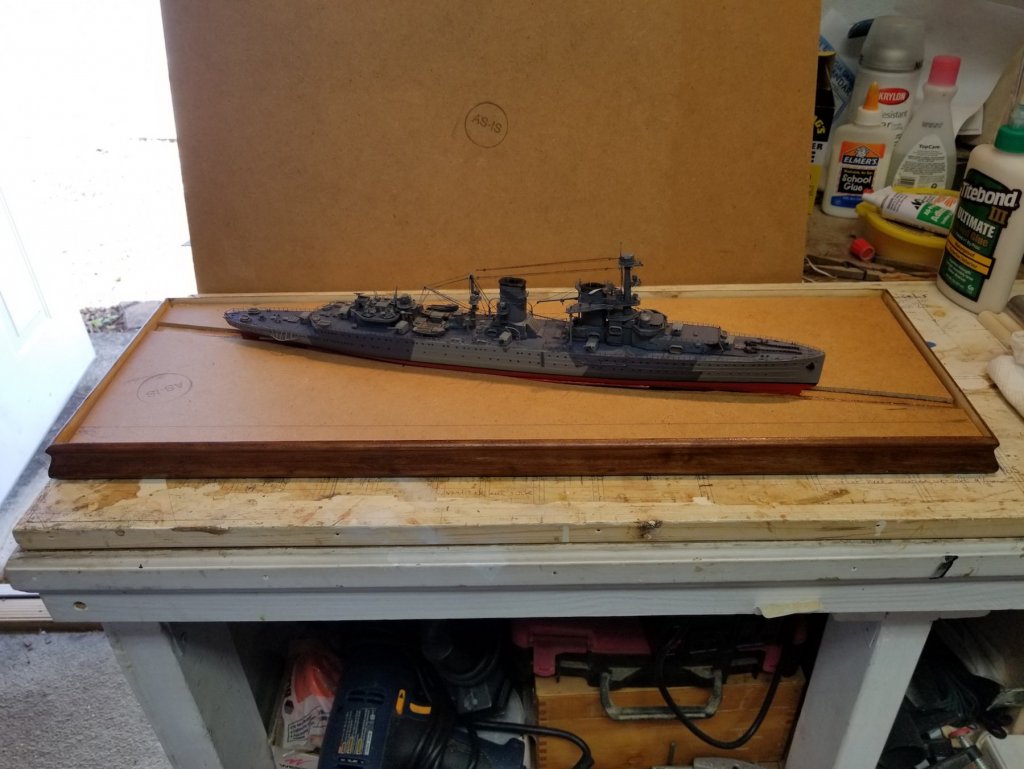
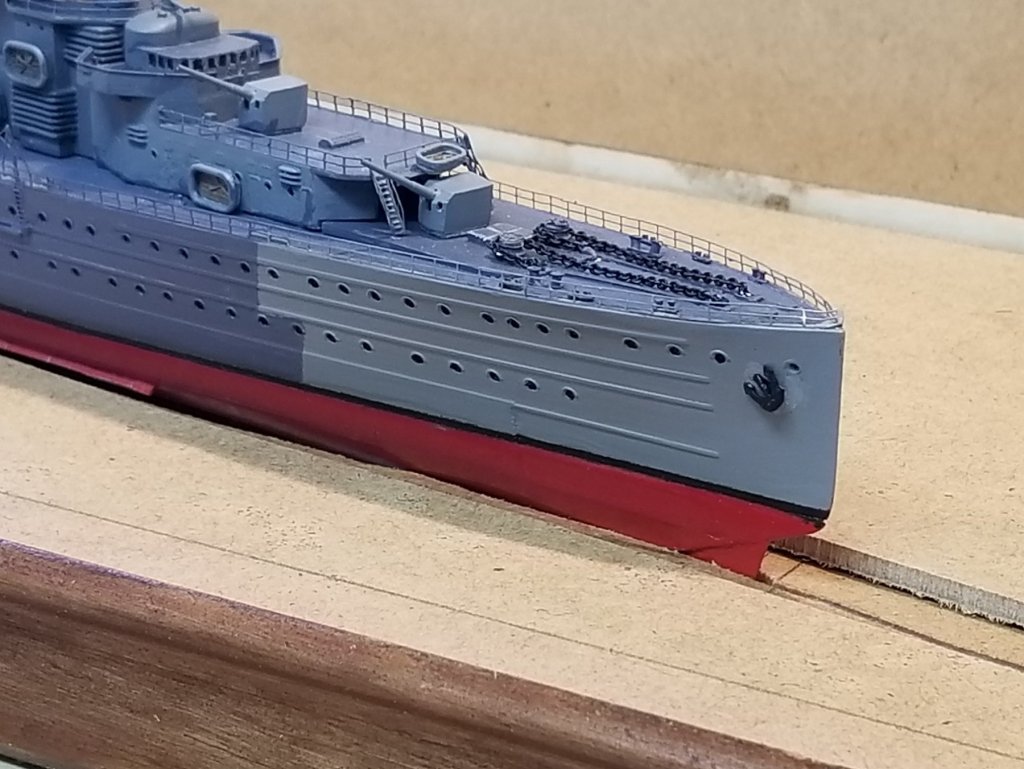
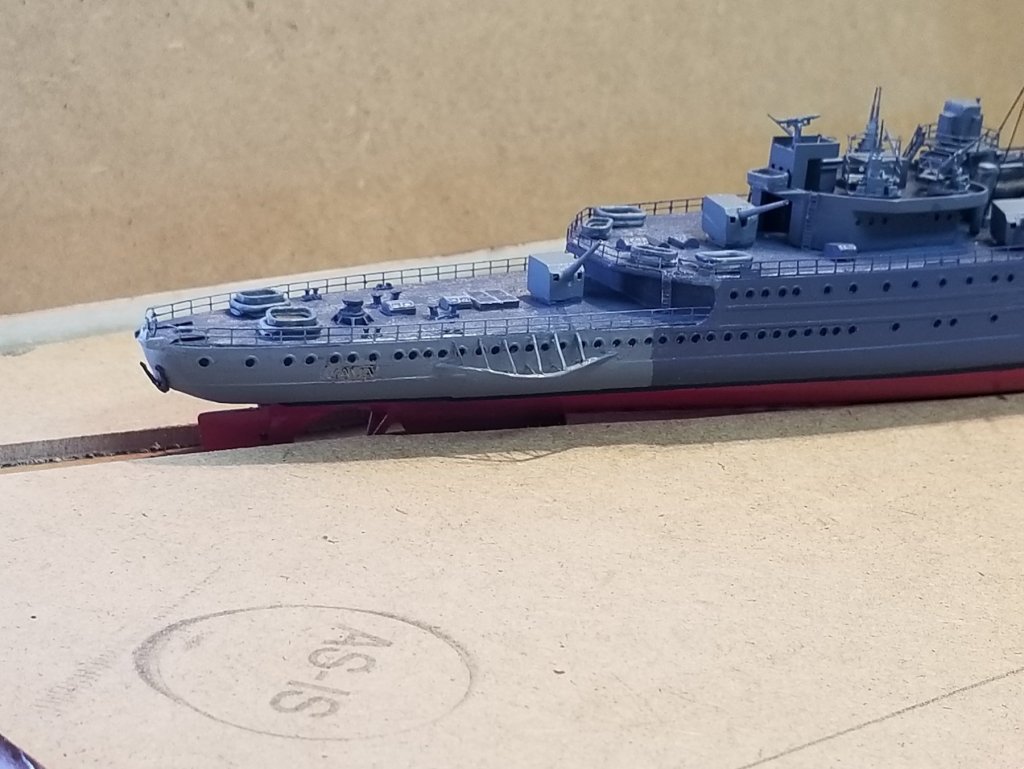
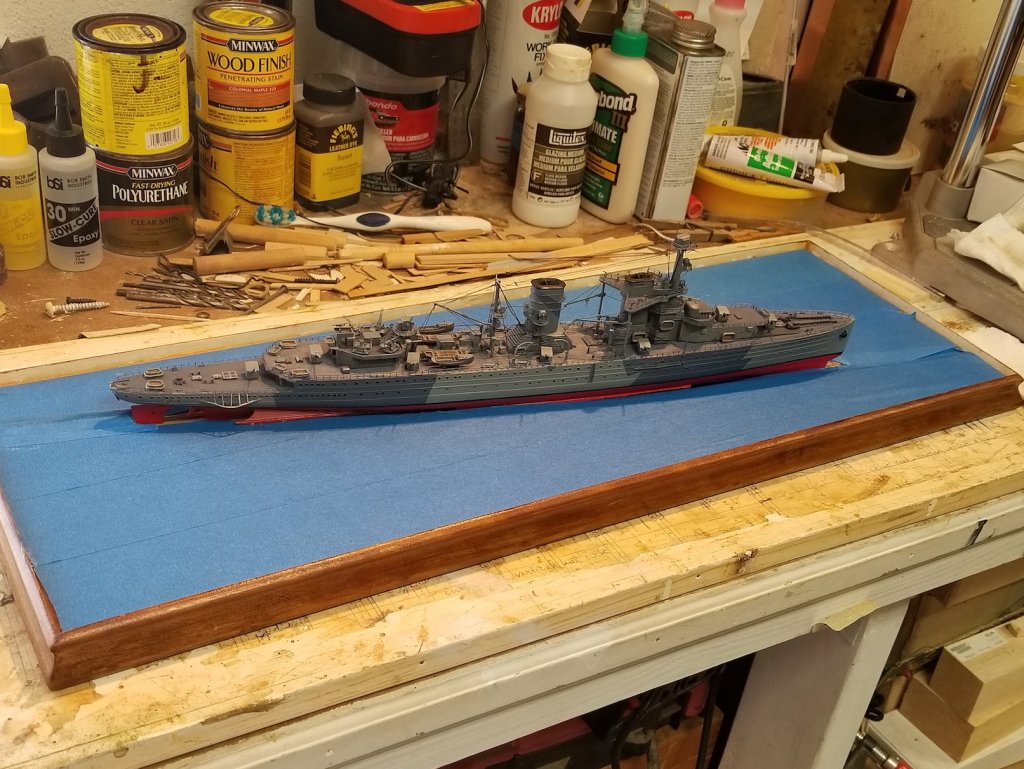
This morning I gauged out a groove in the base plate where the model will be sitting. It's about 1/16 inch deep. I could have made it deeper to 1/6 inch but I wanted the sea surface to come to the top of the side molding and with the two filler pieces that'll work. The model sits in it quite level too. Next I cut two pieces of that 3/16 backing board and glued and nailed it to the base plate, leaving room for the model to sit in. Measuring the distance from that filler piece I will be adding another layer of that 3/26 board on top of that. And so I did. Now I have 1/4 inch from these filler boards to the waterline. This will give me a 1/4 inch thick polymer sea that'll also come up to the edge of the side molding. The model lays in there quite nicely and steady and on an even keel. I'm a happy camper Next will be measuring how much of the polymer I need and buy the stuff and other supplies at Hobby Lobby. I hope they have a dark enough blue coloring but I can always use polymer paint to the surface. I'll do it like I would painting on canvas. The paints I have may no longer be good so I'll get some from Hobby Lobby. Boris send me a message that the deck of "Java" is still too light. He said that it was closer to black. So I mixed some of the dark grey with black and will have to paint the deck again. There are still some items that need straightening, mainly the railings, they got a beating with all the handling. I'll wait with that till "Java" is firmly secured in the sea. Okay, that's it for today. here are a few pixs of the progress. This shows "Java" with the double set of filler material. A closeup of the bow inside the groove. Can you imagine that it's only 1/4 inch from the filler material to the waterline? A closeup of the stern Here I have put some blue masking tape to the board for a visual effect. Another shot from above. Cheers,

- 378 replies
-
- 14
-
-
- java
- pacific crossroads
- (and 2 more)
-
Beginning to look like windmill Marcus. Nice progress. Cheers,