HOLIDAY DONATION DRIVE - SUPPORT MSW - DO YOUR PART TO KEEP THIS GREAT FORUM GOING!
×


Piet
-
Posts
3,568 -
Joined
-
Last visited
Content Type
Profiles
Forums
Gallery
Events
Everything posted by Piet
-
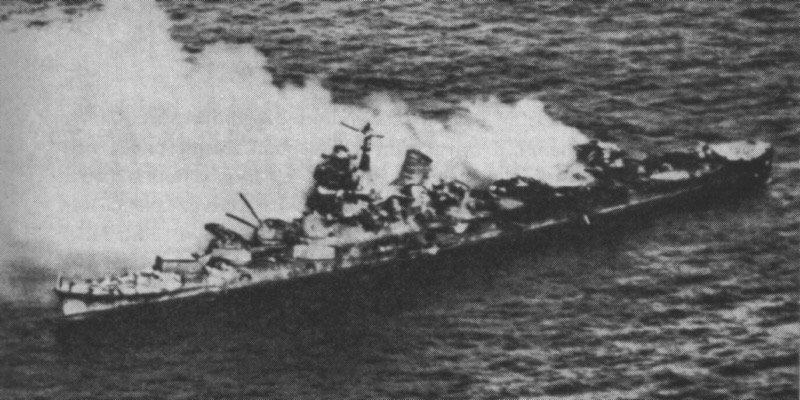
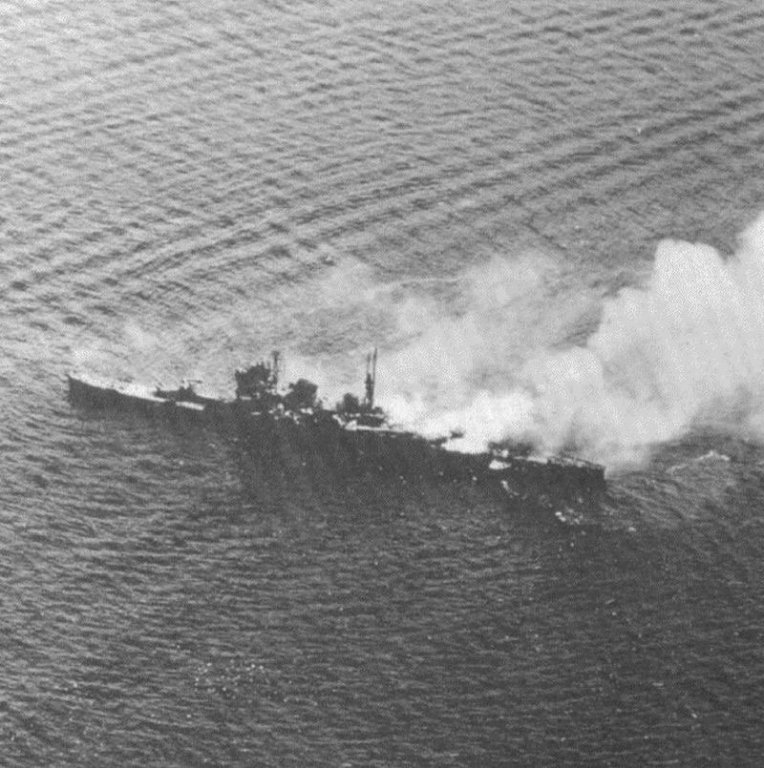
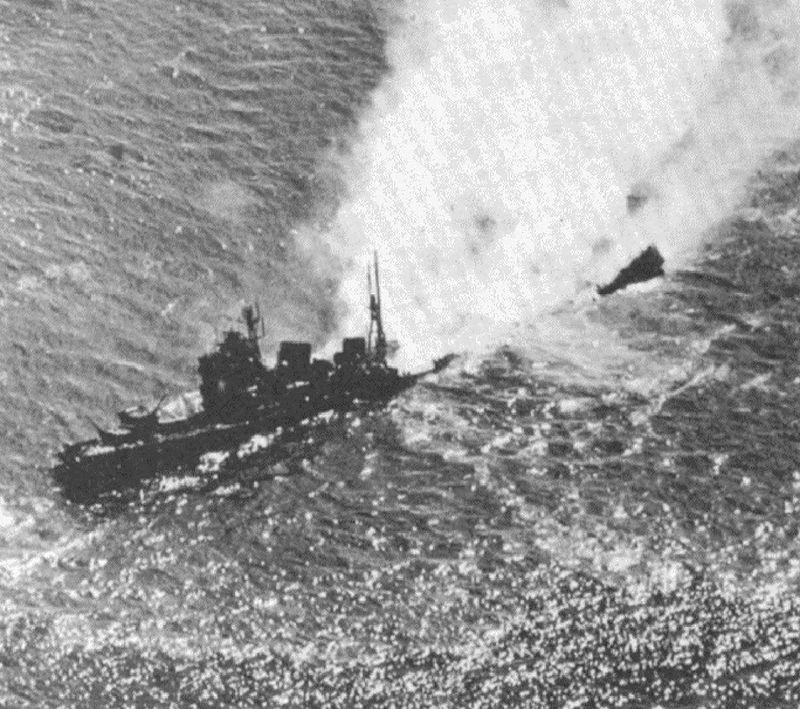
 I have obviously compiled quite a bit of history about the two most important antagonists of the ABDA fleet. They are the Hagura and the Nachi, both are heavy cruisers with 8 inch guns and several torpedo launchers as well as spotter airplanes. According to Jeffrey R. Cox, the author of "Rising Sun, Falling Skies . . ." It was the "long lance' torpedo of the Nachi that struck "Java' at her port side. The United States Navy managed to sink Nachi in 5 November, 1944 with aerial bombardment, ship's gunfire and torpedoes. Bitter sweet revenge, if we can call it that. IJN Nachi 5 November, 1944 5 November, 1944 5 November, 1944. Here the bow is missing and the stern is separated from the ship and sinking.
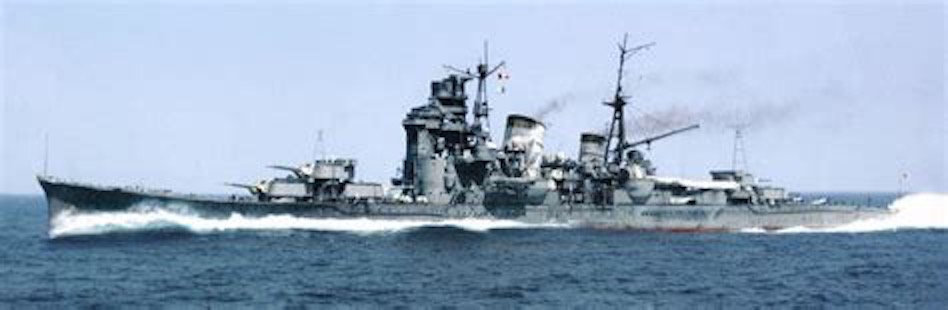
- 378 replies
-
- 9
-

-
- java
- pacific crossroads
- (and 2 more)
-
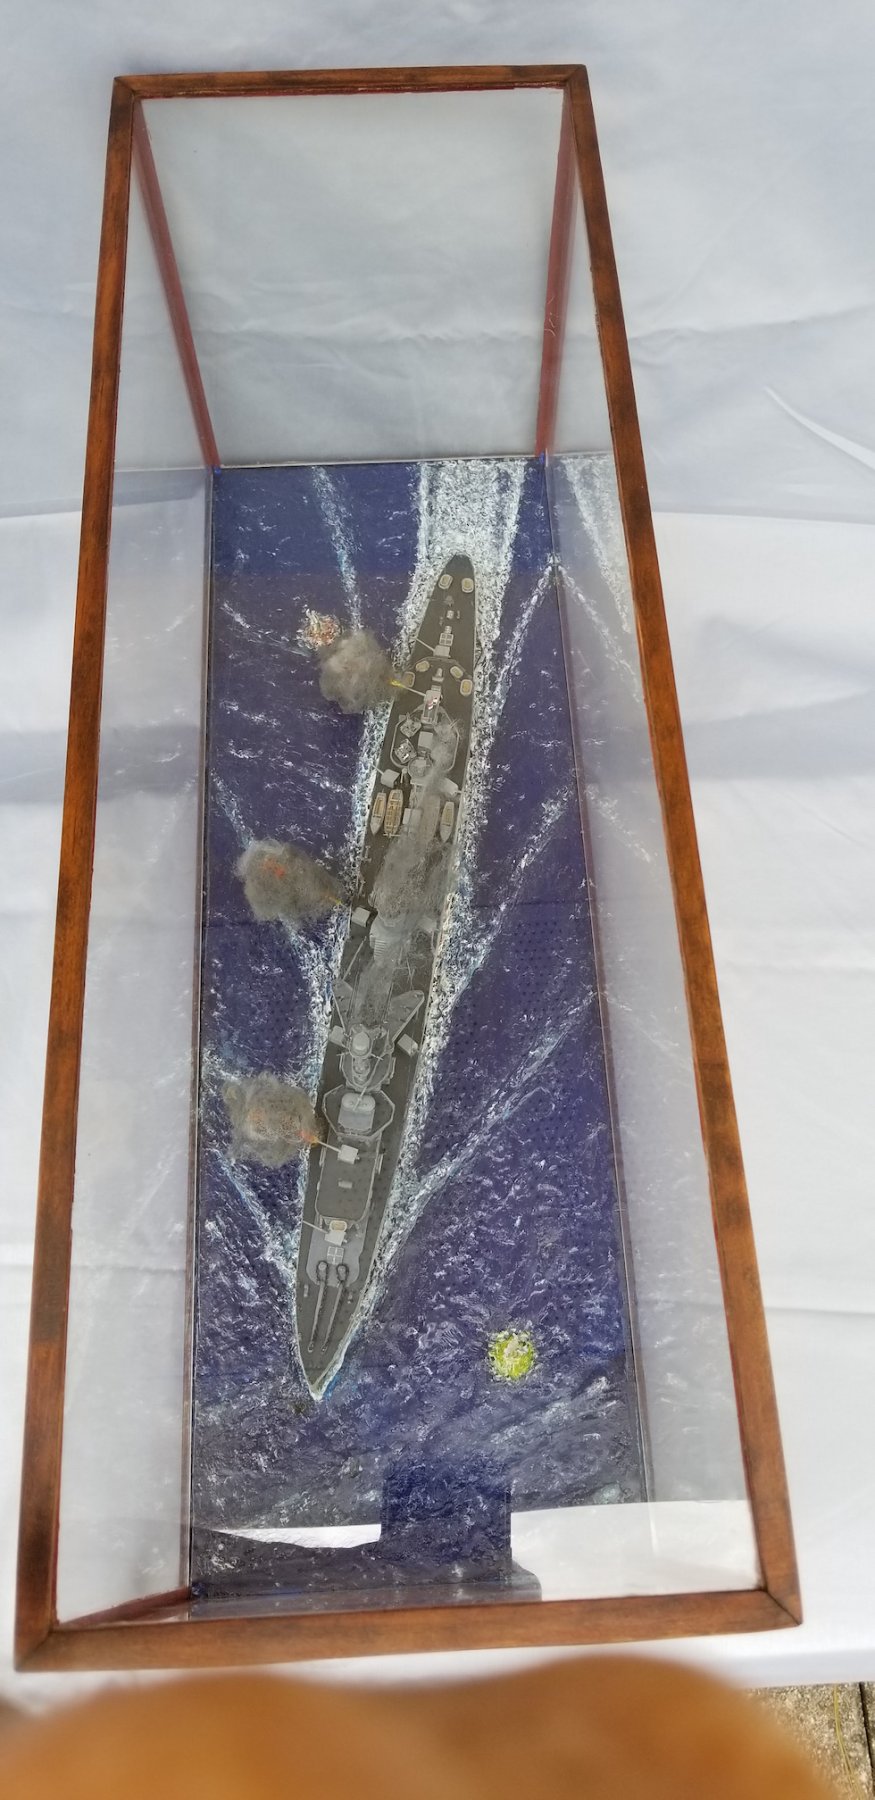
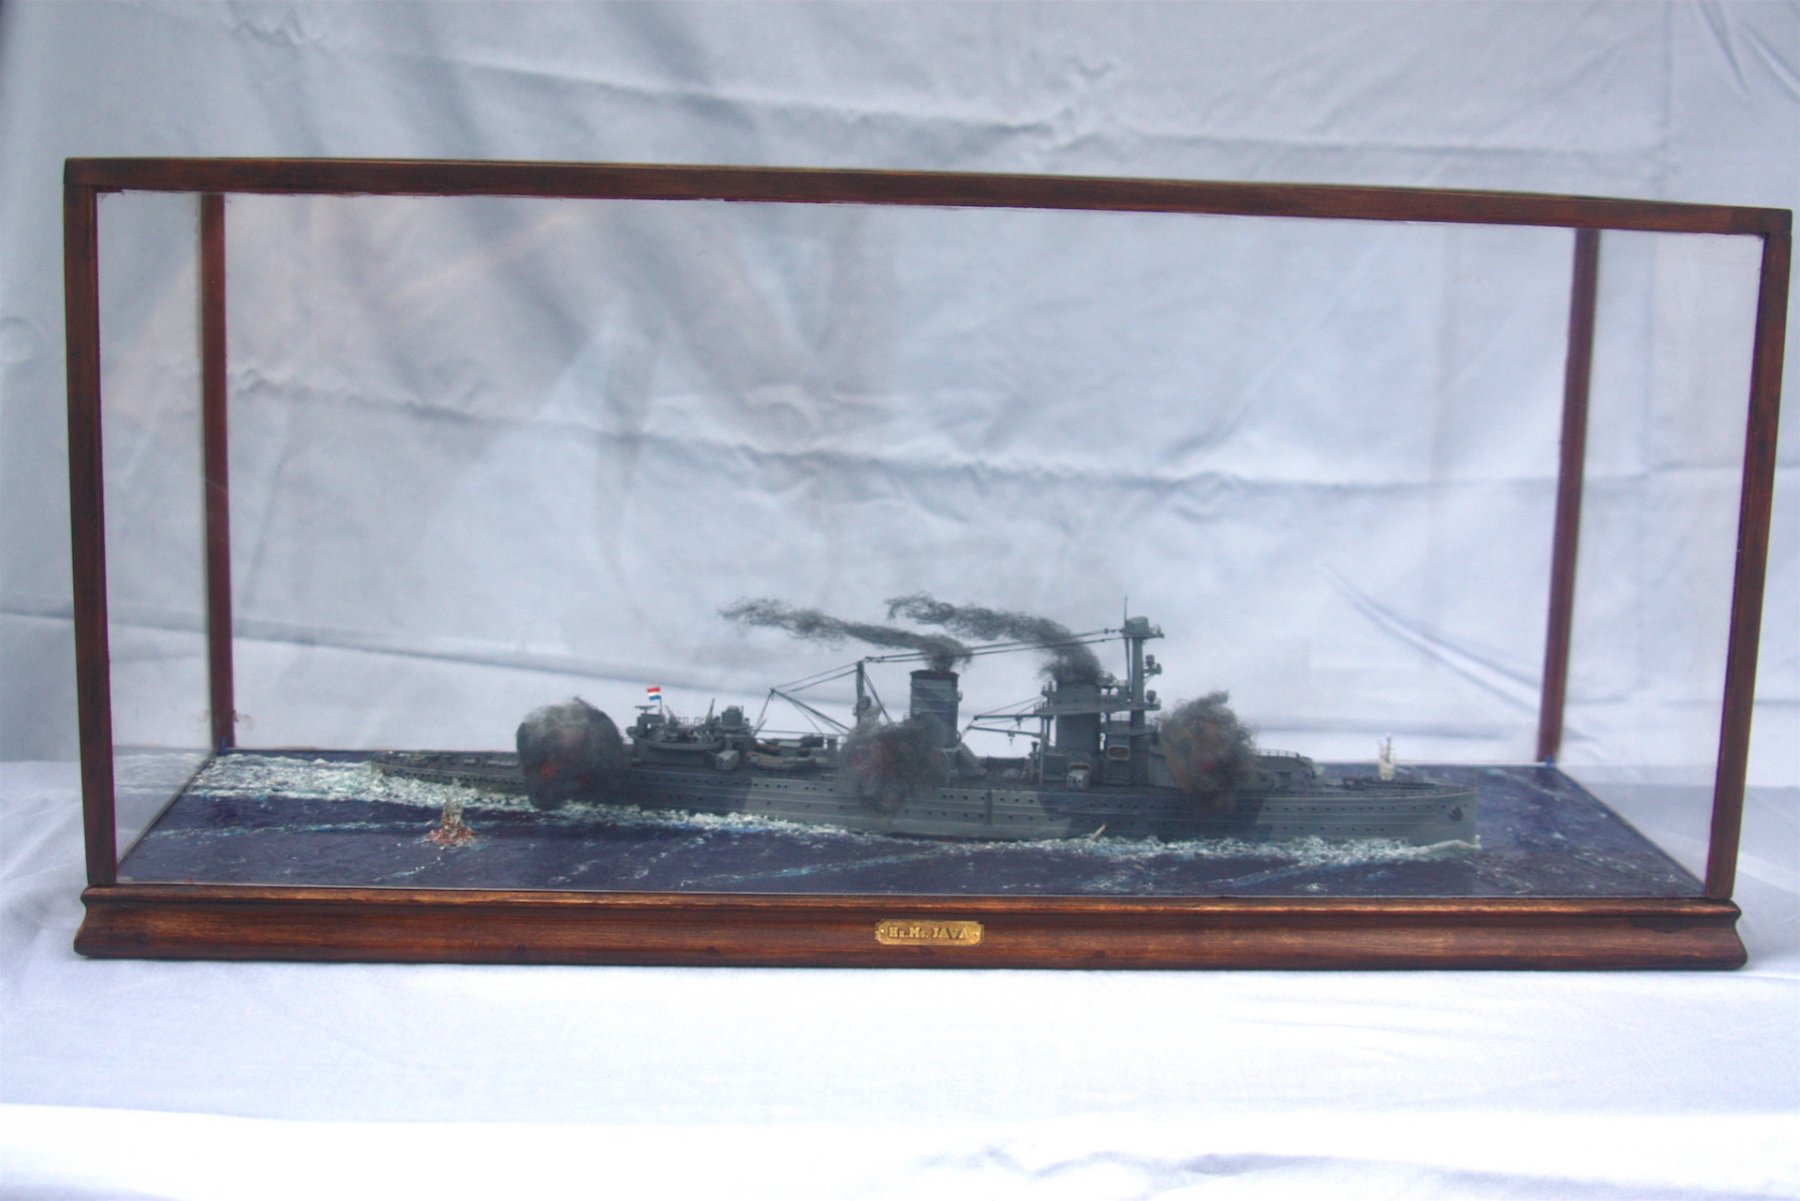
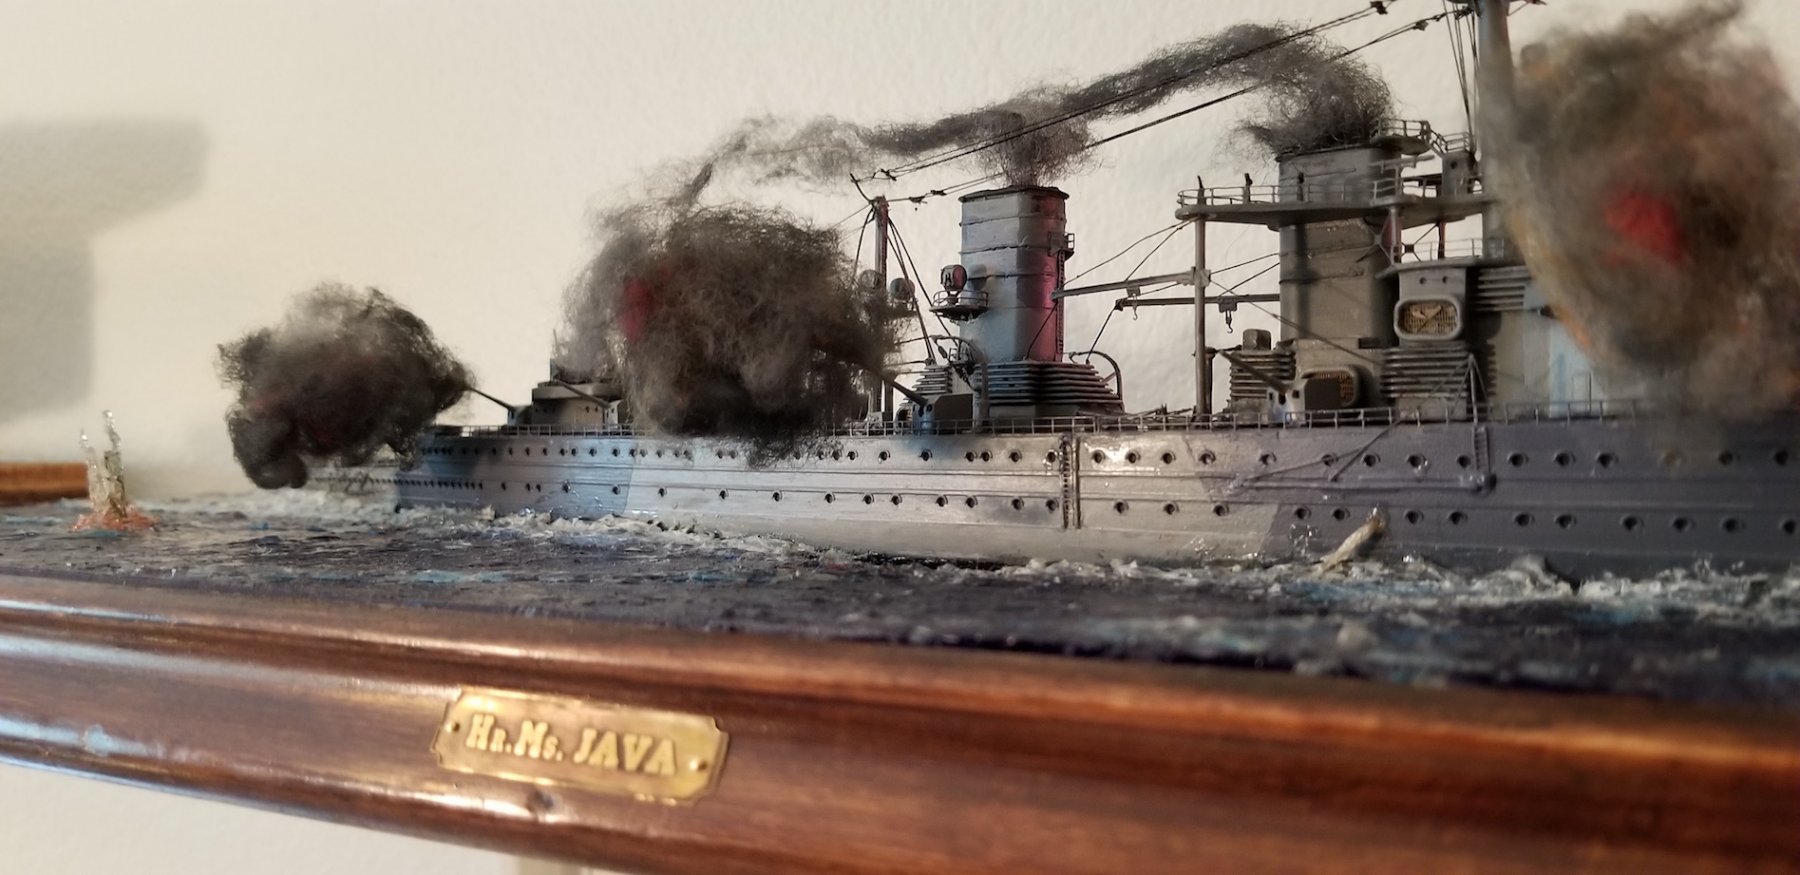
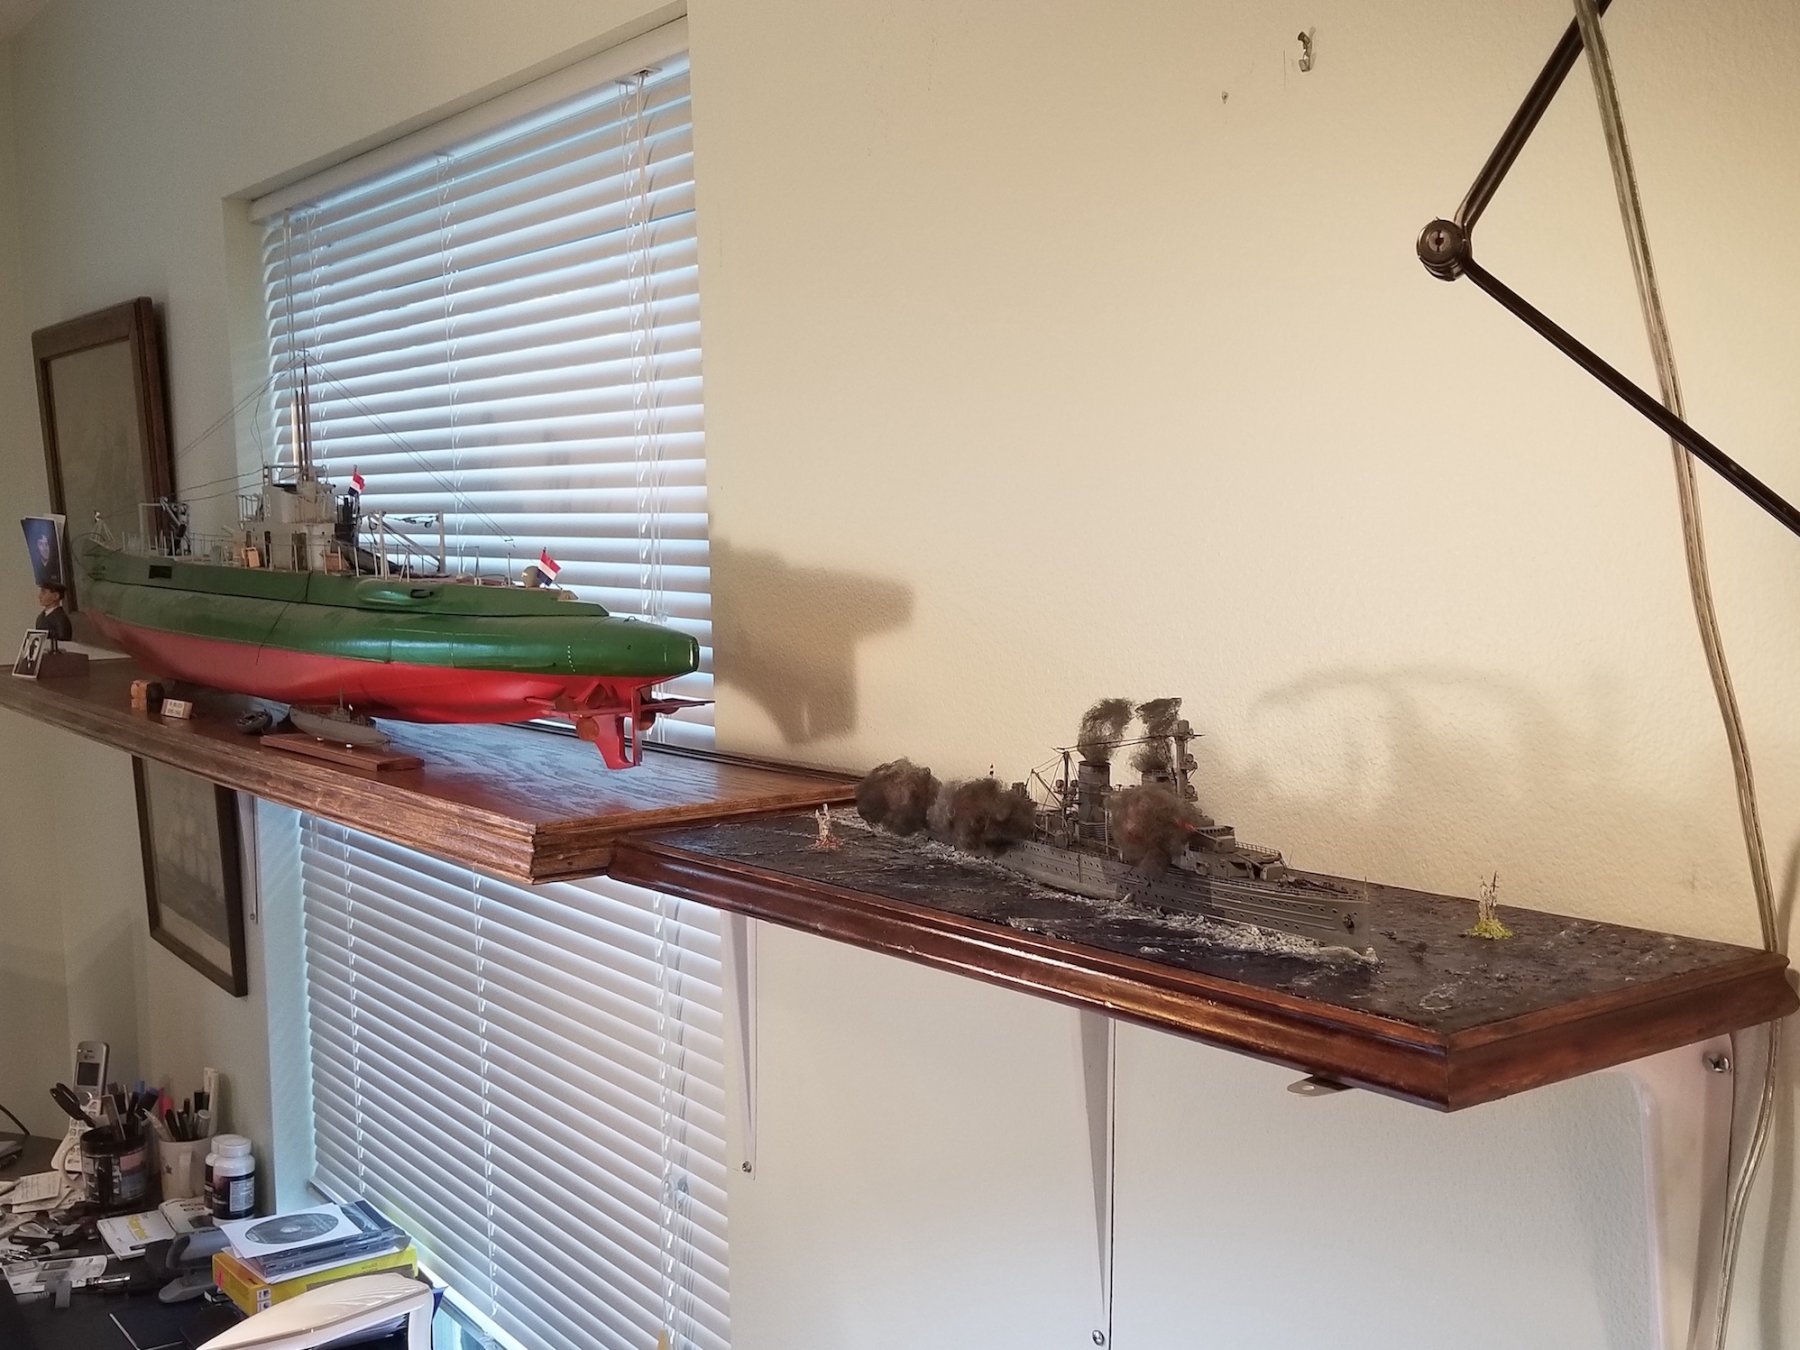
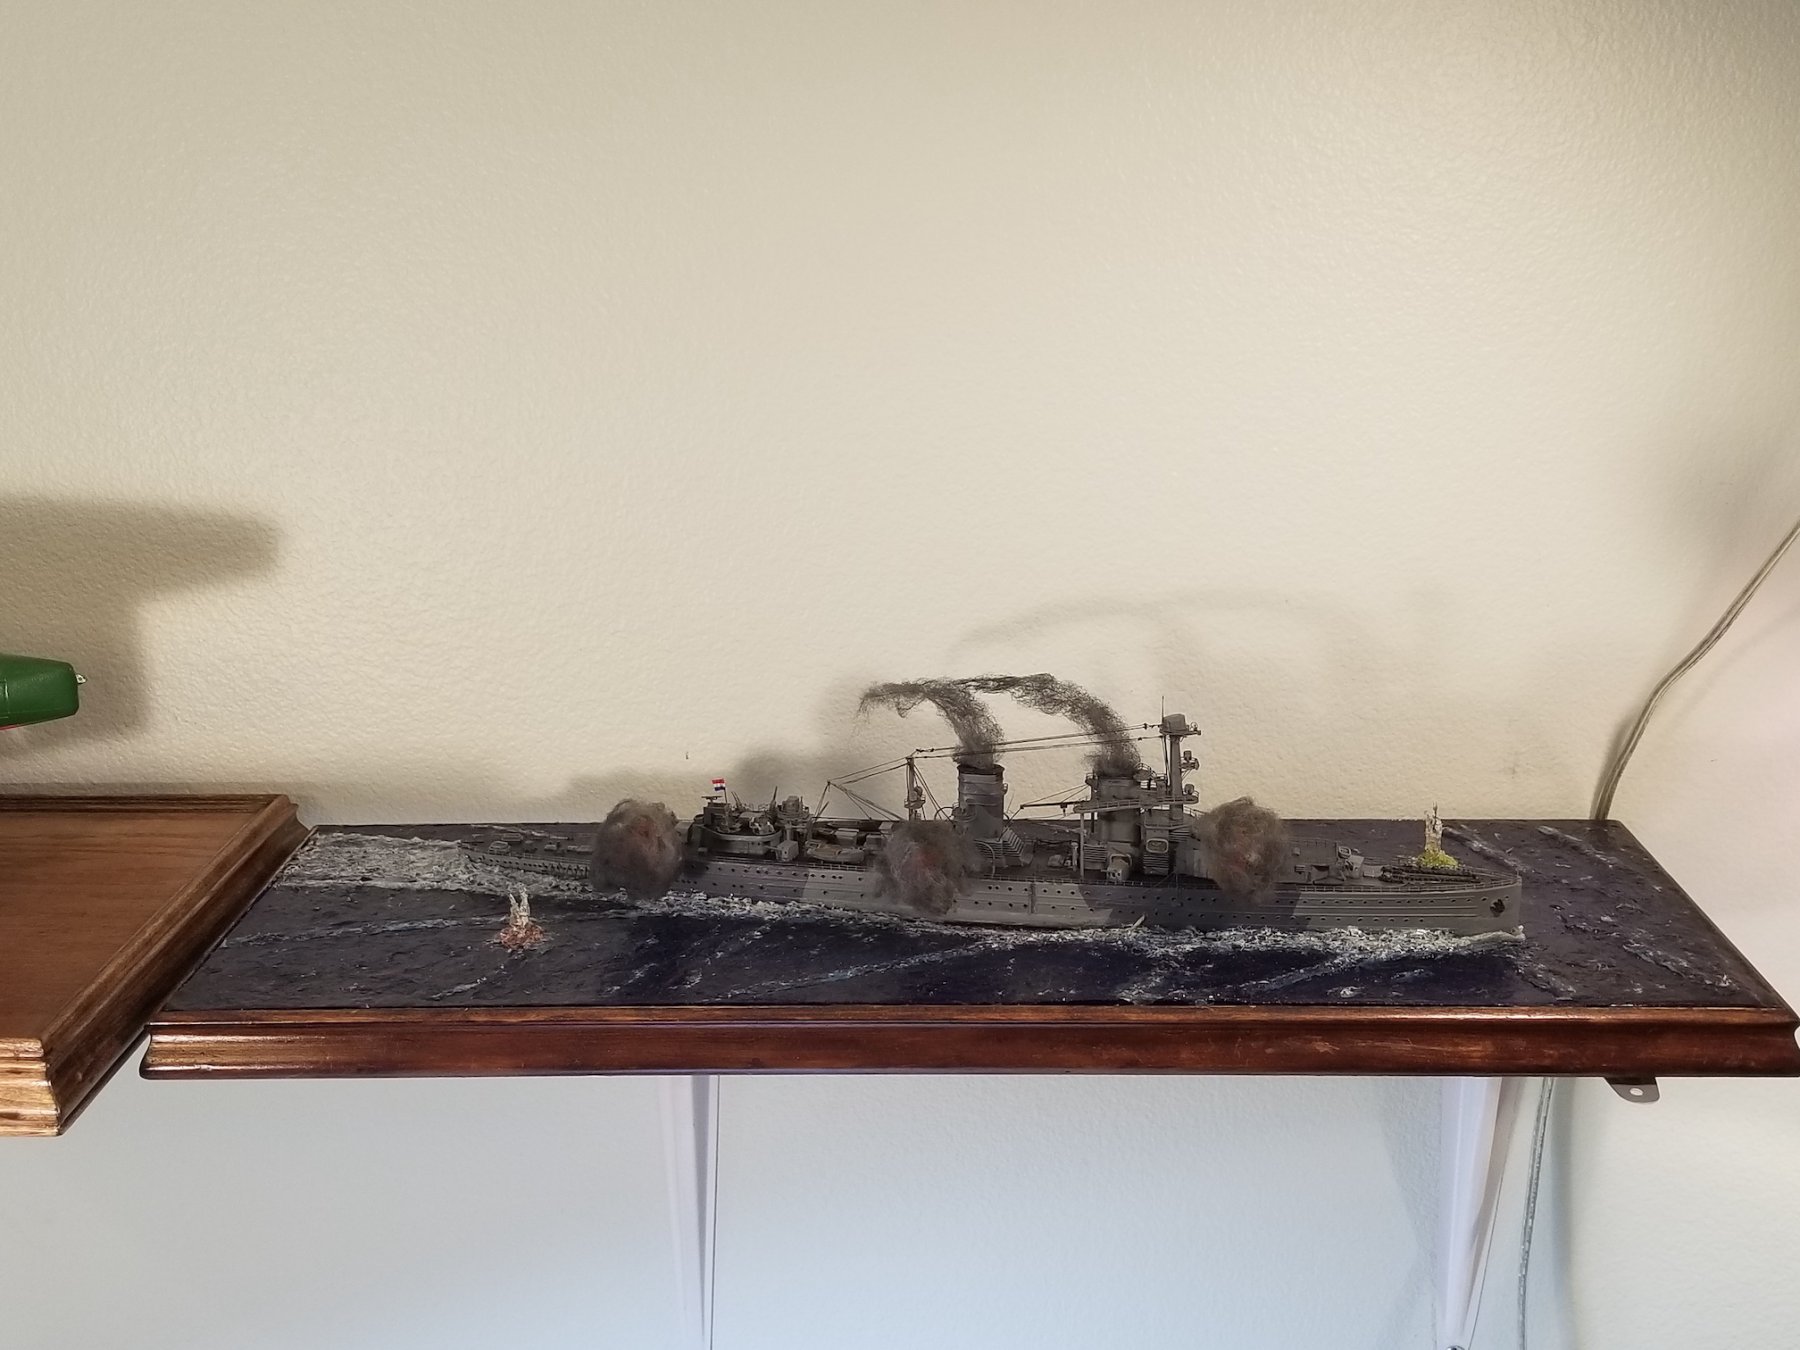
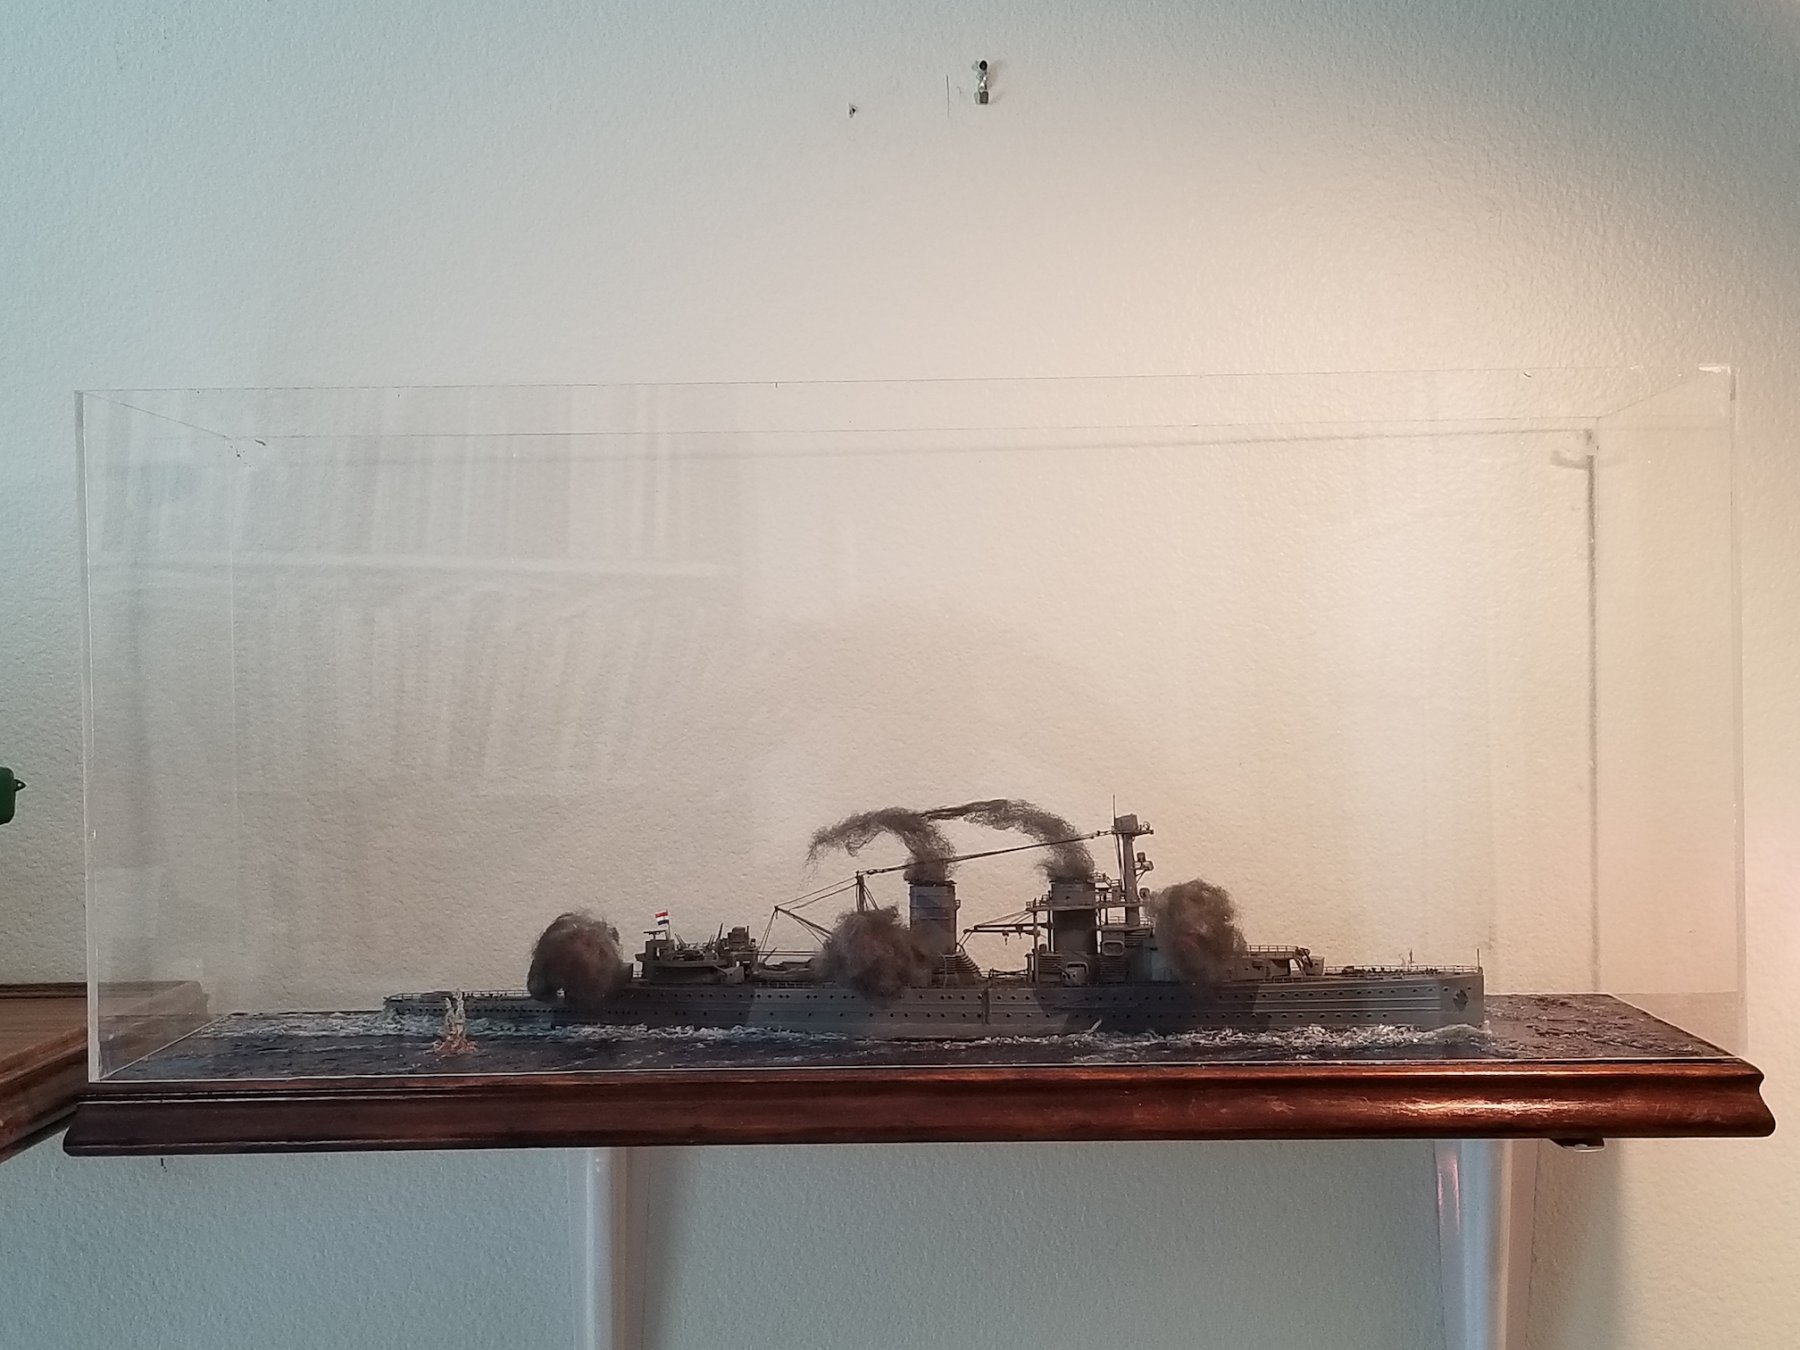
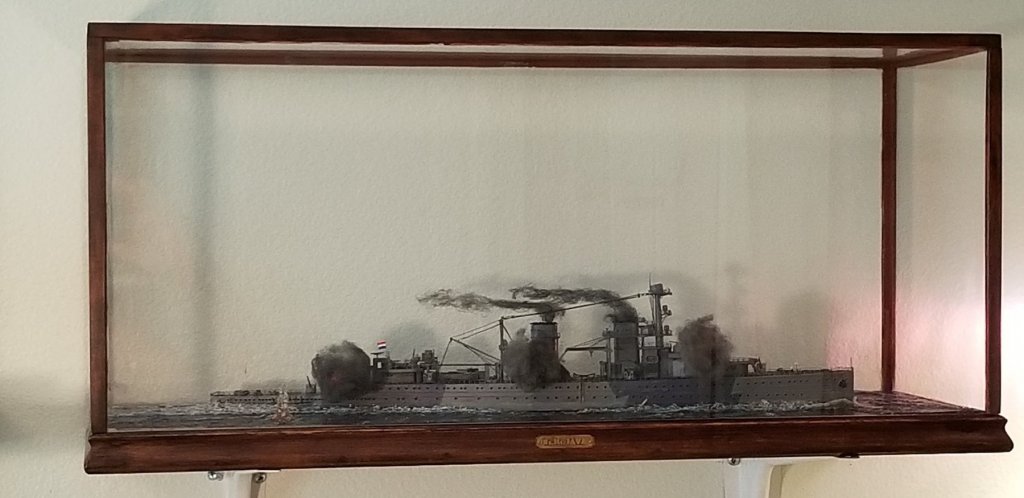
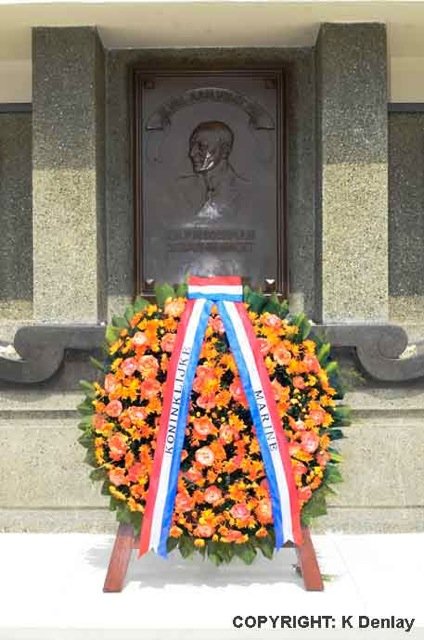
Thank you Denis, Sjors and Carl for visiting and your comments. Ah yes, Sjors is making me to hold my breath awaiting his comment Well, we have come to the end of this project. I need to split my end posts into at least two parts because I like to add a few pictures I have not shown before. Let me start with the final diorama display as it sits above my drawing table and see what I can add that relates to the end of this ship and the rest of the ABDA fleet that was decimated in Februray 27, 1942 by the IJN. I had a real problem taking decent picture with the glass case, too many reflection no matter what I tried. For any other positions of the model please refer to some my previous posts. Below the pictures of the diorama I have posted six photos made by Kevin Denlay, the first diver who saw the wreck of Hr. Ms. Java on the bottom of the Java Sea floor. Kevin was present during the memorial service in Surabaya on February 27, 2013 and send me these photos. Taken outside in the shadow of the house Taken outside the house with a light blue bed sheet as backdrop. The dimensions are 24 X 8 X 10 inches. The diorama in her place above my drawing table and next to Hr. Ms. O19 "All Ships Follow Me" - - - Admiral Doorman's command was "ik val aan, volg mij" (I attack, follow me) Laying of the wreath - - - The bell in the foreground is Java's ship's bell. Attention Wreath with the colors and inscription "Koninklijke Marine" (Royal Navy) Crosses of the fallen. Yes, my father's name is among them. Hr. Ms. Java's ship's bell, placed on board at her commission 9 may, 1925.


27-2-2013copy.jpeg.b006d28093391c48f3df99efa31726e9.jpeg)
- 378 replies
-
- 17
-
-
- java
- pacific crossroads
- (and 2 more)
-
Thank you Jan and Denis for your kind words. I wanted to complete this project this morning but Gwen informed me of an ant invasion in our master bathroom. In searching for how they got inside the house I detected cracks in the stucco around the window. So, with hammer and chisel I removed all the loose stucco and sealed the gaps. That kinda took most of the morning but I did find some time to apply the final coat of stain to the trim. It's now looking much better and I am VERY close to completing this build. Just a little more polishing of the glass. Cheers,
- 378 replies
-
- 8
-
-
- java
- pacific crossroads
- (and 2 more)
-
Hello everyone and thank you all for your accolades on the diorama up to this point and also my thanks to those visiting and clicking the like button - it's all very much appreciated. As usual I have been rather busy with other projects around the house, summer time and a lot of rain makes things grow rather quickly. This didn't give me mush time to work on the diorama. I managed to sneak a few hours here and there and managed to cut all the trim pieces down 1/8 inch. Not only in the thickness of the pieces but also in the width. I think the smaller size looks much better for this size case. Gwen agrees and that says a lot - to me. I now proceeded to glue them to the glass, keeping them secure with masking tape, which worked like a charm. I let this cure overnight, which turned into two days. After removing the masking tape I did a final sanding with my long sanding stick and prepped them for stain. I used the same light oak stain as I used for the base. After the stain had dried I rubbed it with a lint free cloth to polish it up a little. It was now time to clean the clean the glass and used a mild soap with some baking soda. I'll most definitely have to finish it with a plexiglass polishing compound. Well, I'm almost done with this build and hope to present it to all of you in the next day or so. The wood trim pieces being glued to the plexiglass First coat of stain is applied and drying outside the garage. Ready for the second and final coat. Cheers,

- 378 replies
-
- 12
-
-
- java
- pacific crossroads
- (and 2 more)
-
Real nice work Greg. That pe really makes a difference for detail. Cheers,
- 405 replies
-
- 5
-
-
- tamiya
- king george v
- (and 2 more)
-
Great looking model OC, looks very business like. Cheers,
- 229 replies
-
- 6
-
-
- trafalger class
- airfix
- (and 2 more)
-
HMS ROYAL KATHERINE 1664 by Doris - 1/55 - CARD
Piet replied to DORIS's topic in - Build logs for subjects built 1501 - 1750
Magnificent! Cheers,- 1,035 replies
-
- 4
-
-
- royal katherine
- ship of the line
- (and 1 more)
-
Nice work Dave and a nice touch with the large flag. Yes, indeed, all our service men and women should be remembered and honored no matter what nation we hail from. I have two I silently commemorate, August 18 and February 27 in addition to July 4. Cheers,
- 742 replies
-
- 5
-
-
- constitution
- frigate
- (and 1 more)
-
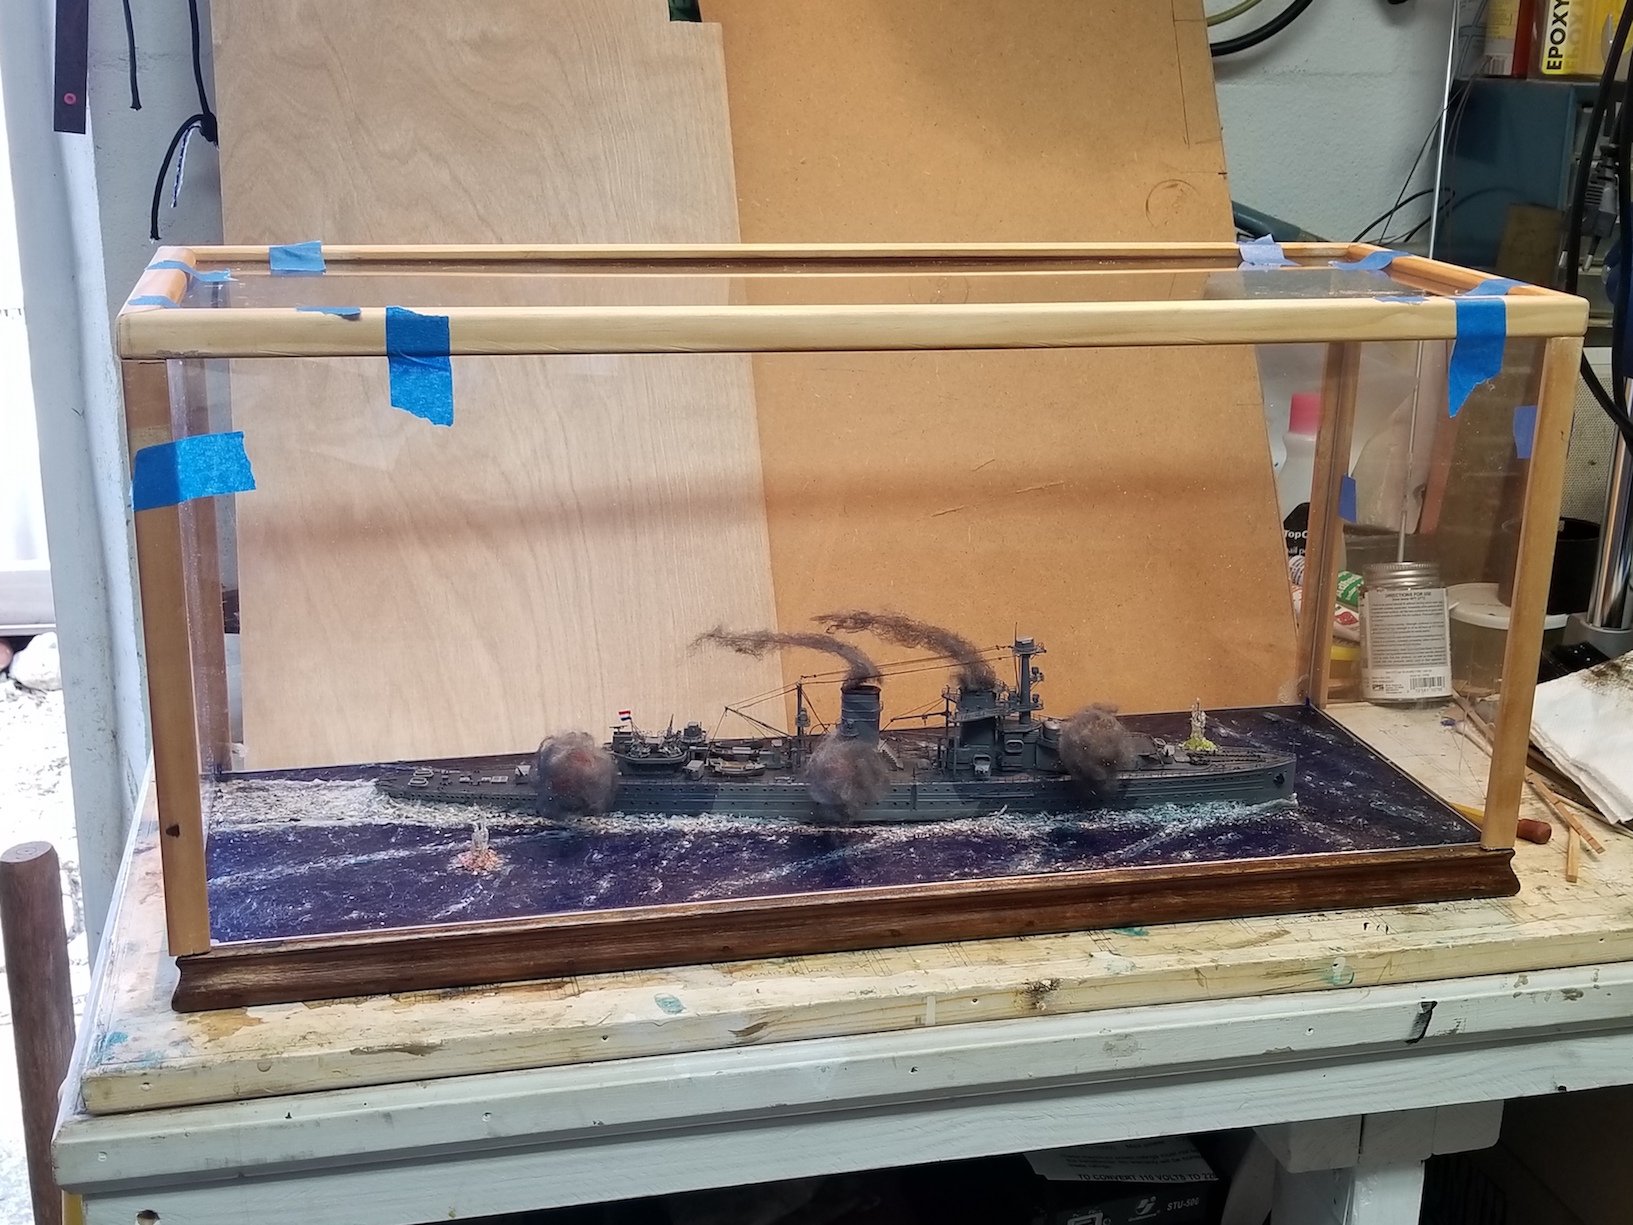
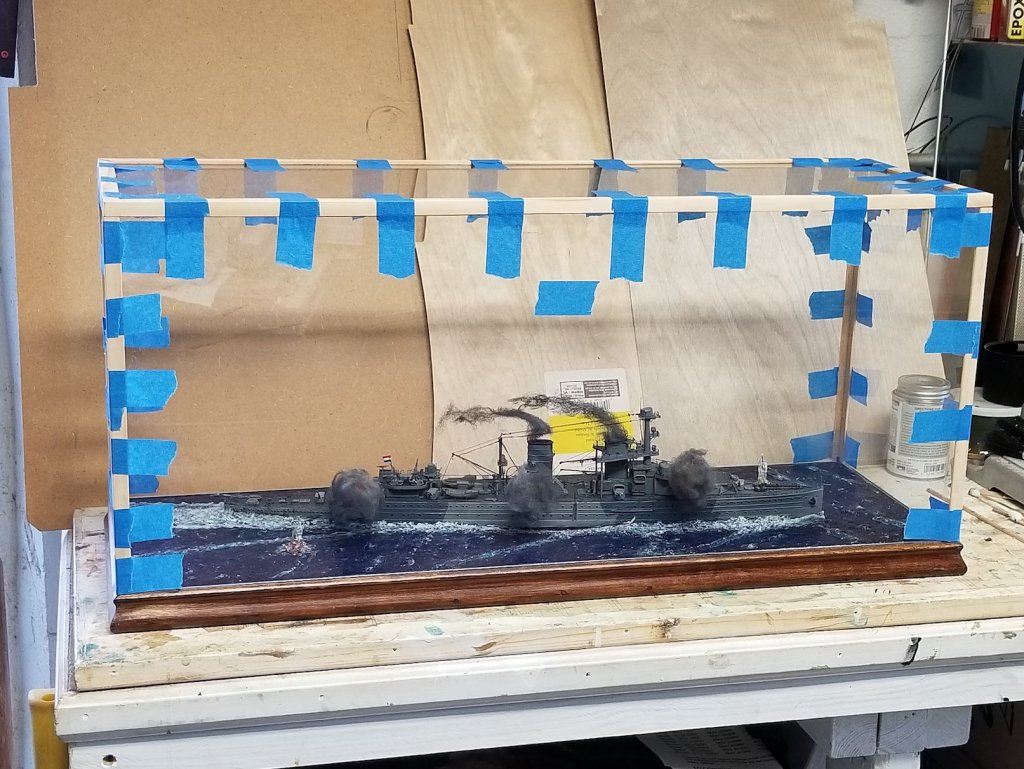
Hello Everyone, and my thanks to all who clicked the like button. I was not successful finding smaller corner molding to I'll have to work with what I have in stock. I proceeded to cut all the pieces to size and temporarily taped them to the "glass" case. Next will be to remove about 1/8 inch from the sides and sand them smooth so I can apply the stain. Once the stain is dry enough to handle I'll cement them to the "glass." I think that I should make 4 corner pieces from copper or brass sheet to kinda dress it op a bit. After everything is done and looking good it's time to put the name plates on and place the finished diorama of Hr. Ms. Java on the shelf. I have also rearranged the gun smoke a little and thinned out the funnel smoke. Here is the diorama as of this afternoon. Cheers,

- 378 replies
-
- 18
-
-
- java
- pacific crossroads
- (and 2 more)
-
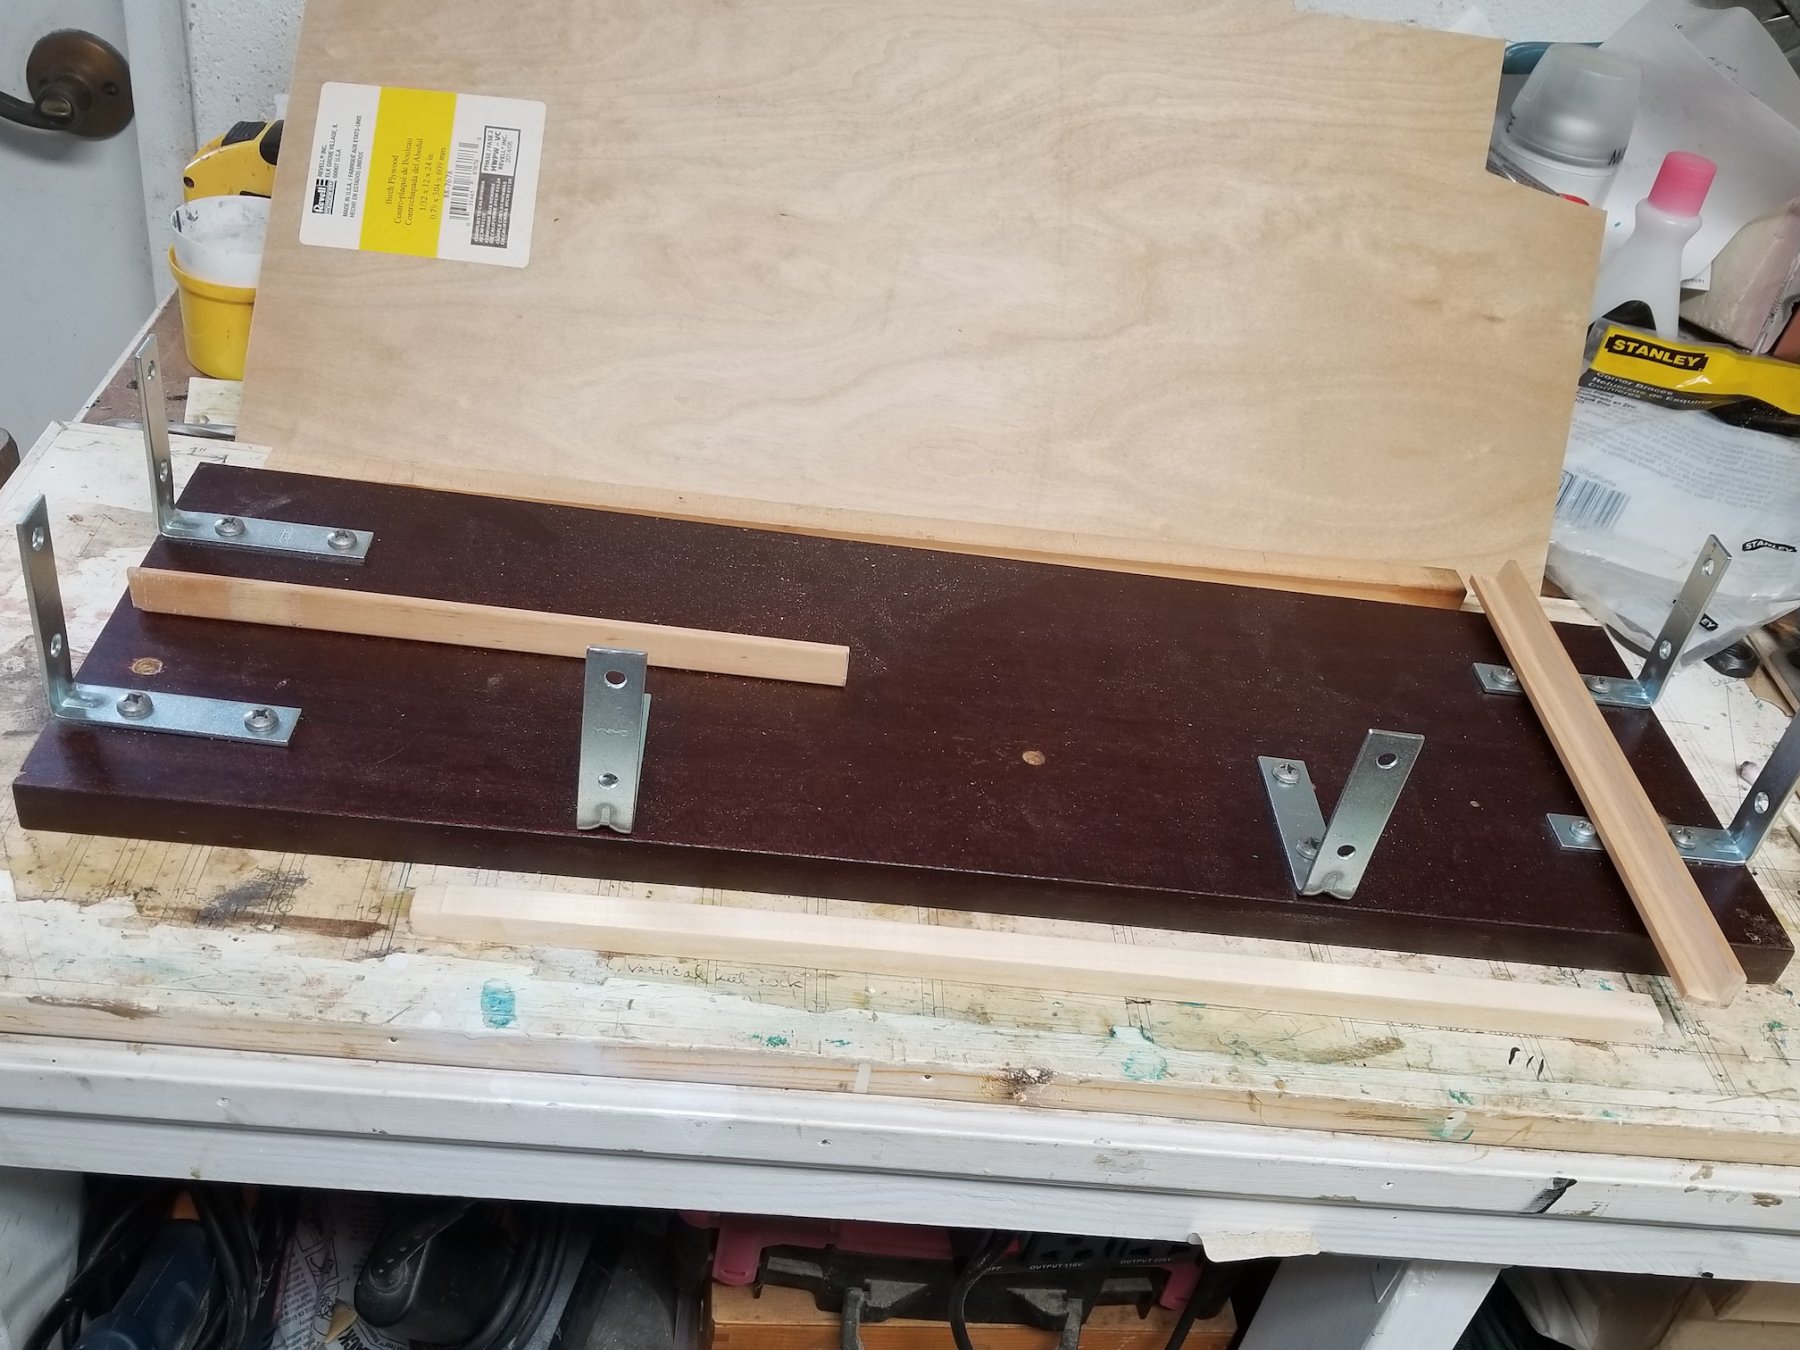
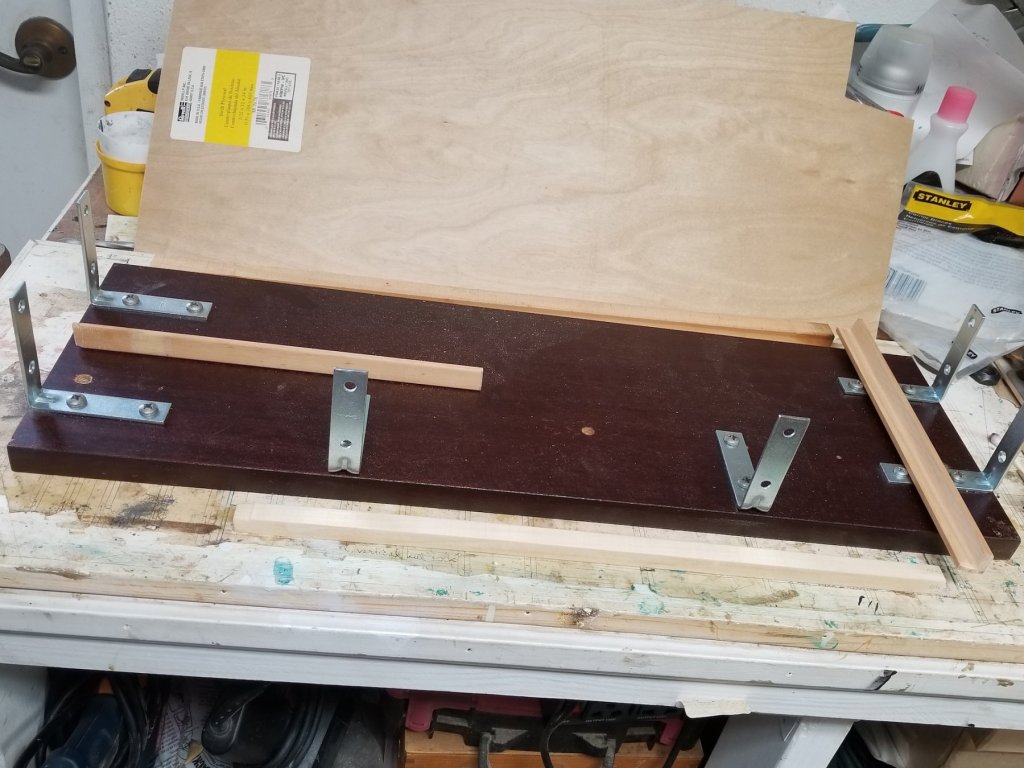
Thanks gents for the nice comments and of course the banter, enjoyable. You mean the wood for the sanding stick Lou? It's a piece of multiplex 11 X 1.5 X 5/8 in this case. It's long enough not to make it wavy. Today I had to remove about 1/8 inch from the sea bordering the side molding so the "glass" could sit on it nice and even. I also put small wooden pegs in the corners to prevent the "glass" from sliding off. Tomorrow I'll see what Lowes or Home Depot has for corner molding. It usually comes in 1/4 inch thickness, which is too heavy to my liking so I'll have cut it down some. We'll see what they have, I can always make it fit. I'm shooting for no more then 1/2 inch wide by 1/8 inch thick. Cheers,
- 378 replies
-
- 9
-
-
- java
- pacific crossroads
- (and 2 more)
-
Right on Carl, the plating shows up real nice. Cheers,
- 292 replies
-
- 7
-
-
- g class destroyer
- trumpeter
- (and 4 more)
-
Thanks Mark. Yup, I'm also looking forward to having this project completed, then I can go back to those on the bench. Cheers,
- 378 replies
-
- 4
-
-
- java
- pacific crossroads
- (and 2 more)
-
Impressive Greg. Interesting paint schemes, which one will you do?
- 405 replies
-
- 4
-
-
- tamiya
- king george v
- (and 2 more)
-
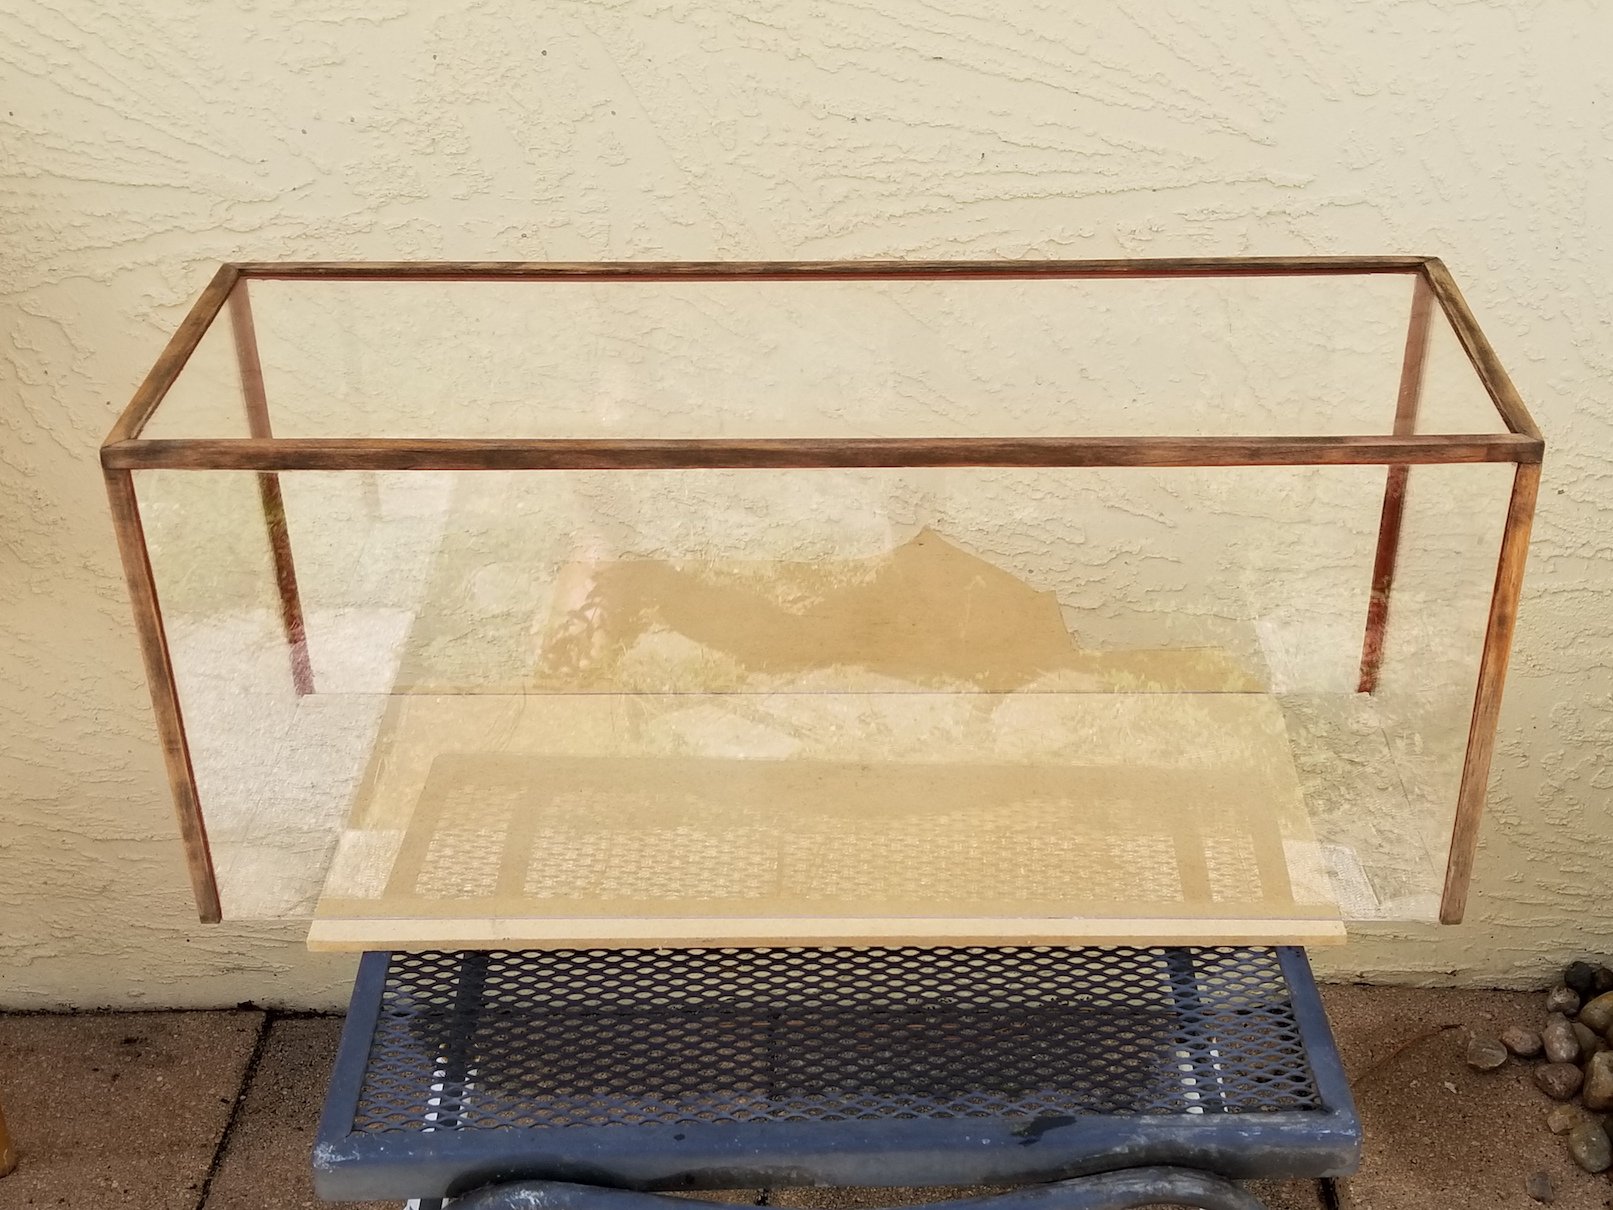
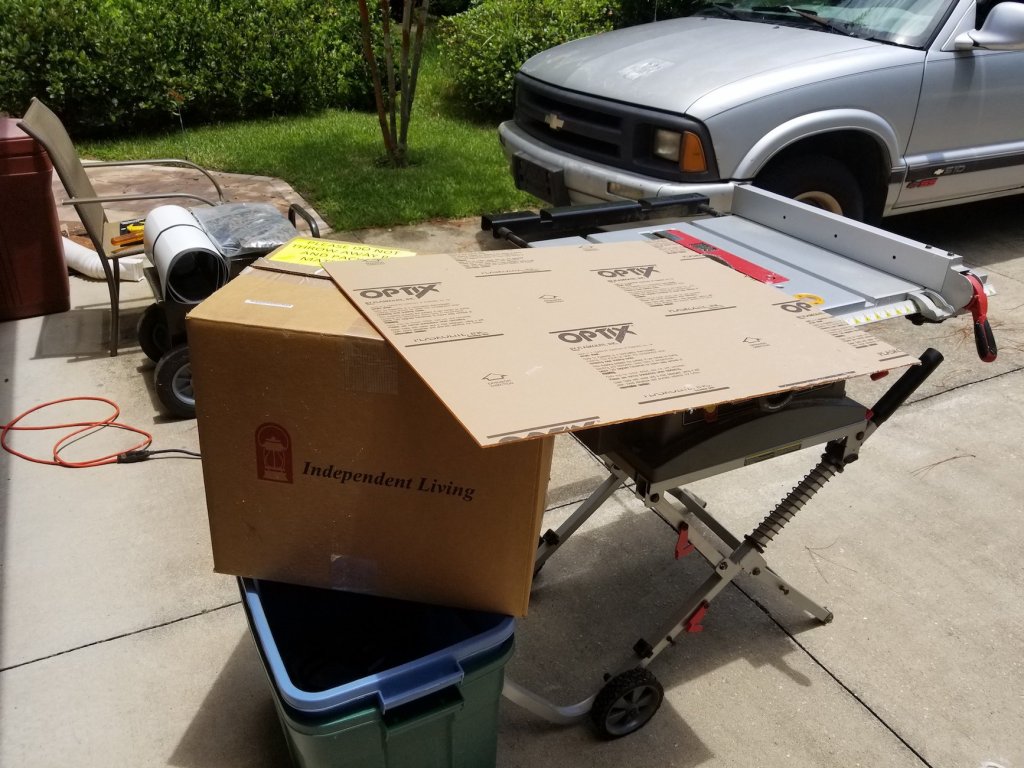
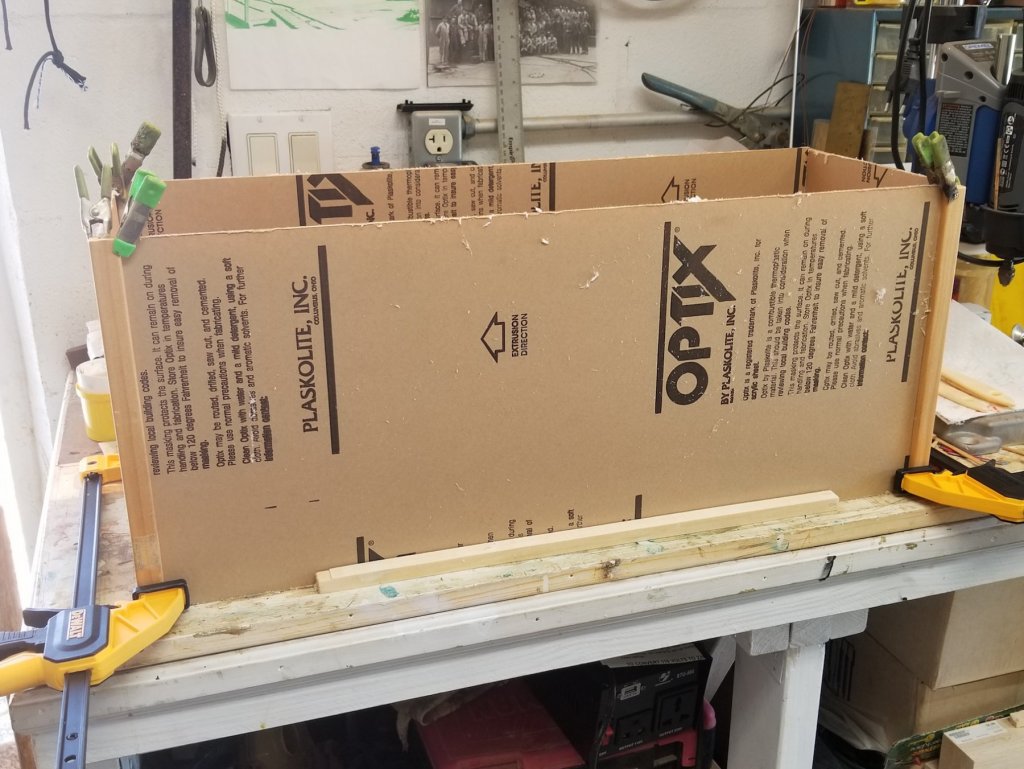
Hello every one, Here's an update of work done in the last couple of days. Cutting the plexy glass went without a hitch and managed to do it without Gwen's help. I just made a support with a few boxed till the first two sides were cut and could remove them for the rest. After all four sides were cut I smoothed the edges out with 180 grit sand paper backed by a 10 inch piece of food, like a sanding stick. Then I clamped three sides in the jig and carefully applied the cement to the edges. This was kinda tricky because the cement is "thinner" then water and did spill over in a few cases causing some smudging, which I hope to remove with a polishing disc. After these three sides were cured I rotated the assembly and clamped the last side in the jig and cemented that one in place. Today I cut the top piece out and cemented that to the box. When using two pieces of corner molding I liked the idea of going ahead and putting corner molding on all corners, it looks much "dressier" then without them. It also hides a few of the cement smudges So, off to the home improvement store for some nice small corner molding. I'll stain them with the same stain as the base and use a few dabs of epoxy cement to glue them in place but that'll be a job for Sunday or later. The jig Hr. Ms. Java next to Hr. Ms. O19 and Hr. Ms. O16 Hr. Ms. Java above my drawing table Plexy glass sawing setup. Display case jigged to check for fit. I removed the protective paper only at the to be cemented sides. I did not take pictures of that process, sorry Display case partially finished. Corner molding to be added. The glare on the left side is from my book shelves. behind me. Cheers,


- 378 replies
-
- 14
-
-
- java
- pacific crossroads
- (and 2 more)
-
Nice progress Kees and some nice sculpting. Cheers,
- 193 replies
-
- 3
-
-
- wilhelmina vii
- fishing
- (and 1 more)
-
Add my condolences to you and Pam. I hope and pray for your situation John, stay strong my friend. All the best,
-
Hoi Remco, Glad to see you back here. Thanks for your PM with all the pics, lovely area you are at. I'll write you a regular e-mail asap. All the best to you and Rosette. Cheers,
- 1,214 replies
-
- 3
-
-
- sloop
- kingfisher
- (and 1 more)
-
Very well done OC and that as a teenager. I think I have completed the jig for putting the plexy glass case together. I have also mounted two shelf brackets to the wall next the O19 model and above my drawing table. I'll show some pics when I get to it. Hope to start cutting the glass tomorrow, I already asked Gwen to help me holding the sheet for me and she graciously agreed Cheers,
- 378 replies
-
- 7
-
-
- java
- pacific crossroads
- (and 2 more)
-
Yeah, that'll work. This will be a super nice model with all the detail stuff you are adding and removing the fake stuff. Cheers,
- 405 replies
-
- 6
-
-
- tamiya
- king george v
- (and 2 more)