HOLIDAY DONATION DRIVE - SUPPORT MSW - DO YOUR PART TO KEEP THIS GREAT FORUM GOING! (Only 13 donations so far - C'mon guys!)
×


Piet
-
Posts
3,568 -
Joined
-
Last visited
Content Type
Profiles
Forums
Gallery
Events
Everything posted by Piet
-
 Very nice looking "house" Popeye and the best of luck with your windows. I have absolutely no clue in what your are doing with that. Cheers,
 -
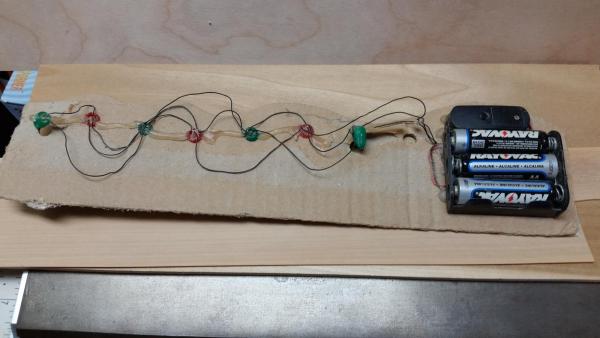
Okay Marcus, you asked how I put a few lights inside my VOC ship.. A few years ago when buying things at our local hardware store they had a Christmas display thingy they were going to trash. So I asked to trash it my way and I became the happy owner of a few LED lamps. I just removed the LED's, stripped a few lengths of black and red telephone wires from a spare cable I had kicking around and installed them. You can buy LED's via Internet of any color you like. Light amber seems nice. Mine are just plain white but it'll do. Just make sure about the voltage, polarity, how many batteries and would you need a resister. There are a few builders on MSW who have a lot more knowledge about this then I do and hopefully somebody will jump in and give you much better info. I havent tried mine yet and may not work, needing help myself. This is what I brought home and used. A true Dutchman can't let a FREE bargen go to waste Cheers,
- 165 replies
-
- 6
-

-
- cape cod catboat
- Finished
- (and 1 more)
-
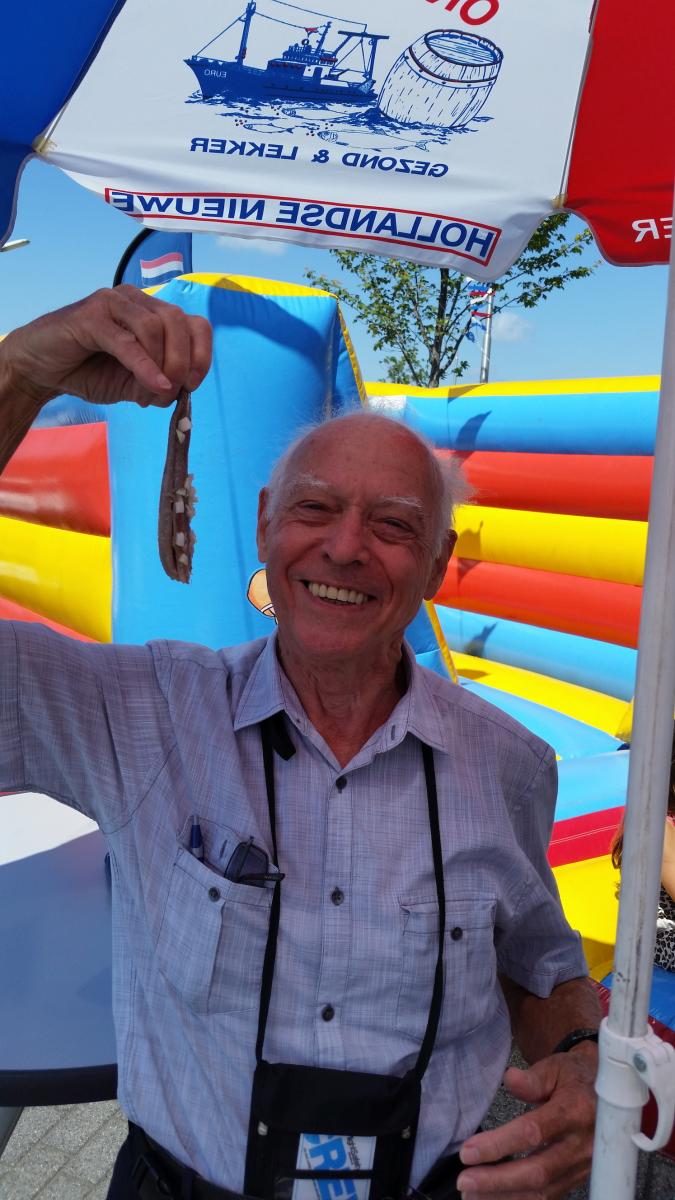
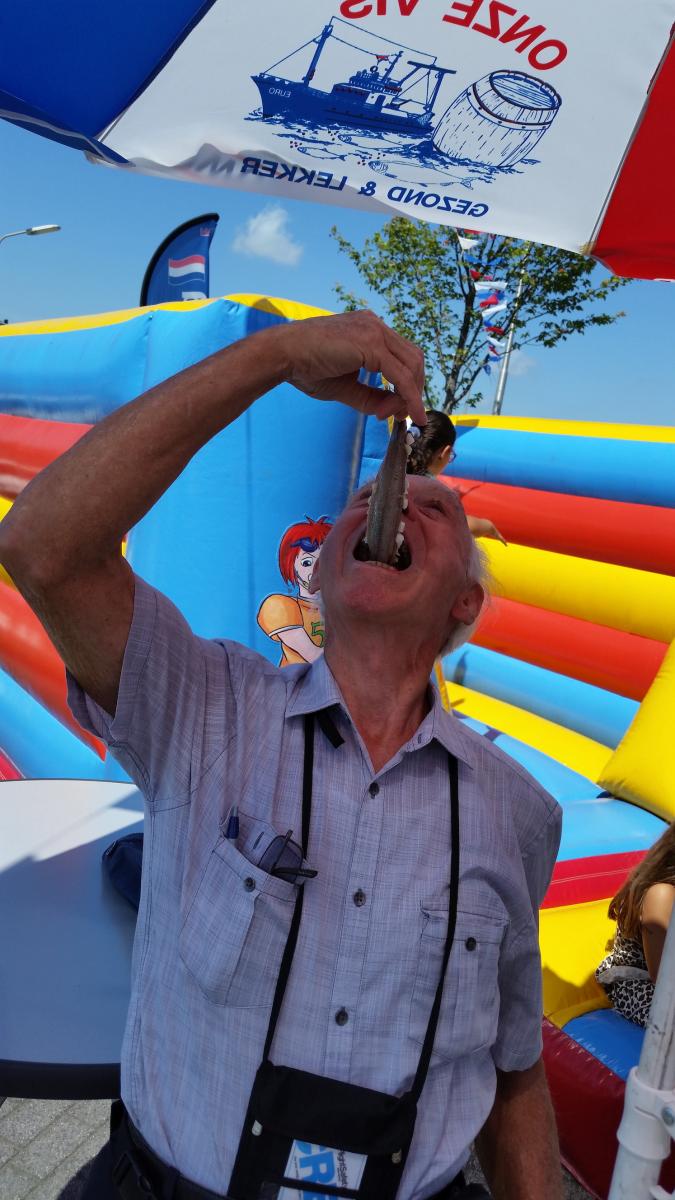
Hey Marcus, I don't mean to hijack your log but your avatar doesn't quite show how to eat a good new raw herring (haring). For the benefit of all your followers here is how it's done Your's truly visiting Remco, who treated us with Holland's best, ready and with eager anticipation for the delicate tast of the fresh herring. Notice the minced onions? Your's truly ready to take a bite from the fresh herring. All of us really enjoyed them, even our grandson! Cheers,


- 165 replies
-
- 5
-
-
- cape cod catboat
- Finished
- (and 1 more)
-
Statenjacht Utrecht by Angarfather - 1:36
Piet replied to Angarfather's topic in - Build logs for subjects built 1501 - 1750
Beautiful work Hartmut, Really like the frames around the alcoves. Cheers, -
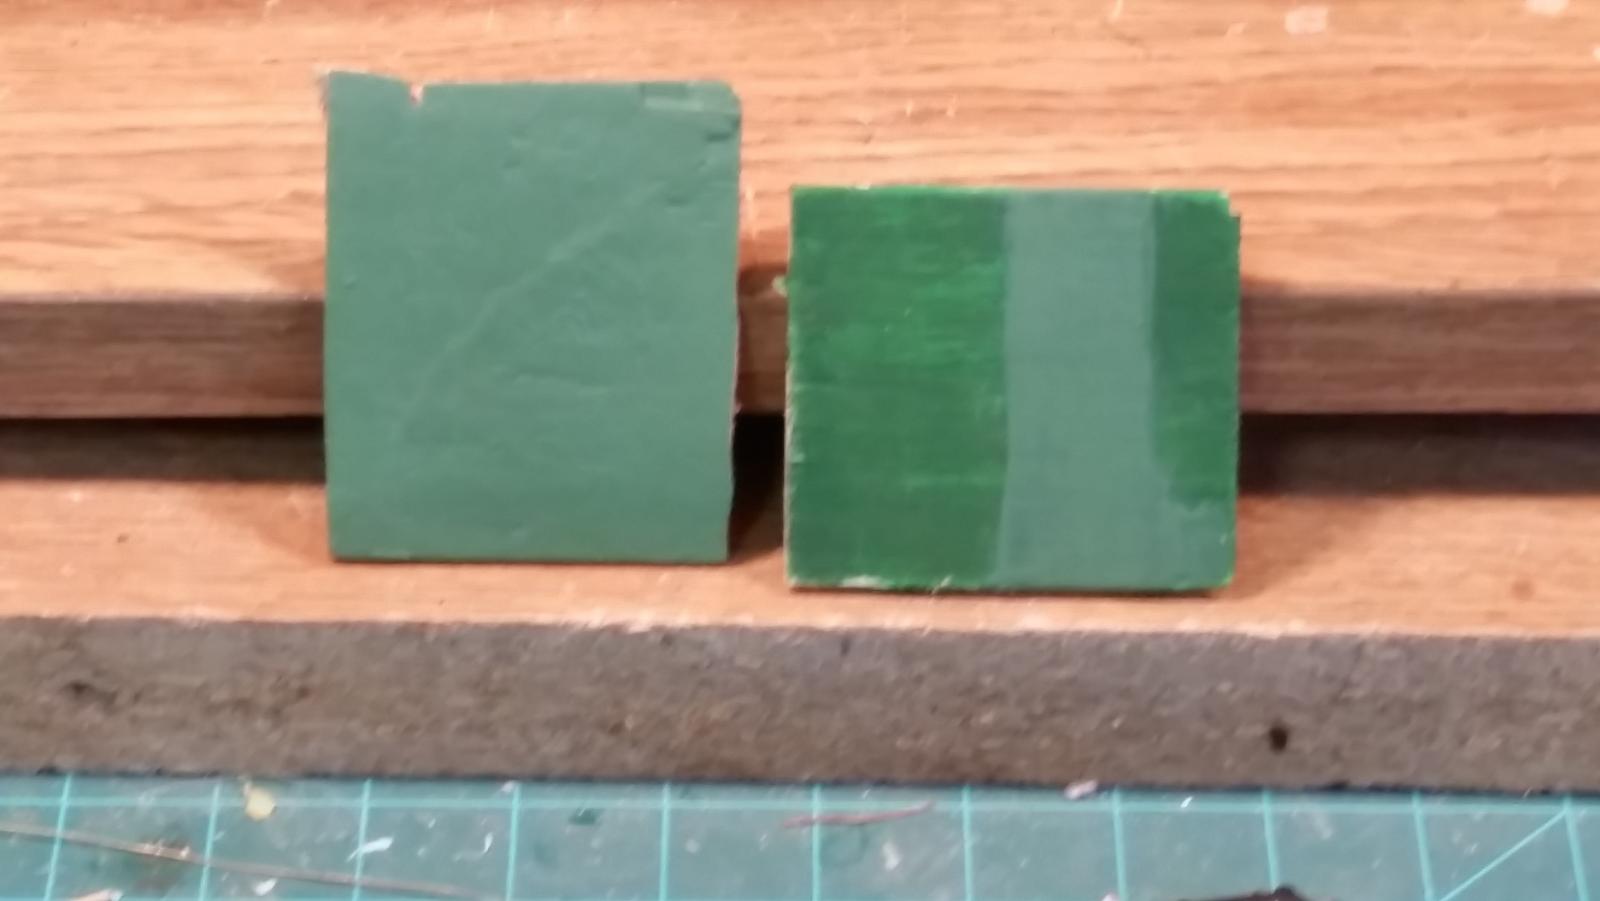
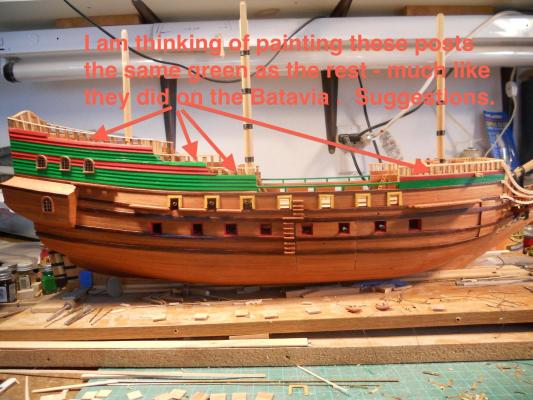
Wow, thanks Hans - - - overwhelming. The green on the top right looks like what I'm looking for, right? Cant read the tag due to glare. Here is a mix I did this morning, I added some of the darker green with the light version. The piece on the left is the latest mix from this morning. I also added a strip to the darker green to show the difference.. Right now the jury is still out but I discussed this issue with Gwen (who doesn't want to be called admiral ) She listened to all the suggestions and gave her input. It looks like a compromise from several of those you folks gave and my wants. Personally I want to keep it as simple as possible but yet keeping with the pigments available and used by the Middelburg Chamber of the VOC around 1670. Repainting the ship to match the Batavia is not really what I have in mind, I want it to be different enough to be kinda unique, my personal touch so to speak. I wish I had not put the poly varnish on the railings , I could have simply stained them - - - but alas, I'll have to do the best I can without ripping everything off and start over. I'll let yuns know two or three possibilities - - - soon. Right now I'm working on the anchor capstan, fun. Cheers,

-
Interesting little boat. I may as well join in and watch - - on and off. Cheers,
- 129 replies
-
- 3
-
-
- armed launch
- panart
- (and 1 more)
-
Oooooh yeah, that's really looking very good Nenad. Sorry to hear about condition of mother in law. Stay strong my friend. Cheers,
- 4,152 replies
-
- 5
-
-
- cutty sark
- tehnodidakta
- (and 1 more)
-
Fantastic Dave, thanks for sharing this special moment with all of us. Cheers,
- 209 replies
-
- 8
-
-
- cheerful
- Syren Ship Model Company
- (and 1 more)
-
Nice work JesseLee. I would imagine they tied a rope to the doors to pull them up and let the top ones down. Too long a reach over board and besides these doors must weigh enough to make it awkward otherwise. Cheers,
- 1,306 replies
-
- 7
-
-
- syren
- model shipways
- (and 1 more)
-
Hello again friends and my thanks to David B, Anthony, MarkT, Remco, Jan, George, Marcus, JesseLee, Greg H and pete for your input. Of course also my thanks to those who clicked the like button. Yes, I understand that it's ultimately the owner/captain and shipwright, me in this care, who is responsible for the final decision. I am taking all your input under advisement and mull it over. There is no haste in the final decision. As mentioned before, staining is no longer possible because the railings and stanchions have already been varnished. It's either paint or leave them as is. All of you have given me some valid input and I truly appreciate that very much. Jan's picture of the Batavia replica shows red painted railing stanchions but my initial thinking of green is because my paint scheme is different in that red already borders at the stanchions. Yes, the cap rail can be painted and the color will be decided on later. I like Jan's idea about gallion railing but here too, my ship does not look the same as the Batavia model and I won't add many carvings there, being the cheap Dutchman owner Painting the stanchions would not pose a problem for me, I have some tricks op my sleeve not to put paint where it doesn't belong Look at the paint job of the railing at the waist. Gold colored cap rails JesseLee? Really now Hey, this is a working vessel owned by a cheap Dutchman Hmmmm, frugal, frugal What color Remco? Well, let me think about it some more and also ask Gwen what she thinks about your suggestions and take it from there. Marcus, I believe you mean that little brass block plane? I really don't remember but it's what you can pick up at Harbor Freight or American Science or some other mail order outfit that sells cheap tools. They come in a set of three and are really junky tools but with some care in sharpening the blades and adjustments they are useable enough for me. Cheers to all and thanks again,
-
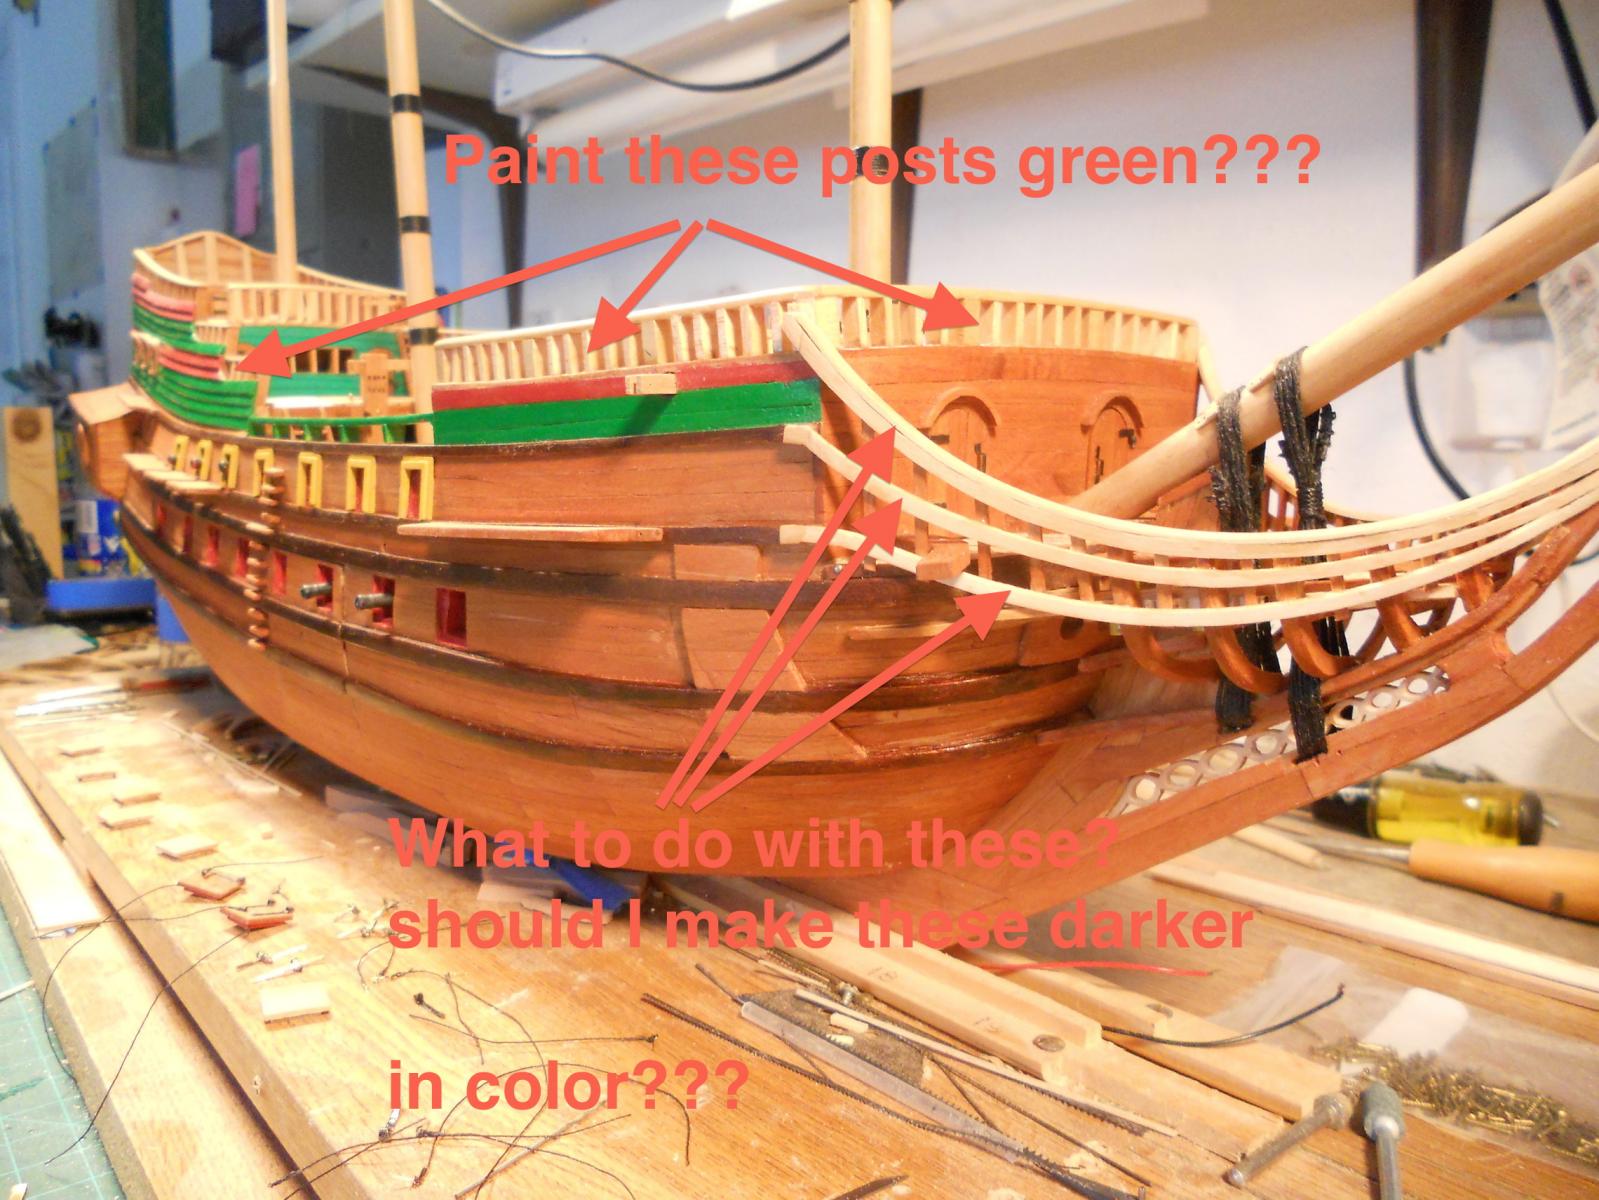
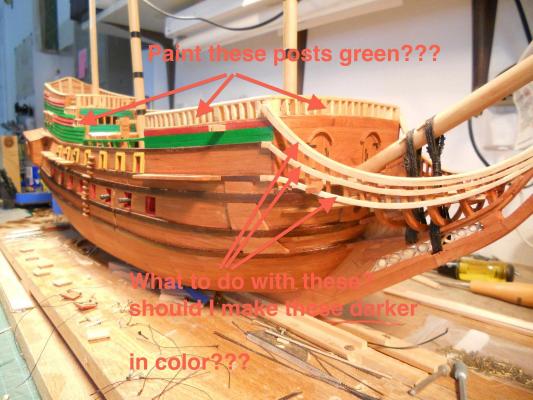
Dear friends, I have two questions and need your honest opinion and ideas. As I am going to change the green paint color as suggested by Jan and Hans I thought to also paint the railing posts in the same color. Looking at the photos of the Batavia replica it kinda looks very attractive and cuts down the blond looking railings. I will appreciate your input on this very delicate issue - - - well, not that delicate but just your opinion. The next question is that looking at the bow with the same stark blond looking railings for the head I think that making them a darker color would be closer to the original way. I cannot stain them anymore because they are already painted with clear poly. This is more of an issue to me because I really don't like this attention getter glaring me in the face all the time. Other then removing these and replacing them with maple or stainable wood and stain them in either maple to match the hul planking or walnut to match the wales. I could also try to match the color with paint, not an easy task. Here too I will really appreciate your thoughts and don't hold back, I do value you your input so I can mull it over. Here are two pics to help you in forming your opinions. Cheers,
-
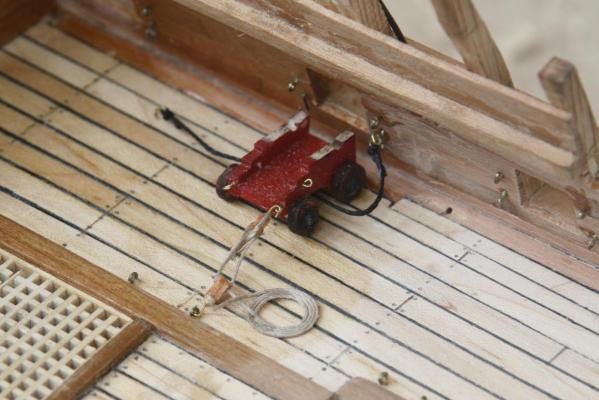
Thank you Dave and Patrick for your comments and thank you all who clicked the like button. Well Dave, a cup of hot green tea with a fresh orange to suck on calmed the nerves With a pair of small long needle nose pliers I twisted the eye bolts some to brake them loose from the epoxy and they came right out. I only dislodged one cun carriage and with a dab of epoxy they are again rock solid. Thank you Patrick but I just found an error that will be extremely difficult if not impossible to rectify at this stage in the game. I'll look into it and see if it's even worthwhile to do without creation some major damage. Yeah, the O19, sits on the shelf on my right side and steal a glance at her so once in a while This day was almost a total loss as far as work on the Surabaya is concerned. Gwen and I had to bring the Buick to the dealer in Daytona Beach for warranty work and while in town I planned to go to BestBuy and pick up a new Mac keyboard. Well, the dealer did not have the parts in stock and failed to notify Gwen. She was on T'd off lady - - spitting fire, smoke out of her ears and that sort of thing Resced for tomorrow, same time, same place. I did go to get my keyboard and am happily pounding away on it After lunch I "quickly" made a big batch of guacamole. Gwen likes the tuff and it's healthy. But then I mozied into the garage and managed to finish the cannon work, including the touching up things. It looks much better this way and I'm satisfied with the results. Here is the result of all that tedious work. Cheers,

-
Ah yes, I see what your plan is Cees. I figured already that the two half mold method is the only way to be able to separate the molds from this quite busy plug. Good thinking Cees and I'm sure it'll work. Cheers,
- 434 replies
-
- 6
-
-
- pelikaan
- beamtrawler
- (and 2 more)
-
Beautifully done Dave. I too am looking forward to the presentation pics and hopefully a video. Cheers,
- 209 replies
-
- 6
-
-
- cheerful
- Syren Ship Model Company
- (and 1 more)
-
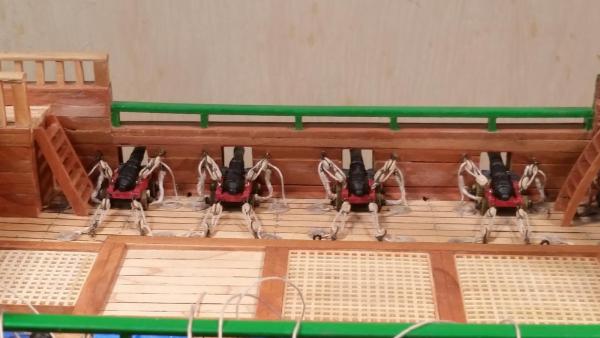
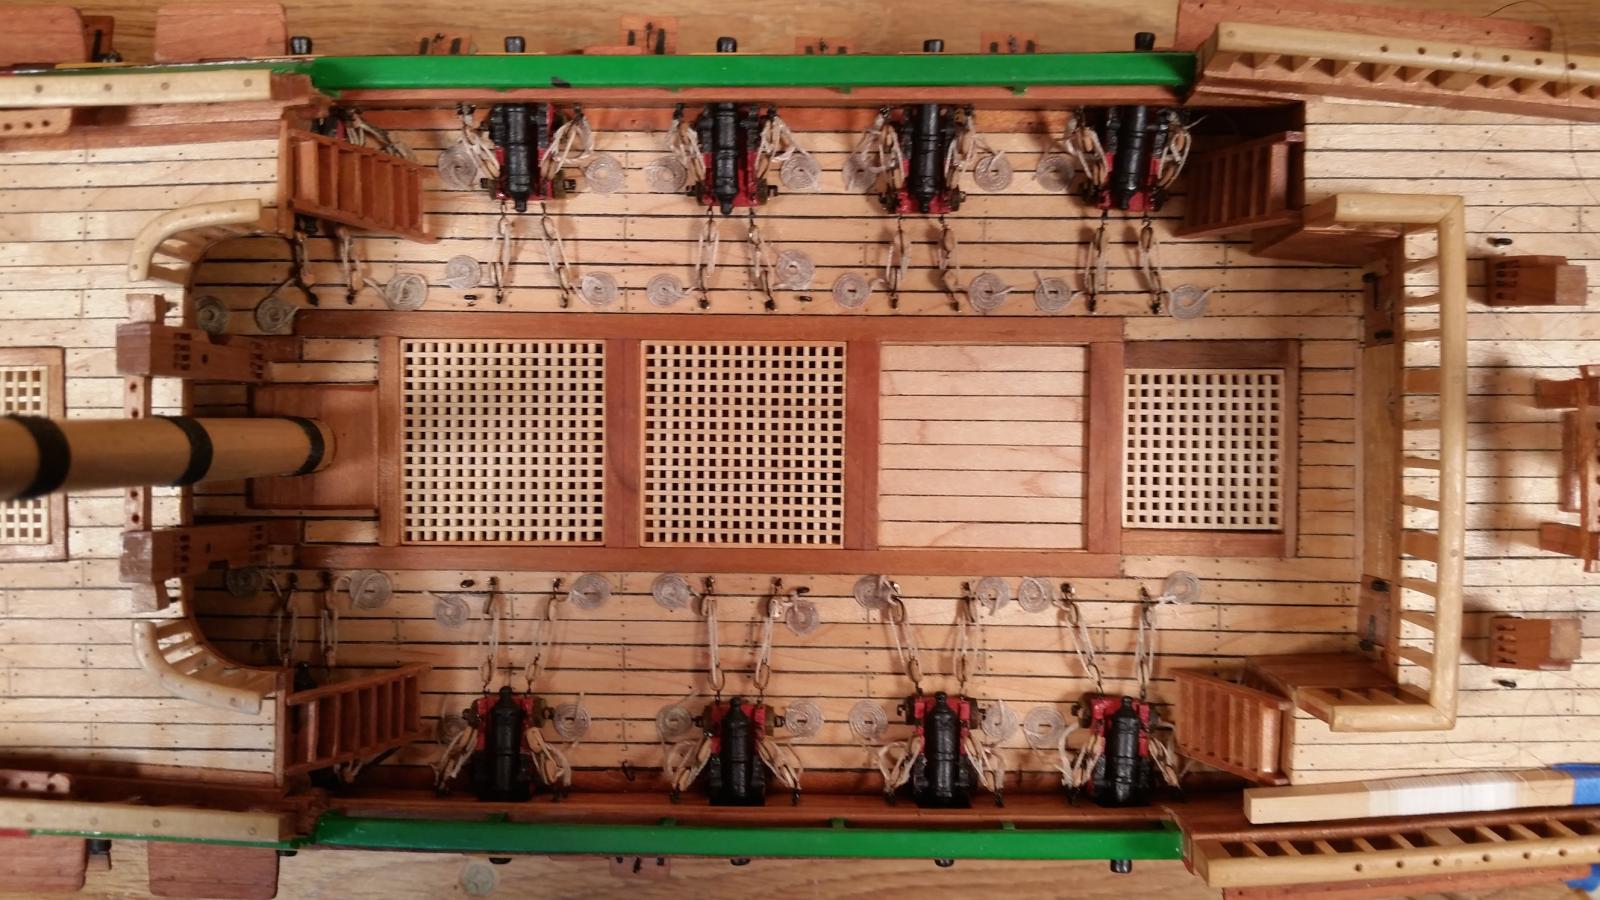
Thanks everyone for hitting the like button and thanks Ian and Patrick for your comments. Yeah, when shining a flashlight under the quarter deck it looks rather real with the cannons nicely rigged. I should have put a few lights in there too but didn't think about it. Oh well, with a mirror and a light we can still see everything. I ran into a snag yesterday with my computer. When I tried to add comments to a few of the build logs I found that the letters i and k did not work. This morning I couldn't even log on to my computer because these two letters are in my password. I tried to fix the MAC keyboard but no dice. I have a PC type keyboard and plugged that in and wonders above wonders I got in I spend a lot of time trouble shooting so not much work was done on the Surabaya. After attaching the pull-out tackle to the cannons and bulwark I saw that the pulley blocks were just too close together and thus not acceptable. I decided to move the eye bolts on the cannons one step further back on the carriages. Hmmm, easier said the done. I was afraid of causing damage by removing the existing eye bolts and lifting the carriages from the deck. But I was lucky and the tackles came off okay as well as the previous eye bolts. Now I had to make 8 new eye bolts, drill new holes in the carriage cheeks and cement the new eye bolts in with epoxy. I started this process yesterday after noon and got it almost done today, two more cannons to go before I can tough-up paint and poly on the bulwark. It's looking much better now even the coiled ropes look okay. Nothing like two steps forward and one back. When it's all done I'll make a few pics for my archive and post them here. After this I'll tackle the anchor capstan. Cheers,
-
Nice miniature work Nenad. Yeah, you could make the window panels a little thinner, if possible. But you already figured that out Cheers,
- 4,152 replies
-
- 5
-
-
- cutty sark
- tehnodidakta
- (and 1 more)
-
My, you have been busy! Great looking wheel Remco and the process layout. Cheers,
- 1,214 replies
-
- 3
-
-
- sloop
- kingfisher
- (and 1 more)
-
Gorgeous Pete! Yes, at first thought it does seem a shame to cover this nice finish but then again it's only a means to the final end, a nice paint job. She'll be just a jewel! Cheers,
- 258 replies
-
- 4
-
-
- buzzards bay
- herreshoff
- (and 1 more)
-
Nicely done Ian - marvelous detail. Cheers,
-
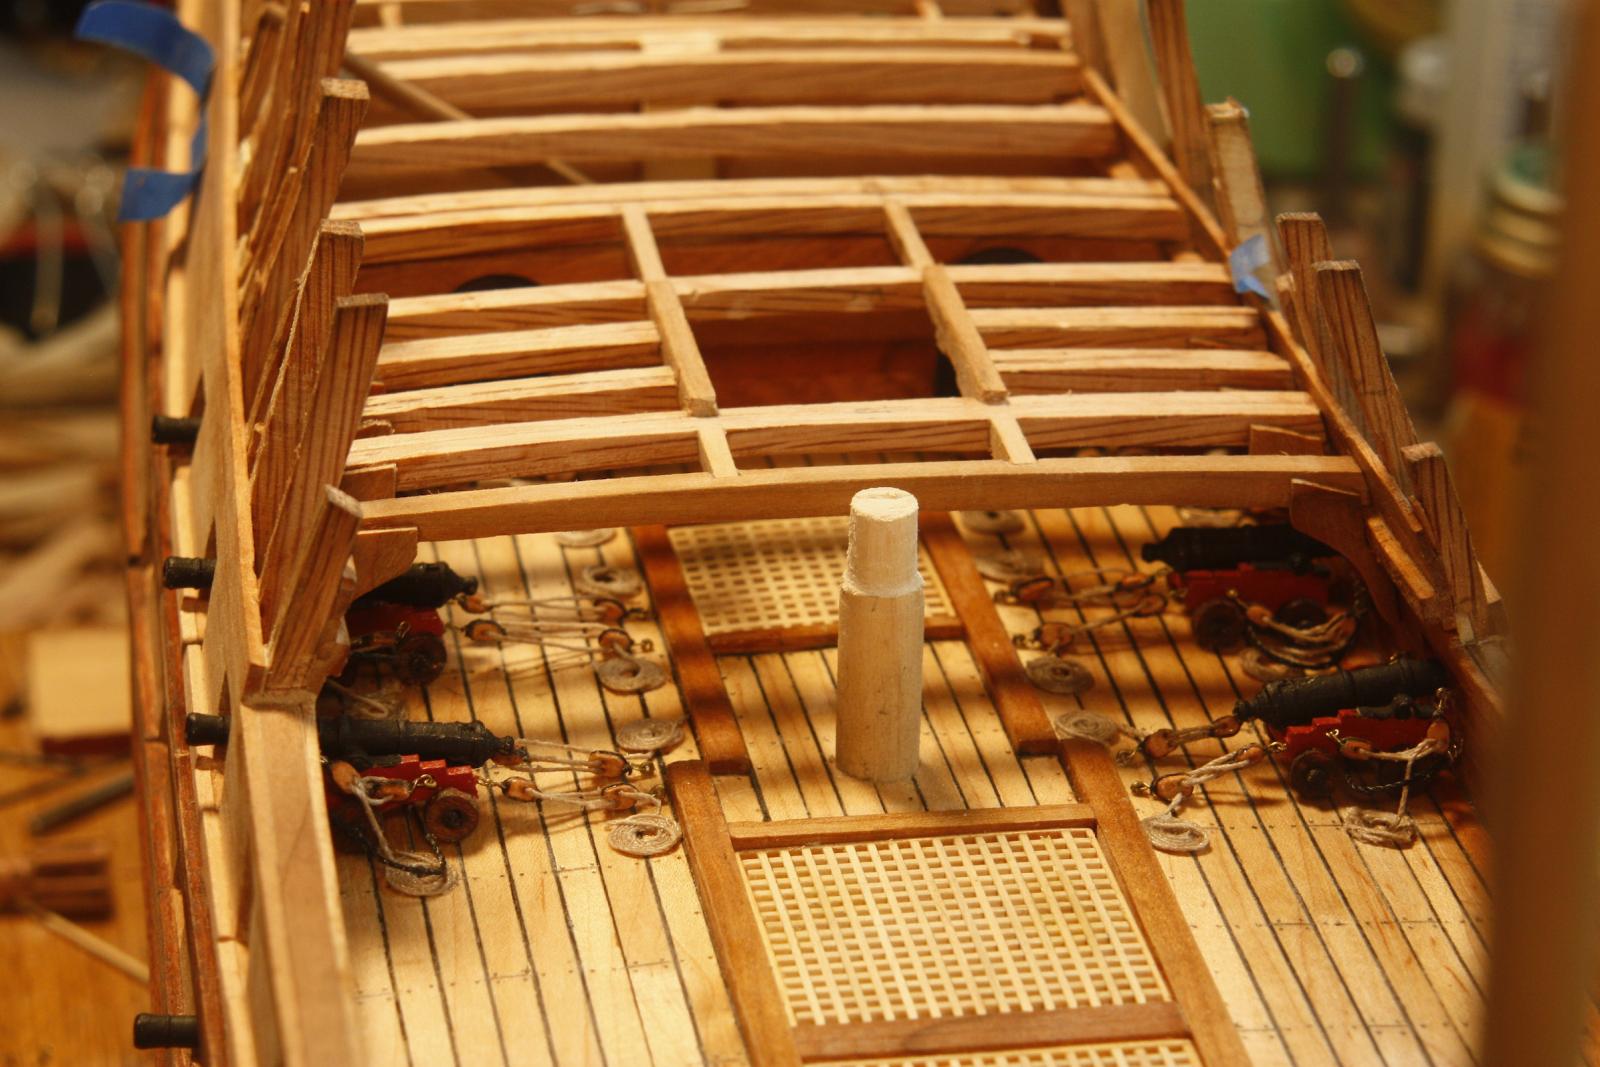
Thank all of yuns for clicking the like button and your comments Hans and Bluto Jim. Yes Hans, the ants were properly disposed of and I like the color blue, matches the ocean I understand your dilemma with the guns on your ship Jim but they could have been rigged before the gangboards were installed. I'll show you what I did for a similar situation. The Surabaya has two gun decks, the lower or orlop deck has sixteen 18 pounders that are hidden from view, thus not rigged. I did put the gun carriages on the decks and cemented the guns to them. The upper gun deck has fourteen 12 pounders, six are under the quarter deck and then the eight on the waist I am now working on. The part under the quarter deck is open in the front thus visible and I rigged them before the quarter deck was put on. I had plenty of space to work with because there was nothing yet behind the main mast. I wanted people to be able to see the guns and their rigging tackle. Some parts of this build has been a challenge for me, specially at this scale. I am an airplane guy, maintenance and engineering with over 12 certificates in the machinist trades but I have always loved ships and the sea. I understand the basics of ship design (part of my educational background) but it's the details of these 17th century ships I was lacking. Thanks to Amateur Jan, Amazon Dirk and now Hans I'm spooling up to that too. When I started this build I didn't have much of any info, like books and line drawings, just paintings and copies of old prints. Not much to go by. In the meantime I have increased my library and have a lot more confidence. Besides, I love fiddly stuff, it's a challenge. Unfortunately my introduction to this build and many posts after that were lost with the crash of version 1.0 of MSW. I explained why I am building this ship and how. Your ship is certainly looking very good and doing a partial gun rigging should work okay. Too late to install the full gun tackle now. In any case here are a few pics of the guns being installed under the quarter deck way back in September of 2012. This shows one of the gun carriages being dry-fitted for the tackle. I made the gun trunnion bands from paper and cemented them to unpainted parts of the carriage cheeks. That way the guns could pivot a little. This shows all six guns under the quarter deck installed and rigged. That stump is a dummy where the mainmast will be. Cheers,

-
Yesterday I completed coiling all the gun tackle ropes on the starboard side I have been working on. There is some collateral damage to be taken care off. Nothing that some 360 grit sandpaper and poly brush-on can't handle. I had to coil the forward rope behind the forecastle ladder because there is no way to put it right in front of the ladder. The sailor's union would never approve it I understand that this may not even be the way it was in real life, too many obstacles on the deck, unless the sailors walked over the gratings. But it's just to show how the guns may have been rigged. But then again, they could have easily unhooked the pull-back tackles and stowed them under the gun carriages. After everything is touched up I can rotate the build dock and do the same thing on the port side. Cheers,