GuntherMT
-
Posts
2,213 -
Joined
-
Last visited
Content Type
Profiles
Forums
Gallery
Events
Everything posted by GuntherMT
-
Sorry to hear that Frank. Hope that the follow-up visit is more productive for you and brings some relief.
-
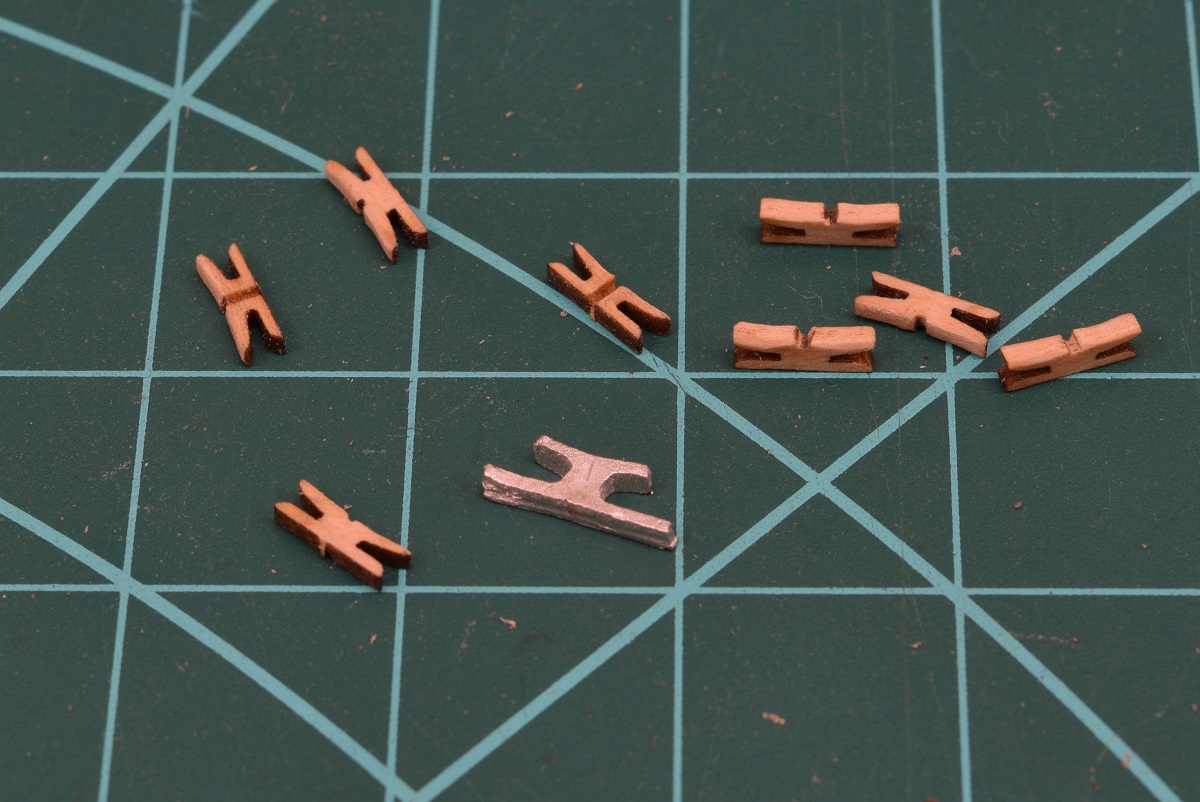
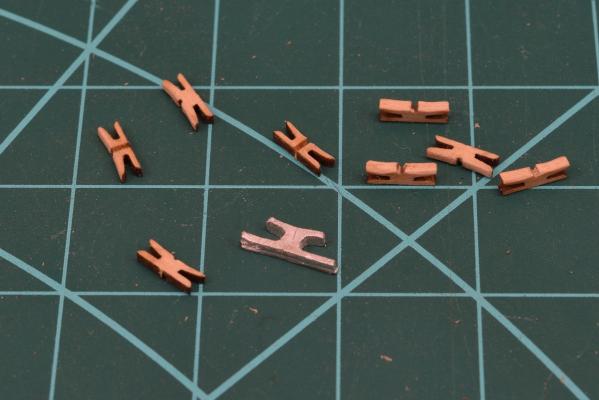
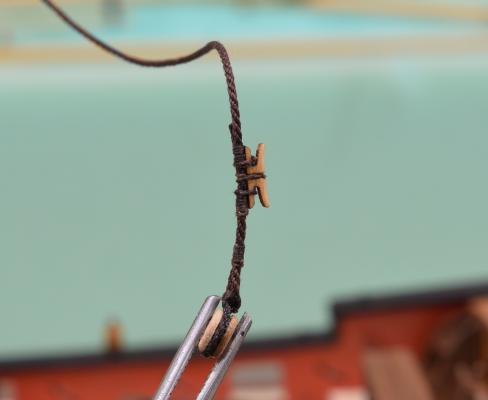
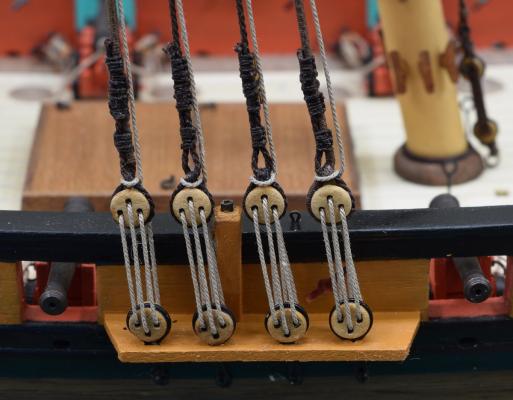
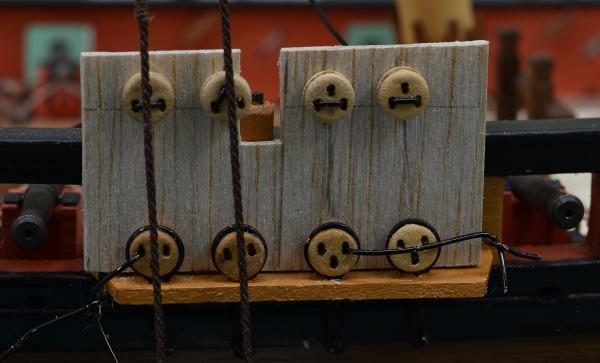
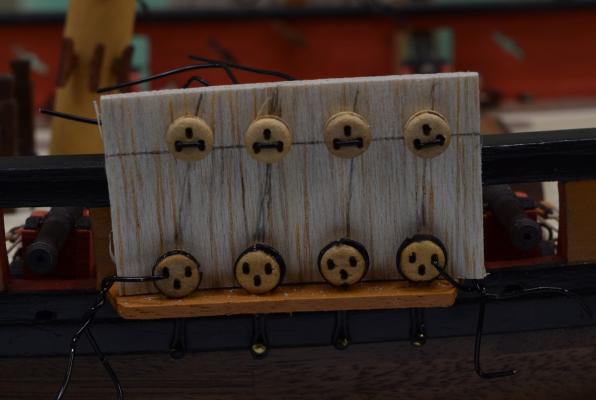
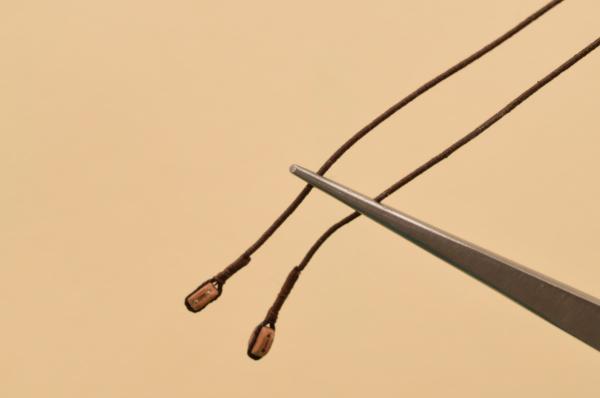
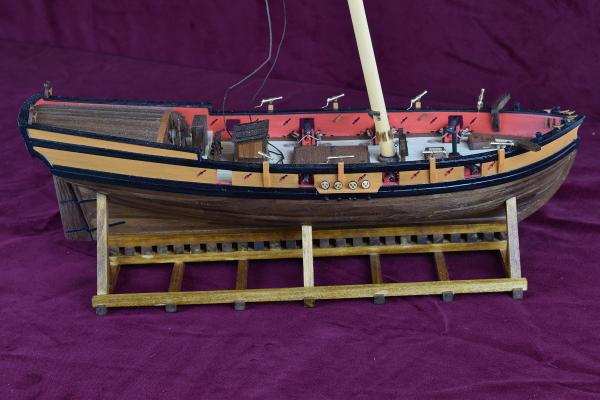
With the shrouds attached to the dead-eyes, it was time to add the shroud cleats. I hated the look of the kit brittania cast cleats, so I ordered some boxwood shroud cleats from Syren. They look.. somewhat nicer than the cast ones. Things have been going far to good for quite a while now, so troubles were bound to happen, and tonight.. was the night. The starboard side is coming out great, all rigged up and set for final adjustments before I wrap the lanyard around the shroud and seize the end. The trouble was on the port side. Even though I measured both sides the same, and everything still measures the same relative to the chain plate locations, the ship is clearly not perfectly symmetrical, as this happened. Stupid swivel gun post is interfering with one of the shrouds, and in a big way. There is really nothing to do except deconstruct it, but man I'm afraid of this, those suckers are attached pretty firmly, and goodness knows how much damage I'm going to do getting it removed. Oh well, it's got to be done, but I'm going to let it rest for the night and start fresh on it after work tomorrow I think. Maybe I should import Dirk to help me Wish me luck!

- 831 replies
-
- 24
-

-
- Armed Virginia Sloop
- Model Shipways
- (and 1 more)
-
Looks good to me! Also, in case it was unclear at all, any time I have to seize a block to an eye-bolt, I do it off the ship using a vise or helping hand, and then once it's done, attach the eye-bolt to the model. Much easier.
- 389 replies
-
- 2
-
-
- scottish maid
- artesania latina
- (and 1 more)
-
Quite an interesting project Danny. Just cleaning up the layers of dirt appears that it will be quite a chore! Seems strange that anyone could have progressed that far on the masting/rigging and not done any of the standing rigging. People are strange. Good luck, I'm sure we'll learn a great deal from you as you do this!
- 59 replies
-
- 4
-
-
- norske lowe
- billing boats
- (and 1 more)
-
Ah, gotcha. Way back when I was working on the Carmen I realized that I would need some thread for seizing, but didn't really know what I would need (other than black) in order to match the tan rigging line. I was perusing thread on Amazon (my favorite store, I should really own a bunch of their stock), when I ran across this package of various 'earthy' colors of thread, so I bought it - http://www.amazon.com/gp/product/B00I4EVA9O?psc=1&redirect=true&ref_=oh_aui_detailpage_o07_s00 It no longer appears to be available, but the label on one of the un-opened colors says 100% long staple cotton satin finish thread "Essential" from ConnectingThreads.com, Size 50, 1200 yards. So yea, it appears to be size 50, and I have 1200 yards of it. No danger of running out before I finish up!
- 831 replies
-
- 3
-
-
- Armed Virginia Sloop
- Model Shipways
- (and 1 more)
-
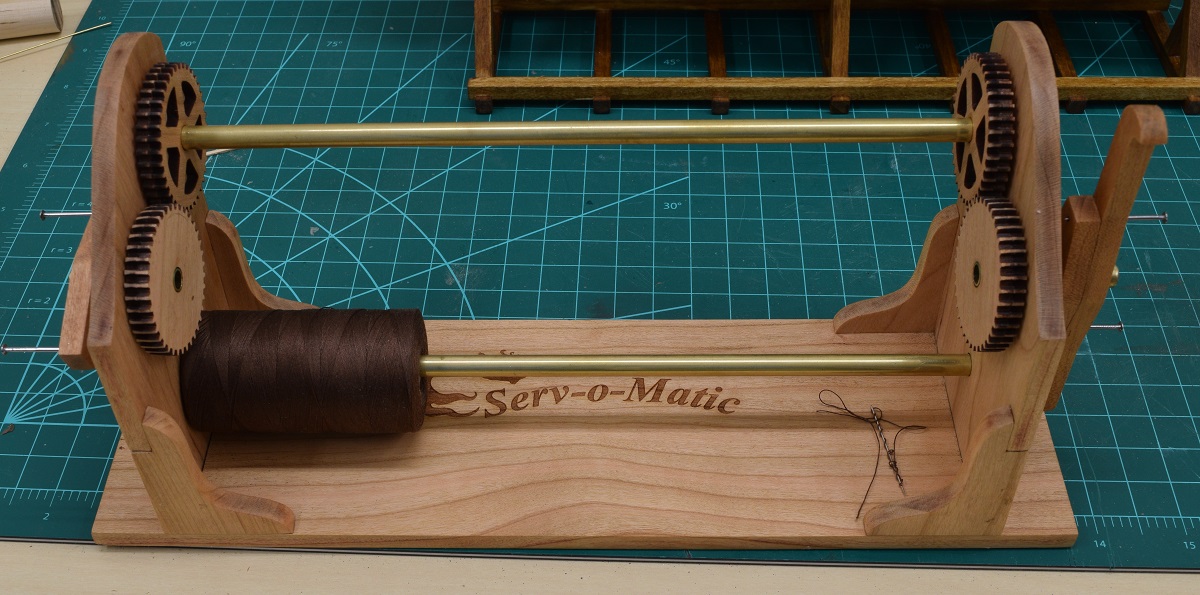
Thanks for all the kind comments, and the likes. Nigel has flooded my 'like box'. Haha.. I'm not sure I understand your question David. I have a photo of the Syren Serv-o-matic that I served the rope with, and the roll of thread that's on the machine in the photo is what I used. What exactly did you want to know about it? I'll be happy to answer anything that I can.
- 831 replies
-
- 2
-
-
- Armed Virginia Sloop
- Model Shipways
- (and 1 more)
-
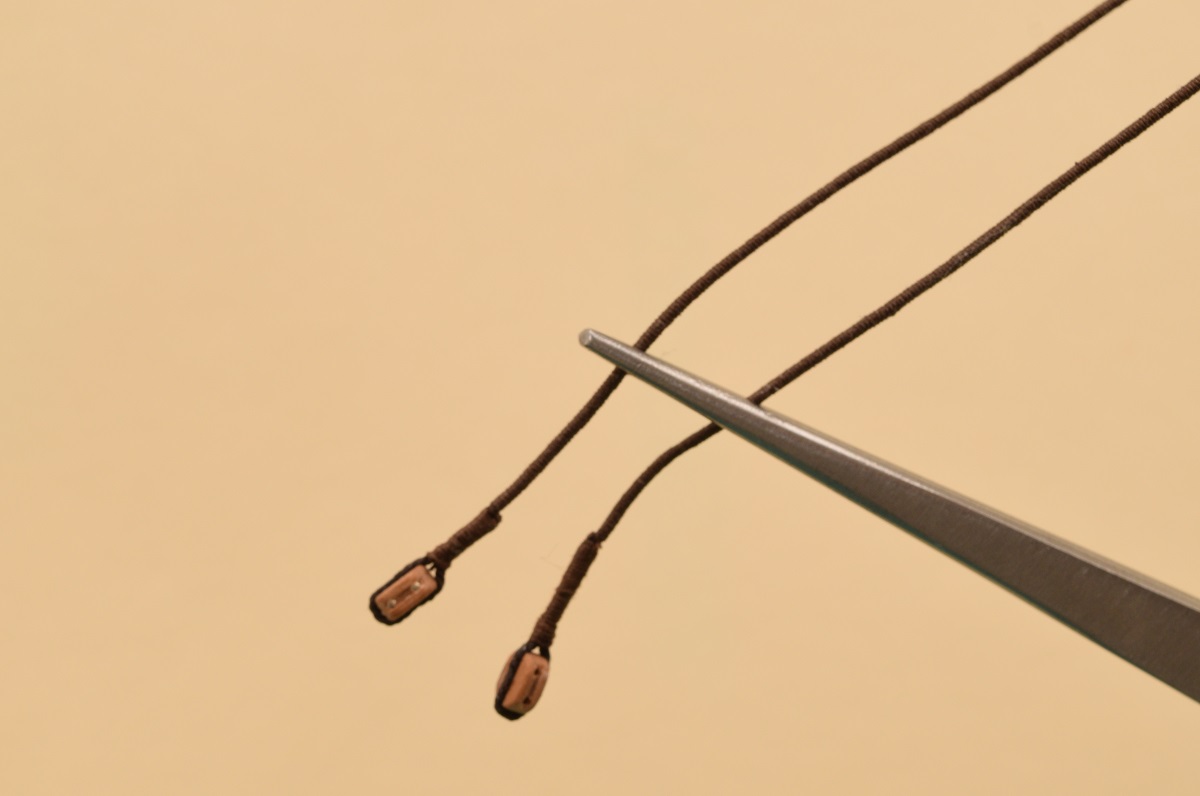
If nobody gives a good answer I'll try to take some pictures and make a little tutorial type post when I get home tonight, as I am posted from my phone at work. What I do is to make an 'S' out of a short piece of rope. Thread the eyebolt into one of the loops of the S and then seize it, making sure to capture all three legs of the S. This will give you a eyebolt that is seized to a loop. Pull the seizing up as tight as you want against the eyebolt. Now take your block and place it into the loop, grab the loose line that is seized with the eyebolt, and pull it through the seizing to tighten the loop and secure the block. Finish by securing everything with diluted white glue, or CA if you prefere, and trim the loose ends of the rope and thread.
- 389 replies
-
- 2
-
-
- scottish maid
- artesania latina
- (and 1 more)
-
Thanks Chuck, George, and Antanas for your comments and thanks for all the likes everyone. The plans and the alternative rigging schedule that is floating around for the model both call for .040 shrouds. I'm using Syren rope which comes in .045 or .035 size. My general feeling is that rigging is generally oversized on models, and when given a choice I will always downsize instead of upsize when presented with a choice like this, so I use .035 line for the shrouds. So yes, they are 'smaller' than the plans call for, but I don't think my eyes could honestly tell the difference between .035 and .040, but if yours can, they are certainly sharper at picking out that detail than mine are. I'm not sure if I envy you for that, or am glad I can't!
- 831 replies
-
- 9
-
-
- Armed Virginia Sloop
- Model Shipways
- (and 1 more)
-
For me, it's as much about time. Since I work full time, it is more than worth it to me to just purchase the rope I need from Chuck, and concentrate on building the model in the time I have to do hobby stuff, rather than make my own. I just use the closest size to the size I need, and as long as it looks good, that's good enough for me, nobody is going to be measuring my rope to yell at me for using .018 instead of .021 line. Some people enjoy making their own line, and that's cool, I'd rather work on wood or actually do the rigging instead of making the rope to make the rigging.
-
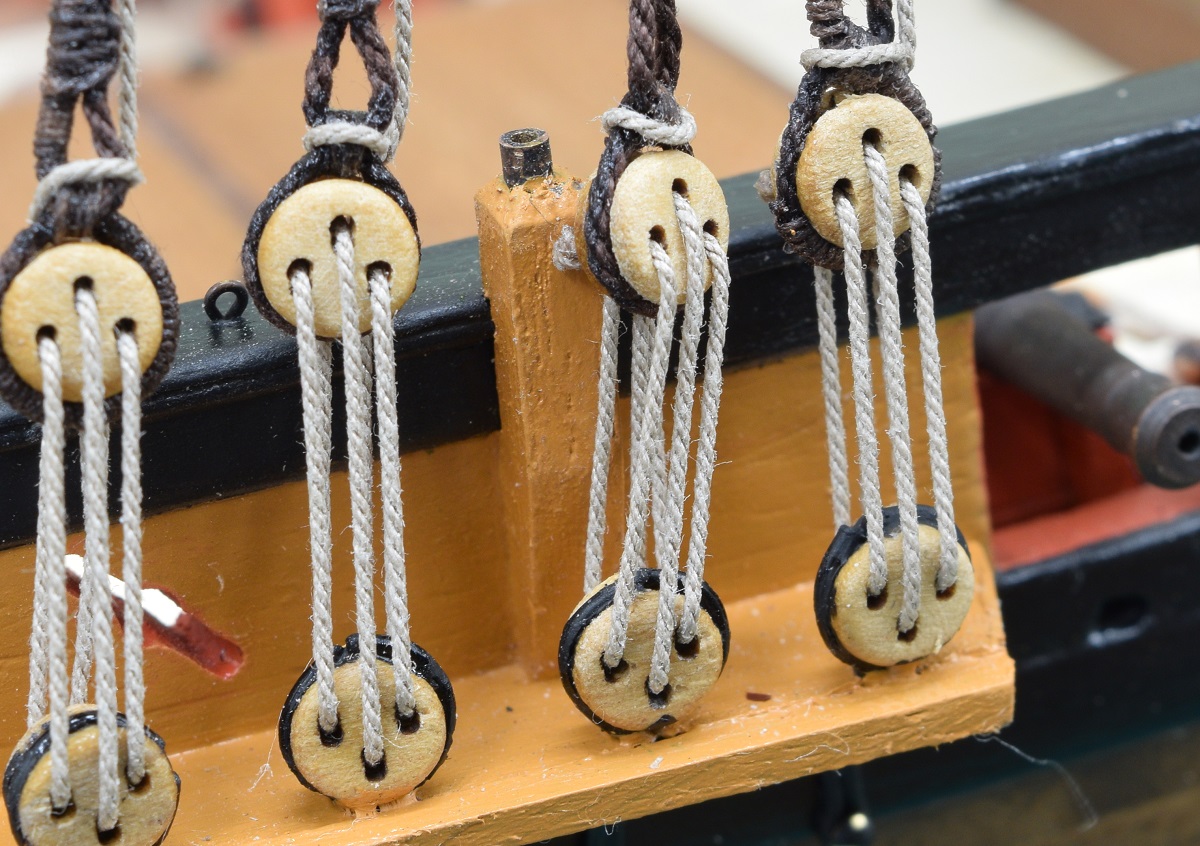
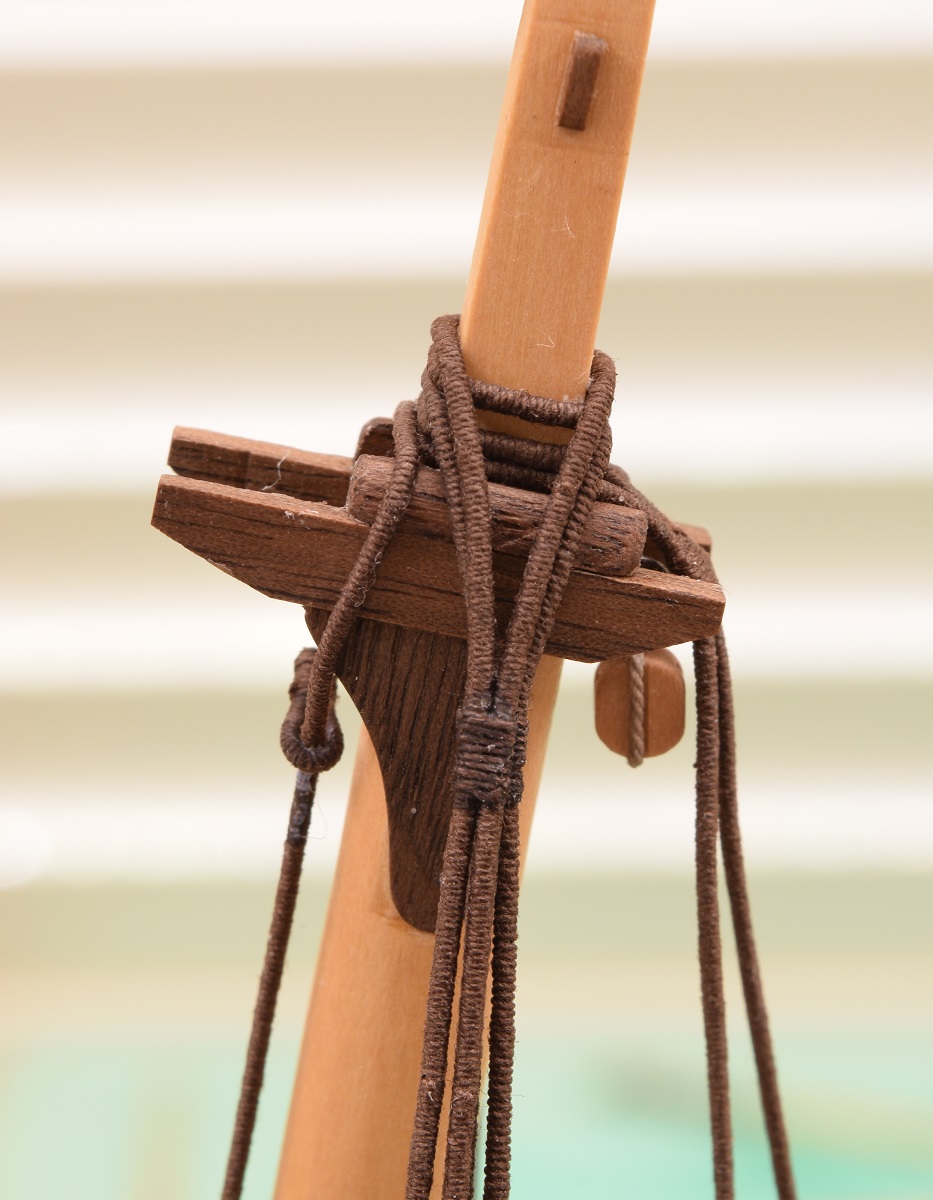
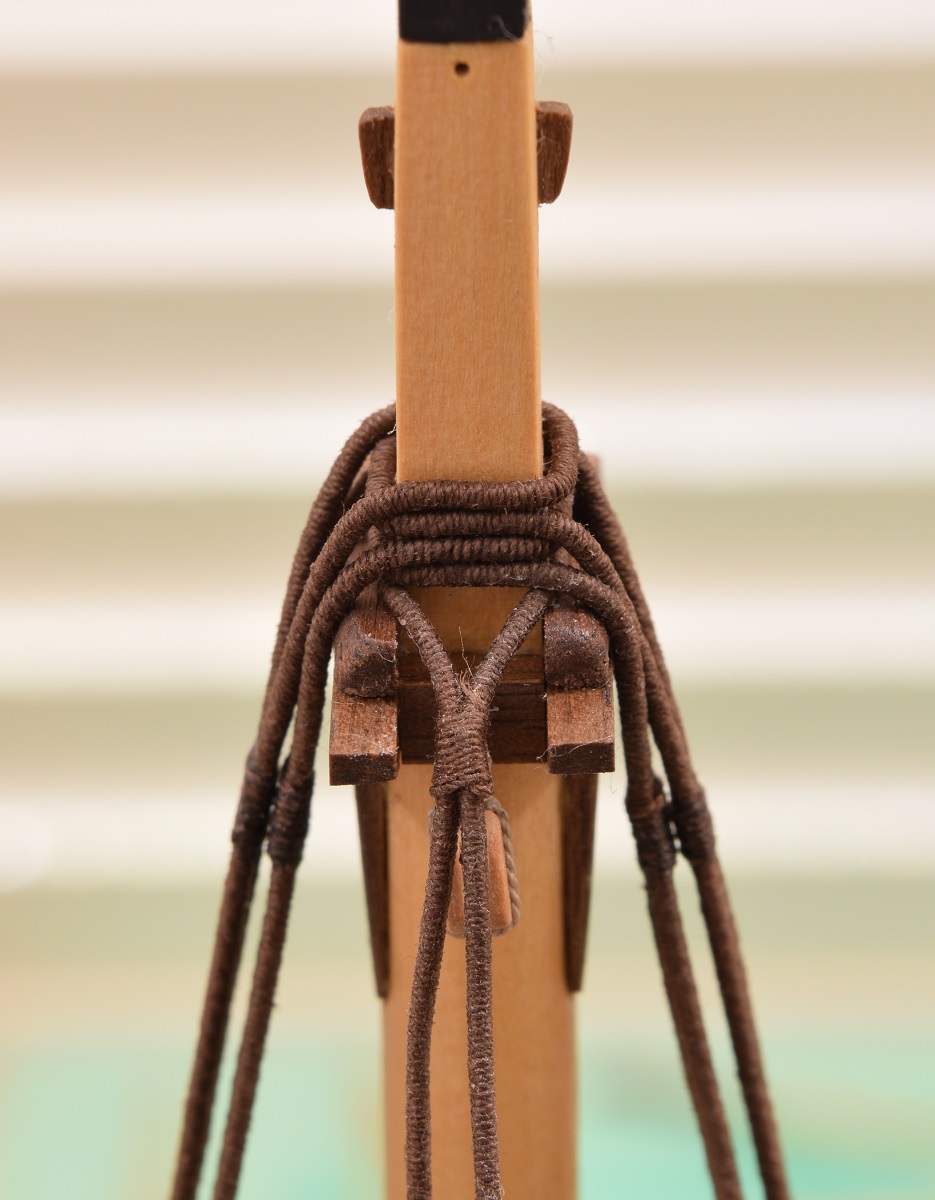
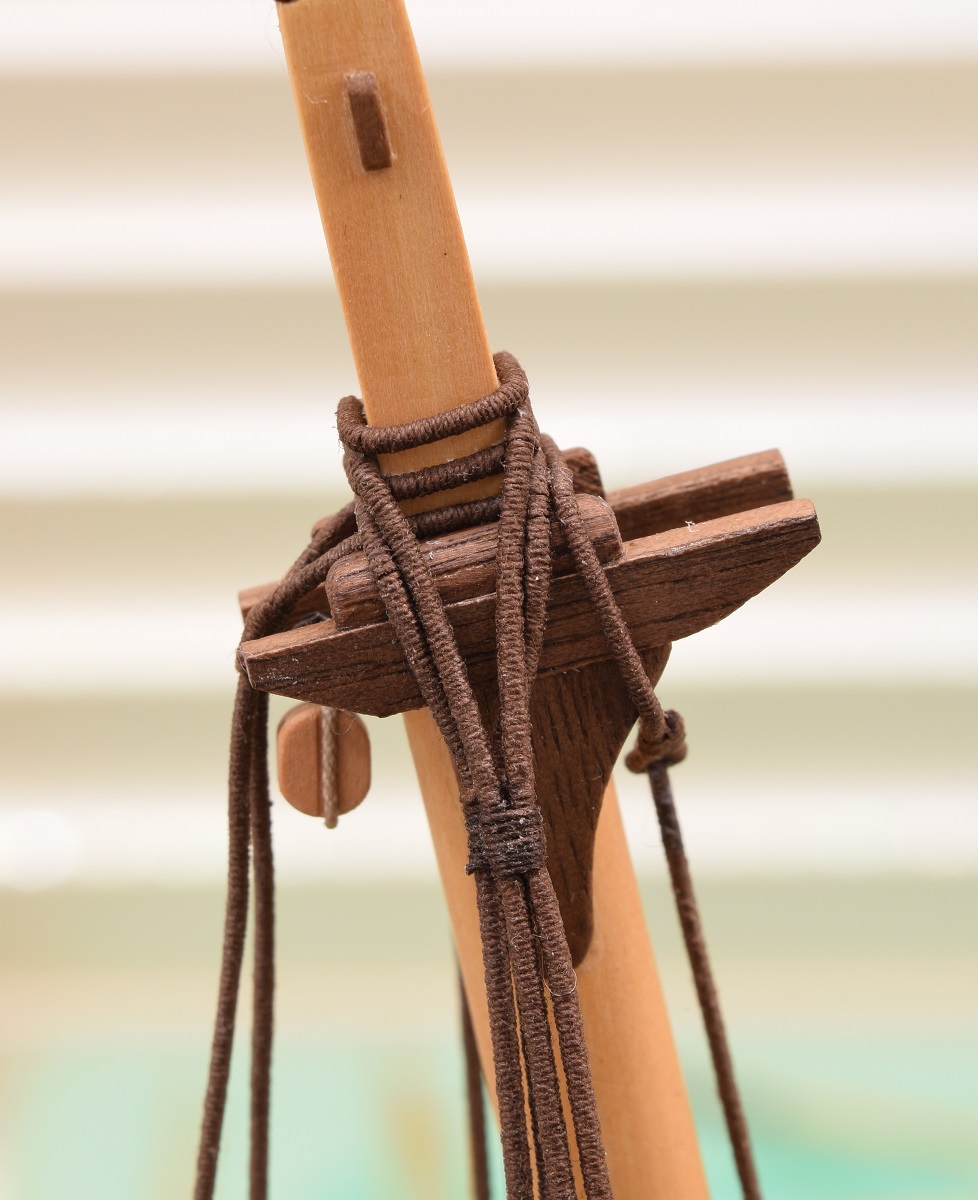
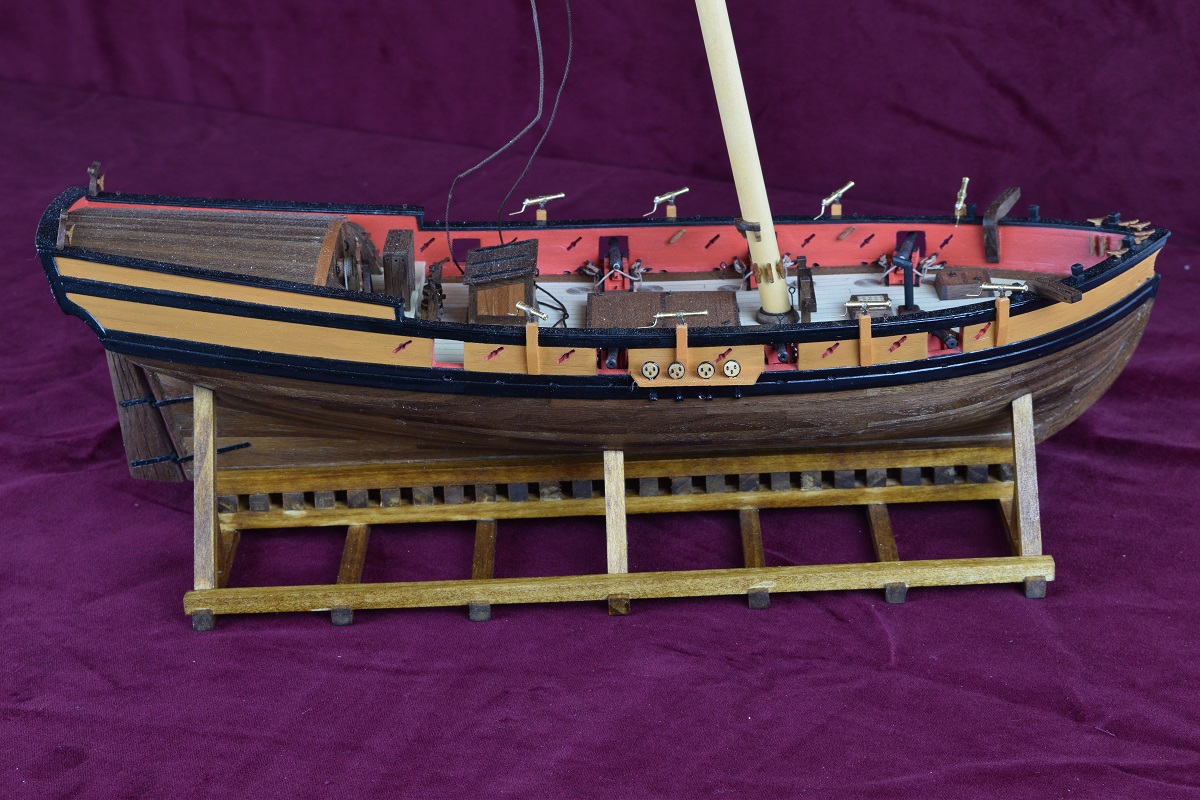
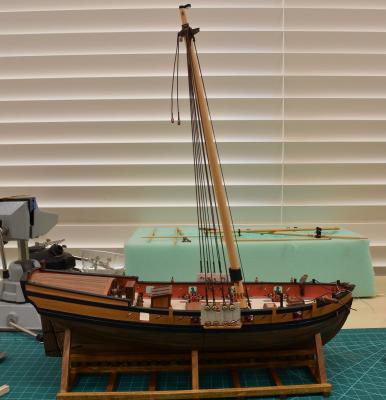
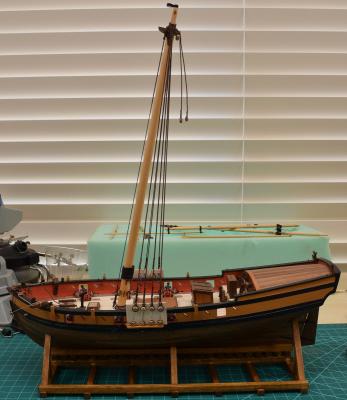
Today's project (and last nights) was the shrouds. Lots of serving of rope, but I think I'm good on thread for a while. The dead-eye/shroud jigs I made worked fantastically, and allowed me to make much better looking rigging than I would have thought at this point, being only my 2nd build. I also used zip-seizings on top of the dead-eyes to allow the proper rigging of the shrouds crossing over on top of the dead-eyes. Really like the way they turned out. Current status, shrouds completed, but attached to the jigs. I am trying to decide the easiest way to seize the shroud cleats - I am leaning towards removing the jig, and seizing them by sticking the shrouds in a third hand to the side of the ship, one at a time, rather than trying to work on the inside of the shrouds on the ship. About a year ago, when I first started building the Carmen and found MSW, I spent a lot of time going through build logs, and like any new thing, I think people tend to see a specific 'thing' that make them go "Wow, that is amazing, I could never do that". On this site, for this hobby, there is a lot of that 'wow' factor in many of the logs here, but one of the main ones that stuck out to me (for whatever strange reason) was the mast-heads on some of the ships, where so many ropes come together and chaos should reign, but instead, there is an orderly and neat stack of ropes showing a definite purpose and design. Today I had a real 'wow' moment in my ship modeling. I have no idea why that seems so amazing to me, but it really does, and even now I'm having a difficult time believing that yes, it really was me that did this thing (although there is more to go there of course). There have been plenty of things on this ship that were more difficult than this, and took far more effort to be happy with, but for strange reasons in my head, this is probably one of the coolest moments for me so far in the hobby. It's a good day.


- 831 replies
-
- 28
-
-
- Armed Virginia Sloop
- Model Shipways
- (and 1 more)
-
Fantastic. Do the lights flicker like lamps? I know they make LED controllers to do that.
-
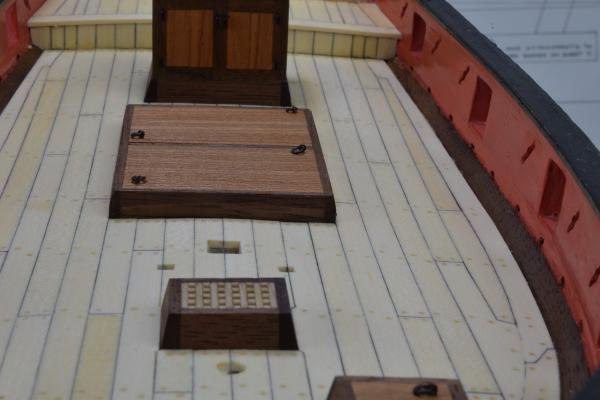
Very nice clean deck planking, looks good. It's a bit late now, but a very common way to make the planking lines show up is to use a pencil and mark ONE edge, and ONE end of the planks before they are placed. This is how I did the deck on my AVS, using a #3B pencil on the edge of each plank. I think there are several threads in the planking sub-forum that talk about different methods for adding this detail to your decking, if you have the time to go through other build logs and the sub-forums relevant to the steps you are going to do prior to doing them, you'll find a wealth of tips and tricks here on the forums. You will also learn about the different ways the butt ends of the planks were shifted rather than just alternating them.
-
If you don't need to serve a line for the entire width of the machine, move the end pieces closer together. The closer they are, the easier it is to keep even tension on the thread. Also, don't tie knots, wrap the rope around the end pieces and clamp them with an alligator clamp or binder clamp so it can't loosen up, and you can hold it tight while you are clamping. I use the Syren rope as well, and there isn't much wastage if you use the minimum width between posts for what you are serving, and clamp the ends instead of messing with knots. I presume you aren't using the Syren .008 as the actual serving thread, because yea, I wouldn't do that. You want the thinnest thread you can get actually, the thinner the better.
-
Thanks George & Ken, and everyone for the likes. I remember your stand and guard Rich, but I don't have a cool turntable thing built for the model like you did. I'm mostly working out of the new stand I built for it since it's stable, and lower then the other holders I have. I would have to first build a new stand to attach the guard to, so I'm going to just try to be careful and not break it!
- 831 replies
-
- 4
-
-
- Armed Virginia Sloop
- Model Shipways
- (and 1 more)
-
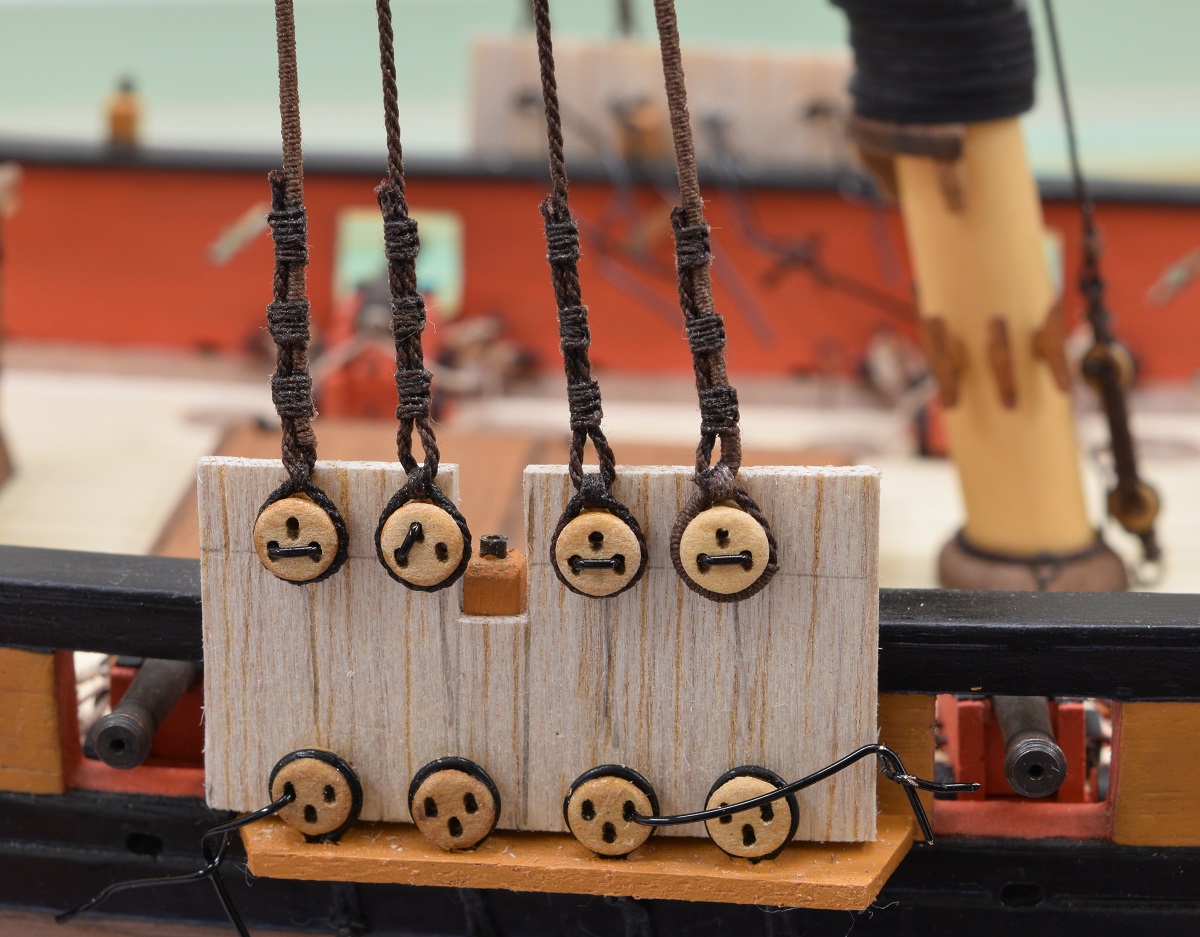
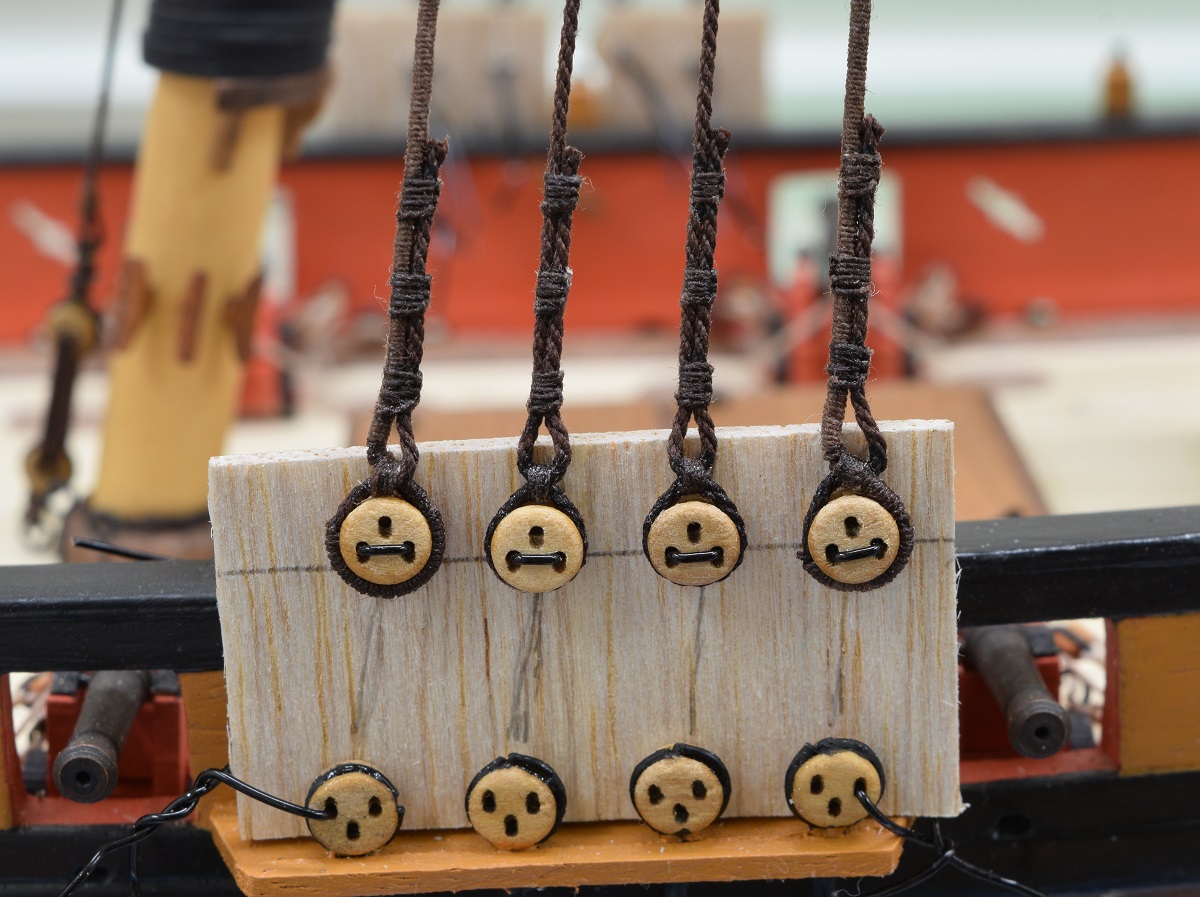
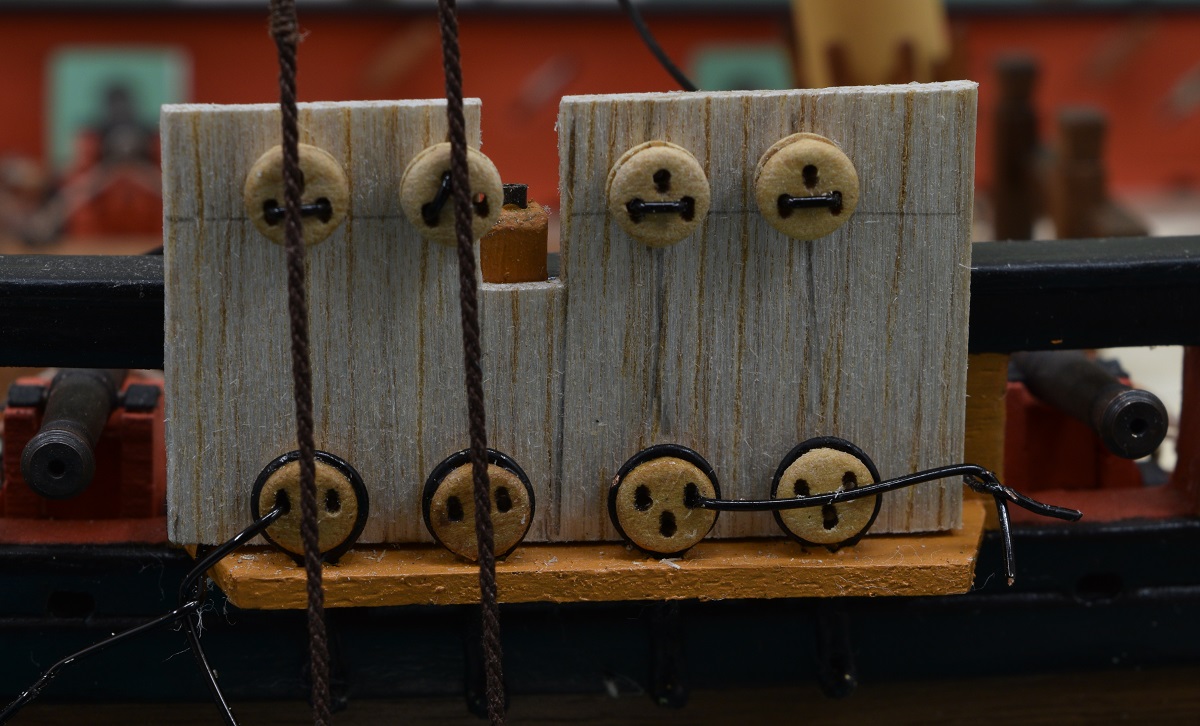
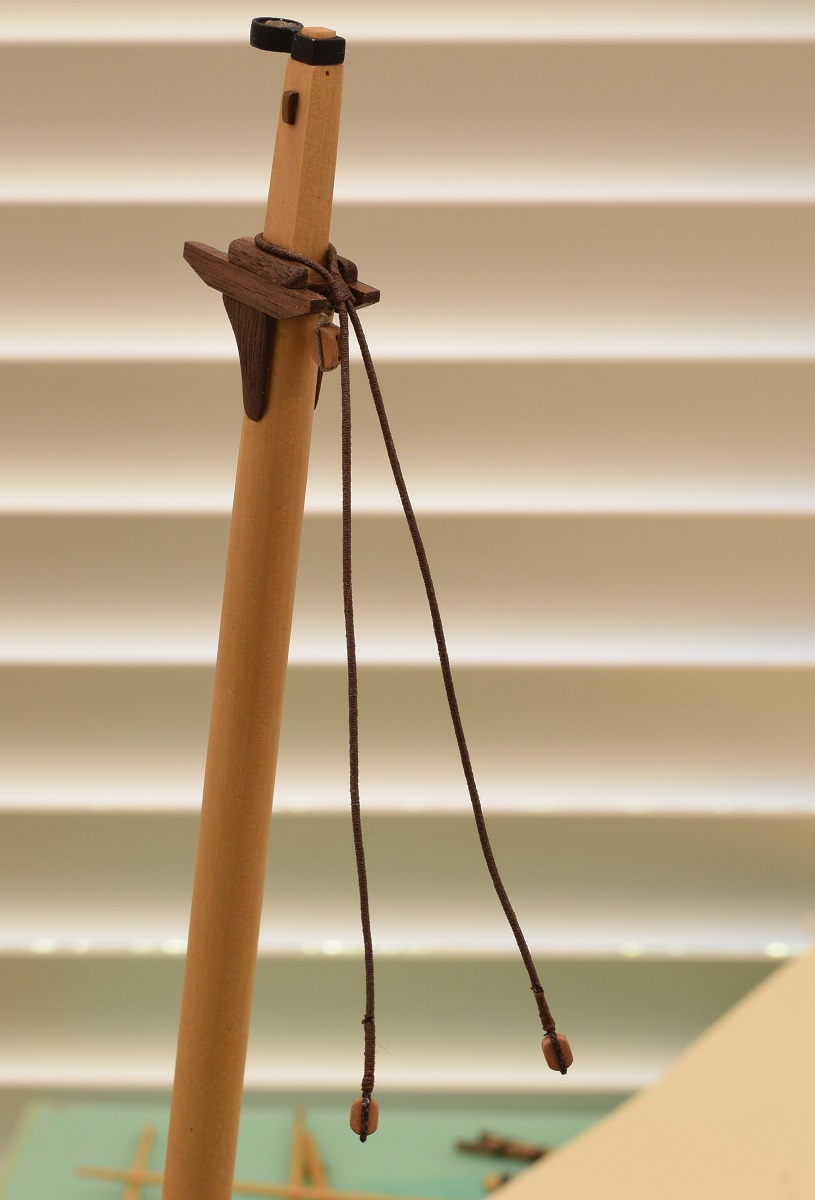
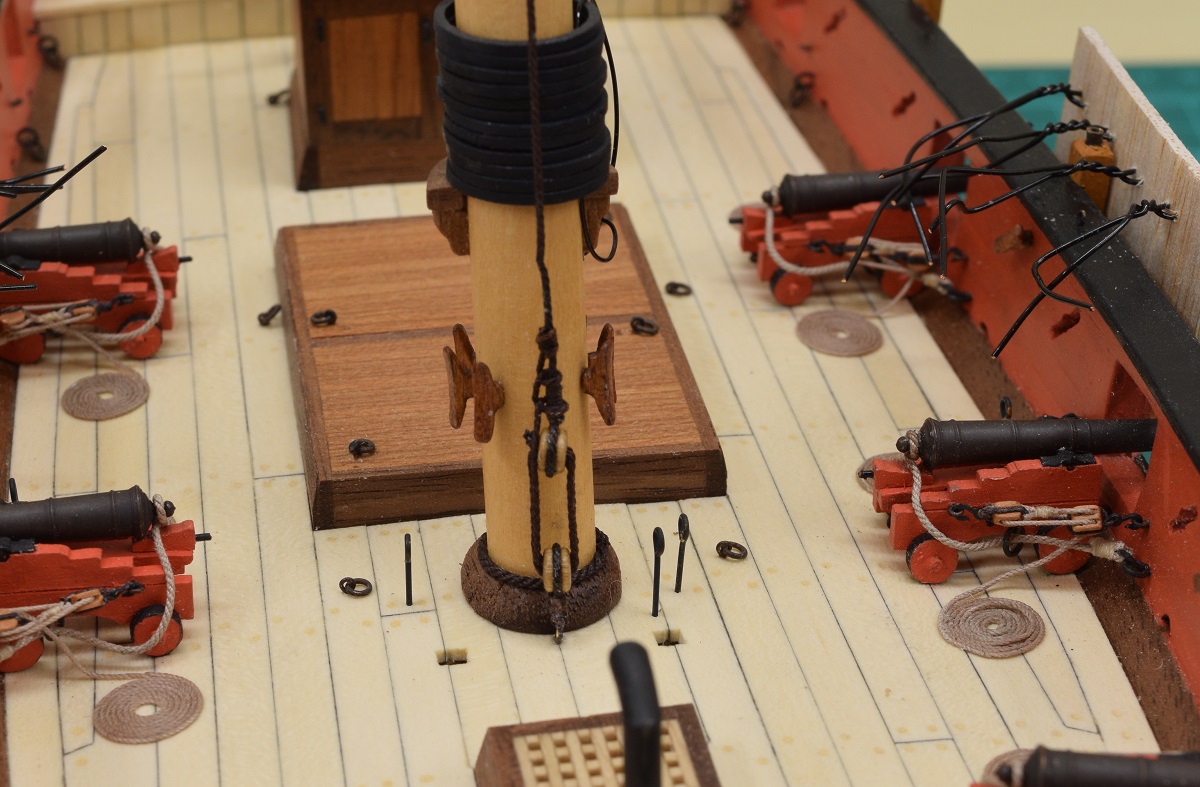
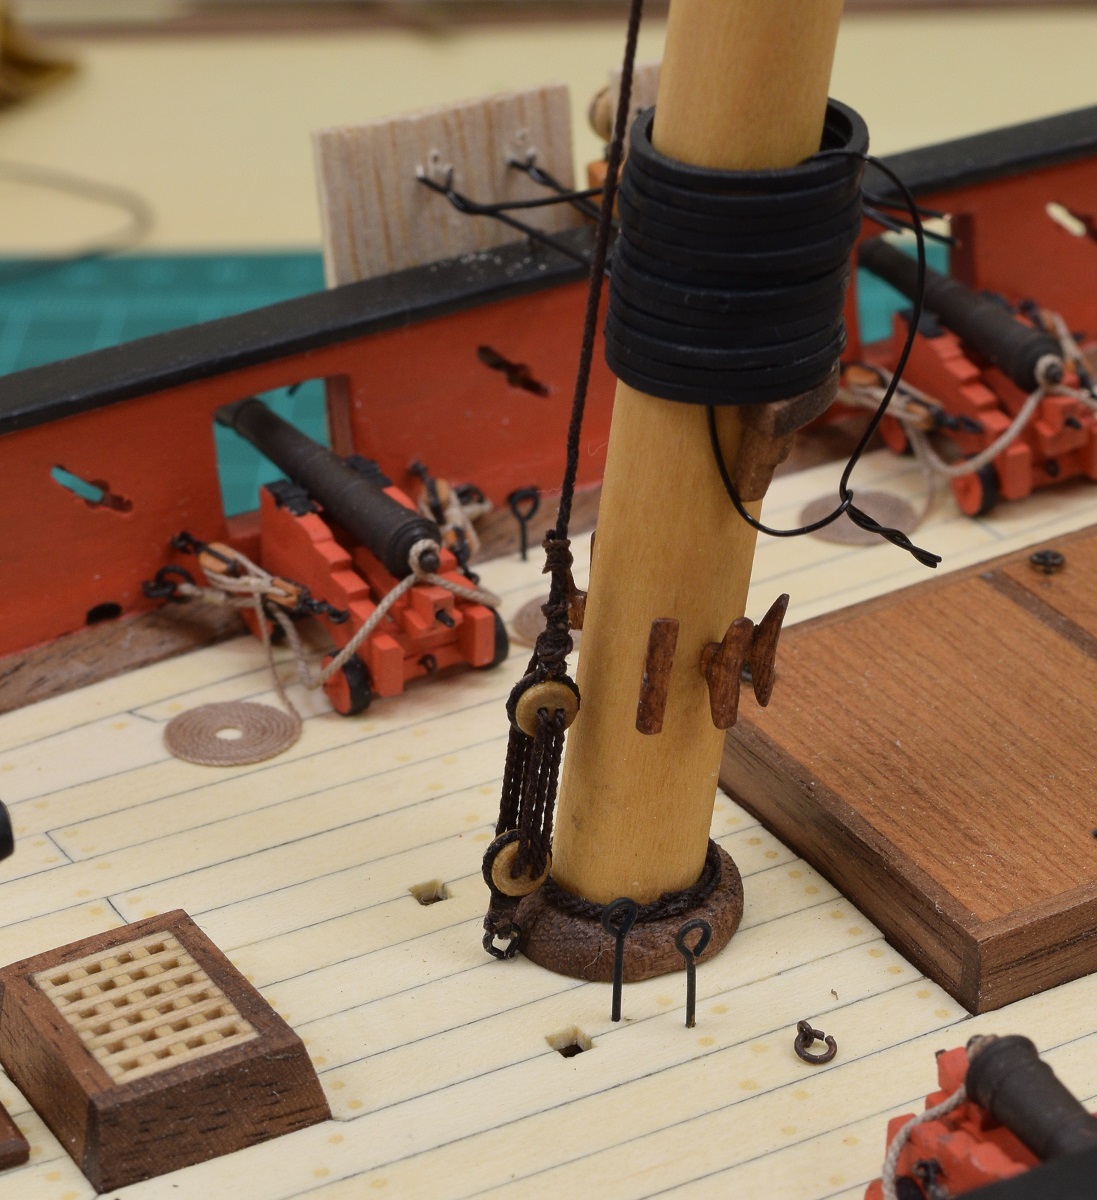
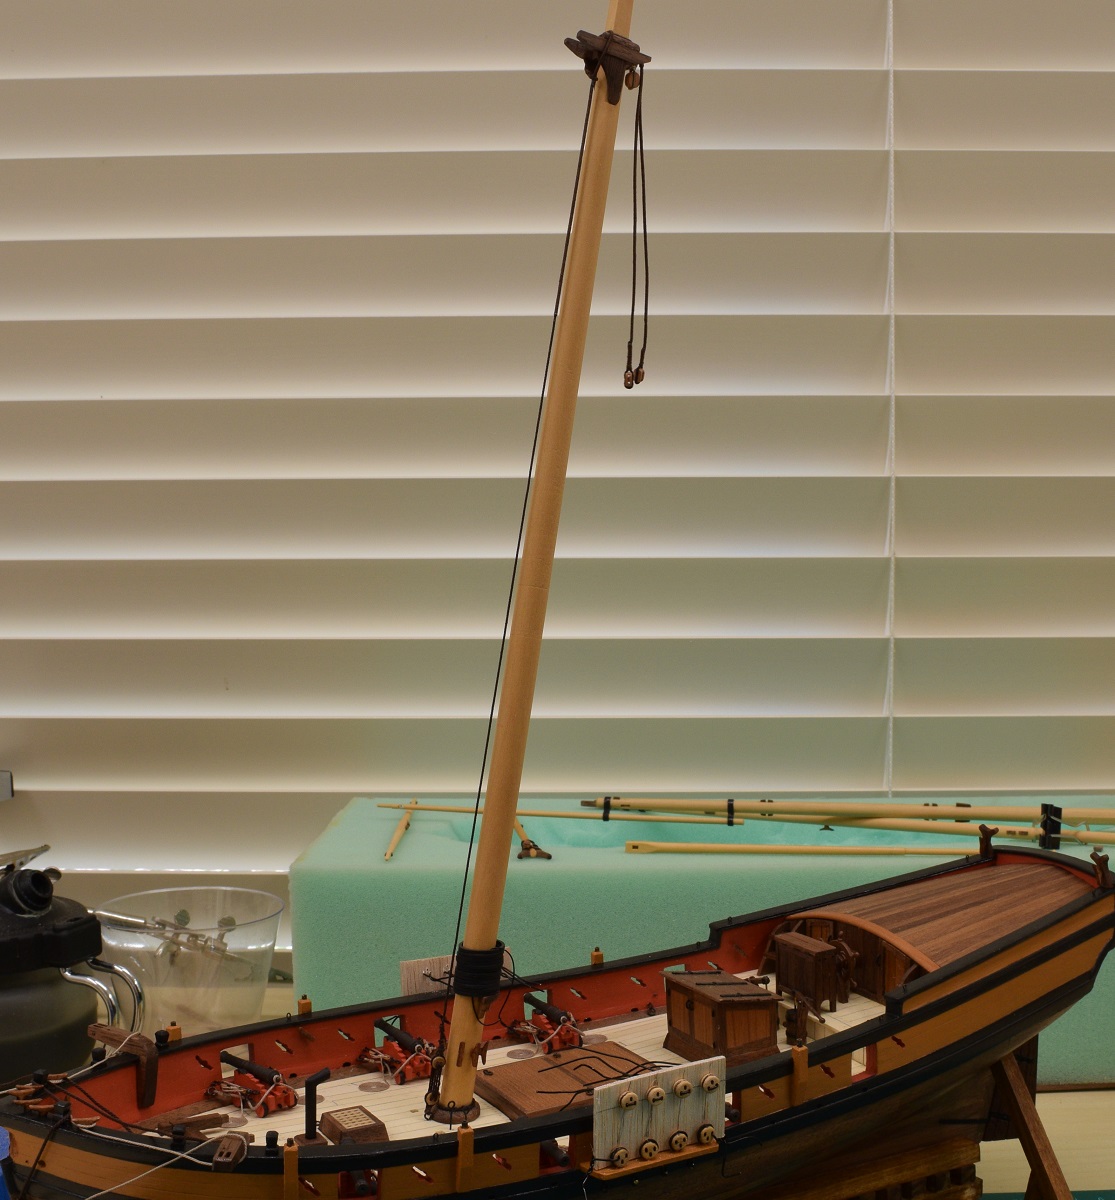
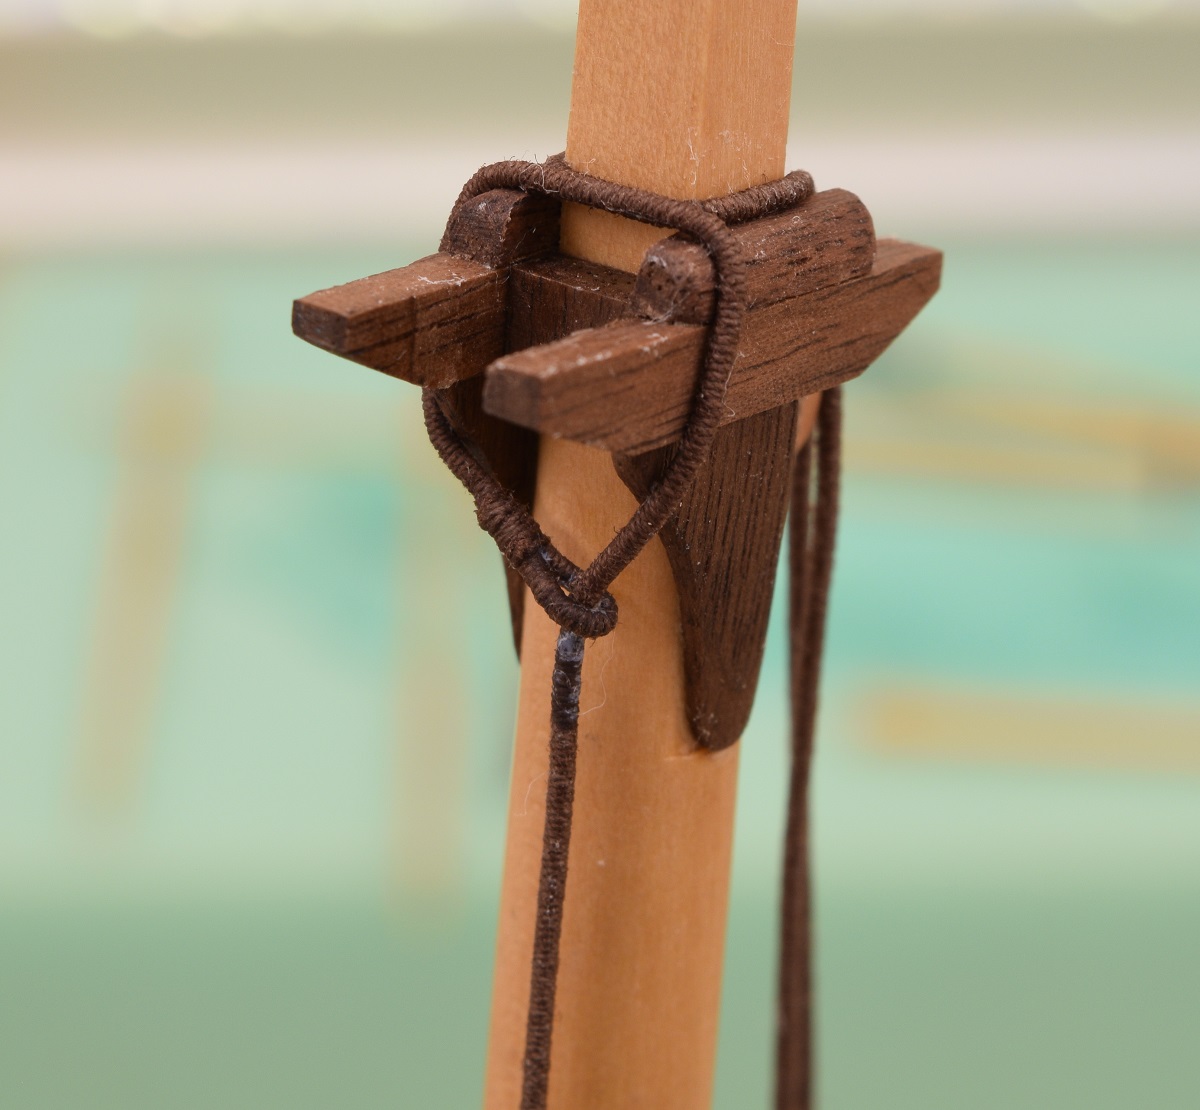
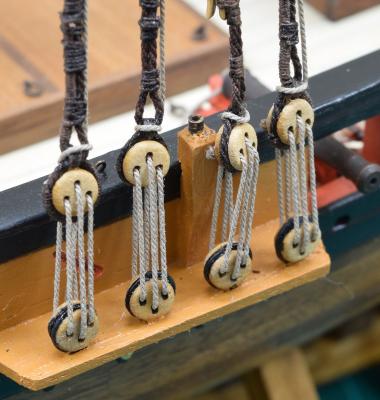
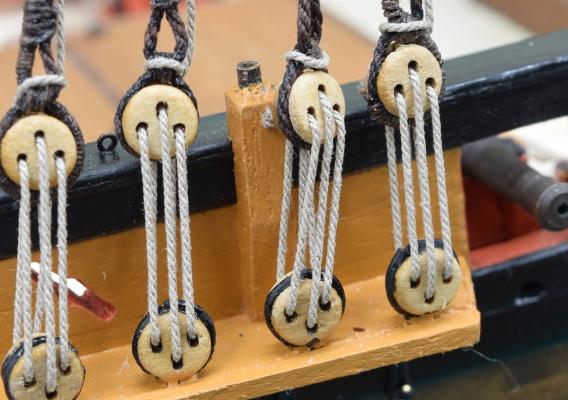
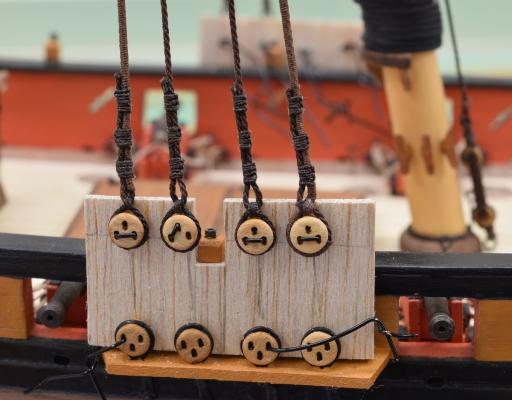
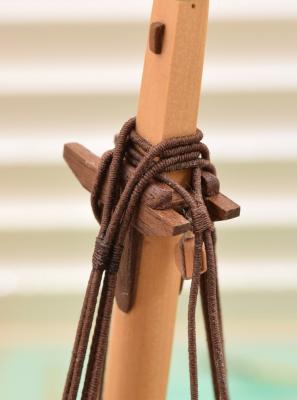
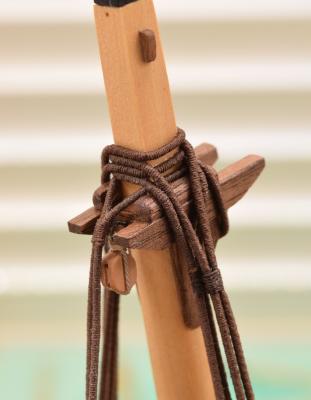
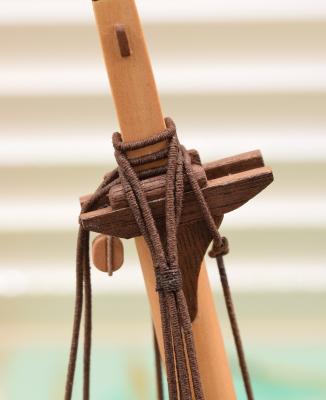
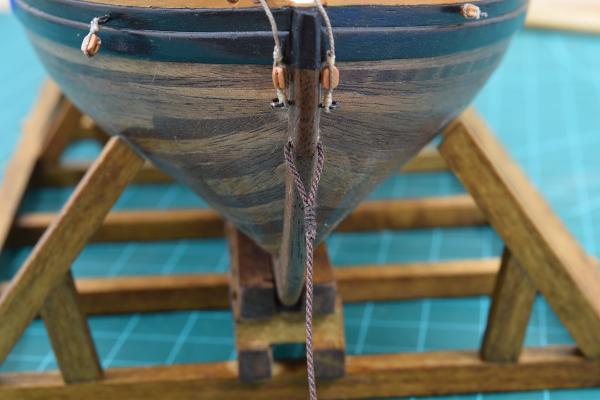
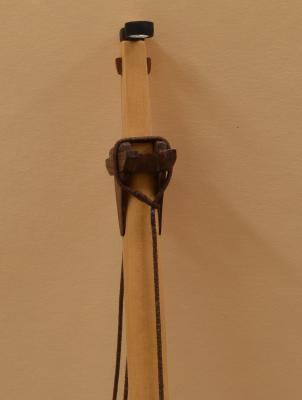
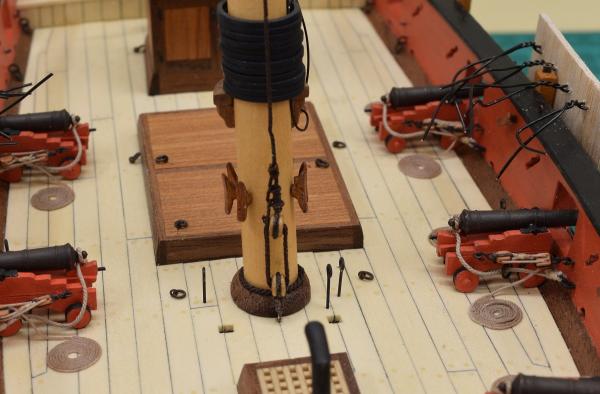
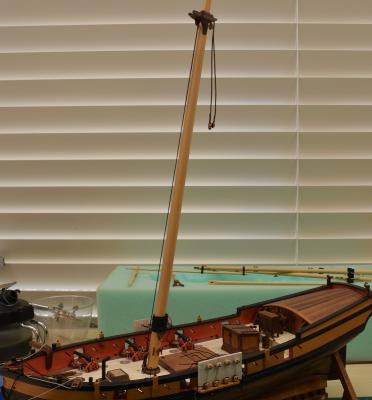
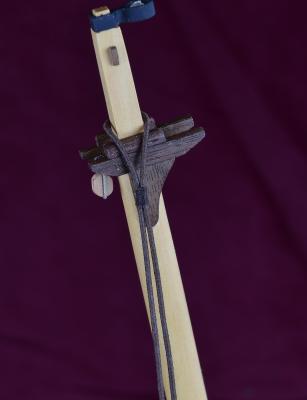
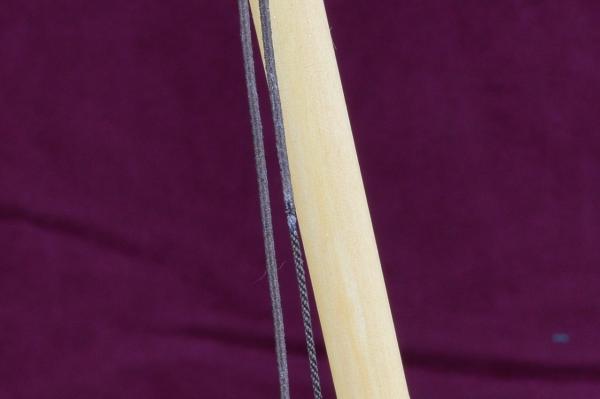
I have actually started on the rigging, finally! Not just messing around with serving and making a test shroud, but actually rigging! Started by attaching some blocks to the bow that will hook to the bowsprit when it's installed. I'm putting that off as long as possible, it's so long, and thin at the end that I'm afraid of breaking it while turning the model around to work on it. Unfortunately, there is very little I can do on the bowsprit itself before it's installed to the ship, so I moved to the main mast, which while it will be sticking up, it won't be sticking way outside of the hull to the front, so I think it's a lot safer to have in place for a long time, and it's also much thicker and tougher than the bowsprit. First thing was to figure out a way to make the shrouds all line up properly at the bottom where they will tie into the dead-eyes that were mounted in the channels earlier. I ended up using a thin piece of wood, and drilling holes into it to hold the upper dead-eyes with soft copper wire, so that I will be able to attach the shrouds to them while they are held in position. I made a line to align them vertically, and then held the shroud lines down in the position that they would run in order to orient them to be in a straight line when the shrouds and lanyards are all rigged. You can see the pencil lines I made by holding the shrouds in front as shown here. Then, started on actual rigging stuff. I made the backstay pendant. This goes around the top of the main mast before anything else, and has blocks at the ends which will attach to tackle on the rails near the ships wheel on either side. Next I made the first piece of rigging that will actually make the mast un-removable from here on out. It's officially part of the ship now. This is the Spreader Yard Horse. I have no idea why it's called a horse, but it is. I'm learning lots of new things about sailing ships by doing this. This thing actually acts as a secondary mast, and the lower yard (the spreader yard) attaches to this, not the mast. The reason is that the yard needs to be able to be lowered to the deck, and it if was attached directly to the mast, the parrel (the thing that holds it to the mast, err.. to the horse) would run into the main sail hoops that are around the main mast. I had to re-read the bit about this thing several times, and look at the rigging plans a bunch, before I finally understood what it did and why. In any case, it's the 2nd item that has to go around the top of the main mast, so it was installed next. Here it is in all it's glory, it's the rope running along the front of the mast. Top: The top mast will go into the spot in front of this, so it won't be able to slip off of the braces it's sitting on (the raised curved pieces on either side). Bottom from front and side: It's attached to the deck with little tiny dead-eyes, just like the shrouds will be attached to the channels later (next actually). And that's an update of probably 8 or so hours of ship-building. Strangely, when I'm focused on working on it, I don't really realize how much time is passing at all. I guess that means I enjoy this stuff! ps - For those who are curious about why I explain a lot of stuff, I write this for a non-ship building audience of general modelers as well, and I'm too lazy to re-write everything when I post it here. If I did it the other way around, and posted here, I'd have to re-write it for the other group, or they wouldn't understand half of it. I figure you guys can look past the over-explanation of what things are, and there might also be new people reading who actually appreciate it!


- 831 replies
-
- 18
-
-
- Armed Virginia Sloop
- Model Shipways
- (and 1 more)
-
Fantastic looking rigging Ken! I'm just now starting in on mine, which is not going to be nearly as involved as yours, having only a single mast and 1 square sail.
- 440 replies
-
- 2
-
-
- niagara
- model shipways
- (and 1 more)
-
Great looking planking job so far Mike!
- 452 replies
-
- 1
-
-
- cheerful
- Syren Ship Model Company
- (and 1 more)
-
ROYAL CAROLINE 1749 by Doris - 1:40 - CARD
GuntherMT replied to DORIS's topic in - Build logs for subjects built 1501 - 1750
Just caught up with this and finished going through all the photo's of your amazing Royal Caroline, Doris. All I can say is that I'm in complete awe. Your work is simply magnificent. Thank you for sharing this work of art with us.- 883 replies
-
- 6
-
-
- royal caroline
- ship of the line
- (and 1 more)
-
If you read back through my log at all you'll find that I did both of these things long ago. I can't even find the kit blocks and rigging line, so it might have *actually* been thrown away instead of just proverbially.
- 831 replies
-
- 4
-
-
- Armed Virginia Sloop
- Model Shipways
- (and 1 more)
-
Thanks Zoltan, I have that. I collected all kinds of documents like this in the early parts of the build, but I'm sure I'm missing something!
- 831 replies
-
- 3
-
-
- Armed Virginia Sloop
- Model Shipways
- (and 1 more)
-
Looks like a very nice kit, will enjoy watching it go together! From the photo, it looks like it has some nice instructions, hopefully that's true and it's not 1 paragraph per page in 8 different languages (like Constructo).
-
No idea, I haven't got any yet and have never used it. There is a blackening thread in the metal work subforum where it is discussed.
- 831 replies
-
- 1
-
-
- Armed Virginia Sloop
- Model Shipways
- (and 1 more)
-
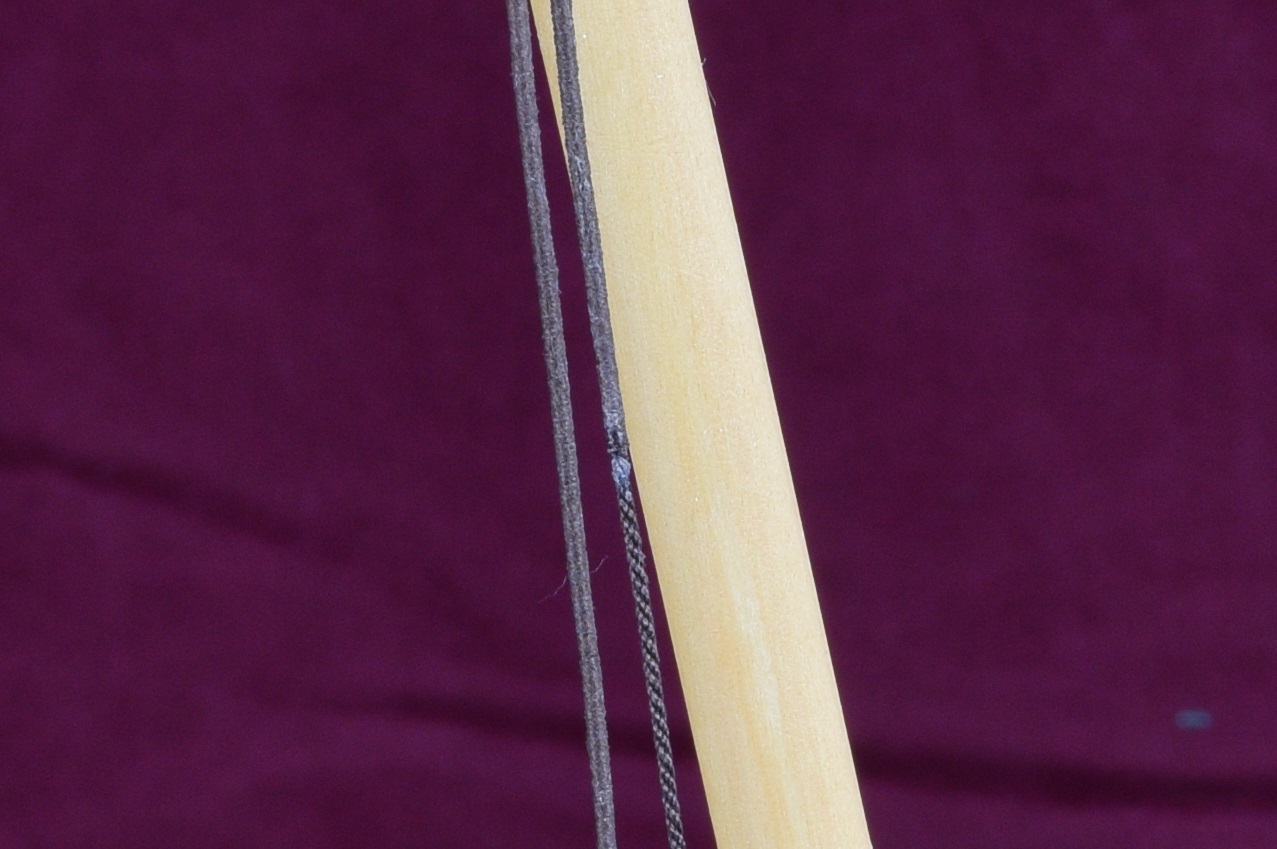
It's not very difficult if you have a serving machine. I wouldn't try without one though, although I've seen build logs of people who do this manually by fixing the rope in a pair of vices and then rotating a thread spool around it. No thanks! The shroud is Syren .035" line, and the thread is #50. The serving was done to protect the ropes from wear, so they are served where the rope might rub against something. The aft shroud could be chafed by the main sail, so it would be served for the entire length. The other shrouds don't have that risk, so were only served at the top where they went around the mast and over the trestle tree's. I may have carried the serving down a bit too far. I do, but Chuck's machine was cheap enough that I thought I would try it. I like the simplicity, while Domanoff's machine is pretty great too, and is motorized. Right now I have Domanoff's machine set up with the ends quite close together, with the bits for serving blocks, and am experimenting with it for that type of work. So really no great reason other than my compulsion to collect neat tools!
- 831 replies
-
- 6
-
-
- Armed Virginia Sloop
- Model Shipways
- (and 1 more)
-
I got Chuck's Serv-o-matic a while back, and last night I began the assembly. Lots of sanding of laser char. The parts fit pretty much perfectly, just lots of sanding! Also finished the stand, got it stained and a coat of poly on it. For some reason the lighting in this shot makes the horizontal pieces almost glow gold. Doesn't look like that to the eye. Odd. Tonight I put Chuck's machine to work, and served the first set of shrouds. There isn't any real tension on it in these pictures, just a couple binder clamps to keep them sort of in the right position (not clamped to anything, just laying on the table top). And a shot of the forward shroud where it transitions to non-served. The aft shroud of this pair (the rear-most shroud) is fully served all the way down.

- 831 replies
-
- 23
-
-
- Armed Virginia Sloop
- Model Shipways
- (and 1 more)