-
Posts
1,569 -
Joined
-
Last visited
Content Type
Profiles
Forums
Gallery
Events
Everything posted by Ryland Craze
-
You are doing a fine job building this Picket boat. I am enjoying following your build log.
- 54 replies
-
- picket boat
- model shipways
-
(and 1 more)
Tagged with:
-
I would finish fairing the last bit of the transom where the laser char is, especially at the top of the transom where the "ears" are. It appears that the aft portion of that area needs more taken off near the ear. It may be the photo, but the transom edges look somewhat flat instead of angled. You have done a good job on the fairing and it looks like you have reinforced the bulkhead tabs nicely. This definitely helped keeping the bulkheads from splitting. I can tell this is going to turn out to be a nice build.
- 217 replies
-
- medway longboat
- Syren Ship Model Company
-
(and 1 more)
Tagged with:
-
Welcome to Model Ship World. You did a good job on building your Longboat. I am looking forward to see your build of your Lady Nelson.
-

I finally took the plunge.
Ryland Craze replied to florida_troll (James)'s topic in New member Introductions
Welcome to Model Ship World. As Michael said, please start a build log of your dingy. We all like to see the work of others. -
Your build looks nice. You are making good progress. Your work area looks very clean and organized.
- 137 replies
-
- winchelsea
- Syren Ship Model Company
-
(and 1 more)
Tagged with:
-
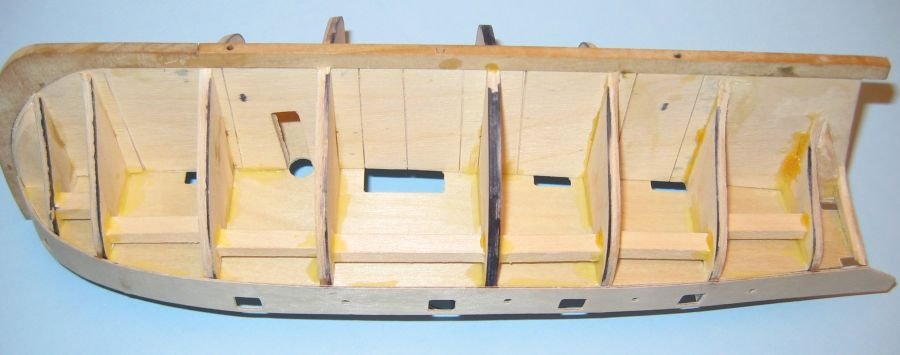
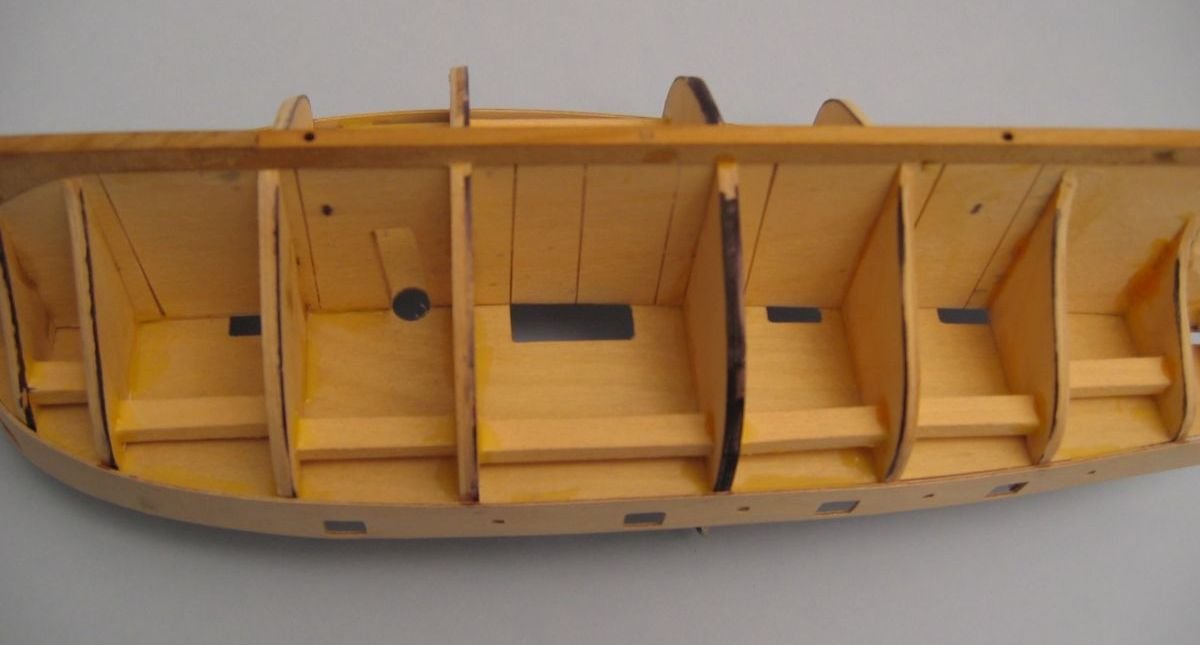
I did not completely fill in the space between the bulkheads, I planked over what you see in the picture. I did not varnish any of the wood. I believe it is the lighting that makes it darker. Here is another picture where I used more lighting: Notice that I used a black felt tip marker on the outer edges of the bulkheads. This let me know that when I faired the bulkheads, as long as I had some black remaining on the edge of the bulkhead, I knew that I had not over faired them.
-
I made vertical cuts using a razor saw on the first layer of the plywood false keel to make it more flexible. I then put it in a jig to hold the false keel straight. After I installed the bulkheads, I placed wooden fillers between the bulkheads to make the assembly rigid. Once the false deck and the gunport patterns were installed, I had no problems with warpage. I have attached a picture showing what I did to the false keel.
-
Welcome to Model Ship World. It looks like you are off to a good start in this hobby. I look forward to seeing your progress on your ship model.
-
Like Bob, I also "start in the middle and fair the frames towards the bow and then the middle to the stern or visa versa but start in the middle". I use nail files that I purchased from a beauty supply store. They are somewhat flexible and contour to the frames. I have also made my own using 1/8" plywood, rubber cement and various grits of sandpaper. I start with the 180 grit and finish up with 240 grit for the frames. I use nail files for most of my sanding needs. Just go slow and use gentle pressure as you do not want to flex the frames. Let the grit in the files do the work.
- 217 replies
-
- medway longboat
- Syren Ship Model Company
-
(and 1 more)
Tagged with:
-
Beautiful job on your Pinnace. Your work is very crisp and clean. I like the modifications you made to the kit version.
- 77 replies
-
- model shipways
- pinnace
-
(and 1 more)
Tagged with:
-
Looking good Bob. You are almost at the finish line. I hope to post my progress soon.
- 170 replies
-
- medway longboat
- Syren Ship Model Company
-
(and 1 more)
Tagged with:
-
I used Titebond. I placed my support blocks aft of the transom to lock it in place. Just remember that you have to remove the support blocks aft of the transom before you remove the keel and frame assembly after faring from the build board.
- 217 replies
-
- medway longboat
- Syren Ship Model Company
-
(and 1 more)
Tagged with:
-
I am enjoying your build log. You are making good progress. I hope you and your family stay safe.
- 108 replies
-
- armed virginia sloop
- model shipways
-
(and 1 more)
Tagged with:
-
Thanks Peta for the how-to guide on making rope coils. I will refer to this when I get to making rope coils on my build. Your Avos is looking great.
- 315 replies
-
- master korabel
- avos
-
(and 1 more)
Tagged with:
-
Nice job on the head. It reminds me of the original one that I saw at Mystic Seaport when they were refurbishing the Morgan.
- 294 replies
-
- charles w morgan
- model shipways
-
(and 1 more)
Tagged with:
-

Hi to all from Tijuana MX.
Ryland Craze replied to Sergio Camacho's topic in New member Introductions
Welcome to MSW Sergio. I am looking forward to seeing your Titanic model. -
Looks real good Michael. I cannot wait to see it with the WOP on it. It will really bring out the beauty of the Cherry wood. Glad to see you have some time to work on this project as I know you must have some huge challenges at work. You guys are my hero's during this crisis and I appreciate all that you are doing for the public. Just be careful and stay well.
- 221 replies
-
- queen anne barge
- Syren Ship Model Company
-
(and 1 more)
Tagged with:
-
Congratulations on your rigging and iron work. Your Longboat is coming along nicely. I appreciate your detailed pictures as I will be referring to them while building my Longboat.
- 170 replies
-
- medway longboat
- Syren Ship Model Company
-
(and 1 more)
Tagged with:
-
Diver, you are off to a good start. I agree with Chuck in that you need more frames installed on both ends of the build board. I would complete all of the frames and install them onto your build board. The you can start tweeking the frames to get them to set properly in the keel slots. I used blue painter's tape to hold the frames to the build board as there is some slight side to side adjustment built into the frame slot. The design of this kit almost insures that everything will fit just fine.
- 217 replies
-
- medway longboat
- Syren Ship Model Company
-
(and 1 more)
Tagged with:
-
Sounds like the frame is not setting in the slots properly. 3/16ths of an inch is quite a difference. Is there a gap between frame H and the build board when it is inserted with the letter forward? Posting a picture would help to figure out why this is happening.
- 217 replies
-
- medway longboat
- Syren Ship Model Company
-
(and 1 more)
Tagged with:
-
Nice models. Welcome to MSW. I look forward to seeing your AVS build log.
-
Nice work on the carvings. Glad you are able to get back into your workshop after your surgery.
- 103 replies
-
- queen anne barge
- Syren Ship Model Company
-
(and 1 more)
Tagged with:
About us
Modelshipworld - Advancing Ship Modeling through Research
SSL Secured
Your security is important for us so this Website is SSL-Secured
NRG Mailing Address
Nautical Research Guild
237 South Lincoln Street
Westmont IL, 60559-1917
Model Ship World ® and the MSW logo are Registered Trademarks, and belong to the Nautical Research Guild (United States Patent and Trademark Office: No. 6,929,264 & No. 6,929,274, registered Dec. 20, 2022)
Helpful Links
About the NRG
If you enjoy building ship models that are historically accurate as well as beautiful, then The Nautical Research Guild (NRG) is just right for you.
The Guild is a non-profit educational organization whose mission is to “Advance Ship Modeling Through Research”. We provide support to our members in their efforts to raise the quality of their model ships.
The Nautical Research Guild has published our world-renowned quarterly magazine, The Nautical Research Journal, since 1955. The pages of the Journal are full of articles by accomplished ship modelers who show you how they create those exquisite details on their models, and by maritime historians who show you the correct details to build. The Journal is available in both print and digital editions. Go to the NRG web site (www.thenrg.org) to download a complimentary digital copy of the Journal. The NRG also publishes plan sets, books and compilations of back issues of the Journal and the former Ships in Scale and Model Ship Builder magazines.


