
MORE HANDBOOKS ARE ON THEIR WAY! We will let you know when they get here.
×


NMBROOK
-
Posts
2,305 -
Joined
-
Last visited
Content Type
Profiles
Forums
Gallery
Events
Everything posted by NMBROOK
-
 Stunning work mate I think you will have no problems with the ratlines other than the fact it is so time consuming.You started the rigging with much trepidation but your abilities are shining through Kind Regards Nigel
 -
HMS Victory by JPett - Corel - 1:98
NMBROOK replied to JPett's topic in - Kit build logs for subjects built from 1751 - 1800
Looking good JPett I am following along in the background I wouldn't be overly worried about getting the plank run bang on,it is always preferable to have a little miss match between planking layers for strength reasons.Spiling the second layer in this area is a good idea and you can alleviate the need for any stealers.When you come to buy the walnut sheet,I do advise you either take with you,or mail an offcut to your supplier.Walnut can vary massively in colour. Kind Regards Nigel -
I would go for the first mate,but I am biased Kind Regards Nigel
- 1,319 replies
-
- 1
-

-
- caldercraft
- Victory
- (and 1 more)
-
I think you may have misunderstood.The first planking only wants to be thinned right down where it touches the sternpost.I am referring to the area directly below the counter,not further down where the ply false keel is.If you like,I can post a sketch tomorrow,I am off to bed shortly as I am at work tomorrow morning. Kind Regards Nigel
-
ancre La Salamandre by tadheus - 1:24
NMBROOK replied to tadheus's topic in - Build logs for subjects built 1751 - 1800
Fabulous work Tadeus I love the precision and consistency of the nailing.Incidentally,I do follow the builds on the Koga forum,there are many very talented builders on there. Kind Regards Nigel -
Hi again JPett This is one of those things that is hard to put into words Ok,run the first planking completely over your filler pieces and then feather and reduce the thickness of it after it is completed.You want to be aiming for full thickness when the planking meets the filler,tapering to nothing where it meets the sternpost.If you are in anyway concerned to the plankings thickness where your filler meets the last bulkhead,you could add a filler block on the otherside.You don't have to fill this 'bay' completely,just 20mm or so for added insurance. You are correct in your understanding of how Corel perceived the planking is intended to be carried out.The best illustration of this,is just look at Panart's 'catalogue' pics of the San Felipe.Google images should show a few.The manufacturers intention is that the builder should notch the planking for the rudder hardware. You are right in that the section you remove for the new stern post should stop at the horizontal rabbet on the keel.You can cut this out,a rotary tool with a sanding drum is the easiest way and then square the ends with a sharp knife and file.Alternatively as you may cover the keel with veneer,you could cut this piece out right to the bottom,fit a stern post the full height and then notch at the bottom of the hull planking to allow the veneer to run across the posts base.This would create the 'illusion' of the correct joint. Nothing about this area is straightforward,which is why myself and a few other builders on here choose to remove the keel,sternpost and prow completely and replace with solid wood.It may look daunting at first,but it is actually a lot easier than trying to make the kit's false keel more authentic.You can get away with an awful lot if the hull is painted or coppered,but if you prefer a natural wood finish,there is a lot of preparation involved to get a good result. You are off to a good start anyway by asking these questions and not being desperate to start laying planks Kind Regards Nigel
-
Hi JPett This design is common amongst many Italian kits.They are designed so the first planking is feathered out at the bearding line.The second planking is then clad on top and cut short to create what appears to be a stern post.The exposed ply forms the sternpost and there is a step where the second planking ends.You can rebate the plywood to take the second planking,but if it were me,I would find it easier to cut away what is the sternpost,reduce the thickness of the ply and fair everything.You can then apply the second planking and trim along what would be the vertical rabbet at the sternpost.The sternpost can then be replaced with a solid piece of walnut in your case. Round tuck sterns and double planking is always a bit of a 'fudge'.When you have fillers behind,I would not be concerned about sanding completely through the first planking to the block behind.I have done this on many occasion to get the correct line as the planks curl around to meet counter and sternpost. Kind regards Nigel
-
Thank you very much indeed Tom Pear is a joy to work with.I have steamed it,but find a quick soak in water is enough for all but the tightest of bends.It does have a good degree of natural bendability pretty similar to boxwood but it is much more absorbent so steaming or soaking is a much quicker process. Kind regards Nigel
-
Hi Boyd I have found tamiya dark iron to give a very satisfactory alternative finish to chemical treatments,dry brushing with silver adds to the effect.Prior spraying with tamiya primer is advisable.If leaving the brass natural,I would give it a spray with a satin or matt varnish,I think gloss can look too much at smaller scales. Kind regards Nigel
-
Gosh,thank you very much indeed everyone for your kind comments Ebony treenails is an interesting thought Bill.The only issue would be the short grain structure,I think it would not work too well in a drawplate,but I maybe wrong.Boring treenails with the hypodermic needle technique may just well work.Marsalv illustrates this technique in his new scratchbuild log if you are unfamiliar with it No flash used Ferit,so it can't be that Kind Regards Nigel
-
Thank you very much indeed Nick Kind Regards Nigel
-
Thanks Brian,I did take a chance on the variation of tones.On Caroline,I batched the Pear into two shades,one for above and one for below the wales.Doing this resulted in an enormous amount of waste,so I decided to let the 'quirks' of the pear show and I am pleased with the result. Kind Regards Nigel
-
My wife did suggest it maybe due to the red blind in the background,elsewhere it wasn't so red but there were shadows everywhere Roll on some decent natural light buddy Kind Regards Nigel
-
Thanks mate! The photos don't really do the colours justice I just wanted some pics of this stage as the next update will be too far along otherwise. Favourite,mmm,probably not because each are different in their own way.The one that has drawn me in the most is probably Royal William,but I am deliberately holding back as I want the others to move along at a faster pace Kind Regards Nigel
-
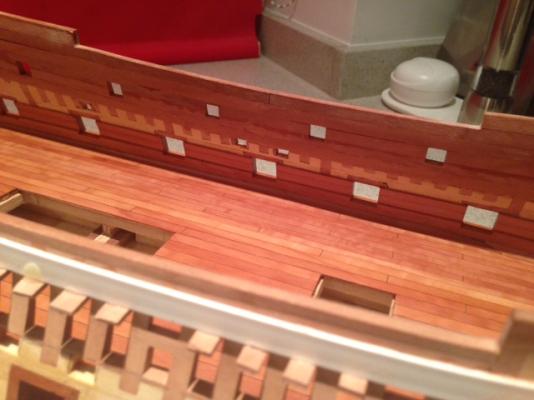
I thought it was about time for an update as the last one was several months ago . I have fitted the waterway and quickwork to the other internal hull face and completed the planking of the deck.I am currently completing the exposed frame finishing pieces and working on the deck finish.I anticipate many coats of poly rubbed down every three coats.This gives a glass like surface as whilst I wish to see joints in the woodwork,I don't want to be able to feel them. I feel these pictures may be a little on the red side.The pear is definitely brown with no hint of red,trouble is outdoor daylight pics are hard to come by as its dark when at home during the week and we have had some awful weather on the weekends Kind Regards Nigel
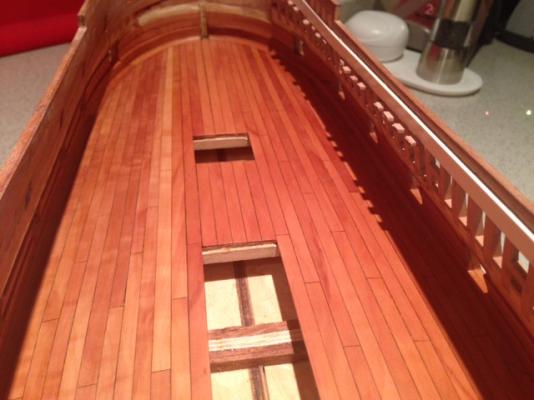
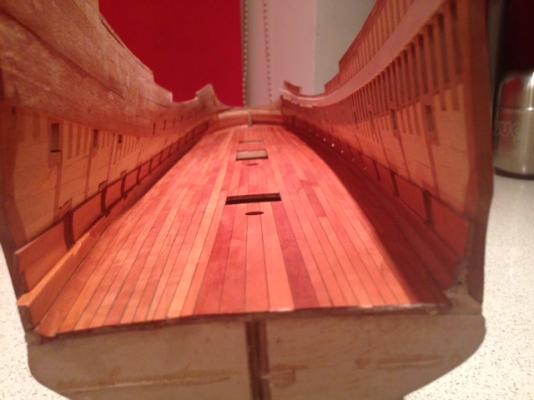
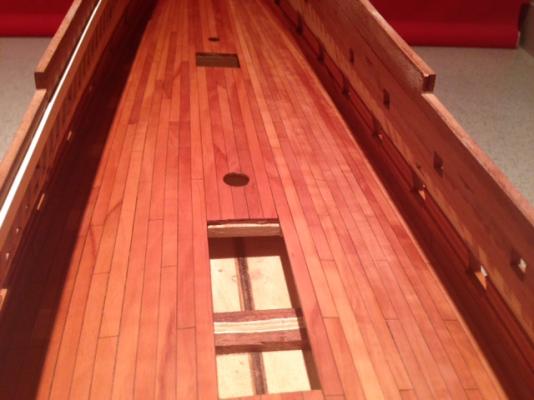
-
Thank you very much indeed Johann I do hope to resume work on her over the Christmas holiday period Kind Regards Nigel
-
Outstanding build Johann Your fastidiously clean metalwork really brings the model to life Kind Regards Nigel
-
drill press/mill decision
NMBROOK replied to peewee's topic in Modeling tools and Workshop Equipment
I think the easiest solution for the MF70 would be to remove the handle from the handwheel and fit it to a larger disc.Then glue the disc to the handwheel.However,having machined pieces recently that overhang the table,whilst they may be enough clearance,it would be nigh on impossible to turn a larger diameter handwheel in this instance.I struggled with the standard setup.The only other option would be to pack the workpiece up,but then you reduce the height capacity. Kind Regards Nigel -
Looking good Tom I assume you are following Dr Mike's lead with lining the ports.The only downside is you end up doing the job twice.I can understand this on Rivoli though as he ran the black stripes (ebony?) around the port linings.Do you propose to use thin Veneer planks as he does,or go for something a little thicker? Kind Regards Nigel
-
drill press/mill decision
NMBROOK replied to peewee's topic in Modeling tools and Workshop Equipment
If contemplating CNC control for your MF70,check out this German company,offering conversion kits and also lots of other parts for this miller. http://www.usovo.de/shop/CNC-Machines-accessories/CNC-Conversion-kits-Proxxon/Conversion-kit-for-Proxxon-MF70-into-MF70-CNC::274.html?language=en&MODsid=7ftmjahdc2u9hv1rue00e2tbq3 Kind Regards Nigel -
Thank you very much indeed Tom You are most welcome to follow along. Kind Regards Nigel
-
Looking good Tom How did you find the match up of the two halves after gluing up?There are a lot of joints stacked together,I just wondered whether they may distort slightly due to the glue shrinkage. Kind Regards Nigel
-
Congratulations Jan and good to see you recommencing work on your Caroline Kind Regards Nigel
-
MONTANES by Garward - OcCre
NMBROOK replied to Garward's topic in - Kit build logs for subjects built from 1751 - 1800
Congratulations Garward,I was actually revisiting your Montanes log last night and did wonder whether you had plans to rig the model.A very well deserved award for a very fine model. Kind Regards Nigel


