Cathead
-
Posts
3,538 -
Joined
-
Last visited
Content Type
Profiles
Forums
Gallery
Events
Everything posted by Cathead
-
 Mark, I believe the problem is that known hulls show no signs of ever having had figureheads, removable or otherwise (Steven can correct me if I'm wrong). If there was a clear socket for one, or a clearly hacked-off stempost, we might at least confirm that we were used. But as I understand it they're only known at all from literature and later artistic renderings.
 -
Have fun! I’m near the end of the larger version of this, took me over a year rather than the few months I expected, but much of that was my own fault. I had some trouble with various aspects of mine but the smaller version may be easier. Looking forward to what you do with it!
-
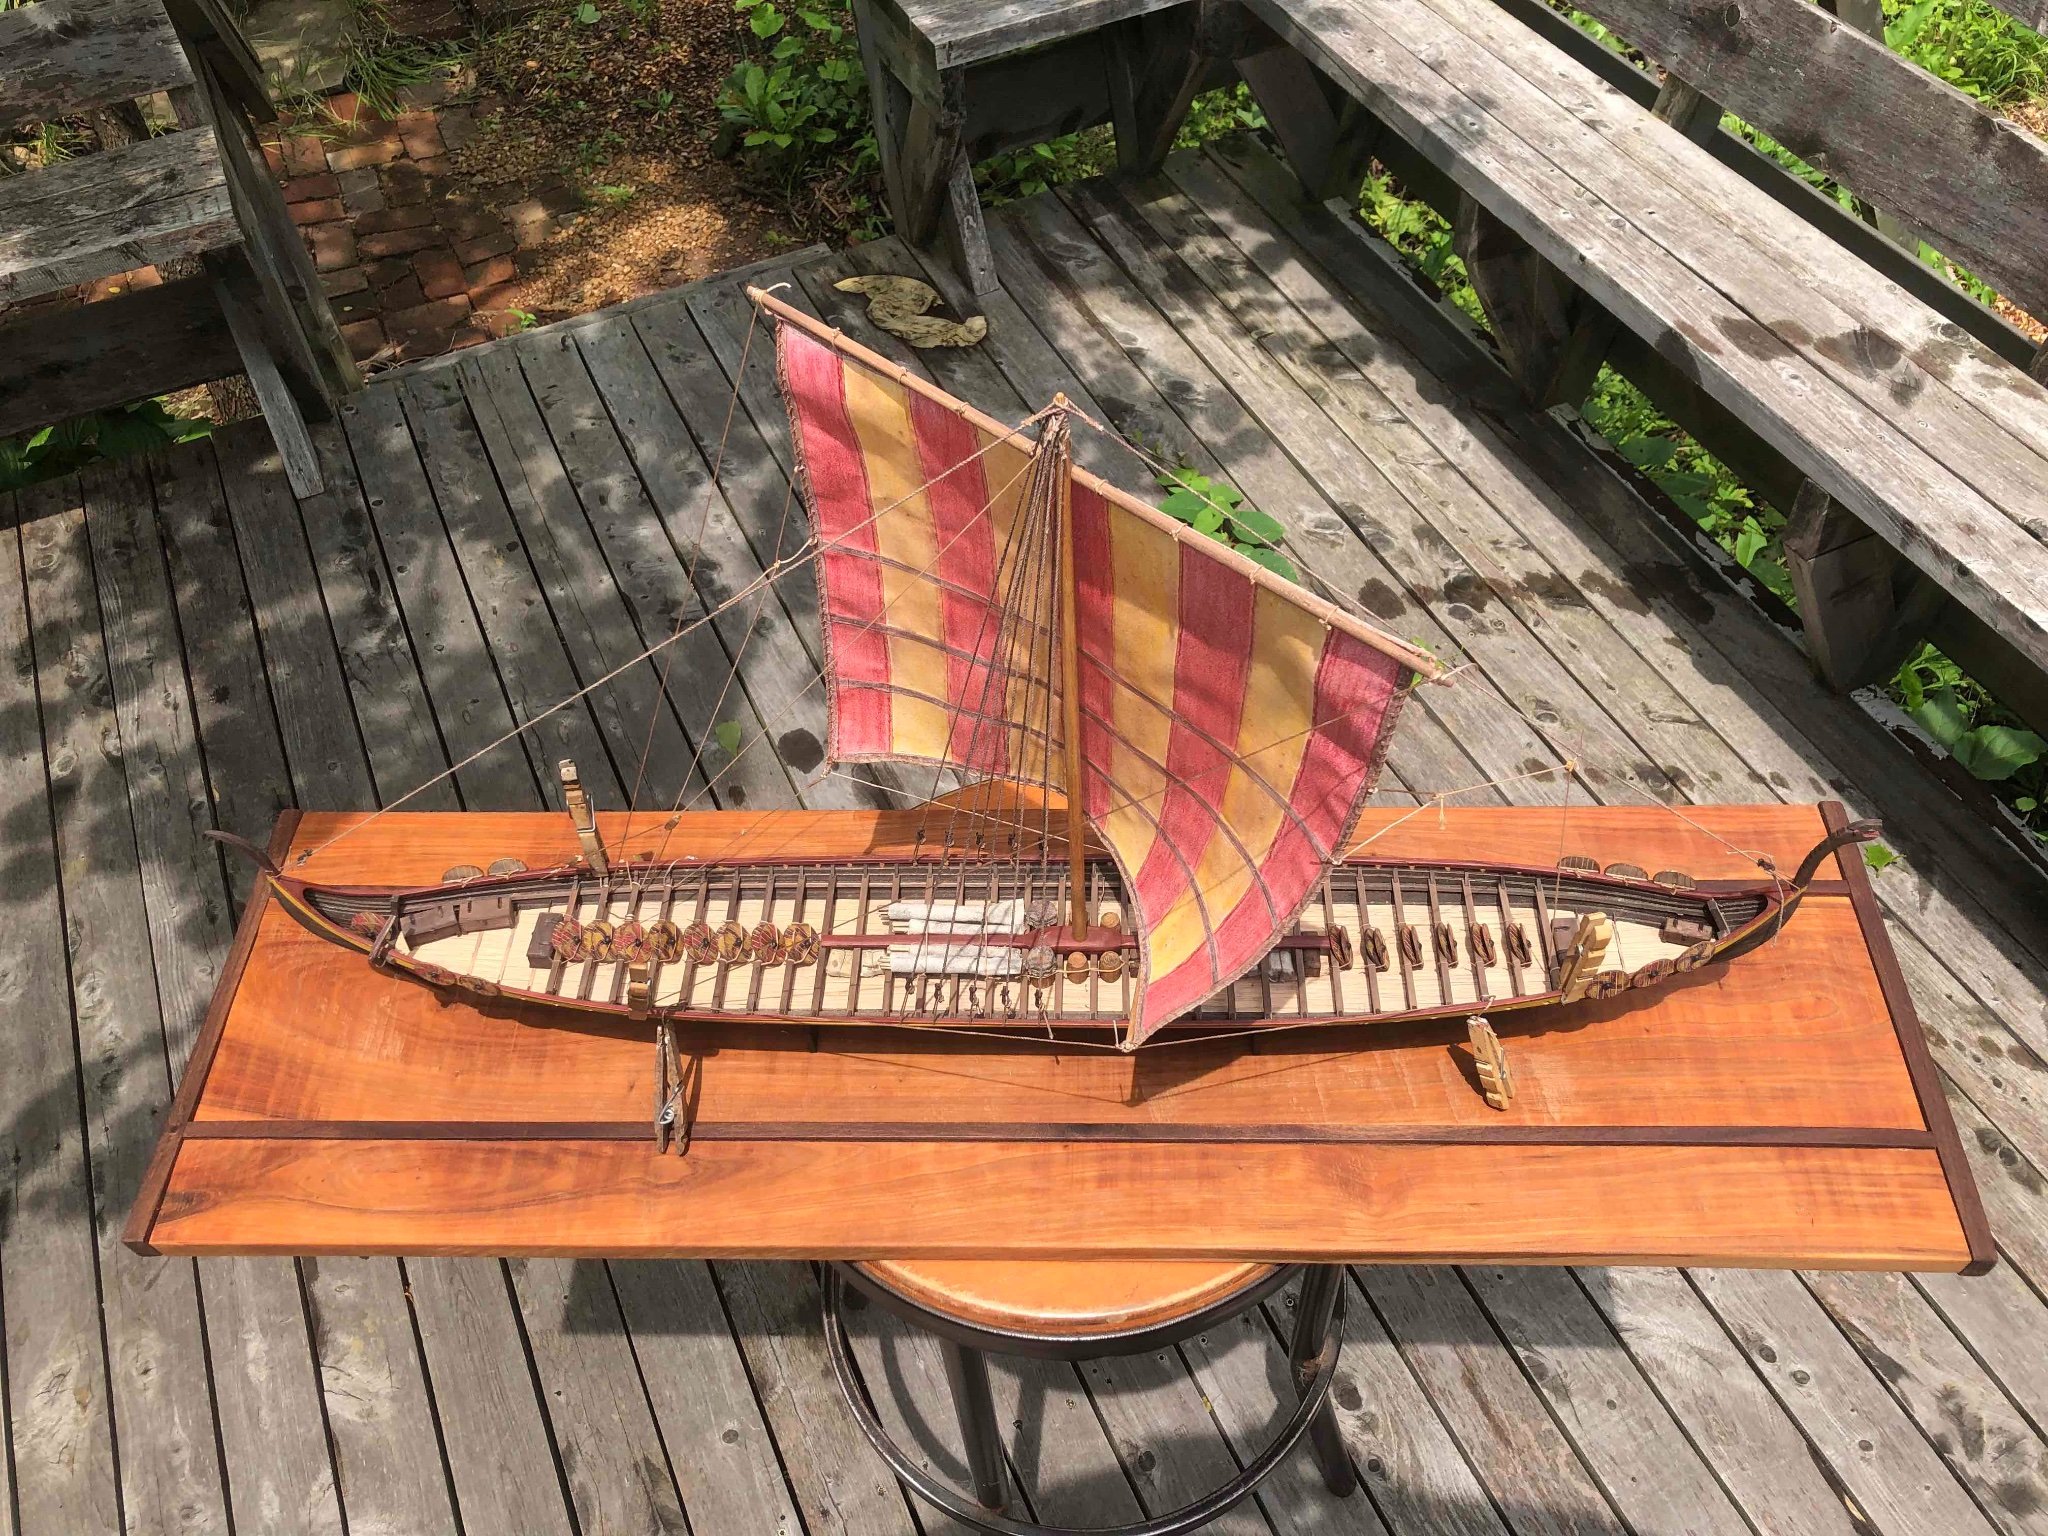
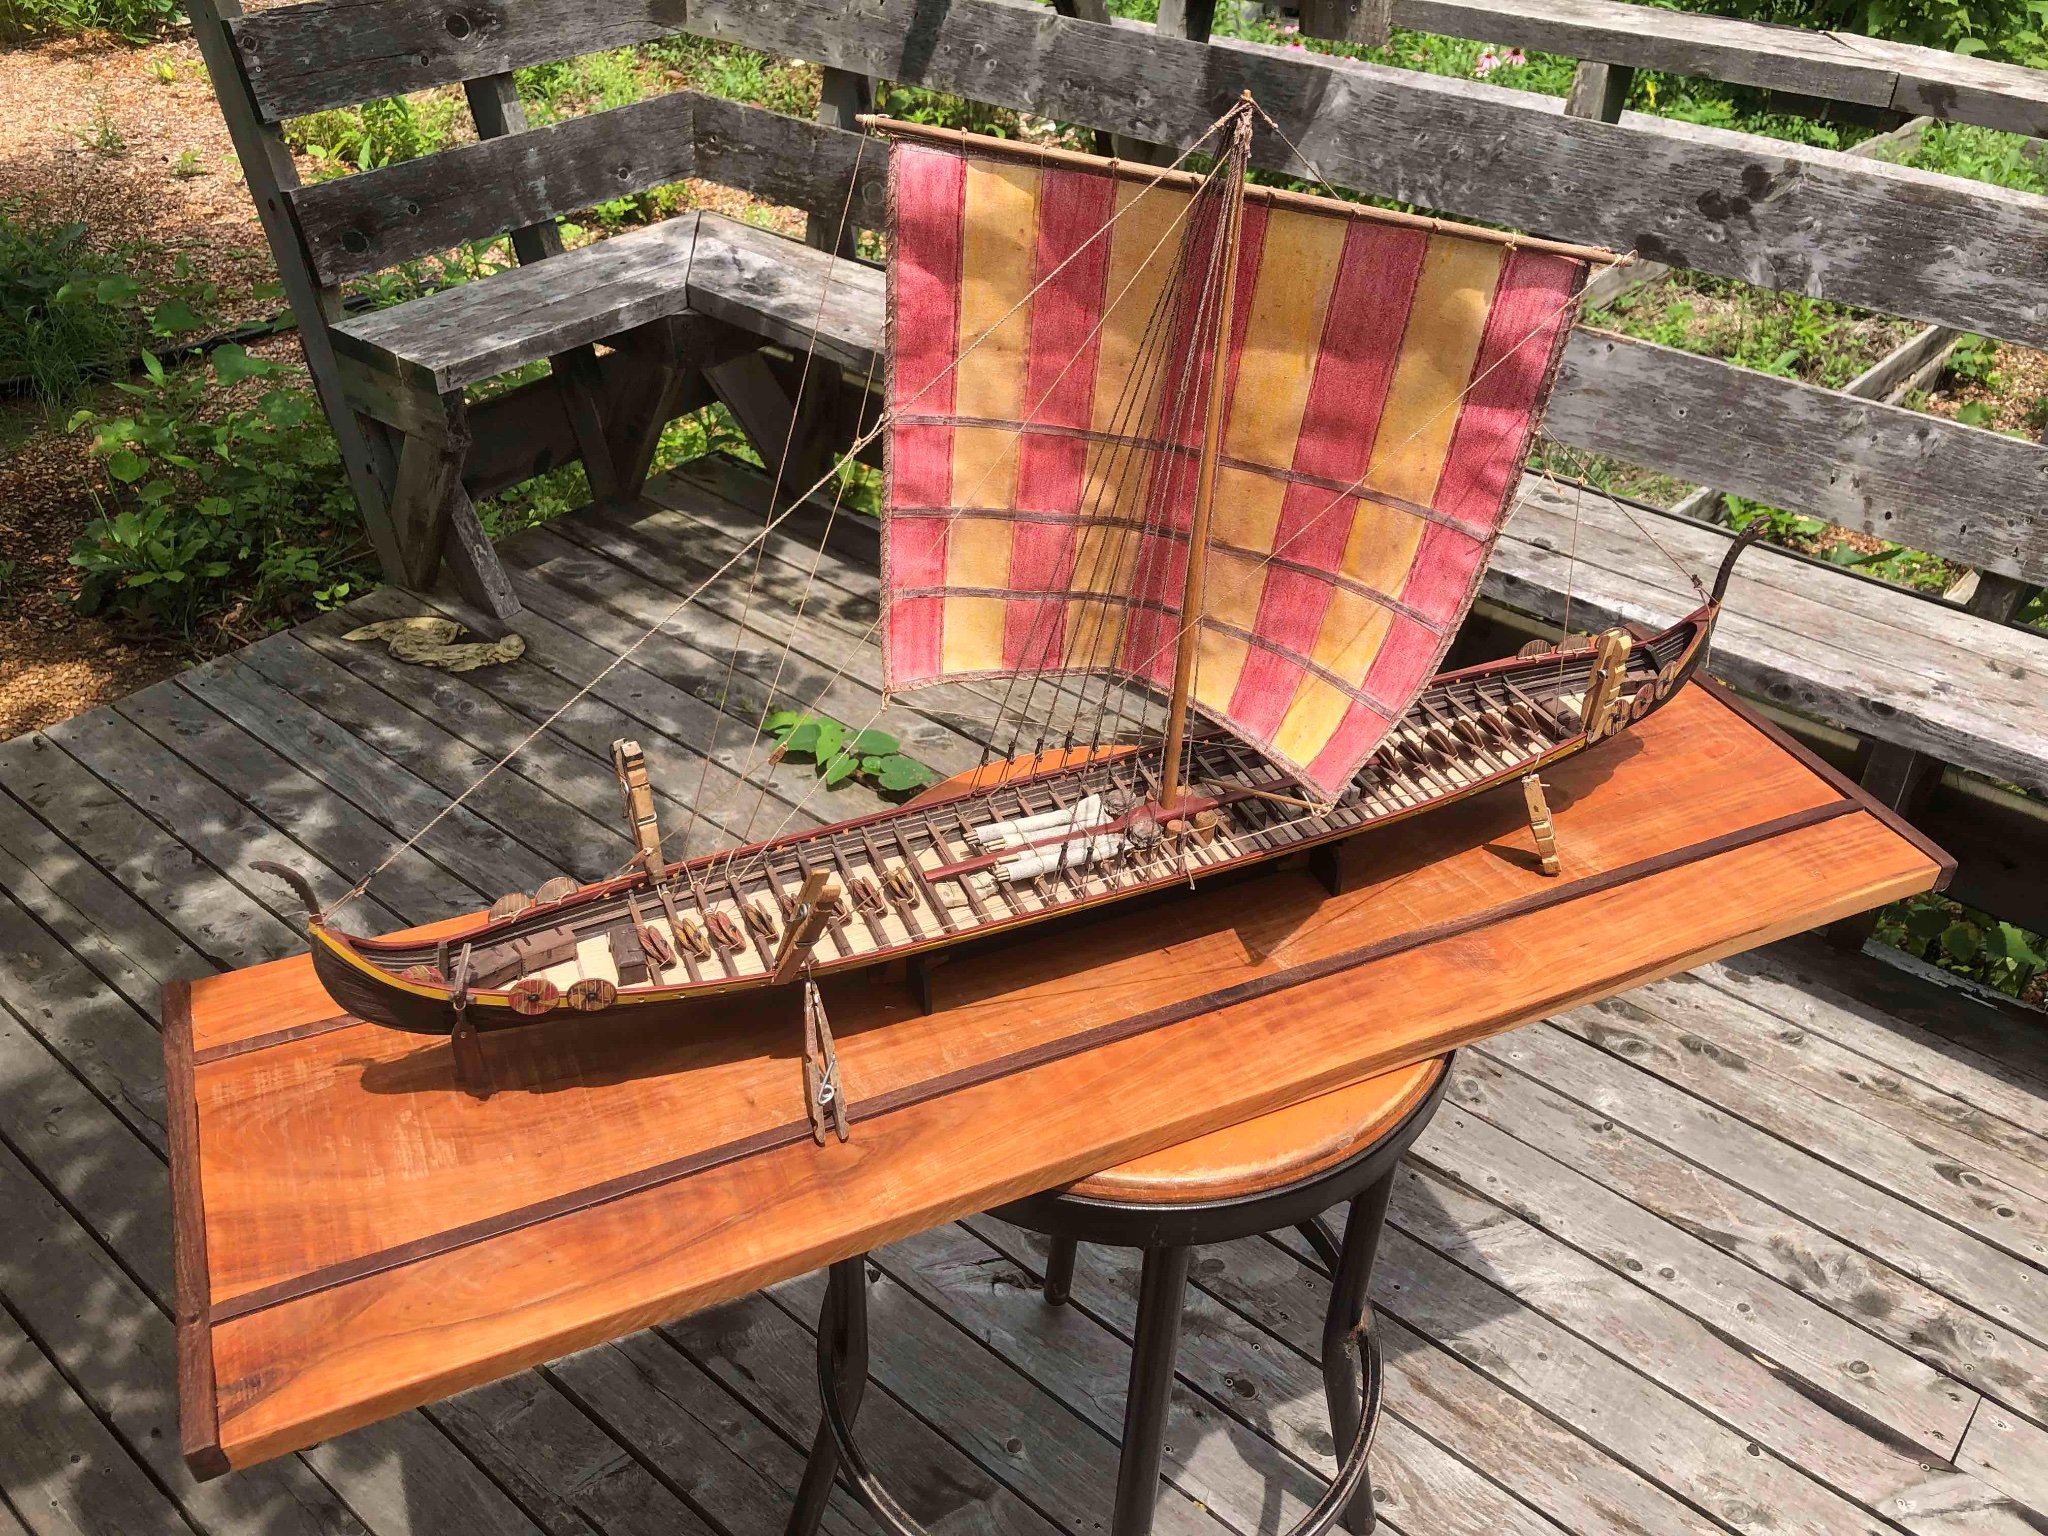
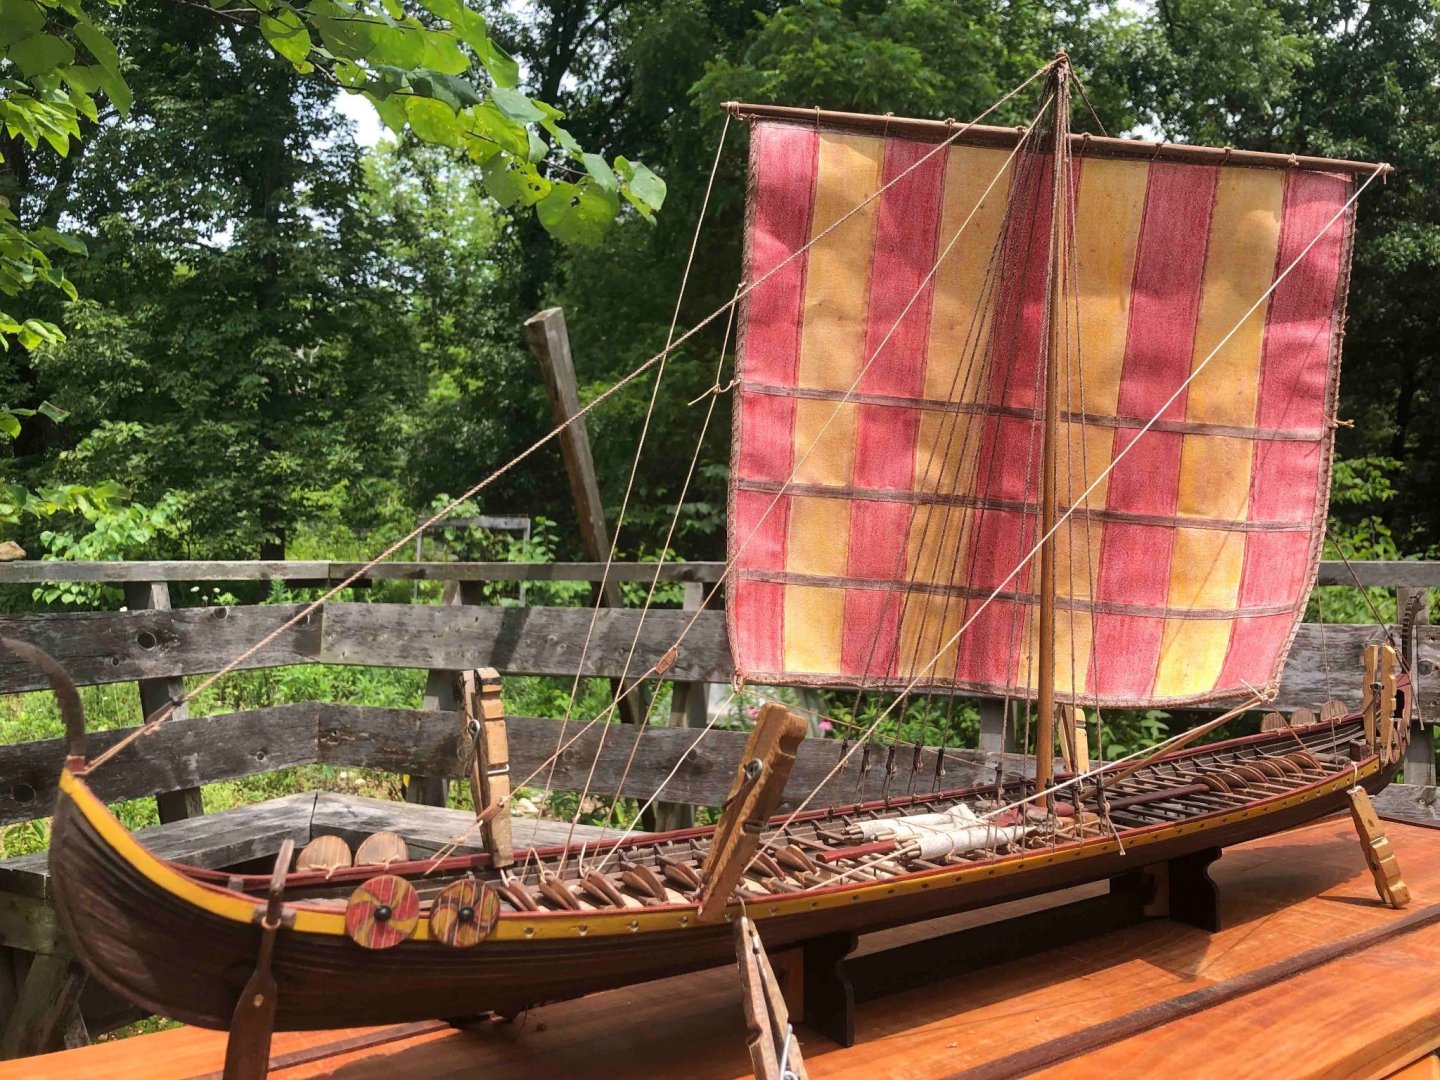
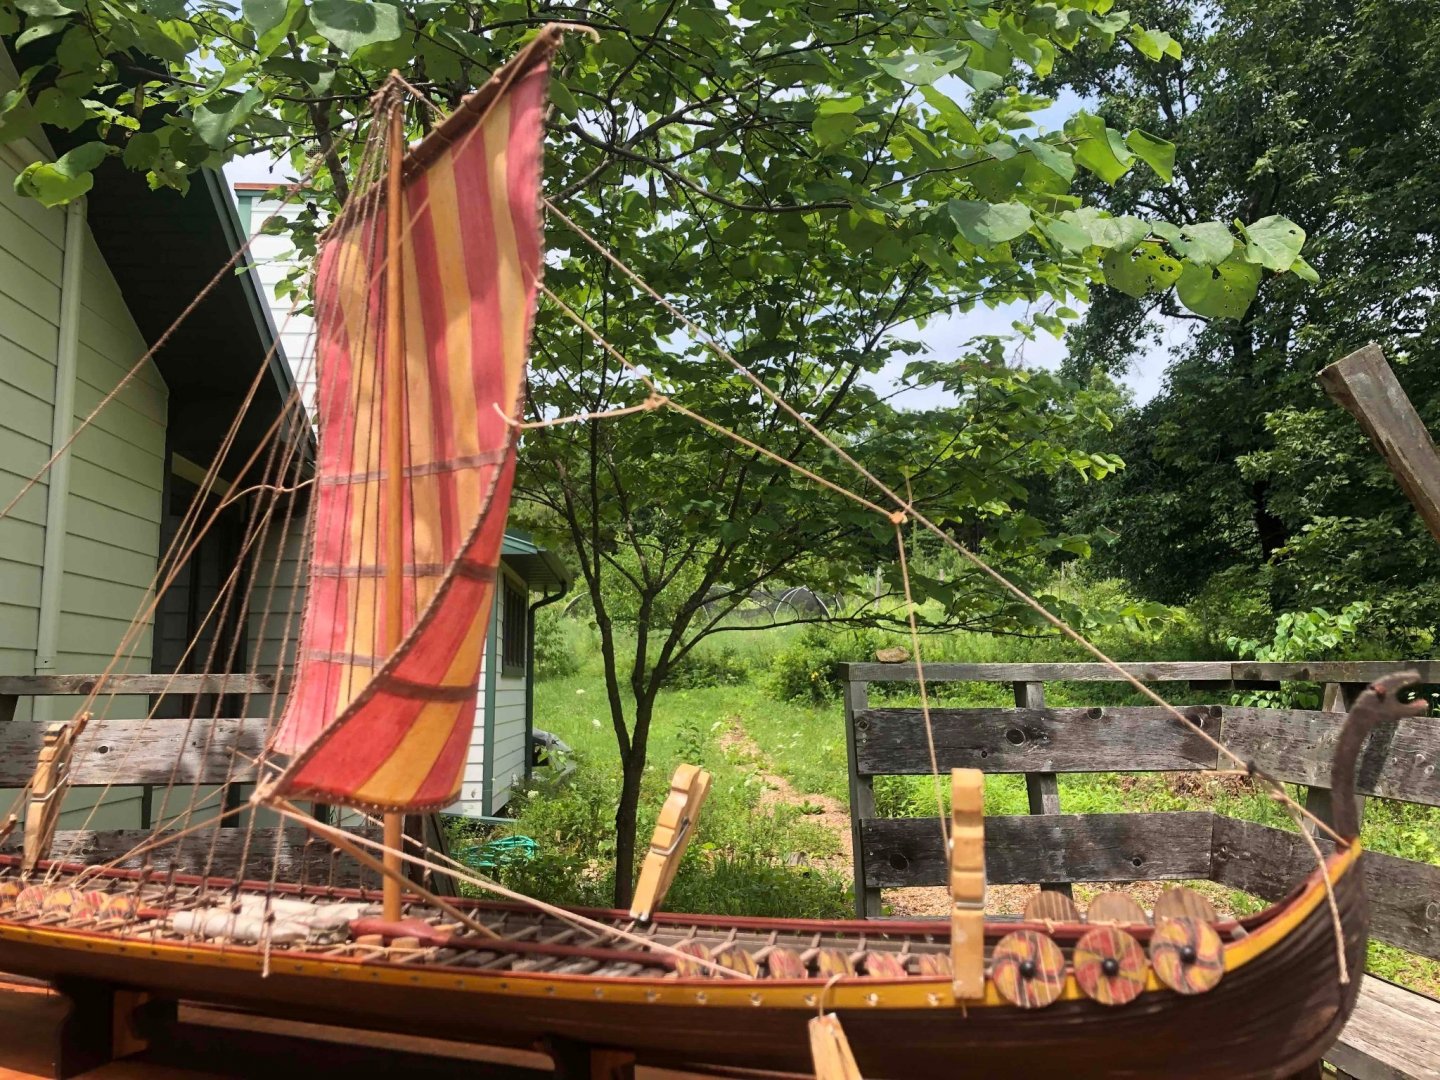
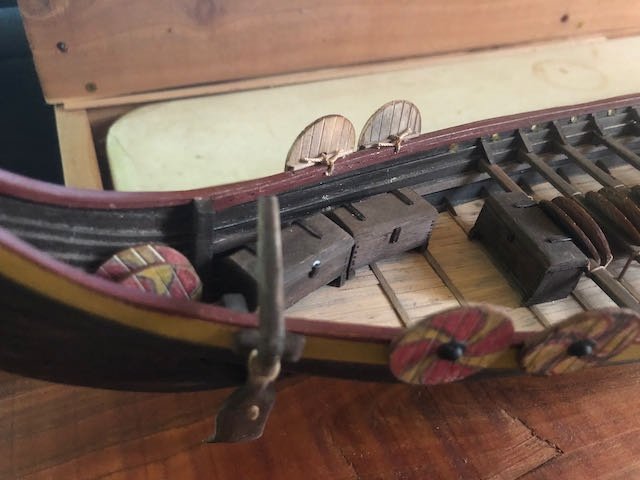
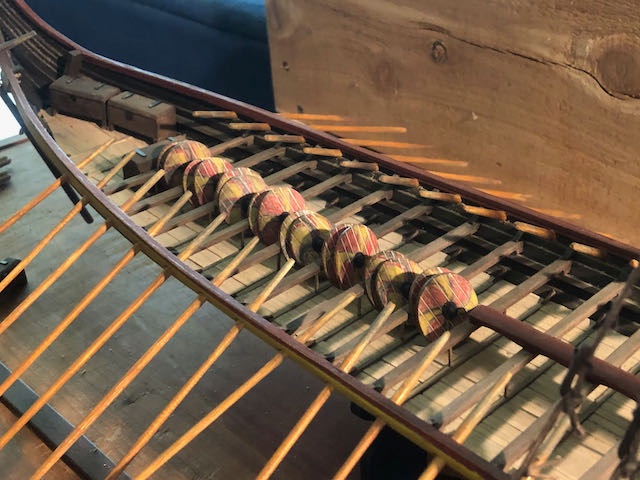
Finished the rigging, which wasn't overly complicated. I just followed the kit's instructions. There's probably a more complex and accurate way to do it, and I temporarily studied some photos of the reproduction, but had a really hard time following the lines. What's shown here at least makes basic operational sense to me. Note the beitass holding the windward corner of the sail (the pole wedged into the leeward hull and extending up to the sail). Balaclutha75's drakkar log has some good discussion and imagery of how this might have functioned, especially the lovely National Geographic artwork linked in this post. That image also shows a few shields lashed along the bow gunwale, forward of the oars, just like I decided to do. Don't know if that's coincidental or if I subconsciously remembered that when working out my shield arrangement. It also shows shields stashed below the deck, which I can always used as an excuse for my missing 20 shields, even though I dismissed that as an overall solution earlier. Nothing is glued in yet (hence the clamps in the photos below), so I'm curious if anyone has specific arguments for how/why I should change anything (within reason). You'll also notice that I installed my figureheads. I realize these are still somewhat controversial as literary and archeological sources don't line up. But as someone who loves the Icelandic sagas and other literature from the period, I'm fine with hinting at that style of ship-building. Artist's license. Looks like I got the focus a bit off on this last one, but don't feel like retaking it as the ship is already back inside. It gets the point across regarding rigging setup. Once I'm comfortable with the rigging, all I have to do is add the oars back in and I'm done. Then it's time for some proper photography. Please let me know what you think of this rigging setup (especially if you think any changes should be made), so I can move toward completion! Thanks so much.


-
I've never used pins myself but I'd have to assume the idea is to draw them again once the glue dries. Or you could use a pair of flush cutters to nip off the heads, leaving the shaft of the pin in for strength.
- 109 replies
-
- 1
-

-
- Finished
- Artesania Latina
- (and 1 more)
-
Honestly, the sort of high-end machinery shown there is primarily used in managed tree plantations. It only really works with high-density uniform stands, not the sort of gnarly, diverse stands you get in "natural" woods, and these are usually replanted. Globally, deforestation (as in the permanent removal of natural trees) is driven by more brute-force methods (chainsaws, bulldozers, etc.) in places that can't afford the sort of machinery shown in the video. Tree farms like that still aren't great, because they lead to major soil, biodiversity, and habitat loss, as well as often using copious amounts of helicopter-applied herbicide to suppress unwanted regrowth until the next round of farmed seedlings are planted. But they aren't really "deforestation" once their cycle gets started. For example, here in Missouri, it's common to see woods being bulldozed to make room for more corn planting (the government pays for corn, not for trees). Acres at a time just bulldozed into a huge pile, burned, most of the topsoil stripped off to get rid of the stumps, then plowed for crops. But that's just dudes with bulldozers and matches. Same thing happens in the Amazon at a much larger scale.
-
Well done!
-
That's one brave & skilled pilot operating that thing so close to power lines.
-
Seems like you'll have a result to be proud of.
-
Very cool model. I particularly like the consistent and muted color palette that ties the whole thing together, and the extra thought and detail you put into making it your own. Thanks for sharing and inspiring me to reach higher in my own work.
-
If you're referring to what I think you are, there are no standard measurements, as the idea is to make a jig that matches the curve your hull needs. So you'd need to either trace the curve of the hull or take if off plans (if your kit has them), then use that trace as a template to make your own jig. It doesn't have to be exact, the idea is just to get most of the curve set in the wood before it goes on the model. So, for example, you could hold a piece of paper against the hull where the plank needs to be, then use a pencil to make a rubbing following the approximate curve needed, then use that to drill a series of holes for pegs that would hold a plank in that curve. Does that make sense? Or am I misunderstanding you?
- 62 replies
-
- 1
-
-
- amati
- greek bireme
- (and 1 more)
-
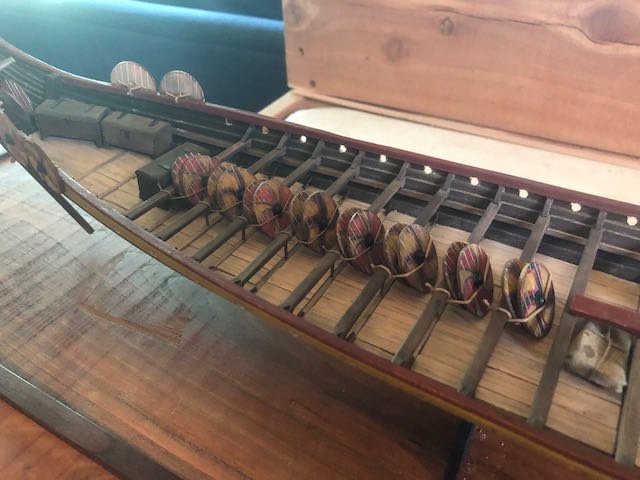
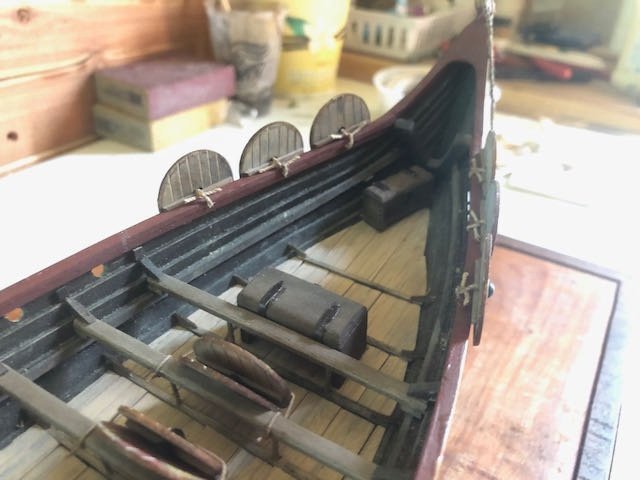
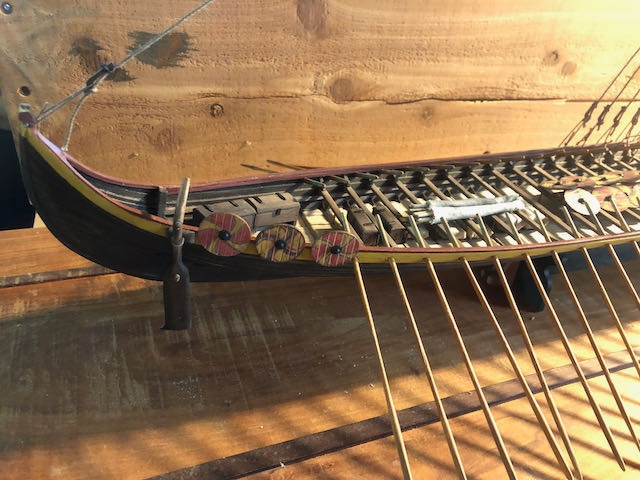
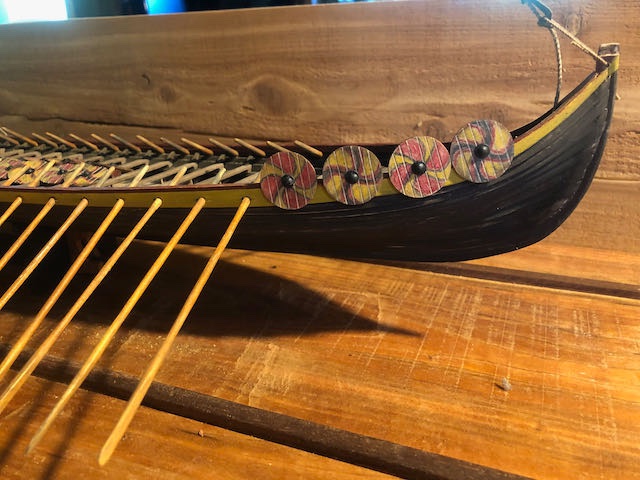
OK, for better or worse, here's the hull with its final detailing arrangements. These are all glued in and no going back. Apologies for the crappy photos, I hurt my knee this morning (nothing permanent, just very stiff) and didn't feel like carrying the model outside for better light with the increased stumbling hazard. You'll get proper photos when it's fully done. This is just to show you what I did. Bow: Paired shields lashed between the thwarts as far back as the mast foot, with three shields lashed to the outer hull. A couple chests in the bow and another angle of the shields: Amidships cargo: Bundles and chests before the mast, barrels around the mast, spear bundles aft: Stern: More shield pairs lashed between the thwarts aft of the mast foot, two more shields on the hull on either side along with a couple stashed in the very stern, and more chests: And an overhead view of the whole thing: Astute eyes will notice that this is only 40 shields for the 60 rowers, but I'm stopping there. Partly laziness in just not wanting to make more shields, but more that I don't see a clear place to store/display any more without the hull starting to look crowded. Maybe it was crowded in real life, but I don't want the model to look too busy. I'm pretty pleased with this overall. It's enough detail to bring the hull to life without really feeling cluttered. Next step is to tighten the standing rigging and install the sail & yard. Actually getting pretty close now since I pre-made that whole assembly. Looks like I'm not quite going to finish by the one-year anniversary (July 5), but I do intend to finish in time to enter this in the NRG's online contest (deadline August 2). Thanks for sticking with me!
.jpeg.16e1d70852ff17475326b628d7aa0a17.jpeg)
- 323 replies
-
- 11
-
-

-
Heh, thanks. As you can tell, I submitted that a long time ago, but he's got so many submissions it took this long to make it through the queue!
- 599 replies
-
- 3
-
-
- sidewheeler
- arabia
- (and 4 more)
-
I'll be entering, but it's still a month away and I'm trying to get my current model done in time!
-
You could try very light tracing of the seams with a pencil to create a hint of a shadow. As Keith says, glue some wood scraps together and test the idea that way first.
-
I've read that too. I found it entertaining but pretty loose with the accuracy while being kinda boilerplate (all Follett's novels follow the same basic template and get predictable after a while for me). Evening and the Morning basically felt like every one of his cathedral books with a couple words changed to make it sound like a different era. Bernard Cornwell is a far better writer and takes far more care to get his facts and cultures right. You'll find that the books take far more time to give a balanced portrayal of Norse/Danish culture than does the show, which mostly treats them as barbarian invaders and puts all its focus on the proto-English. I don't know if you meant download ebook or audiobook, but the audiobooks for Last Kingdom are quite good. The first few books especially have a fantastic narrator who understands how to use accents.
-
Allan, if you want to get more deeply engrossed, try The Last Kingdom on Netflix, or even better, the series of historical novels it's based on. The books are a fairly accurate account of the Anglo/Norse era of Britain around the time of Alfred the Great, and the TV show does a decent job (it's far more accurate than Vikings), especially the first two seasons when it was British-made. Once Netflix took over, seasons 3 and 4 became more gratuitously American and the Viking characters became more shallow, but it's still entertaining and at its worst is as good as the better parts of Vikings. Of course, that's just my opinion. Glad you're interested now! I certainly don't want this to be my last such vessel, I've learned so much that I want to apply from the beginning on a future build.
-
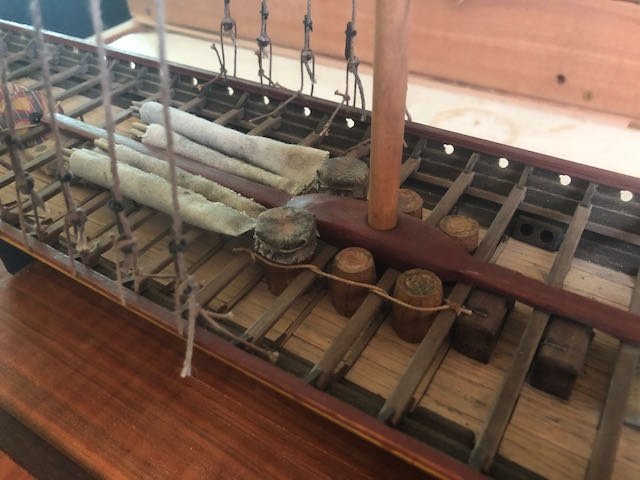
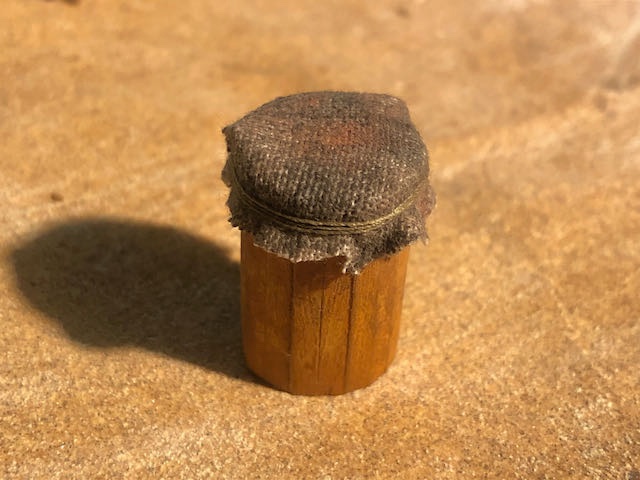
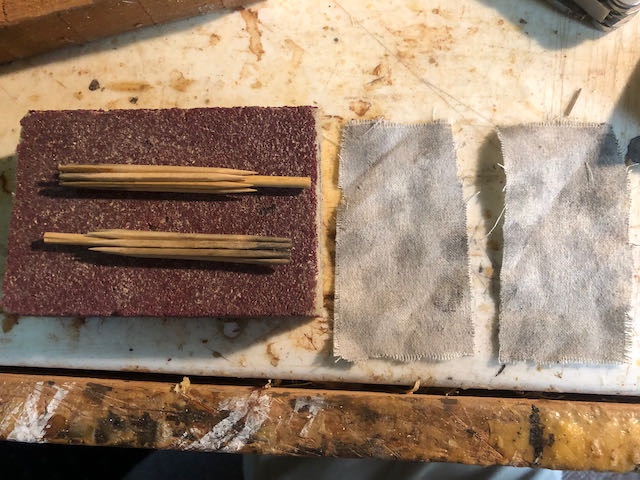
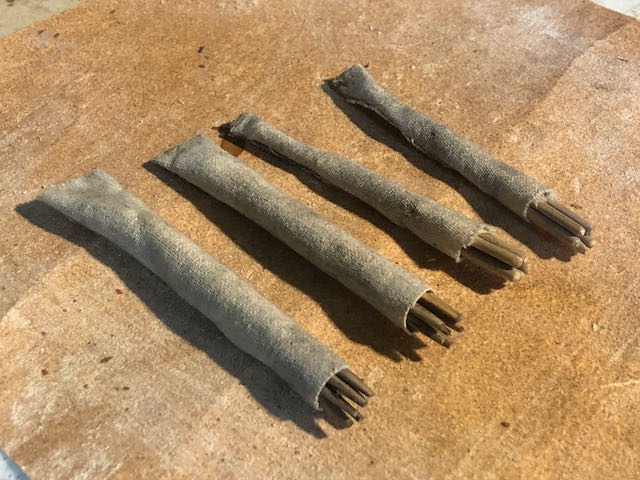
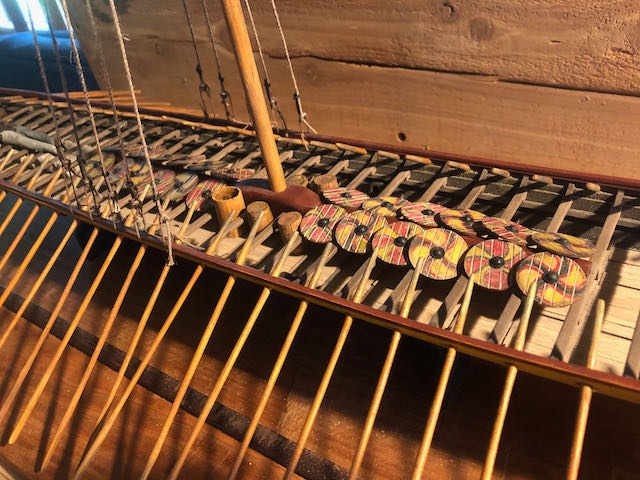
More detailing updates. I played around with Steven's suggestion of stacking shields under the thwarts/benches and couldn't make it work. The shields are too wide to fit easily and I knocked out a number of the delicate little stanchions supporting the benches. So here's my latest idea: stack some shields in groups of twos vertically between each bench (corresponding to a rower on each side), at least where the mast foot doesn't get in the way: These are loosely placed for demonstration. If I did this for real, I'd glue the pairs together, then glue them to the bench. Then I'd simulate some kind of basic rope lashing holding them in place. I think I like this approach as it lets both sides of the shields be seen, makes them reasonably accessible, and at least makes some functional sense. The rest of the shields I can tuck into corners at bow and stern or maybe hang from the gunwales as suggested above. I'm going to sleep on it before doing anything permanent. I made a cloth cover for the open barrel, lashing it one with some fine line: I think it's good enough for display on the model. Another barrel is underway so I can place one on each side of the mast footing. I made two more bundles of "spears", this time using toothpicks as the shafts. I sanded these down a bit smaller, glued them in bundles around a central dowel, and wrapped them in cloth: The newer ones are at left. I like these a bit better, though I'll use both sets, piling them together. Their length matches the spear held by one of my figurines. The handles are probably still a bit thick, but I think it's close enough for artistic representation. In this approach, the spears and most of the cargo will set centrally surrounding the mast foot. I think this will work out pretty well.

-
Steamboats and other rivercraft - general discussion
Cathead replied to Cathead's topic in Nautical/Naval History
Thanks for sharing that, Balclutha! Samuel Clemens' brother was killed in steamboat boiler explosion along the Mississippi. One of the worst steamboat disasters on the Missouri occurred not far from me, near Lexington MO. Randy, wish I had an answer for you.- 281 replies
-
- 3
-
-
- Steamboats
- riverboats
- (and 3 more)
-
Bolin, I agree, there's no way they would have been stored like that during actual sailing operation. I'm just really struggling to find the balance between artistic display of relevant details and an operationally accurate model. Again, just the fact that I'm displaying it with oars out and sail rigged blows operational accuracy right out of the water, so the question is how much further do I go?
-
Congratulations. Such a beautiful model, and so much care and accuracy in the building of it. Thanks for the inspiration and the time spent to share it.
- 179 replies
-
- 3
-
-
- longship
- Helga Holm
- (and 1 more)
-
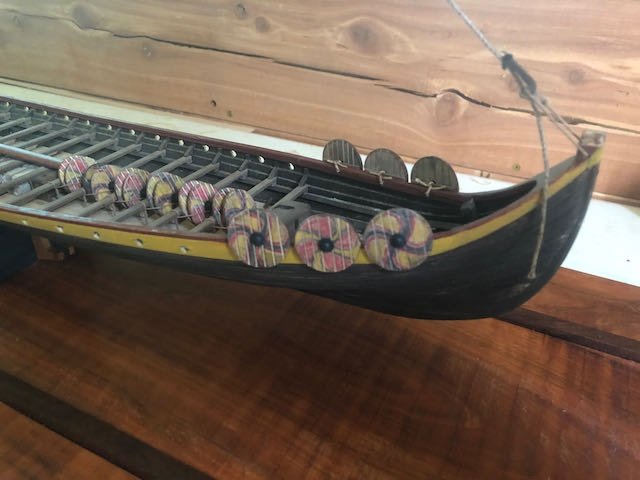
Steven, Swords: Yeah, I know they were high-value. Especially any Ulfberts. The barrel idea was artistic license to have a chance to display some. I knew I couldn't justify putting a bunch of axes in a barrel given the physical logistics of it! But you're convincing me it's just not plausible enough even in that context. I think I'll cover the barrel with "oilcloth" since they wouldn't want seawater slopping in no matter what it contained. Spears: Those were the thinnest dowels I had on hand and I was hoping they would blend in to the overall presentation. Though it just occurred to me I could try rounding some toothpicks. Axes: I know these were more common than swords but haven't figured out a good way to make some or display them. Seems wrong to just have them lying around the deck. Viking safety regulators would issue a citation for sure. Shields: My justification for the "turtling" layout was that they were lashed to the thwarts from the underside, so they wouldn't be sliding around. I'm having a devil of a time figuring out what would make sense operationally, since as you observe, shields just don't stack and they have to be accessible but not in the way. And I want to have a bunch visible since I put all that work into making them. What do you think of the few lashed to the side fore and aft? Mark, Shields hanging from the sides really did happen, since some vessels have been found with shield racks built on. The question is really whether it's acceptable to decide that this ship only did that fore and aft of the oars. Various mistakes in construction mean that I can't hang shields between the oars like otherwise might have been done. Balclutha75, I can't accept the museum-quality complement because I know the workmanship level isn't there. It definitely looks good in photos, but any in-person examination would find lots of ways this isn't anywhere close to that level. And I've made various compromises between authenticity and practicality that wouldn't stand up to a real museum examination. But I appreciate the sentiment, as I am pleased with how it's coming together visually. On the oar jig, two notes: It will create a slight paint boundary where the handles go into the jib, because you can't paint all the way down in one go. This is one reason I went with the "rubbed" handle look, because it hides that issue! Also, be careful not to apply to much paint/stain, because if it runs down the handle at all, it can pool where the oar meets the jig and create an unsightly blemish that can't be fully gotten rid of. I have a couple oars where I made this mistake and will be careful to display that spot facing downward.
-
Mark, I agree that in reality there's no way swords would be stored in an open barrel like that. I was thinking of it as an artist's license way to display some weaponry more openly (same reason why the oars will be run out with the sail hoisted). Haven't decided. It may be best just to cover it, as you say. Did a little more staging, trying to work out how to display the shields. Thoughts on having a bunch run along the centerline, and a few hung along the gunwales fore and aft of the oars? Apologies for the photo quality here, the idea is just to show the layout.
-
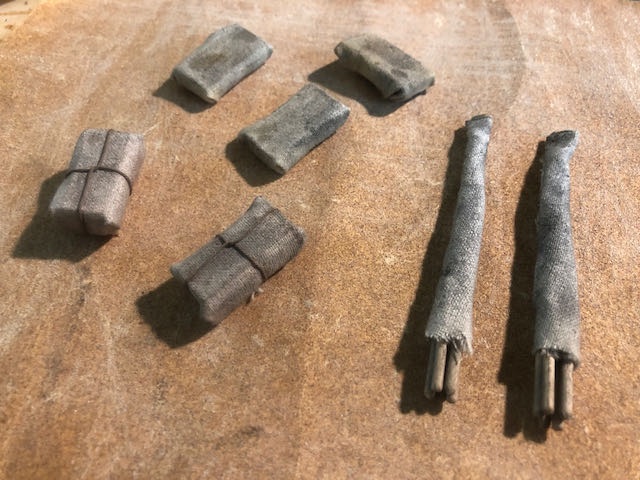
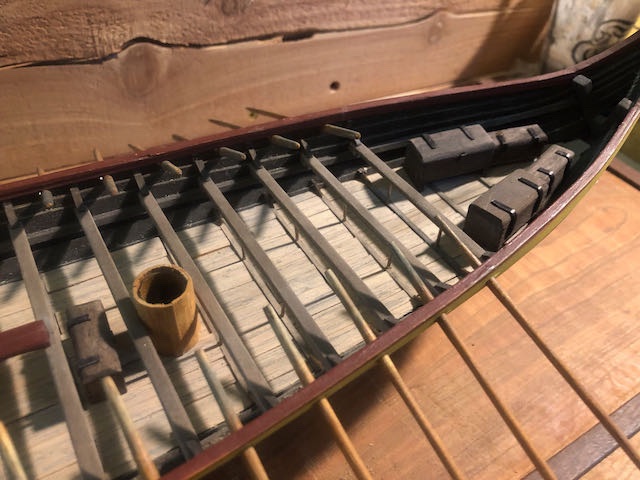
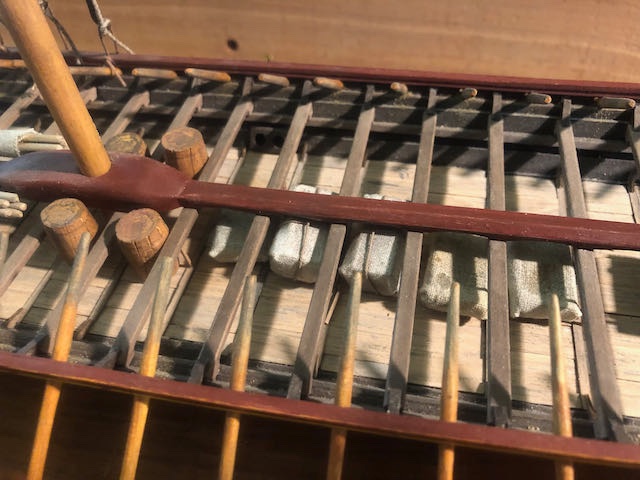
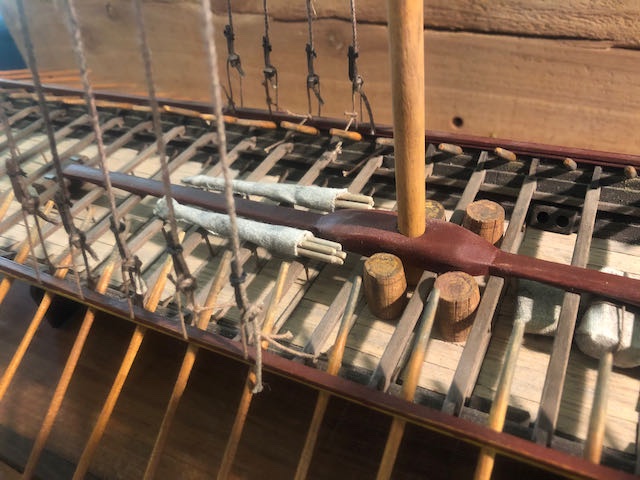
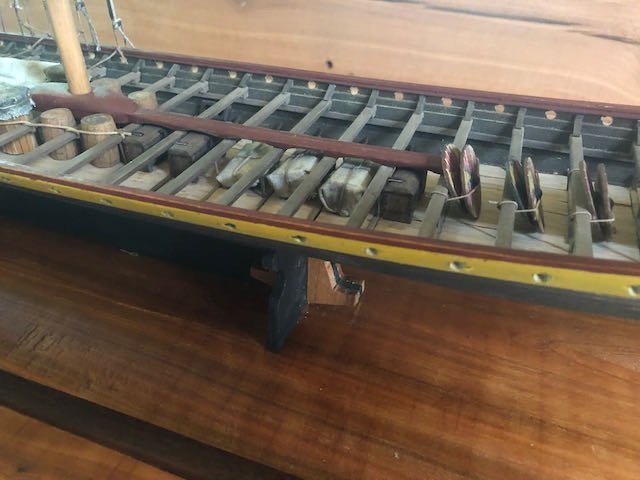
Playing with some detailing this afternoon. I made up some test parcels wrapped in simulated cloth. Who knows what they are, but they represent supplies the crew doesn't want getting wet. I also made several bundles of "spears", with stub-end shafts sticking out from the end of the wrapping (meant to keep saltwater off the metal tips). I might have wrapped these a little tight, I'm not sure there's actually room in there for the full spears and spearhead, but I don't think it's noticeable in the broader context of the model. The wrapping is the kit's original sailcloth weathered with pastels. What do you all think, tie up the "parcels" like the front two or leave them untied like the back three? And here are details test-placed in context. Large chests at the stern: Large and small chests at the bow, along with an open "barrel" I was thinking of filling with swords. Or maybe it's just a water barrel, like a scuttlebutt? I made this by gluing thin wood strips to a piece of plastic tubing: Parcels and closed barrels tucked into the thwarts: \ Spear bundles just aft of the mast: I like the complexity these add. Not sure how many more I need, I also don't want the model to be too busy, and I still have to figure out where/how to display a bunch of shields. Thoughts on this arrangement?