


Cathead
-
Posts
3,538 -
Joined
-
Last visited
Content Type
Profiles
Forums
Gallery
Events
Everything posted by Cathead
-
At this point you should consider starting a build log, that's the best context for asking questions about actually building the kit. Here's a thread about how to start a build log. When you do so, let us know here so we can easily find it. Also, it's really hard to diagnose and answer questions without photos of the problem. As for clamps, that really depends on what you're doing. Here's a good thread with some suggestions and photos for different clamps in different contexts. The Modeling Tools and Workshop Equipment section of MSW has lots more information.
-
 Oops, just realized druxey did suggest essentially the same thing and I somehow read past it. Sorry, didn't mean to duplicate.
- 160 replies
-
- 3
-

-
- Model Shipways
- norwegian sailing pram
- (and 1 more)
-
That's high praise coming from you. If it was anyone else I'd say read more build logs, but I think you've read them all! So thank you, though I do think there are many other really nice ones out there. I'm really excited to see how various other details I'm working on come together.
-
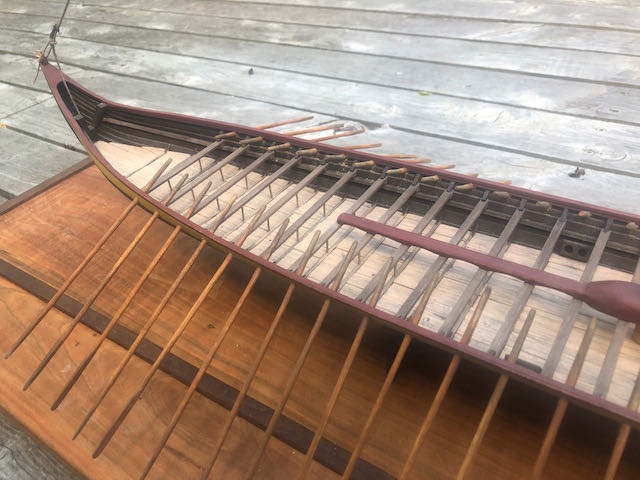
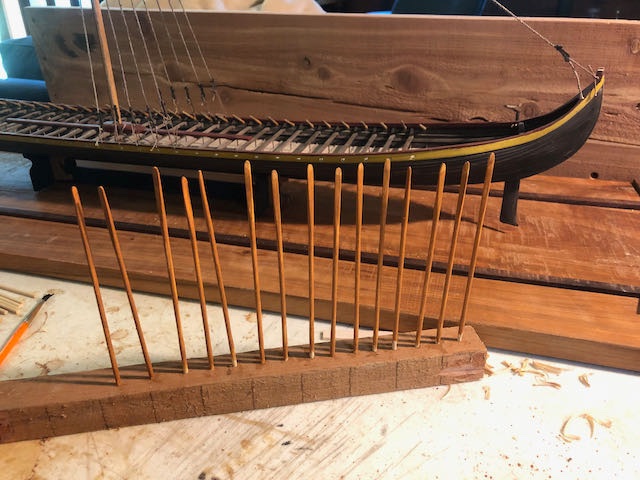
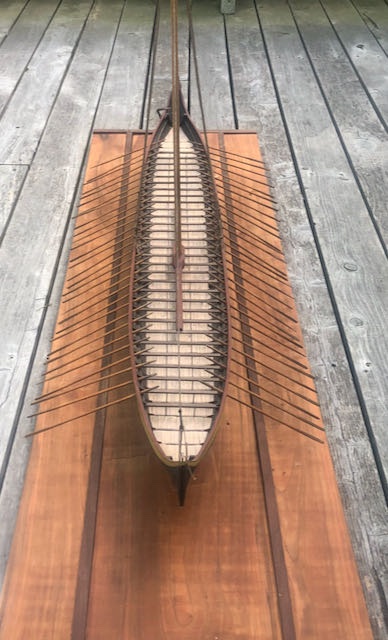
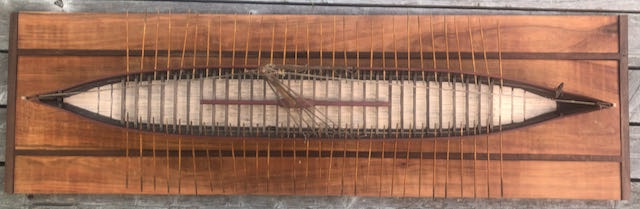
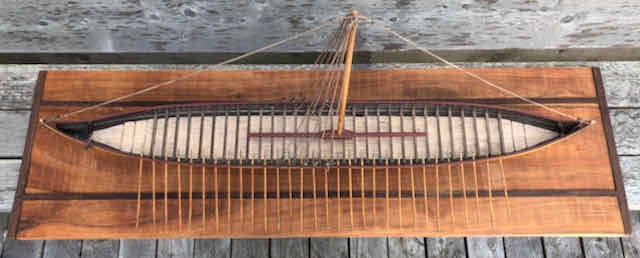
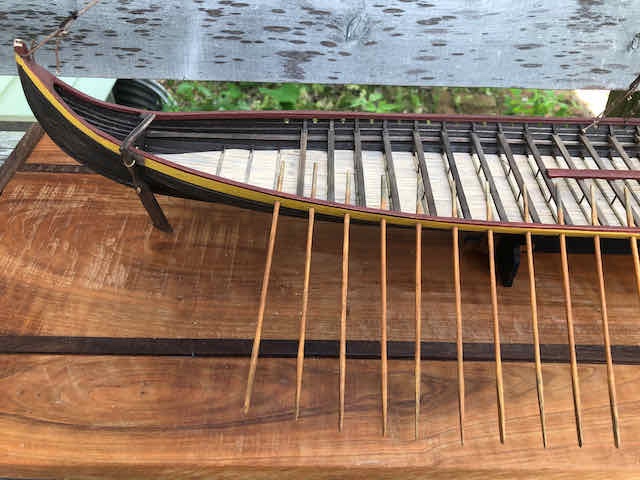
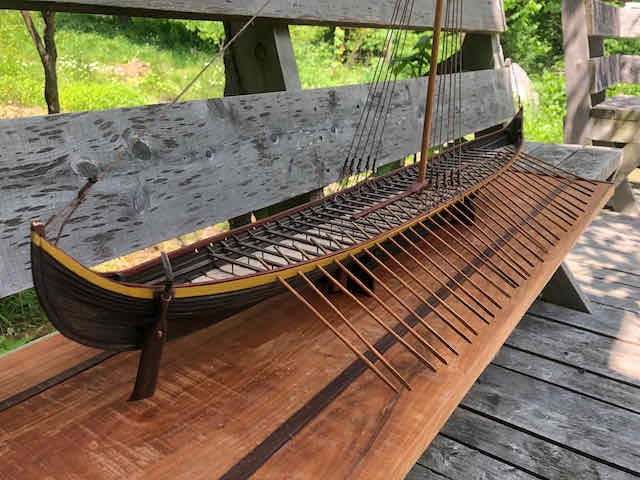
In an unusual burst of productivity, I made the other 30 oars today. So here's how the ship looks with all 60 set loosely in place: I took one shot of the oar-making process, here's the basic painting jig I set up by drilling holes in some scrap wood: This is really exciting, as now the focus turns to final details, which I haven't wanted to install until I was sure I had the oars right. Now I just have to decide how obsessive I'm going to get about said details. Since I started this log on July 5, 2020, I think I'll be able to have this done by its one-year anniversary. Not bad for a project I foolishly thought would only take a few months.
- 323 replies
-
- 10
-
-
So exciting to hear! Thanks for keeping us updated. You're doing a great job.
-
Steamboats and other rivercraft - general discussion
Cathead replied to Cathead's topic in Nautical/Naval History
Great description and detail! Those were really common for decades until steamboats finally did them in. They had a long tail of use since it was often still easier and cheaper to slap one together and transport goods yourself than deal with steamboat rates and schedules. They were common on the Missouri, too. Another benefit was that they could be broken up into salable timber in New Orleans, adding to the collective income. Here are two versions of a painting by contemporary Missouri artist George Caleb Bingham. The first is from 1847, during the actual flatboat era: The second is from 1877. Bingham apparently repainted it, changing some details. This was done after the flatboat era had ended. The second one looks especially like a Missouri River setting. I was amused at the following description of the painting from the National Gallery of Art: This was written by someone with no knowledge of river transportation. These men certainly did NOT row this craft upstream. There aren't even oars in the normal sense. The long pole sitting lengthwise is a sweep, used for navigation and gentle propulsion, but in no way capable of fighting the current of the Missouri or Mississippi Rivers to any meaningful degree. They're clearly floating downstream, as shown by the man at the steering oar at the center back of the flatboat.- 281 replies
-
- 4
-
-
- Steamboats
- riverboats
- (and 3 more)
-
Sorry, I have a very dry sense of humor. Hope it was clear that was a joke. I'm a fan of both. Back on topic, I'm now looking into one of those cases for me.
-
There are a lot of logs for this kits that will give you a good idea what to expect, also some inspirations for how various builder have adapted the kit to add their own personal touches. Have fun!
-
I have a seen a great home-made version on MSW, I wish I could remember where so I could credit it. I think it was in a Viking ship log (which have the same internal-clinker problem). Basically, you cut a series of strips from stiff card, each about the inner width of your planks. Then you use a clamp (like a paper clip or clothespin) to hold them together in a fan shape. You match the end of each strip to one of your planks, resulting in a fan with a very close approximation of the inner hull shape. For non-clinker hulls, just make the strips thinner and they'll still approximate the curve. Now you have a pattern to trace that doesn't require endless trimming of a single piece of card. Does that description make sense, or do I need to figure out a sketch?
- 160 replies
-
- 2
-
-
- Model Shipways
- norwegian sailing pram
- (and 1 more)
-
Good eye from EotL, I didn't even notice that in your photo and just assumed you were using vertical grain but snapped the delicate piece anyway. If you do rotate the grain (which is definitely the right way to go), do the sanding and shaping when the trunk is already assembled as otherwise you could still crack the piece longitudinally. With vertical grain, the trunk's floor will go across the grain and prevent that, unlike with horizontal grain where the leg just sticks out below any support.
-
Reread my first post. Open Access is becoming increasing popular for publishers because it's good PR, but the cost just gets shifted elsewhere, such as higher fees for scientists (which suppresses publication by those without sufficient funding) or through sponsorships (which introduces conflicts of interest). Don't be fooled by thinking that "free" equals "virtuous". There's always a catch.
-
If you build models too fast, you'll run out of places to put them! Seriously, everyone else is right, you're doing fine. Every mistake you recognize now is one you'll learn to overcome later and be proud that you did. I'm still a bit stunned at what I can do now when I look back at my first models.
- 160 replies
-
- 5
-
-
- Model Shipways
- norwegian sailing pram
- (and 1 more)
-
I work as an editor helping non-native-speaking scientists improve their scientific writing and get their research published in international journals, most of which are in English these days. I've helped papers get published in over 100 peer-reviewed journals from major publishing houses, so have a fair amount of experience with this aspect of the publishing world. It can cost thousands of dollars for a scientist to get a research paper published, whether or not the journal is open-access. And if it isn't, it can still cost the public a quite high fee to access that research unless they have a subscription, which usually means they're part of a major research institution themselves as the cost is way above what individuals are likely to pay. Which usually means that journalists and the public are mostly locked out of what's actually happening in science. I find this extremely problematic. That being said, it also really does cost money to publish a journal. Journals get inundated with submissions, all of which have to be reviewed and responded to. Much of this gets sloughed off onto unpaid peer reviewers (another abuse in the system) but there's still a lot of in-house work. Expecting anything to be free requires defining where you expect the money to come from, because there is no such thing as free. If it's not publishing and subscription fees, then where? Donations or sponsorships? That puts you in conflict-of-interest territory. Government funding? Kind of the same thing. There's no one clear answer in a world where people increasingly expect information to be free online but either aren't willing to pay for it or haven't figured out the right model for paying for it. I do tend toward thinking the current journal publishing model is on the scam side of the spectrum, especially where some of the big corporate publishers are involved, but it's a very complex system overall without easy answers.
-
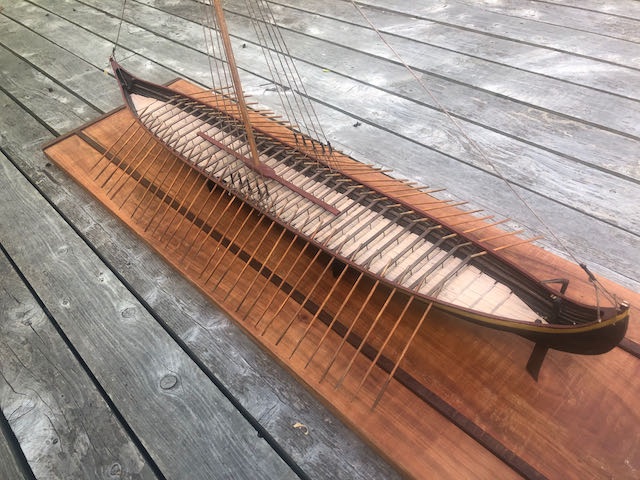
Finally reached the halfway mark in oar-making, so decided to go ahead and finish them. I've seen other models with multi-colored oars, and while I didn't want to paint mine fancily as it wouldn't quite fit what I was going for, I did like the way that different shading brought out the oars' structure and broke up what's otherwise a pretty bland linear feature. So I stained them with the same color I used for the mast and yards (to achieve a color that fits with the model overall), then lightly sanded them smooth again. I then further sanded the area gripped by rowers (not sure of the right terminology here) to remove most of the stain, as I figured the wood here would be discolored due to use and skin-oil patina. Finally I rubbed dark pastel onto the oars, focusing on the grip areas and blades (in the latter case, figuring these would be discolored by mud and such). I like the way they came out. Broader view: A couple full-ship views: These are just set in place right now, so they're not even or consistent. Still trying to decide if I'm going to glue them in, somehow support them in an unobtrusive manner, or just let them be a little chaotic. Time to get up the courage to face 30 more of these things. Finally, I believe this will be my 2,000th post here on MSW. It's become a valued part of my life and identity, and many thanks are owed to all who have helped me along the way.
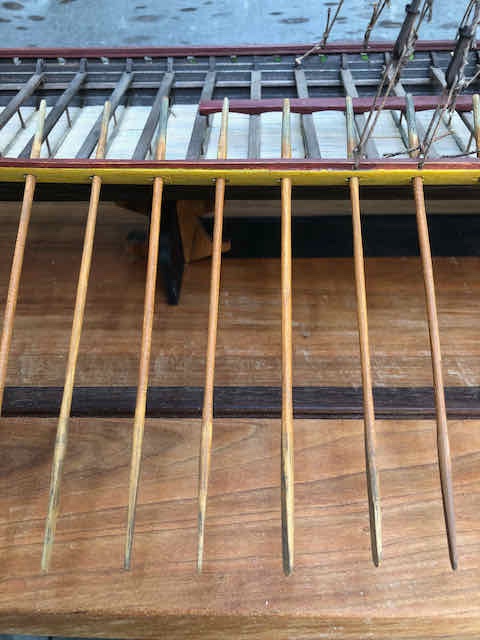
- 323 replies
-
- 12
-
-
I like the upper-left color pattern as well. It took me several tries to develop a chest style I liked and could make without messing up.
-
Looking good so far. One question, are you ensuring that the deadeyes are oriented correctly? In a given pair of deadeyes, the "top" of the triangular set of holes should always point toward the permanent part of the rigging with the two at the "base" toward lanyards connecting the pair. In the first photo (in the jig) these look backward, while the next two photos look closer to correct. For example: Forgive me if you knew this and I was just misled by a photo. It's a little thing that's easy to miss but makes a difference in the accurate appearance of the model.
-
Paul, It looks like the link in your signature isn't actually a link, or is a mis-formatted link. When you edit your signature, make sure you select the text you want to serve as the link (such as "Revell container ship Colombo Express", click the link tool (looks like a pair of handcuffs to me and is next to the quotes), and enter the actual link (https://modelshipworld.com/topic/28943-revell-container-ship-colombo-express-scale-1700/) in the URL box. That should result in this: Revell container ship Colombo Express, which is what I think you want. Have fun with your project!
- 17 replies
-
- 3
-
-
- Colombo Express
- Revell
- (and 1 more)
-
Nice work so far. I've never used a magnifying lamp (yet, I'm only 41), so can't help you there.
- 160 replies
-
- 2
-
-

-
- Model Shipways
- norwegian sailing pram
- (and 1 more)
-
The Midwestern US was also hit very hard by freezes this year. We lost all our pears, apples, cherries, and peaches, and took damage to blueberries and grapes. Welcome back to the build!
-
You've got a nice display & conversation piece there! Congrats on finishing. I also like your tool display photo, a nice idea for others.
-
Excellent! This will make a nice companion for your Syren. Glad to be in from the beginning. Adding the rigging yourself sounds like a fun extra challenge.
-
I had the same thought as Justin in wanting to encourage you to enter the photo contest. Here's the official link: https://thenrg.org/contests Don't know what I can add to the existing plaudits, beyond my personal gratitude for taking the time to share this build and for taking such excellent photographs to document your work.
- 950 replies
-
- 1
-

-
- syren
- model shipways
- (and 1 more)
-
Cool, that's what I wanted to know. Thanks!
-
Thanks, Roger. I was especially referring to the original ship; was there any engineering reason to lay the plates out in a certain way, i.e. to ensure that the In or Out plate was at the sheer or garboard?