HOLIDAY DONATION DRIVE - SUPPORT MSW - DO YOUR PART TO KEEP THIS GREAT FORUM GOING! (Only 13 donations so far - C'mon guys!)
×


Cathead
-
Posts
3,482 -
Joined
-
Last visited
Content Type
Profiles
Forums
Gallery
Events
Everything posted by Cathead
-
 You can edit any post you make by clicking on the three black dots in that post's upper-right corner (next to the post number), then select edit. To change the title of a log or any other thread you've started, go to the first post and select edit; you'll be given an option to alter the title. The standard on MSW is that you placed FINISHED after your username. So in this case, Mississippi by Vicnelson - OcCre - 1:80 would become: Mississippi by Vicnelson - FINISHED - OcCre - 1:80
 -
Are you still adding details, or do you consider this done? If the latter, you might consider changing the title to mark this as finished, so folks know you're not still working on this. Otherwise, let us know how it's going.
-
Any progress? This is a tricky but rewarding build and I hope you're sticking with it.
- 28 replies
-
- 1
-

-
- 18th Century Longboat
- Model Shipways
- (and 2 more)
-
How are you coming on this? It's been a while since you posted. Did the planking strip help you with the sanding?
-
It's been a while, how are you coming on this?
-
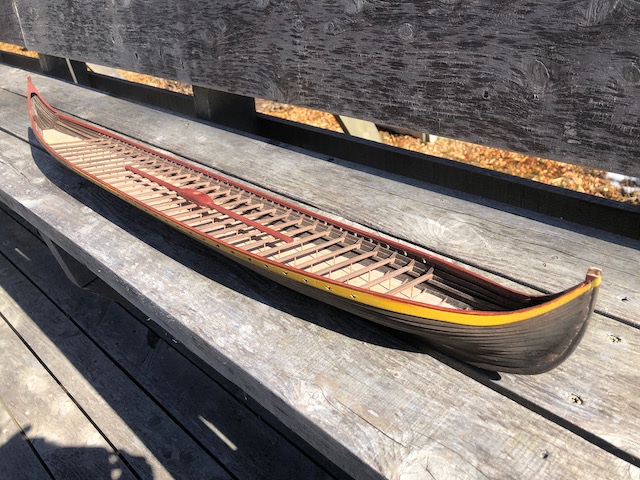
Long gap in posting but I've been rather busy with other things, including developing a talk on steamboat design along the Missouri River, which you can watch online Tuesday March 9 (see link for details). This was supposed to be in April but the March speaker for this series canceled and I agreed to move it up a month. I also realized that I needed to make a final decision on how to handle the display stand, as I'm about to place the mast in the vessel and after that won't be able to turn it over nearly as easily. The kit-supplied stand doesn't fit the hull perfectly, as my version ended up somewhat deformed from the theoretical version the kit expects, but it's good enough and I don't feel like trying to make a new version that fits the clinker planking perfectly. However, it's too simplistic and has very few contact points. So after some thought, I came up with the idea of adding a few extra pieces of wood to better clamp and stabilize the keel, and to do this in an artistic way. I cut some thin pieces of cherry off a larger block (harvested here on-farm) and cut them into half-pieces representing a Thor's hammer design. I then clamped these on either side of the kit stand such that they'd grab the keel. Here's a test-fit: I then painted the stand black so it'd fade into shadow, and oiled the cherry to bring out its color. I think it looks cool: I might also hang some shields along the stand between the two hammers, for more visual interest. And here's another view of the current hull:

-
Paul, I studied both German and Russian, but did not have the opportunity to add Polish to the mix. клар doesn't mean anything in Russian as far as I know, but its German meaning definitely fits what you're describing in the sense of precision, accuracy, preparedness. Looking in Google Translate, the same word has the same meaning in Danish (closely related to German), so I'd guess it's a long-standing Germanic root word that got transferred to Polish a long time ago (like French words in English after 1066, another otherwise Germanic language). Here it sounds like you're describing the English word "shipshape", usually used as in "everything made shipshape" to imply that all ropes are coiled, all loose items put in their proper place, tidy and organized. Forgive my being a language nerd, I love questions like this.
- 20 replies
-
- 2
-
-
- Le Renard
- Artesania Latina
- (and 1 more)
-
Good luck with your health, hope to see you back at this soon!
-
I forget what your native language is? Klar means "clear" in German but I'm not sure what you're describing here. Your work looks nice.
- 20 replies
-
- 1
-
-
- Le Renard
- Artesania Latina
- (and 1 more)
-
HMS Beagle by Krupi - OcCre - 1:60
Cathead replied to Krupi's topic in - Kit build logs for subjects built from 1801 - 1850
The deck has a nice complex weathered texture. You're doing a great job overcoming challenges so far! -
Welcome from a regional neighbor and great job on your Syren!
-
Yeah, I'm being dumb, they have a bunch of past talks archived on their YouTube channel. I always watch them live so had never investigated that before.
- 599 replies
-
- 2
-
-
- sidewheeler
- arabia
- (and 4 more)
-
I should have noted, I also posted this in a different thread under Nautical History for broader exposure, just mentioned it here as well to capture those who followed this log. The same question was asked over there, and the answer is "As far as I know, but if not, I'll make it available". Sorry for not clarifying that point up front.
- 599 replies
-
- 2
-
-
- sidewheeler
- arabia
- (and 4 more)
-
Talk on Missouri River steamboat design & history, March 9, 2021
Cathead replied to Cathead's topic in Nautical/Naval History
Chuck, great question, as far as I know the talk will be placed online afterward. If for some reason that's not the case, I'll make sure you can see it somehow (for example, I have a draft recording I made for a couple of NRG/MSW experts who were gracious enough to review it ahead of time). -
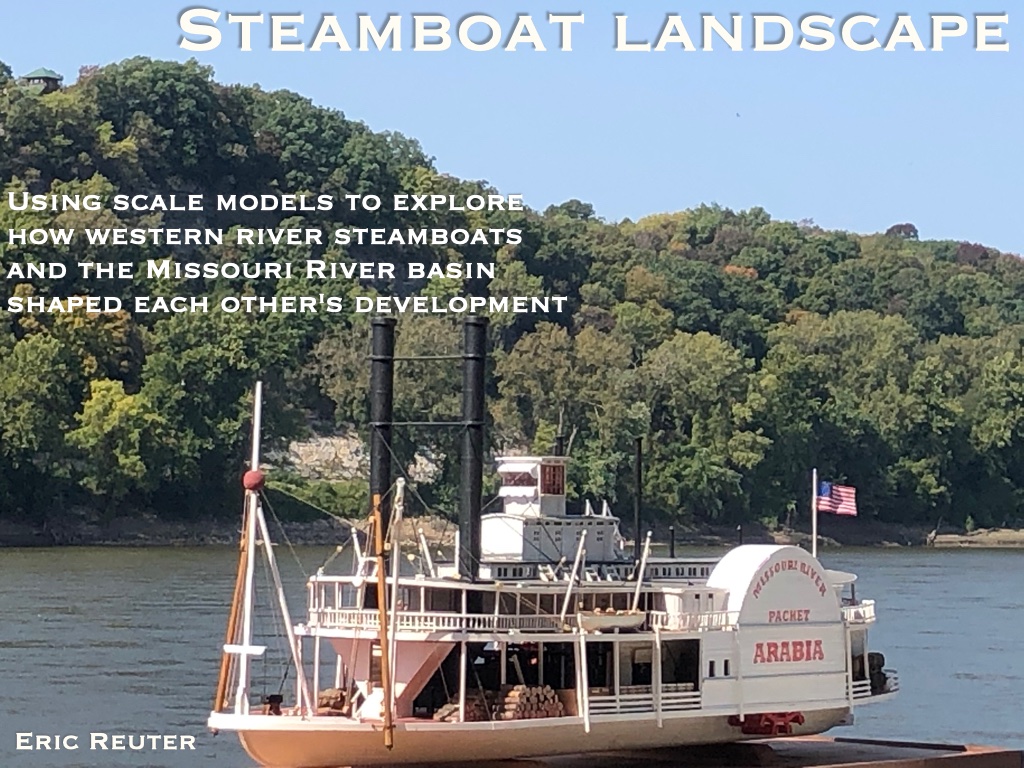
Anyone who followed this log might be interested in an upcoming talk I'll be giving: Steamboats symbolize a historic era in Missouri River exploration, commerce and transportation. Missouri River steamboats evolved over time, becoming ever more adapted to the basin’s unique environment while simultaneously altering it, much like an invasive species introduced into a new ecosystem. In this presentation, Eric Reuter will use hand-made scale models of Missouri River steamboats and other vessels to discuss the linked history of steamboat development and environmental changes in the Missouri basin, drawing on his professional and personal interests in the links between geology, ecology, history, and land management. Specific information, including how to watch, is available here. The time is 7 pm American Central time.
- 599 replies
-
- 2
-
-
- sidewheeler
- arabia
- (and 4 more)
-
For anyone who might be interested, I'll be giving the following talk in a few weeks: Steamboats symbolize a historic era in Missouri River exploration, commerce and transportation. Missouri River steamboats evolved over time, becoming ever more adapted to the basin’s unique environment while simultaneously altering it, much like an invasive species introduced into a new ecosystem. In this presentation, Eric Reuter will use hand-made scale models of Missouri River steamboats and other vessels to discuss the linked history of steamboat development and environmental changes in the Missouri basin, drawing on his professional and personal interests in the links between geology, ecology, history, and land management. Specific information, including how to watch, is available here. The time is 7 pm American Central time.
-
Sounds good. When you start a build log for the launch, let us know here so we can be sure to follow you over.
-
Nope, only built the MS version. Looking briefly online, I think the MS kit is likely more beginner friendly, but you could certainly make an argument for the OcCre version to help you learn how their kits and instructions work.
-
I've never built this, but there are a number of logs for it on MSW (including several active ones I'm following right now), so you could read through those to get a sense of the kit's overall quality and ease of construction. You could also send their builders a private message to ask about their specific opinions of the kit. I definitely agree, as someone with professional and personal interests in geology and ecology, that this ship is high on my "want" list. If this is your first wooden build, you might consider starting with a small, simple model that won't take you long and will help familiarize you with some of the basics of the craft. For example, Model Shipway's Bounty Launch was an early kit for me that taught me a lot while not being too challenging, and fits well in your era of interest.
-
As with many (most?) consumer products, expensive does not guarantee proportional quality, but cheapness likely guarantees low quality. The middle ground is often where you want to be. Do not underestimate the frustrations that a low-quality kit can produce in terms of poor or insufficient materials, bad kit design, and/or incomprehensible instructions. A well-done kit will have well-presented instructions, proper materials, and a sensible kit design. Providing you are not insisting on building only the most massive ships of the line or modern battleships, you can get such kits direct from retailers for sensible prices (Bluejacket, Model Shipways, Syren, and Caldercraft come immediately to mind). Getting addicted to bargain-hunting has a higher chance of wasting your time and money than saving it. There are threads elsewhere on MSW that discuss kit and manufacturer reviews. As for stashing, I too cannot understand this practice. If nothing else, consider that kit design and manufacturing has (and presumably will) continue to improve over time. So if you bought a kit 15 years ago and stashed it in the closet (or bought a 15-year-old kit online in an attempt to save money), you'll end up with a lower-quality kit than if you bought the modern, upgraded version. For example, the newer kit might have better laser-cut parts, higher quality metal castings, and improved instructions. As a personal opinion, I'd recommend in the strongest terms buying only what you can build in a reasonable time. In the unlikely chance that you miss out on a dream kit because the company failed, chances are kits will still be circulating online for a long time (due to all the other hoarders). Also, your skill sets, interests, and life circumstances can change, which is more likely than that you'll actually build a whole hoard of kits. You might choose to develop your skills toward scratch-building, a transition many of us make as it lets us make a unique model free from the design constraints of manufacturers. Or you might learn a new skill or hobby that leaves old ones behind. For example, I still have a few plastic ship kits sitting around that I never built because I discovered wooden modeling; I bought them with full intention of building them, but life changed and now they represent a waste of money that I have no interest in building because I've moved on.
-
So fun to see a second attempt. That's so rarely done in model building, but such an interesting way to test ones' improved skills and knowledge. It reminds me of the need, in science, for more researchers who focus on retesting/checking others' results. In theory I'd love to take another crack at my longship with all the insights I've gained, but I also really don't need two gigantic longships hanging around the house! I like your shield rail, I'm debating whether to add one to mine or not.
-
Residents of British prison hulks during the American Revolution would beg to disagree, though I defer to your superior knowledge in this case. Why were the French treated so much better than the Americans?
- 95 replies
-
- 4
-
-
- POW
- Bone model
- (and 2 more)
-
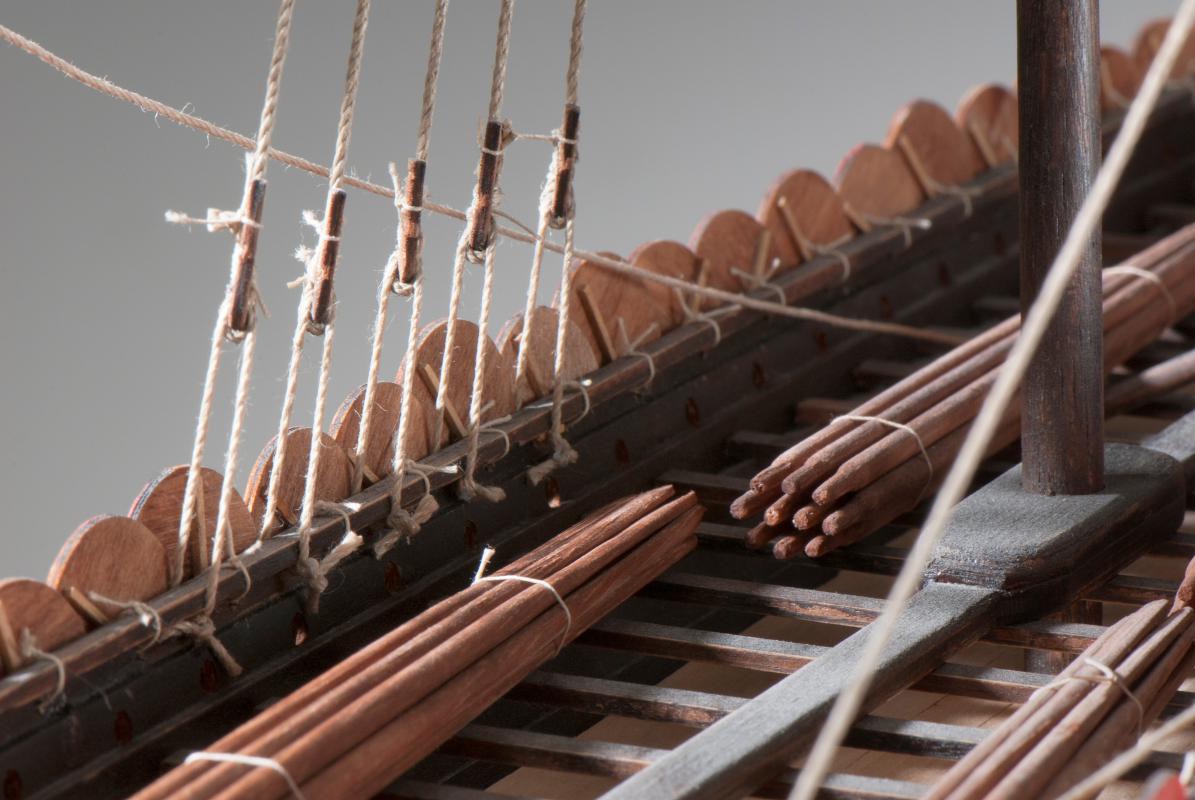
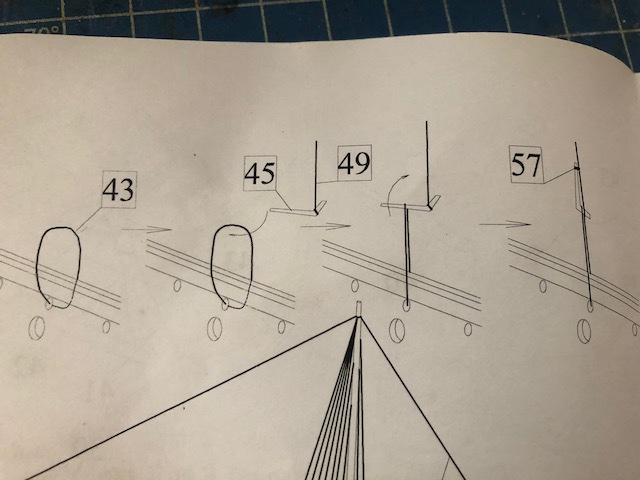
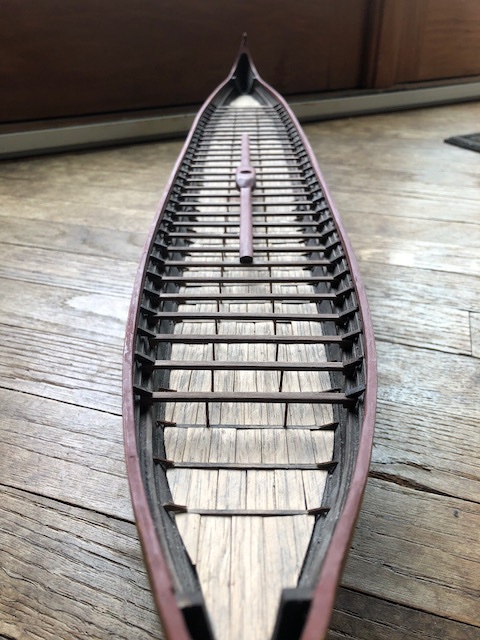
Does anyone have a good suggestion for understanding the rigging layout of a Viking ship? Unsurprisingly, the kit instructions are not only rather simplistic, but also don't seem to match the practices used on the Skuldelev reproduction. For example, on the standing rigging for the mast, the kit tells you to tie loops through the side of the hull (see photo below and image from the Dusek website below), while the reproduction seems to loop these around the rowing benches (see image linked here ). One resource I've found shows a different way to connect standard rigging to the hull (see image here) by running a short loop through a single hole and using a short rod to hold it in place. I like the look of this but am open to other suggestions. I also cannot figure out the rope pattern used on the L-shaped pieces (no idea what they're called in this context) that replace the deadeyes used in more modern sailing vessels (see image linked here). The instructions are also vague as to how this actually works, either in the model context or in real life. Any suggestions? I really want to understand how this is supposed to work and what a reasonably accurate practice would be. I'm pretty annoyed at myself that I followed the instructions and drilled holes in the hull already before doing research to realize (of course) that there might be other, more accurate practices. I don't know why I even look at the instructions at this point. Also, here's a better lengthwise view of the model that really shows how much visual interest is created by adding the bench supports and two layers of triangular braces along the hull (one along the deck and one atop the benches).