


Cathead
-
Posts
3,550 -
Joined
-
Last visited
Content Type
Profiles
Forums
Gallery
Events
Everything posted by Cathead
-
 On MSW, this is called the signature, and here's a thread that explains how to do it. My wife is a scientist who has also worked in male-dominated fields and has often been cautious about revealing her gender in related online or publication settings because she has definitely experienced discrimination and other issues. When I joined MSW, I was fairly cagey about identity at first because I didn't know what I was getting into. I've opened up quite a bit since then as I've learned just how friendly and helpful this community is. I'm so glad you feel comfortable as well. There's certainly an innate assumption that most modelers are older men (rather justified by the actual demographics), just as I tend to get odd looks as a younger man going into craft stores! And there can be a bit of a "boy's club" mentality here at times, just look at the nature of the prevalent jokes about "admirals", "honey do lists", and so on. But I think all communities benefit from diverse perspectives and participants, so you're all the more welcome for that reason. Thanks again for sharing your work with us and I hope you'll enjoy a long and worthwhile time here on MSW.
- 85 replies
-
- 4
-

-

-
- Lowell Grand Banks Dory
- First Build
- (and 2 more)
-
Congratulations, she's beautiful. A result to be proud of, and even more to the point, you did a great job learning and applying what you learned as you progressed. I look forward to seeing what you do with the pram! If you remember, once you start that build log, let us know here as I'd like to follow it as well. By the way, I'll be in Kansas City next week, among other things at the Tuesday and Wednesday Royals games.
- 85 replies
-
- 3
-
-
-
- Lowell Grand Banks Dory
- First Build
- (and 2 more)
-
My favorite way to handle this issue is with a needle threader. These are sold in various crafts shops and also by model suppliers like Model Expo. They're extremely useful and versatile. Just make sure to get a packet of a few, because they can also break given their delicate nature. Another tip is to use a bit of glue to seal in one end of the rope/line in question, as even tiny frayed ends can catch on a hole and make it really hard to pull the rope through. You can even use a knife to shave the glued end into a pointed shape (like its own needle) that will help it pass through. You can then just cut off the 1/4" or less of glued area once the threading is complete.
- 85 replies
-
- 4
-
-
- Lowell Grand Banks Dory
- First Build
- (and 2 more)
-
Pedantic alert, those aren't really lifeboats, but rather work boats. Their primary purpose wasn't lifesaving or safety, but rather as auxiliary craft for all sorts of everyday needs. For example, a research paper on Beagle's boats (delightfully titled "The Beagle's Pups") notes that she "carried seven open boats of varying types, which were employed in surveys of waters which the ship could not reach." Other uses would have included carrying water casks to and from shore (along with other provisions), towing the ship during calms, allowing harbor access when quays weren't available, and so on. Just mentioning this as you've expressed an interest in learning as you go. You're continuing to make great progress!
-
Steamboats and other rivercraft - general discussion
Cathead replied to Cathead's topic in Nautical/Naval History
When this project first came up, I searched that UW collection for the Biddle, hoping to be helpful, and came up with nothing. I recently bought a copy of the NRJ article on that keelboat (more accurately, barge) as I'm considering that as a future project.- 281 replies
-
- 2
-
-
- Steamboats
- riverboats
- (and 3 more)
-
Steamboats and other rivercraft - general discussion
Cathead replied to Cathead's topic in Nautical/Naval History
That's a cool looking park for sure, though I have to say that replica keelboat isn't all that accurate. Though it doesn't really matter as it was probably a lot easier to build that way and 99% of visitors won't care while getting a reasonable taste of the size and layout of the original vessel. Pedantic sticklers like me aren't really the target audience!- 281 replies
-
- 2
-
-
- Steamboats
- riverboats
- (and 3 more)
-
Same here. My problem is I'm always ready for the next adventure when I'm about 80% done with the current one. Look out for "I-don't-want-to-deal-with-this-itis" when that stage comes!
-
If you end up doing more projects like this, you might consider an inexpensive planking iron. These apply heat to planks, helping them bend easily and quickly. It speeds up the process quite a bit and can eliminate or lower the need for awkward clamping and waiting for drying. That being said, tiny boats are tricky no matter what and easily can be maddening.
-
NRG Capstan Project
Cathead replied to tlevine's topic in - Build logs for subjects built 1751 - 1800
Toni, where does one view/buy/download the monograph and plans? You gave no link and the NRG's Plans and Projects page doesn't have anything listed for this. Forgive me if I'm being dense and missing something obvious. This is the first I've heard of this project and would like to know more. -
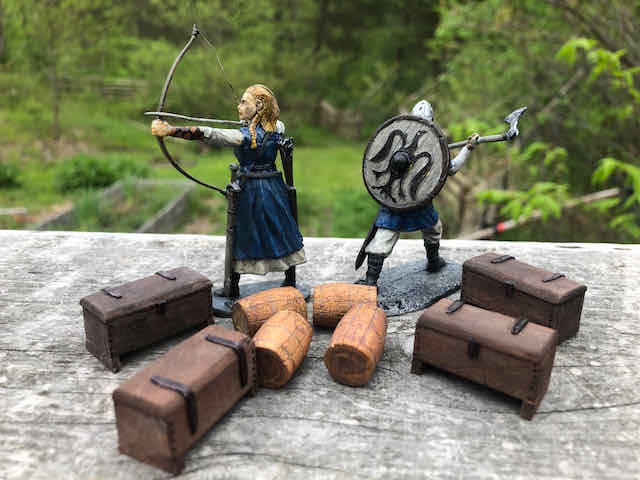
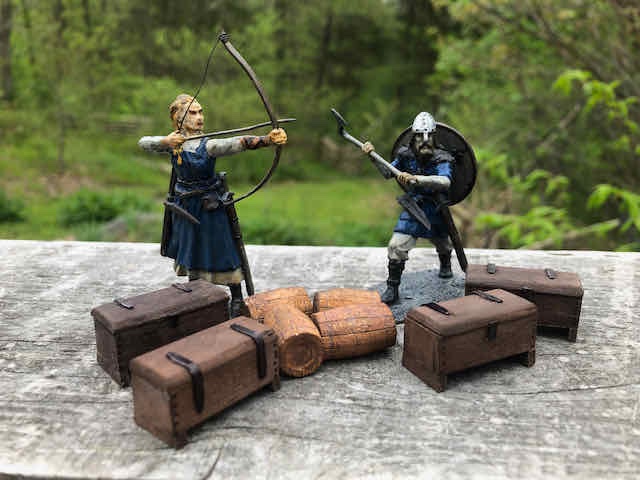
I took a shot at some cargo based on the above ideas. I didn't take any photos during the process so you'll just have to imagine. I'm also featuring the final two figures here, which I actually painted months ago but can't remember if I ever posted. These are a "his & hers" pair representing Mrs. Cathead and myself. The blue color isn't as likely but is our favorite color. And as a birdwatcher I very much appreciate this guy's raven shield. He also has a proper axe, unlike the swordsman and spearman I already painted. I thought these would give some good scale for the cargo. The crates are based on Steven's links. I assembled them from strip wood, painted them, then weathered them with pastels. The hinges are thin strips of styrene colored with a black marker. The barrels are dowels I sanded into a more barrel-like shape using a sanding disc on a Dremel. I then filed rough plank boundaries and darkened them with pencil. I also added some faint hoops with pencil. These were also pained and then weathered with pastel. Oh, I also used a carving tool on the Dremel to eat away a little bit of each barrel end to hint at the inset nature of a real barrel head and remove the shiny smooth dowel-end effect. None of these necessarily would stand on their own, but in a cluster they look pretty good and when they're in the hull among the thwarts I think will be quite acceptable. The real question is how many more I make. It took me most of the afternoon do to this. Mrs. Cathead looked at my project and said "You're procrastinating on making oars, aren't you?". Yes. Yes, I was.
-
Steamboats and other rivercraft - general discussion
Cathead replied to Cathead's topic in Nautical/Naval History
Very cool! Hard to imagine, now that the river's been destroyed by damming.- 281 replies
-
- 2
-
-
- Steamboats
- riverboats
- (and 3 more)
-
For me it's less "I must be accurate" and more "avoid blatant anachronism". For example, I didn't even know whether hooped barrels had been invented then or were in use in this region. Steven, those are great, thank you. On the tapestry, as a devil's advocate, how do we know that's a barrel as opposed to, say, a rolled-up carpet? Would barrels have had such a different length-width ratio as modern ones? It looks a rather unwieldy design.
-
Does anyone have any suggestions for reference for what Viking-era cargo might have looked like? How were barrels built? Did they use forms of crates? Would things be wrapped in some equivalent of oilcloth? I want to put some cargo within the hull (provisions for a crew, not merchant cargo) so it doesn't look so empty but am having difficulty finding information on what that would look like. Also, how might weapons have been stored? I assume stacks of axes & swords had to be reasonable accessible yet still protected from salt spray. Bundles wrapped in cloth? I just want to give this hull a busier, less empty look, and that would be the next step before I start restricting my access to it through further rigging.
-
If there's one thing I've learned in modeling, it's that the final product almost always looks better than the sum of the mistakes made along the way. There's something about a finished model that draws the eye into the essence of the whole and away from any given detail. Especially for most viewers; a contest judge or expert will notice flaws, but most people will think it's pretty neat that you built anything at all, and the overall impression is often more important than the detailed nuances. Especially so for a beginner project like this. If I look closely at my earliest models, I can see all sorts of things wrong. But they still look cool on my bookshelves and any visitors find them appealing. At worst, you eventually shuffle the early ones quietly into less prominent places and thank them for their service because you now have something even cooler to feature. You should also be proud that you chose such a good simple kit as your learning experience; far too many people dive in over their head. Imagine making beginner mistakes on a $600 ship of the line!
- 85 replies
-
- 5
-
-
- Lowell Grand Banks Dory
- First Build
- (and 2 more)
-
Rob, I understand where you're coming from. I'm just trying to suggest that the only real difference between buying a $1000 kit through a payment plan and a $1000 kit by saving up for it is (a) the inevitable interest payments on the former, raising its cost even higher when money is already tight, and (b) the delayed gratification from the latter. Either way you're planning to spend $1000 that, by your own statements, is very dear. But it seems that you may have more time than money (since you don't have all the money now but you aren't starting the model any time soon). So why not try to set aside whatever you can so that if/when the time comes for the kit to be a good choice, you're already at least partway there? Unless you have reason to believe you'll have a higher income later? I mean, not to be personal, but if you've found it impossible to maintain savings for things like medical expenses and car repair (which is an all-too common situation and nothing to be ashamed of, you're doing a wonderful thing), are expensive models really in your budget? If it's simply impossible to set aside any money toward a $1000 kit that's a long way off and you don't have reason to think that will change, maybe it's not the most realistic goal? It's a lot harder to turn a half-finished model into medical payments than a half-filled future model savings account (full disclosure, I've been self-employed my whole adult life and am all too familiar with how easily health insurance and/or medical expenses can destroy personal finances). The third option being to find secondary-market kits that tend to be cheaper, as suggested by others above. My comments are directed at your original question about trying to afford a $1000 kit in your self-described situation. And I think the reason there aren't more subscription options is that it's a lot more work for the manufacturer/seller, which inherently means the price goes up if they bother at all, so you still don't really come out ahead if money is the primary restriction.
-
You all are very kind. I do agree, now that it's pointed out, that the chatter lines echo the thwarts nicely, though that's harder to see when you're not viewing from above. As with many things in modeling, individual faults (such as they are) often get subsumed into the visual appeal of the whole, and that's probably true here. My real problem is where to put the thing; this is the first model I've built that I didn't have a prepared place for.
-
I did NOT need to learn about this. Dangit.
-
You say "eventually", implying not any time soon, so why not just start saving for the model now and buy it when you're actually ready to build it? Why try to find credit for something you can't afford and aren't sure you'll even use? Way too many people buy and hoard kits they don't end up getting around to for various reasons, which is such a waste. If you save up first, you don't lose the money if the kit never happens for some reason. It'll still be available when you're ready, likely even on the secondary market from someone who bought it and never built it. If you can afford, say, $100/mo for 10 months on Paypal (plus whatever interest they charge you), why can't you afford $100/mo into a bank for the same period of time with no extra costs? The key here being "eventually" since that implies you can wait. Also, asking a retailer for a payment plan if they don't offer one is likely to just be a pain. There's a reason it's not common, having to accept and track many payments (and/or shipments) is a lot more work for the retailer, especially small ones. Maybe someone would be nice and work with you, but it's an inconvenient ask.
-
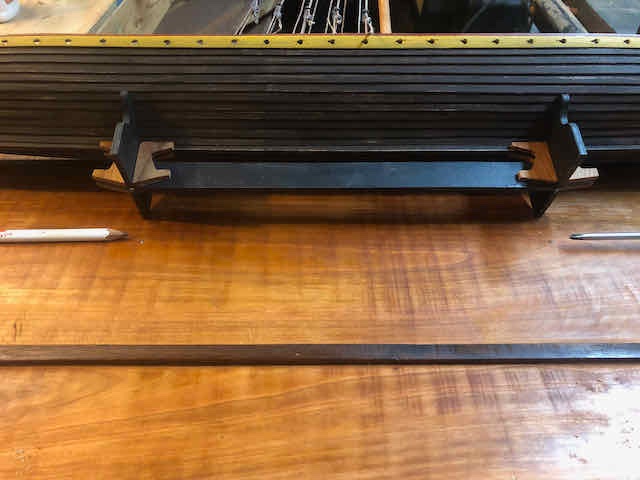
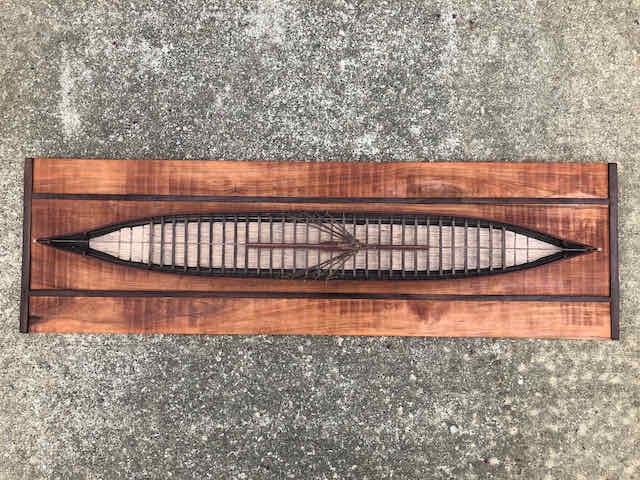
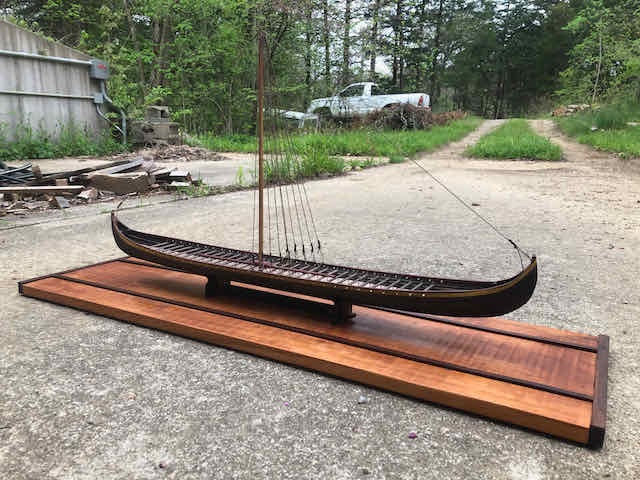
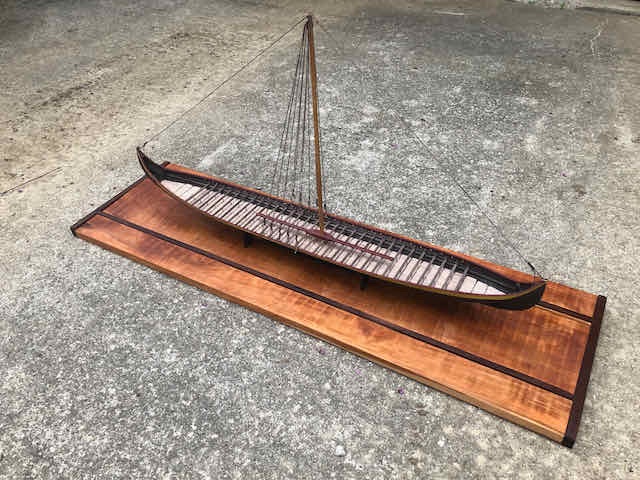
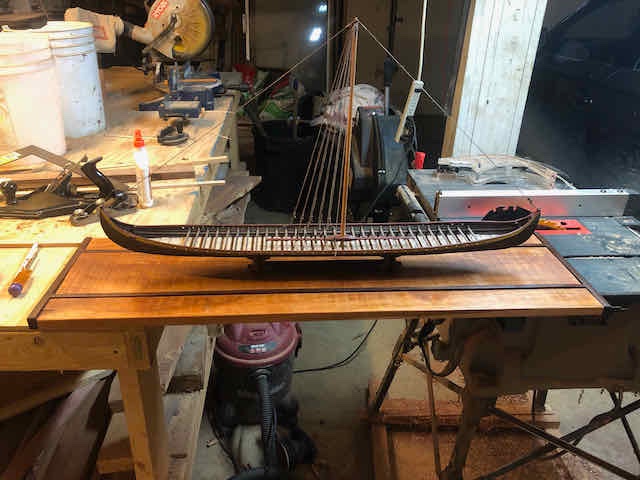
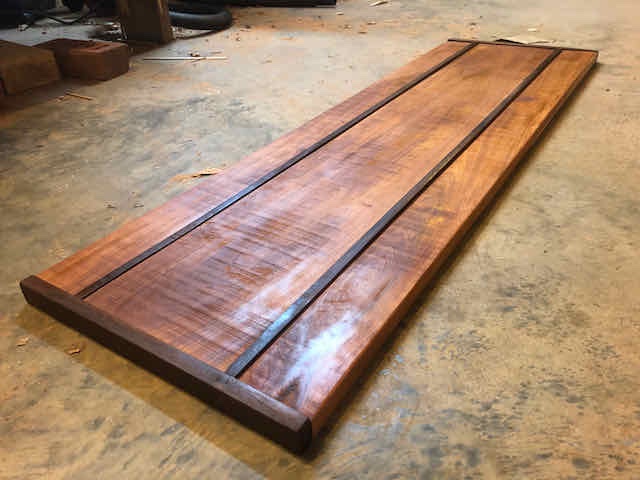
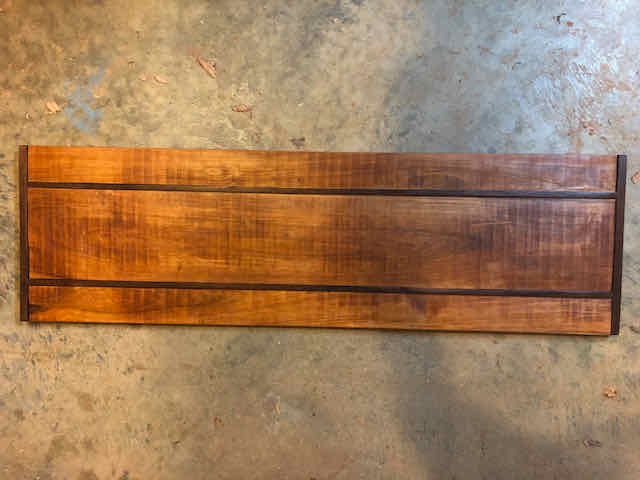
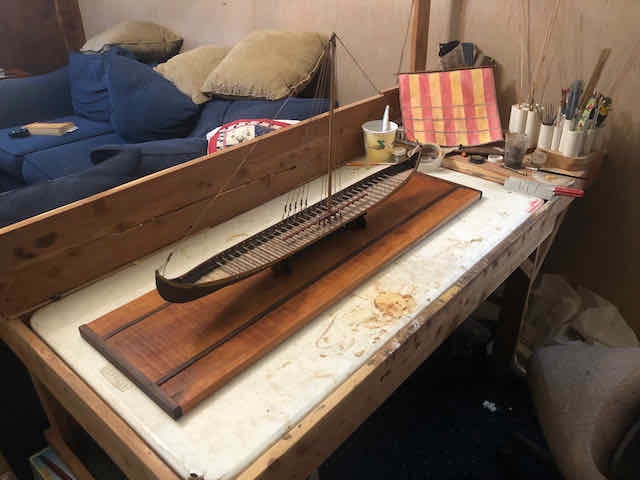
I took a break from the ship itself to build a base, as the lack of one was holding me back from various steps. For example, I don't dare install the rudder until the hull was permanently fixed in place over a base wide enough to protect it (as the rudder sticks out way below the hull), and I can't start rigging the sail properly until the hull is stable (since I can't tip the hull onto its side once the yard is fully rigged). I pulled out some cherry and walnut that I'd harvested years ago here on my farm and bandsaw-milled. The cherry was more cupped and warped than I would have liked, despite years of drying in a stickered pile, but since I don't have a planer, I made do. I used a hand planer and rotary sander to flatten and smooth the surface somewhat, but couldn't get it fully flat. So I adapted the base design to "hide" this. I had two 6" cherry boards, so ripped one of them in half lengthwise and framed the other with them, using walnut inserts to separate them. I intentionally left the walnut thicker than the cherry. This meant that I didn't have to get any of the boards lined up at the exact same thickness, as the subtle (unwanted) variations between the cherry pieces are obscured by the more obvious (and intentional) difference between the two types of wood. I then added end caps of more walnut strips to further hide the cherry's problems. I did this with the base sitting on my flat concrete garage floor (where, sure enough, it wobbled slightly since the cherry wasn't flat), but simply attached the end caps flush with the floor so the final base would be stable. Not going to win any awards for woodcraft, but it worked well enough. I didn't take any photos of the assembly process, but here's the completed base with several coats of wood oil. I definitely like how the raised walnut gives it some visual diversity and interest (also looks less like a cutting board than if it was all flush). You may notice some chatter marks on the cherry. That's from the bandsaw mill. Ideally these would be planed off, and I don't have (or really want) a planer. With enough time I could have eventually taken all of them out using a hand plane but I frankly didn't care to. The oil and photograph really brings them out, they're not as noticeable in person, and I never intended this to be art. I may make a nicer base sometime, like post-pandemic when I'm willing to go into a wood shop and have them plane some boards for me, but this is good enough for a working base for a model that itself has various problems and isn't likely to ever be displayed outside of my home. I really want to be done with this model and didn't want to spend tons of time crafting a perfect base. So then I proceeded to attach the model. For this, I carefully measured a centerline, then marked the two points directly under the thickest ends of the stand (where the cross-pieces are). I then drilled holes in these locations, both in the base and the stand. Below, the screwdriver and pencil are pointing to the holes, which you can just barely see. I then hand-drove wood screws up through the base, leaving the tips just sticking out the top. I could then fit the holes in the stand onto the screw tips (the model would only sit flush when the tips met the holes), then held it down tightly with one hand while final-tightening the screw with the other. To make this easier, I set the base spanning a gap between my table saw and garage workbench, so all I had to do was kneel underneath. And now that she's firmly attached, here's a couple broader views from the pad outside my garage: I think it's good enough. The screw attachment means I can always take it off again if I decide I want to make a nicer stand someday. Now I can move forward again, although I quickly realized I'd need to change the layout of my workspace, as this now takes the entire width of my workbench (which normally has a lot of other resources on it): There's a bunch of stuff living on the floor next to the bench now. Another reason to get this done! Thanks for sticking with me.
- 323 replies
-
- 14
-
-
-
I've developed the habit of designating a "show" side of the model early on, and always work on the opposite side first. That way, initial mistakes are concentrated on the "wall" side and I have a better chance of a higher quality "show" side.
-
I agree that wire is the most practical way to strop a block. Easier to use and easier to tighten properly.
-
Just found this and looking forward to following it. With a family history in northern Minnesota iron mining, and an upbringing along Lake Ontario, lake freighters are certainly of interest to me.
-
Steamboats and other rivercraft - general discussion
Cathead replied to Cathead's topic in Nautical/Naval History
I think we're missing the model photo?- 281 replies
-
- 1
-
-
- Steamboats
- riverboats
- (and 3 more)
-
Steamboats and other rivercraft - general discussion
Cathead replied to Cathead's topic in Nautical/Naval History
Pretty sure the darker object you indicate is actually a grasshopper spar stowed horizontally, hanging from lines coming down from its white support spar. The angle makes a good visual illusion but if you look really closely you can see the lines wrapped around it near center. I also don't think there's any reason rolled clothes would be hung like that, especially out over the bow.- 281 replies
-
- 2
-
-
- Steamboats
- riverboats
- (and 3 more)
