kurtvd19
-
Posts
3,019 -
Joined
-
Last visited
Content Type
Profiles
Forums
Gallery
Events
Everything posted by kurtvd19
-
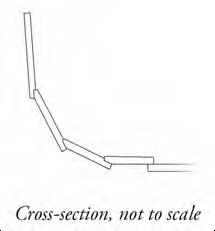
 Check the directions (page 12) - the rabbet is only needed on the last scale foot of the plank ends. Sanding will work as shown in the photo from the instruction book (below). However, the gains on this boat are different. Each is a sloping rabbet, rebate or recess, cut along the last scale foot or so at each end of the plank. This gain is a scale inch wide. You can measure this using the scale rule (page 7). Mark this distance on the edge of a paper strip, then transfer this measurement to the plank. Carefully cut along the line with a sharp blade. Don’t press too deeply! Then shave the slope using a chisel blade in your craft knife handle. Make the deep end of the rabbet no more than about ⅓ the thickness of the plank. At the transom the planks fit as shown here (below right).
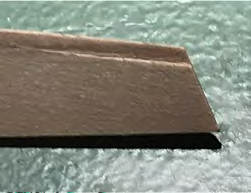
- 54 replies
-
- 5
-

-
- norwegian sailing pram
- model shipways
- (and 1 more)
-
My Space Saving/Mobil paint Booth...Mario
kurtvd19 replied to Cap'n Rat Fink's topic in Modeling tools and Workshop Equipment
Images are to be attached to your posts here - not on 3rd party sites.- 1 reply
-
- 3
-
-
350's are real workhorses. Also capable of good paint jobs. I can point to 6 models that took gold at Manitowoc where the paint jobs didn't hurt the results. They have to be the easiest to clean too.
- 40 replies
-
- 4
-
-
- best airbrush
- compressor
- (and 1 more)
-
I recommend the Badger Modelflex Marine Paints - acrylic paints ready for spraying. MSW sponsor USA Airbrush Supply carries these paints. Simple shake to use. Note that when you go to the sponsors on the right hand side of the main page here there is a line of text that says to use a NRG discount code at check out. USA Airbrush has the lowest prices for these paints and then an additional discount.
- 40 replies
-
- 5
-
-
- best airbrush
- compressor
- (and 1 more)
-
I rinse with water, then a cleaner I mix. Use it between colors and then at the end of the day I do the same, remove the needle and reapply needle juice when I put it back into the brush. Final thing I do when done for the day is to spray a short eyedropper of Lacquer thinner through it. Have never had a problem with a dirty brush but have cleaned many up for friends who were not as thorough.
- 40 replies
-
- 5
-
-
- best airbrush
- compressor
- (and 1 more)
-
That's what I thought and at the premium price I was paying for outside GB I decided to drop it.
-
I dropped my subscription many years ago when my copy here in the US quit providing plans to US subscribers. Same attitude when I contacted them no way did they think a subscriber in the US mattered. Maybe left over from our breaking away?
-
Actually the wood tends to slide towards the blade - away from the fence which is up hill (to the right) from the blade when the saw sits on the bench. You do have it right with the "book" tilting the saw so the tilt table is level with the table top.
-
One tip on using the tilt table. If the saw is kept level using the tilt table is a bit awkward. Use a couple of wedges under the saw so the tilt table is level with the bench top and it does away with the awkward working on the tilt table and the tendency for gravity to work against holding the wood against the uphill fence.
-
2021 NRG CONFERENCE
kurtvd19 replied to kurtvd19's topic in NAUTICAL RESEARCH GUILD - News & Information
How about the Nat'l Museum of Toys and Miniatures in KC? The collection they have of miniature tools, tool boxes, etc. is someplace I am going when I go to see the Arabia Museum again. -
2021 NRG CONFERENCE
kurtvd19 replied to kurtvd19's topic in NAUTICAL RESEARCH GUILD - News & Information
Chuck: We constantly hear from E & W coast members that a mandatory element of a NRG conf has to include salt water. Here by the Great Lakes we like to say that Doctors are always saying to cut out salt. Also, our waters are guaranteed to be free of sharks! Not that you would be likely to swim in Lake Superior - it makes the Atlantic and Pacific Oceans feel like kiddie pools temperature wise. Duluth is also one of the busiest ports in the US. -
I spoke with Bob last week. He's doing better but moving slowly. If he got the order you will get the book.
-
2021 NRG CONFERENCE
kurtvd19 replied to kurtvd19's topic in NAUTICAL RESEARCH GUILD - News & Information
Roger: We lost the third vote for Duluth when Steve died. Toledo is on the short list. You are probably correct about the CA airport situation but good spots near to airports are very expensive and already been done. There are many of our members who can't get to anyplace on a non stop flight but they bite the bullet and do it. Then you have a place like Boston - easy to fly to - but traffic worse than LA. It's a real balancing act. -
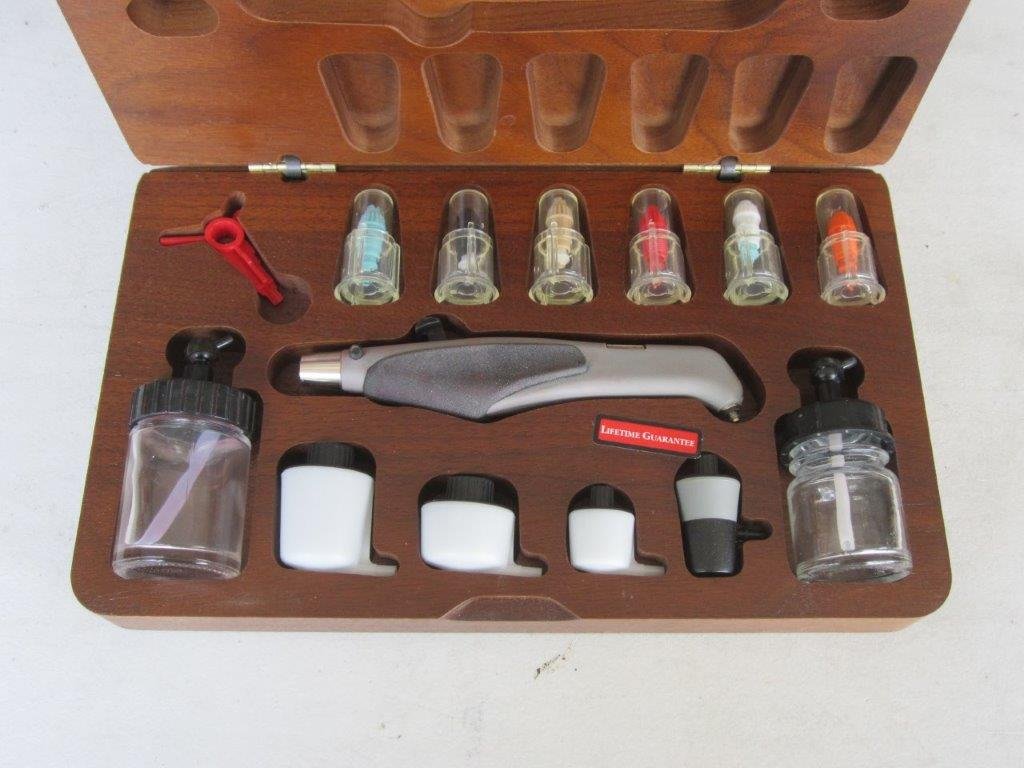
AZTEK AIRBRUSH SET This is the deluxe set of the Aztek Airbrush – I think it was produced by Testor’s. I have never used this brush and have not tested it. But it was formerly owned by the late Steve Wheeler and he took great care of his tools and it appears to be immaculate. This does not include an air hose or instruction book. SOLD Cost is $25 plus USPS shipping (at exact cost) US & Canada only. PayPal preferred. Please reply by PM.
-
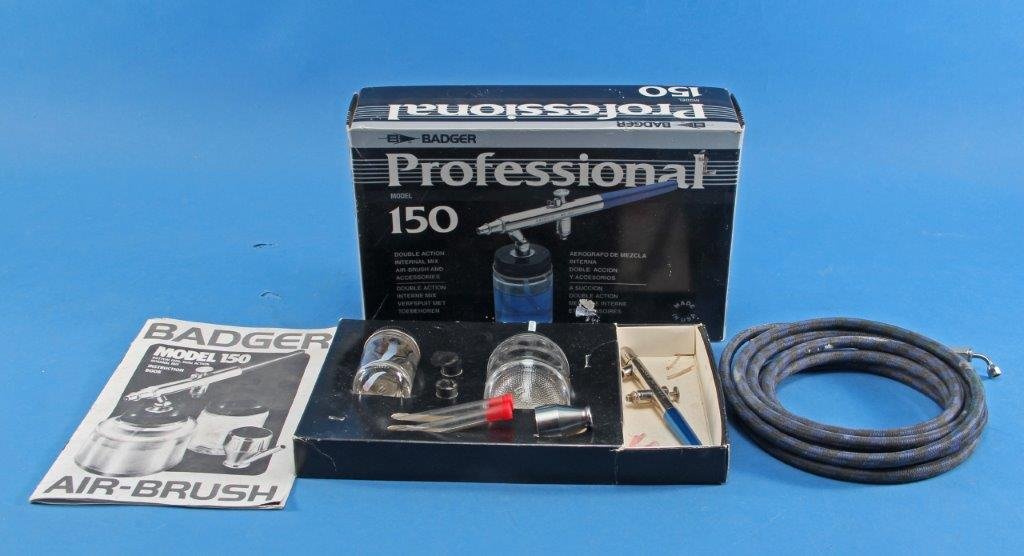
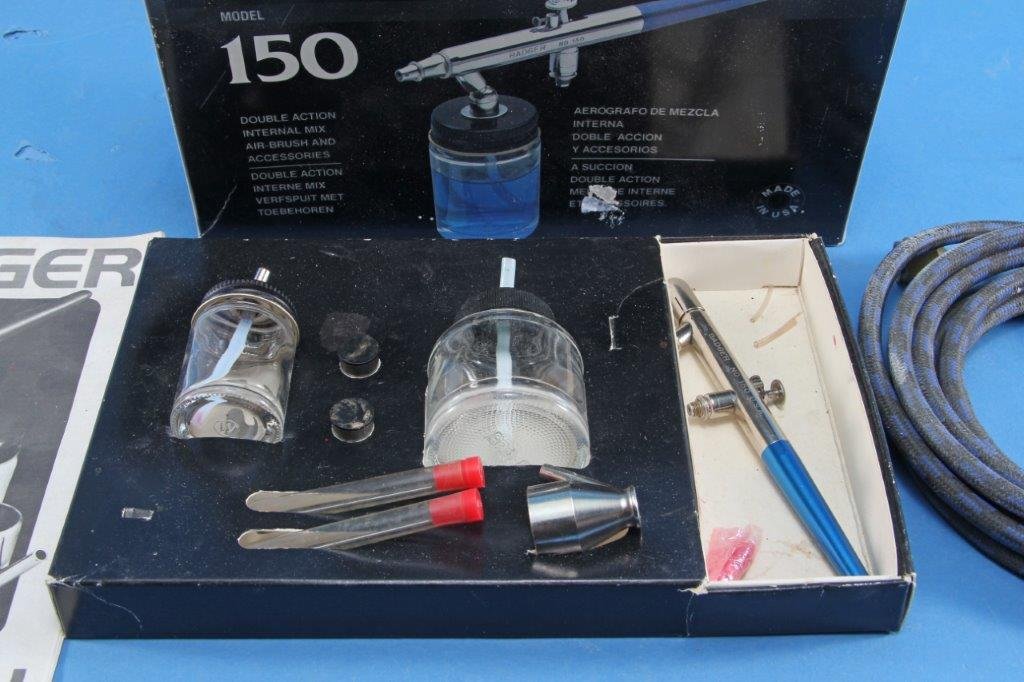
BADGER 150 DOUBLE ACTION AIRBRUSH SET SOLD The Badger 150 is an exceptionally reliable airbrush made to provide the modeler with an airbrush able to spray any type of paint or finish. It is a double action, internal mix unit. Internal mix airbrushes provide the best finish when using an airbrush. Double action airbrushes are not the best choice for beginners. This airbrush set is complete with fine, medium, and large orifice spray heads and matching needle sets, a braided air hose, two sizes of paint bottles and a 1/4 oz. color cup for small jobs. The medium needle/spray head set up is currently in place as it is the most used in painting model ships. To purchase this new today would cost at least $150. I have tested this set and can assure the purchaser it works great. It was previously owned by the late Steve Wheeler and was used to paint several models that all won gold awards in competition at the WI Maritime Museum contests. Some of the models also won best of show awards. YOUR RESULTS MIGHT VARY. The price is $50 plus normal USPS shipping (at exact cost) US and Canada only. The proceeds will go to the WI Maritime Museum in Manitowoc, WI. PayPal preferred. Please reply by PM.
-
- 4
-
-
2021 NRG CONFERENCE
kurtvd19 replied to kurtvd19's topic in NAUTICAL RESEARCH GUILD - News & Information
Gary: The history is that we move the conferences so that as much as possible East and West coasts plus the Midwest are covered as close to equally as we can do so. This is so that all members can attend a conference without having to travel clear across the country as often as possible. Since 2013 there have been 4 Eastern events, with the 2020/2021 being in CA that will be a third Western event. The only Midwest event since 2013 was 2014 in St. Louis. So, we are overdue for a Midwest conf. The 2021 event will be in CA where the 2020 event was to be held. We plan on the 2022 event being a Midwest event possibly at a Great Lakes location. We have talked with the Mariner's Museum in VA and it is a likely location but there have been absolutely no plans made beyond 2022. A membership survey will be done before we make any plans beyond 2022. Kurt -
Converting a Backyard Shed into a Model Workshop
kurtvd19 replied to Hank's topic in Modeling tools and Workshop Equipment
An adjustable drafting chair is what I use for the couple of different height tables/benches in my shop. -
Ripping Planks - what I've learned from others
kurtvd19 replied to glbarlow's topic in Modeling tools and Workshop Equipment
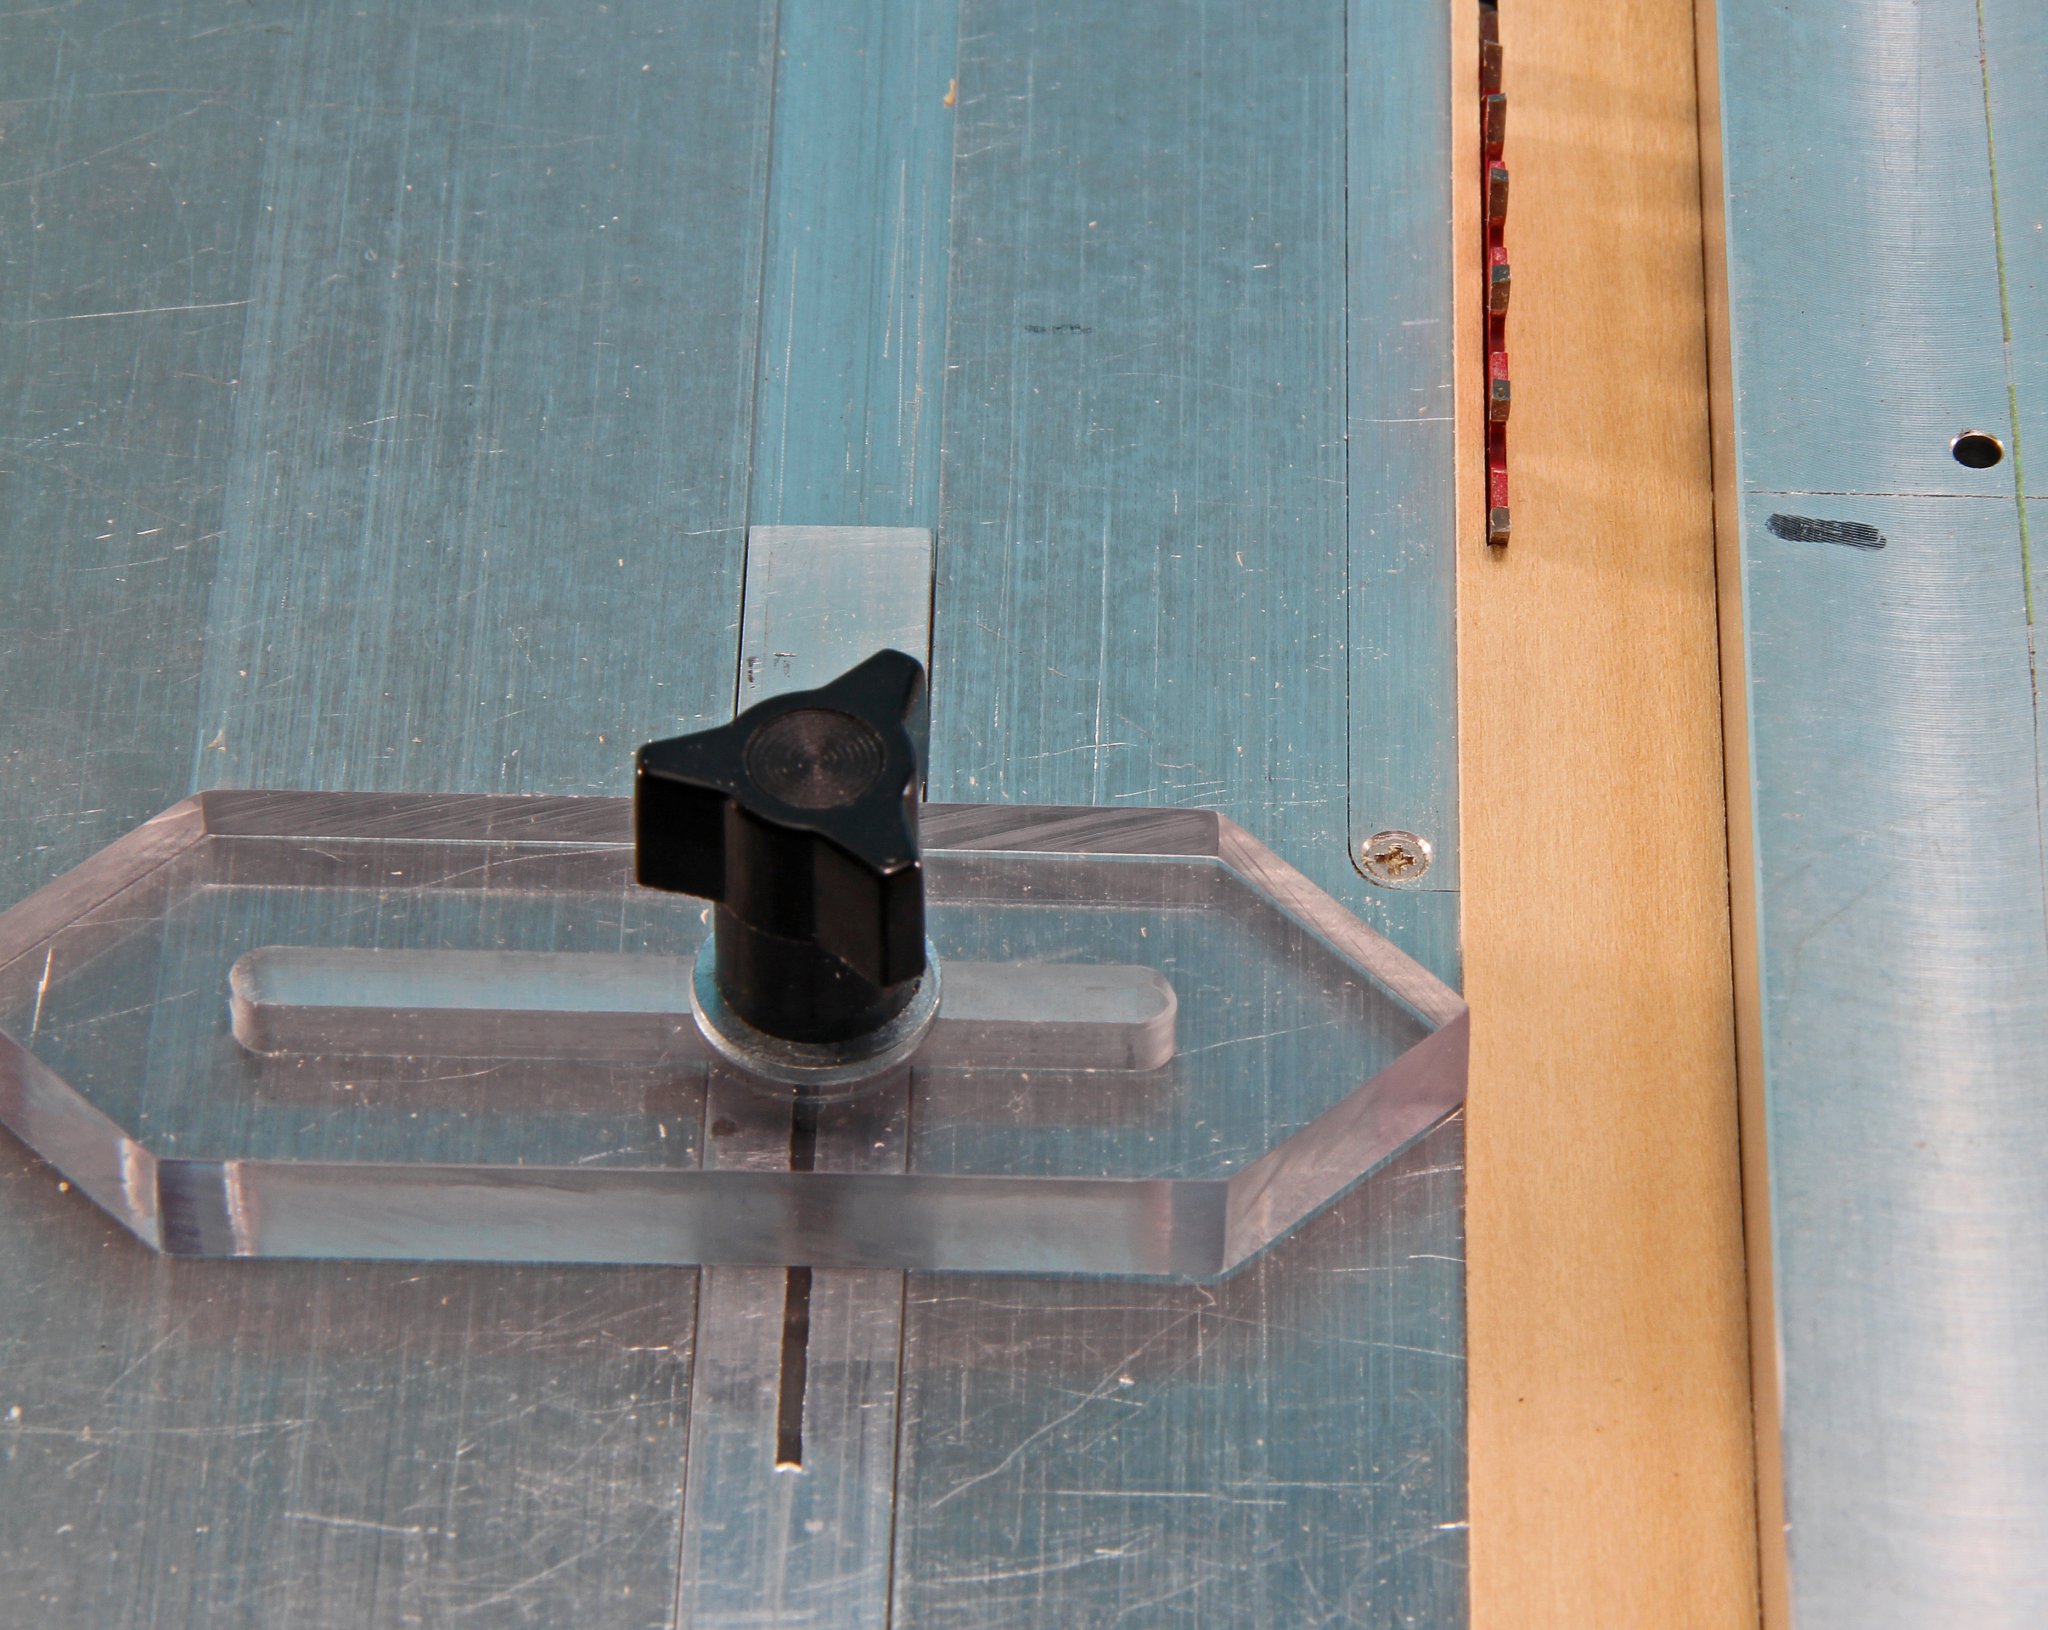
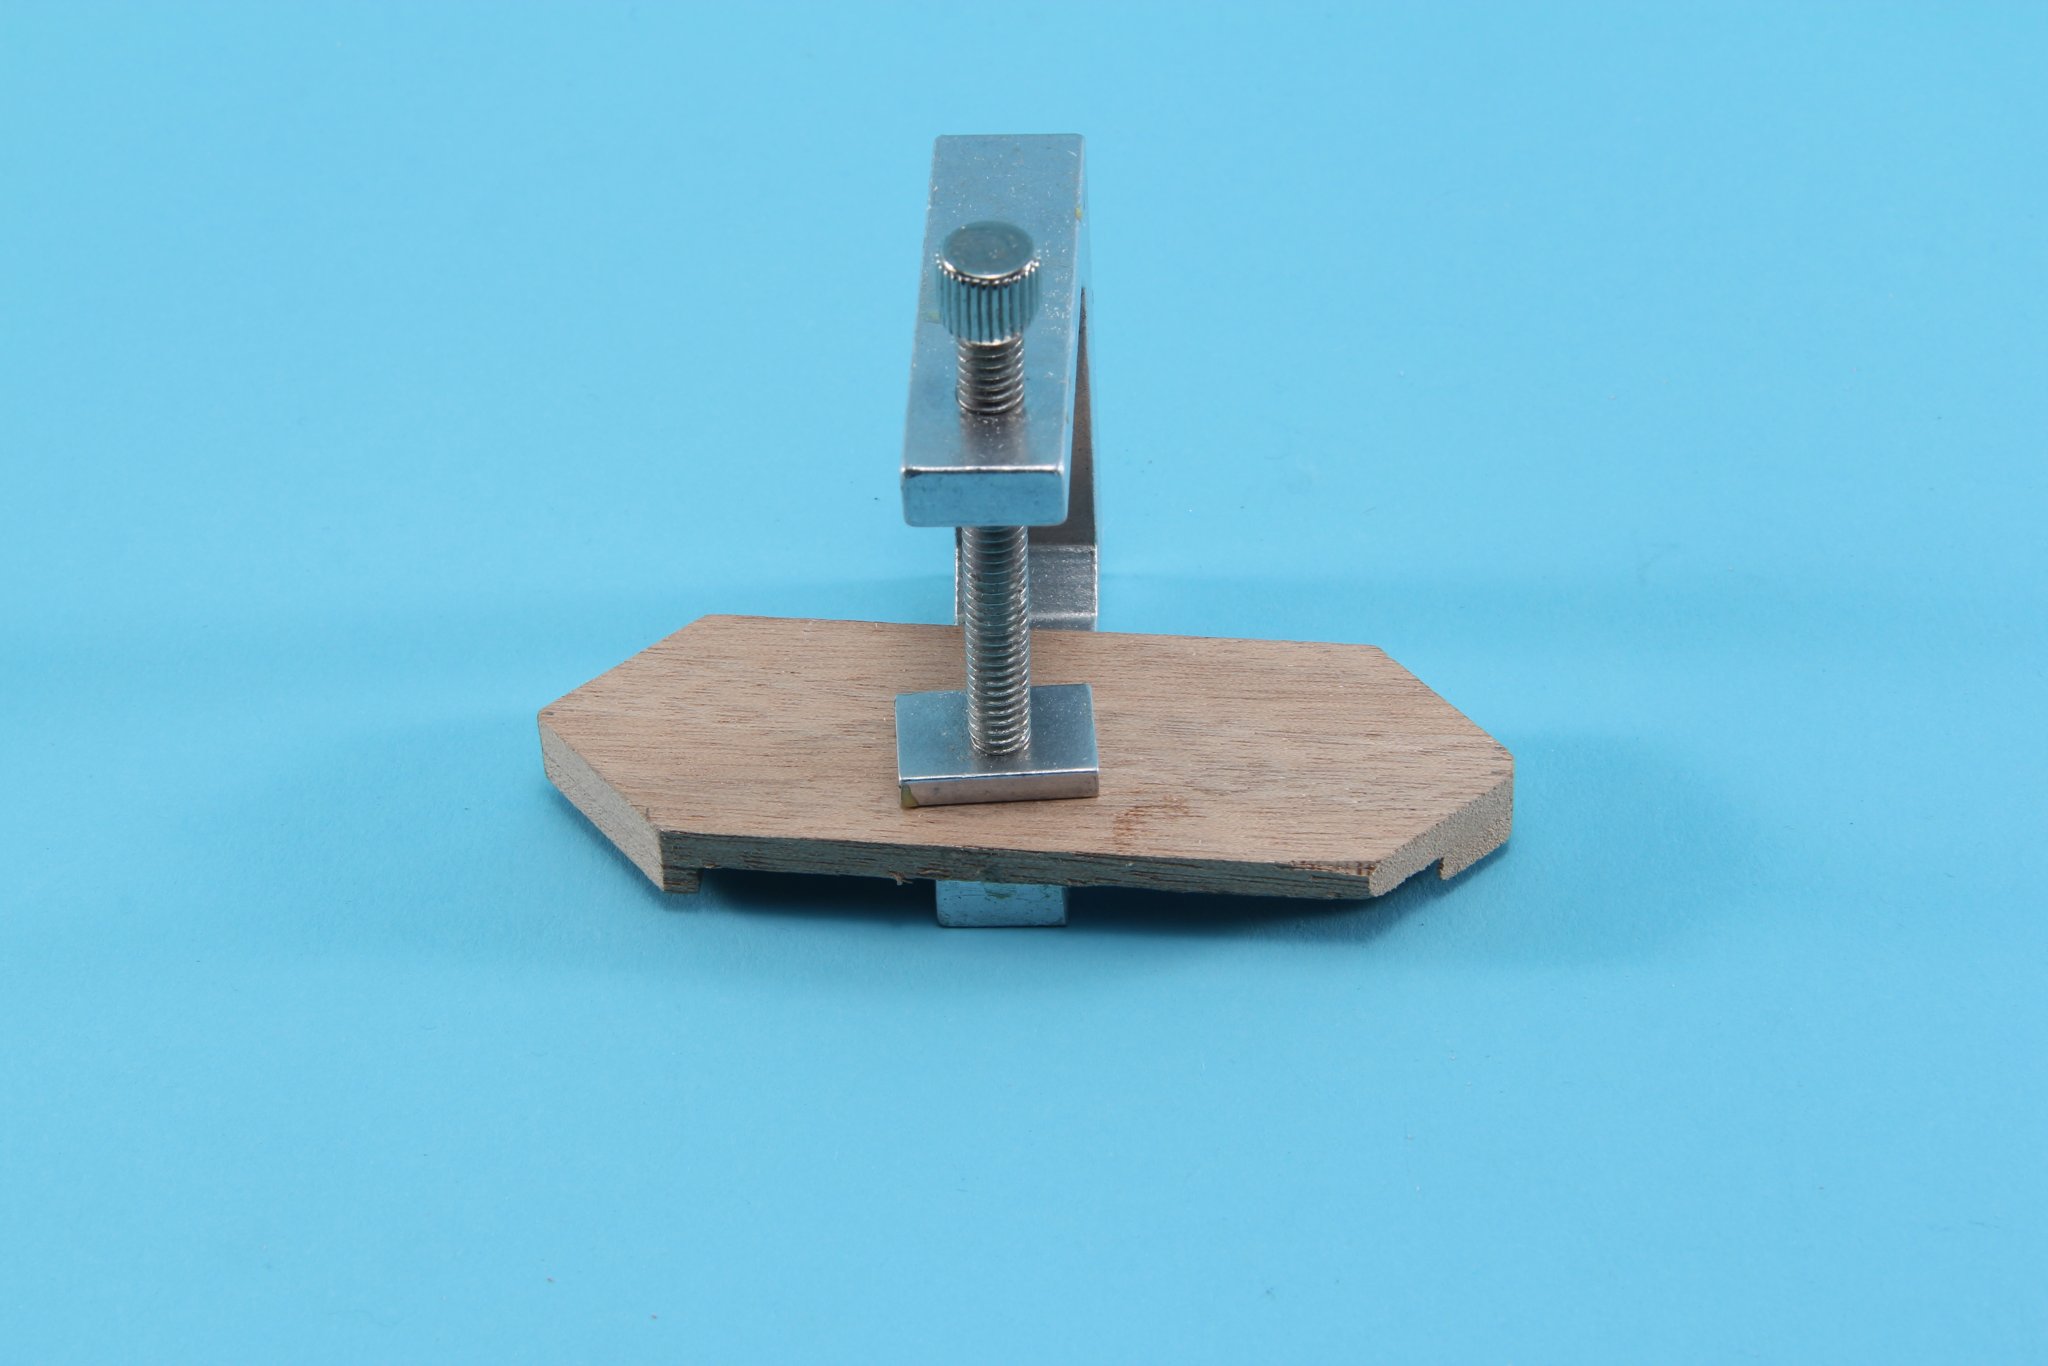
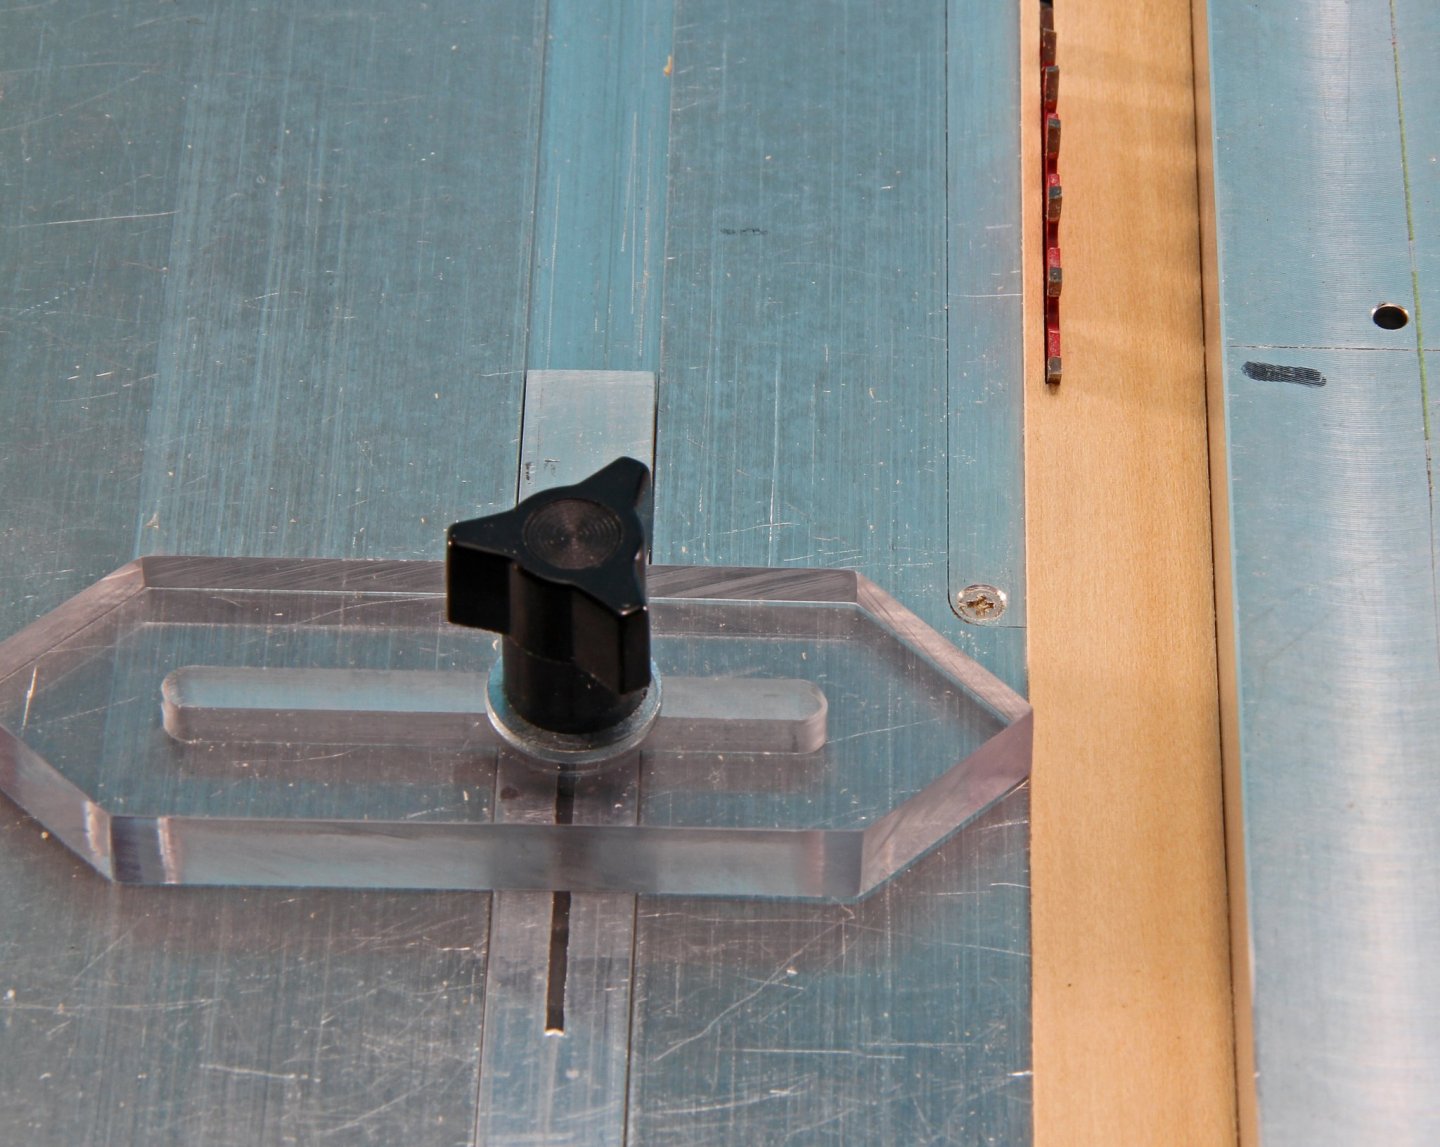
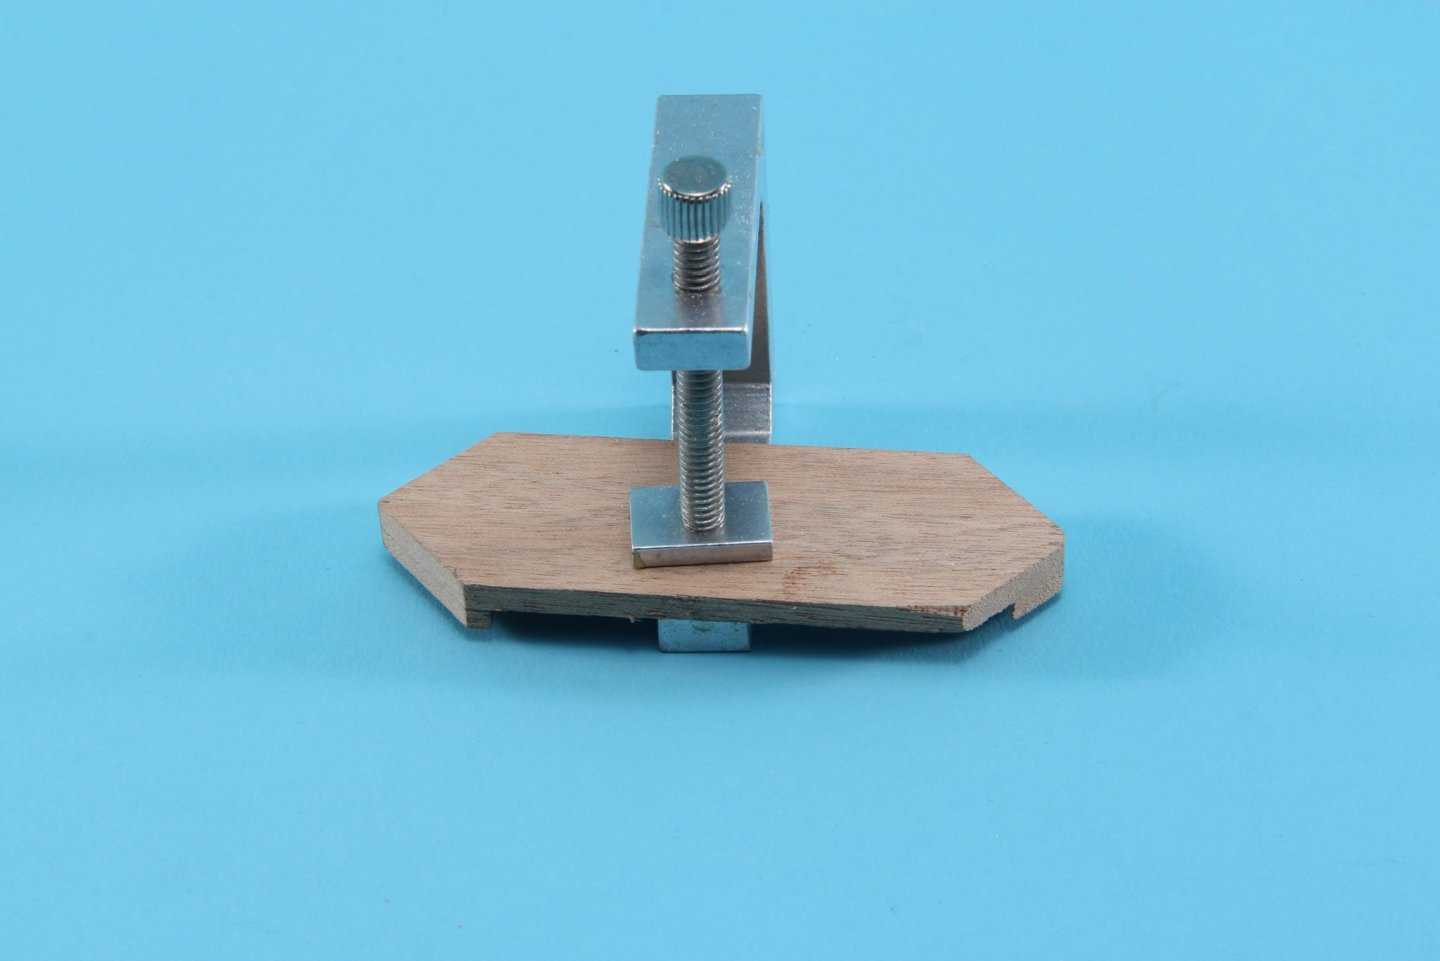
A problem with cutting planks - or anything thin - between the blade and the fence is the rotation of the blade will send it back at the operator with the slightest amount of pinch or a twist of the cut piece. On big saws this has injured operators severely as well as killed some. I don't think anybody has to worry about a fatal injury from our model saws but don't think this can't injure you. Using a push stick helps cancel this out but one chews up a lot of push sticks when doing thin strips because the push stick has to be real thin when doing real thin planks. If you have ever had a push stick hit by the blade tooth you know the kind of shock that can be transmitted to your hand. It can all be avoided when using a tool to the left of the blade so there is nothing adjacent to the cut piece and it can fall away from the blade rather than come back at you and it's easier to use a push stick when one is pushing on the thicker part of the sheet. This is something that is used with full size table saws but the fixtures/tools that work on the big saws will not work on our small saws. I adapted the idea to a fixture I use on my Byrnes saws. The fixture is set to the left of the blade as shown above (Lefties you probably set your fence to the left of the blade so when I say left or right do the opposite). Measure where to place the fixture as shown below - measuring from the blade to the tip of the fixture for the thickness you want for the strips. With the sheet material moved into contact with the fixture on the left and the fence on the right. Lock the fixture down. This only locks the gauge part to the aluminum piece that fits into the groove on the saw table. I cut the aluminum to be a tight fit that still slides back and forth within the groove until I tighten it a bit more and the aluminum piece locks into the groove - notice the slit in the length of the aluminum piece - there is a counter-bore on the underside so the flat head machine screw makes the edges spread a bit wider when the screw is fully tightened. Move the fixture back towards you so there is a gap between the leading edge of the blade and the fixture as shown above and fully tighten the locking screw as described above. Turn the saw on and use a push stick to push the wide sheet material to cut the strip. When the strip is cut, it will fall to the left of the blade, move it out of the way and then pick up the sheet material and place it between the fixture and the fence - forward of the blade. Move the fence over to bump the sheet material up to the fixture and cut the next strip. On the Byrnes saw the thickness of each strip will be as close to exactly the same thickness as you can ever get. When I started cutting strips this was I measured each strip to see the variation - if any - and found that +/- 0.0005" maximum was what I was getting. Wood can change that amount or more from day to day with humidity changes in the shop. A bit of practice on how tight to make the fit between the fixture and the fence is needed but by the time one cuts a dozen strips the variation will be what I listed or less. The fixture shown below was my first generation tool that I used for several years before I made the one out of Plexiglas. The first generation fixture below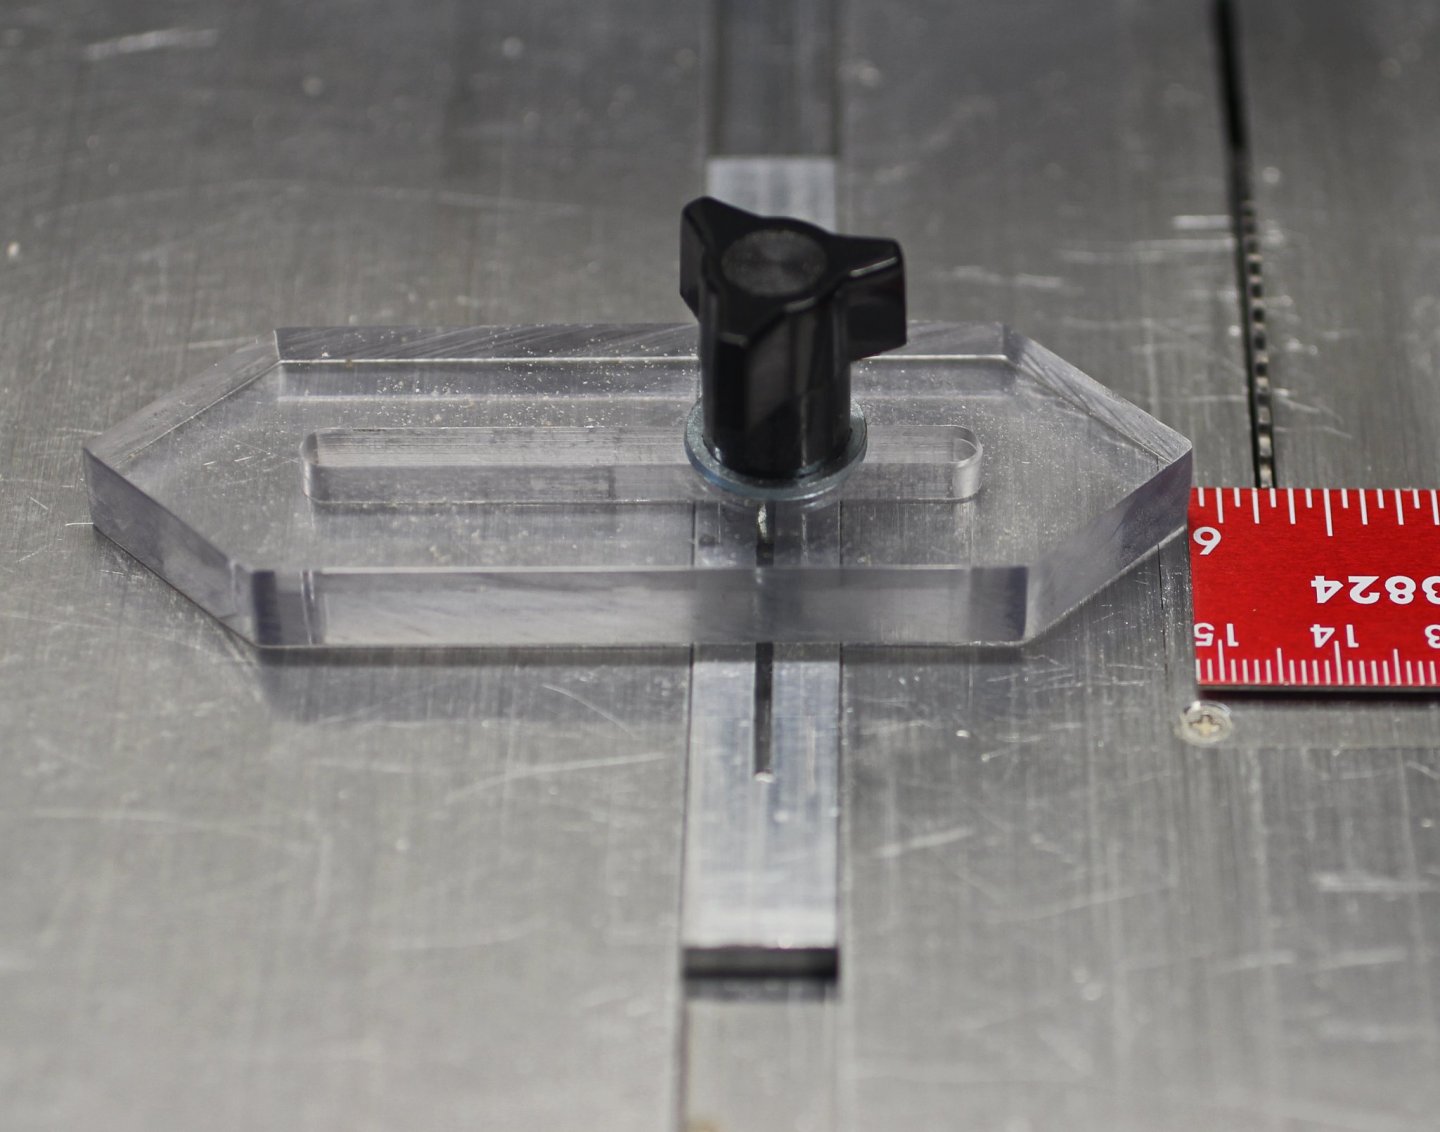
- 47 replies
-
- 11
-
-
USS Constitution Best historical wooden kit available?
kurtvd19 replied to J11's topic in Wood ship model kits
Blue Jacket's kit is endorsed by the USS Constitution Museum as "The official kit of the USS Constitution Museum". Sounds like it's accuracy is backed by the experts. -
I agree that fiberglas cloth isn't needed for a museum model. What you are looking for is a smooth surface not strength.
-
Fiberglas used with epoxy resin will give a glass smooth surface. Hardly any odor. West System 105 epoxy resin and 206 hardener will work perfectly. Check https://www.westsystem.com/ It's very versatile and their instructions are great - the website has a lot of tips. Used for full size boats but works for models too. They have some other combinations if you need extended work times. I have used this and can recommend it. A bit expensive but their pumps for the resin and hardener do the measuring - 1 pump of each = the correct mixture - not a 1:1 mix but the pumps are calibrated to deliver the right amount to the mix. The containers are much different in size for the resin vs hardener. Good shelf life too.
-
Plans - Midwest Products - Fireboat #960
kurtvd19 replied to Chuck L's topic in Wood ship model kits
Is this the old wood framed kit? If so edit your question to mention it's the wood framed kit. The plastic hulled kit #993 has only one plan sheet. I just went and checked the partial #993kit I have - before paying attention to the kit # you listed. Sorry I can't help you. Kurt -
Eric: I have seen backing plates supporting ends of adjoining planks just like you mention below the floor used on small boats all over the hull - full size prototypical boats - but not being into that particular type didn't pay too much attention as to what kind they were. Somebody with more knowledge of this type of construction might be able to give you more info. Kurt
-
Not out of business but they stopped making all their ship/boat kits.