

trippwj
-
Posts
3,156 -
Joined
-
Last visited
Content Type
Profiles
Forums
Gallery
Events
Everything posted by trippwj
-
Boy, Danny, - you are getting tricky! Flipping the picture to confuse image search engines, changing the background...makes this game down right fun!
-
 Happy Birthday, Andy!
 -
That build is absolutely gorgeous, Caroline! VERY nice - looking forward to the next step in the rigging!
-
Nice job on those doors - they look great! Hmmm...maybe leave one or two ajar and allow a peak inside... Nah, never mind. Too late now to furnish the interior!
-
Sorry to hear about the accident, Mobbsie! Best wishes for a speedy recovery.
- 1,279 replies
-
- 1
-

-
- agamemnon
- caldercraft
- (and 1 more)
-
Nice start, Adam. I'll be sitting here in the lurker section with Andy waiting for Mark or Sjors to bring the pop corn machine over.
-
Andy - I think everyone else has already said it - WOW!!!! All those years working the Lakes are paying off! I can only imagine how you keep the lines on the 1:1 models you work on....
-
Those are painted cotton cannon balls, right? I would hate to think that all of the detente that has been going on is now in jeopardy!!! Continues to look very crisp and impressive, Sjors - want to do the planking and furniture on my Ranger??????? Only one cannon so not much benefit to either fleet, though....
-
Looking better all the time! Great job, Sjors!
-
Nice - no idea what the name is, but I want one!!!
-
Dang, Rocker - that is a bunch of cutting and jigsaw puzzle building ahead of you! Nice start on this. Totally agree on the kids - mine are a bit younger and not always so thrilled to do stuff with the old folks (we prefer to think of ourselves as parents, but a teenager can make that sound like a terrible infectious disease of some sort), but give them as much time as we can!
-
Hello, Jack. Very nice job so far. This looks like a very interesting ship. 1.1 meters in length - this will be one large ship to display! Nice repair on that bulkhead. I am enjoying the build - thank you for sharing it with us!
-
Oops...disregard my gaff!
-
Sorry, Anja - couldn't resist sharing this with you as you gaze over the edge into the abyss of "The Dark Side"
-
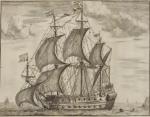
That does appear to be a sprit sail rig - the following is from Wikipedia (they do so much better at paraphrasing the more extensive verbiage in other reference books): The spritsail is a form of three or four-sided, fore-aft sail and its rig. Unlike the gaff where the head hangs from a spar along its edge, this rig supports the leech of the sail by means of a spar or spars named a sprit. The forward end of the sprit spar is attached to the mast but bisects the face of the sail, with the after end of the sprit spar attaching to the peak and/or the clew of the sail. It is said to be the ancestor from which the common gaff rig evolved in 16th-century Holland.
-
Greetings, David! I am a late arrival here, but you are doing a great job on this one. Robbyn, Augie, Keith and (yes, even Sjors) are all giving you some great advice. Like Adrian said, for holding things when there is no hold like at the bow use rubber bands. As keith showed in his Swift log, it is amazing how you can adapt rubber bands to clamp strange shaped pieces!
-
Hello, Elmir. Very nice workmanship so far - hope you get your saw back soon so you can show the next stages. What you have so far is very nice to look at!
-
Sounds like you are moving along smartly, Mobbsie! Look forward to seeing the result of that planking and initial painting work. Based on the size of this beastie, did you need to buy paint by the liter rather than by the ounce?????
- 1,279 replies
-
- 1
-
-
- agamemnon
- caldercraft
- (and 1 more)
-
Good morning, J. The crew was courtesy of Maurys - some left overs from his ECB build. They are actually a scale rail road crew - several sites carry them. I think they would work more than an 8 hour day, but they don't seem to get much done unless i am there to poke and prod for some reason.
-
Thanks, Matti. I only wish they worked a bit more quickly! Thank you, John. Any day i can bring a smile to your face is a good day, Augie! :P :P Thanks, Craig. I got the idea for the string from a couple of logs here (just don't remember whos logs ) - it really helped with keeping the spacing equal. Thanks for stopping by, Adam. I am really enjoying the POF - takes quite a bit longer to get the basic hull built, but for some reason feels more satisfying. (of course, I may change my view if it comes out all catywompus rather than nicely faired...)
-
Looking good, J. I am slowly getting to this stage and am taking copious notes!
-
Golly - I am arriving rather late to this build! Looks good so far, Robbyn. I think I am going to have to stand out side and look in the window...but I did bring a friend with me!!!
- 234 replies
-
- 1
-
-
- 18th century longboat
- model shipways
- (and 1 more)
-
Gosh - I leave town for a week and come back to see Sjors is building chess sets on his bus! Nice progress, kindly sir. Suggest counter with knight to queens bishop 6 check....
- 1,873 replies
-
- 3
-
-
- occre
- san ildefonso
- (and 1 more)
-
The rebuilt decking looks good, Adam. I like the color.