HOLIDAY DONATION DRIVE - SUPPORT MSW - DO YOUR PART TO KEEP THIS GREAT FORUM GOING! (Only 51 donations so far out of 49,000 members - C'mon guys!)
×

trippwj
-
Posts
3,156 -
Joined
-
Last visited
Content Type
Profiles
Forums
Gallery
Events
Everything posted by trippwj
-
This one is, indeed, a challenge - not giving up though! It must be out there somewhere for one of us to fall over!
-
 She continues to get prettier and prettier, John! Very nice work!
 -
Glad to see that is getting a good workout, popeye! Congrats on another promotion - since Sjors is the senior Captain he is obligated to provide the for the celebration!
- 377 replies
-
- 1
-

-
- america
- billing boats
- (and 1 more)
-
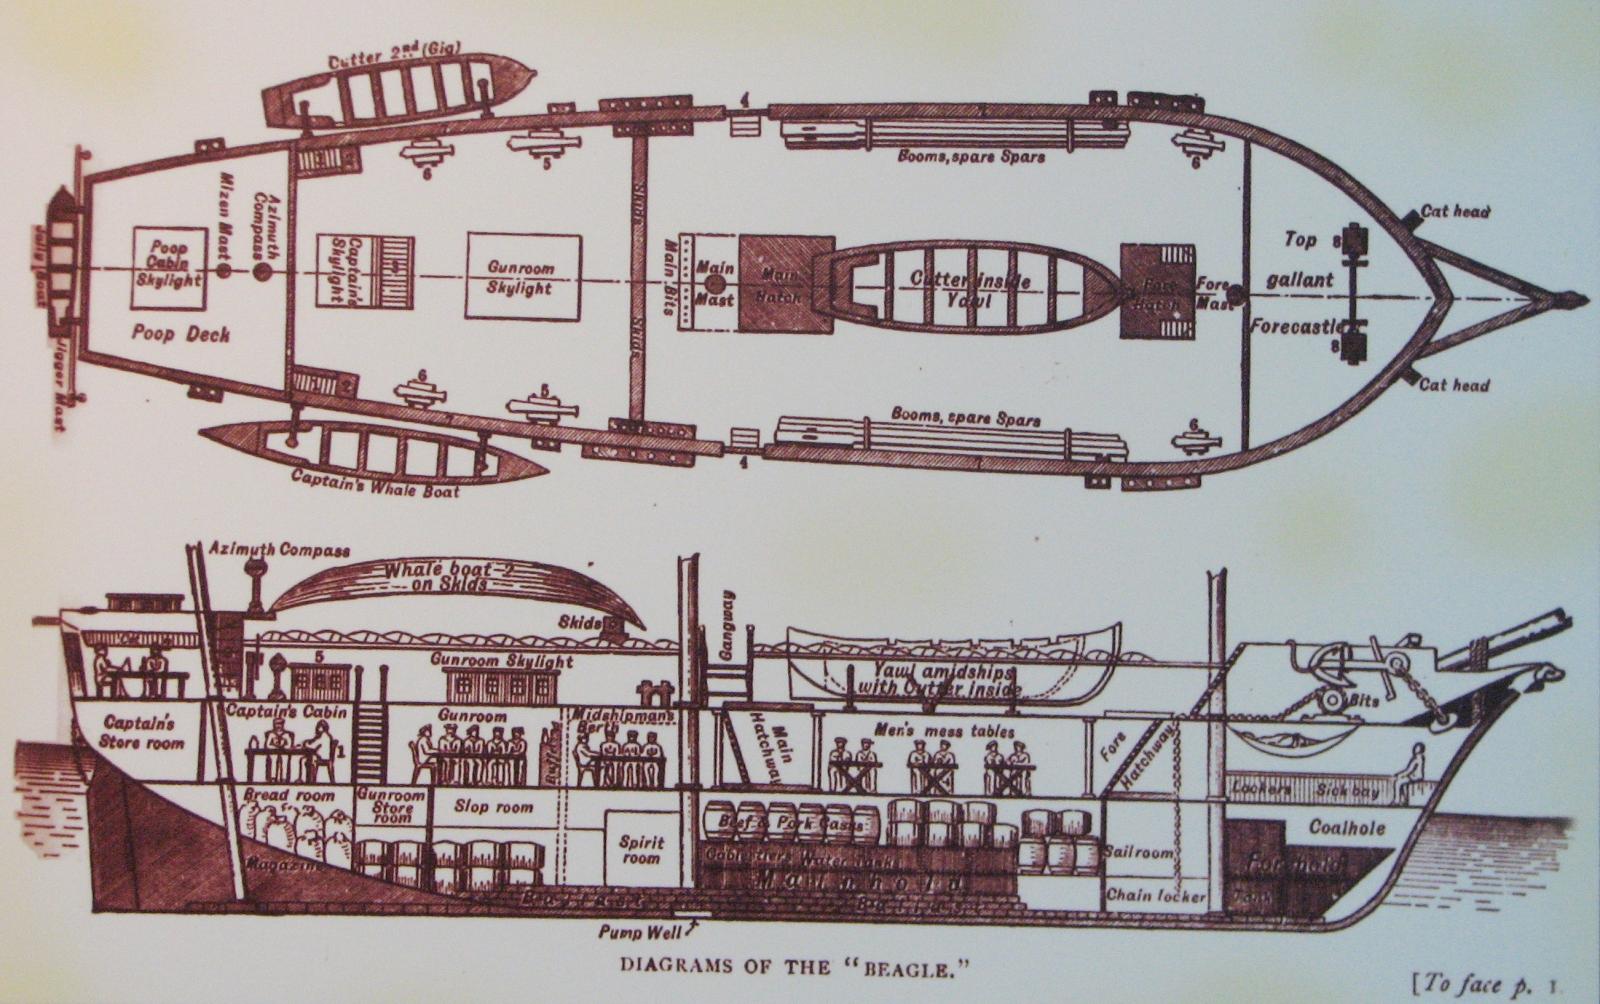
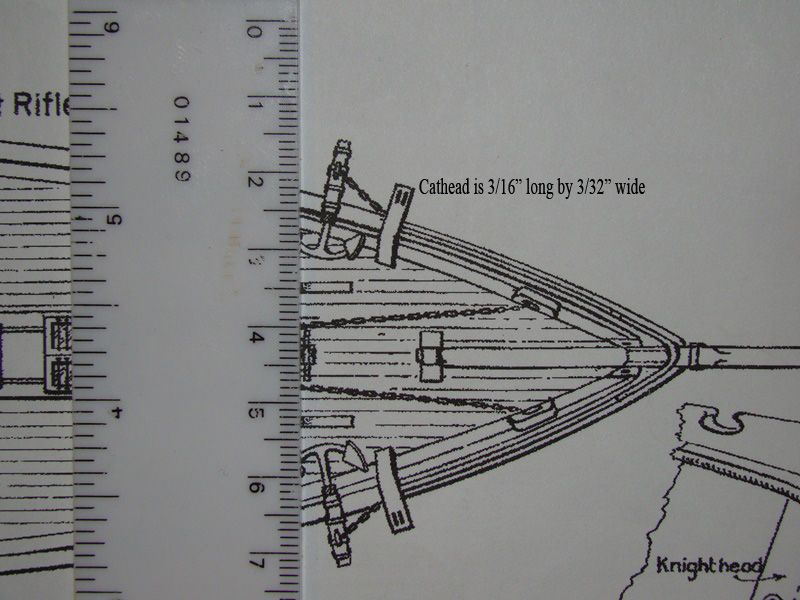
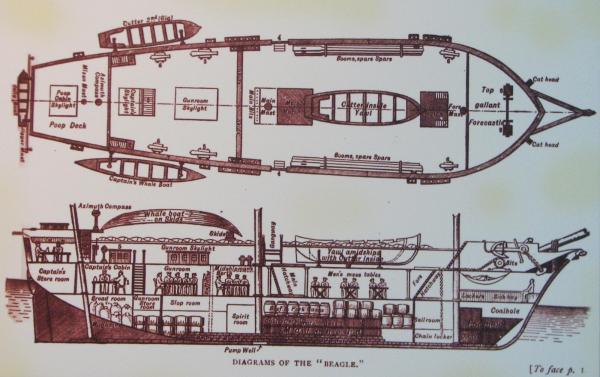
I am still checking some of my books - I recall seeing in at least one a good drawing of stowing cannon parallel to the bulwark. Here is a deck diagram from the HMS Beagle that may help a little.
-
Robbyn - Very nice job on these! As long as they all hold even tension when you serve the lanyards you should be fine - I would serve them the same manner as installing them initially by alternating larboard and starboard to keep the tension even. Do you hear that little voice I'm hearing??? Sounds like it is coming from that box right over there.... "Build me, Robbyn, you know you want to at least see how the keel looks and start a building board.....just a little work on me doesn't count..."
- 773 replies
-
- 1
-
-
- san francisco ii
- artesania latina
- (and 1 more)
-
Sorry to be joining in so late, Anja - I hope that this was a fantastic day for you and that Sjors took you out somewhere nice for dinner!
-
The "R" should align with the underside of the rail, about where you have it. You will be installing a cap rail around the bulwarks (see step 6/Figure 13 in the instructions). As you shape the hull, it will start to fit better along the stem and the keel. take your time, start about template 5 and slowly fair the hull in each direction from there fore and aft.
-
Sergey - VERY nice looking model - look forward to following as you continue. Welcome aboard!
-
For what it's worth, I vote for the Dallas with the Eagle a close second. Realistically, any of these would be a good next step!
- 515 replies
-
- 1
-
-
- artesania latina
- whaleboat
- (and 1 more)
-
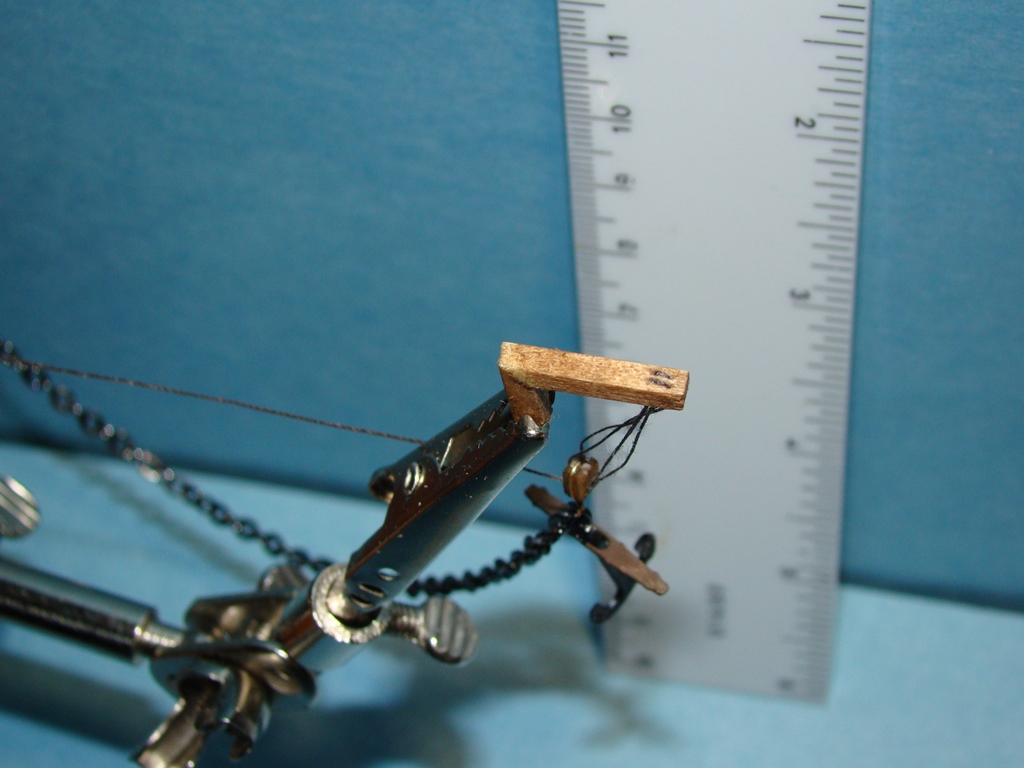
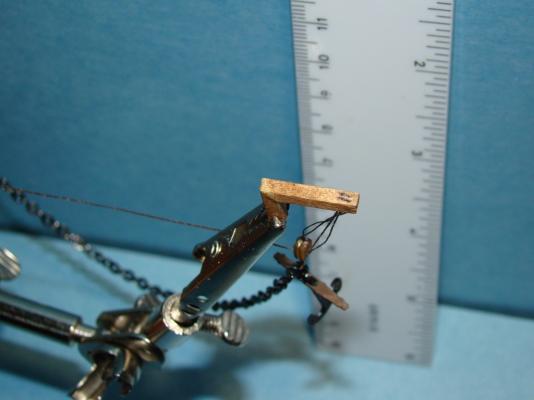
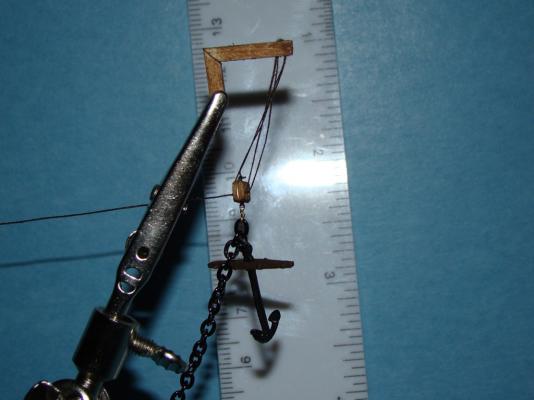
J., Augie and Carl - Thanks for the suggestions. I opted to stain the cathead. Here is Mk-I of the cathead, reeved to a double block with a hook in the anchor chain at the shank. So - should I re-do this? Many thanks! Second cathead - pre-assembly. First cathead - overhead view. If'n you look closely you can just make out the line in the groove. Side view showing how it will be mounted to the anchor on the model.

-
I do believe you found it, Barnacle Bill. Let's see if David confirms it for you!
-
Danny - I generally just lurk on your log, but I gotta say, your craftmanship is amazing! The iron work on the rudder is simply amazing. Thanks for posting all of this - it is a great learning tool for new builders like myself. back to lurking....
-
Nice piece of work, sir. Very clean and detailed!
-
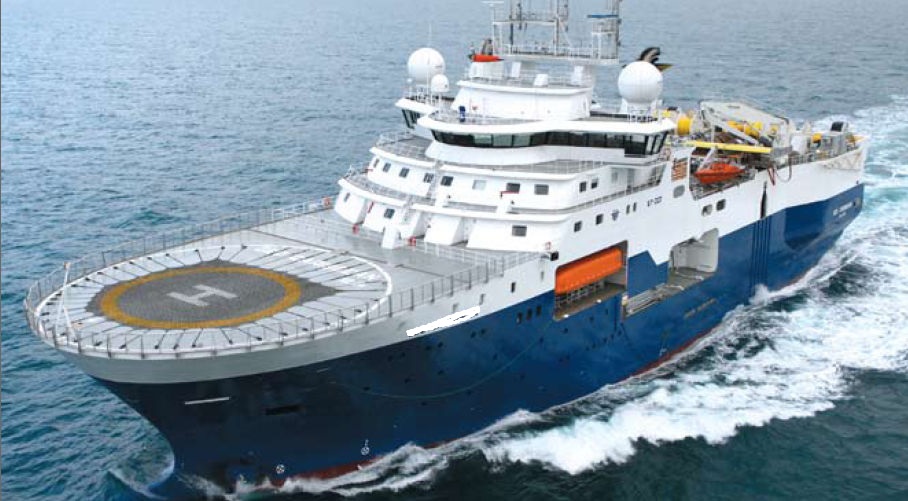
You are, sir, correct. It is indeed the Geo Caribbean.
-
Outstanding work, Rusty!
-
That is a neat looking ship. Try this one (and I apologize for the lousy redaction - really must learn to use Photoshop one of these days...)

-
Bourbon Mistral platform supply vessel?
-
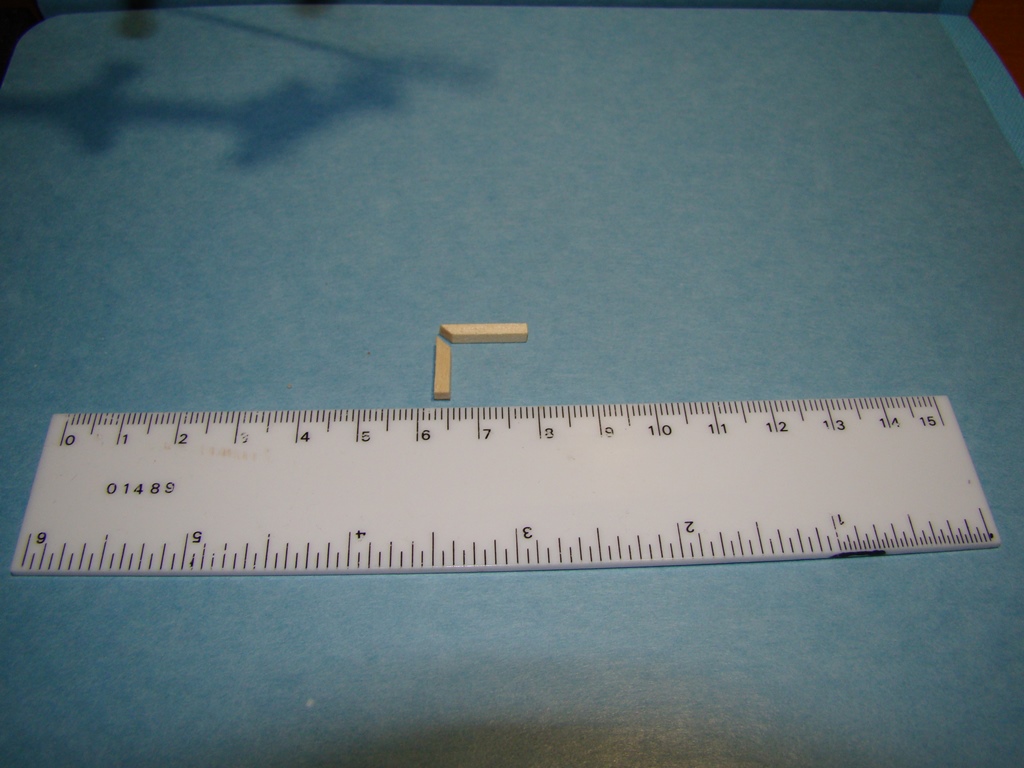
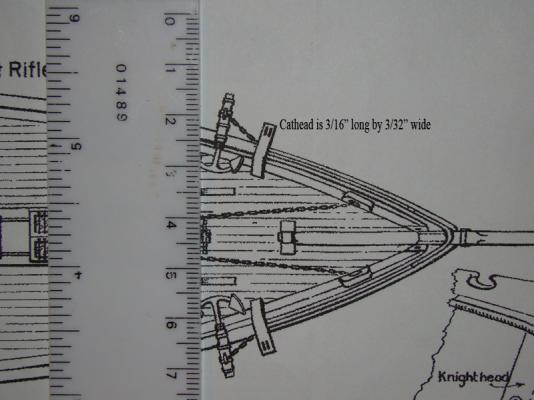
So, continuing to work slowly on the HL. I have the port chainplates and lower deadeyes installed, but before going any further on the rigging I wanted to take a step back and finish all the deck furniture so as to avoid working around the rats nest of lines. I am about to start on the catheads - these beasties are tiny. The piece is 3/32" square. I am obviously not going to be able to install any sheaves in this. I think, possibly, maybe, that what I will do is drill a leading and trailing hole for each sheave, then put a very small groove between them to simulate the opening where the sheave would be. I also think I will follow what is shown on the plan below and just use 2 instead of 3 sheaves. Any other options you folks can see?
-
Nice start, Sjors! I can handle 4 days, I guess, if I must....
- 1,873 replies
-
- 1
-
-
- occre
- san ildefonso
- (and 1 more)
-
The last picture is actually of the Victory. Some are actually quite a bit easier....
-
Robbyn - You don't ask much, now, do you? The deadeyes are installed with the single hole at the top (upper deadeye) or bottom (lower deadeye). each pair of shrouds is a continuous piece from forward deadeye, around mast, to next deadeye on same side. The part at the mast is then siezed, the shroud attached to the deadeyes and then the deadeye lanyard is installed and used to tighten the shroud to the correct tension. Best approach (so I have been told) is to get the length correct for the shrouds then do the lanyard between deadeyes - able to ensure that the upper deadeyes remain at a consistent height that way. Alternate sides, doing first pair on starboard then first pair on port. Hope this helps!
- 773 replies
-
- 3
-
-
- san francisco ii
- artesania latina
- (and 1 more)
-
Richard - Beautiful work on this. The dredge turned out very nice - the netting looks pretty realistic as well. I also like the color on your deck - it has a nice contrast with the hull. Glad to see you have a crew now to pick up some of the work!
-
Relax, Andy...it's just a bunch of those folks forming a Confederacy to try and entice others using the Syren call. We know the force is strong in you...but, boy, new tools, a place to use them, the ability to really screw up in a more spectacular and rapid fashion!