dafi
-
Posts
2,292 -
Joined
-
Last visited
Content Type
Profiles
Forums
Gallery
Events
Everything posted by dafi
-
 No this was still before ... ... the camera refused to take pictures afterwards as being believed to be too disturbing ... ;-) XXXDAn
 -
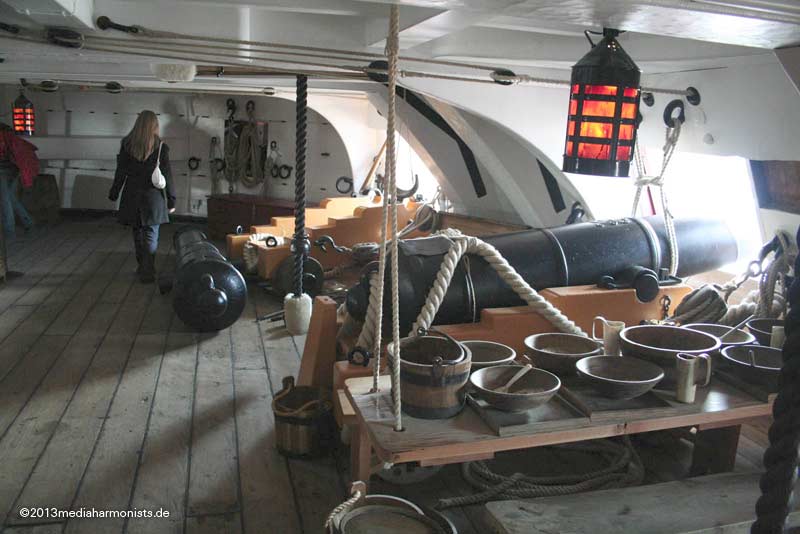
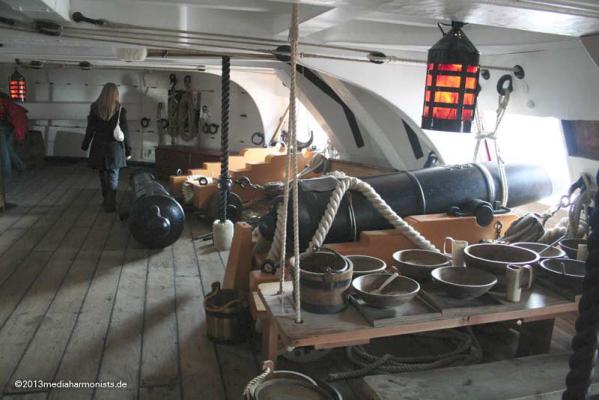
The mess and sailors chests ... A lot of contemporary pictures show sailors sitting on their chests while having their meals on the tables that were hung up from the deck beams. Most AOTS and the Vic in P. show benches to sit on instead. This gives me some of my usual intriguing questions: - Was the use of benches something special in the navy for that in case of clearing for combat there were no hundrets of chests to be removed into the hold? - Were bags used instead like in the sketch of AOTS Bellona? - Were their any chests for the common sailors on the RN? - Were chests used at the merchant vessels or smaller RN vessels where they did not interfere with gun exercise? - Were the cupboard plates and the barrels removed in case of exercising? How did everything did not get messed up or broken? - was the table always fixed to the inboard hull or was it sometimes left swinging by a second rope to avoid spilling? Thank you for any hints, Daniel
-
Simply wonderful! Daniel
-
I think you are doing all right :-) The overlap is difficult as the material is far to thick in scale. Some modelers use hand made plates with the rivets just on two sides in L-shape and not on all four sides, thus implementing the overlap. If you look at historic coppering, the overlap is almost not visible - as are the nails :-) Here a picture that wefalk shot at the HMS Garnet and showed here some time ago: http://www.wefalck.eu/mm/maritime/chatham/100220-72.jpg Cheers, Daniel
-
I love Halloween, the kids used to run off in panic three blocks away ... ... perhaps I should have worn a costume with mask ;-) Thanks for the nice feedbacks, Daniel
-
Love the bending tool! The grenades were in fact mere cannon balls, painted black. Good luck with your build, Daniel
-
Thank you all! My pleasure - building and enjoying your comments :-) Very appreciated! Daniel
- 33 replies
-
- 1
-

-
- trinkstein
- frigate
- (and 2 more)
-
Thank you Sirs :-) Big M.: The only thing to envy me are my specs - 3 dioptrine with build in LED for 5€ from the supermarket ;-) XXXDAN

-
Thank you Aldo, Andy, Popeye, Chris and all the others, very appreciated :-) So the next quantum leap, means lot of work for shortest distance possible ;-) Next were the gunport lid topping lifts. A blackened 0,3 mm copper wire wound around a 1 mm needle and cut into rings. For the next steps I skipped the tweezers and used fine pliers from the electro department, thus reducing the free flights of the parts enormously ! After some tests I did like follow: As the thread was to thin to do a real splice, I held the ring with the pliers ... ... some CA in the U-turn of the tread and twisted counter clockwise ... .. to get a well enough splice imitation. Then positiond the ring, hooked in ... ... closed with the pliers ... ... and the lift is in place :-) The original idea was to imitate the small tube that enters the hull with diluted PVA but now I wanted to try something more tricky. Some time ago I already presented the trick, that heated and pulled sprue keeps the proportion of its section. So I prepared a 4 mm sprue by drilling a center hole of 2 mm, fixed toothpicks on its ends ... ... and slowly heated it up and pulled to the wanted diameter ... ... then cut 3 mm pieces and fiddeld them on a 0,1 mm copper wire to avoid unwanted escapes. In the front the test topping lift. Then drilled 0,7 mm holes for the tubes pointing 45° upwards, inserted the tubes, glued them in and cut them to the necessary length ... ... used a needle to reopen the squeezed holes, put the lift in and glued it by fixing with the needle. And it looks like this: With a little more practice it will for shure look even tidier macro wise, but for the naked eye it already works :-) Cheers, Daniel
-
Thank you Lawrence and Gil! I love the "very serious" bending jig :-) Thank you for posting! Here is my "very toyful" jig Lieber Gruß, Daniel
-
Thank you Dirk, Kats, Mark, Popeye, Paul, Jan and "Bones" :-) :-) :-) I am already wondering, but nobody dares asking about the title of the thread ;-) ... okokok, before I have to wait too long: dafi, what strange thread title you have ?!? Once upon a time, the shout from the channels was to be heard "By the Deep 17" meaning a little more than 17 fathoms of water were measured, roundabout 30 meters. The line used was ca. 20 to 25 fathoms long (about 36 to 45 meters) and had marks indicating the depth measured. So the shout "By the Mark XX" meant that it was exactely on the mark and "By the Deep XX" meant it to be above the mark. The marks were at 2, 3, 5, 7, 10, 13, 15, 17 und 20 fathoms (after Nares) and had : 2 fathoms leather with 2 stripes, 3 fathoms leather with 3 stripes, 5 fathoms white, 7 fathoms red, 10 fathoms leather with hole 13 fathoms blue, 15 fathoms white, 17 fathoms red und 20 fathoms two knots. http://en.wikipedia.org/wiki/Sounding_line So hastily made the 20 fathom line, fitted marks and lead ... ... and the sound of the falling lead could be heard :-) "By the Deep ..." XXXDAn
-
Wonderful :-) Daniel
-
Dear Robin, thank you for your feedback!!! Thank you, Daniel PS: As it is more quiet here - I am not in summernation yet, here is the little side project, closely linked to this one :-) http://modelshipworld.com/index.php?/topic/1487-by-the-deep-17-by-dafi-royal-navy-17801805-display/page-3
-
Bang :-) :-) :-) XXXDAn
-
And more tempting as the 1803 chain irons are the 1765 ones: same length but two pieces more! Testing the lengths, carefully remembering that the outer ones are longer. ... homeopathic doses of solder ... ... degreased the wire, first soldering the single rings, then joining them on the central part, the flux with the solder embedded, small touch with the hot iron ... ... and the same game with the dead eye and the triple pack ... ... adjusting over the edge of a blade ... ... and comparison: bottom as cut, then solderd and on top adjusted. Inside length 4 mm :-) A small jack done for thinning the deadeyes ... ... and painting them with casein paint to give a better to scale wood appearance than the original wood ... ... put on place ... ... made the batten to cover the channels ... ... and painted and rusted. And here the comparison :-) Cheers, Daniel
-
Oh Mark, I am sooooo sorry ;-) XXXDAn PS: Thanks for referring to my build, this is worth more than an award!
-
Hello Brian, look here: #160 down to 165 :-) Plus extras: #136 #146 #150 #156 I do believe that the bulkwards were taken down, as the stanchions in the way had to be removed. The way back to the front was often done by just dragging the messenger over the floor. Daniel
-
That skipped my eye :-) I will follow with pleasure! XXXDAn
-
Royal William by derebek - 1/72
dafi replied to derebek's topic in - Build logs for subjects built 1501 - 1750
Wonderfully done :-) Congratulstions for the results! Daniel -
Wonderful and lovely job :-) XXXDAn
-
HMS Victory by EdT - FINISHED - 1:96 - POB
dafi replied to EdT's topic in - Build logs for subjects built 1751 - 1800
As always: Big thanks for showing the how-to-do :-) Always an inspiration! Daniel -
Love it :-) Daniel
-
Thanks Brian, Paul and Mark, as always, I do not know yet what this is for, just a small nagging voice inside my head told me to do so ... XXXDAn