


Roger Pellett
-
Posts
4,519 -
Joined
-
Last visited
Content Type
Profiles
Forums
Gallery
Events
Posts posted by Roger Pellett
-
-
Common construction pine would be my choice for this application. Here in the USA construction quality lumber is graded SPF- Spruce, Pine, Fir. I would dig through the pile to select a piece of pine. Spruce is white, soft, and has a distinct and unpleasant smell. Fir has a distinctive grain. Pine has a nice tight, not particularly prominent grain and a light color. An 8’ 1”x4” should be plenty unless you are building a model of the Great Eastern or Titanic. You don’t need select grade as you can scrap areas with knots.
Before fiberglass, pine was the choice of the professional model builders that built the ship hull models to be towed in experimental test tanks.
Roger
- mtaylor, Jaager, CaptnBirdseye and 1 other
-
 4
4
-
-
While the open frame admiralty construction POF model might be considered by some to be the ultimate example of the shipmodeler’s art it really only makes sense for those limiting themselves to the era before about 1850. This ignores a rich variety of subjects built from iron or steel where solid hull construction will produce an excellent model. I am amused to see builders building planked POB models of Titanic or Bismarck, where more correct construction would require POB to mean “Plating on Bulkhead.”
I used to have several A.J. Fisher catalogs from my Father’s ship modeling days in the 1930’s. I seem to remember that back you could buy a full kit, a fittings only kit, or just the plans. If you bought the full hull kit, they furnished sawed out lifts to be laminated into the hull block.
Roger
-
I personally enjoy building “solid” models by which I mean those carved from a block of wood vs planked on bulkheads. The term block encompasses various laminations; by waterlines, buttocks, etc. with the inside removed to leave a thick shell. For me, shaping the hull with chisels, spokeshaves, and rasps is an enjoyable part of the model building process.
Accurately shaping the old machine carved solid model kit hulls was complicated by the lack of a flat datum. I, therefore, build my carved hulls as two half models. This allows me to maintain a flat surface that the hull can be layed on when checking the carving process with templates.
Roger
-
Hi Bill, different San Juan. In the late 1500’s Newfoundland’s Red Bay was a Spanish whaling station. It was adjacent to the migration route for a particular species of whales. Whaling was done from shore. Small boats, remarkably similar to later American boats were launched from shore to capture whales. Rendering was done in triworks erected a onshore.
Archeology has revealed much of the onshore infrastructure. In addition the wreckage of two galleon type vessels, a whaleboat, and a longboat has been discovered. The whaleboat has been reassembled and is on display at the visitor’s center. One of the Galleons, thought to be named San Juan was completely recovered. The pieces were each measured and the ship was virtually reassembled. The pieces were then preserved by burying them offshore in a stable environment.
While this might seem far removed from the Spanish Armada, a squadron of these Basque built whaling vessels did sail in the armada, as they were prized for their sturdy construction. If you google Red Bay you should be able to see the model of the vessel that Parks Canada bult. It is the best example that I know of a real Spanish Galleon.
Roger
- thibaultron, mtaylor and Canute
-
3
-
After finishing my post I realized that a the review of the kit was posted above. After looking at the photos IMHO the kit bears little resemblance to a real working vessel of 1580 or any other time period. It appears that the kit mfgr is intentionally trying to offer an updated version of the mass produced “decorator models” of the past.
The large sailing warships of the 1500’s had “boatlike” hull lines with separate lightly built upperworks above. The model built from this kit appears to lack these characteristics.
Roger
- thibaultron, mtaylor and Canute
-
3
-
Many Naval Architects (the professionals in the boat and shipbuilding business) were and still are enthusiastic ship model builders. Two of the best known, L. Francis Herreshoff, and Howard I. Chapelle have written that the basis of a good ship model is an accurate set of “ lines” that define the shape of the hull. Chapelle further argues that models based on other than known hull lines “should not be built.”
Archaeology has now provided us with accurate hull lines for two previously undocumented vessels. One is of course, Mary Rose. The other is the less well known Spanish vessel San Juan. This medium sized Nao or Galleon was crushed in the ice at Red Bay in Newfoundland in about 1580. An extensive report including hull lines has been published by Parks Canada with copies supposedly on line.
This should provide you with an objective standard to evaluate your kit.
Roger
- Canute, mtaylor and thibaultron
-
3
-
Scotty,
When building a Virginia Pilot Boat, less is better. In the very early 1800’s a Royal Navy officer painted pictures of several of these interesting craft. They were very simply rigged and outfitted, usually a solid low “log” rail instead of bulwarks, and no standing rigging (shrouds or stays).
There is no need to include a second anchor as paintings usually show just one. Use the one that came with the kit and move on to your next project.
Roger
- Knocklouder, Scotty W, Keith Black and 1 other
-
4
-
Sheet brass is readily available in different thicknesses. OnLine Metals is a great source but maybe not for small quantities. sheet brass for hobbyists is readily available in 3in x 8in (approx?) sized sheets. I find .010in thickness to be a good compromise. It is easily cut with ordinary scissors but thick enough for structural purposes. The eye is not going to recognize.001” thickness differences.
A Byrnes Saw with a very fine blade is ideal for cutting brass sheet into strip. These small fine toothed blades are designed to cut metal. Glue the sheet to a piece of 1/8” craft plywood. Duco Cement works fine for this.
Roger
-
DrPR: Thanks for your insight. Hopefully this discussion will encourage others to tackle projects involving brass work.
Roger
- Keith Black, FriedClams, Cathead and 3 others
-
6
-
Another advantage of the blob on the soldering iron technique is that when applied to the joint, the molten solder is ‘superheated;’ heated above its melting point. Heat transfer between a liquid and a solid is usually more efficient than heat transfer between two solids.
Roger
-
Andy, In building this model, I have arrived at some conclusions that don’t necessarily fit the common wisdom about soldering, especially when applied to the very small parts that we work with.
Soldering is all about applying intense heat to a small area. When using conventional heat sources heat is transferred to the work area by Conduction. Conduction is time dependent. Think of heating one end of a metal bar and seeing how long it takes for the other end to get hot. Likewise, when you apply a soldering iron to a joint, while the iron is heating it, heat is being transferred outwards to other parts of the structure. This can damage previously soldered work. This means that the quicker that you can solder a joint the less risk there is of damaging other work.
I, therefore, use a “hot” (950f) soldering iron with the smallest tip that will effectively transfer heat. Most of the time this is a conical tip.
Most books on metalworking tell you to “heat the joint to let the solder be drawn into it.” While this might work for large objects, for the small work that we do, I find that a small dab of solder on a hot iron works better. Again, having the solder on the iron already melted minimizes the time that heat needs to be applied.
I use one type of flux; Bakers Fluid. This is a clear water thin liquid that is applied with a model size paint brush. It seems to draw solder into the joint. I like conventional wire solders, lead free. Find one that flows easily. IMHO, brand names are mostly witchcraft.
Water makes a great heat sink. We all knows that water boils at 212F; less if you live in Denver. This also means that the temperature of a water saturated Qtip, cotton ball, or wadded up paper towel cannot get hotter than 212f until all of the water boils off. In addition, the energy required to convert 212f water to steam is much greater than that to just heat it up.
These are my personal observations. I hope that they work for you.
Roger
-
Hi Valeriy
The Hyde Windlass Co is an old American manufacturer of marine deck winches.
If you Google “Steam Cargo Deck Winch” you will find a copy of one of their old catalogs. There is a detailed drawing of one of their winches.
Roger
- mtaylor, Valeriy V and Keith Black
-
3
-
While there is a temptation to want to use “the best,” unless you are building an open framed Dockyard style model, the classic ship modeling woods are a waste of money.
Do Not use plywood for bulkheads. By doing so the working surface becomes the the various veneers and punky “mystery wood” used to laminate the plywood. While some modelers have had success with very high quality Baltic Birch plywood this is very different from the usual craft grades available. Likewise, I would not choose MDF, the staple of many kits today.
If you live in the US and have access to a table saw regular construction grade “pine” lumber can be an excellent choice. In many USA markets this is actually SPF lumber. This stands for Spruce, Pine, Fir. For structural members I would choose pine or possibly fir. Spruce could actually be a nice planking choice as it bends nicely. It is easily distinguished from the other two. It is whiter in color and has, at least for me, a slightly objectionable odor, not the nice piny smell.
True pine is a beautiful wood. It was the choice of makers of patterns for castings and of professionals building ship models for display and especially for experimental models towed in towing tanks. In your case, to form bulkheads I would build frames Hahn style laminated from two thinner layers.
Selecting your lumber by sorting through a stack at your local lumberyard to find the right species, and grain orientation can be an enjoyable way to begin your project. And, since the cost per board ft will be much less than that of a hobby grade material you can afford to buy larger pieces in order to utilize smaller areas with the grain that you are looking for. Add what’s left over to your stash.
Roger
-
Steel’s Mastmaking, Sailmaking, and Rigging available as a reprint includes detailed scale drawings of sails for a wide variety of sailing vessels. One consideration, American sailing vessels were often outfitted with cotton sails considered to be superior to British flax ones. This is often mentioned as a factor in the Yacht America’s 1851 victory over her British competitors, but I don’t know how much earlier use of cotton was widespread.
Roger
- mtaylor, allanyed and thibaultron
-
3
-
Thanks for your likes and especially your comments. This is a model that I hope will last for a while. Reading about the professionals examining old models with endoscopes, CT scans, etc., all technologies that the builders never dreamed of certainly increases the stakes.
Roger.
- Canute, Cathead, Keith Black and 3 others
-
6
-
For my last rigging project I bought a small bottle, with the brush on the lid, of clear lacquer based nail polish. I believe that it cost less than $2.00. It worked great on the linen line and Cotton thread used. Like CA glue it dries almost instantly. It is convenient since you don’t have to work with an open bottle. It works by evaporation as it is a plastic resin dissolved in a solvent. When applied, the solvent evaporates leaving the resin behind. While I also like shellac, for rigging nail polish is more convenient.
Roger
-
Many years I built a model of a Passaic Class Monitor. It was possible to reconstruct a lines drawing from an original body plan reproduced in a monograph published by the Naval History Center and known frame spacing. Otherwise there is remarkably little useful technical information about the appearance of these vessels during the Civil War. As these vessels existed in the naval reserve fleet to at least 1900 many available drawings reflect post Civil War rebuilds, and as the turret was the monitors’ novel feature Civil War photos are always groups of officers posed in front.
I found Alvah Hunter’s book to offer the best description of these vessels at the time of their Civil War service.
Roger
- mtaylor, Canute and thibaultron
-
3
-
Anxiously looking forward to this. The model posted in the gallery looks spectacular!
Roger
-
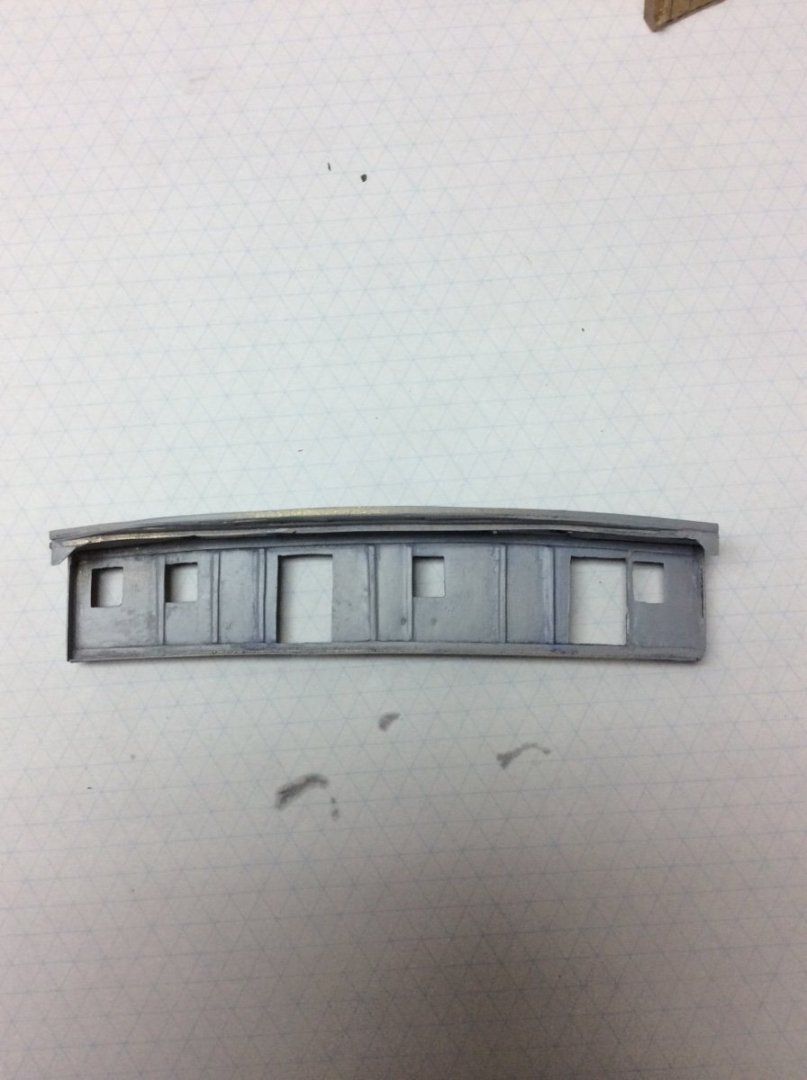
A shot of primer, eliminates the reflection from the brass making it easier to see any remaining problems. Almost there. A touch of Bondo will fix the pick marks under the port window- a result of too aggressive solder removal.
- FriedClams, JKC27, mtaylor and 12 others
-
15
-
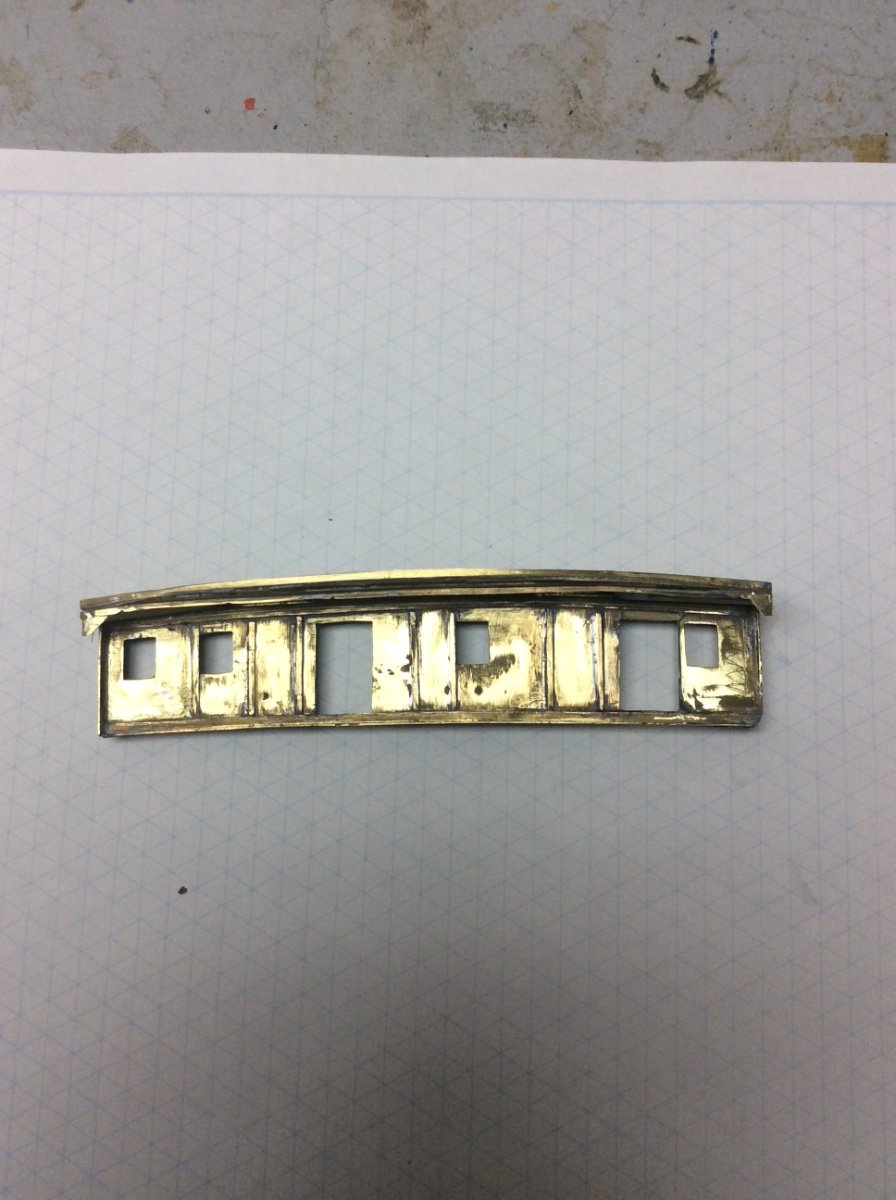
Next, the bulkhead has been cleaned up to correct the above problems
- JKC27, FriedClams, GrandpaPhil and 8 others
-
11
-
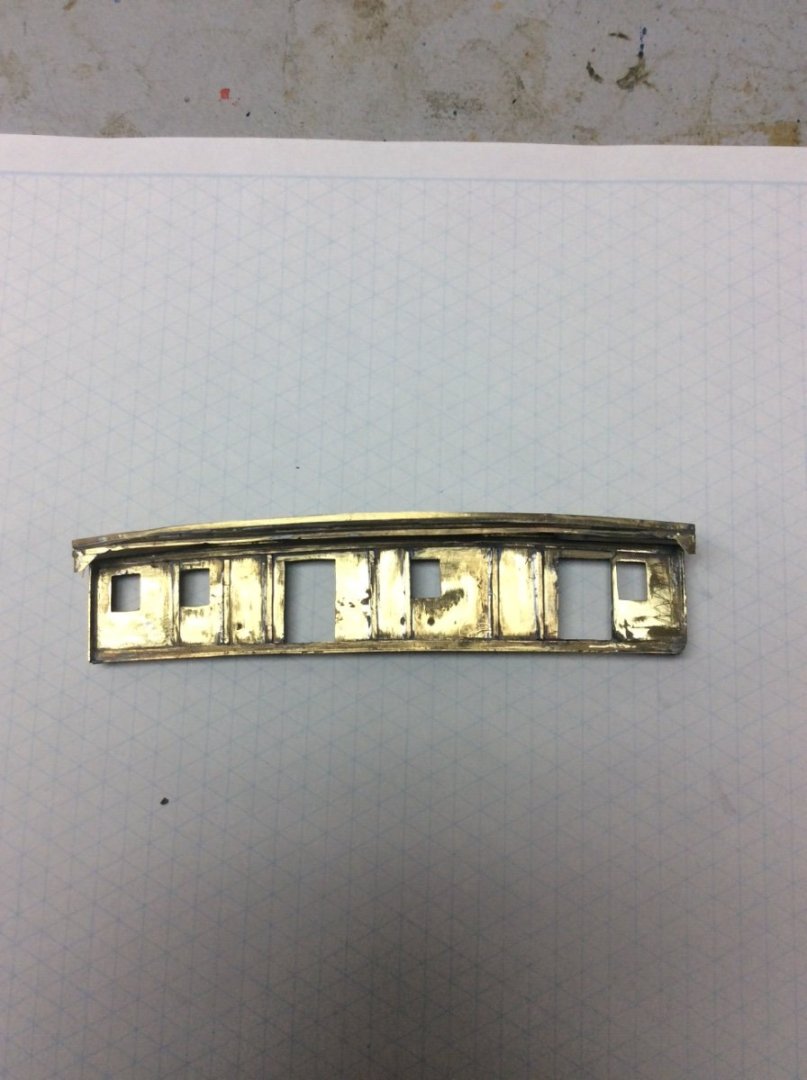
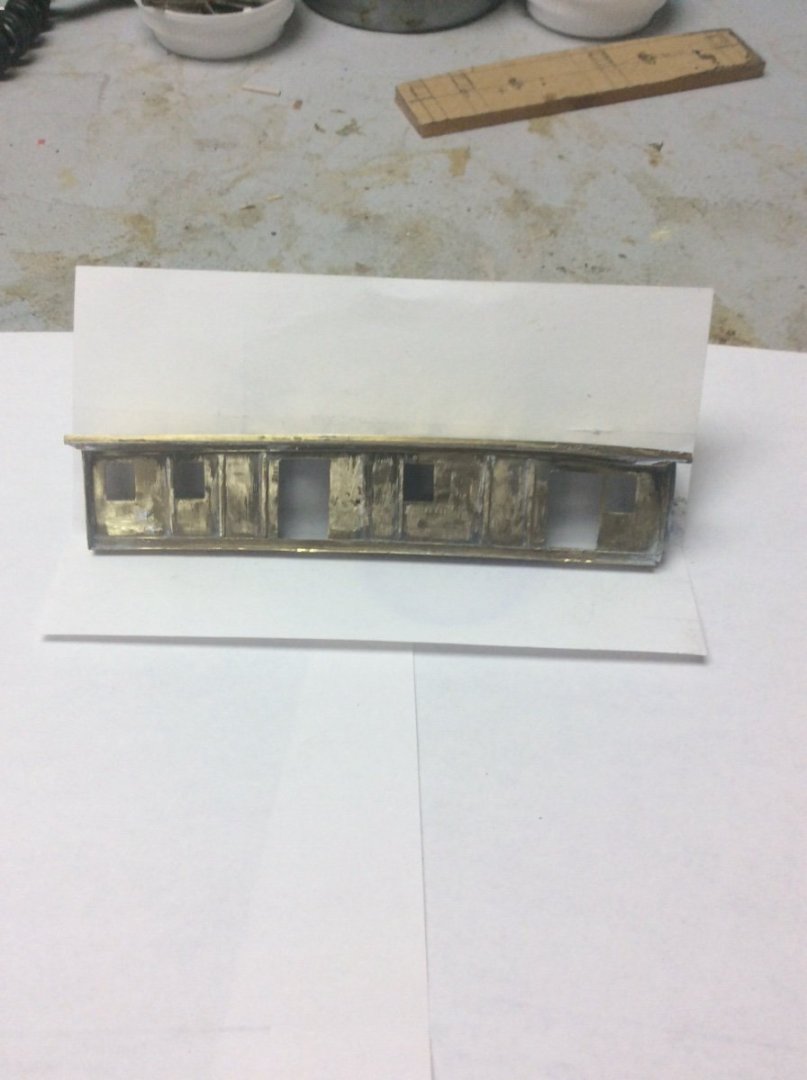
The first shot of the completed bulkhead. As posted above, digital photography reveals some problems: there is an unsightly twist to the port side, the frame for the starboard door is not straight, and there are some nicks in the window frames. Also, the angle between the bulkhead and the deck does not quite extend all of the way to the stbd. side.
- Prowler901, Cathead, JKC27 and 9 others
-
12
-
I used to make tissue covered balsa airplanes too. An old fashioned fly sprayer was good for wetting the tissue. Silkspan is exactly the same idea.
Roger
- thibaultron and mtaylor
-
1
-
 1
1
-
I recently bought a spool of 1/32 in dia Aluminum MIG welding wire for about $10.00. Solder does not stick to Aluminum and melts well below Aluminum’s 1200F melting point. Better for wiring parts together than iron or steel. I also custom fabricate little clips from a piece of thin walled aluminum angle that I salvaged from a yard sign.
I keep several thicknesses (1/64in to 1/8in) of inexpensive craft plywood in stock. This can be cut as needed to hold small parts. For example, a strip of 1/64in or 1/32in plywood with one end nailed or screwed to a larger block of wood makes “spring” for pressing two pieces to be soldered together. The wood chars, but it’s disposable.
Consider changing your sequence. It might be easier to solder two larger more easily clamped pieces together, cutting to finished size after they have been soldered. A rotary tool fitted with a thin cutting disc easily cuts brass tubing.
I realize that professionals do wonderful work with torches, but for most of us using a torch is doing things the hard way. If not adjusted properly, the flame lays down an oxide layer that solder won’t penetrate. The flame can also blow away very light weight objects, and the hot flame can burn or melt easily fabricated wooden or aluminum holding jigs. Furthermore, the very hot flame is not needed to melt soft solders and can damage nearby work.
When I decided to complete my Benjamin Noble Lake Freighter model with its extensive brass fabrication, I rearmed myself with an array of soldering equipment:
A Weller fine tip 15watt corded iron
A Weller 25 watt cordless iron
A 40 watt corded iron
A homemade resistance soldering probe
A Bluefire Propane/MAP gas torch
So far, the only tool that I have needed is the 25 watt cordless iron. With an easily flowing small diameter lead free solder it works for almost everything.
Roger


solid hull vs. plank on bulkhead/frame
in Wood ship model kits
Posted
I am presently building a model of the Benjamin Noble, a steel hulled Great Lakes Freighter launched in 1909. You can find a currently active build log on the Scratch Builds 1901 and Later section of the forum. The hull for this model was carved from “solid” pine to make two half models as Bob describes. The hull block was drilled for Brass locator pins before shaping to assure accurate alignment of the finished hull. The hull was then plated to simulate the riveted hull of the actual ship and the hull halves were joined.
Look it up!
Roger