


Roger Pellett
-
Posts
4,519 -
Joined
-
Last visited
Content Type
Profiles
Forums
Gallery
Events
Posts posted by Roger Pellett
-
-
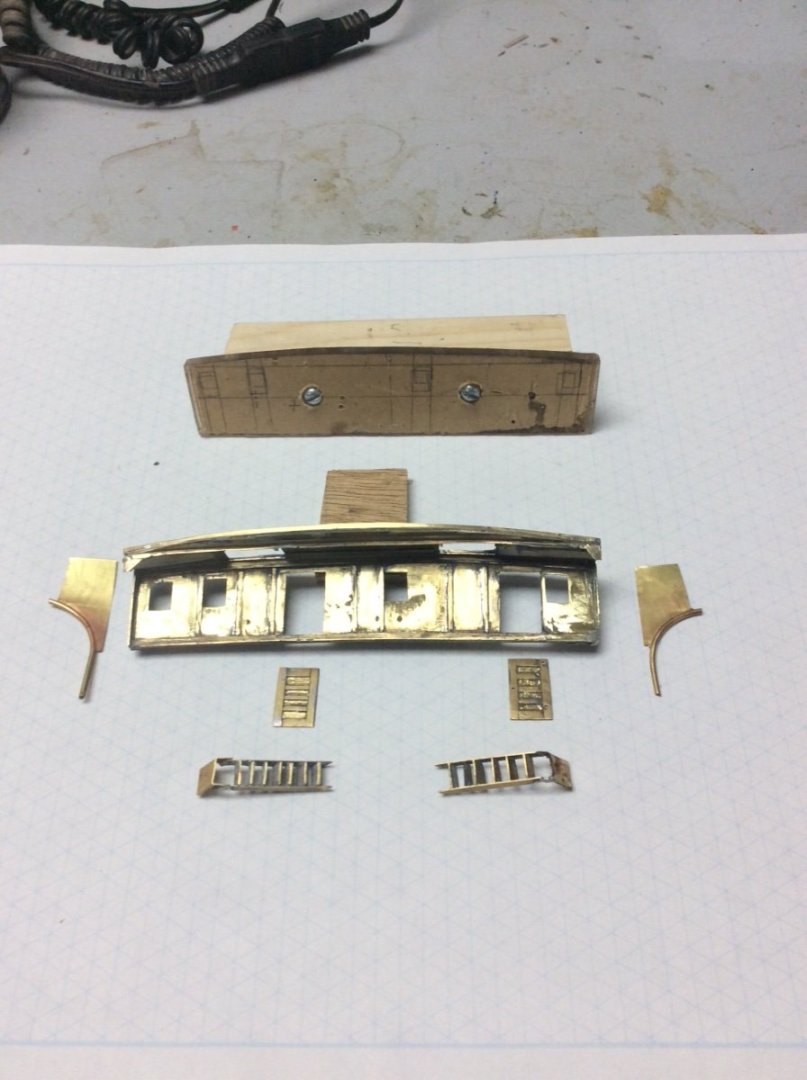
Work since my last post has centered around fabrication of the forecastle bulkhead. Below the main deck, this is a watertight bulkhead which is of course invisible on the model. The section between the main deck and the forecastle that will be visible is pierced by a number of openings; several windows and two doors. The bulkhead drawing notes that these are wooden doors. I have assumed a typical raised panel design shown for deckhouses elsewhere on the model. The doors provide access to living spaces within, the starboard door to the large owner’s suite, the port to a hallway. Quarters for deck officers and other “fore end” watch standers are along this hallway.
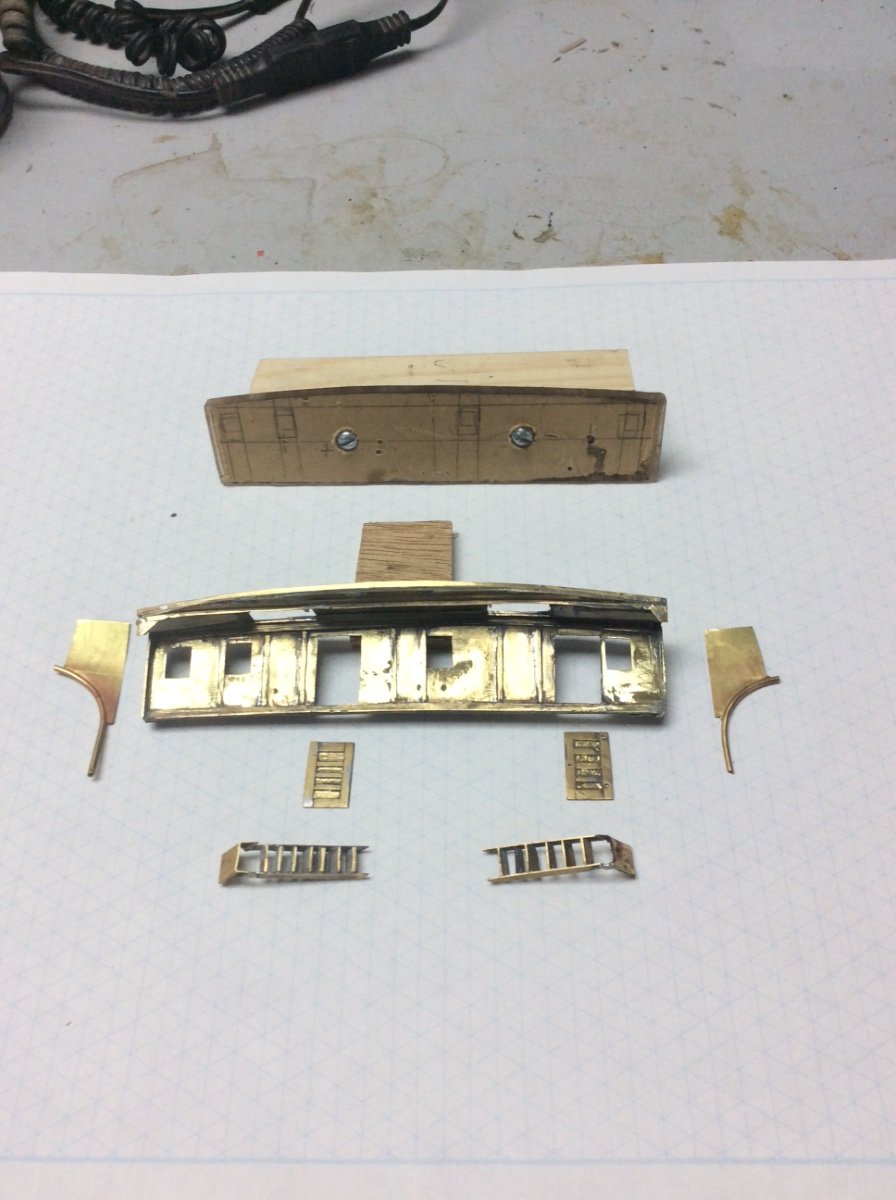
The photos that I have posted show that the openings for the windows are not rectangular. This is not a mistake. Careful measuring of the openings on the bulkhead drawing shows that these openings are skewed to follow the camber of the deck. After considerable head scratching I finally concluded that the window casings which would be rectangular are hidden behind the bulkhead. Why the shipbuilders chose to add this non-functional but graceful touch is a mystery. The “glass” in these windows will be represented by a piece of 1/8” Plexiglass that will be sandwiched between the brass bulkhead and the wooden hull. The Plexiglass, with its protective paper is shown in the first photo. It is screwed to a block of wood to allow its backside to be machined to allow it to fit tightly against the brass bulkhead piece.
The owner’s suite, while not a visible feature of the model is interesting. Great Lakes ships have long hosted passengers; valued customers, family members of crews, Owner’s and their families, etc. who were anxious to escape the summer heat of midwestern cities by sailing on the cool Great Lakes. These vacations were usually prim and proper but occasionally led to some mischief. The Nicholson Steamship Company specialized in using retired ore carriers fitted with special decks to transport new cars from Detroit to markets along the Lakes. In the excellent account of the Company published by the Dossin Museum, a retired Nicholson Captain tells of the time that the Company agreed to host a group of wives of Detroit area Buick dealers unaccompanied by their husbands. The ladies arrived, unpacked a huge supply of alcoholic beverages, and appeared on deck wearing little or nothing! It was of course the captain’s job to lay the law to maintain order. Even today a “cruise” on one of these lakers is prized as a fund raiser at local charity events.
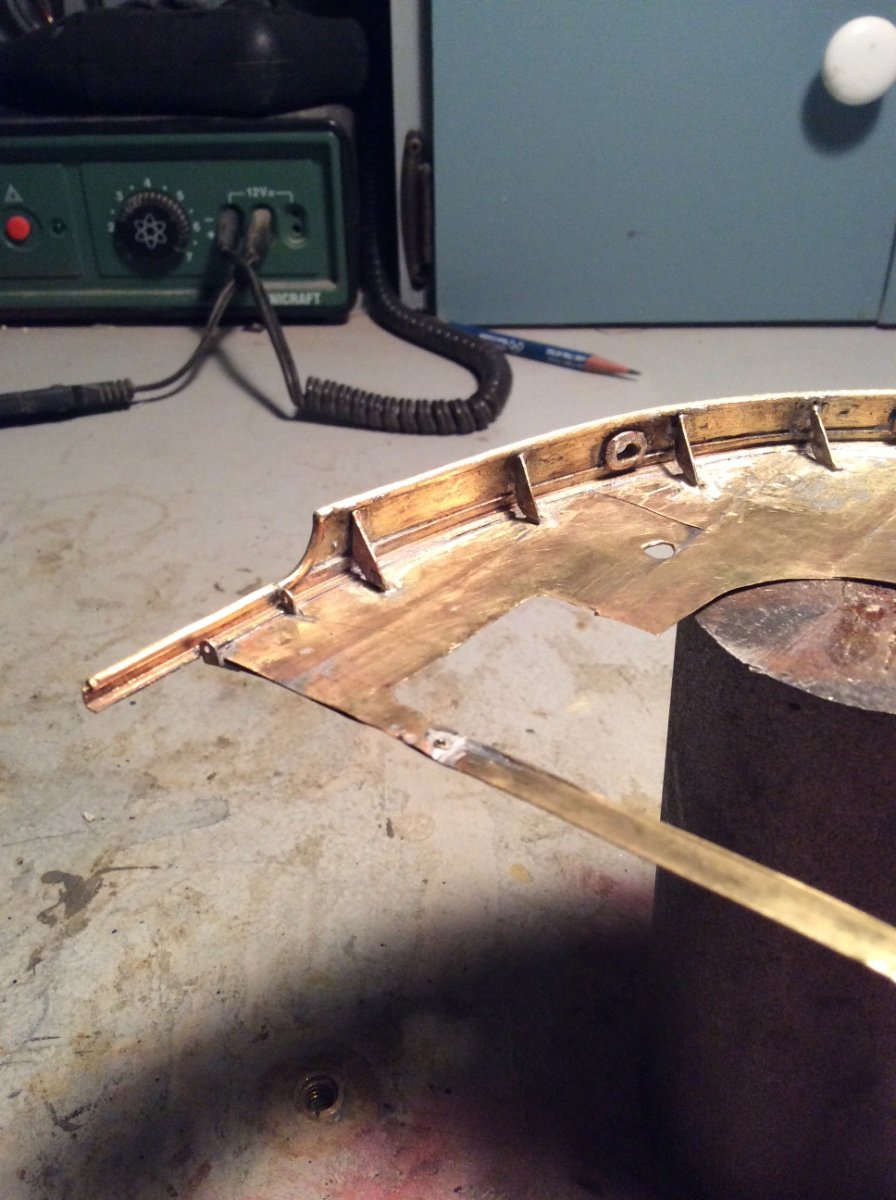
I’m sure that all readers of posts on the forum are aware of the extent that digital photography reveals (some would say exaggerates) defects beyond what can be seen by the naked eye. This means that the camera can also be a valuable inspection tool. The series of photos shows the progression using this process.
First, Parts that will make up the subassembly to be soldered to the previously built forecastle bulwark
To be continued
Roger
-
I recently reviewed a book on the history of tankers. It was published in Volume 67, No 4 of the Journal.
Petroleum, particularly in its unrefined State was and still is a dangerous cargo requiring special handling. Crude oil is actually a mixture of several organic compounds. Some are quite volatile and all of course are flammable. Leakage of the more volatile parts of the oil through seams in wooden barrels was a constant fire and explosive hazard. Heavier fractions could also accumulate in bilges. Sailing vessels were, therefore, favored for shipping this cargo as the ignition source inherent with a steam plant was not present.
Roger
-
-
Al, Merchant vessels (those that engage in commercial activities) as well as some yachts, must be registered in a home port. By doing so, they become subject to the laws in effect where they are registered. This can become an arcane and confusing legal matter. For example, modern cruise ships are often registered in a third world country with lax laws regarding operating requirements. The 1000 ft bulk carriers that sail the Great Lakes are often registered in Wilmington, Delaware even though they are too long to pass through the St Lawrence Seaway Locks to get there.
Vessels carrying cargos from one US port to another are required to be registered at a US port. Assuming that this ship was built on
the West Coast, She would likely hav.e been registered at the major West Coast ports; the registers for these vessels are now being published on line.
By the way, like any true antique, you can destroy any value that this old model might have by Over Restoring. The brass deck is an example. Careful cleaning, saliva on a Q Tip, is probably preferable to painting. MSW sponsor Seawatch. Books, has just published a book on the subject by Master Ship Model restorer Rob Napier. Highly Recommended.
And last, how about some photos?
Roger
-
Great to see you back again Valeriy and starting work on your next masterpiece. These early “Steam Navy” models are interesting and challenging to build. From a Naval Architecture/ Marine Engineering standpoint I consider them to be far more interesting than the Nelson era sailing war ships. Hull forms, Construction materials, Structural designs, Weapons systems, and Power plants were all evolving.
Roger
- Ondras71, Bob Cleek, Ras Ambrioso and 8 others
-
 11
11
-
A couple of years ago I knocked an open bottle of CA glue over on my workbench. Frustrated at a gummed up nozzle I had removed it. The contents of the bottle spilled down the front of the blue jeans that I was wearing. 12 hours later, I woke up in a panic with my sinuses completely blocked up. Long story short this involved a trip to the Emergency Room at our local hospital. A cautionary tale to others.
I haven’t used or needed to use this stuff since.
Roger
-
Brian,
Building a welded ship is not that different from fabricating a welded truck trailer; just much larger and more complicated. The yard’s design office furnished detailed drawings complete with welds sized in accordance with the relevant construction standards. In this case it probably was ABS, (American Bureau of Shipping). Another department, Production Planning or Industrial Engineering would then break the structure down into subassemblies. These people with specialized knowledge of the yard’s equipment, production load, and the build’s critical path would try to make maximum use of mechanized welding techniques, while not affecting work on the critical path. For example, I have read that a factor that pushed the use of sub assembly fabrication was the need to move work away from bottleneck launch sites. Each yard’s assembly techniques would have therefore been different. To look for welds to show on your model, see if you can find photos of Drydocked vessels built by JeffBoat.
Roger
-
Phil (Dr Pr)’s post above exactly sums up the techniques that I have stumbled onto for soldering brass; Liquid flux, taking advantage of the latent heat of water for a heat sink, and avdab of solder on the the soldering iron tip. I would add one other thing- Find a solder that flows. It seems that there are dozens of proprietary solders all advertised to have magic properties. I have tried many. For reasons that I don’t begin to understand some simply do not work for me. For example, I have never had much luck with the solder-flux pastes. While they work well for others, they don’t for me. I don’t know why. I have recently been using a lead free 1/32 in dia Weller formulation that flows beautifully (at least for me).
Druxey- Regarding your jeweler’s trick, I suspect that the water is the heat sink. The yellow ochre powder forms a paste to keep the water in place. I use a tiny piece of wet twisted paper towel to do the same thing. I have read that yellow ochre is used as a masque to prevent solder from flowing where it is not wanted.
Roger
-
I have a 25w cordless soldering iron with two interchangeable tips; a conical and a chisel point. It’s temperature of 950F is not adjustable. It works for 90% of the work that I have been doing. Photo below. I prefer a “hot” iron. A soldering iron’s job is to transfer heat to the joint being soldered. Capillary action then draws the melted solder into the joint. The iron transfers this heat by conduction. Conduction is time dependent. The iron initially heats a small area. If the iron is left on this area heat is transferred outward into surrounding metal. The longer the iron takes to heat this area the more likely it is that this transferred heat will damage previously damaged work. My little 25 watt is hot enough to quickly heat the joint without overheating other areas.
Some joint design is also necessary. For example, a butt joint between two members seldom works. A lapped joint almost always works. Joints where laps fay tightly to each other are easily soldered. Trying to bridge the gap between two poorly fitting joints is a waste of time.
Roger

-
I bought several spools from Model Shipways way back in the Yellow Box Days. Rob Napier has a stash of it that he uses to restore models.
Roger
- mtaylor and Keith Black
-
2
-
I am presently building a model of a steel hulled ship that requires a great deal of soldered brass construction. Although I am using some silver bearing lead free solder I see no need to use “real” silver solder. But that doesn’t answer your question.
Is your solder not melting or not flowing? If you are willing to sacrifice a little of your solder, does it melt when you heat a piece on a non conducting surface? If it does not, then your flame is not hot enough. If it does, then your flame reaches the right temperature but the joint that you’re trying to solder is absorbing heat faster than your torch can supply it. You need a higher capacity torch; one that supplies more BTU’s.
If your solder melts but doesn’t flow into the joint than the joint is dirty or your flux is not doing its job.
IMHO, torch soldering is tricky. Often, the flame contaminates the joint with oxidized residue before it gets hot enough to flow solder. Masters of the process solder with a “reducing flame” to prevent this.
Roger
-
For your running rigging I would see if I could find some old fishing line. Here in the USA, an ideal rigging line is Cuttyhunk Hard Twisted linen line. This was sold up into the 1980’s. See if you can find similar line manufactured before the advent of synthetic materials. The line is twisted like rope not braided.Maybe there is a stash somewhere in Australia.
Roger
- Keith Black, BenD and mtaylor
-
3
-
Dravo Corporation pioneered what British author J.D. Ladd writing in “Assault from the Sea” called “advanced techniques” in 1942. This was done to mass produce smaller welded steel naval combatants; LST, and LCI landing craft, PC patrol craft and even Some Destroyer Escorts. Much of this work allowed hiring of employees with no welding experience, particularly women. These techniques included subcontracting of prefabricated assemblies, modular construction, and especially manipulation of large subassemblies and sometimes complete hulls to minimize difficult overhead welding. As “lead yard” for the LST program, Dravo introduced these techniques to the “cornfield shipyards” being established throughout the Ohio and Mississippi Valleys. For example, many LST’s were built at Evansville, Indiana. This yard did not exist before the war and no trace of exists now. Evansville is home to LST 325 one of only two surviving WW II LST’s. She was built by Dravo. There is no reason to believe that Dravo’s Competitors, especially JeffBoat would not have taken advantage of their WW II experience to build barges and towboats for the commercial market. All of this was of course before CNC equipment that began to be used in American shipyards in the 1960’s.
Brian, where possible, welding is done “down hand” using mechanized equipment. This works particularly well for flat panels. Plates can be butted together and longitudinal seams welded with mechanized equipment. With properly applied weld procedures weld crown height is minimized. Generally 1/8in on the plate side facing the welder. The width of this might be 3/8in On the other side of the plate there will be a slight crown, necessary to assure complete penetration of the weld 1/16in x1/4 in approx. Stiffeners, such as frames are then welded to these flat panels, usually by double fillet welds with a preplanned skip welding technique.
These stiffened panels are then assembled into modules, this requires more hand welding. The modules are then hoisted on to the building ways and welded together. Depending on accessibility these final assembly welds will be made from the outside of the hull and will be noticeable.
Roger
-
These boats were completely welded, no riveted seams. During WW II Dravo Corporation pioneered the technique of “upside down” construction at their Neville Island (Pittsburgh area) shipyard to minimize the need for overhead welding. In some cases this involved building the entire hull of a 175ft Navy PC patrol craft upside down and then rolling it over. These and other advanced fabrication practices would have spread through the Ohio Valley including JeffBoat by the time that Caroline was built.
About 1980 I visited our Neville Island Yard to see a multi head panel welder that they were using. This could weld several vertical stiffeners to a flat steel panel simultaneously. Hull panels were butt welded and stiffeners added with fillet welds. Welding was done by the MIg process. Not all stiffener welds were continuous. The machine could be programmed for start and stop fillets. Testing was by high pressure hose. No leaks OK.
So, what’s the point of all this? With this type of modular construction heavy manual weld seams with heavy reinforcement on the outside of the hull were minimized. Also, the yards had optimized weld procedures to control heat and, therefore, weld shrinkage. If this interests you I believe that there are a number of papers presented at SNAME (Society of Naval Architects and Marine Engineers) meetings. These may be available on line. I would, therefore, suggest that you go lightly on showing external weld seams.
There is also a specific type of model that I’ll call the “Office Model.” These were and still are professionally built models built for vessel owners. A subset are built for naval vessels and are prized by high ranking officers. By convention these do not show weld seams, riveted lapped plates, etc. Since this is being built for the boat’s owner you might take this approach.
Roger
-
This drill appears to be aimed at the craft market; jewelry, Knick knacks, etc. where things don’t need to be measured. The tool, therefore, is not fitted with a chuck to accept different sized drill bits. Instead the drill uses proprietary bits all with the same sized shank to fit into a socket. This would seriously limit is usefulness and lifetime. Which will fail first, the drill or the proprietary bits?
Roger
-
Keith, Your eyesight is better than mine. I thought that there was a model in the glass cabinet but there certainly isn’t.
Roger
- FriedClams, KeithAug, mtaylor and 1 other
-
4
-
My father graduated from the University of Cincinnati in 1932 with a degree in Aeronautical Engineering. At the height of the depression he and my mother decided to supplement their income by selling model airplane kits designed by my father. I still have sales literature for their short lived “Viking Aircraft Company.”
A part of this enterprise involved manufacture of “Duco type” cement that was included in the kits. My father described this as dissolving Celluloid plastic in acetone. This activity took place in the basement of their rented house in the vicinity of the open flame water heater. The landlord eventually put them out of business.
Roger
- Bob Cleek, mtaylor, Harvey Golden and 1 other
-
4
-
Maybe “African Queen Barbie and Ken?”😀
-
Not The dining area that Keith Black posted above. In the same series of 81 pictures that Tom posted there are several photos of a classic formal dining room; long table, ready to host Royalty. A couple of tables are taken looking down the long axis of the table. Sorry, my MSW expertise does not include dragging photos from one post to another. If you look very carefully there is what appears to be a glass cased model on a self behind the table.
- Keith Black, KeithAug, FriedClams and 1 other
-
4
-
If you look carefully at the picture of the dining room on the pictures in the sales material recently posted there is what appears to be a model of the yacht.
Roger
- Keith Black, FriedClams, mtaylor and 1 other
-
4
-
Fifteen stars and fifteen stripes, looks right.
- hollowneck, chris watton, Canute and 3 others
-
6
-
-
I have three rotary tools.
50 years ago I received a Sears Lil’Crafty rotary tool as a Christmas present. I was pleased to get it as I thought that I could use it with small wire sized drills. Chucking one up and turning the tool on the drill immediately assumed an L shape. Our friend centrifugal force! The tool’s RPM was way too high. The tool gathered dust until I recently got into the brass superstructure for my current project. It’s major use is powering a disposable cut off disc.
My second tool is a Proxxon miniature engraver. It is powered by a 12 v power supply. Again I seldom used It until doing extensive work with soldered brass. It has proven to be the ideal tool for cleaning up just soldered joints.
I was recently given a Dremel Mini Mite two speed cordless rotary tool. Even the low speed is on the high side for drilling and it seems that whenever I want to use it the battery is dead.
For drilling, first choice is a hand Archimedes drill. Second is a Minicraft 12v “pistol grip” drill. If I want to spend time setting it up I use my Sensitive drilling attachment in my Sherline, and unlike Jaager I don’t hesitate to put an entire ship model hull under my full sized drill press.
Roger
- HardeeHarHar and mtaylor
-
1
-
 1
1
-

Wrinkles in silkspan
in Masting, rigging and sails
Posted
First make a simple wooden frame; four pieces of 1in lumberyard SPF construction grade lumber nailed together to form a rectangle.
Tape the silkspan to the frame. Masking tape works fine. Tape continually around all four sides.
Spray with water.. A spray bottle used to mist indoor plants works well. The silkspan will form an ugly bag. Don’t worry.
Let it sit overnight to dry. When you come back to it the next day it will be drum tight.
That’s all that there is to it.
Roger