


Roger Pellett
-
Posts
4,519 -
Joined
-
Last visited
Content Type
Profiles
Forums
Gallery
Events
Posts posted by Roger Pellett
-
-
This is the umteenth time that I have posted about drill presses. You can find lots of discussion here on the forum. Use the search function.
In a nutshell, I see no reason for buying a hobby sized drill press, Proxxon or otherwise. While Kurt is right, you can lengthen the column, you cannot change the other critical dimension, the horizontal distance from the quill to the column. This will limit the tool’s use. My first choice would be to look for a quality used machine. Since not everyone is a tool junkie my other suggestion would be to look at the bench top drill presses offered by stores like Menards, Home Depot, etc. These store brand drill presses appear to offer a lot of capability for the price. I would prefer a belt driven tool over one with electronic speed control.
Roger
-
-
If you live in Puerto Rico you may have a selection of outstanding local hardwoods that most model makers can only dream about. The various Citrus varieties come to mind. Boxwood is supposedly native to the Caribbean. And Mahogany, the real stuff not its misnamed cousins was prized by the Spanish Navy as a shipbuilding timber. I have several pieces in my stash and it’s nice stuff.
I agree with Jaager. Your gifted wood was probably poor stuff to begin with.
Roger
- Jorge Hedges, mtaylor and thibaultron
-
 3
3
-
-
If I were building a J Boat Model I would not buy any planking. I would carve two half models using laminated lifts band sawed to waterline or buttock lines (aka, the bread and butter method). I would then pin and glue the carved halves together. The J Boats were steel or bronze plated with flush seams. Planking, therefore, does not mimic actual construction and many of the old America’s Cup boats were built from half models so you would be following in the footsteps of the old Naval Architects.
A properly carved hull will result in a highly accurate model. I have been reading Rob Napier’s new book Caring For Ship Models and most of the old models that have survived have solid hulls; a few are POF, none are POB. POB hull construction is a relatively recent phenomena. Time will tell how long these models will last.
Lumber yard select quality pine will make an excellent carved hull.
- mtaylor, Jaager and GrandpaPhil
-
3
-
Brian,
HSS Drill bits are much more forgiving than Carbide. I know that it’s easier said than done but make sure that you are not pushing the drill bit too hard . This causes failure by buckling. A small bit is a very slender column so any axial load can cause it to buckle. You can help matters by pushing the bit farther back into the chuck to shorten its unsupported length.
Let the drill bit do the work
Roger
-
Something to consider- In the later years of the Nineteenth Century the design of blocks changed. The earlier blocks can be described as “wooden shell” as they were carved or more properly machined from a solid block of wood. The block had to be strong enough to withstand loads from the sheave transmitted by its axle through the wooden shell to the rope strop.
The later blocks are called metal or internally stropped. These feature a metal frame within the wooden shell that transmits loads from the sheave directly to the block’s attachment point. The block’s wooden shell does not bear loads from the rigging.
I am unfamiliar with Mondfeld’s book but if he is referring to Eighteenth/ early Nineteenth Century practice the block’s in his table would be the earlier wooden shell variety. Chapelle, on the other hand is providing dimensions for the later internally stropped variety that would have been used on the Twentieth Century fishing Schooner. Dimensions for these might have been different. Use the Chapelle dimensions.
Roger
- allanyed, Simon Martin and mtaylor
-
3
-
In the US Navy these are sometimes called “The Admiral’s Balls.” Deviation is compass error, caused by ferrous metals aboard ship. Variation is compass error caused by geographic location. Navigators must consider both. Nautical charts usually show variation. The compass can be remarkably sensitive to the influence of ferrous metals. I have read accounts where a steel wrench left near a vessel’s pilot house has caused a grounding or worse. Even though this is a wooden vessel there was still a significant quantity of iron aboard; anchors, chain cables, and other fittings. And, once the vessel was placed in service, her designers had no control over the cargos that she might carry. Also, these binnacles were usually standardized items bought from ship chandlers so the Kelvin-Balls would have been included. For these reasons, I believe that including them on your model is correct. Just paint them.
Making mistakes and deciding which to correct as they say “goes with the territory” when building ship models. In your case you are building a beautiful model of which you can be proud.
Roger
- mtaylor and Keith Black
-
2
-
I am reading Rob Napier’s new book Caring for Ship Models, published by Seawatch Books. For readers not familiar with Mr Napier, he is a professional ship model restorer, hired by major institutions and serious ship model collectors. No, he doesn’t work on that masterpiece that you built from a kit bought on on EBay. 🤣
In the book, he describes restoring the cracked and chipped shellac finish on the figurehead of a very old Dockyard style model. It was not necessary, or desirable to remove the old finish or to brush on new shellac. With a small brush and alcohol solvent he was able to dissolve and redistribute the old shellac.
Roger
-
Fred, I am not familiar with either the ship or model of it that you plan to restore. Perhaps you might post some pictures of the model in its present state of disrepair. Before you proceed with repair, a note of caution: If this is an antique, much harm can be done to it and to its value by enthusiastic but inexperienced restoration attempts
I am In the process of reading Rob Napier’s excellent new book, “Caring for Ship Models”. Rob, a professional model builder, specializing in restoration walks the reader through 50 case studies. Highly recommended before you proceed further.
Roger
-
At common modeling scales, I would think that a piece of tubing embedded in a drilled hole would be sufficient.
-
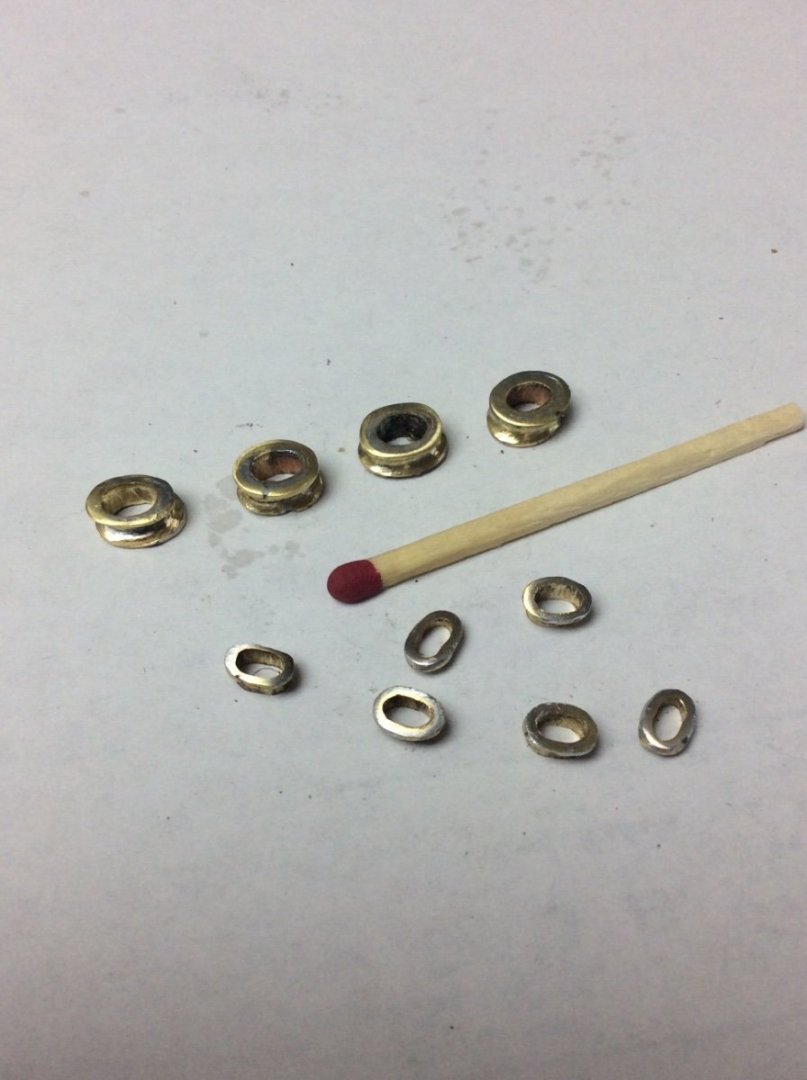
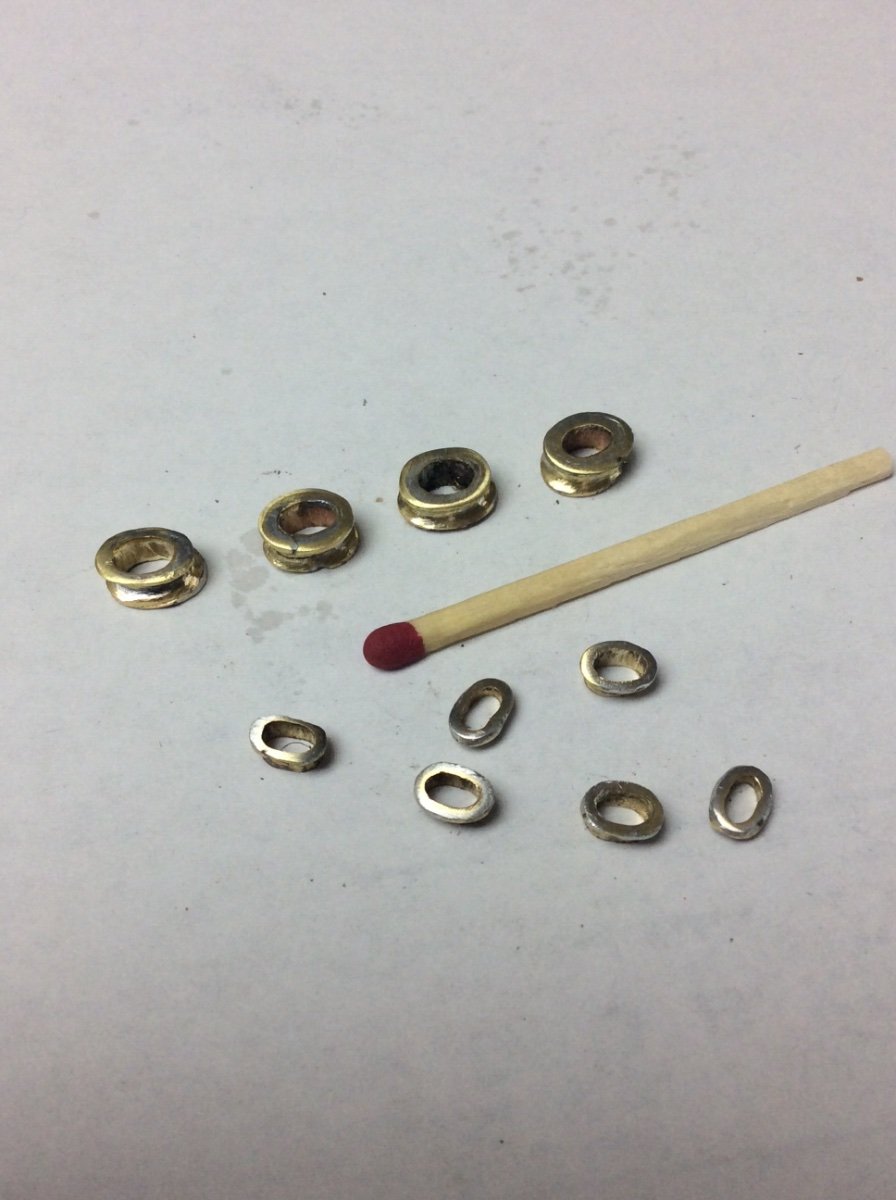
I assume that this question refers to the flanged oval openings that pierce the hull sides and bulwarks of later Nineteenth Century sailing ships and steamships.
I start by calculating the equivalent diameter of a circular tube with circumference equal to that of the oval scupper. I then start with a piece of round brass tubing of that diameter. Here in the USA K&S brass tubing is widely available in both fractional and metric sizes.
I have found that the best way to form the oval shape is to simply squeeze the tube in a vise. Done carefully the tube will assume an oval shape. To ensure uniform size I use a simple wooden stop to limit the closure of the vise.
To form the flange I wrap a piece of wire around the end of the tube and solder it in place, and then shape the results with a file.
Roger
Results below:
- allanyed, AON, GrandpaPhil and 2 others
-
5
-
-
An admittedly brief review of my copy of MRNS indicates that the Mary Rose organization has not published a full blown “lines drawing” for the ship. As the ship as recovered from the Solent was distorted wreckage they are probably reluctant to publish a drawing not fully supported by archeological evidence. The frame and section drawings in the book used as is therefore, may not produce a fair hull.
ATOS appears to have taken things a step further with a lines drawing that produces a fair hull but does not exactly match all of the as recovered, but distorted wreckage.
As I see it, you have two choices: Use the ATOS lines drawing as is. This should produce a fair hull that replicates the shape of a Mid 16th Century large English Carrick based on corrected hull shapes recovered from the Mary Rose wreckage. OR, You can use the MRNS data to draw your own lines drawing. If you chose to do this you may well have to adjust some hull section shapes to produce fair lines.
Either case will produce a hull that reflects someone’s best guess; you or the author of ATOS. Either approach will produce a handsome model that comes as close as we are going to get of this historic ship.
Roger
-
This project really puts into perspective the enormous amount of fire power that could be packed into a WWI era Dreadnought Battleship. A battleship’s secondary armament might include 8-12 of the slightly smaller 5in guns in addition to it’s 12-16in main armament.
- Canute, RGL, popeye the sailor and 9 others
-
12
-
Try a very fine tooth razor saw. Soldering also requires some special consideration. Otherwise when you try to solder your ring shut you will just wind up with a blob of solder. Very small diameter solder is available. I recently bought some .015in diameter from Amazon. You should also use a soldering iron with a very fine tip. Better quality soldering irons are now available with easily changed tips.
Roger
-
Doing this is a two stage operation. Stage 1 is locating the center of the cylinder. Apparently you have figured out how to do this. The second stage is to mark out the location and to keep the hole from skidding off of it.
I have a small Proxxon rotary engraving tool. A Dremel rotary tool would work
too. My tool is fitted with a tiny burr. I often use this to grind a tiny dimple in brass before drilling.
Roger
- thibaultron, Scotty W, mtaylor and 1 other
-
4
-
Put the company in the barn🤣!
I looked up the history of MV Mississippi IV. She was built for and operated by the Army Corps of Engineers. As such she would have occasionally hosted visiting dignitaries in addition to her more mundane river maintenance duties. She was therefore something of a showboat.
Half of my career was spent working for Dravo Corporation, a large integrated engineering and construction company. In the 1980’s Dravo designed and built a highly regarded series of towboats known as the Viking Series. I had nothing to do with this project as I was part of their Pipe Fabrication Division, not their Shipyard but I was able to get aboard at least one of these boats, highlighted at annual management meetings. My recollection is that these boats sold to commercial customers and used in Dravo’s own fleet were more spartan and less spacious than the MV Mississippi IV.
Roger
-
You must have your jeweler grandfather’s genes. The W that you added is indistinguishable from his work. You are going to wind up with a handsome, unique model.
- Django, mtaylor and Keith Black
-
2
-
 1
1
-
You did a beautiful job building what must have been a challenging model. These old boats were real beauties and your model really brings one of them to life.
Roger
-
Well said, Eric!
- Knocklouder, Cathead, Canute and 1 other
-
4
-
I am not one of the proceed slowly group. I built one kit- a Model Shipways “Yellow Box” Harriet Lane many many years ago. I then scratch built a 1:48 scale bugeye; a pretty poor model, eventually given away. Since then I have scratch built 8 more models that I am proud to display. I am working on my ninth.
I believe that many models are not finished because the builder loses interest, not because he lacks the needed skills. The major difference between a cutter and HMS Victory is repetition. There is, therefore, no point in spending money on a kit if you lack the interest in the subject to see it through to completion.
For me, the appeal of scratch building is that I can pick my subjects, building materials and techniques to achieve my vision.
Roger
-
Brian, “Maybe Some Day” might be now as your Caroline is a steel vessel. The brass sheet metal work that I am doing is not difficult and I find it easier in some respects than wood. The only special skill that you need to master is soldering and you probably know how to do that after building your Cairo model. .010in thick brass is stiff enough for structural strength but still cuts easily with ordinary scissors. For structural shapes; angles and channels, I started with square or rectangular K&S tubing. I did need my Byrnes Saw to rip these into required shapes but I believe that if you look hard enough you can find very small brass angles. There are two advantages to using brass. First, at 1:96 scale you can work with materials thinner than possible than if using wood. Second, when painting there is no need to hide wood grain.
Roger
-
Durham’s Rock Hard Water Putty. Cheap, commonly available, fool proof, odor free, and sands to a feather edge. This is an acrylic powder. Mixed with water it forms a paste that can be applied with a putty knife. Unlike other fillers as long as the powder is stored in a dry place it will keep for a long time. I bought my last can Mid-Pandemic from Amazon but our local Ace Hardware stocks it.
Roger
Must be a Minnesota Thing! 😀😀


Value-for-Money Airbrush
in Painting, finishing and weathering products and techniques
Posted
I suspect that most of us who own or want to own airbrushes are just looking for a tool that will lay down a nice even coat of paint. If I am correct why buy a double action airbrush? I have a Badger 350 single action airbrush. It is reliable and easy to keep clean. It sprays both enamel and acrylic paints. Amazon currently sells a Badger 350 with air hose, paint jar, etc. shipped to a US destination for about $40.00.
Roger