


Chuck
-
Posts
9,718 -
Joined
-
Last visited
Content Type
Profiles
Forums
Gallery
Events
Everything posted by Chuck
-
 Simply beautiful!!! No other words for it. Well done. I am glad you enjoyed the project. That is a superb model.
- 950 replies
-
- 1
-

-
- syren
- model shipways
- (and 1 more)
-
They sell pre cut small square sheets of copper like gold leaf. Its thicker than gold leaf and is quite durable. It sticks on any surface just like goldleaf would with the same techniques. Easy to cut and perfect scale. You take several sheets at a time and cut them to plate size with a scissors. Then apply. Its easier to cut when you hold several sheets together. Its super cheap and you get a million sheets in a package. This is the stuff the apply to picture frames and architectural items. so its sturdier and thicker. https://www.google.com/search?q=copper+foil+sheets&tbm=isch&ved=2ahUKEwjGtM31iO_wAhUMeDABHcLpC20Q2-cCegQIABAA&oq=copper++Foil&gs_lcp=CgNpbWcQARgFMgQIIxAnMgIIADICCAAyAggAMgIIADICCAAyAggAMgIIADICCAAyAggAOgYIABAHEB46CAgAEAgQBxAeUJSSGVjKpBlg8boZaAFwAHgAgAGjAYgB9wSSAQM3LjGYAQCgAQGqAQtnd3Mtd2l6LWltZ8ABAQ&sclient=img&ei=YUuyYIaACozwwbkPwtOv6AY&bih=594&biw=1293&rlz=1C1CHBD_enUS907US907#imgrc=r9I6_xHdNEextM
-
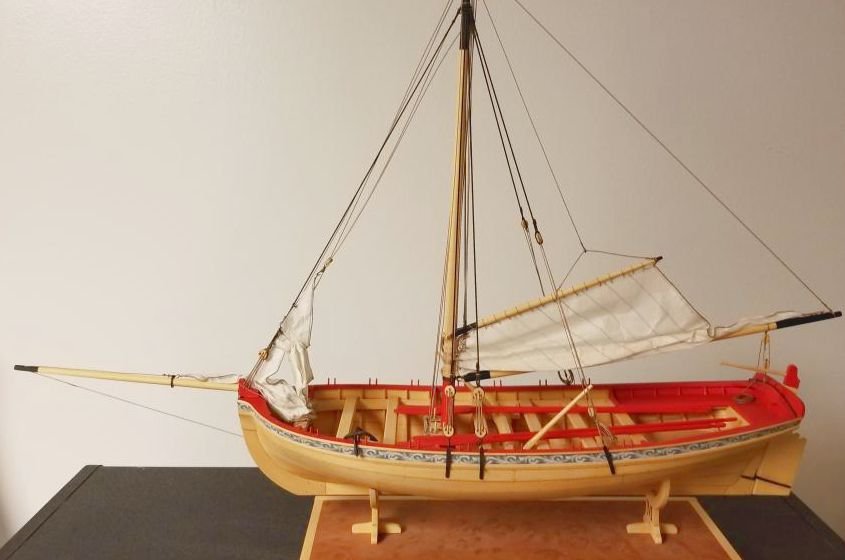
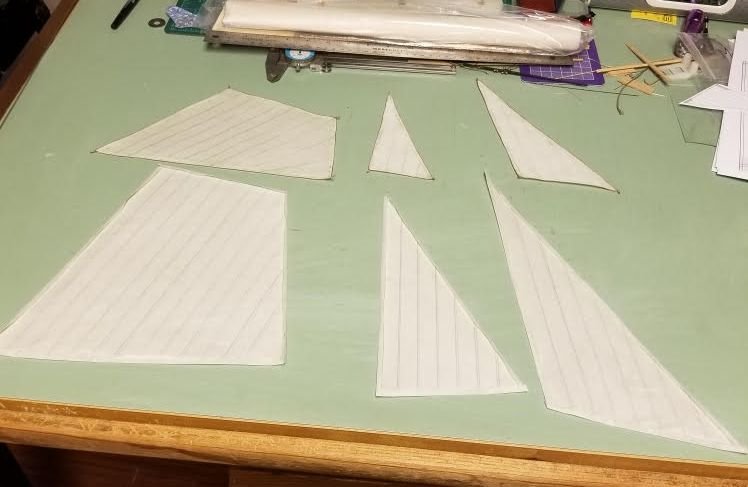
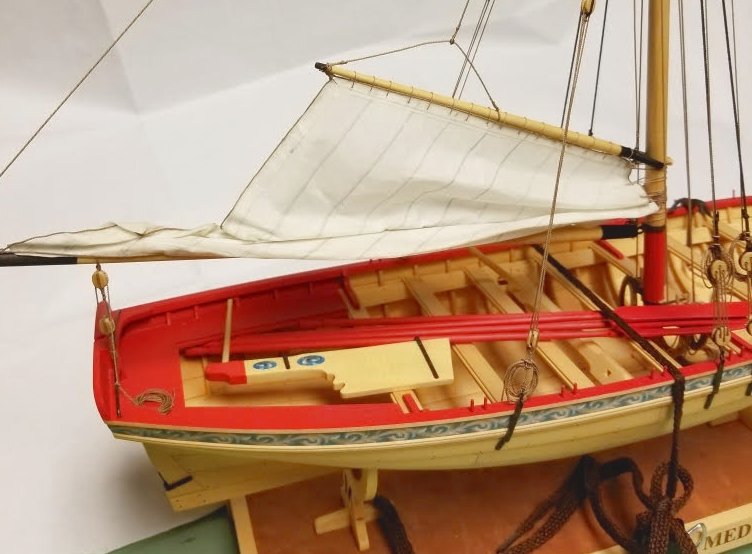
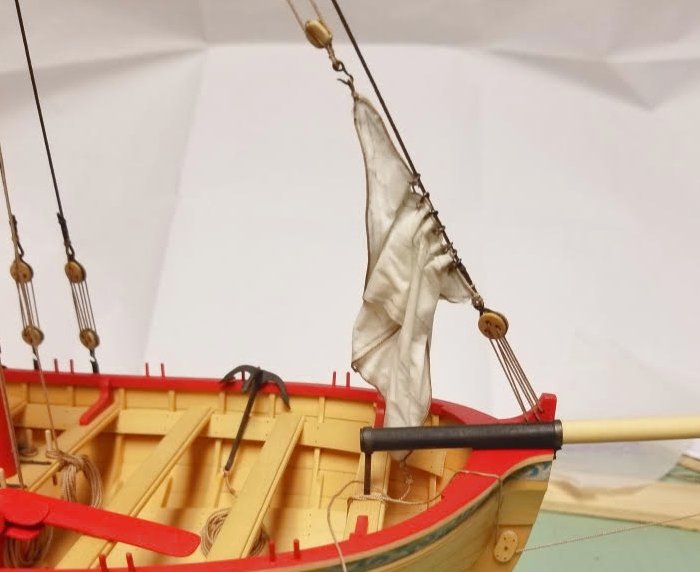
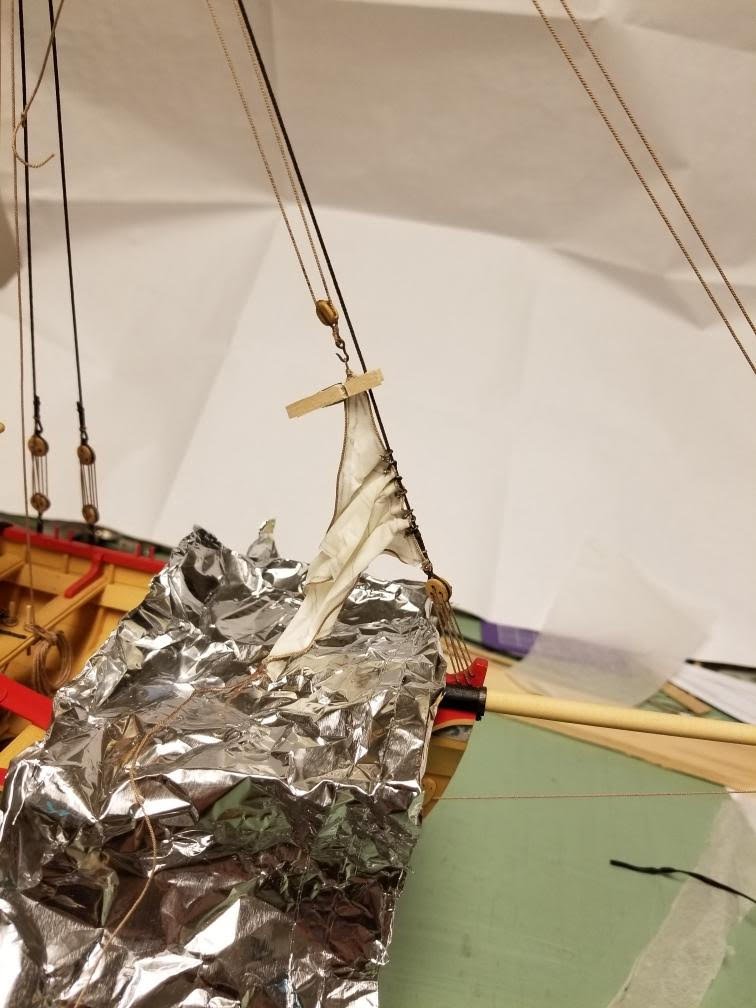
This model is 1/2" scale so I believe he went with 3 layers of silkspan. I cant remember. This is what it looks like completed. Note how the jib sail is furled and brought in close to the fore staysail. Just a small portion of the sail on the bowsprit with the traveller ring brought in a bit more. I will have better photos soon enough and hopefully Tom will post his step by step....all three sails are on the model and look very natural and to scale. These furled or semi-furled versions are smaller in size than if you set them full sail.... Below you can see the two sizes of sails. The full sized sails as if you were setting them raised. The three smaller versions are on the top row with bolt ropes ready to be used as the furled versions. If you tried to furl the full sized sails it would look to heavy and thick and out of scale. So Tom reduced their size accordingly....before setting them on the model as naturally laying furled/semi furled sails.
- 421 replies
-
- 13
-
-

-
- medway longboat
- Syren Ship Model Company
- (and 1 more)
-
I love the look of furled or partially furled sails on a small boat like this one. A good friend of mine and fellow club member "TomShipModel" was kind enough to take my Medway Longboat model and do just that for. I am horrible at this and would have certainly made a mess of it. Tom is certainly an expert at it and I have seen the work he does with sails on his models. So I was so happy he agreed to do this. It has been a learning experience just watching him do this. He used the sail plan that is available for download here. Here are a couple of in progress photos. Tom said he has a bunch of pics and post a how -to of sorts when its all done. I will certainly post more pictures. The sails are made of silkspan. And one of the fore staysail underway....just beautiful work. Hanging very naturally.
- 421 replies
-
- 22
-
-

-
- medway longboat
- Syren Ship Model Company
- (and 1 more)
-
That s looking great. The wood worked out nicely. Perfect grain pattern or should I say lack of grain pattern. Those boards/planks look like butter!
-
National Balsa..... https://www.nationalbalsa.com/BalsaWood_s/2.htm

-
That looks lovely. I am close to getting a shipment of milled cherry so I will soon have more of these kits available. You are doing an excellent job on it. Very elegant indeed.
- 185 replies
-
- 3
-
-
- queen anne barge
- Syren Ship Model Company
- (and 1 more)
-
That looks great to my eye. Keep going. I also imagine if you did a couple more it will get better with each attempt. You have to get your carving sea legs back.
-
I doubt anyone would want to pay for that. The biggest issue is laser cutting the thicker boxwood. Its not easy using a 75 watt laser. The laser kerf is too thick and lots of burning. The Cheerful is easier because most of all the parts are laser cut from thinner boxwood sheets easier to laser cut. It would end up costing someone well over $2000 - $2500 to build it in boxwood because its so big. so probably not.
-
Thats great. Thank You. He has the list of wood required for the Cheerful wood packages. So if you want the pre-milled strips for the model in the Option B wood package....you can order it from him. Because he can do that now, I am even go to go back to offering an all Boxwood Cheerful starter package. You will be able to buy the parts all in Boxwood once again and get both the wood packages in Boxwood from Joe. That will be in stock next week sometime. He will start keeping lists of what is needed for all of my Syren projects for the strips needed and even other kit MFG's. Chuck
-
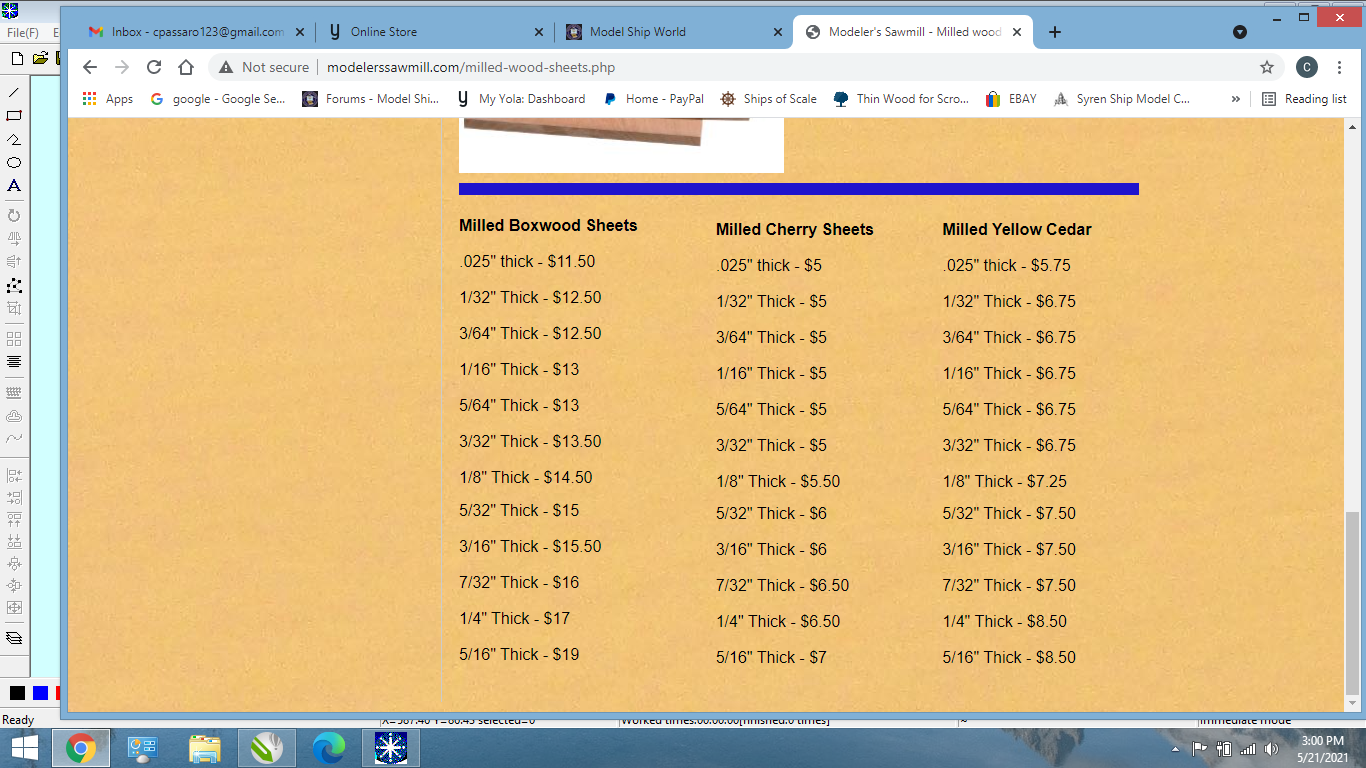
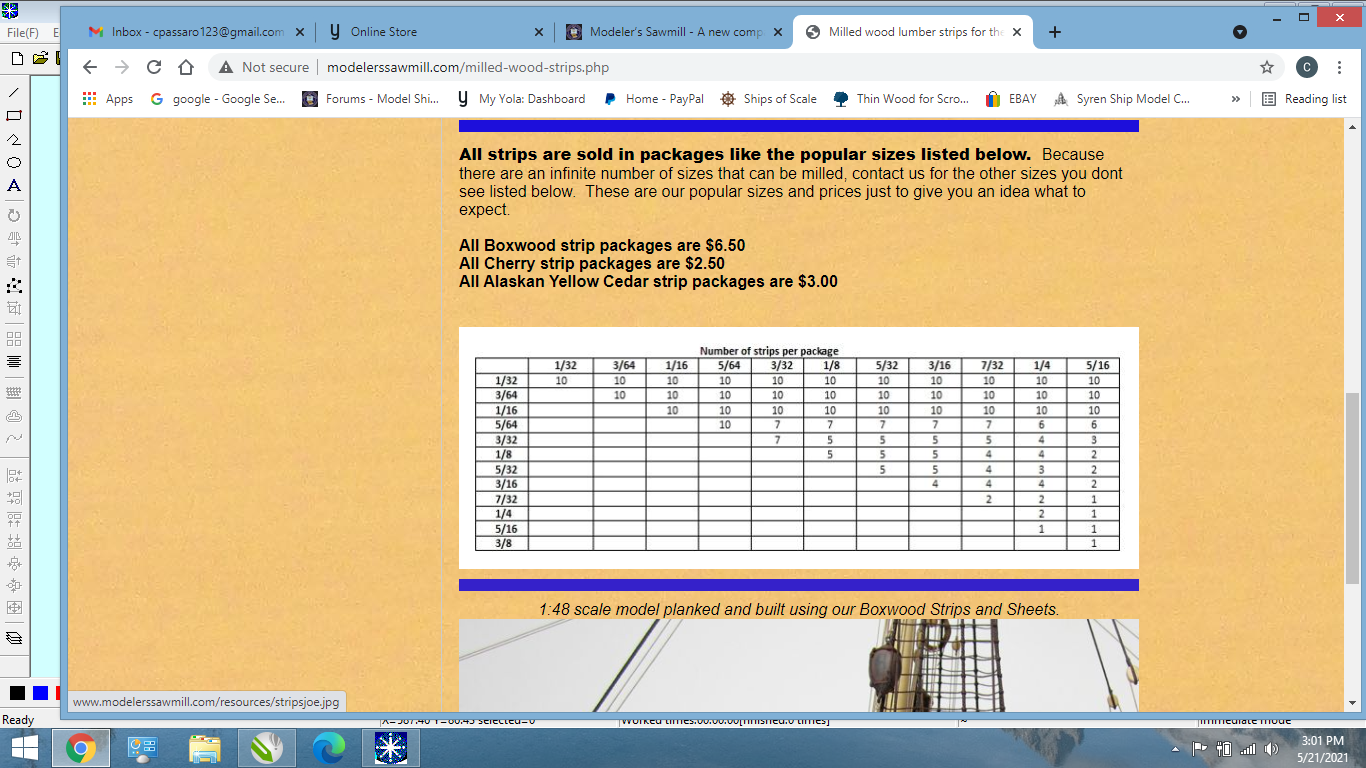
Joe is all set up and ready to go. Here is his website. He should have Swiss Pear in a couple of weeks. But for now....Boxwood, Yellow Cedar and Cherry. Contact him for stripwood needs. http://www.modelerssawmill.com/ Joe will be coming onboard as a sponsor real soon....so look for his banner. He has signed up as a member as well. If you need to send him a PM. His username is "Joe V" Chuck
- 41 replies
-
- 14
-
-
-
I am helping him look for it but other than Domex its hard to find folks selling raw billets thicker than 1”. This is problematic. And when you do it is selling for $65 to $75 a board ft. With no guarantee it will be white like we expect. So the search continues. so for Holly it will be the last thing he probably sources and mills. Prices are crazy.
-
A bunch of people were PMing me about what he will offer.....I have this from his website under development.....wood sheets. He is starting with just these three species as he is awaiting delivery of others like Swiss Pear and Walnut etc. As he gets organized and gets the other stuff I will let you know. I asked him to sign up here and he will be a sponsor of MSW too.....just takes time to get it all off the ground. and strips will be for sale.... So all those folks who were reluctant to sign up for the Winnie project because you couldnt mill your own strips. This should solve that issue. Its gonna be a week or so before he opens up for orders. Chuck
- 41 replies
-
- 17
-
-
-
Looking great. Nice and tidy. The ratlines will go just fine. Just keep them straight and evenly spaced. The worst thing that could happen is pulling in your shrouds to get that dreaded hourglass shape. No pressure.
- 778 replies
-
- 2
-
-
- cheerful
- Syren Ship Model Company
- (and 1 more)
-
Yes you could do that. Absolutely.
-
Once he gets going he will join MSW as a member so he can get to know his customers. I will keep giving updates.
-
Just a heads up. A new company…actually a one man shop like Hobbymill is starting up in the USA. Finally another source to by stripwood and sheets of precision milled wood. His name is Joe Volpe. He will start off slow increasing the species he offers over time. To start, He will be offering Boxwood, Cherry and Alaskan Yellow Cedar. Joe is the guy who currently mills all of my wood for Syren Ship Model. He has decided to open up to everyone. He also has some swiss Pear coming soon. He is finalizing the website and I will announce when he opens. No online store as its going to be very similar to Jeff at Hobbymill. You send Joe an email with what you need and he will give you a price. You pay via PayPal and he lets you know when the order ships. At least for now anyway. Joe is a really nice guy and mills with precision. I am very happy with his product and if you ever bought wood from me then you have seen his work. I encourage you to give him a try once he opens.
- 41 replies
-
- 35
-
-
-
This is a fantastic project and I have given Adam my support and signed up. He has a poscast started which I think all of folks would be interested in. Its sole focus is to get enough interest to convince them to invest in the TV mini-series. It will be along the lines of Downton Abby and the Crown. I recommend it highly. I believe he may be interviewing a model builder or two as well. Please support this by signing up as well. Each episode of the podcast will talk about life onboard the ships and some history and development of the ships themselves. Have a listen to these very short 7 minute episodes of each podcast... https://shows.acast.com/trafalgar-squared/episodes Chuck
-
Thats looking good. Your progressing nicely.
-
She looks great Rusty. Better every time I see it. 😃 Chuck
- 642 replies
-
- 2
-
-
- winchelsea
- Syren Ship Model Company
- (and 1 more)
-
That is looking fantastic. Yes I designed that model with far more rigged ropes than you typically see on a model. Its tedious but when completed it really does look good. Especially when done so nicely as you have done. Really great work.
- 950 replies
-
- 6
-
-
- syren
- model shipways
- (and 1 more)
-
Real nice….it gets easier as you go. They look great so far.
-
I deleted the off topic stuff so guys please just concentrate on the wonderful model. Everything has been before at some point so no need to for that off topic discussion. Thanks and lets keep the build log focused on the tasks at hand.
- 725 replies
-
- 7
-
-
-
- vanguard models
- speedy
- (and 1 more)
-
It could just be age as the finish might have worn off. Most often these old models have a nice patina on all the metal work. They may have been painted but its hard to see any evidence of that so many years later.
- 1,784 replies
-
- 1
-
-
- winchelsea
- Syren Ship Model Company
- (and 1 more)