Chuck
-
Posts
9,702 -
Joined
-
Last visited
Content Type
Profiles
Forums
Gallery
Events
Everything posted by Chuck
-
 Yes.....that is how it will work. Just one hole.....
- 1,784 replies
-
- 5
-

-
- winchelsea
- Syren Ship Model Company
- (and 1 more)
-
Thats not my thing.....but you could. The ring would have been just bolted to the drum. Chuck
- 8 replies
-
- 1
-
-
- syren chuck
- winchelsea
- (and 1 more)
-
No they are for the pins that would go through and into the handles to lock them in while turning the capstan. Have a look at the fully framed model volume2. Great details in that book.
- 8 replies
-
- 1
-
-
- syren chuck
- winchelsea
- (and 1 more)
-
That looks very good actually. But I will mention that the tiny holes in that disc on the top of the capstan should line up above the square holes for the bars in the drum. You didnt align that disc correctly...it should have been oriented on the stick so they matched up. Also a little tip....if you own a miniature chisel....of good quality, you can clean up those notches a bit before adding the chocks. That makes a big difference. But nicely done.
- 8 replies
-
- 3
-
-
- syren chuck
- winchelsea
- (and 1 more)
-
Thats a new one!!! I have never seen that happen.
-
Welcome to the group.....dont hesitate to ask any questions. RNJOY the project. Chuck
-
Nope...the winnie gets a flat one....
- 1,784 replies
-
- 6
-
-
- winchelsea
- Syren Ship Model Company
- (and 1 more)
-
Probably but we shall see when I get that far.... Chuck
-
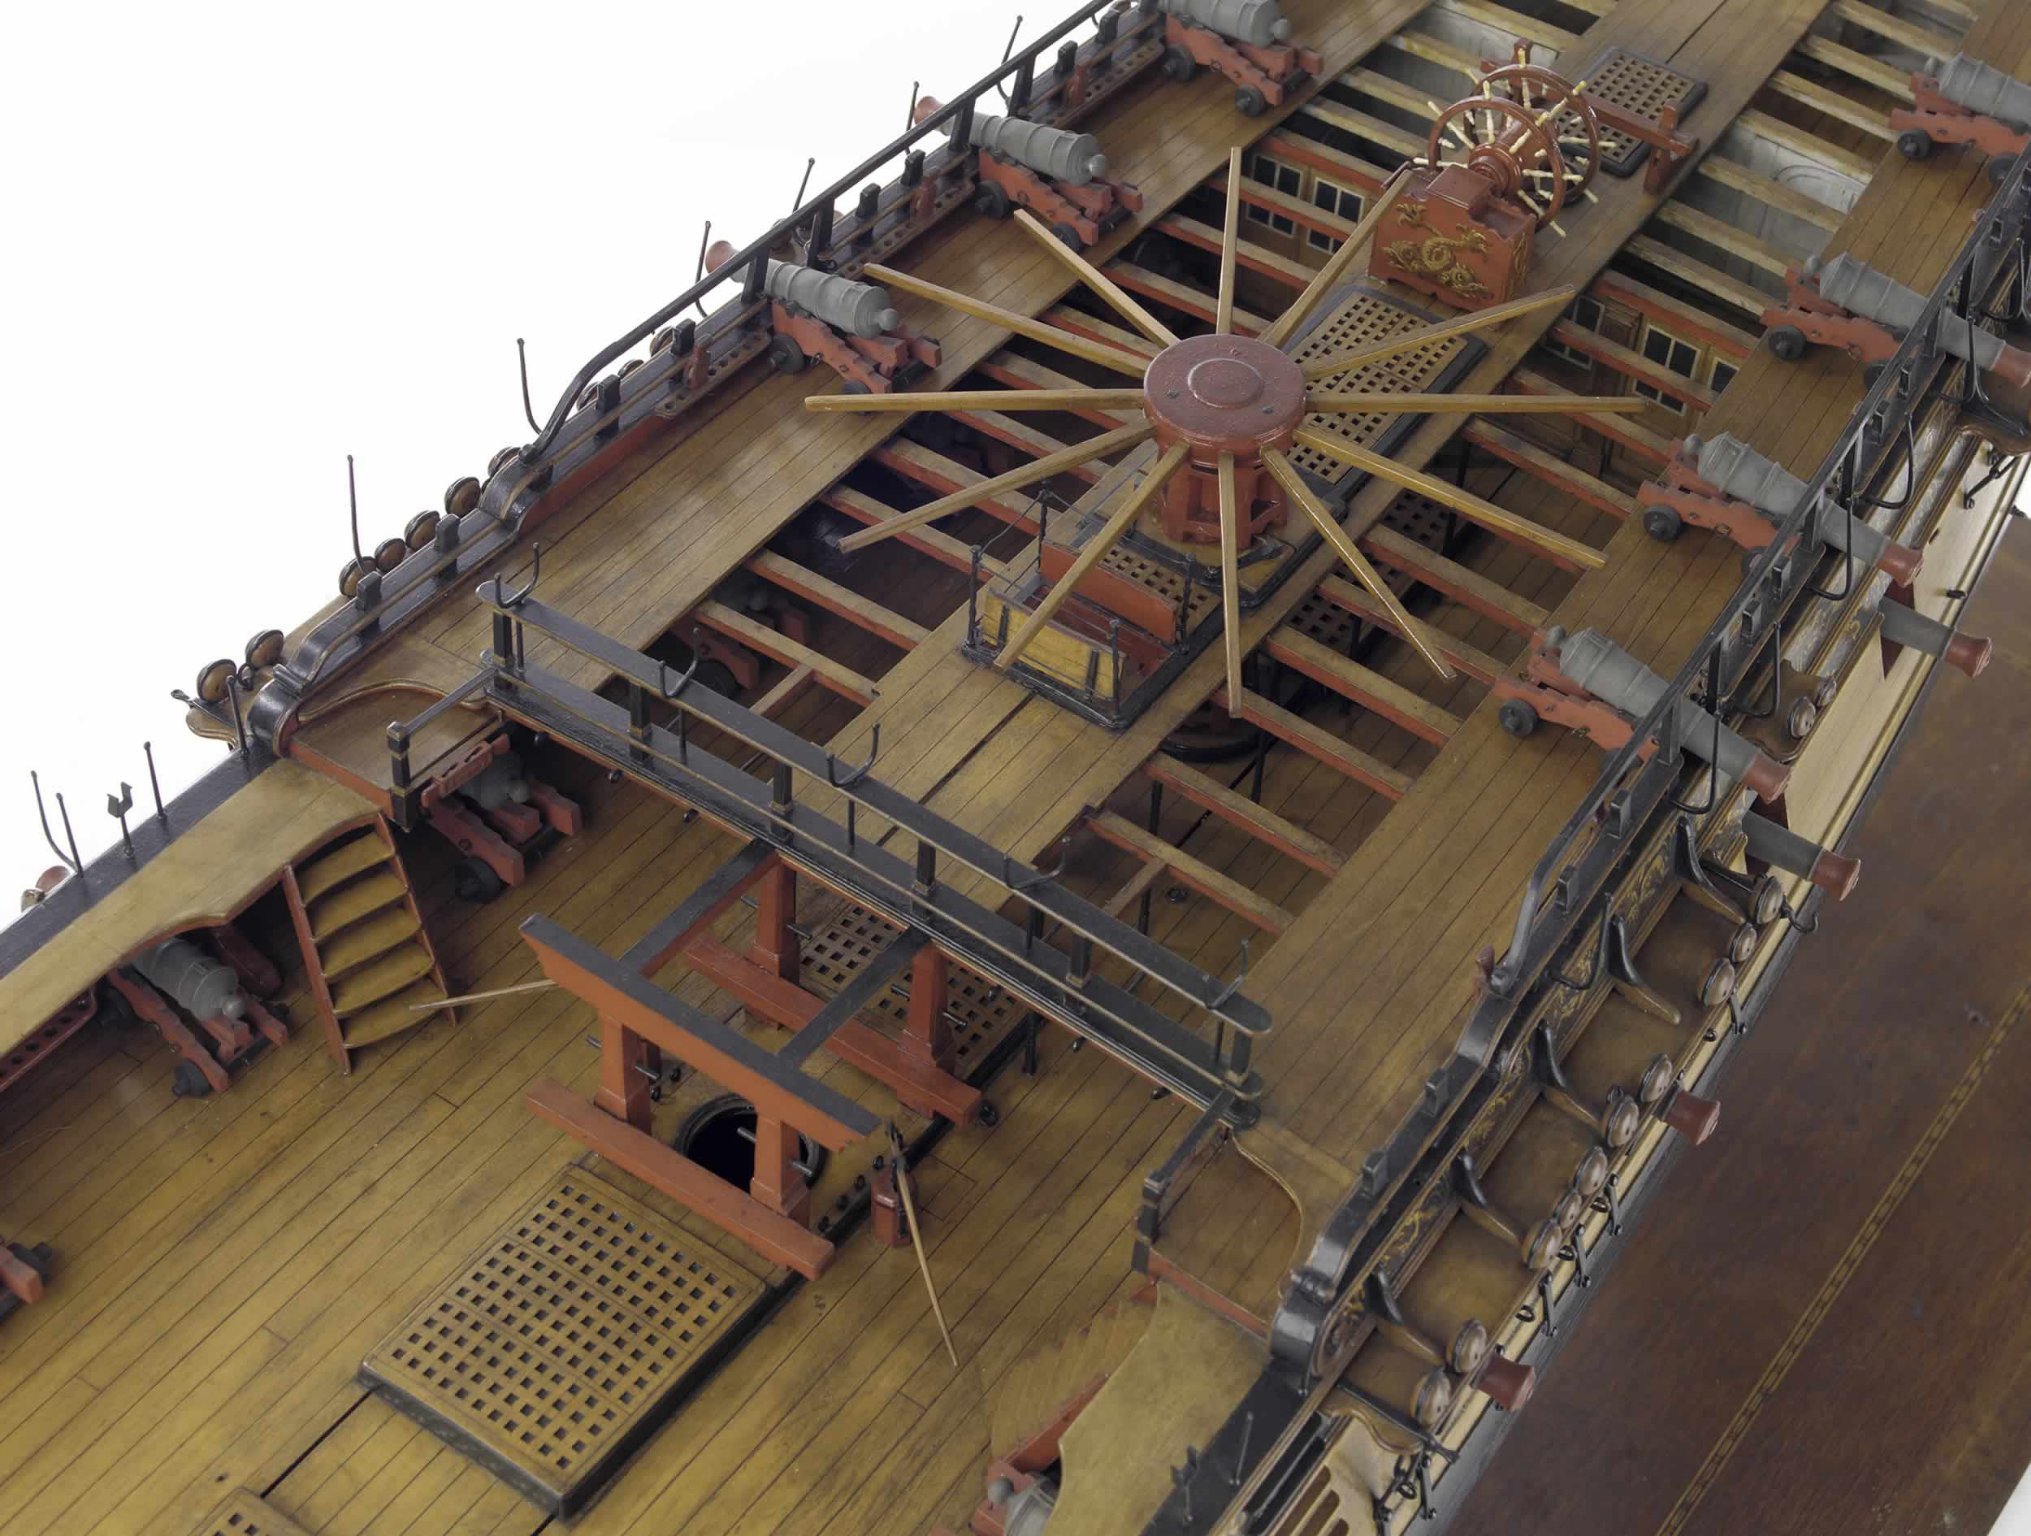
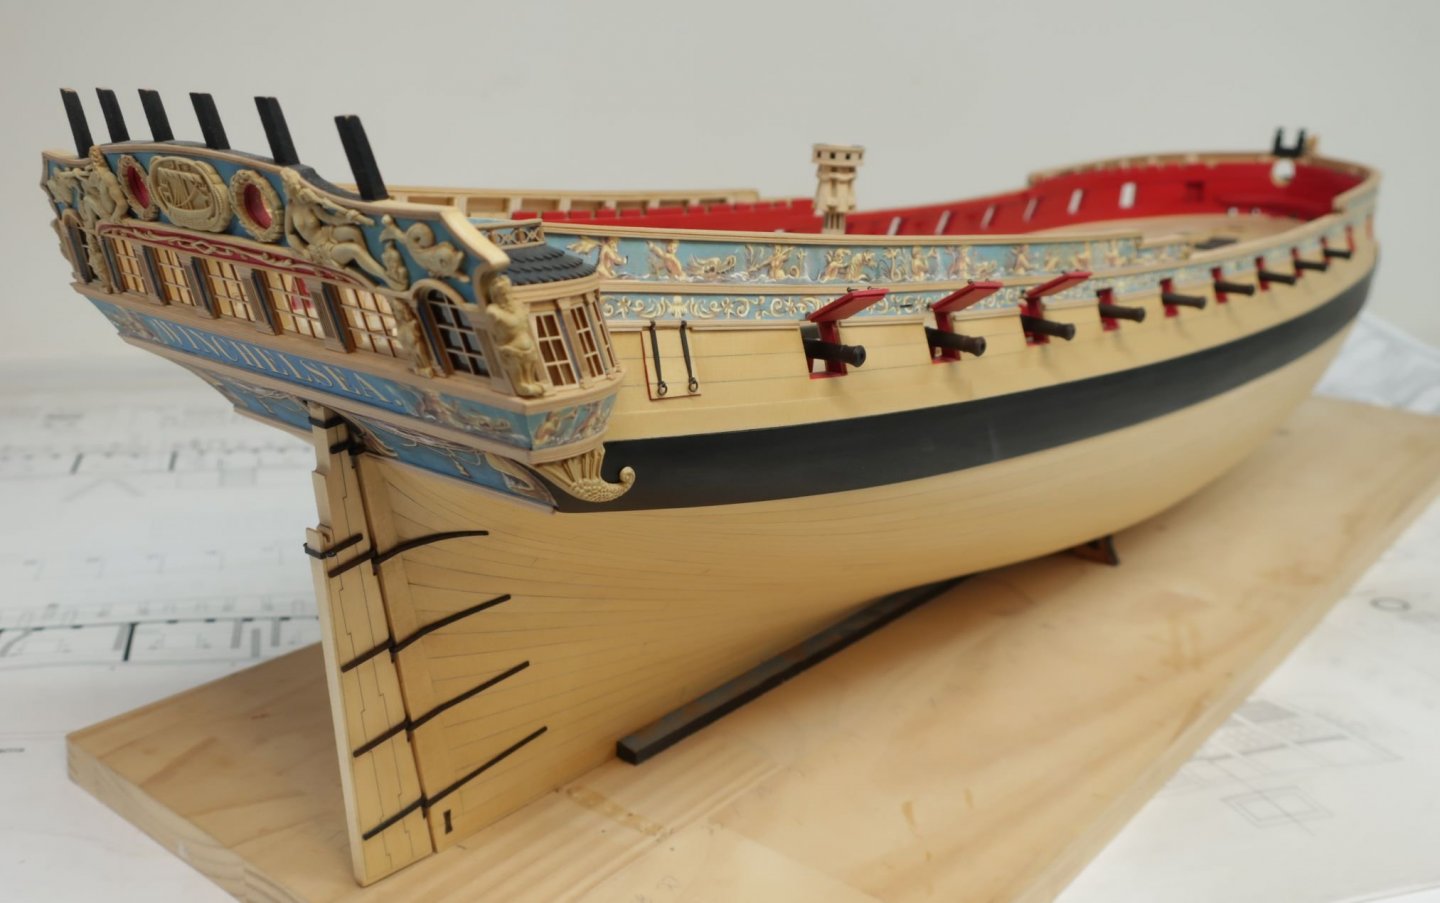
Actually one of the interesting things about the Winnie contemporary model is the columns. All of the columns are square but fancy. Same is true for the uprights on the main rails at the break of the waste. We will be adding them but they wont be round....no lathe needed. Maybe the guy who built this didnt have a lathe either....LOL I love the way this looks actually....see the main rail below. and here is a look at the square uprights on the breast rail for Amazon. This is a better image and how we will make these. Also note the columns holding up the deck beams....you dont see very thick round columns here either. Which is what you usually see in kits and more modern models. These are very slender by comparison. Chuck

- 1,784 replies
-
- 12
-
-
- winchelsea
- Syren Ship Model Company
- (and 1 more)
-
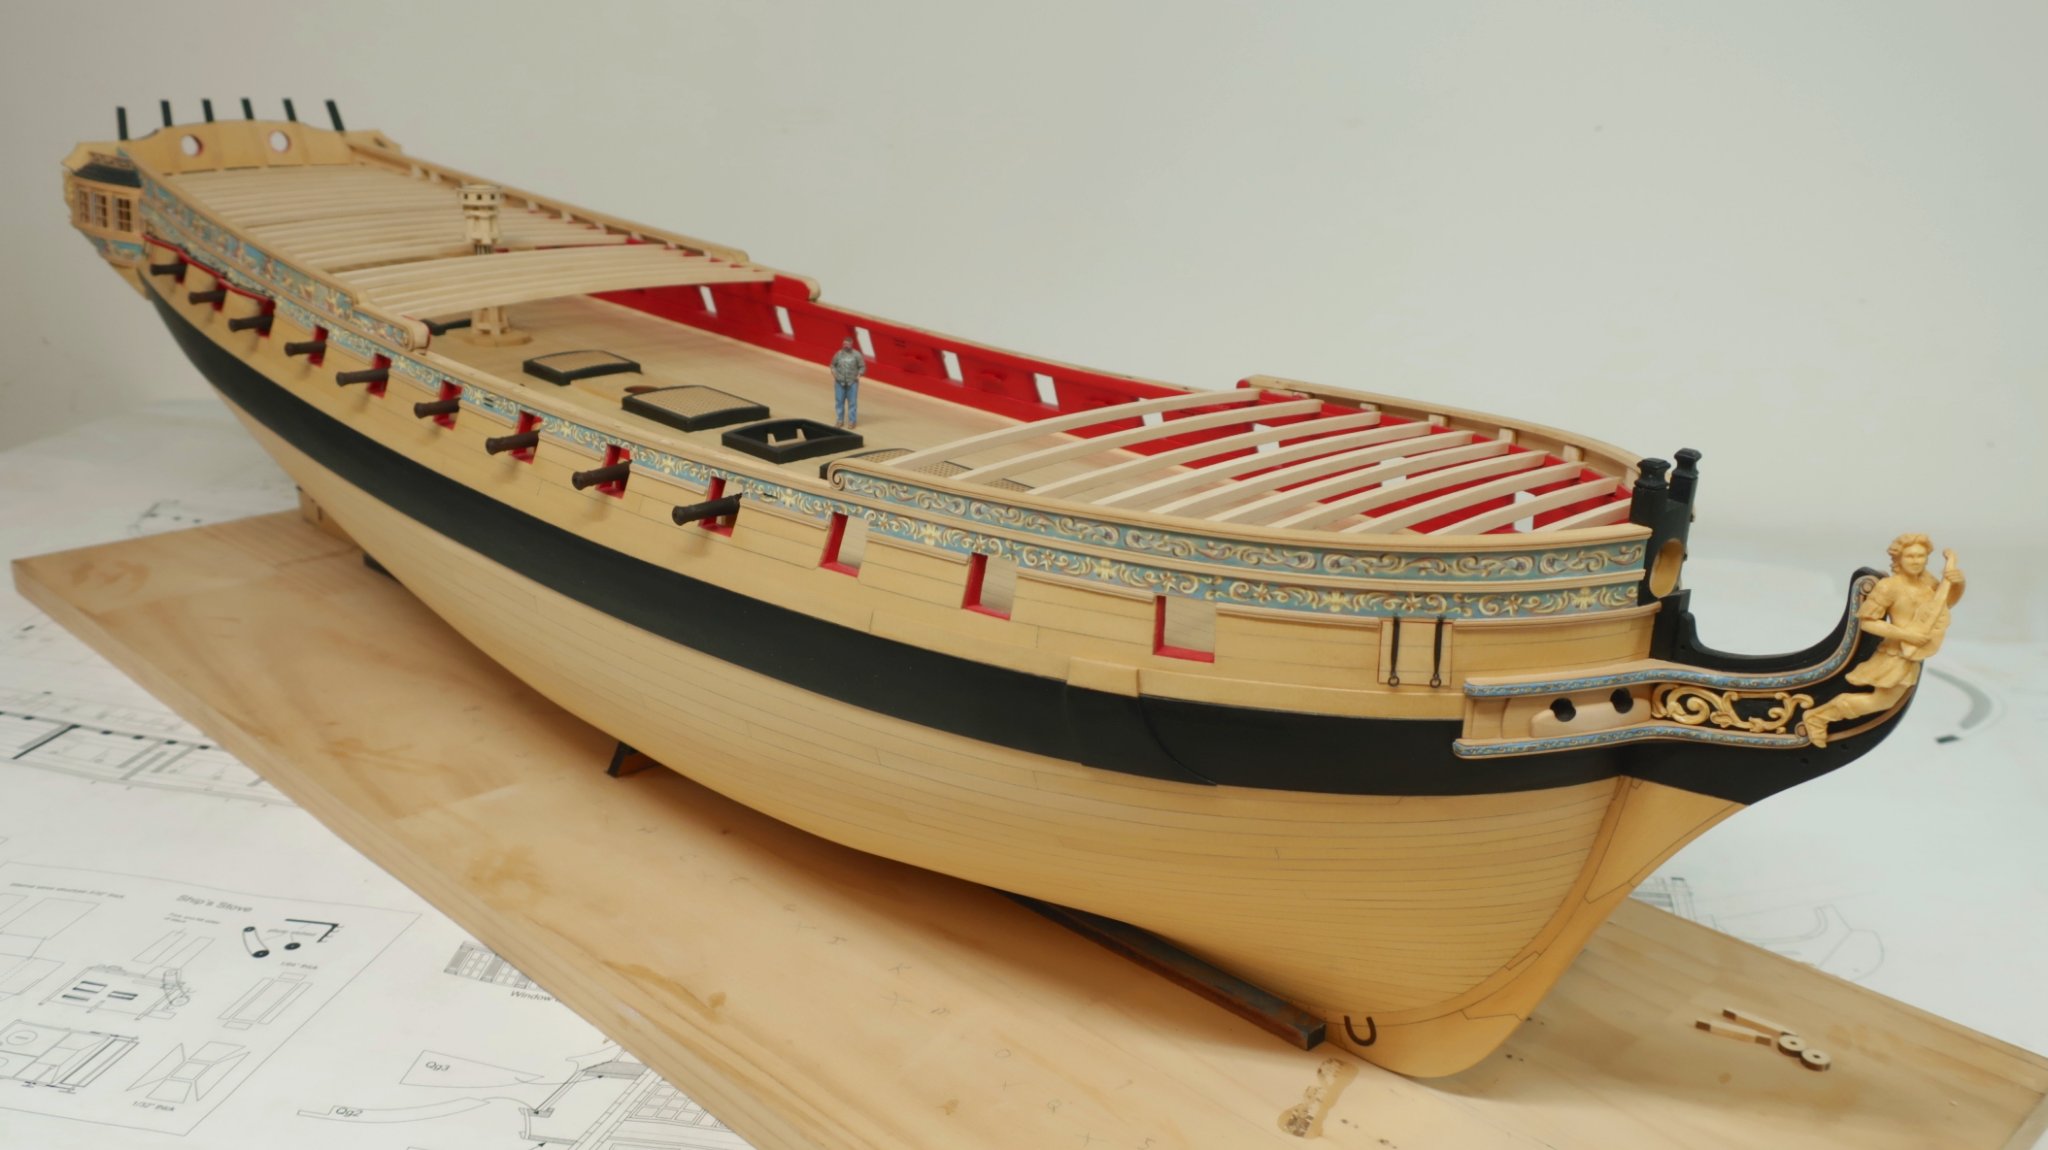
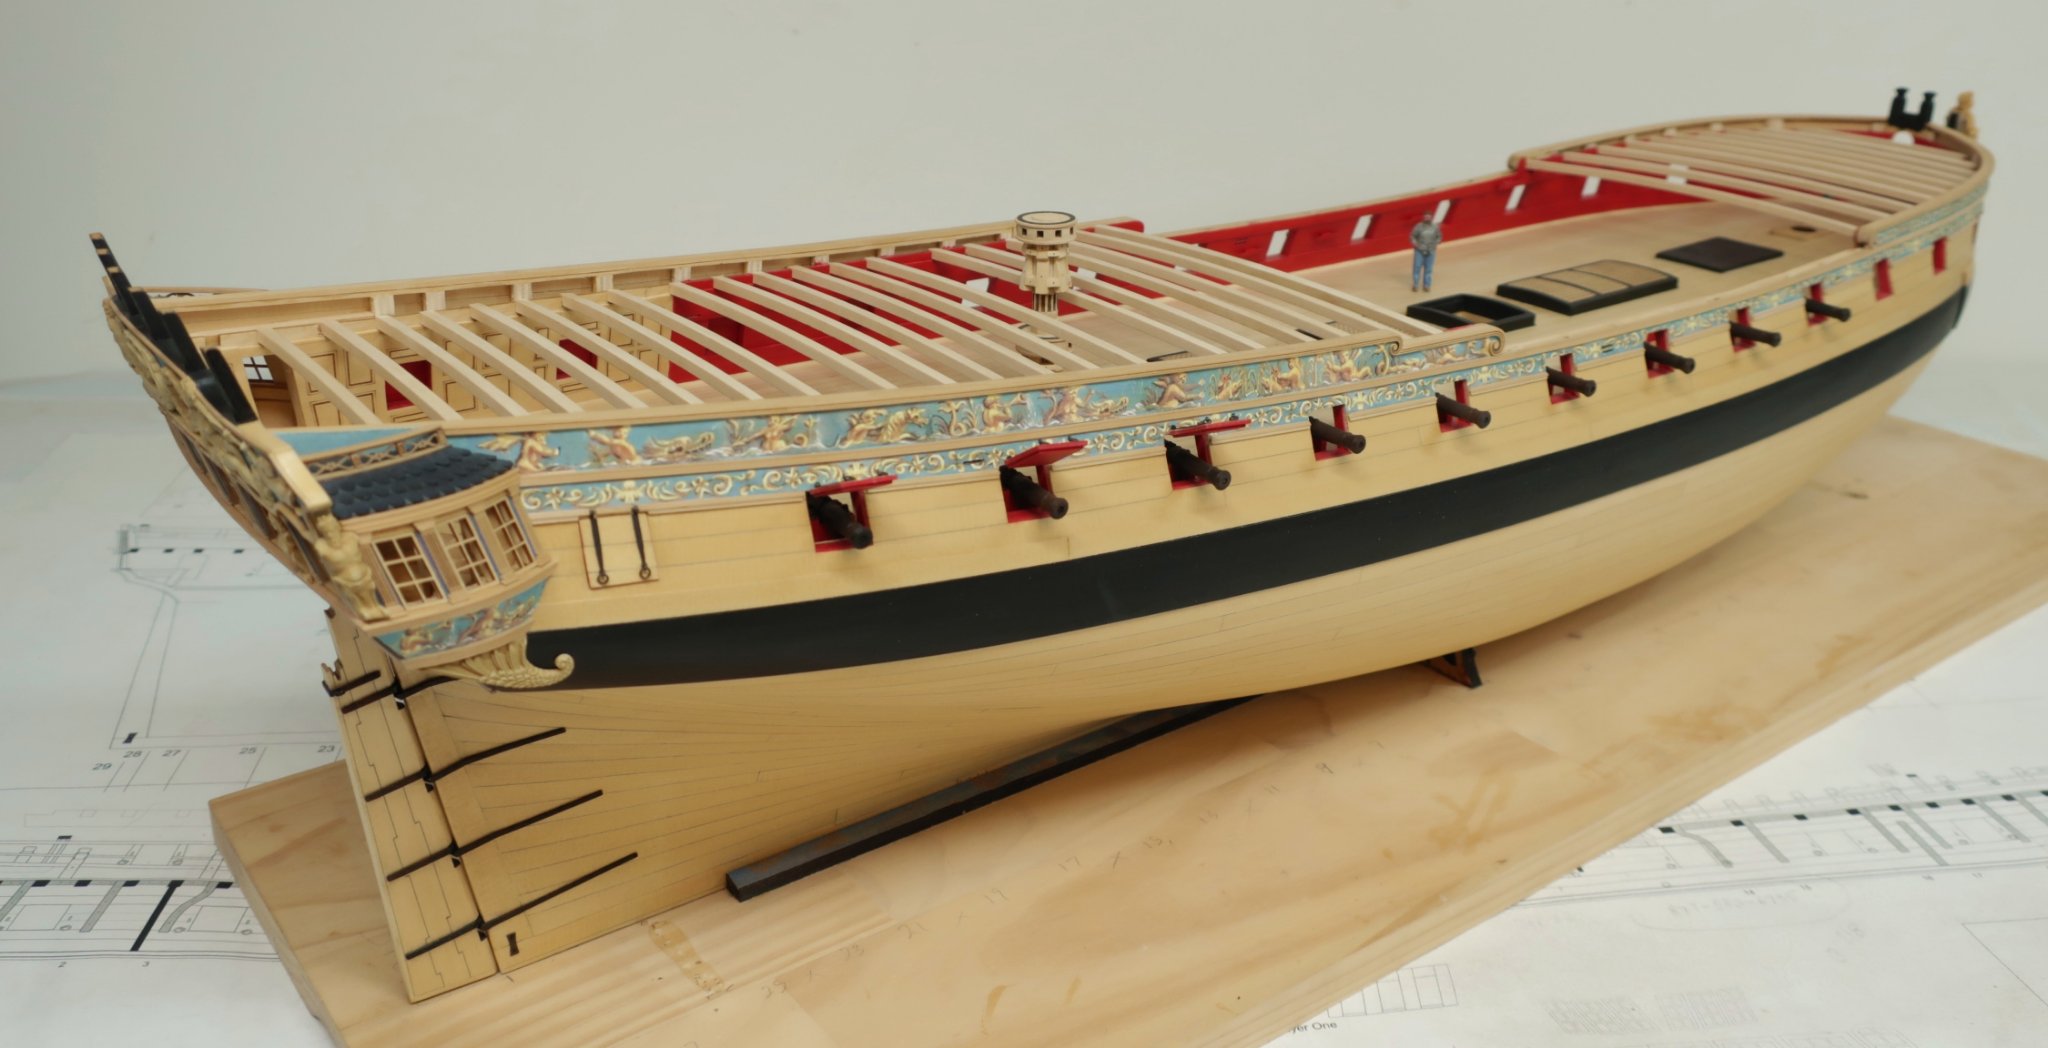
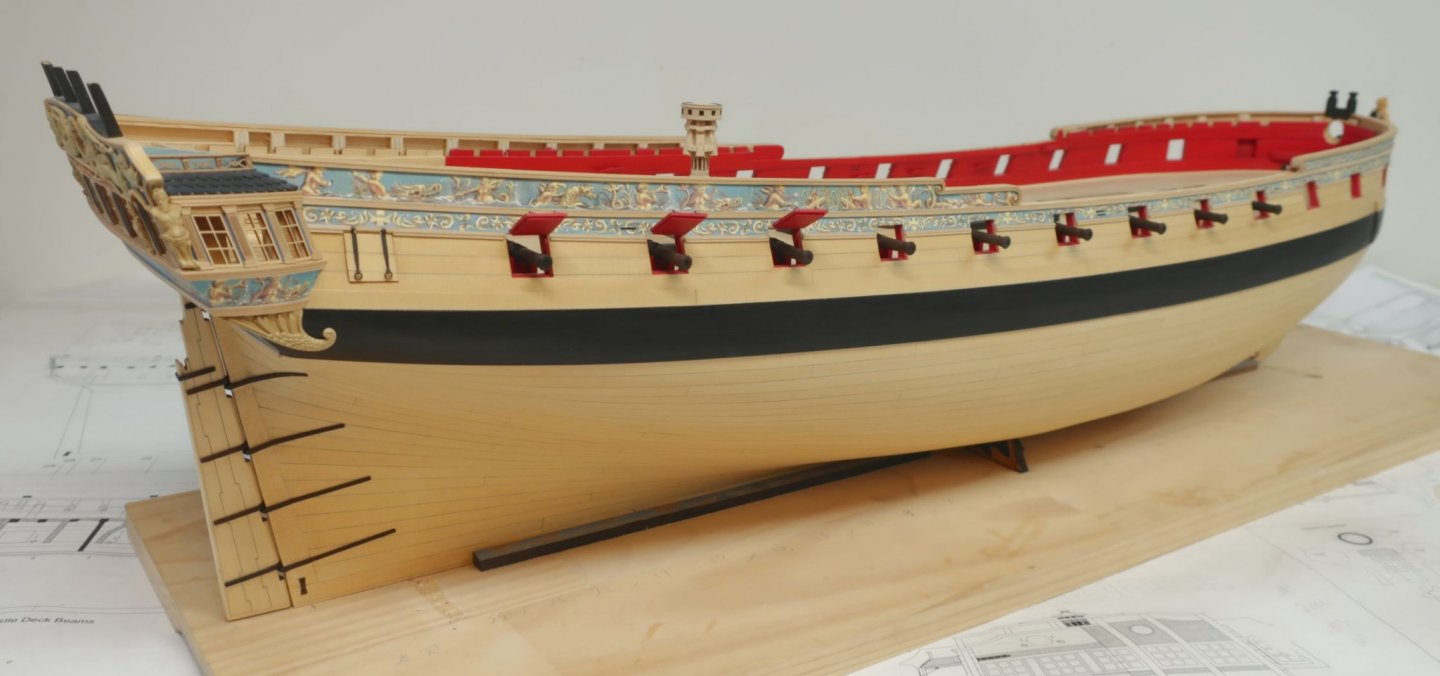
Someone mentioned deck beams earlier. I managed to get all of them sanded of char. I will need them as I move forward and thought it best to do them now while building cannon. Some knees will need to be in position to finish the cannon so these are good to have....but it really does change the appearance and gives you a great idea of how she will look. I will number them and remove them until needed.


- 1,784 replies
-
- 30
-
-
- winchelsea
- Syren Ship Model Company
- (and 1 more)
-
Really nice work Glenn....you are in the homestretch...
- 778 replies
-
- 1
-
-
- cheerful
- Syren Ship Model Company
- (and 1 more)
-
Casting sets are in stock.....but you cant order a figurehead separately. You need to buy the whole set so I dont have to break up sets.
- 1,784 replies
-
- 2
-
-
- winchelsea
- Syren Ship Model Company
- (and 1 more)
-
That is here... Yes you can do that. I will be going the more traditional route however. I will leave two open areas rather than leave an entire side bare. It will enable me to add gins on both sides without using the rather ugly methods that I sometimes see. Chuck
- 1,784 replies
-
- 3
-
-
- winchelsea
- Syren Ship Model Company
- (and 1 more)
-
Indeed they are....Go here to sig up....then you will be given access. https://thenrgstore.org/collections/plans-and-projects Chuck
-
Not "MAY"......I have discontinued rope. But yes I intend to rig one cannon in order to show what blocks are needed and what size rope. Then I will remove it all for my model. But first I have 16 more guns to build and then I have to add all those eyebolts and split rings to the bulwarks. Good times.
- 1,784 replies
-
- 6
-
-
- winchelsea
- Syren Ship Model Company
- (and 1 more)
-
No I am not going to add any rope at all which was customary for most if not all contemporary hull models. But I will rig one just to show how I did it in case you guys want to rig them. Chuck
- 1,784 replies
-
- 5
-
-
- winchelsea
- Syren Ship Model Company
- (and 1 more)
-
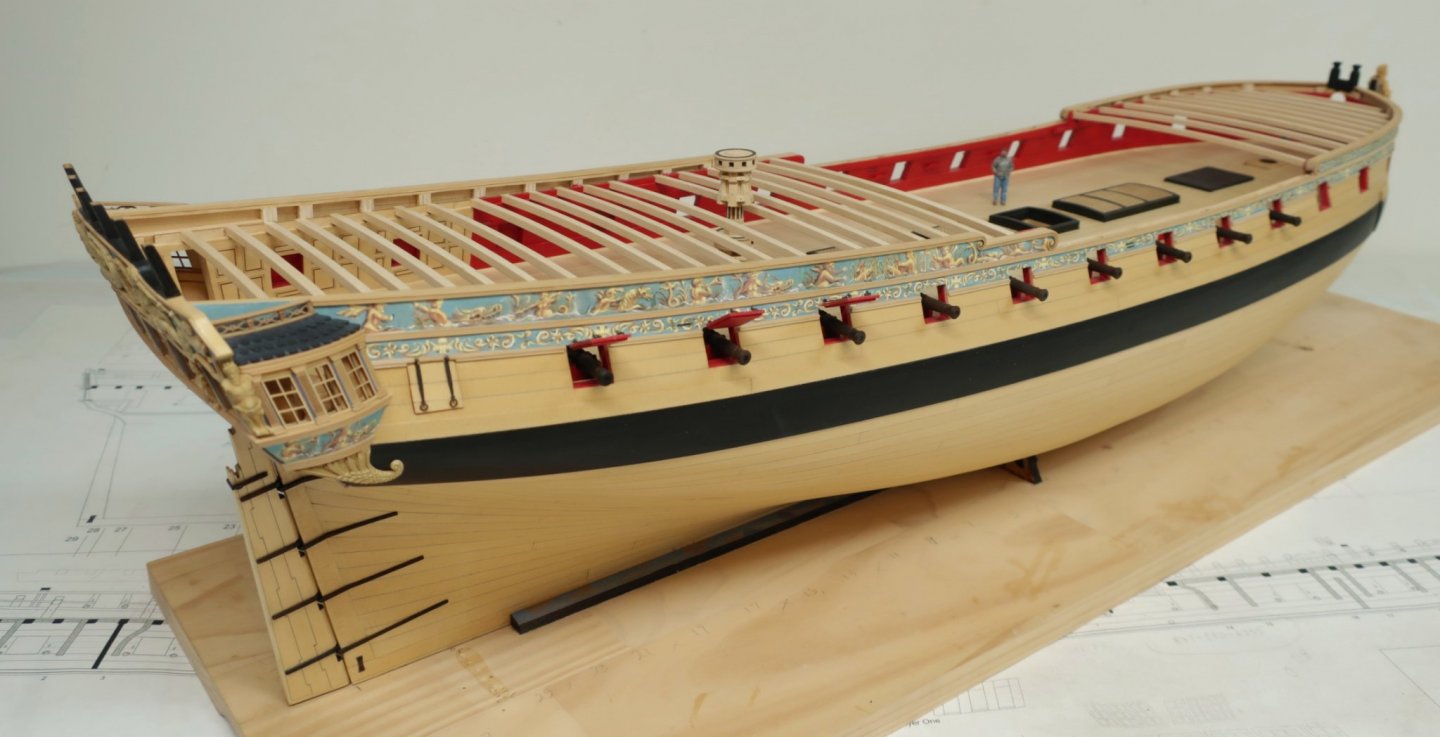
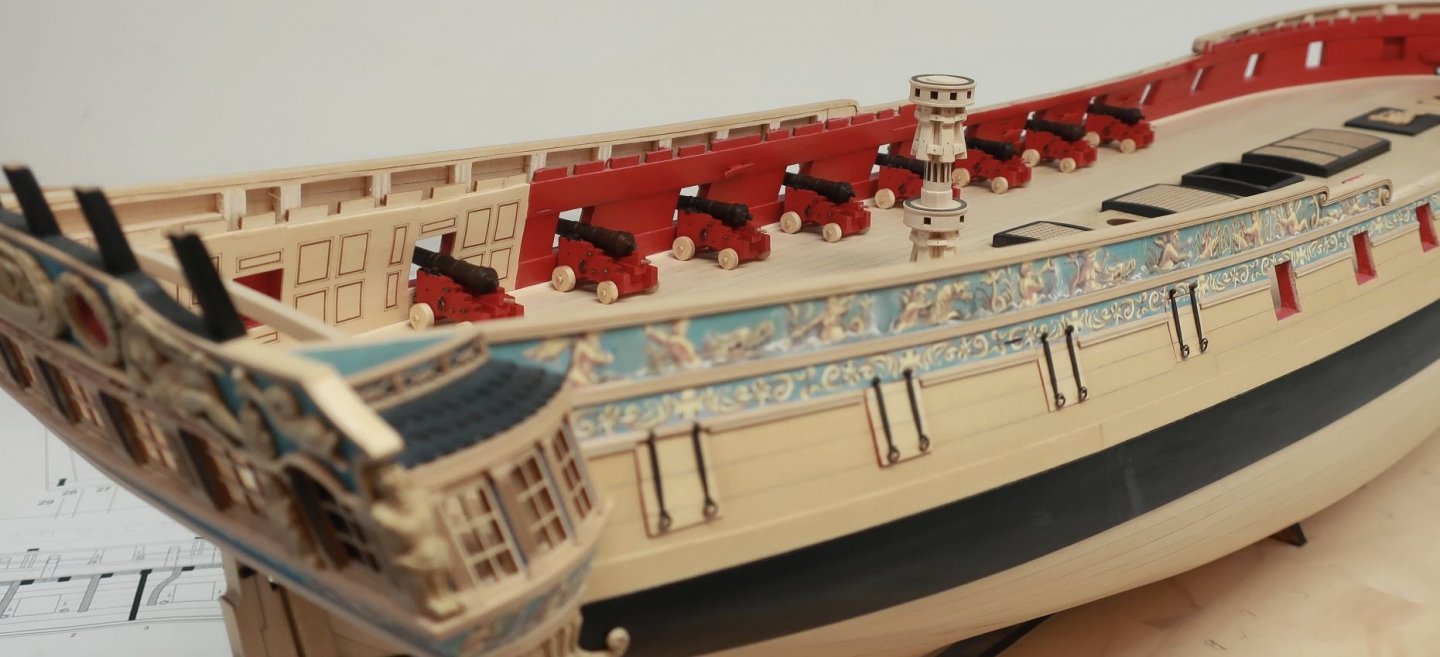
Guns!!! Guns!!! and more guns.... Eight down and 16 more to go. I have been very busy making these. Just take your time and go slow so they come out nice and neat. Some photos of my week of work making 8 cannon....
- 1,784 replies
-
- 22
-
-
- winchelsea
- Syren Ship Model Company
- (and 1 more)
-
1:48 Double Capstan for HMS Winchelsea – 1764 - Syren Ship Model Co.
Chuck replied to Gregory's topic in REVIEWS: Model kits
Have fun building it and take your time. There are lots of fiddly bits and they will require some light sanding and shaping for the best fit. I am also looking forward to seeing the cherry version built as I only built the cedar.- 4 replies
-
- 6
-
-
- capstan
- winchelsea
- (and 1 more)
-
Thanks!!! I do like how those came out as well. Nice and simple. Chuck

- 1,784 replies
-
- 15
-
-
- winchelsea
- Syren Ship Model Company
- (and 1 more)
-
Nice progress Bob....
-
Should have more resin casting sets in stock next weekend..
-
Of course they will be available in my store....the key is how you finish them.....as I described. They look exactly the same as the blackened brass versions. But the cyphers are cast into these resin versions already. The gun deck carriages and cannon will be chapter six....they take a long time. So this will be the entire chapter along with making the eyebolts and split rings for the bulwarks and deck. You will need to buy six packages of 1 15/16" long black resin cannon...or the brass ones I have but that will double the costs. You will also need six packages of gun carriages in Cedar or in Cherry They are sold four per package. I will have them ready as soon as make more ropewalks and a few more chapter parts installments which are currently out of stock. But the cannon should be in stock right now.. Chuck
- 1,784 replies
-
- 4
-
-
- winchelsea
- Syren Ship Model Company
- (and 1 more)
-
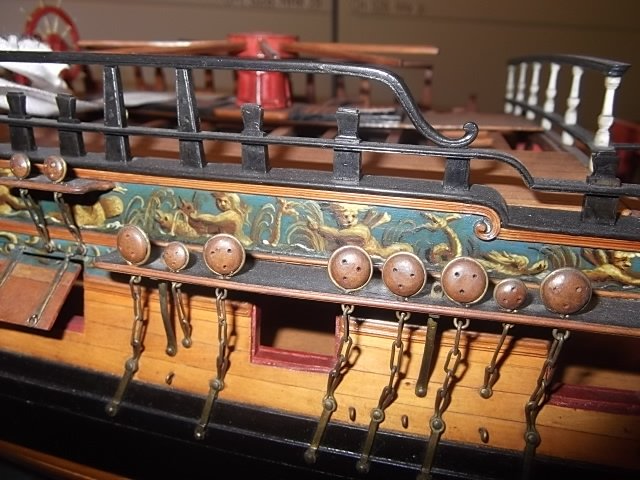
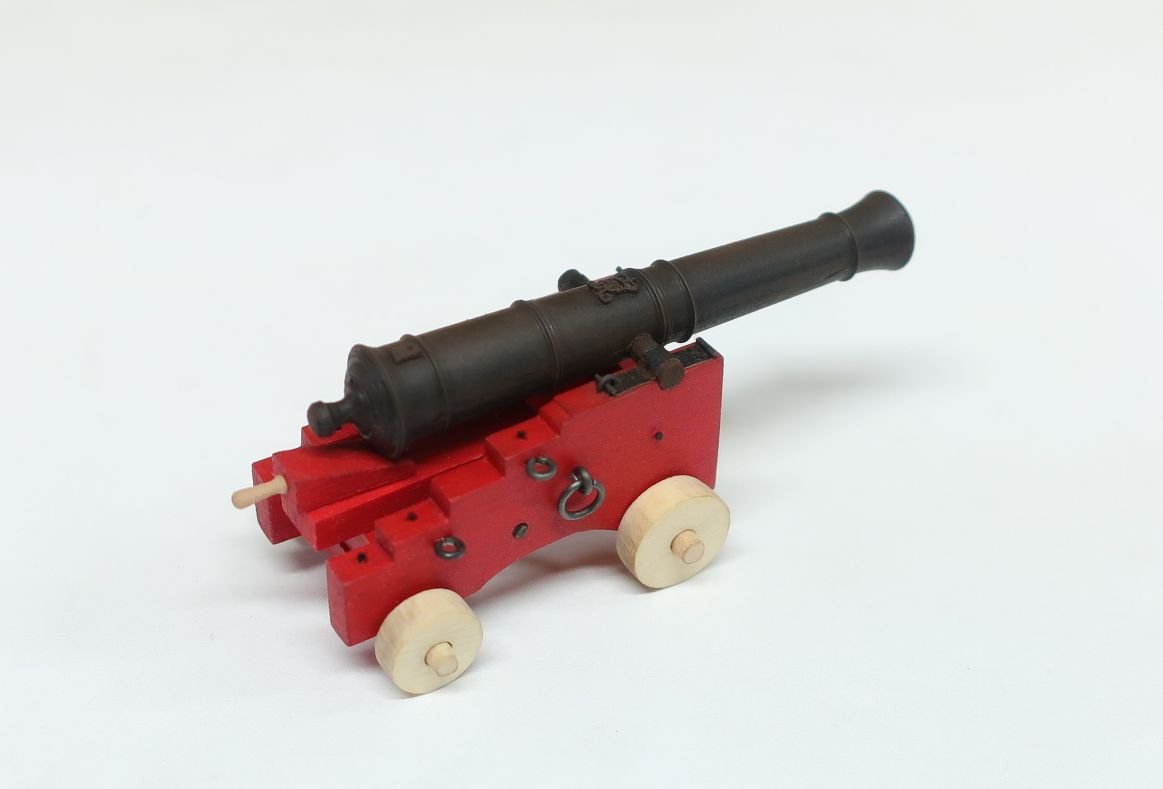
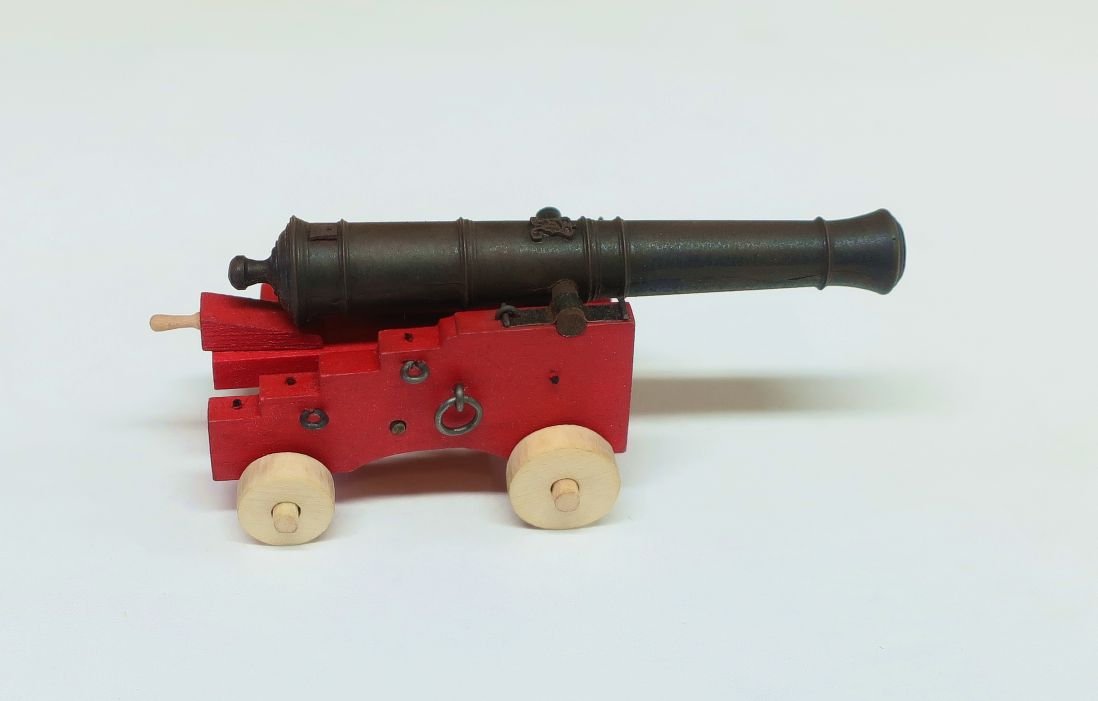
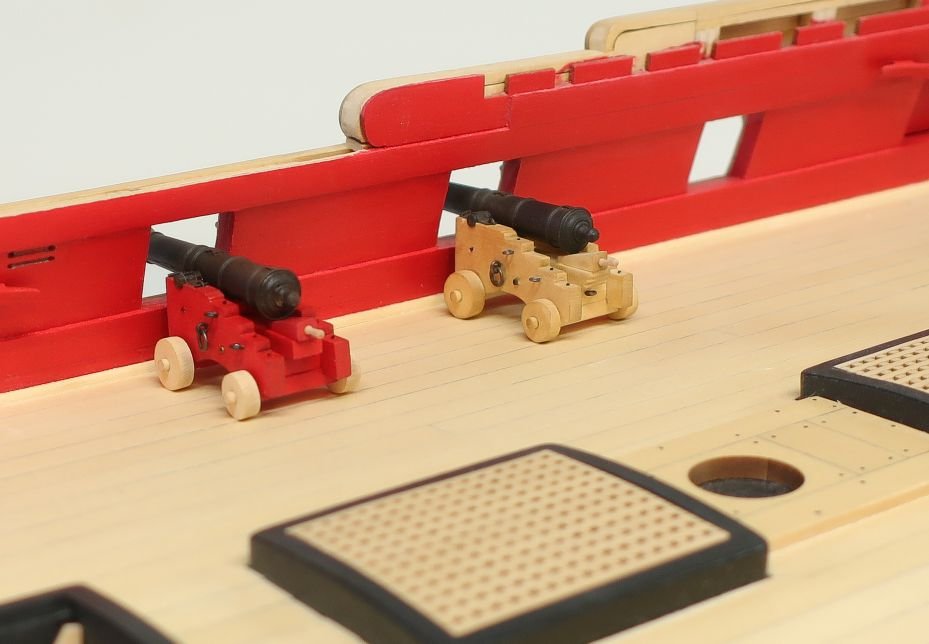
Here is the finished carriage with gun in position... Doesnt that cannon look great? Hard to believe it is black resin and not brass. To treat those, just spray a mist of matte finish on it. You know the stuff....spray fixative. I use Krylon or dull coat. I did this after removing whatever sprues and flashing with a very fine sandpaper. Once sprayed and dry I give each barrel the treatment with some weathering powders as I have described numerous times. It really does the trick. Keep in mind I havent applied any Wipe on Poly to the trucks yet so they appear very light. Thats the raw cedar. They will have a deeper color once I apply the poly. You can also add the pins that hold the trucks onto the axels. Its all up to you. I have seen so many different treatments by builders with gun carriages. You guys can have fun with these. I made the quoin handle.....basically a belaying pin like I usually do. I chock a length of 3/64 x 3/64 boxwood in my Dremel and shape it with files. I suppose you can buy some of those but its real tough to find nice belaying pins to scale. The Crafty Sailor sells some nice ones. Its up to you and how much time you want to spend on these. Remember you have to make 24 of them. The cap square......these are finicky details You can put as much time and detail into these as you desire. Check out a few of the scratch build logs and you will see some guys go nutty with these. I tend to simplify these merely out of boredom with them and lack of desire to go beyond what you see in the photos. My goal is to just give the suggestion of a more detailed version. It is not a great deal accurate but because of there size this gives a great impression at this scale that they are. The close ups are brutal but when you see them in person they do a swell job. Its very simple really....the base of the cap square is literally a length of black masking tape pre-cut into 1/16" wide strips...maybe a tad wider. Then I cut the tiniest lengths of 28 gauge black wire.....to 1/16" long. The same width as the tape. I place one of these wires at the front and back edges of the tape...... To finish it off you will notice that wire loop around the aft wire of the cap square. This is just a tiny "U" that I made out of that same wire. One side of the "U" was a bit longer. I pre-drilled a hole just behind the tapes edge and inserted this "U" into it so the upside down "U" would come down on top of the wire glued to the edge of the tape. I hope that makes sense. Its one of those things that isnt easy to describe. And finally, a picture alongside a natural version I made of the cannon. Its dirty from handling it the last six months or so but you have seen this one. Its up to you guys to choose if you like the painted red version or the natural version. I am going with the painted version....it will add some color to the already colorful model. Otherwise it may look too neutral and drab. Only 23 more to go!!!! I will get the assembly line going now. I will so three batches of 8 guns. I may not even finish these all at once and skip ahead because its tedious work. ANY QUESTIONS???
- 1,784 replies
-
- 33
-
-
- winchelsea
- Syren Ship Model Company
- (and 1 more)
-
Dutch yacht by henry x - RESTORATION
Chuck replied to henry x's topic in - Build logs for subjects built 1501 - 1750
So how goes progress on this restoration?