


Chuck
-
Posts
9,703 -
Joined
-
Last visited
Content Type
Profiles
Forums
Gallery
Events
Everything posted by Chuck
-
 Very nice work. Good to see a rudder not too far away from the stern post. Nice!!!
- 160 replies
-
- 1
-

-
- cheerful
- Syren Ship Model Company
- (and 1 more)
-
Hows this build progressing. Any progress?? Chuck
-
That looks excellent. Well done.
-
Much better.....well worth the effort.
-
Honestly i dont recommend them for the deck at all. I would stick to to smallish size treenails for the hull using a #77 or even #78 drill bit.
- 1,784 replies
-
- 3
-
-
- winchelsea
- Syren Ship Model Company
- (and 1 more)
-
That should be fixed if possible. Remove those fillers and try to reposition. That will give you fits later on. Chuck
-
So have you started making sawdust yet? What are you working on at the moment.
-
Looking good Bob. 😃
-
That is looking simply terrific. chuck
-
Nicely done Tom
-
That looks very good. Nice right joints. Remember to protect it from dirt and keep your hands clean. This cedar can get dirty fast unless you really try hard to keep it clean and crisp.
-
Looks great. The taper is gradual so line 2 is better. Avery gradual taper. Not an obvious one that goes quickly from thin to 1/4” thick if that makes sense.
-
I have sanded and poly’d and sanded and poly’d many times over. It will be fine. But to protect the stem at this point. You might consider covering it with protective painters tape. Something low tack to stop it from getting dirty and dented and scratched.
-
Its the part of the two cheeks that are on the stem. They have the scrolls on the forward end.
- 1,784 replies
-
- 4
-
-
- winchelsea
- Syren Ship Model Company
- (and 1 more)
-
Its somewhat important as it will establish your plank run and port position. Just draw a straight line to the other side along the BH edge. And use that for placement.
-
Unfortunately I would need to have a model hull without any headrails made yet .....and built really well to test any parts. It would impossible for me to create headrail mini-kits for any other project other than those I am working on at the moment.....and it takes weeks and weeks to get it right. The uprights for any headrails take forever to get right. I wont even be starting those yet for the Winnie. Chuck
- 1,784 replies
-
- 6
-
-
- winchelsea
- Syren Ship Model Company
- (and 1 more)
-
Thanks Greg, I cant tell you how many test versions of those were needed. 20 failed ideas for every successful idea. But each failed attempt leads to some fresh new concepts to try. The hair brackets and scrolls are each made in four parts and the cheeks in three parts. Its just a matter of removing the char and shaping them as instructed for assembly. The builder wont have to carve any beaded details or create any profile scrapers to make them. Same is true for the headrails which I will show next. Although I did find it easier to scrape away the char on these with a sharp edge of my scalpel or #11 blade. When I do the other side I will document each and every step in the process. At which time I imagine other MFGs will try and replicate this. Most headrails and cheeks are pretty sub standard on kits which I am desperately trying to rectify. Even the newest companies cant seem to figure it out. No "glue-on-photo etched-kit-like" details for me. They look too fake. Unless of course folks are satisfied with a furniture grade ship model. I dont think folks are though. So its worth spending hours and hours trying to make them better. Chuck
- 1,784 replies
-
- 9
-
-

-
- winchelsea
- Syren Ship Model Company
- (and 1 more)
-
Thanks guys. Before I do the cheeks on the other side I will build another main headrail. I have built about a dozen so far and this next one should be the winner. Chuck
- 1,784 replies
-
- 6
-
-
- winchelsea
- Syren Ship Model Company
- (and 1 more)
-
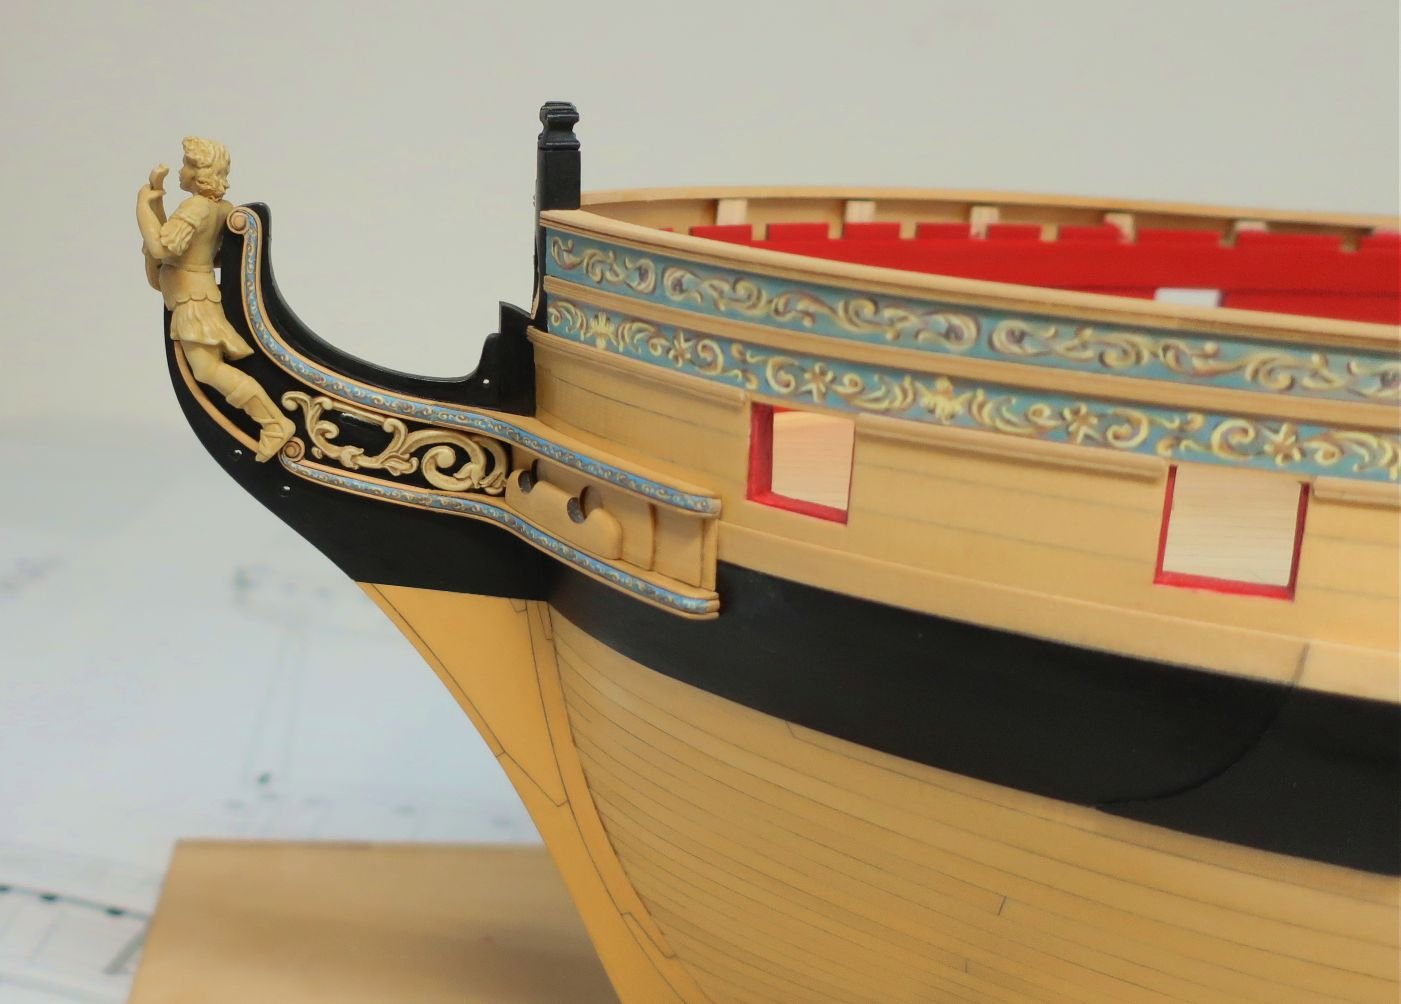
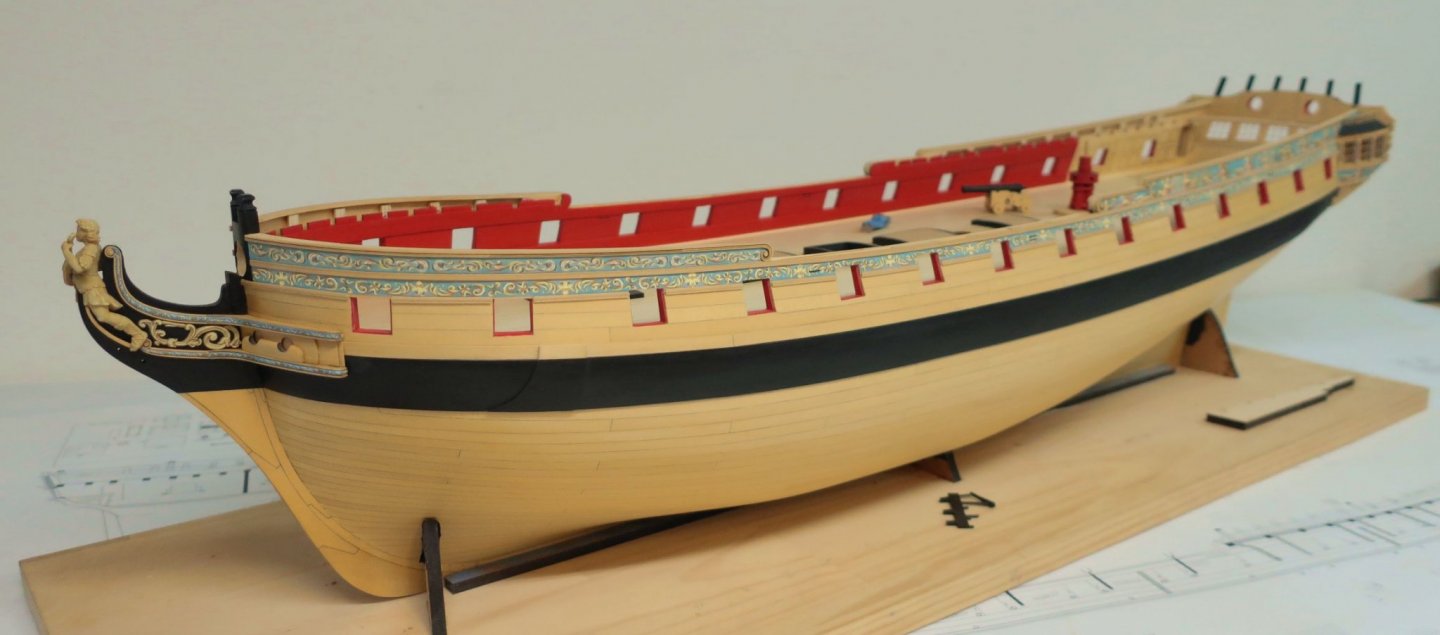
Chapter five.....fun!!! This chapter begins with the cheeks/hair brackets at the bow so we can eventually drill those hawse holes. We need to do that before we can continue working inboard. Then we will shape the hole in the lower counter for the rudder installation. So I began by trying to prototype some cheeks and even the headrails. We wont need the head rails until much later but I might as well get the production and mfg methods developed. I have done so and now I will assemble the one side of the cheeks. Pictures are below. When I add them to the starboard side I will take more step by step photos. I just wanted to do the first go around entirely on the port side first. It all went pretty smooth. These pieces for the cheeks and hair brackets are composed of many separate laser cut elements. I havent added the wash cant yet or drilled the hawse holes. Many of these pieces are not even glued on yet. Its basically a test run. But here you can see the fruits of my labor. Many iterations of cheeks and head rails have been made over the last two weeks. All of these laser cut pieces have been made from boxwood. And of course more printed friezes for these thin details. I believe it will set this project apart from other very simplified kits on the market. Most look overly simplified and kit-like. I am satisfied that these do not look like a kit even though all of the pieces are laser cut. Oh and of course I had to paint the stem areas black as shown, although you could go with blue between the hair brackets.....behind the carving.
- 1,784 replies
-
- 42
-
-

-
- winchelsea
- Syren Ship Model Company
- (and 1 more)
-
Its fine as is. But yes slow down and read it a few times before picking up the glue. That will work out just fine. Chuck
-
That is looking great Rich. Cant wait to see it in person. You are almost done!!! 😀
