


Chuck
-
Posts
9,703 -
Joined
-
Last visited
Content Type
Profiles
Forums
Gallery
Events
Everything posted by Chuck
-
 Beautiful model of the Cheerful Bill, Well done. Cant wait to see that next model come to life. Chuck
- 54 replies
-
- 2
-

-
- cheerful
- Syren Ship Model Company
- (and 1 more)
-
I actually developed a mini-kit for the winch. But then I made a conscious decision to not offer them. I wanted to leave at least one item that wasnt overly difficult to make as a scratch-only item. I wanted to encourage everyone building this model to at least try and build one fitting on their own......I am so glad I did that. Well Done. If you can make the winch you certainly could have made every other fitting which is the message I was trying to encourage. Well Done. Chuck
- 778 replies
-
- 2
-
-
- cheerful
- Syren Ship Model Company
- (and 1 more)
-
HM Cutter Cheerful 1806 by JpR62 - 1:48 scale
Chuck replied to JpR62's topic in - Build logs for subjects built 1801 - 1850
Beautiful start...looking forward to your procgress. -
They were before....from 1779 - 1780....everything happened around the same time though which also makes it very hard. One log book was from 1782. I cant remember from which came what info however. This was researched so long ago. About 5 or six years ago. So I am just trusting my findings from that time. I actually hired a researcher who dug deep into the archives over in England. He sent me his findings as he went because he couldnt take any documents from the buildings etc. I do have some photos taken on his phone though if I can find them. You can hire folks to do the research for you which is great. I forget the guys name...he did work for many people. He was like 100 back then though so I am not sure he is even alive today. I think his last name was Salt if I remember correctly. Its very expensive to to a deep dive into the research this way. Which is why it angers me so much when folks takes such a care-free approach to piracy. I spent big money on researching Winnie when I started. Including having the original building contract photo-copied and sent to me. Chuck
-
I read through the ships logs to find that info...so I think it may be reliable. What is interesting is that there were numerous notations of poor pump performance and they had them moved in the Americas. In addition.....the stove was moved also. As far as Carronades...I had seen someting about two 18 pounder Carronades on the f'castle but could not confirm this. My mistake earlier yes you are correct that there were 12 swivels. That is in my notes. Rather than muddy the waters I am going with what they had when the did some work on her in the north atlantic. Chuck
-
Its hard to say for sure but We are building her to a later appearance. After much research and even reading the logbooks for winnie, our plans reflect her appearance during the American Revolution. Such things found in the logs indicate the moving of pumps up to the gundeck as well as the stove. There are other minor changes as well. The winnie was certainly copper plated but this is a personal preference thing. This was in fact the first class of frigate ever copper plated. Based on log info 24 twelve pounders and 8 six pounders were used at this time. Also 10 swivel guns. Beyond that there are many inconsistencies in the source documentation but my plan shows her either during the revolution or shortly after. Chuck
-
Have you ever considered trying rowmark black acrylic......the solid black comes in .020 thickness. Its what I used to make my hooks from. https://www.jpplus.com/rowmark-fibergrave-black-engraving-plastic Its a flexible plastic but not too flexible. Great for small parts that wont require tensile strength. Anchors in particular. But this is the thinnest available. Its expensive but what isnt these days. Chuck
-
Low low power and low speed is my mantra. Every laser is different but I use just 8 power and maybe 18-20 speed for the Ivory stuff. I use a 65 watt laser. Very little to no laser burning at all. For example these monograms are super tiny and I use the black thin laserboard. No charring and a very thin kerf. Can hardly see the cut line. Otherwise these small items would not be possible. I know some guys that wont vector cut laserboard and they will raster cut or engrave through the board entirely. I prefer to do the line cuts however. Chuck
-
Yes...that is the ivory polybak. Each color is a diff thickness. I believe that is .016. there are different brands but this is the only one that wont kill you if you laser cut it. The other stuff is made with harsh chemicals and literally poison. I use three colors or 3 thicknesses. Black is very hard to come by and very thin.
-
I am not sure why you bought these as you wont really need them. You can download the materials list for each chapter to find out what size wood sheets you need to buy. I will replace these with the proper sizes of wood you will most likely need but you will need a lot more than just these 8 sheets. See here for the materials lists. Your order will probably ship out in two boxes as they wont fit in just one. Chuck
-
I use a hair dryer.
-
That is looking fine. Your son did an excellent job.
-
Thanks guys.....Trying to find some time today to do those cheeks.... But today is the first day after opening the store. Its been getting nutty. But maybe later tonight if I am not too tired. I forgot how crazy these reopening's get.
- 1,784 replies
-
- 7
-

-
-
- winchelsea
- Syren Ship Model Company
- (and 1 more)
-
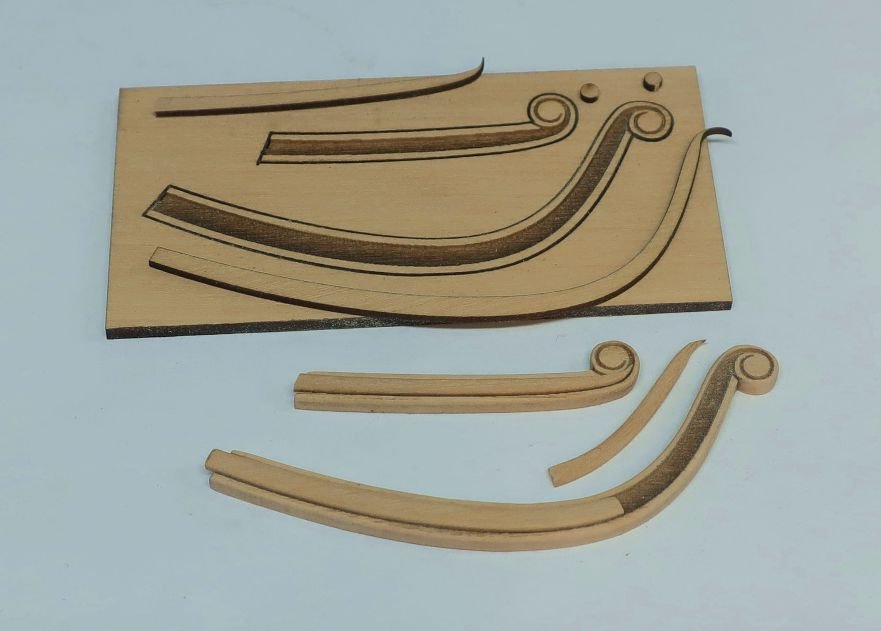
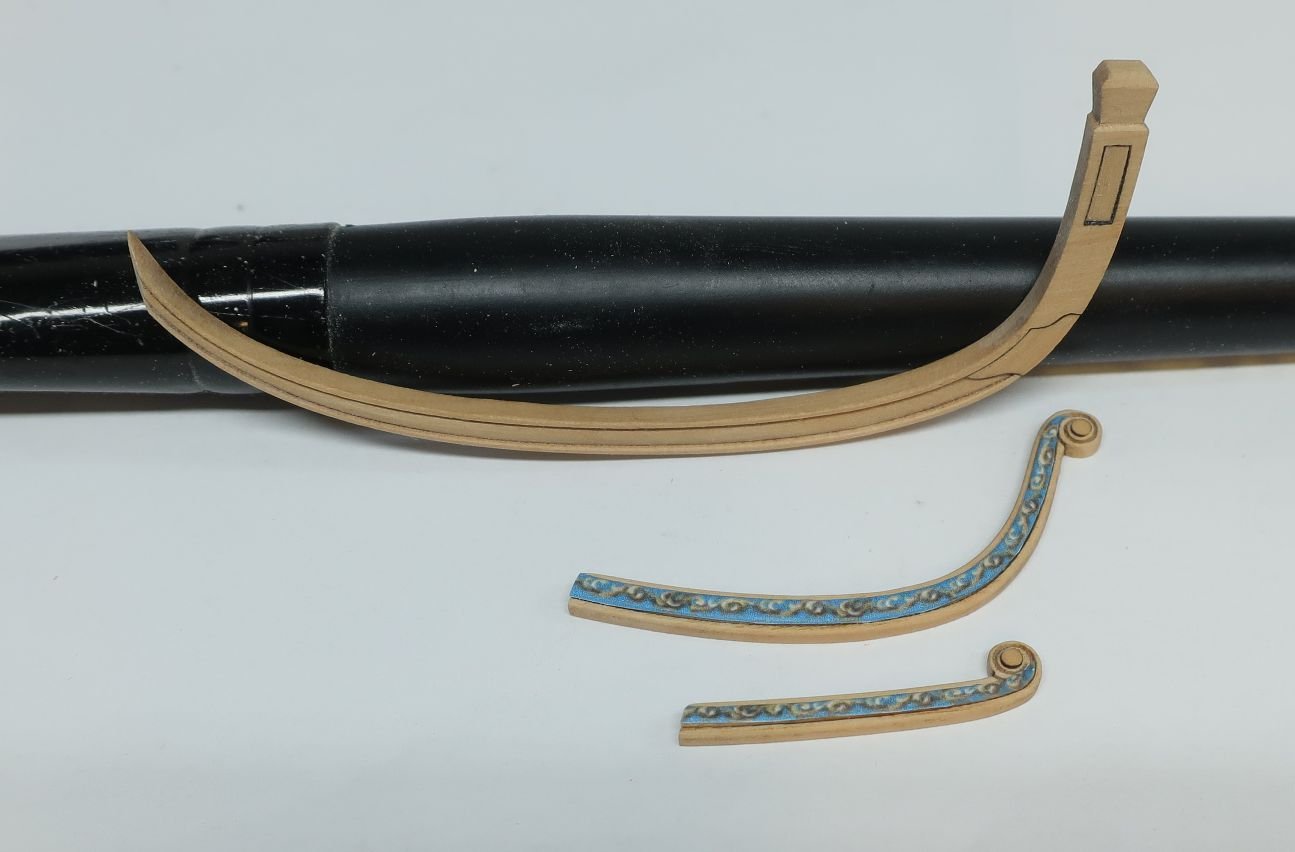
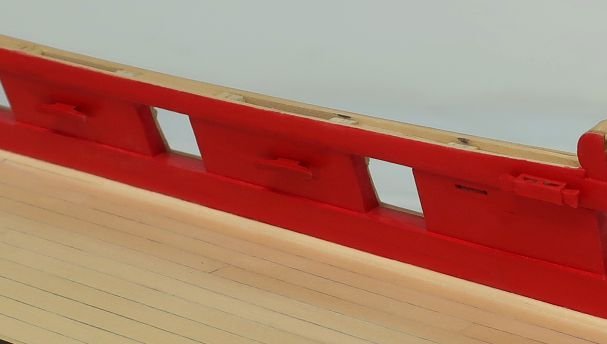
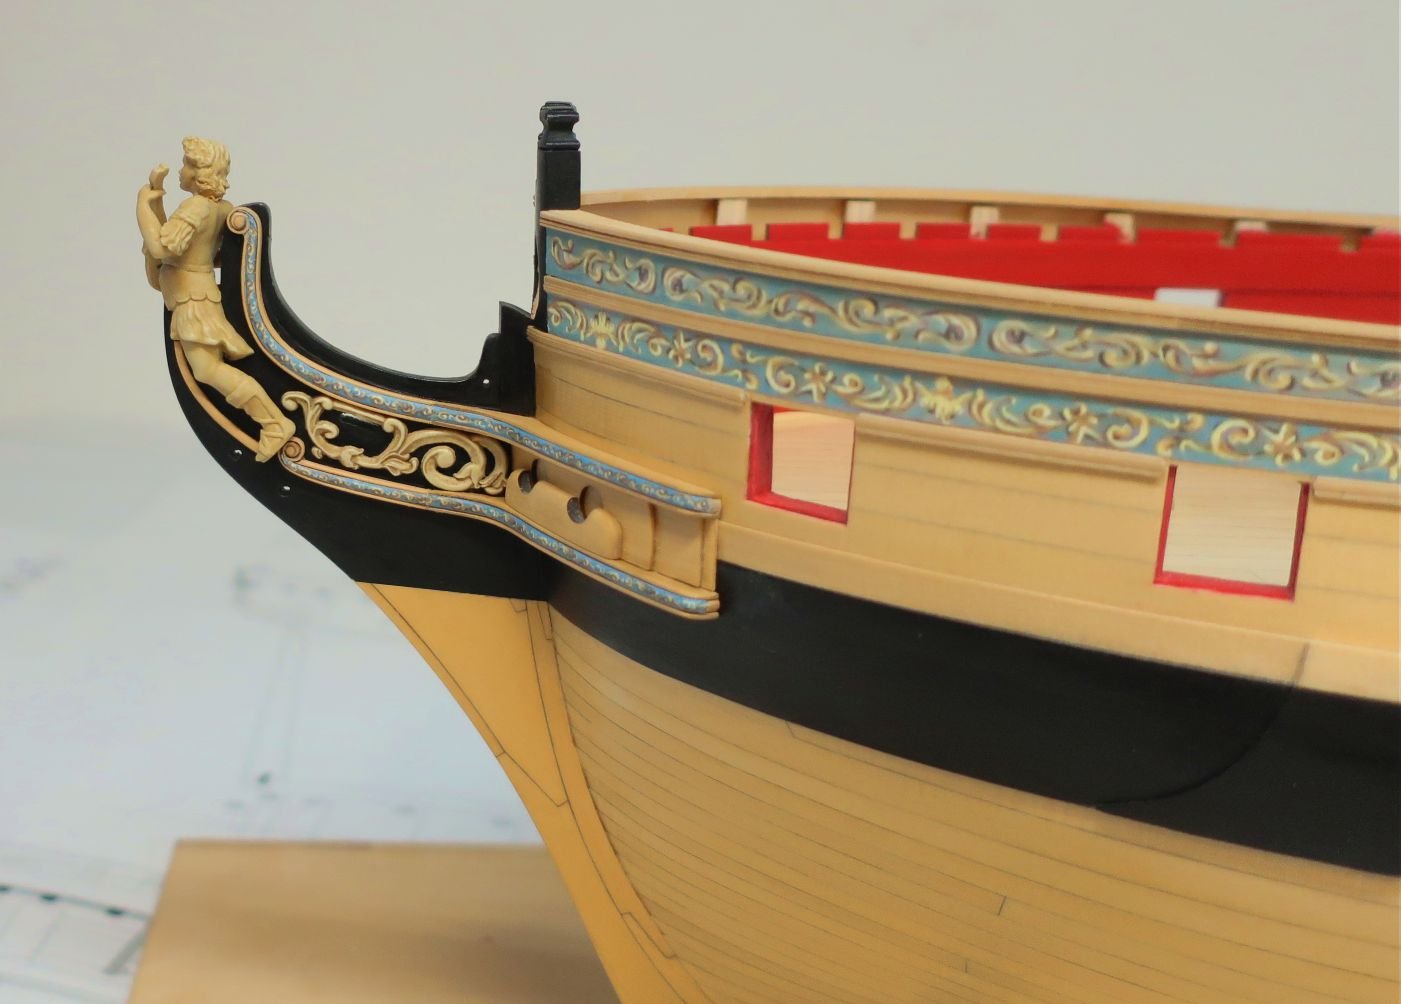
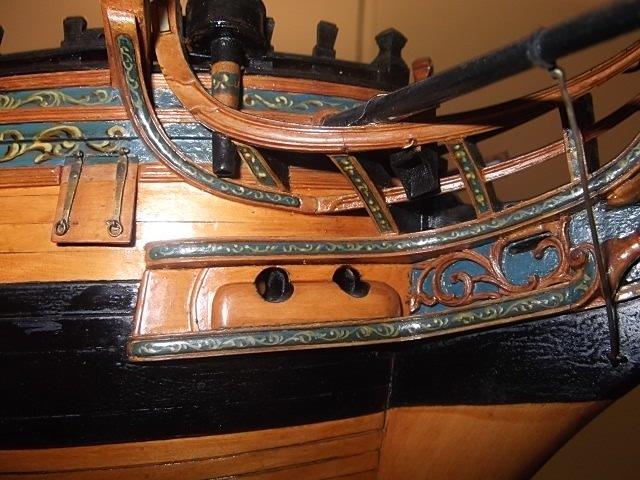
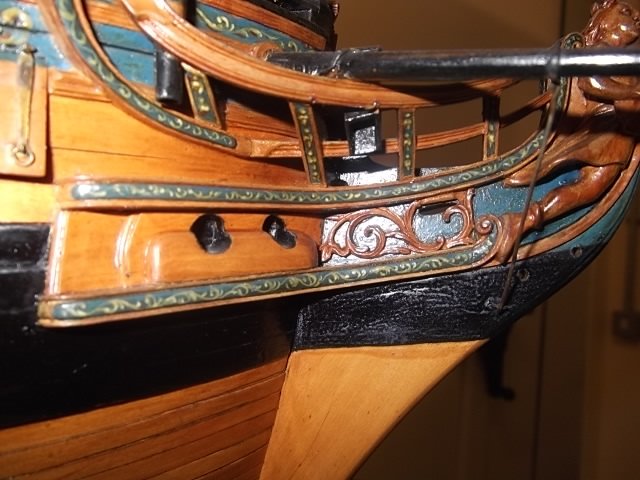
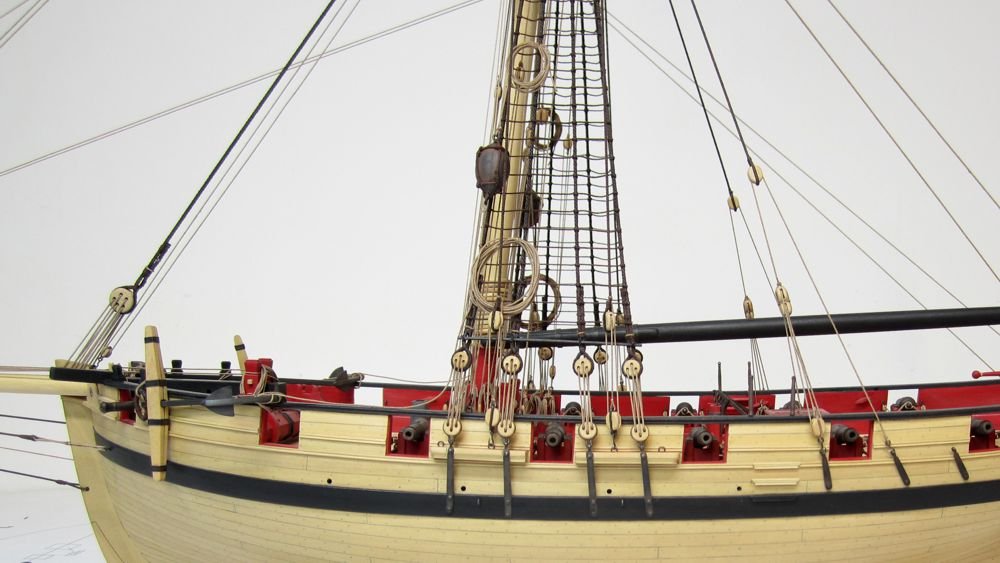
On the bulwarks you will see several cleats and a staghorn.... The cleats are self explanatory. Laser cut cleats were cleaned of laser char and painted. Then glued onto the bulwarks. You can peg them with some 24 gauge wire for extra security. There is one other feature on the bulwarks. I believe its called a staghorn or basically its a fancier cleat with some sheaves. Someone can correct me on the terminology as I seem to have a mind block as I am writing this. These are also laser cut for you from boxwood. They are quite small but add a nice detail seldom seen on most kits. But they are used in a bunch of places. But one is needed on the bulwarks on each side. Basically the first thing you do is add the backing piece which will enclose the sheaves. Those are laser etched as you can see above. The the two "horns" (for lack of a better word) need to be shaped. These are the ends which need to be shaped like a typical timberhead. I used a #11 blade to do this. A quick stop cut was used across the end to match the profile laser cut. Then I sliced towards the stop cut on an angle to give the end some dimension on the front side. Otherwise it would be flat ...you can see the front of the finished piece above. Then I lightly chamfered the edge...again like you would do with a timberhead. These were painted and glued on the bulwarks. Just check the plans for their locations. Its hard to see but below you can see one side of the bulwarks with some cleats and this "staghorn". Now I should start making all of those eyebolts for the gun tackles. Ugh! But I think I am going to skip ahead and start making the cheeks on the starboard side. If you recall I finished these on the port side already. I dont feel like making eyebolts and split rings today. Here is a shot of the cheeks and hair brackets on the port side. Let me detail how they are made next. Its quite a long process even with most parts laser cut for you. You start with the hair brackets.... These are the pieces on the stem, while those on the hull above and below the hawse holes are the cheeks. The hair brackets are laser cut for you. The first thing you do is lightly sand the laser char on the face of the sheet before you remove any of the parts. You can see in the photo that I tried something new. Cheeks and headrails always look pretty crappy on kits so here goes nothing. Hopefully a better result and not too difficult to build. They are laser etched with a channel down the center of them. Its not very deep but then it doesnt have to be. In this channel will be a precision laser cut insert. The hair brackets are 1/16" thick while the inserts are 1/32" thick. Once the inserts are shaped and positioned, they will stand proud of the hair brackets. To pull this off properly, you must first sand all the laser char from the edges or sides of each hair bracket. Then round off the outside edge. Just knock off the hard edge as it doesnt need to be over-sanded. Dont worry about touching the laser etched channel. Then carefully with a light touch sand the char from the edges of the inserts. These are thin and fragile. Then round off the edges of these along their entire length if that makes sense. In the photo below you can see an extra set of pieces not touched....note the flat inserts etc. But below that you can see the pieces all finished and being dry fit into the etched channels. To finish these up after you glue in the inserts, add the tiny laser cut button to the scrolls. These are 1/32" thick which are too thick. So once glued into position you must sand them thinner until the look right. They should be pretty thin. Lastly, I applied some WOP and then glued the friezes on. These are printed on regular paper like the other friezes. I used a glue stick. You can slide them around before they set. Then take the point of a toothpick and lightly burnish or "tuck" the edges of the frieze along the edges so its nice and neat. Thats it for the hair brackets. Tomorrow I will work on the cheeks and finish off all the other parts. This is also the method or design concept I will use to make all the headrails. You n see one test headrail in the same photo. I have made about 10 test examples so far and it looking good if I can just choose the one I like best. Each headrail is made up of between 5 or even ten pieces depending on which one I choose. I do like this one for its simplicity. But we wont need these until a lot later. So now its onto the cheeks. All of the elements come together well to create a pretty convincing execution. Keep in mind this is what we are trying to replicate without having to carve these from scratch.
- 1,784 replies
-
- 36
-
-
- winchelsea
- Syren Ship Model Company
- (and 1 more)
-
You havent faired the hull frames yet. Once you do that they will be fine. You will be removing more wood than you think. Plus you may have beveled more than needed which doesnt matter all that much at all. Just keep going. Nothing worse than analysis paralysis!!! I have seen many a newcomer suffer from this this. Just get all those frames on and then fair them very carefully. Chuck
-
Those fittings look great. Its the fun part. I am almost at this stage on the Winnie now so I am looking forward to it. Excellent work on that stuff.
- 778 replies
-
- 2
-
-
- cheerful
- Syren Ship Model Company
- (and 1 more)
-
Very nice start!
-
Sometimes but not for strength. Its just cosmetic. I do t find any need to clamp or use pins to fix the planking in position. But once planking is finished if I want that look I will treenail. Like below. × ×
-
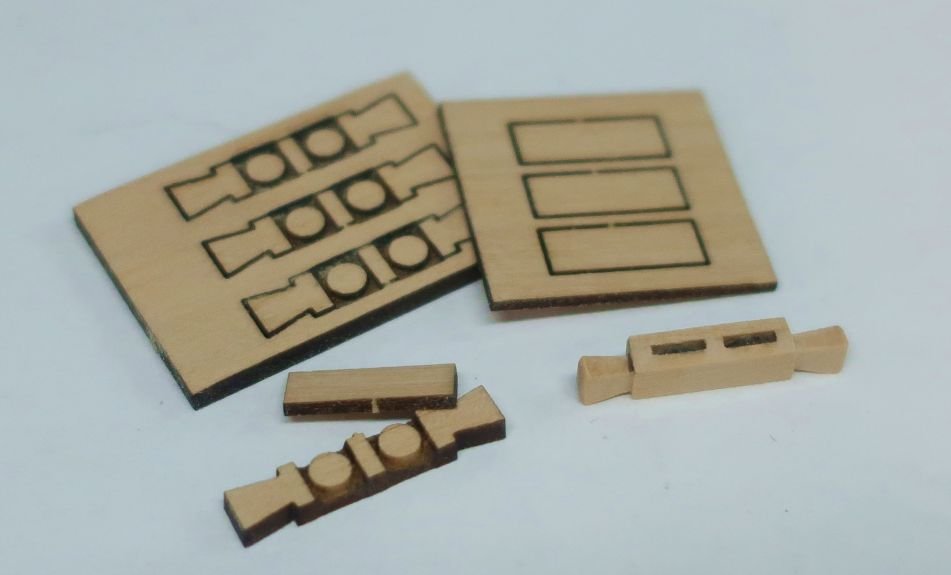
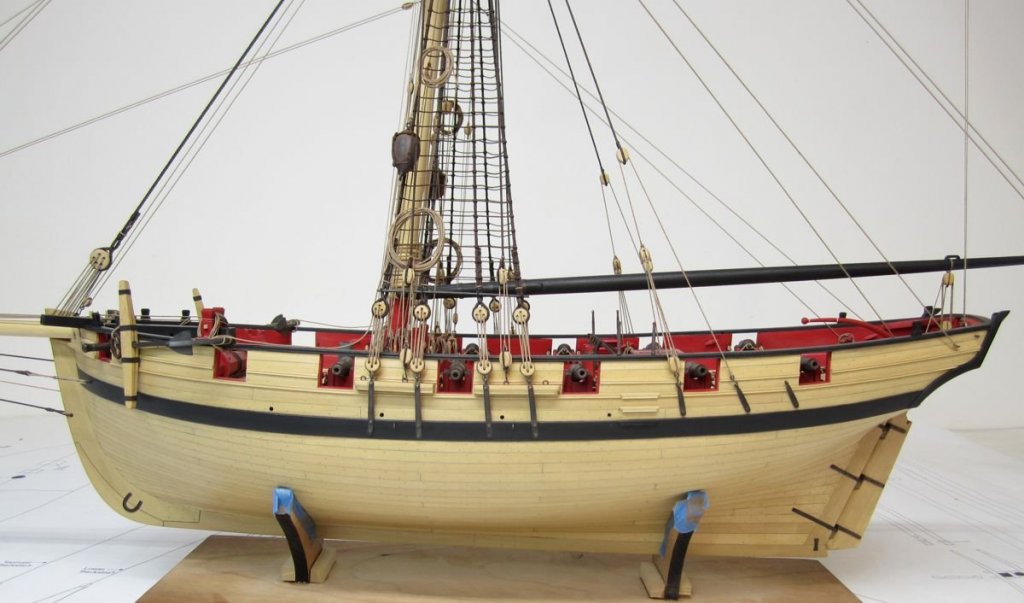
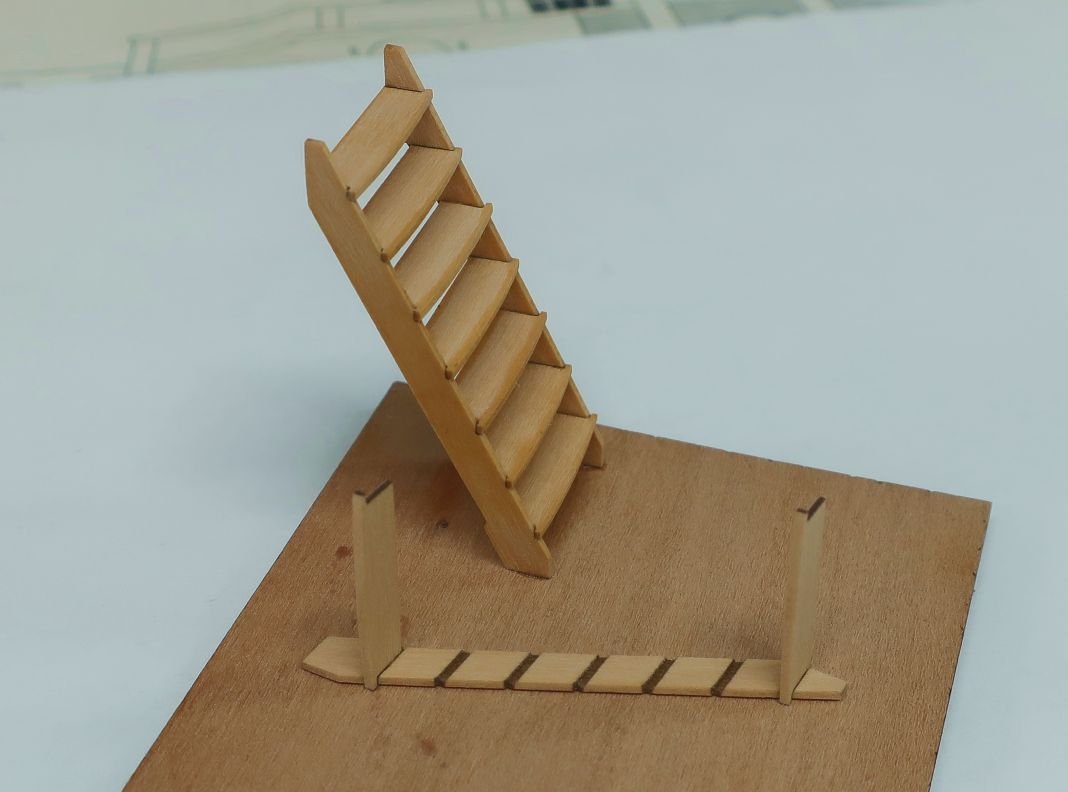
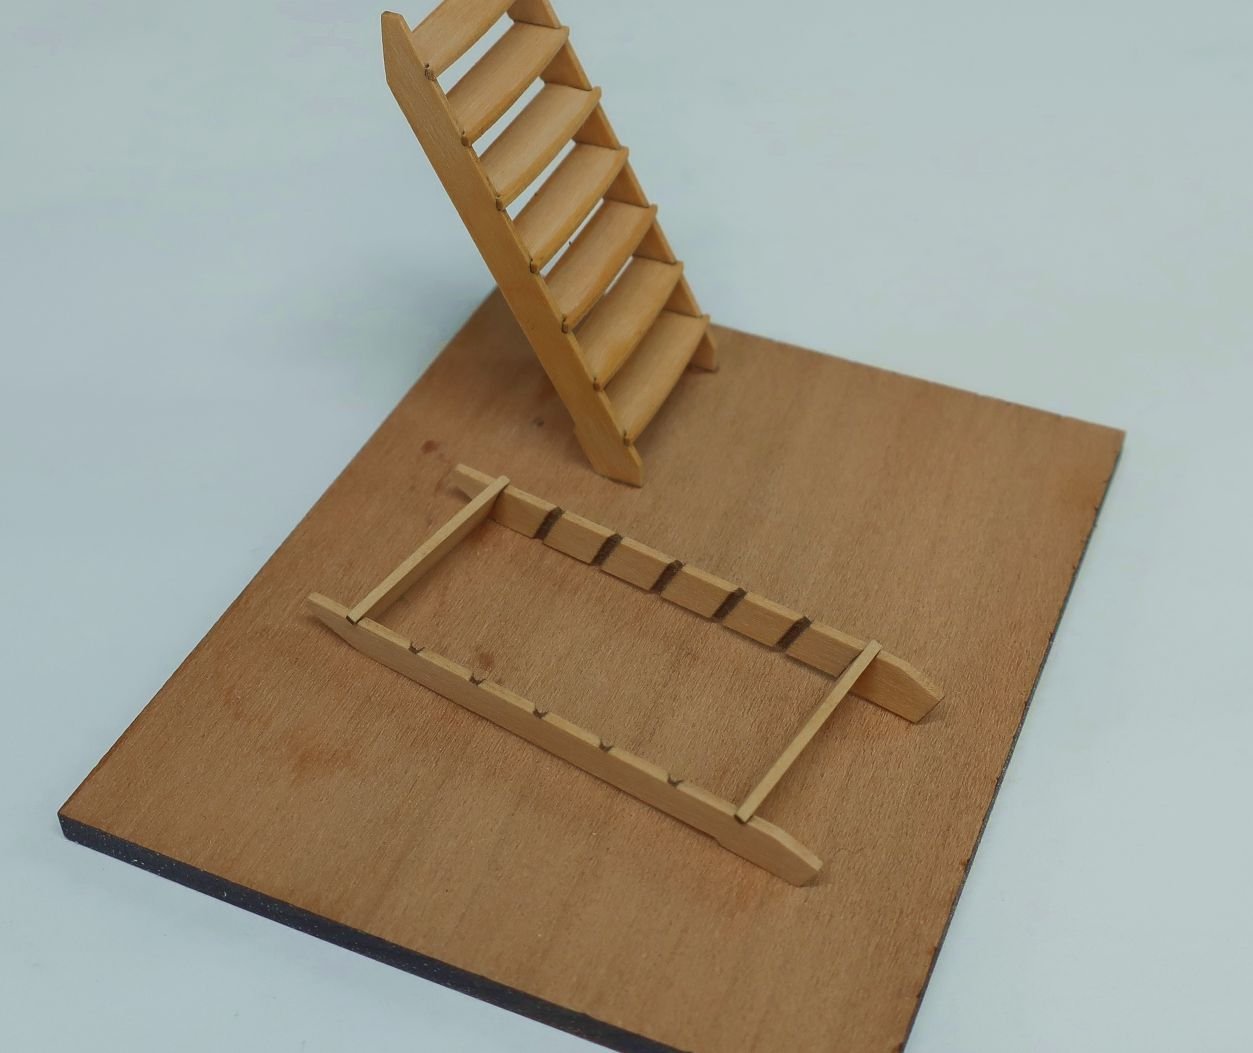
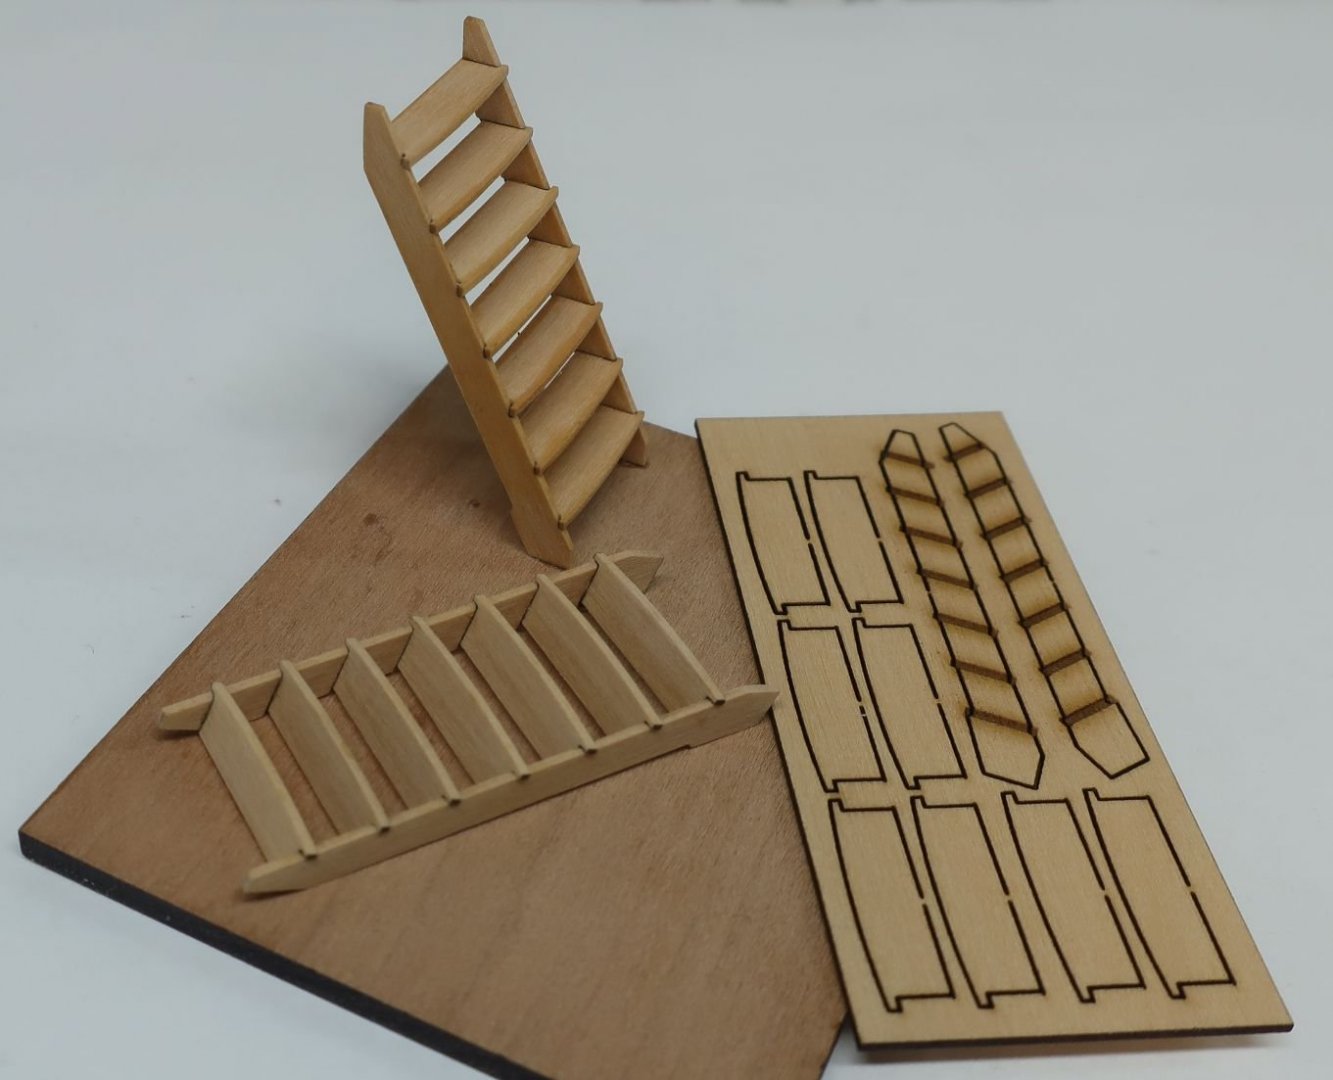
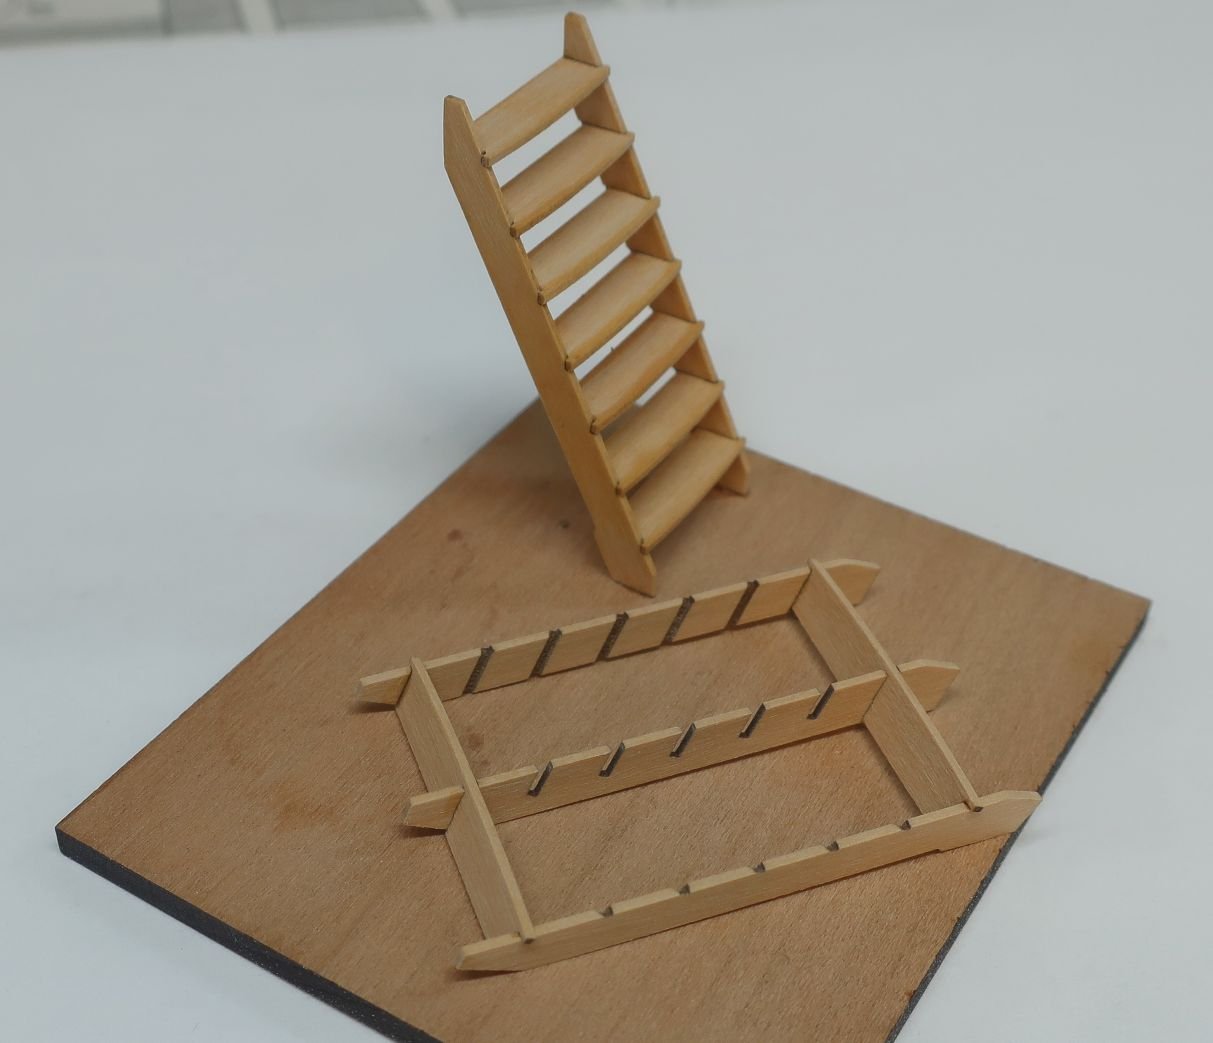
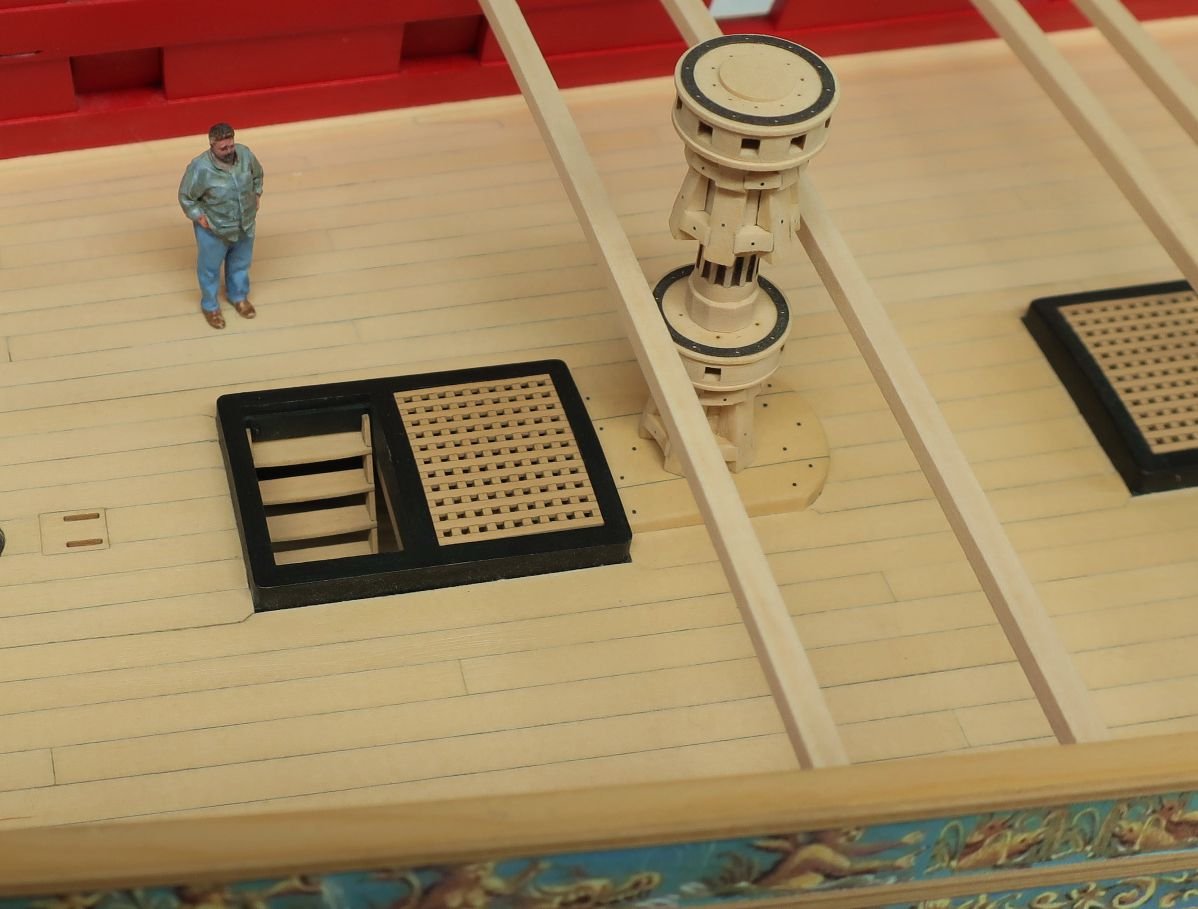
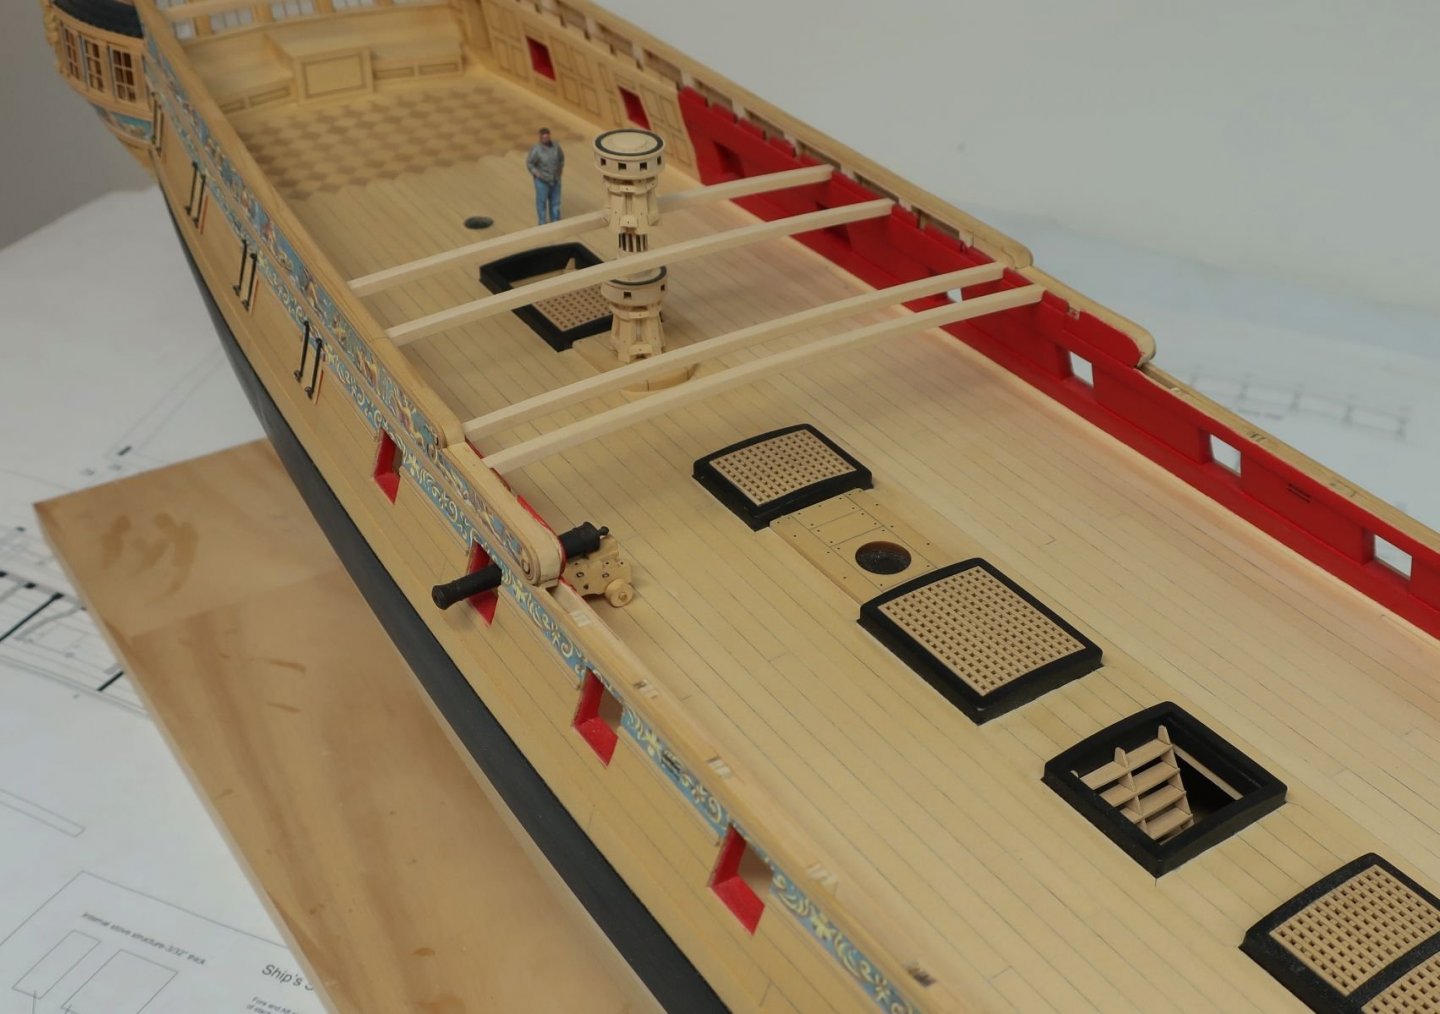
Port lids are all done.....they take longer than you think. 😊 So now the two ladders for the gundeck. The thing about ladders on commercial kits is they are usually so out of scale. You must consider that the ladders or steps were made much as they are today. They are made from 2" thick stock. So that translates to just 1/32" thick at this scale. Most kits provide parts double the thickness so its like they used a 4 x 4 to make the stairs which looks pretty horrible. I was also never happy with their shape which was usually very generic and not at all like they are shown on good contemporary examples and plans. So I worked up a simple design but they can be finicky to build. So this is how I managed these. First I sanded both sides of the sheet to remove any char before the parts were removed from the sheet. The photo shows the prototype build and now I will make another to show you how its done. The edges were sanded free of char.....these are made from boxwood. I have laser etched mortices to accept the stairs. So first thing you should check is the fit of the sides of the steps in the mortices. If they are too thick....simply knock off the corner or bevel the edge of the steps ever so slightly. Not too much and dont touch the little "wings" protruding from the front of each step. I also did not remove any char from the side edges of the steps as I want them all the same length exactly. This is important. I started by adding the top and bottom step to one side of the ladder. I got a nice fit into the mortice after just lightly beveling the edge of the steps. Then I added the other side of the ladder and made sure the glue was dry before handling it further.....otherwise it could fall apart easy. Remember these are just 1/32" thick. Finally I beveled the side edges of ever remaining step and slid them in position after applying a small drop of glue to each edge. They slid right into place without much trouble. Once you do one or two it gets easier......straight in and back. The top step is a bit wide which you will soon discover so at this stage I used a sanding stick to sand it flush on the back side of the step. Then to finish it off I sanded the sides of the ladder to make those little "wings" on each step flush with the sides of the ladder. I hope that makes sense as I left them a bit longer so they would need to be finish-sanded. Thats it..... But the larger hatch mid-ship has a double ladder. Its built basically the same way. The top and bottom step first. But then I slipped the center riser in position as well. Then its just a matter of slipping the remaining steps into position. With each step added, the entire assembly gets stronger. Finish sand the sides and that top step and its all done. You can see how the front of each step has just a slight curve to it......not too much. When finished these are light and elegant. It is important to have them look this way. Apply some WOP and then glue them into position in each companionway. See below. Next up its time to add some cleats and bolts to the bulwarks. Yippie. Any questions???

- 1,784 replies
-
- 38
-
-
- winchelsea
- Syren Ship Model Company
- (and 1 more)
-
Will reopen on Sunday as a took a few days off to ring in The holidays.
-
Looking good Ron!!
-
Welcome Frank. You are all set. Enjoy the project.
-
Any progress on this longboat. Your model up to this point is looking fantastic. Hope you didnt give up on it...... Happy New Year by the way.
-
Lively model and so happy we will see some more progress soon.


