Chuck
-
Posts
9,703 -
Joined
-
Last visited
Content Type
Profiles
Forums
Gallery
Events
Everything posted by Chuck
-
 Should have more in a couple of weeks. At Syren. A few weeks ago I completely sold out of every size. Except for a handful of triple blocks, I literally sold them all over a four day period. Which was insane. About 20,000 blocks. so i have been slowly restocking them. I am about 1/2 way through making more.
- 8 replies
-
- 14
-

-
Coming along really well. Keep up the fine work.
-
Just sand it flush inboard instead. Thats the way to go.
-
I would redo it...but thats my preference. A very out of scale cap rail is typical on most models and kits. The importance of sanding down the bulwarks thin enough is crucial otherwise the model will look clunky and toy-like which unfortunately happens a lot. At that width the cap rail would be 2 feet wide on the actual ship. If you can try and picture that. It will be tough to do at this point though. You would only be able to sand the outer layers by abut 1/64" on each side. The good thing however is that you will be adding the hammock cranes and these should obscure the width of the cap rail a bit....but not much. For any model....its best to go thinner with the bulwarks than the other way around. It makes for a much more elegant model in scale. Maybe remove the outboard molding and sand the hell out of the bulwarks to taper them as much as possible to get it thinner along the shear. Just a gradual tapering towards the sheer inside and out. Chuck
-
Its grumbacher acrylic in a tube. Just plain crimson. Straight from the tube thinned down with water.
- 1,784 replies
-
- 4
-
-
- winchelsea
- Syren Ship Model Company
- (and 1 more)
-
Thanks...yes these parts will be in chapter 5. But not the monofilament. You guys should puck some up in various weights. I use Sunset Amnesia black fishing line.
- 1,784 replies
-
- 2
-
-
- winchelsea
- Syren Ship Model Company
- (and 1 more)
-
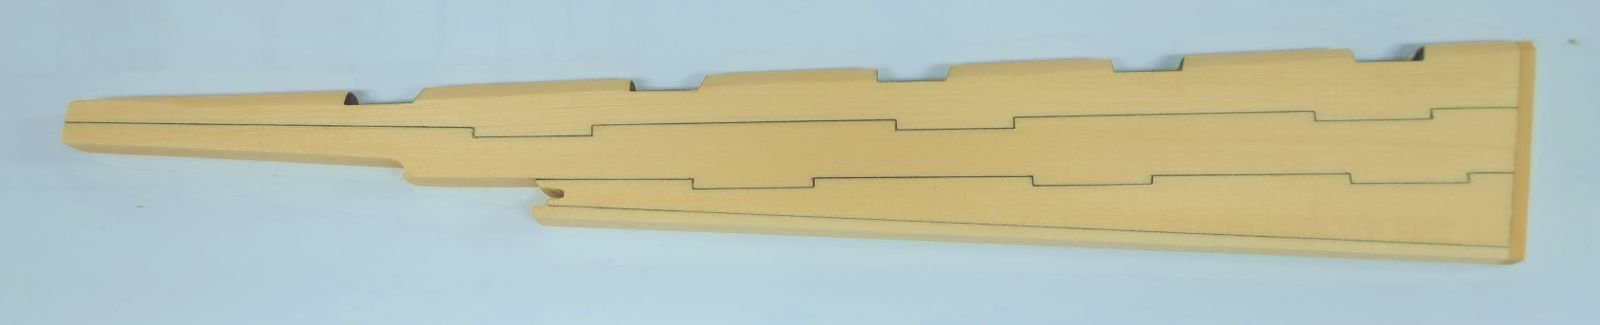
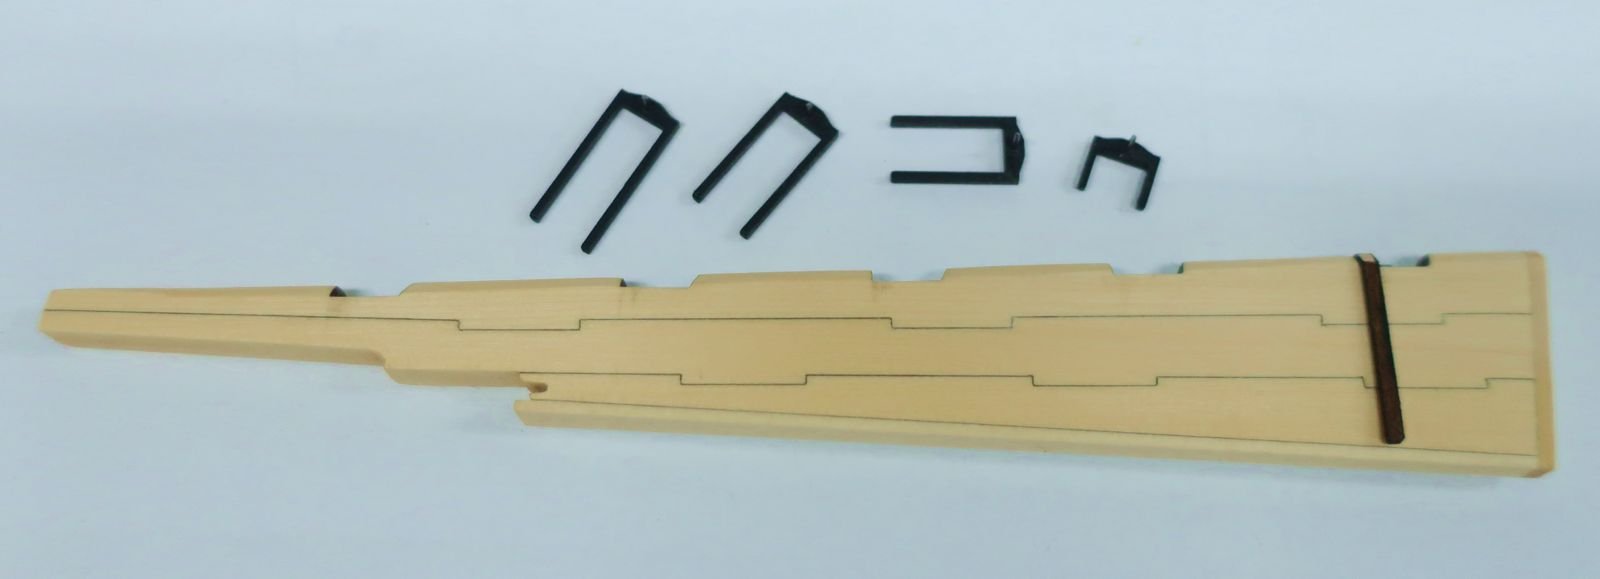
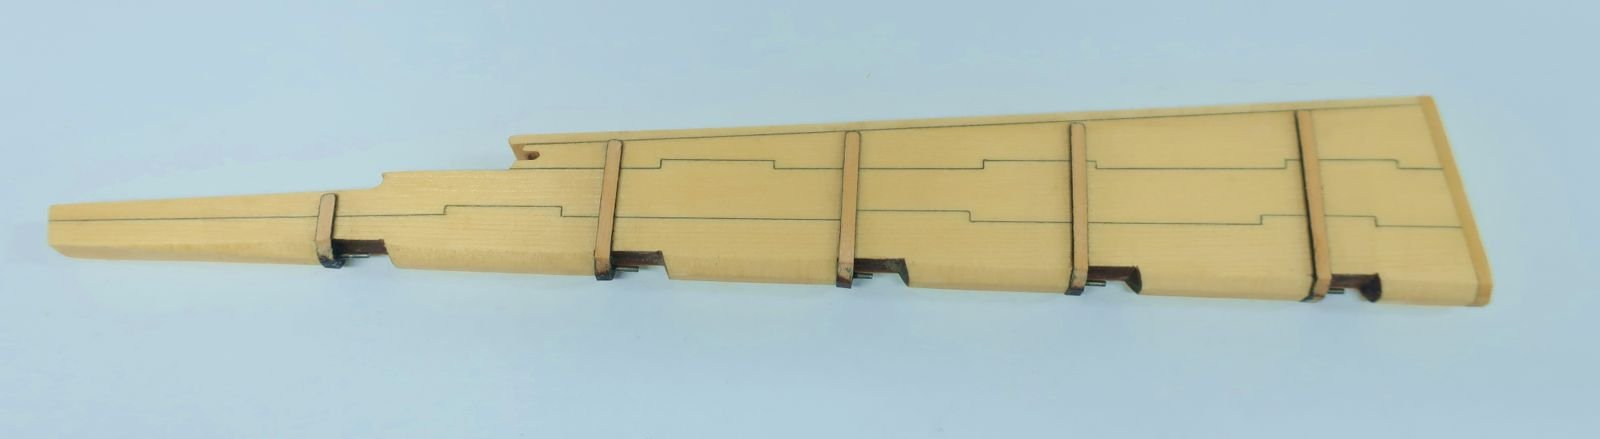
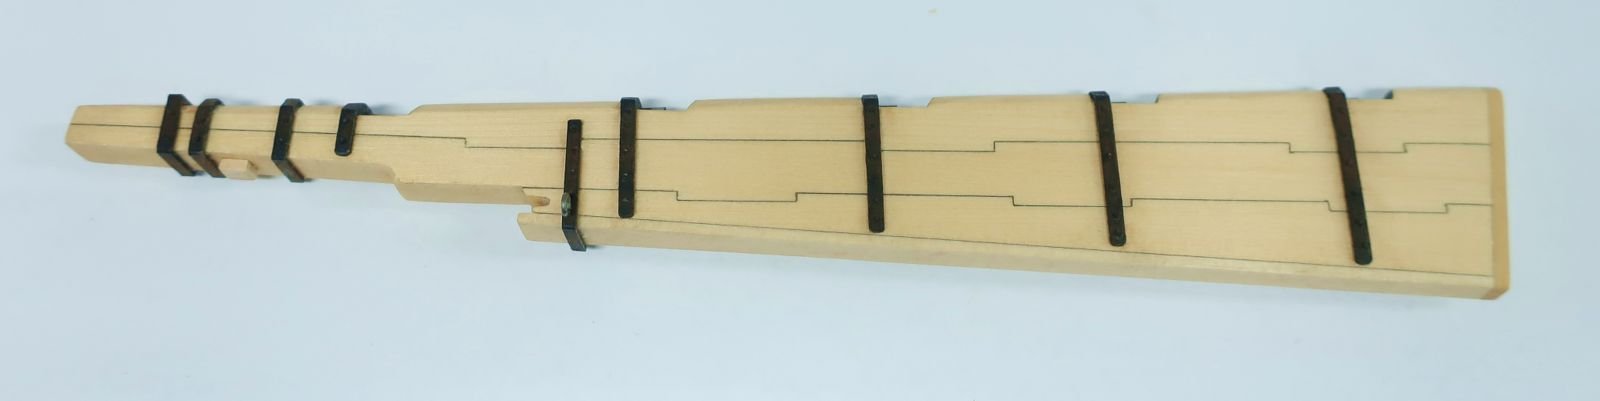
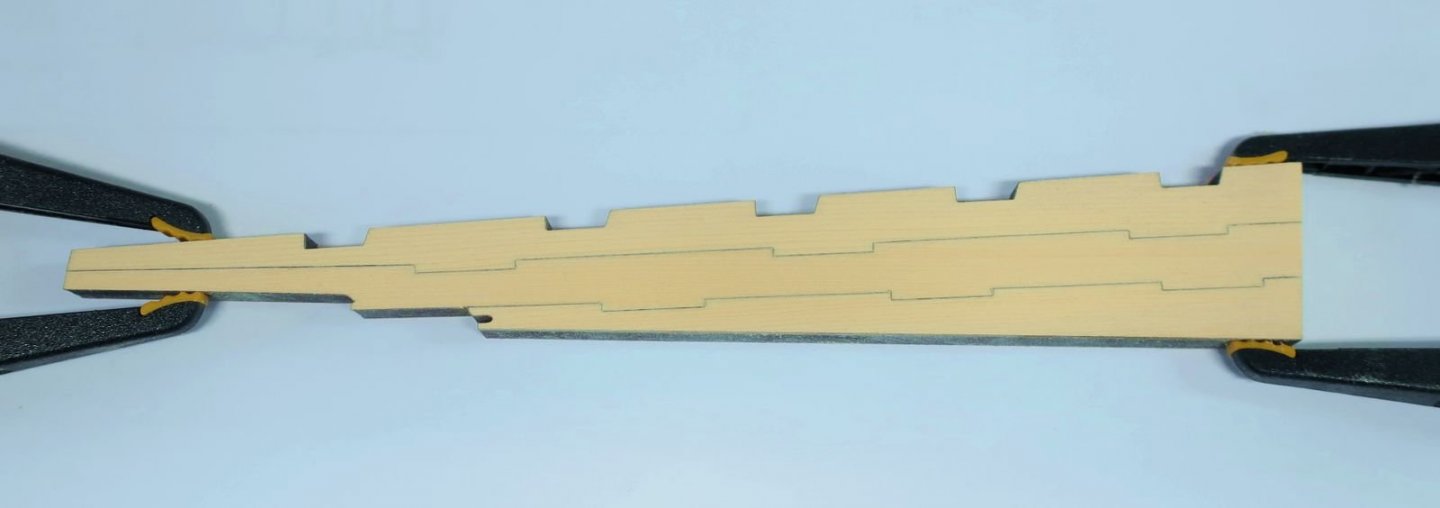
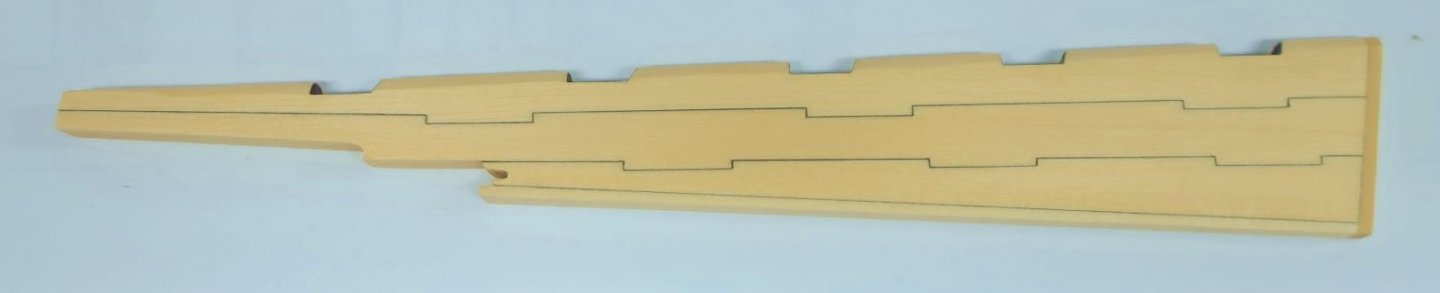
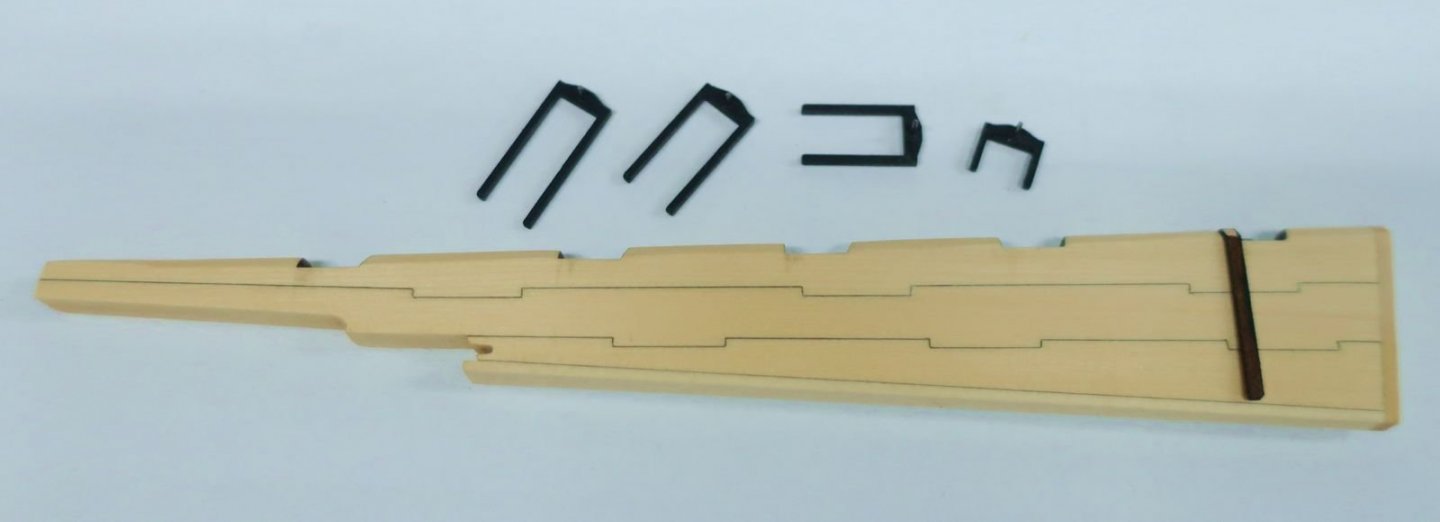
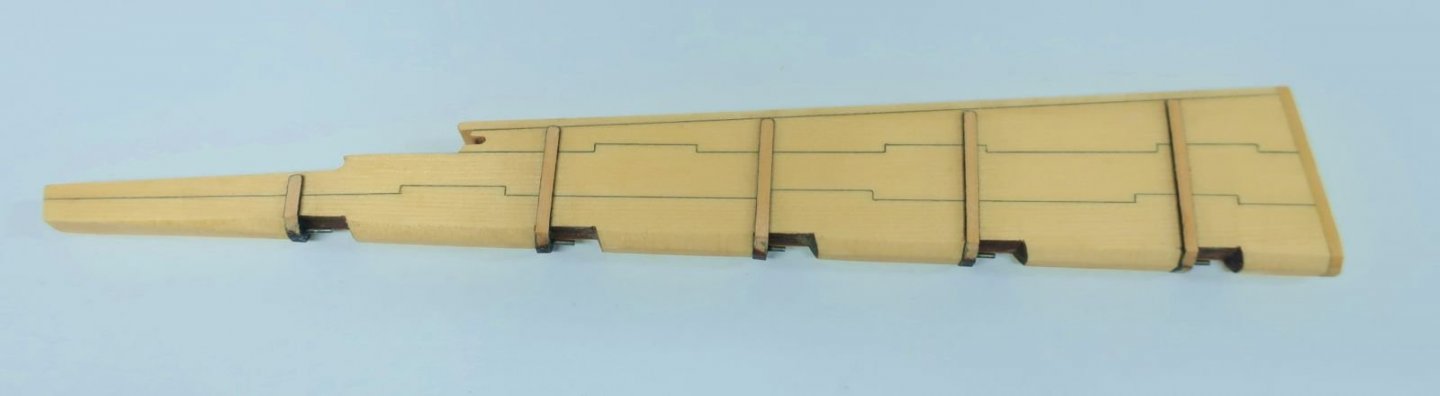
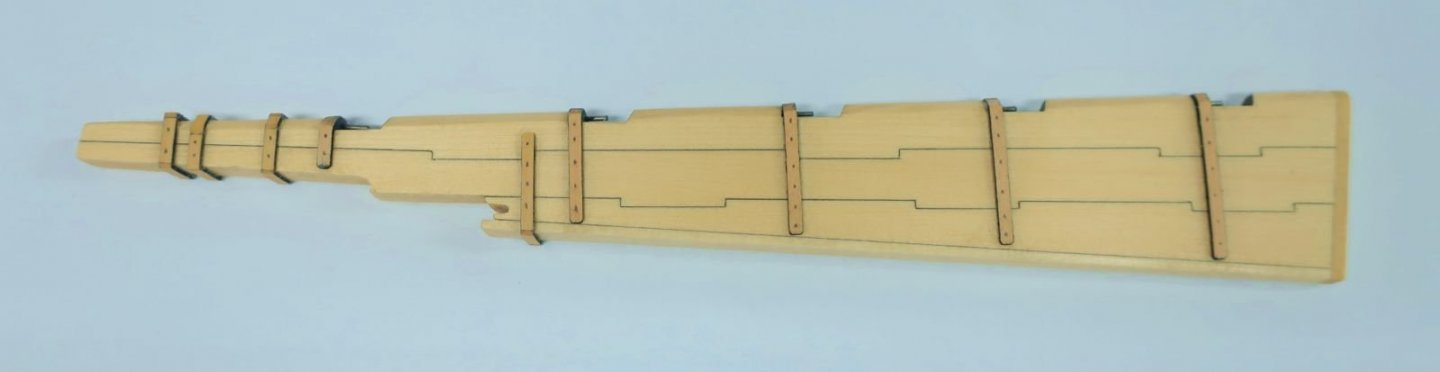
Finally an update as life returns to normal....well not exactly during these times but I am back on the project. Since I want I turn the hull over so I can drill the rudder port, I thought I would put the rudder together. This should be the last time we have to turn the hull upside down.... So the rudder. I was originally going to go with a one piece rudder....BUT...I was pleaded with to do a built up version as well. I cant do both because that would be a lot of wood that would end up being tossed. That would be a an incredible waste of 1/4" thick wood. So a built up version it is. To begin, glue the three main pieces of the rudder together with PVA. Dont sand the joints at all because they are precision laser cut for a snug tight fit. No need to use pencil on the seams either. The laser char simulates that nicely. You can see below how tight the pieces fit. Then add a 1/4" by 3/64" strip along the aft edge as shown on the plans. That is followed up with a small length of 1/4" x 1/16" strip along the bottom of the rudder. So far easy-peasy. But then you must sand and shape the rudder to the typical shape. Meaning the rudder blade tapers narrower towards the aft lower edge. Quite a bit actually to around 5/32" thick at the bottom aft corner. The forward edge where the rudder hinges will go...this edge needs to be chamfered on both side almost its entire length. But all the way. Again...you should follow the plan which I will attach at the bottom of this post..its 8 1/2" x 11" so you can print it out and keep beside you as you work on the rudder. When satisfied, the pintels and gudgeons will be made from boxwood. They may be fragile to handle but once glued to the rudder are just as strong as brass. I painted the top and bottom edges black right away. This will make a nice crisp edge when you glue them on so painting these small edges will only require a bit of touch up. I hope that makes sense. I also inserted the pins into the pintels ahead of time. Dont make them too long. The straps of these hinges are too thick initially. Dont worry about that at this time. Just glue them onto the rudder as shown on the plan. There are five of them with the longest one at the bottom. Keep the angles consistent. You can see one of them temporarily slid into position. Once glued on..... Sand the straps thinner. I sanded mine to about 1/32" thick or slightly thinner towards the aft edge. See below. Note how the pre-painted edges are nice and crisp after sanding these straps free of laser char. There are a few more iron bands and the spectacle plate as well. For these I just used 1/16" x 1/32" strips. Much easier to work with. All of these details are shown on the plan. Just take your time. The edges of the strips were painted black first just like the pintels. Then the outsides were sanded thinner and the hard corners softened up a bit. I also took this time to mark the locations for the bolts along the straps with a sharp pencil. Then I drilled the holes with a #73 bit so I could insert some 20 pound black monofilament in them. This was used to simulate the bolts. It was inserted into each hole and snipped clean so the ends stood proud of the straps a bit simulating the bolts. To finish it up, The wood hinges and straps were carefully painted black. Then I used a bit of weathering powder to help them look like metal. See below. Lastly, I added the two ring bolts for the spectacle plate from 22 gauge wire and a tiny portion of 1/8" x 1/8" strip to simulate the aft end of the tiller sticking through the rudder head. You can see that below. Its just 3/64" thick. I did soften all the aft edges before gluing that on. Thats it!!! A down and dirty laser cut rudder with tabled joints. Over the next couple of days I will drill that rudder port and repeat the process of gluing the rudder hinges to the stern post so I can install the the rudder. Stay tuned. And there is no reason why you couldnt use brass for the metal work if you prefer. But I know most of you dont have the equipment to do the soldering and that is a whole additional skillset. But you can use brass if you want. This is a great way to simulate the same results however. Here is the PDF of the rudder as well for download. rudder.pdf

- 1,784 replies
-
- 29
-
-
- winchelsea
- Syren Ship Model Company
- (and 1 more)
-
That looks great. Now its time for the fun part.
-
In the other tabs above......where the other discussions are ongoing. https://modelshipworld.com/forum/93-general-project-discussions-on-planking-fittings-and-monograph-chapters/
- 1,784 replies
-
- 1
-
-
- winchelsea
- Syren Ship Model Company
- (and 1 more)
-
The curve is too severe on those planks already on the hull. They should be straighter at the bow....it should follow your lining off if that was correct. Chuck
-
Very nice!
-
Every piece of wood is different. That will happen. It happens to me as well. How thick is your blade? I use .30 which minimizes deflection. The thinner the blade the more deflection you will experience.
-
That look so good. Very nice work. Precise and clean...😃
- 140 replies
-
- 2
-
-
- benjamin w latham
- model shipways
- (and 1 more)
-
That looks pretty good. The aft window needs to be lowered but i know how hard it is to tack everything in place. You did a fine job.
-
Im the worst person to ask about colors. But I will say that you certainly did a fine job on the bolsters. Indeed they are tricky. Maybe I should add a fourth extra pair of blanks. i went through many attempts as well. But its smooth sailing from here on out!!! Nicely done.
- 109 replies
-
- 3
-
-
- medway longboat
- Syren Ship Model Company
- (and 1 more)
-
You should have some wiggle room to split the difference and slide it over a bit. But in the end when you fair the frames it should all work out.
-
No need to rush on the glass...they will get dirty and collect dust. You can wait up to the very end to install the glass. In fact its better that you do.
-
Really nice progress. The model looks great.
- 144 replies
-
- 3
-
-
- winchelsea
- Syren Ship Model Company
- (and 1 more)
-
Nice start! You go slow and steady....but remember to have fun. The biggest issue will be resisting the urge to speed along....just keep it slow and steady.
-
Sawdust at last!!! Wonderful news and I will happily follow along.
-
Nicely done Ryland. You are in the home stretch!!!
- 263 replies
-
- 1
-
-
- Medway Longboat
- Syren Ship Model Company
- (and 1 more)
-
Nice work....I missed this topic. Your rope looks great. Keep up the good work. Once you get the hang of using the Syren Rope Rocket it becomes second nature. Remember to make a recipe card as the results will be same each time you use it. Chuck
-
Only those for the butt joints. The others you can but dont drill all the way through the frames behind them.