michael mott
-
Posts
5,200 -
Joined
-
Last visited
Content Type
Profiles
Forums
Gallery
Events
Everything posted by michael mott
-
 Pete I set it at 275f Michael
 -
I will certainly be following this very carefully. Nice start and do you ever work fast. Michael
-
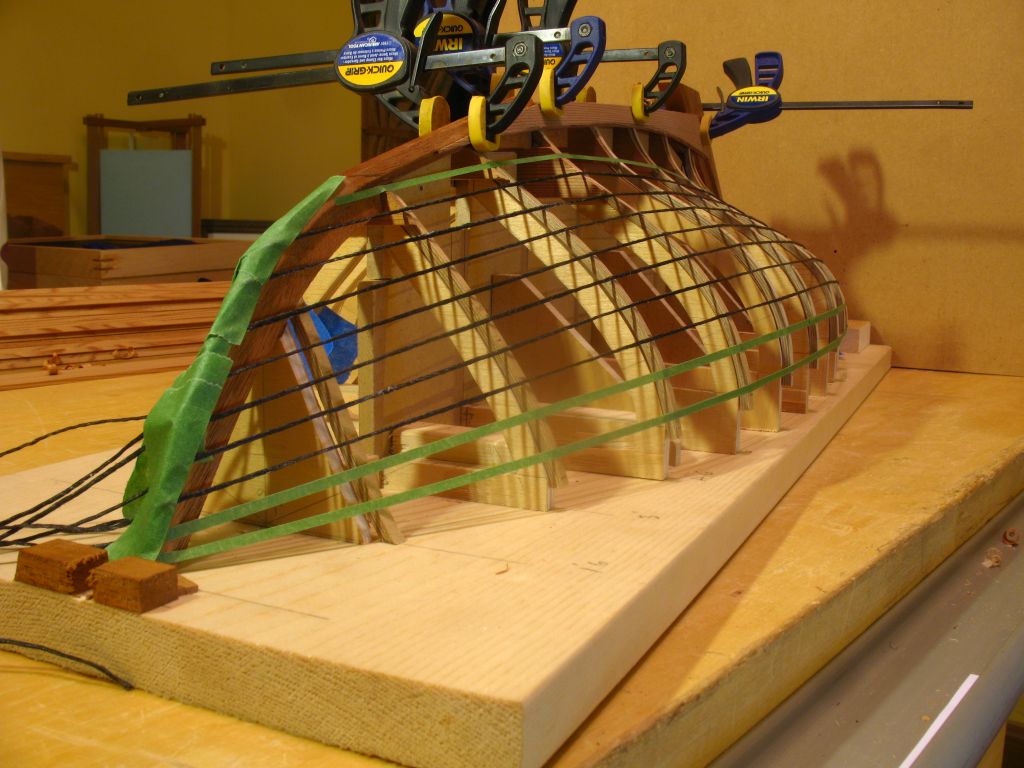
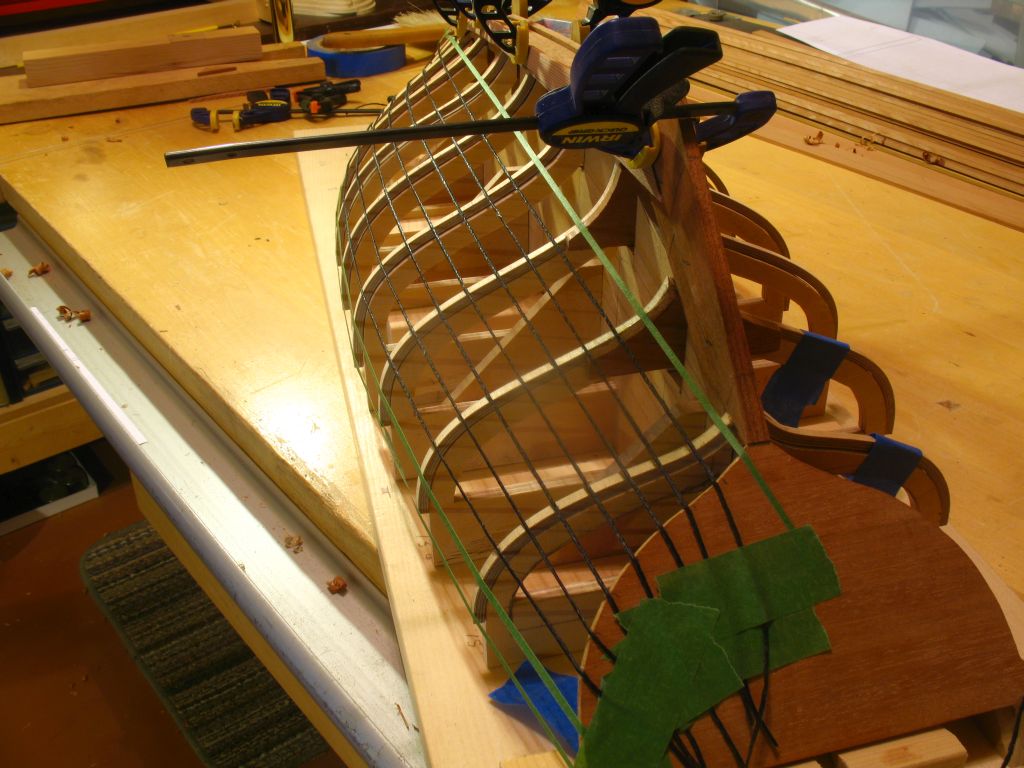
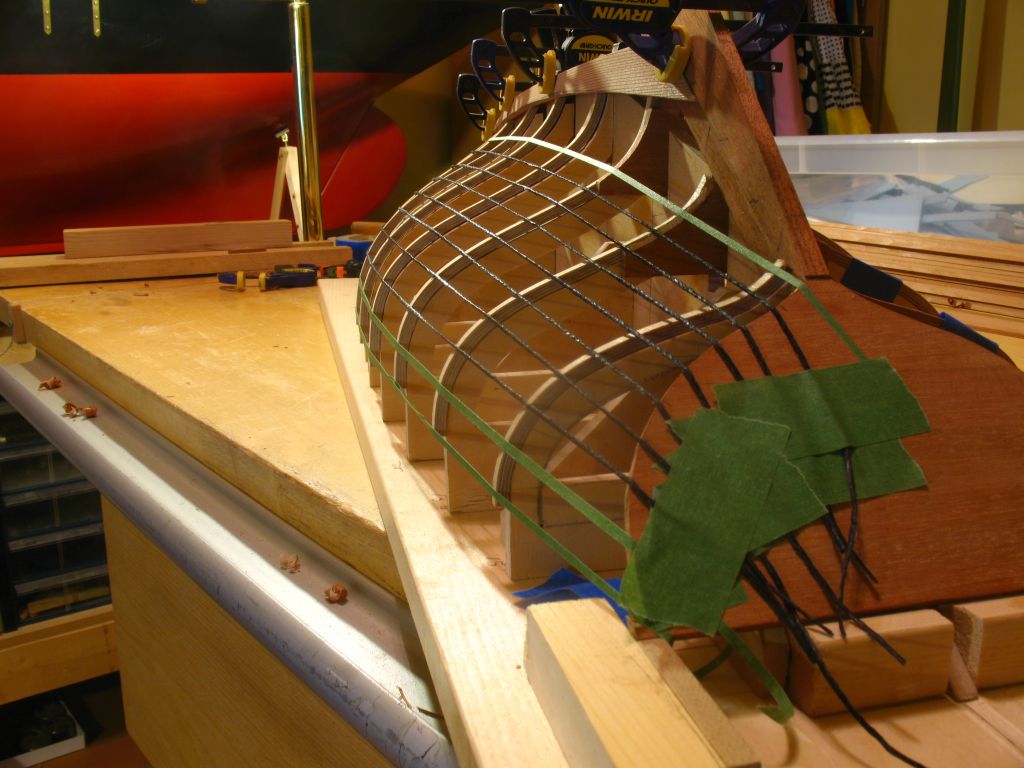
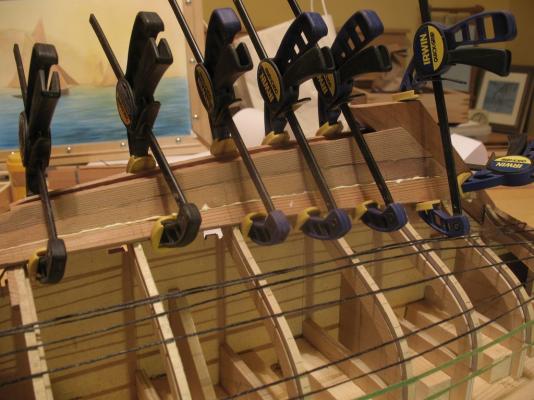
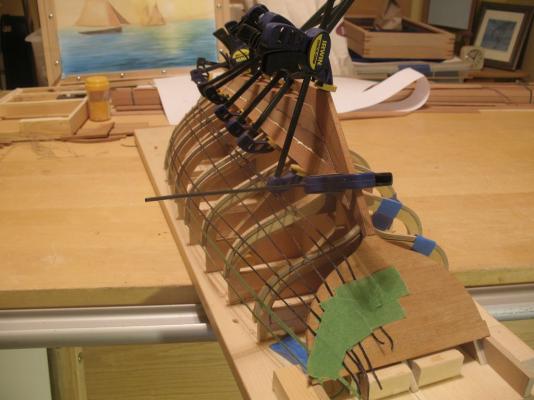
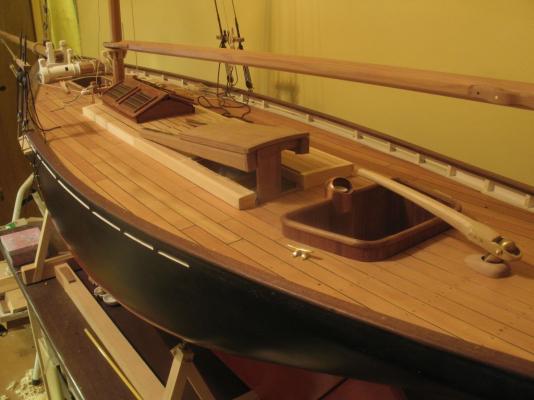
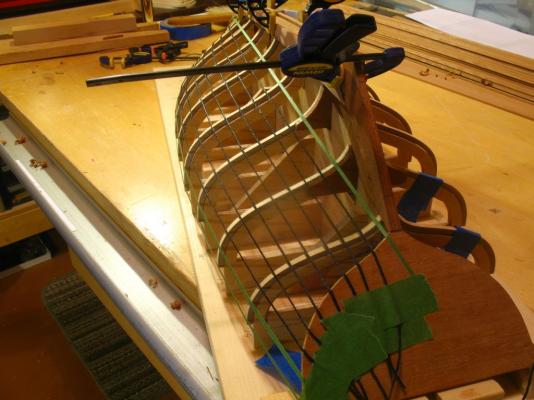
Build part 13 I am now at the third plank stage on each side. The distances are big enough now that I need to glue one side at a time. I tried a novel way to soften the planks (redwood) by wrapping them in a wet towel and placing them on a baking sheet and putting them in the oven for 15 minutes. it seemed to work well enough. I am shaping the ribs as I am moving down them, the rational being that because they are not supported yet at the sheer I wanted to have some good solid glue joints at the keel area before working at the sheer. Michael

-
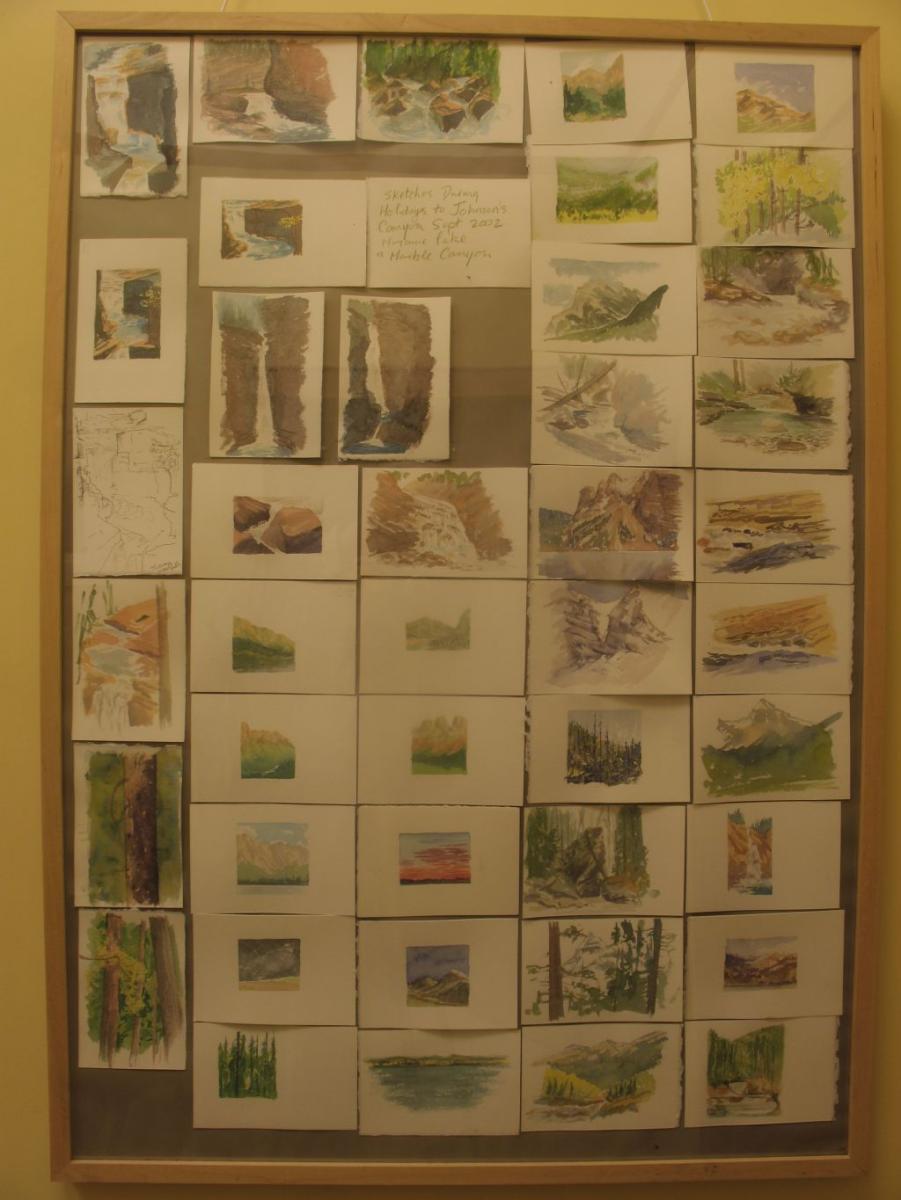
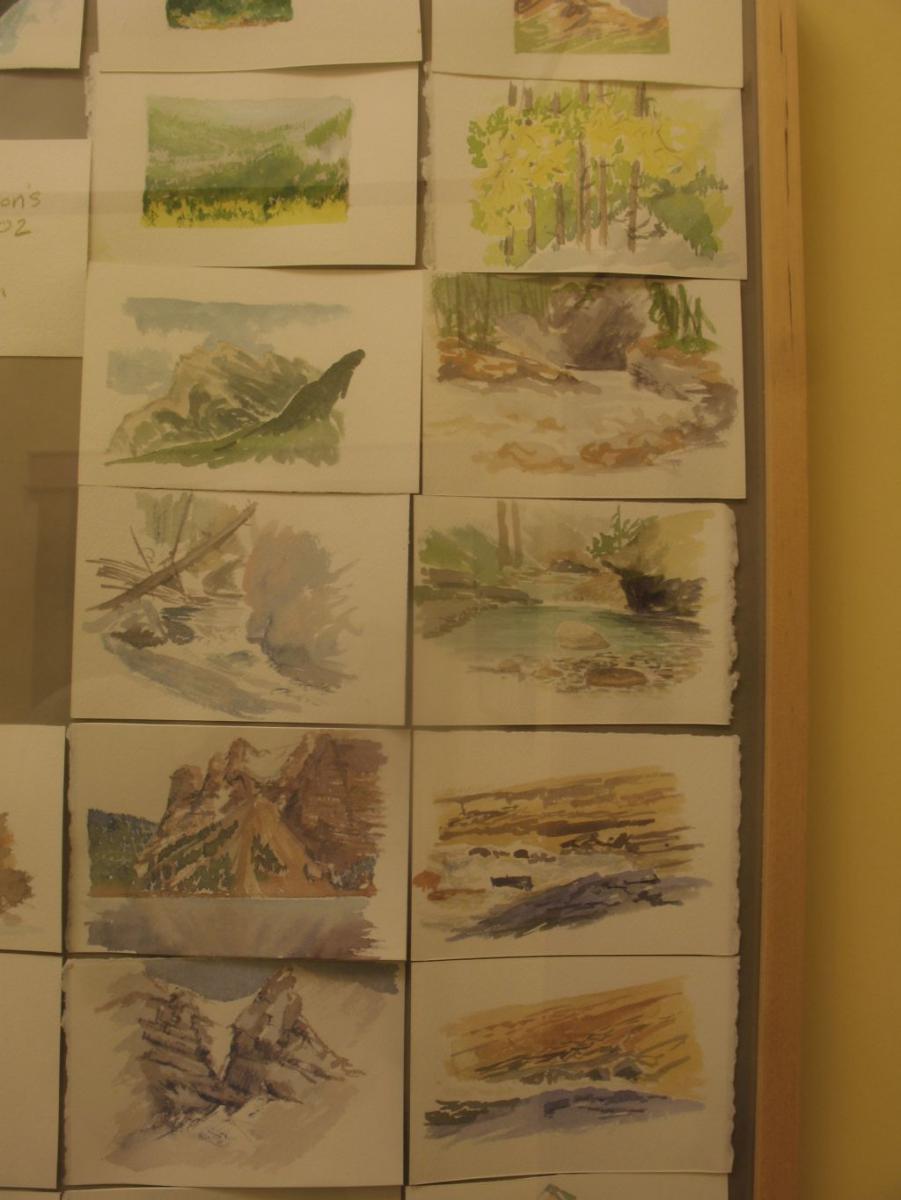
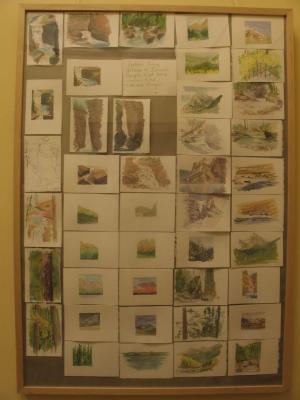
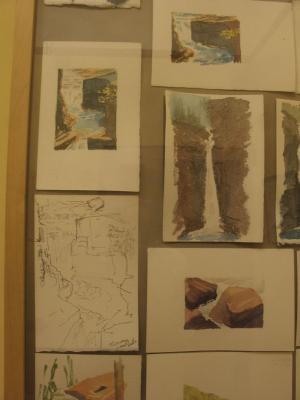
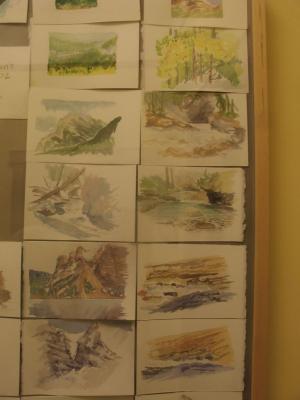
Hi Mark Regarding the watercolours I did them It is a compilation of a series of sketches dome during a trip to Marble Canyon in the Canadian Rockies here is a link to an art show where I exhibited them and here is a couple of detail pics sorry about the colour it is still dark and the lighting was not great. I paint and do the odd odd art in my spare time. I have a watercolour show coming up in April in Edmonton Now back to the cutter. Patrick and Druxey thanks, Sometimes I let things sit for what often feels far too long,I suppose because in the back of my mind there is something that is just not quite right about it,( this is especially true when I am following my own design and not making a copy of something already built.) and then all of a sudden it seems I have the answer and it really doesn't matter about the previous effort it was just a step on the journey anyway. Well that's my story and I'm sticking to it.
-
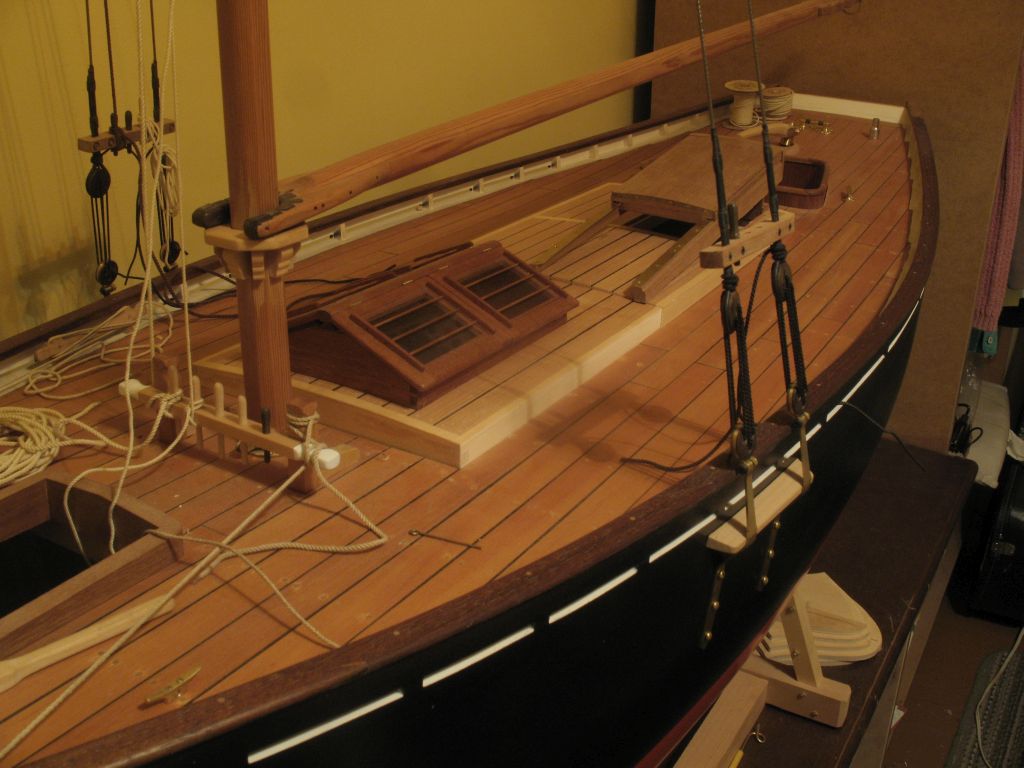
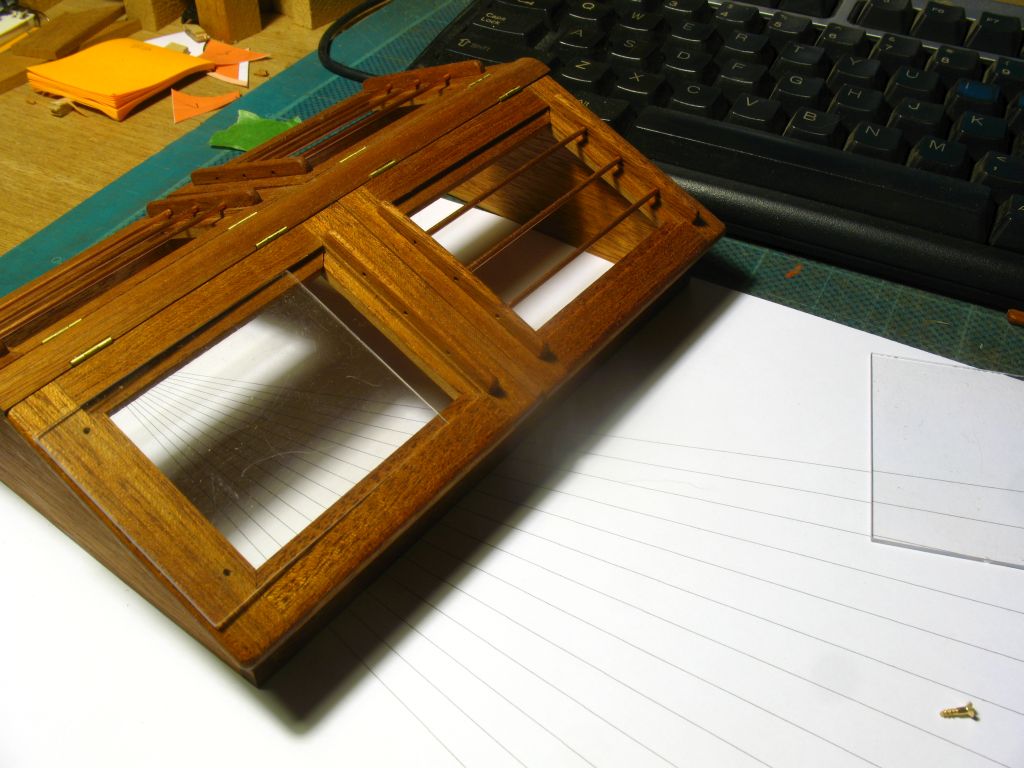
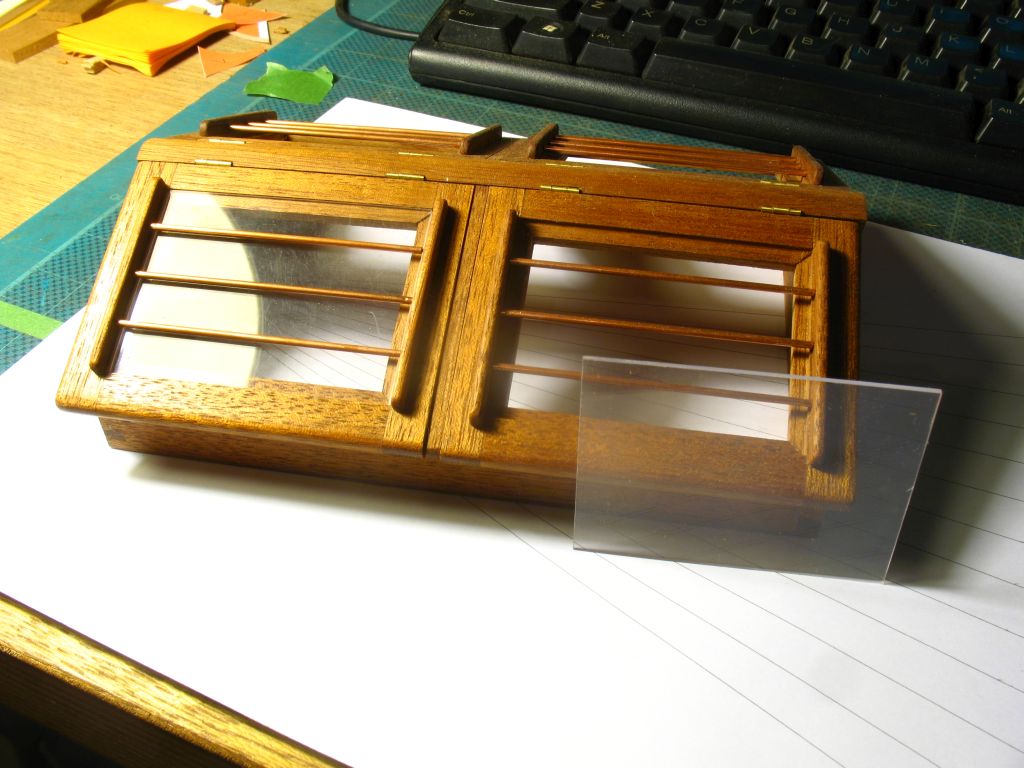
Jack next time I am in the city i will check out what the Michaels has. there is also a hobby shop close as well. Deon I will give the canopy glue a look. Thanks for all the likes While waiting for the other boat to dry I had one of those moments where I fitted the skylight to the low raised cabin roof. I kept looking at the junction between the two halves of the original cabin, and picked up a chisel and a razor saw..... The went out to the shop to the big bandsaw... before after I will need to rework the hatch area but I like the overall design better, it feel a little more elegant and less boxy. Michael


-
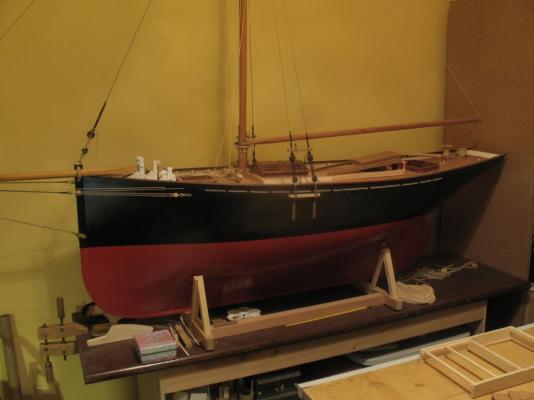
Me too Pete Nils I am not sure at this point because I will be adding the lead ballast. Bob It has crossed my mind to make a set of draw dies out of some 1/4 drill rod I would first step them down to 1/8th so that I can use the collet set And make a few stepped sizes.The thing is that for 1/8 scale a toothpick is close to 1/2 inch in scale, it is just that they are not very consistent, even 1/16 dowel is a bit slack on the tolerance regarding the diameter. I have ordered the Byrnes plate. in the meantime I am going to do a couple of experiments with the shape of the front face of the dies by making them a little conical, not much but a little. Thanks everyone who visited and added a like. The first two planks glued up well after they had dried thoroughly, I have shaped and steamed the next pair I will do the fine tuning tomorrow when they are dry. The discolouration makes it appear that they are not fitting well it is an illusion caused by the colour difference. Michael
-
My condolences on losing your feathered friend Dave. Michael
- 962 replies
-
- 5
-

-
- sovereign of the seas
- ship of the line
- (and 1 more)
-
Nice work on the ship Mike I like the sequence for the block. Michael
- 452 replies
-
- 1
-
-
- cheerful
- Syren Ship Model Company
- (and 1 more)
-
Ed, happy new year to you. Your method of quickly and easily making a large number of pins in very elegant. Half the battle it seems to me is figuring out how to accomplish these small repetitive tasks. I shall file this one away for the future. Michael
- 3,618 replies
-
- 5
-
-
- young america
- clipper
- (and 1 more)
-
mark thanks the next time i am in town I will stop by the model shop (they have mostly airplanes anyway) to pick some up. The last twenty years have seen some great changes in glues and paints, I think I need to get out more.... Michael
-
Kees nice work on the hull and the other small pieces that you are casting, do you plan on a fleet? Michael
- 434 replies
-
- 3
-
-
- pelikaan
- beamtrawler
- (and 2 more)
-
Thanks Mark, so the next question is how to produce a micro bead of silicone? Michael
-
Isn't it great the way time just vanishes while we are completely absorbed with our work, especially when we are enjoying it. Beautiful work for sure. Michael
- 1,215 replies
-
- 6
-
-
- sloop
- kingfisher
- (and 1 more)
-
Rob any more progress on this. Michael
-
Denis, Piet, belated thanks. while waiting for wood to dry on the Herreshoff, I cut up a CD case and this is the way that I will do all the lights. I will need to use a tiny bead of something to seal them in. Michael


-
Piet, thanks for that tip. I don't actually have a drill index..... lots of drills but no index. Michael
-
Pete thanks for the picture, Druxey thanks for the heads up I shall get one. Build part 12 While waiting for the redwood to dry I used a combination of Chucks division method using the fan. and also I think that Druxey uses a thread. By looking at the Hadlock divisions as a starting point I was able to get a good Idea of the run of the planks. I will see how the plank dries and take it from there. Michael

-
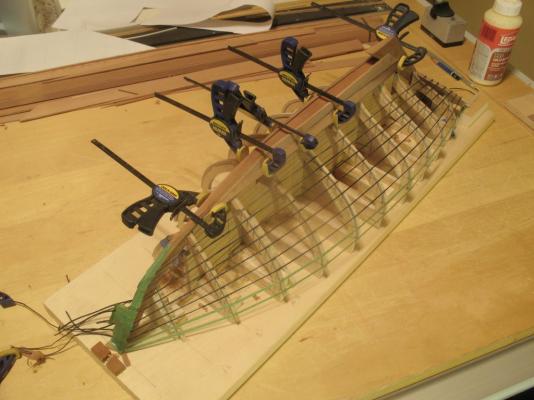
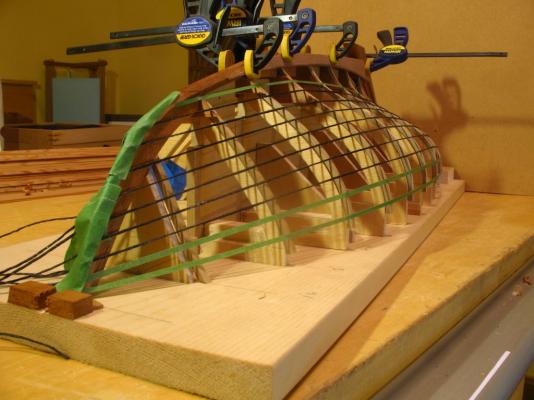
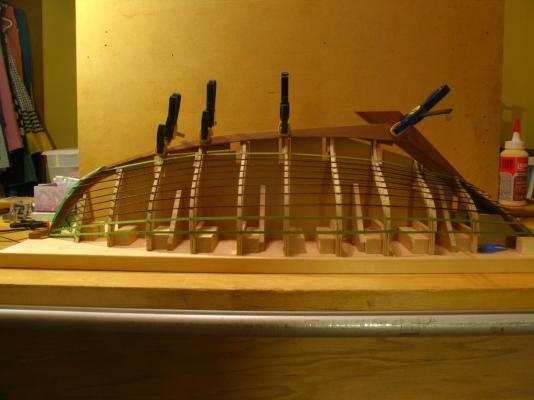
Thank you to all who visited my build over the last few days. Build part 11 I have been fettling the keel and the building molds it was apparent that I had miscalculated a few areas that needed to be re positioned vertically by distances from 1/16 the to 3/16 increasing incrementally from the bow to the stern. I am not quite sure how I managed to build in this error, but build it in I did. I used the Port Hadlock images to plan the garboard strake and cut a pair from the planks cut from the re-sawn garage door panels that I salvaged. The wide planks are 1" x 5/32nds" and the narrow ones 9/16th" x 5/32nds" After cutting out the shape I put them into the turkey pot raised up on a couple of tin cookie cutters and steamed them for 20 minutes then clamped them up to dry. Now the real test begins. There are so many amazing planking jobs on this forum if I can get this done half as well I will be really pleased. I was also doing some tests trying to draw some cane doweling through a draw plate but this does not seem to be working very well, I am not sure what I am doing wrong but even starting with an easy hole size then stepping to the next one I am having difficulty pulling it through without crushing it with the pliers or simply tearing it off leaving the rest stuck in the plate. I am drawing it through from the smallest diameter side, it would be reverse for drawing down copper or silver wire. Michael

-
Lovely work on the hull so far Nils, a happy new year to you and your family. Michael
- 2,625 replies
-
- 4
-
-
- kaiser wilhelm der grosse
- passenger steamer
- (and 1 more)
-
Pete you are doing great job on the details of this "little" boat it will be interesting to see what you achieve with the larger one. And a happy new year to you and your family, also wishing you many days of great sailing this year. Michael
- 258 replies
-
- 4
-
-
- buzzards bay
- herreshoff
- (and 1 more)
-
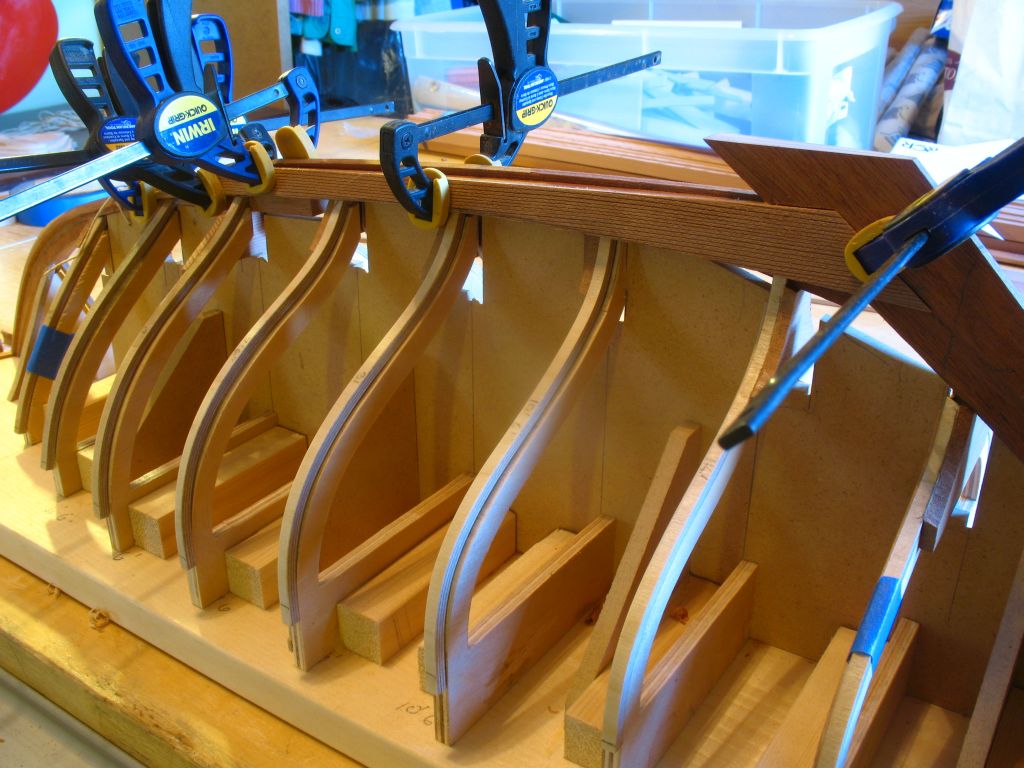
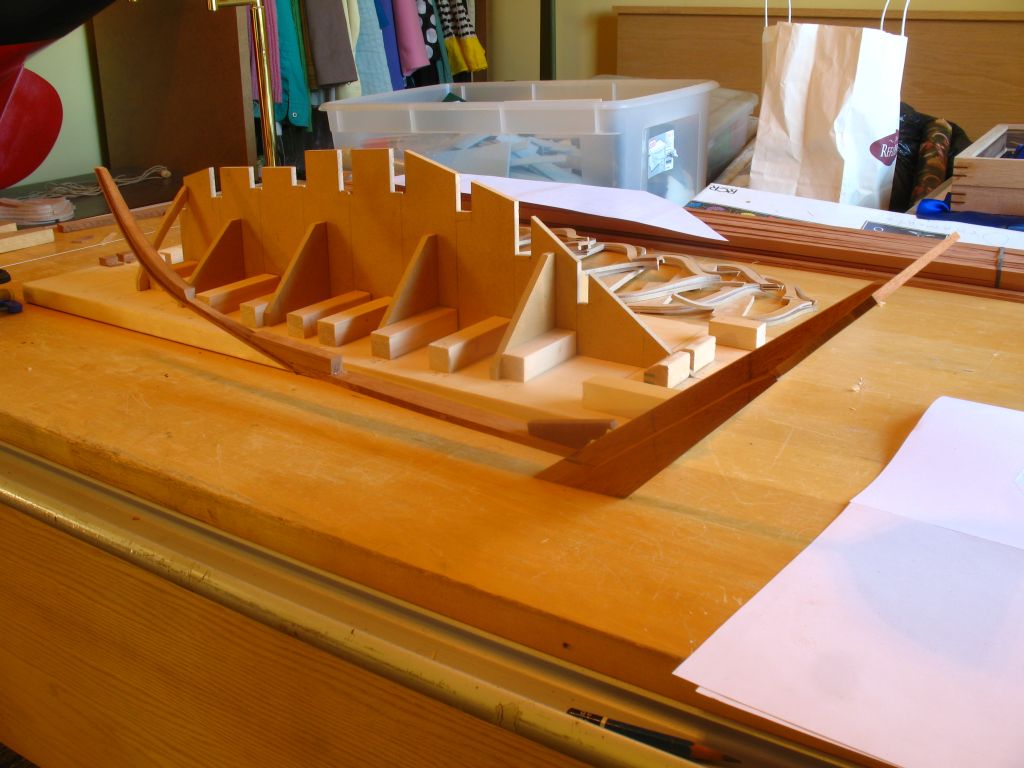
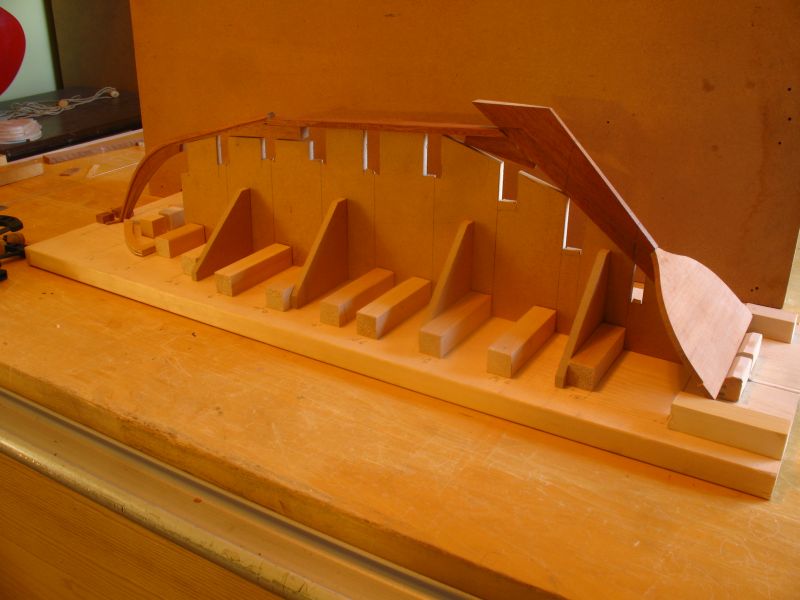
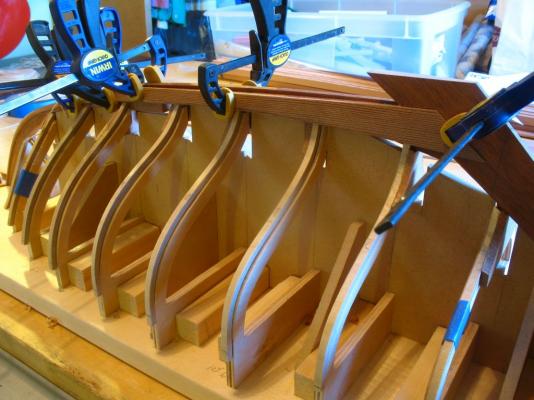
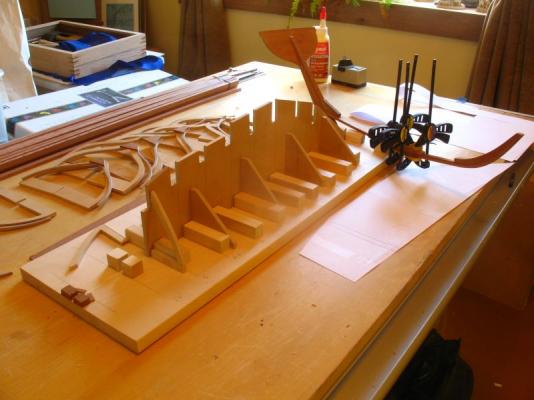
Bob I used a chisel and snapped them all off to cut them. Build part 10 The MDF is removable and is slotted tightly between the MDF square supports like this. The keel glued up, there is still some shaping to do on it, and I liked the fact that it balanced by itself like a sculpture. Michael


-
Pete the three pieces of mahogany that form the stem, stern and the plate that the lead bolts to will be joined with a couple of knees basically that is how The keel appears to me made in the port Hadlock picture here https://www.flickr.com/photos/nwswb/5640427809 Michael
-
Gerald thank you for linking your site to this thread. I have enjoyed following your work for the past 30 odd years or so I think I started with the tulip wood bodied Hispano Suiza in your book the "Complete Car Modeller" I spent quite some time studying your tools for doing the manufacturing of the parts for this hull section model. I can see that to work at the level of precision at this scale is akin to watchmaking and your tools have a style reminiscent to me of the instruments of the 19th century and watchmaking all rolled into one. Your approach and skill are very inspirational and I am sure that "retirement" will continue to keep you busy with similar projects. Regards Michaell
- 281 replies
-
- 5
-
-
- falls of clyde
- tanker
- (and 2 more)