HOLIDAY DONATION DRIVE - SUPPORT MSW - DO YOUR PART TO KEEP THIS GREAT FORUM GOING! (Only 13 donations so far - C'mon guys!)
×


Salty Sea Dog
-
Posts
666 -
Joined
-
Last visited
Content Type
Profiles
Forums
Gallery
Events
Everything posted by Salty Sea Dog
-
 Thanks druxey! It seemed like a lot of pieces. I'll need to do some more research to draw up something more suitable. I have some curved branches I've harvested from the back yard I'm hoping to saw up and use!
 -
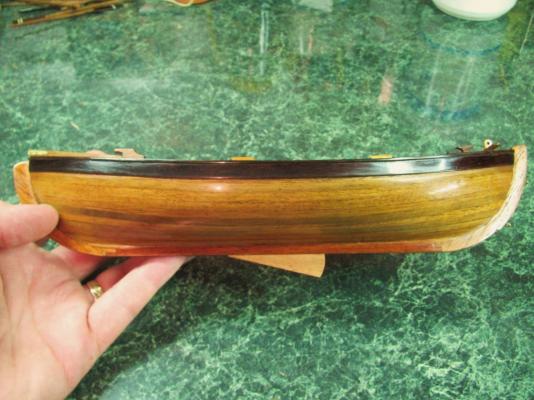
Hi Popeye! That looks gianormous! How long is that boat?
-
This detail nerd is taking notes! Your paint work looks great!
-
The deals are still out there for the taking if anyone is interested. http://www.amazon.com/gp/offer-listing/9185268372/ref=dp_olp_used?ie=UTF8&condition=used http://www.amazon.com/gp/offer-listing/039557322X/ref=dp_olp_used?ie=UTF8&condition=used
-
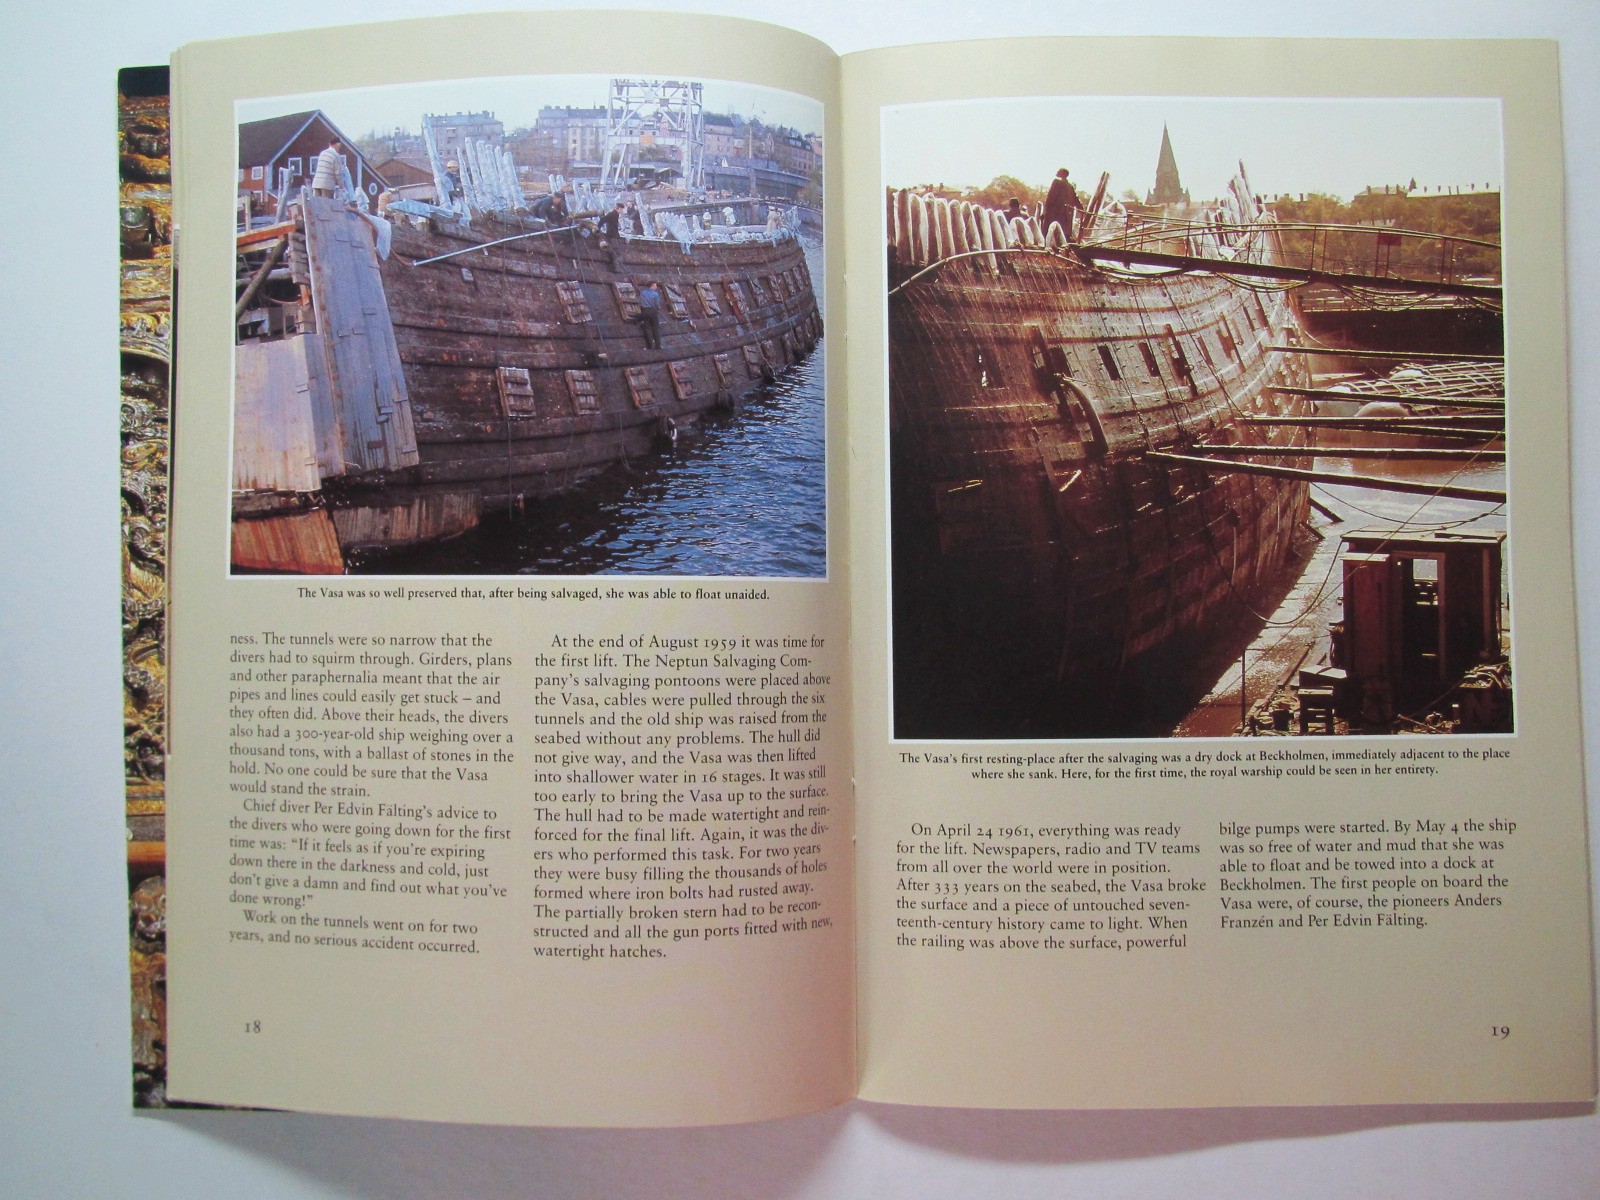
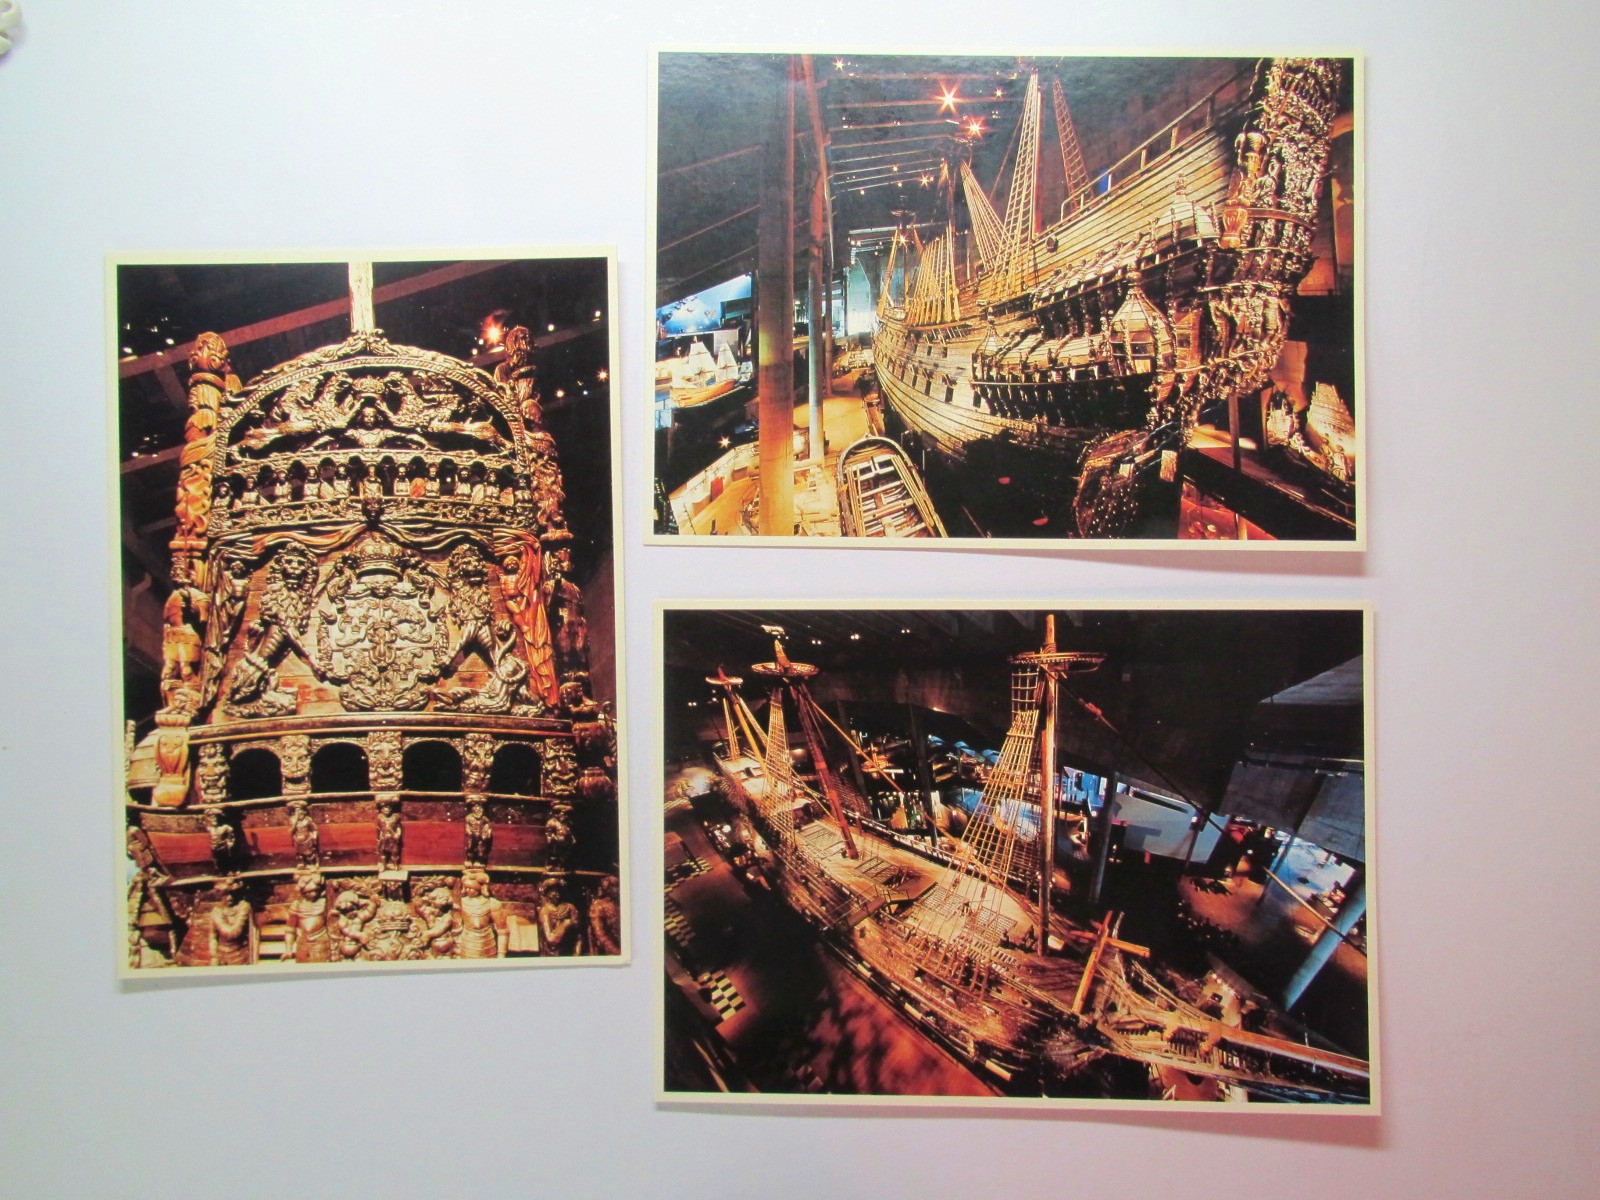
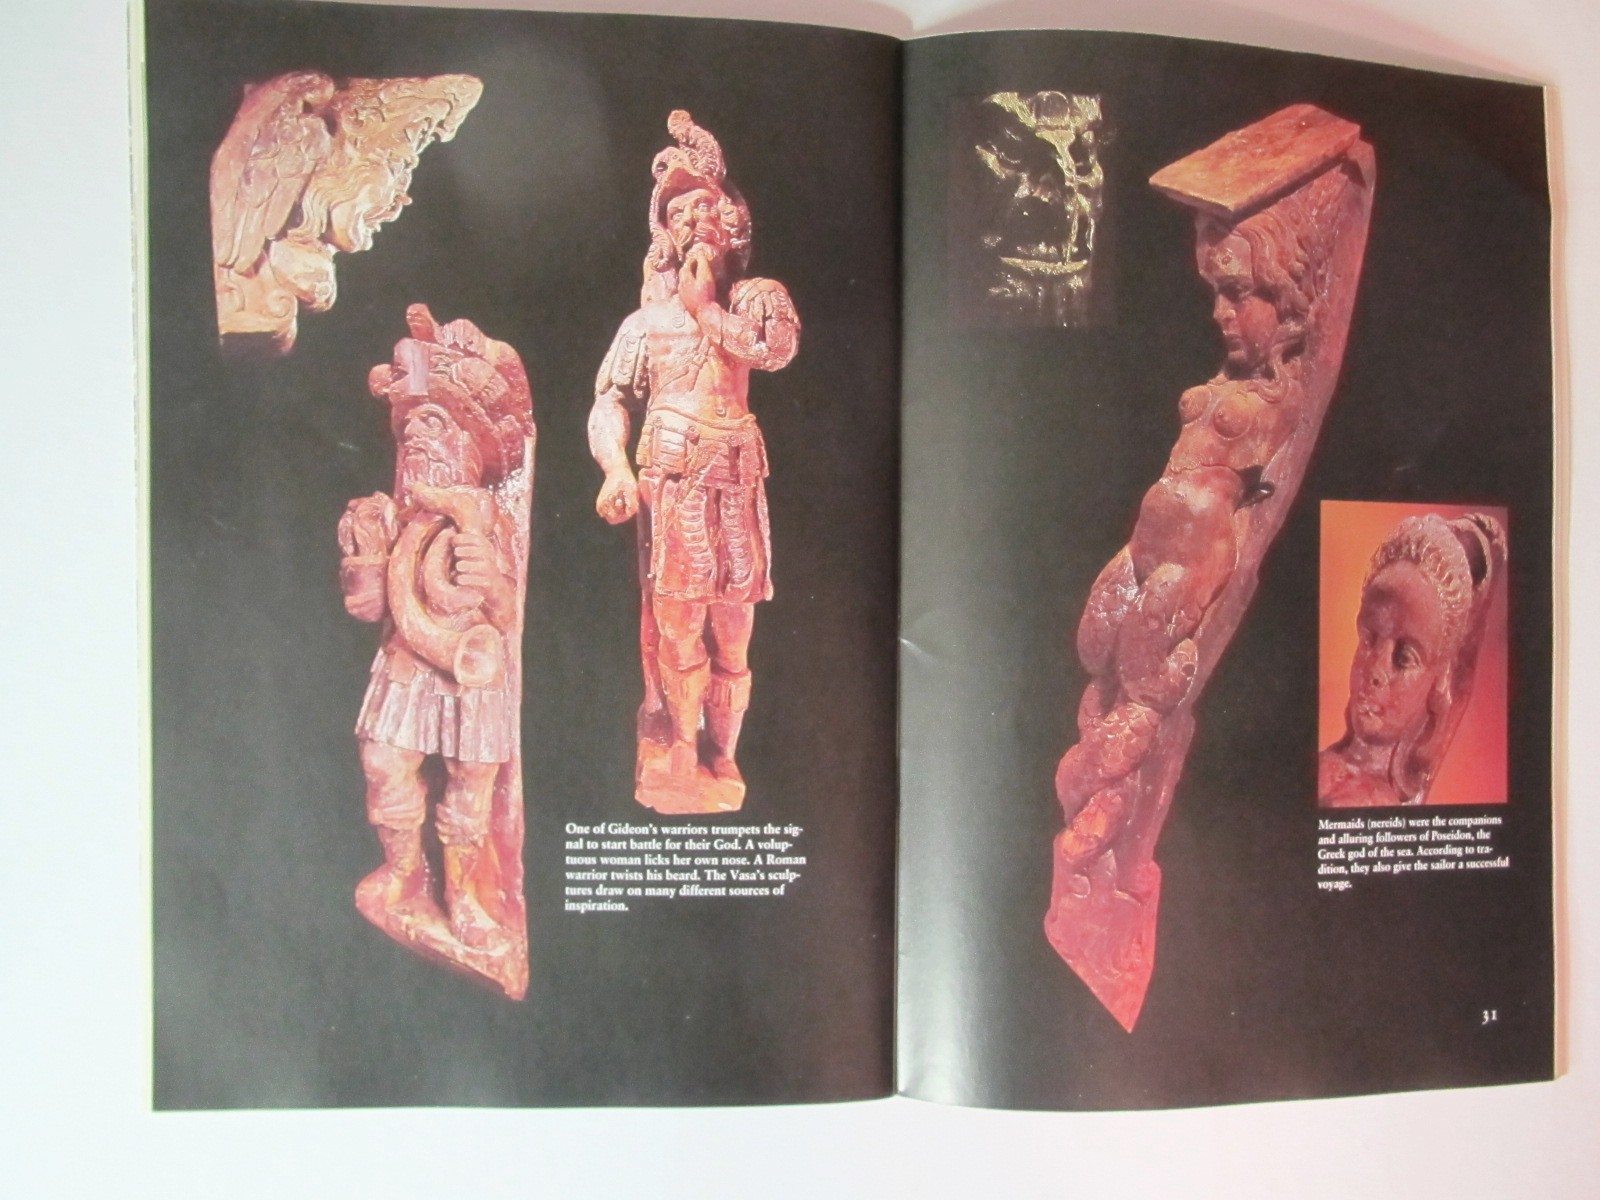
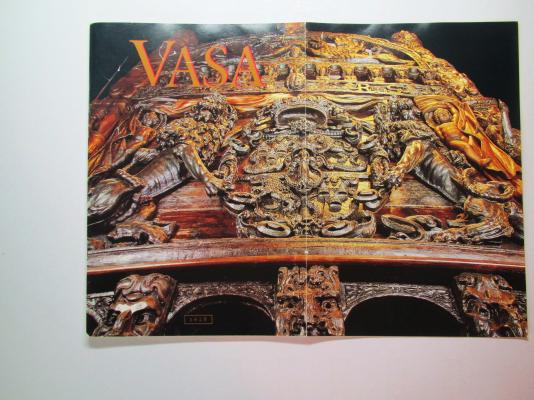
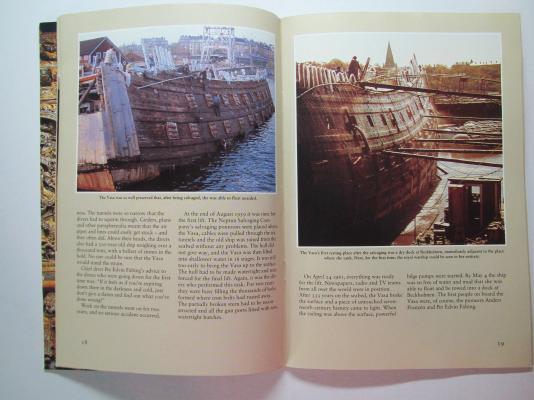
This is a 48 page 9-1/2" x 6-1/2" color booklet put out by the Vasa Museum. I picked it up in "Very Good" used condition on Amazon for $1.90 + shipping! The amazing fold-out front cover photo of the stern is worth at least $2! The booklet covers the history and salvage of the ship and is a good read. Nice photos, drawings, maps and diagrams. I don't know if all used (or new) books would include them, but mine came with 3 large color postcards too. This is probably the best $1.90 I've spent! Highly recommended.


-
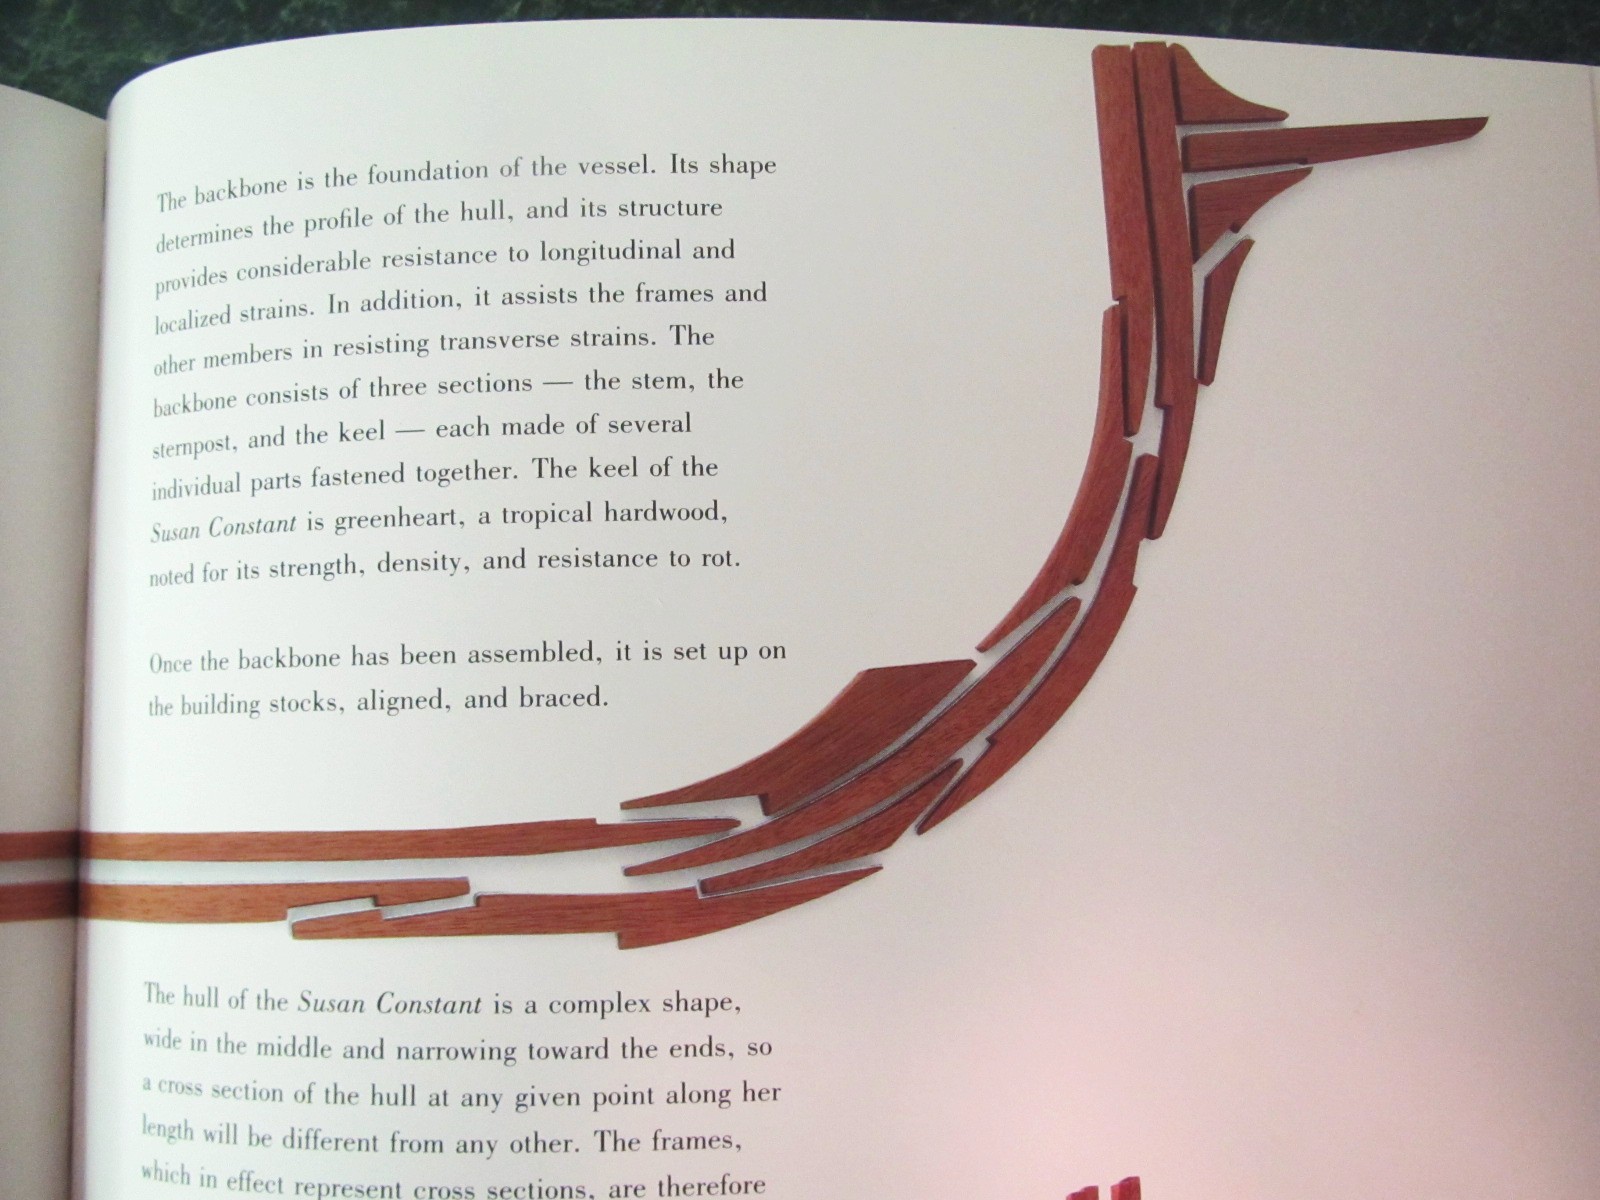
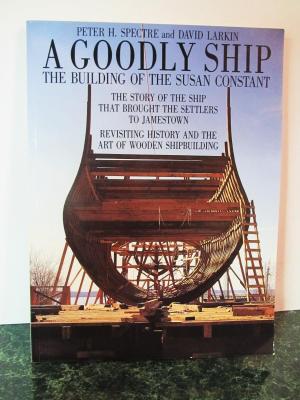
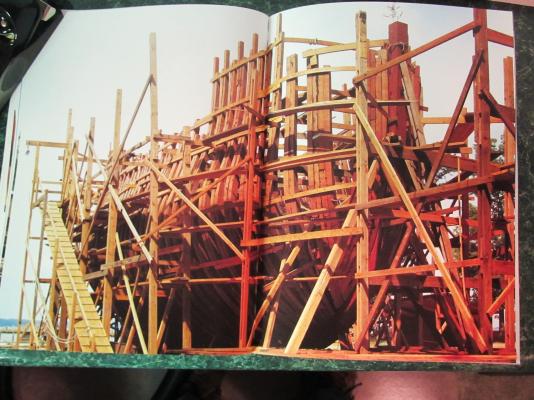
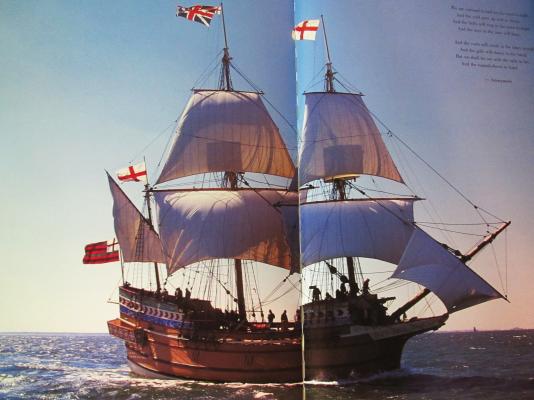
This is a 96 page 11-3/4"x 9" soft-cover book by Peter H. Spectre and David Larkin which amounts to a build log of a full-size replica of the Susan Constant, the lead ship of the Jamestown Settlement. This ship always seems to take a back seat to the Mayflower even though it sailed 13 years ahead of the Mayflower and ties in to the history of Pocahontas. This book can be obtained used in "Very Good" condition for less than $5 + shipping on Amazon. The jacket price on mine is $15.95 (U.S.). The book has a lot of great pictures of the build with quite a few 2-page pictures. As well as the full-size build, a highly detailed POF model was constructed and there are some photos of it's construction too. I am going to be building the Golden Hind next which has many similarities to the Susan Constant. I plan to do some kit bashing and was wondering if you more knowledgeable folks would know if the jointery shown in the stem and keel of the Susan Constant would be correct for the Golden Hind? I know the real one didn't use plywood!

-
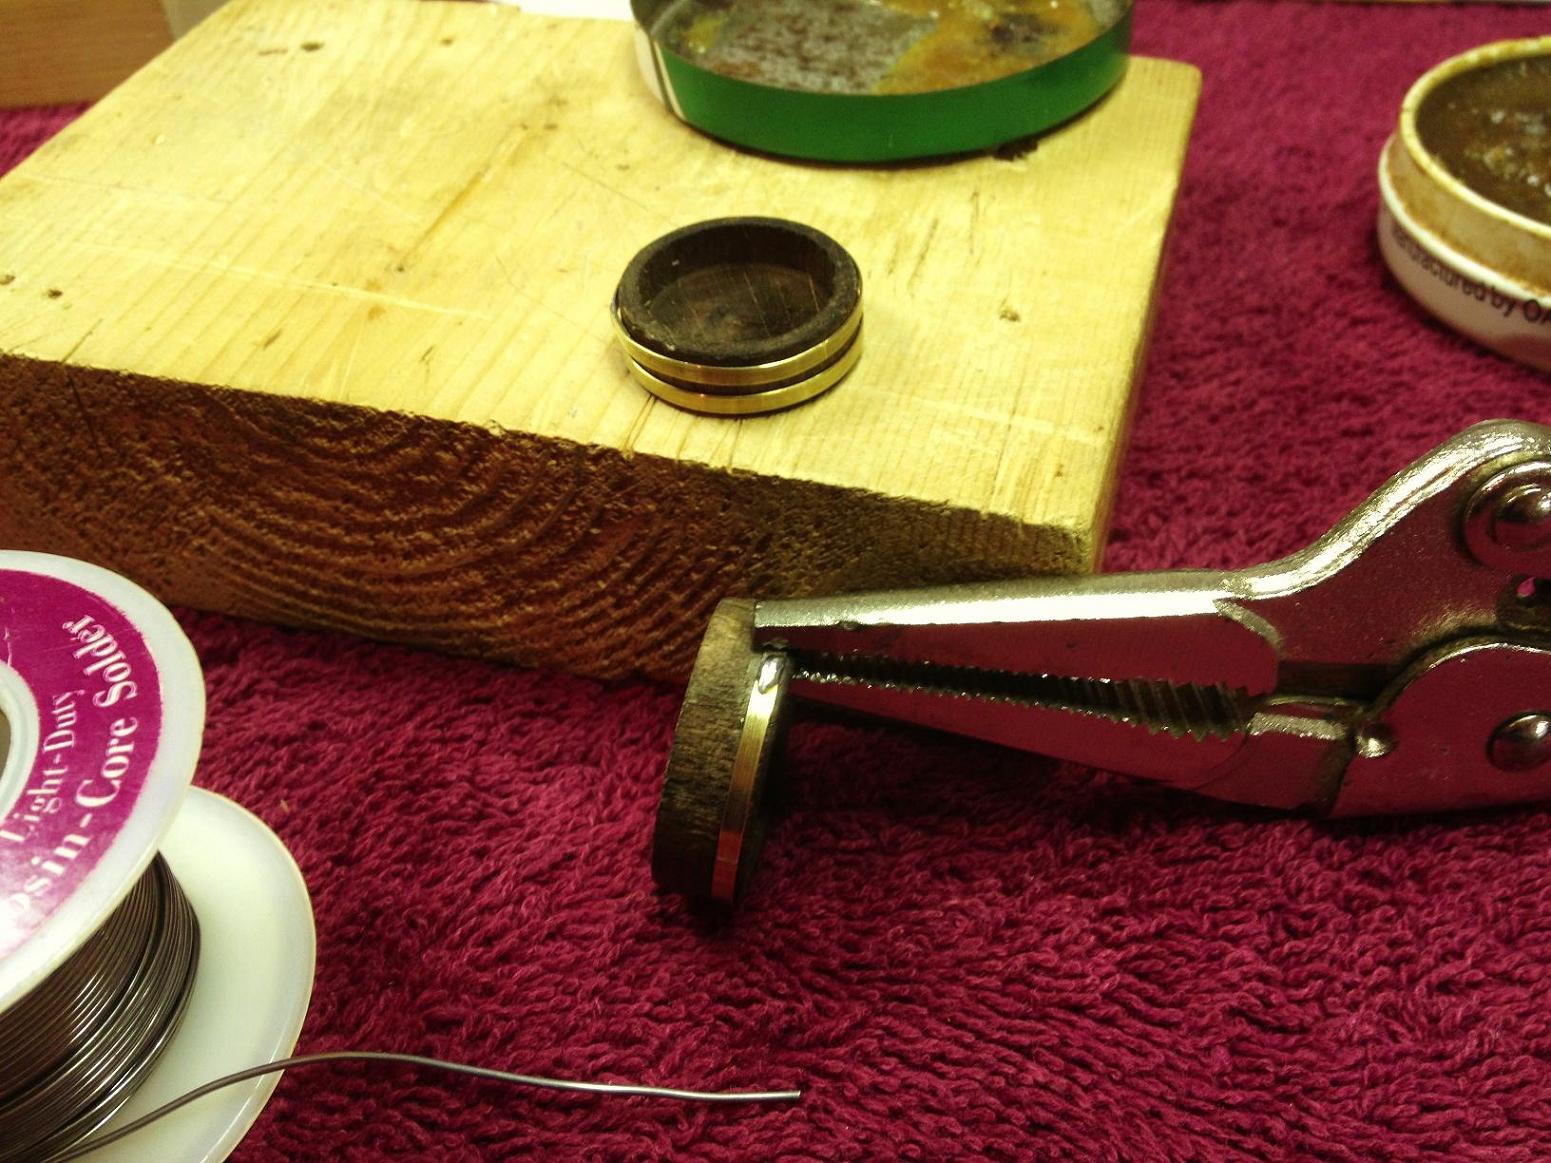
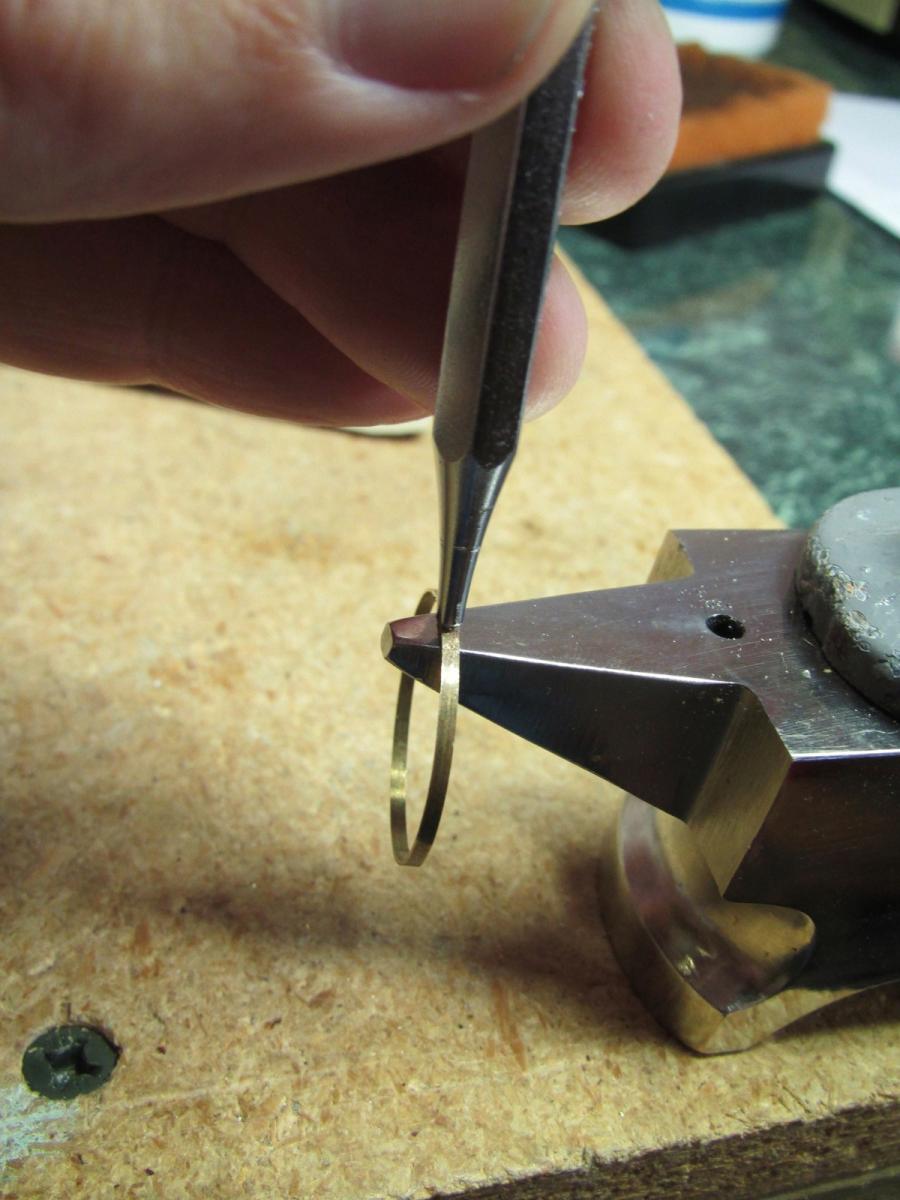
JP- Just using regular solder. I don't have the equipment for silver soldering but I think it requires a torch. The bands were initially soldered while wrapped around the tubs and held with vise grips which would have been risky with a torch! By the way, when you look up tenacious in the dictionary, isn't that a picture of you?

- 515 replies
-
- 3
-

-
- artesania latina
- whaleboat
- (and 1 more)
-
Hi Ferit! Your first build is AMAZING!!! I can't even imagine how fantastic your 12th build will be. You are a true artist and craftsman!
-
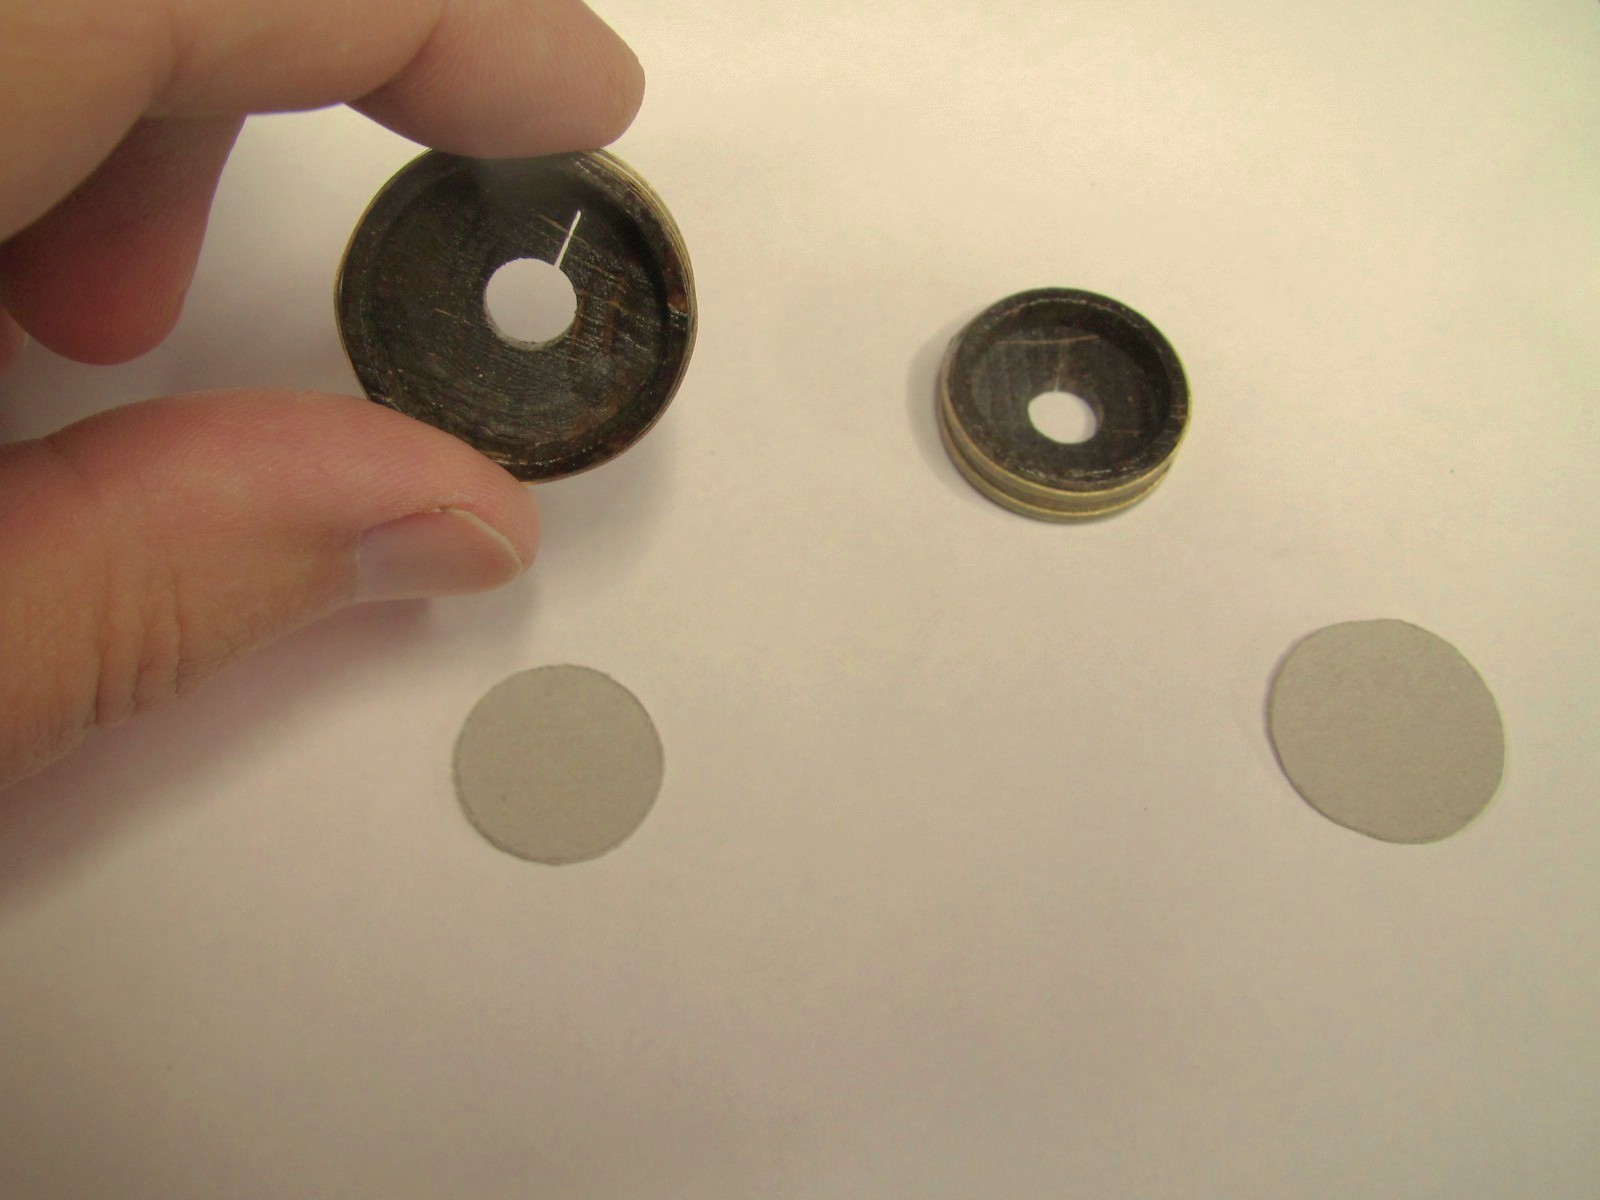
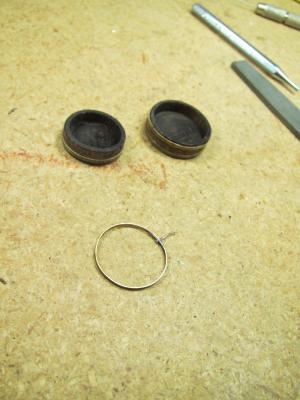
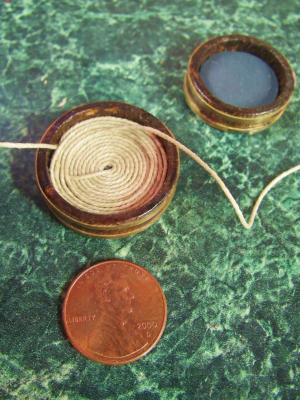
12) The Son of Making Little Stuff Earlier I had mentioned the problems I was having with the soldered joints on the bands around the line tub barrels popping loose with changes in humidity. The wood would swell just enough to pop the bands which would fly off and hide. I could have switched to bands made of paper, but as my wife would tell you, “Stubborn” is my middle name. I don't know why she tells people this and she should know what my middle name really is after 27 years of marriage. Anyway, here's the fix. The bands were re-soldered and a hole was drilled for a brass nail to pin the joints. The nail and joint were soldered again. The excess nail was trimmed off and the cut end was peened on my great big little anvil (it is being held down with a c-clamp). The anvil is from Model Expo and it has really been handy. Knowing that the wood would swell again, a big relief hole and a relief cut parallel to the grain were made in the floor of each line tub. New cardboard floors were made. The cardboard was painted and held with a drop of glue opposite the relief cut. My thought was that would allow the wood to move freely. This fix seems to be working, so last night I started coiling rope. I'm starting to like this rope stuff! Best wishes,


- 515 replies
-
- 4
-
-
- artesania latina
- whaleboat
- (and 1 more)
-
Wow! That is a real treat for the eyes! Beautiful work Augie!
- 1,668 replies
-
- 1
-
-
- syren
- model shipways
- (and 1 more)
-
Yea!! Looks great.
-
Hi JSGerson! Thanks for posting this. I'm getting a lot of ideas on how to kit bash which could be applied on my next build. Your build is looking good! Best wishes
-
It sounds like you have thought through a good plan and I know with your determination, it's gonna look great! Just one pic?.....
-
Matti - I like the distressed look too and it is something I need to learn. I will be bugging you when I start experimenting with pastels and dry brushing. Scott - Thanks for checking out my build and the kind words! Best wishes,
-
Thanks Mark - I will make the 2nd one a tad shorter. Augie- I guess I have just been thinking the keel was a little clunky. Trophy whales? That would be one big fireplace to mount one above! Robbyn - I think your view is right on target! Thanks for the awesome comments too. My next build will be Mamoli's Golden Hind and I don't have any other builds done. This is my first boat but I got a stack waiting!! You have been flying through your build -the ratlines look great. To quote someone famous (Augie), I may not be that good, but I'm slow!
-
Nice work Pete! After this everything else will seem huge and easy!
-
Hi Mark! Thanks for dropping by to my build log and your kind words! When you say a hint of the centerboard, do you mean less than my shorter version? Maybe just barely poking out and the lift strap fully exposed and laid flat atop the case?
-
Hi Michael! The ship is looking incredible! You set the bar really high with this build. Beautiful work!! Wishing you safe and enjoyable travels.
-
Hi Augie! Yes I beleive the centerboard would only be lowered while under sail. A lifting strap would pull it back into the centerboard case when using oars or during a Nantucket sleigh ride. After the whale tired and they finished it off, they could raise the mast and sail and lower the centerboard for the long journey back to the ship. I think the keel (and definitely the prow and stern posts) are too wide. It would probably require making a new rudder to follow the shape of a thinned down stern post. Thinning the keel would make the half lap joints look off too. If I knew what I've learned since I made those parts back then I would have done them different. Thanks for the nice words! Hi JP! The only thing visible from inside the boat will be a small hole towards the back of the centerboard case with a rod with a looped handle poking out of it. Thanks for the kind words!
-
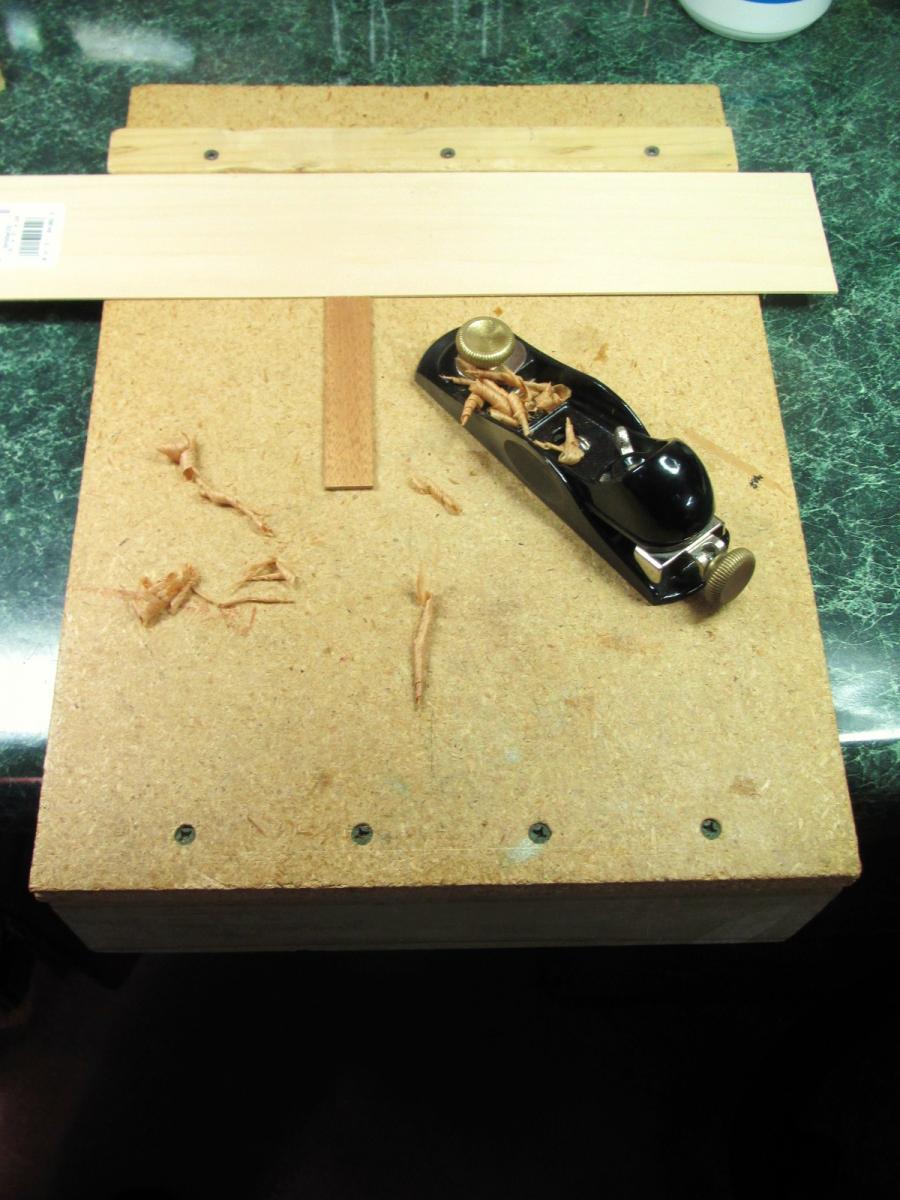
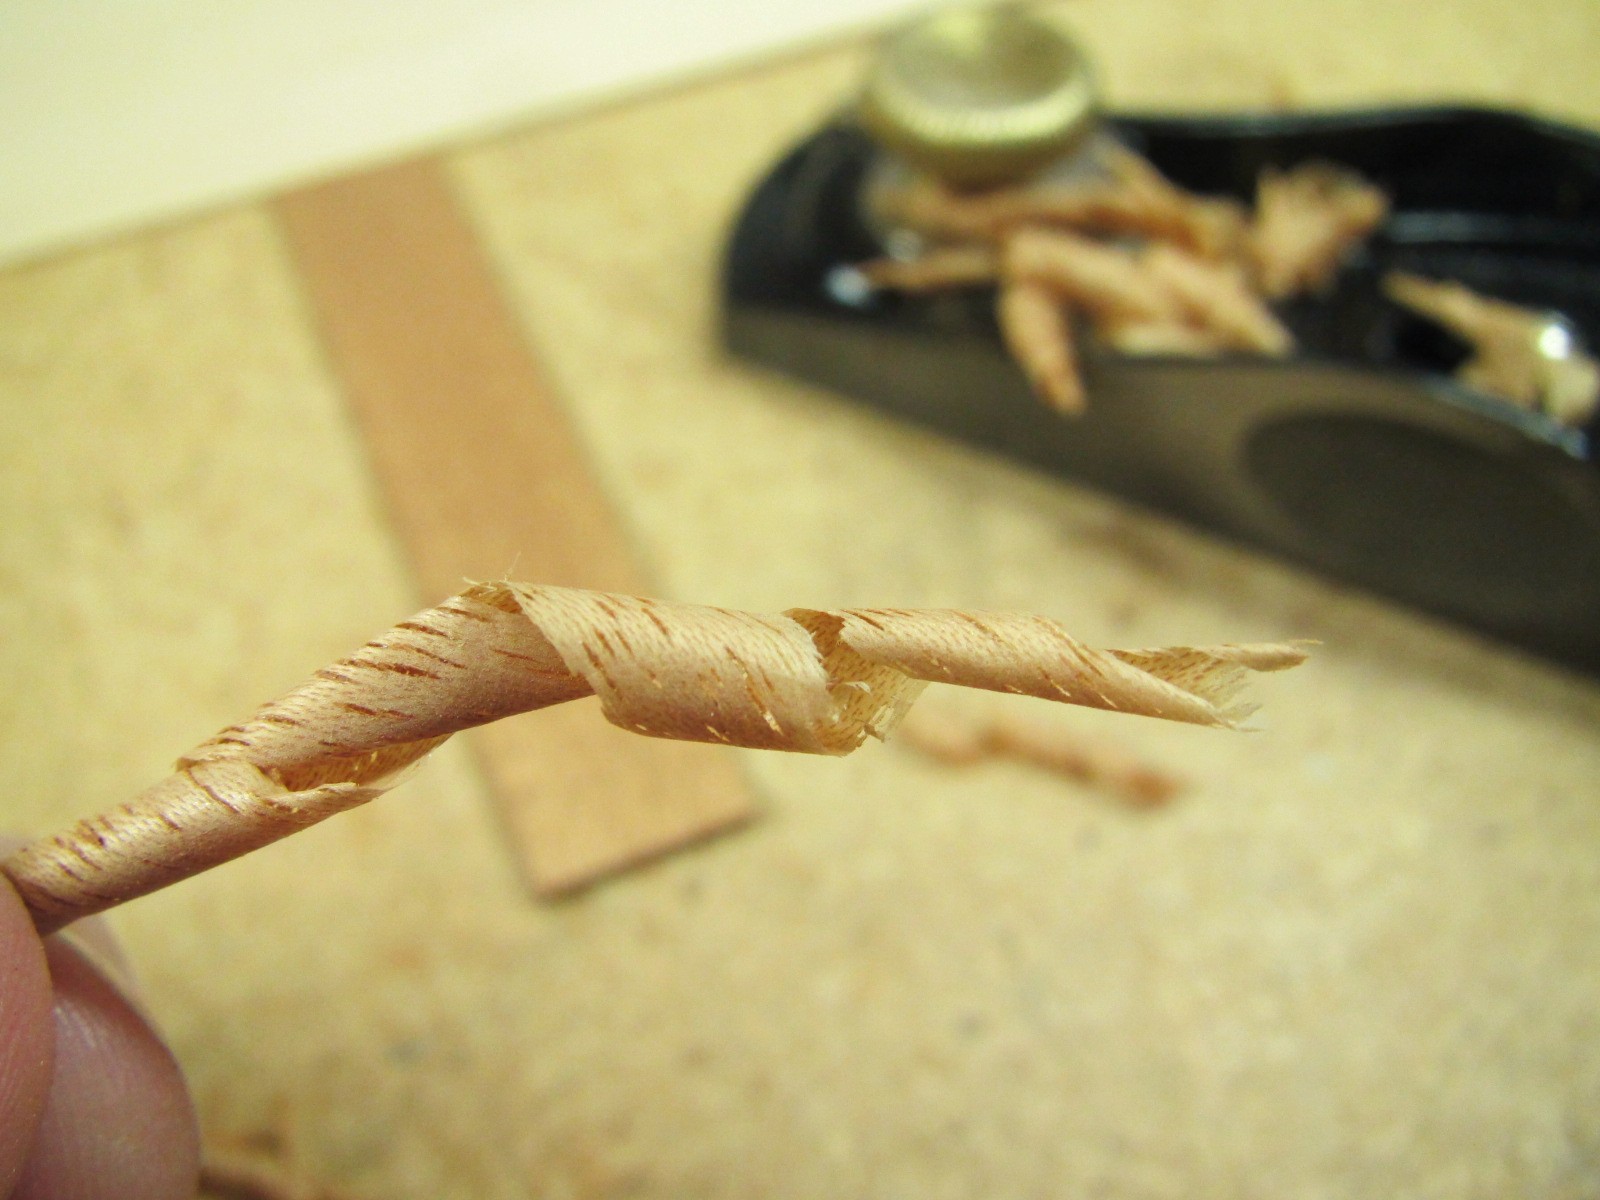
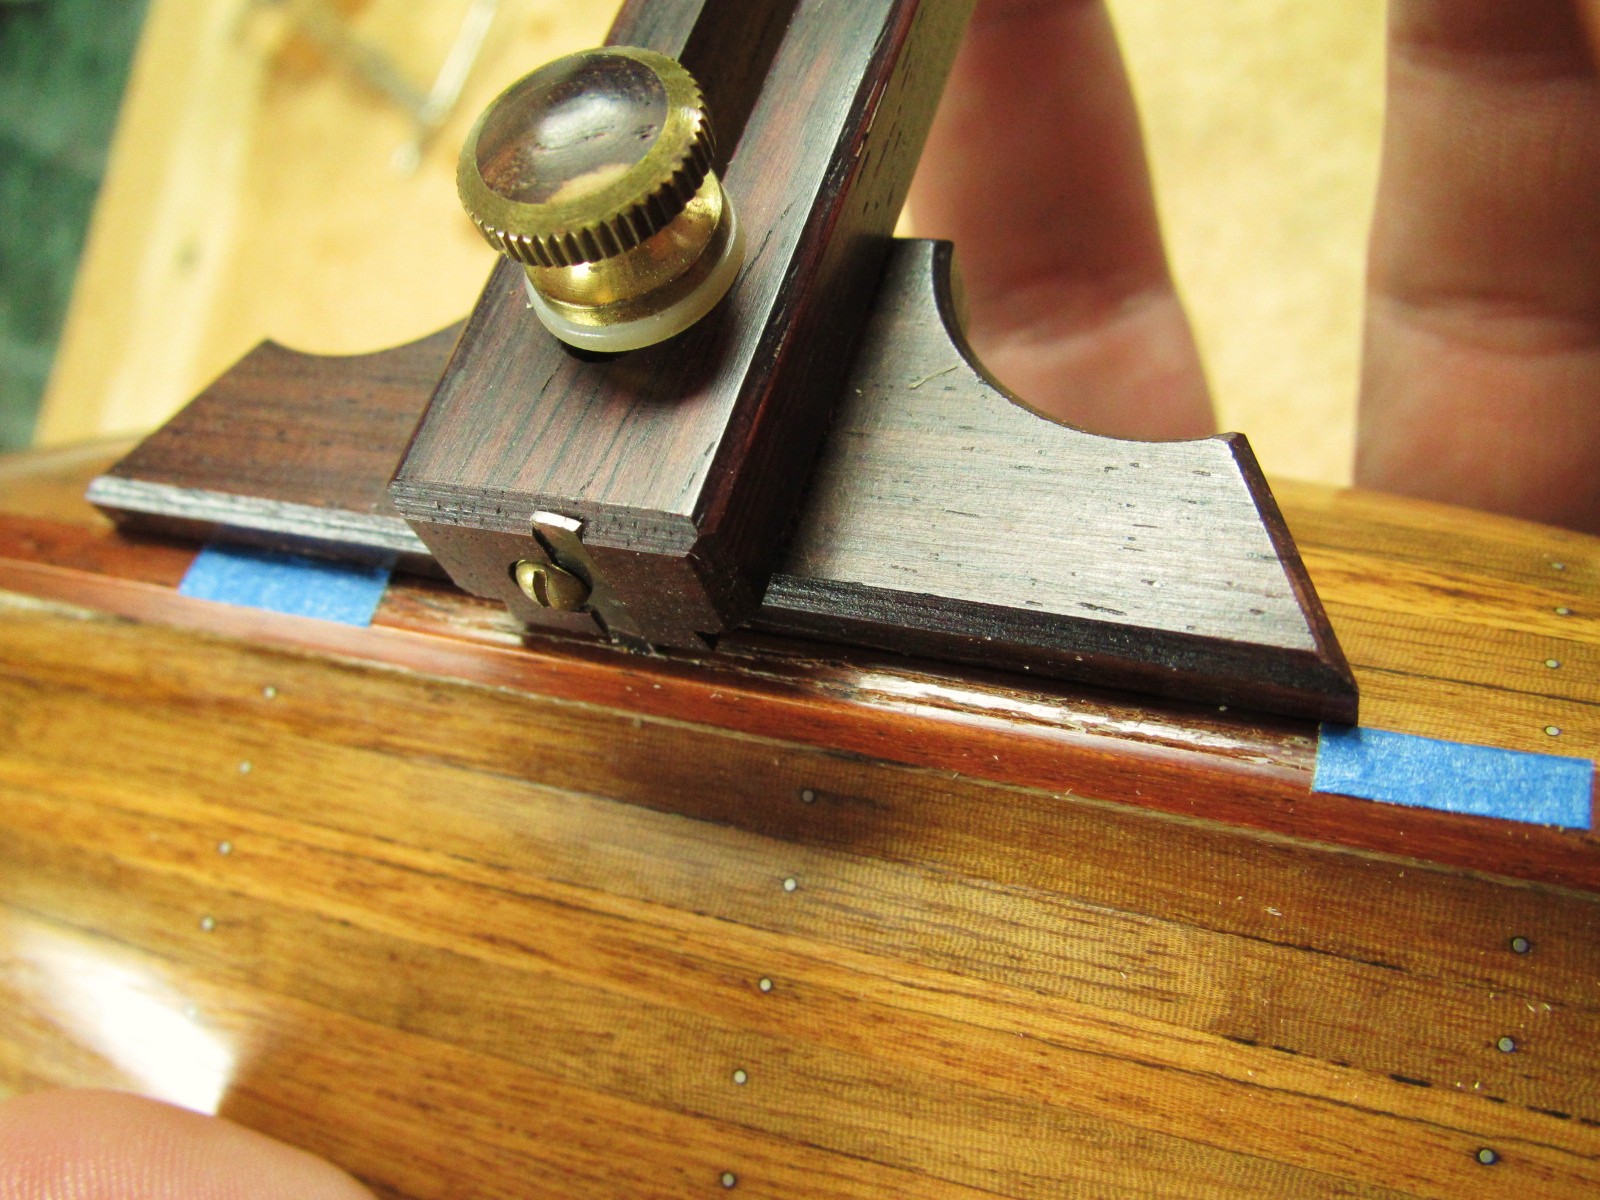
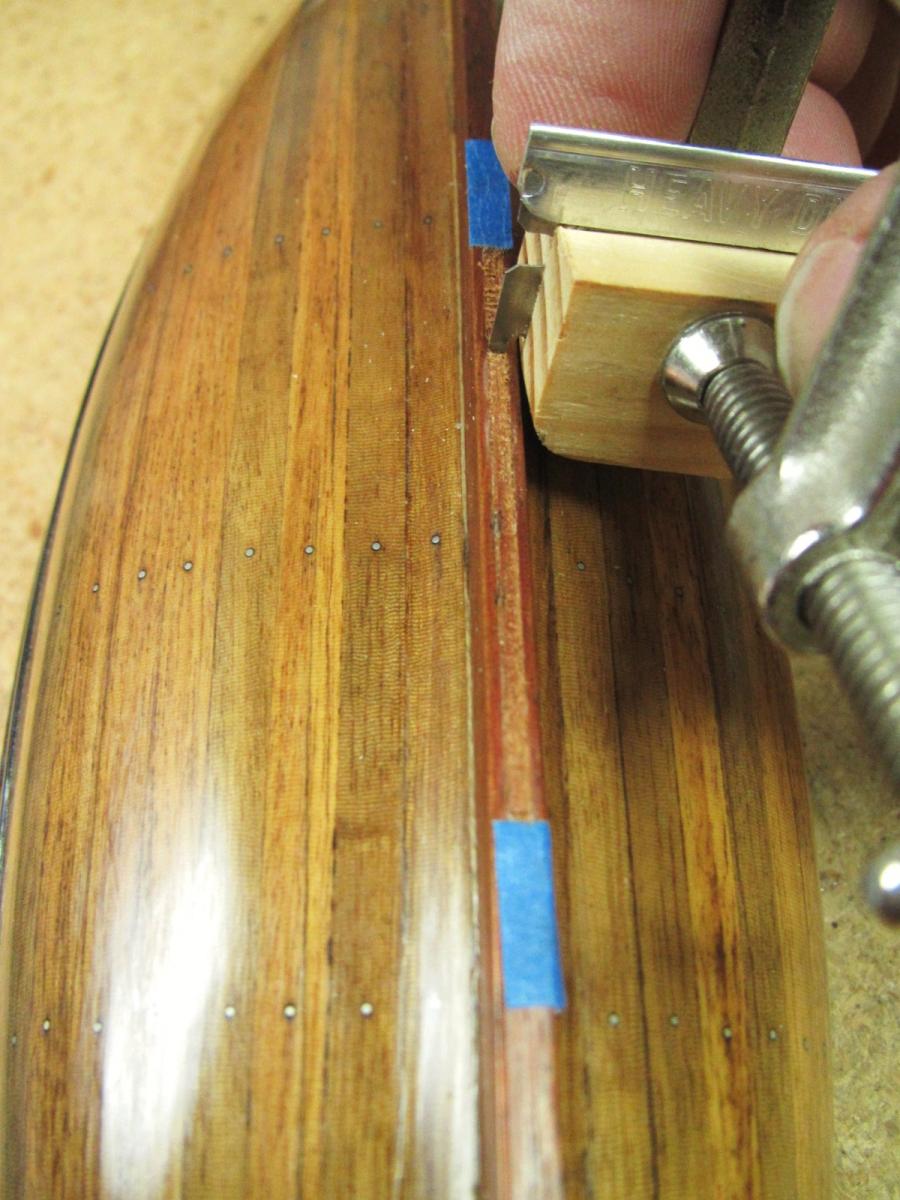
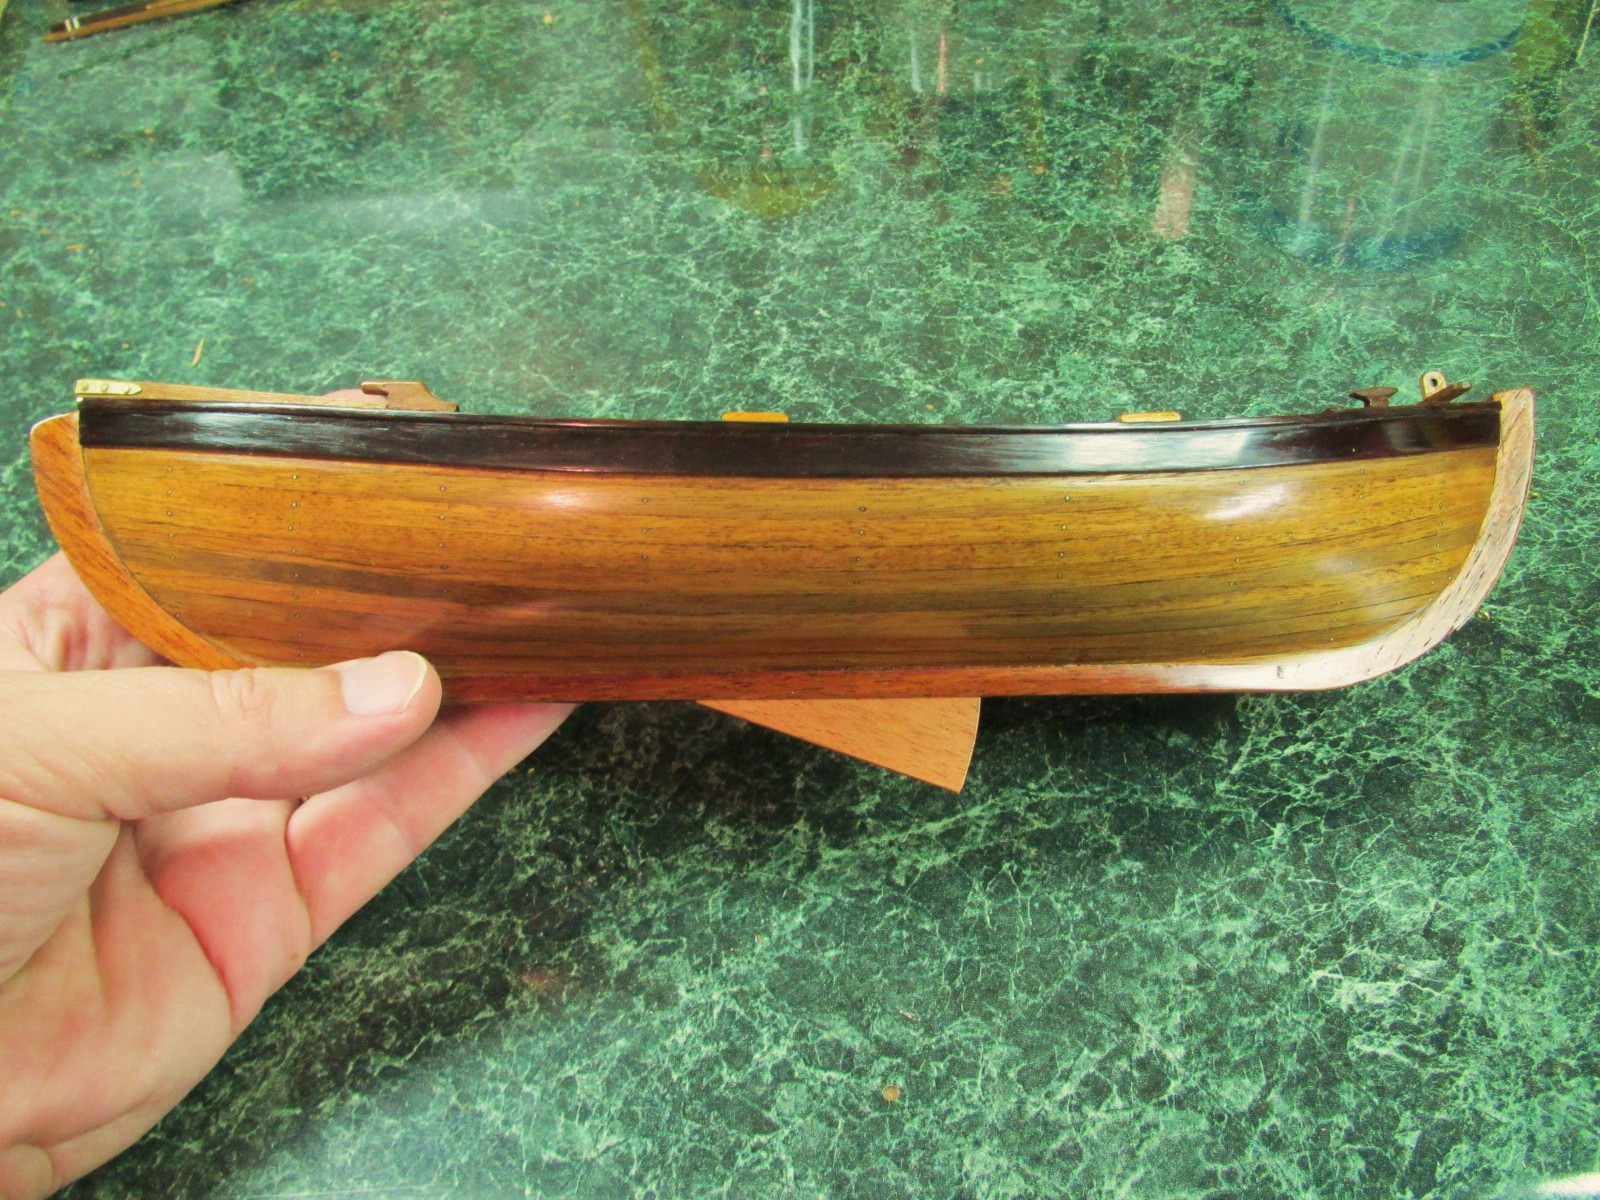
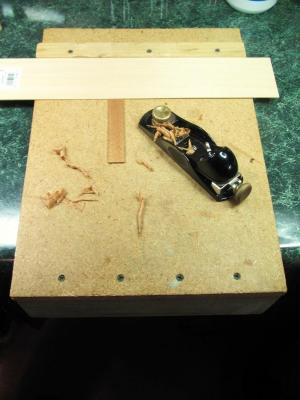
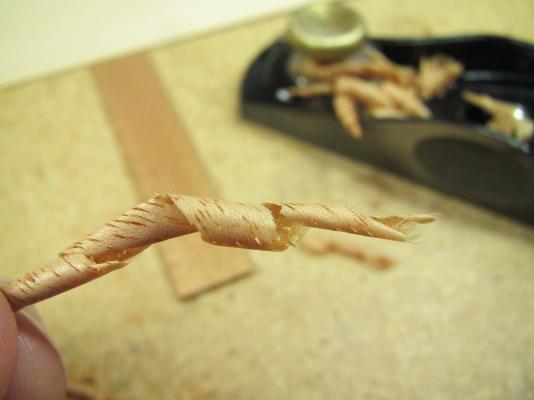
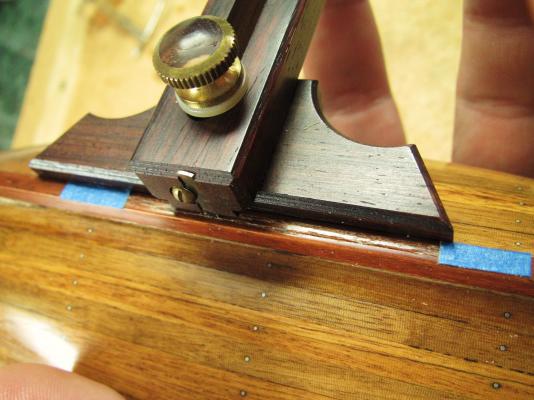
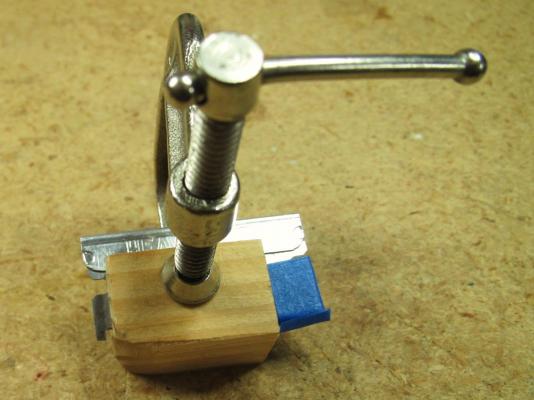
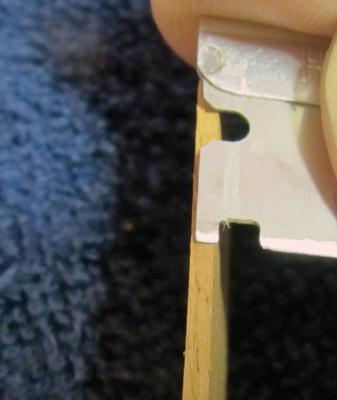
11) Centerboard This whaleboat kit has a large centerboard case but the plans and instructions make no mention about the actual centerboard. Looking at the Model Shipways plans for the New Bedford Whaleboat, I compared its centerboard length to the overall boat length and using that proportion, decided my whaleboat's centerboard should be a hair over 2" long. The keel is about .150" thick and I planed down a piece of mahogany until it looked about the right thickness for a centerboard (.070"). I love using a handplane and any excuse to use one is a good one. I use a bench hook to plane, saw and chisel small pieces. This hook uses a 2x4 front edge and a paint stick as a fence that are fastened with countersunk screws. To plane pieces thinner than the paint stick, you can use a thin sheet of wood as an 'auxiliary' fence. When taking very thin cuts, I skew the plane at about the angle shown. Being a handplane junkie, I can't look at this without grinning! Full length tissue thin (less than .002”) curls! The large pores in mahogany make a Swiss cheese effect. Give me a beer and I could have fun just doing this for for a while. I figured it would look better to make a slot in the keel for the centerboard rather than just glue it to the bottom of the keel. To start the slot in the bottom edge of the keel, I marked the start and end of the slot with tape and used a small-bladed marking gauge to score the sides of the slot. A razor blade was modified with a Dremel cut-off wheel to make a scraper tooth slightly narrower than the centerboard so it would be less likely to chip the centerboard slot's edges. A kerf was made in a scrap of wood with a razor saw and the razor blade was positioned so the tooth would be centered in the keel when the wood block was against the side of the keel. A clamp holds it in place. The grain in the wood scrap is perpendicular to the kerf to get a better grip on the razor blade and avoid slippage. Some tape was wrapped around the other end of the exposed razor blade. I probably should have spent an extra minute looking for a longer scrap of wood. The contact face on the wood scrap was sanded smooth and rubbed with paste wax. It worked pretty well. The razor blade tooth was stabbed into the ends of the slot to mark it off before scraping out the slot. I used the tip of the razor saw to further deepen the sides of the slot as it was carved out. The finished slot. So now I'm trying to figure out how far a centerboard would stick out. The one in the New Bedford Whaleboat sticks out really far leaving a gap above the back top edge. The keel on this AL kit is much taller than the keel of the NB whaleboat's, so with a pivot up in the centerboard case, I don't think there would be a gap. Maybe something like this? I made a shorter centerboard because the other looked big. Is this too short? Maybe something in between? Any comments would be welcome and appreciated. In Chapelle's “American Small Sailing Craft”, Figures 15 & 16, he compares whaleboats from the the 1st half of the 19th century with the 2nd half. My AL kit looks more like an early one while the NB whaleboat looks like the later one. Supposedly the early ones had no centerboards....hmmm. The earlier whaleboat has a taller keel than the later one.

- 515 replies
-
- 5
-
-
- artesania latina
- whaleboat
- (and 1 more)
-
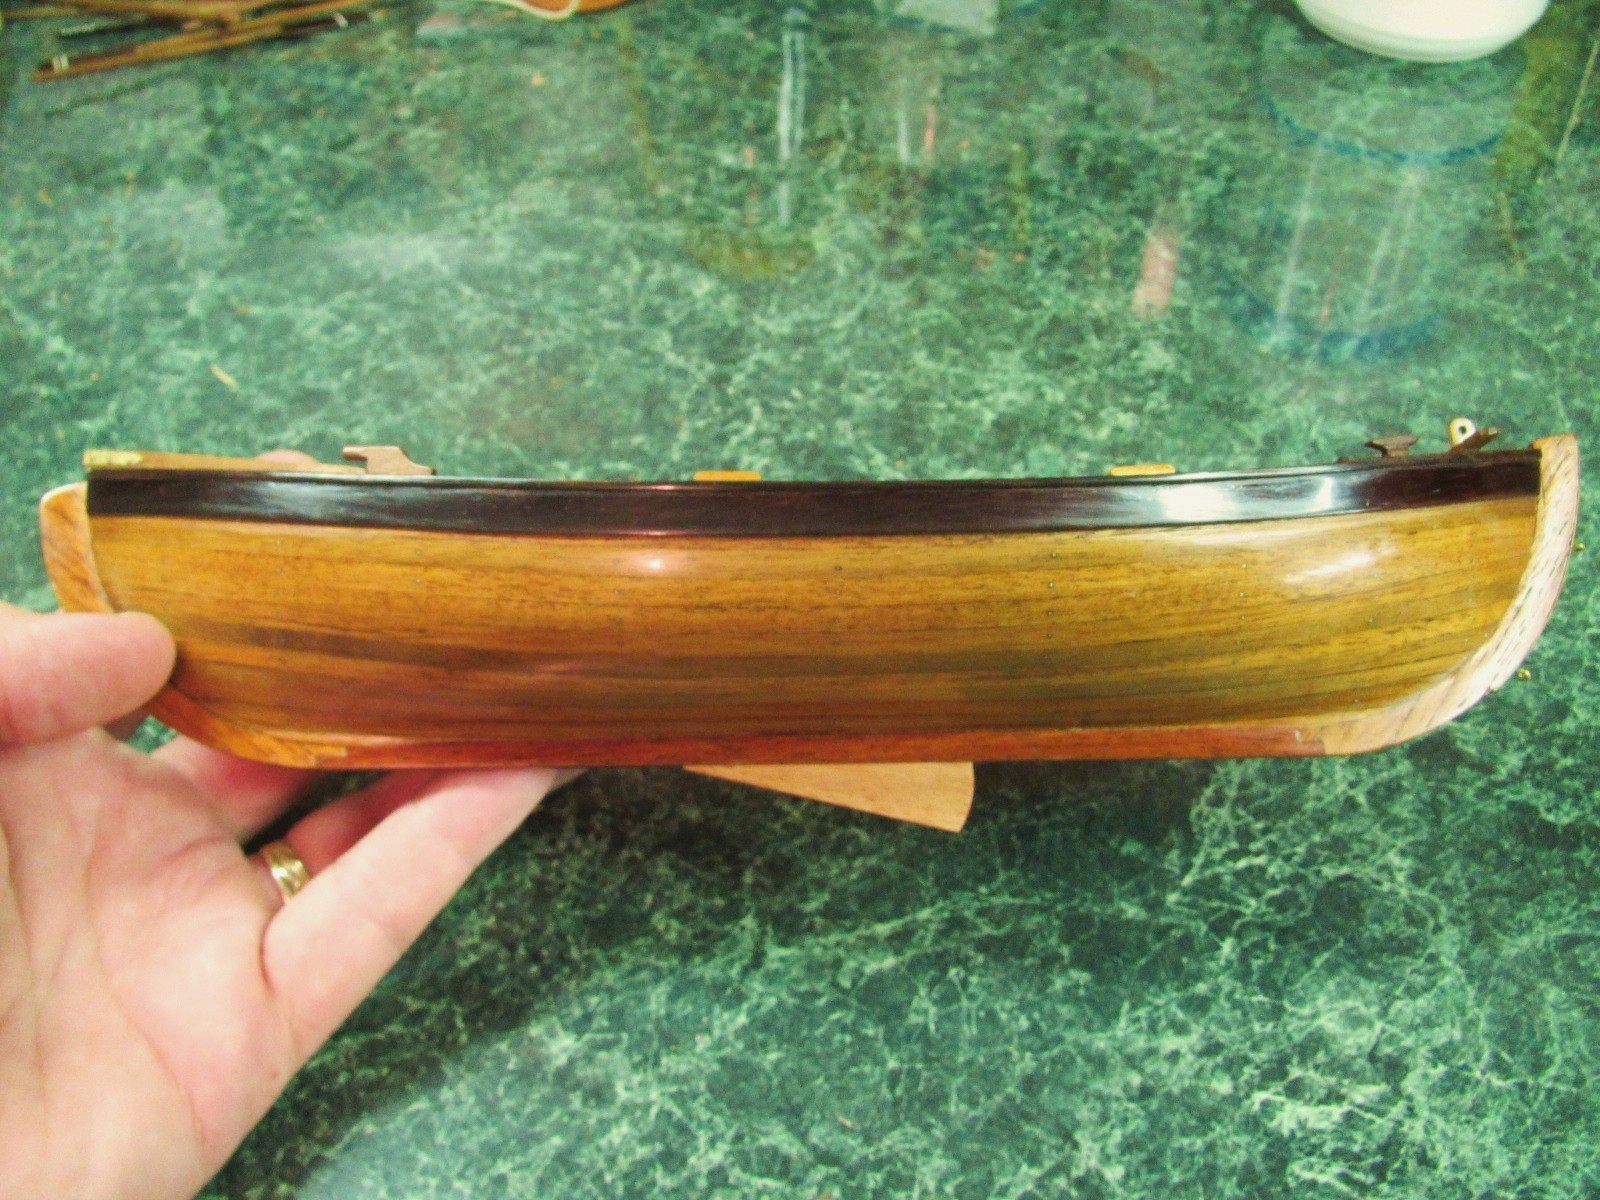
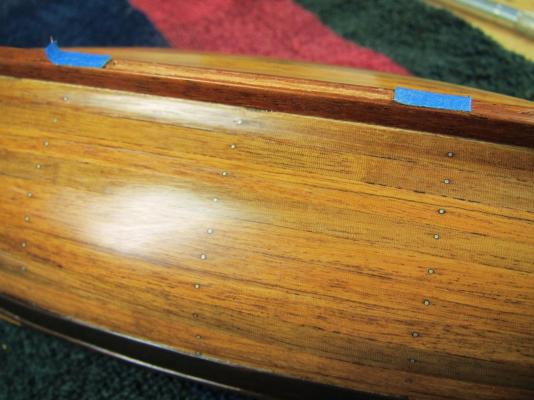
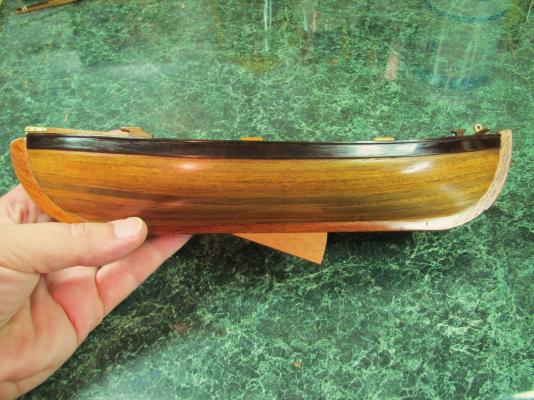
Sorry for the delay in posting. Last week was hectic and expensive. The 50 gallon 12-year gas water heater started leaking at, you guessed it, 12 years. It about killed me getting the old one out of the basement! All 3 dogs needed to get updated on all their shots, exams and rabies tags, and my front tire got a bulge in the sidewall and needed replacing. Been doing a lot of yard work too and have been busy at work. Still, it's all good and I'm happy to be working on the boat again. I decided that the finish was too uneven in the grooves of the wales and sanded the whole thing and lightly scraped the grooves with a razor blade. Wet-sanded the worst areas with 400 grit and followed up with 600 grit. Then switched to 1500 grit and baby oil. I was tempted to leave it at that -it looked good. I decided to go gloss again and padded one coat on to seal it from handling because I decided to cut a centerboard slot. I may "cheat" and spray the last coats of shellac rather than French Polish them to get a nicer coverage in the groves. Matti and Michael and others - Thanks for your input for my next build. I will be building the Golden Hind next but eyeing the stern of the Eagle as a possible side build after the dinghy. Keith - We haven't heard from you in a while and I hope you are well and just busy in your gardens. Sending healing thoughts your way since you were having a rough spell last we heard. Take care my friend. JP- I performed an experiment and had some Shiner Bock and then played guitar. I think I sounded better!
-
Hi Mark! What brand of brown-bottled liquid anesthetic do you recommend for shop injuries? I should get some just for medicinal purposes! I have some miniature planes but, my go-to plane for something like beveling corners is an adjustable mouth low angle block plane. The adjustable mouth really helps make clean precise cuts, and the extra heft glides through small pieces like butter. A v-grooved bench hook to hold the small piece would be handy.
-
Hi Matti, I've been meaning to ask - is your new avatar the Wasa crewman "Ivar" that the forensic artist did the facial reconstruction of?
-
Hi Matti - Great job explaining. I have not done any shading (other than sprayed sunbursts on guitars) or pastel work before. Looks like I need to start experimenting! Your results are great! I was thinking it might be cool to build the Wasa to look like it does now and your shading techniques would go a long ways to pulling off that sort of look. Thanks for explaining!
-
Matti- I really like those last two pictures. The red shows up better plus it just looks cool at that angle! Keith B- Is there any chance you could start a build log for the Golden Hind? That is going to be my next one to "warm up" for the Wasa. Great buy on your Wasa! Matti- You just posted your last picture with the stained and painted lower planks as I was posting this. That looks amazing. Can you maybe do a short pictorial on the steps involved? That is a great look!