AntonyUK
-
Posts
1,190 -
Joined
-
Last visited
Content Type
Profiles
Forums
Gallery
Events
Everything posted by AntonyUK
-
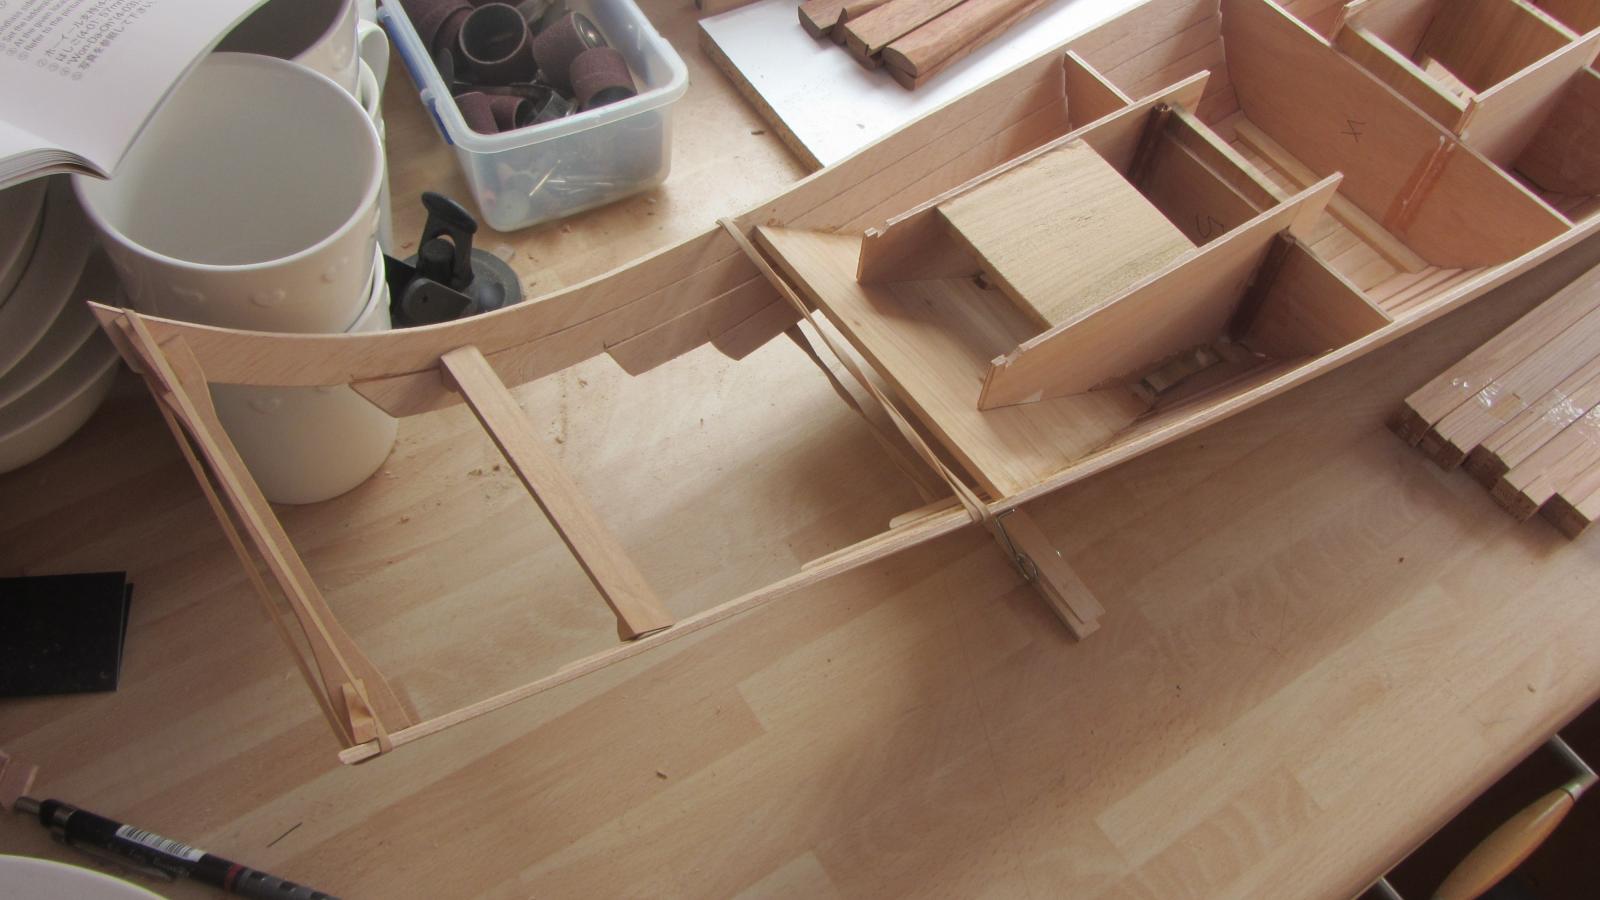
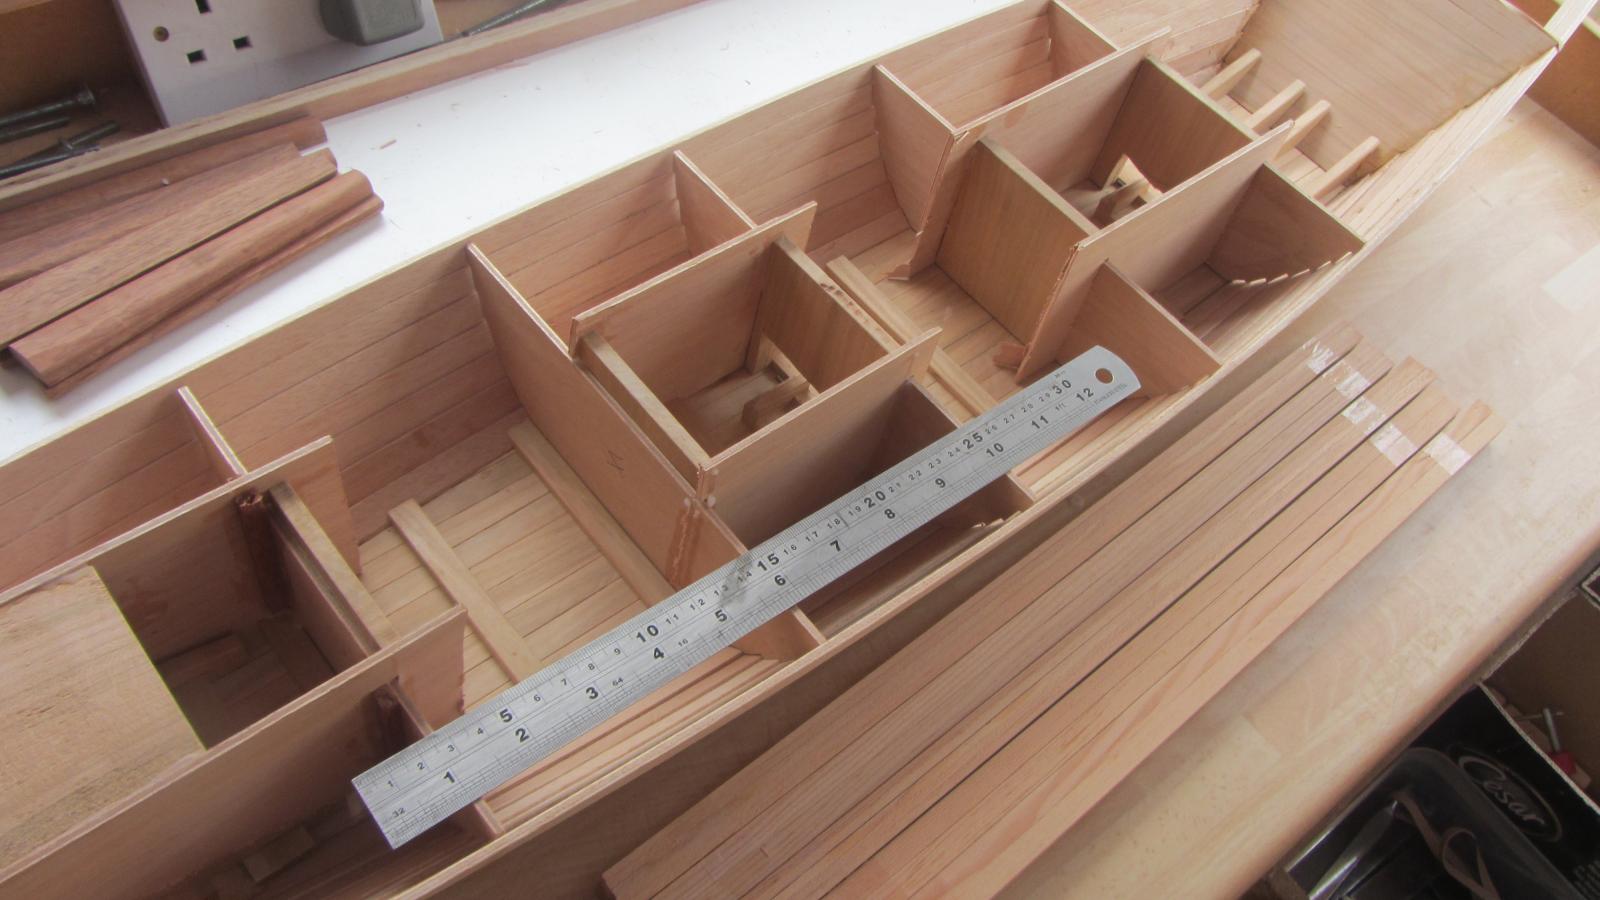
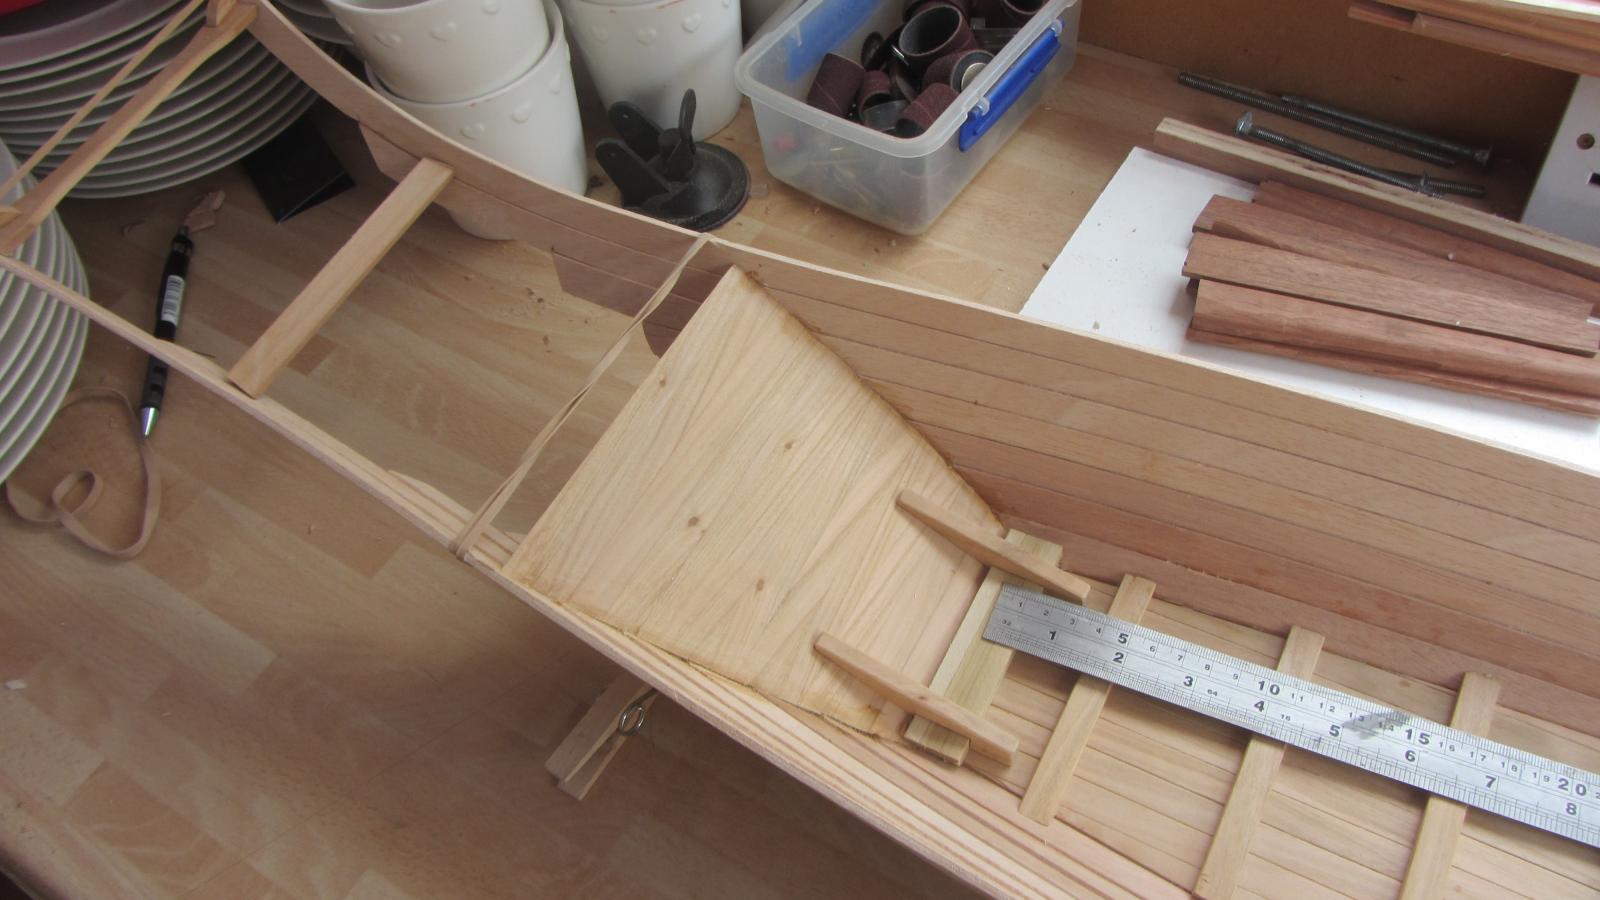
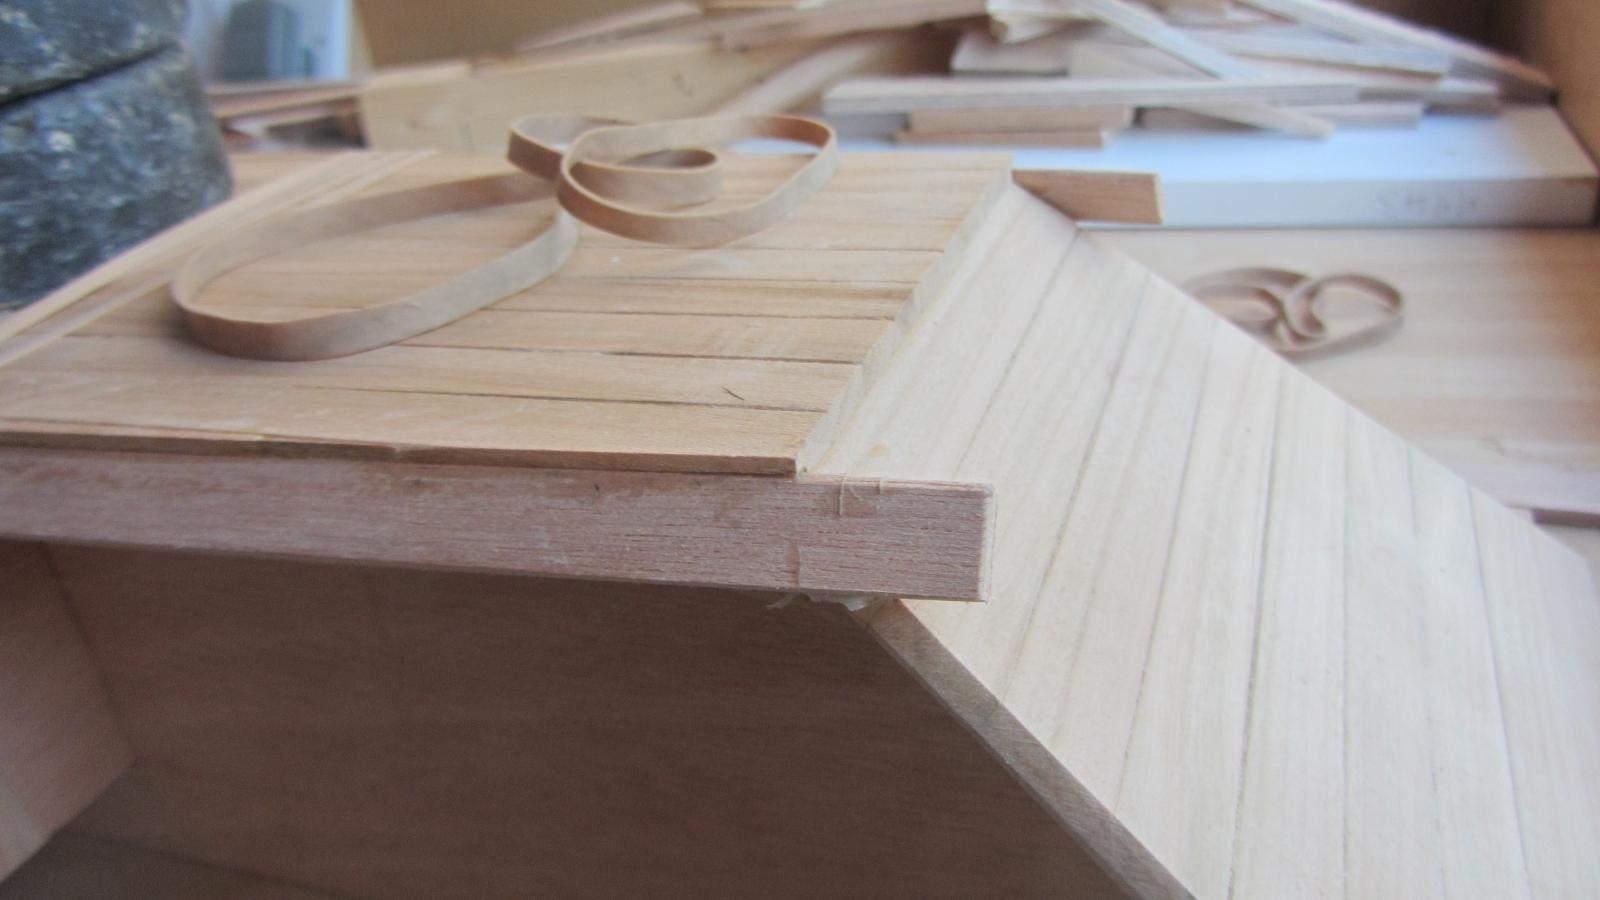
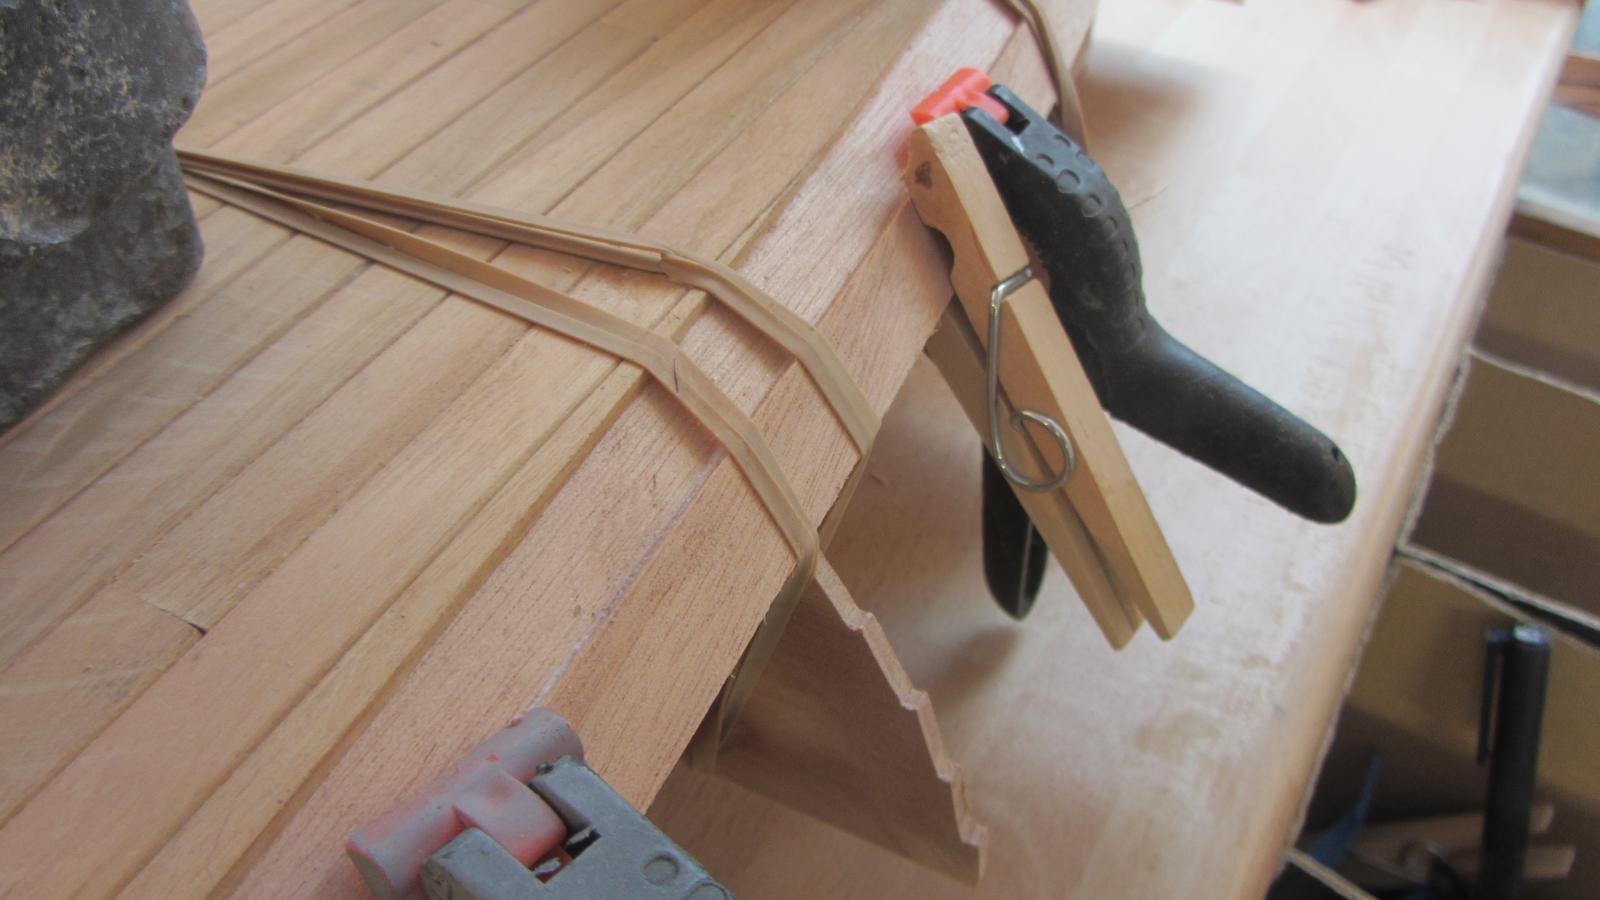
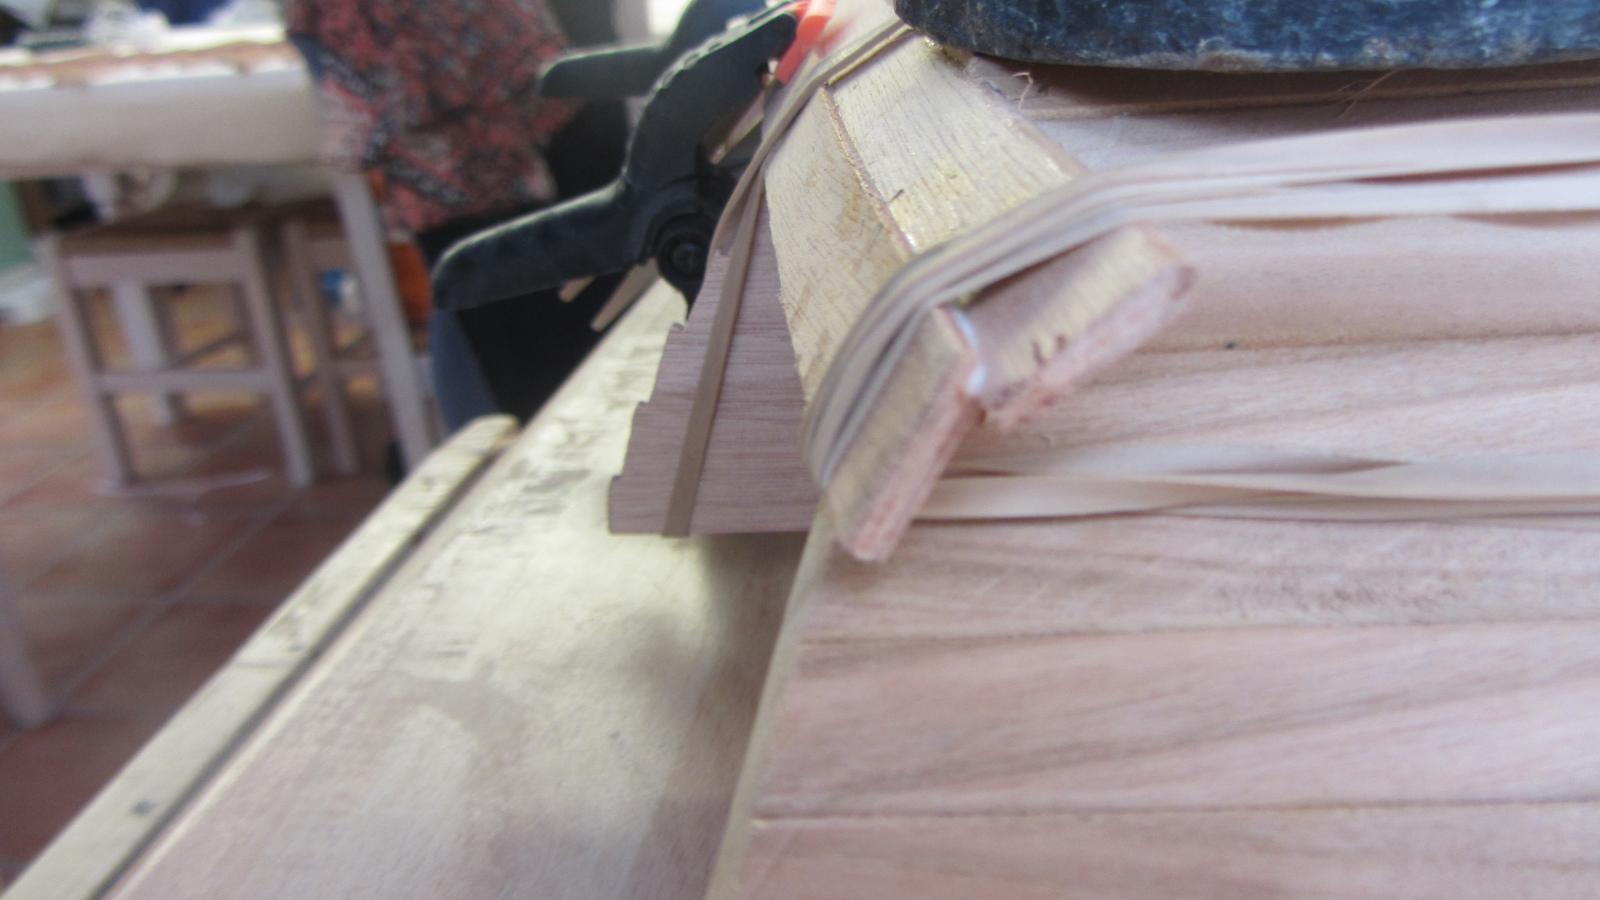
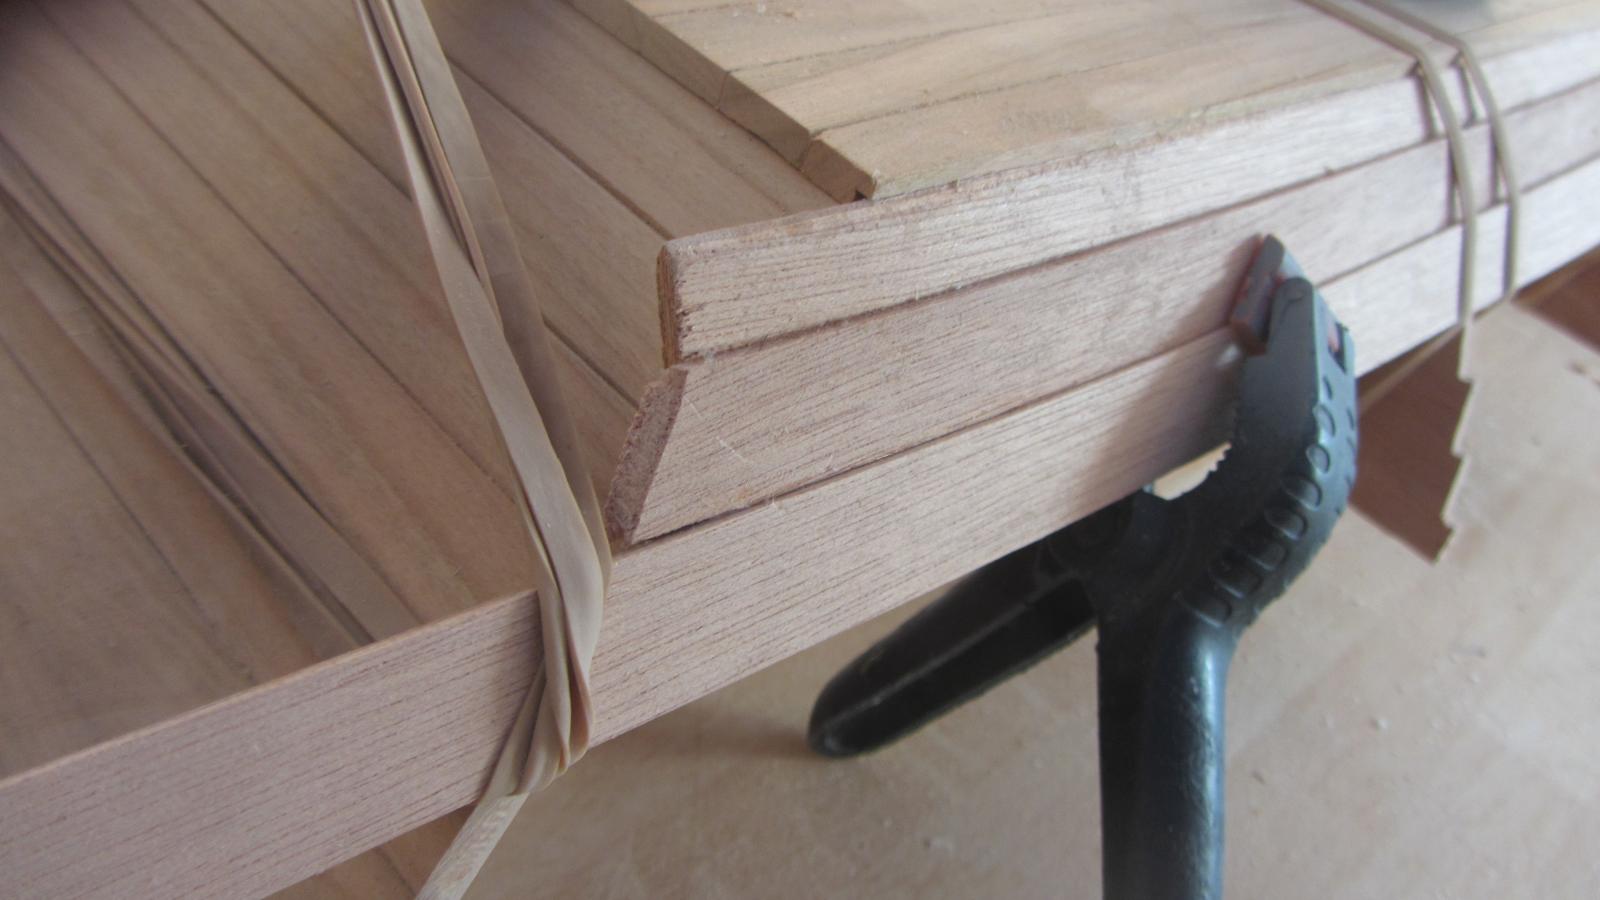
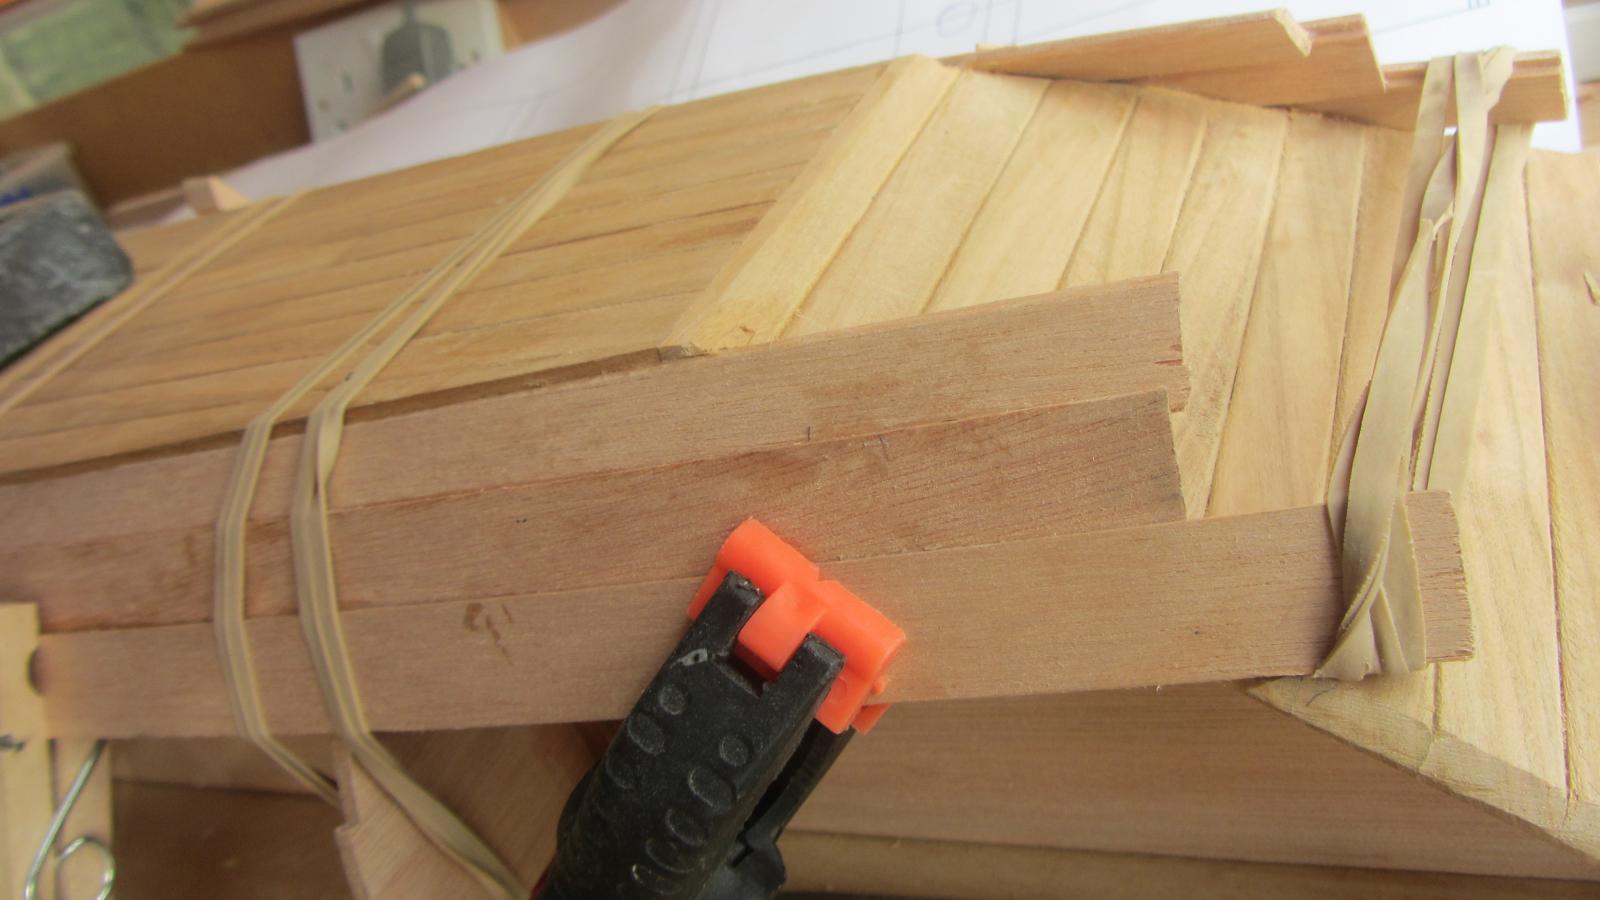
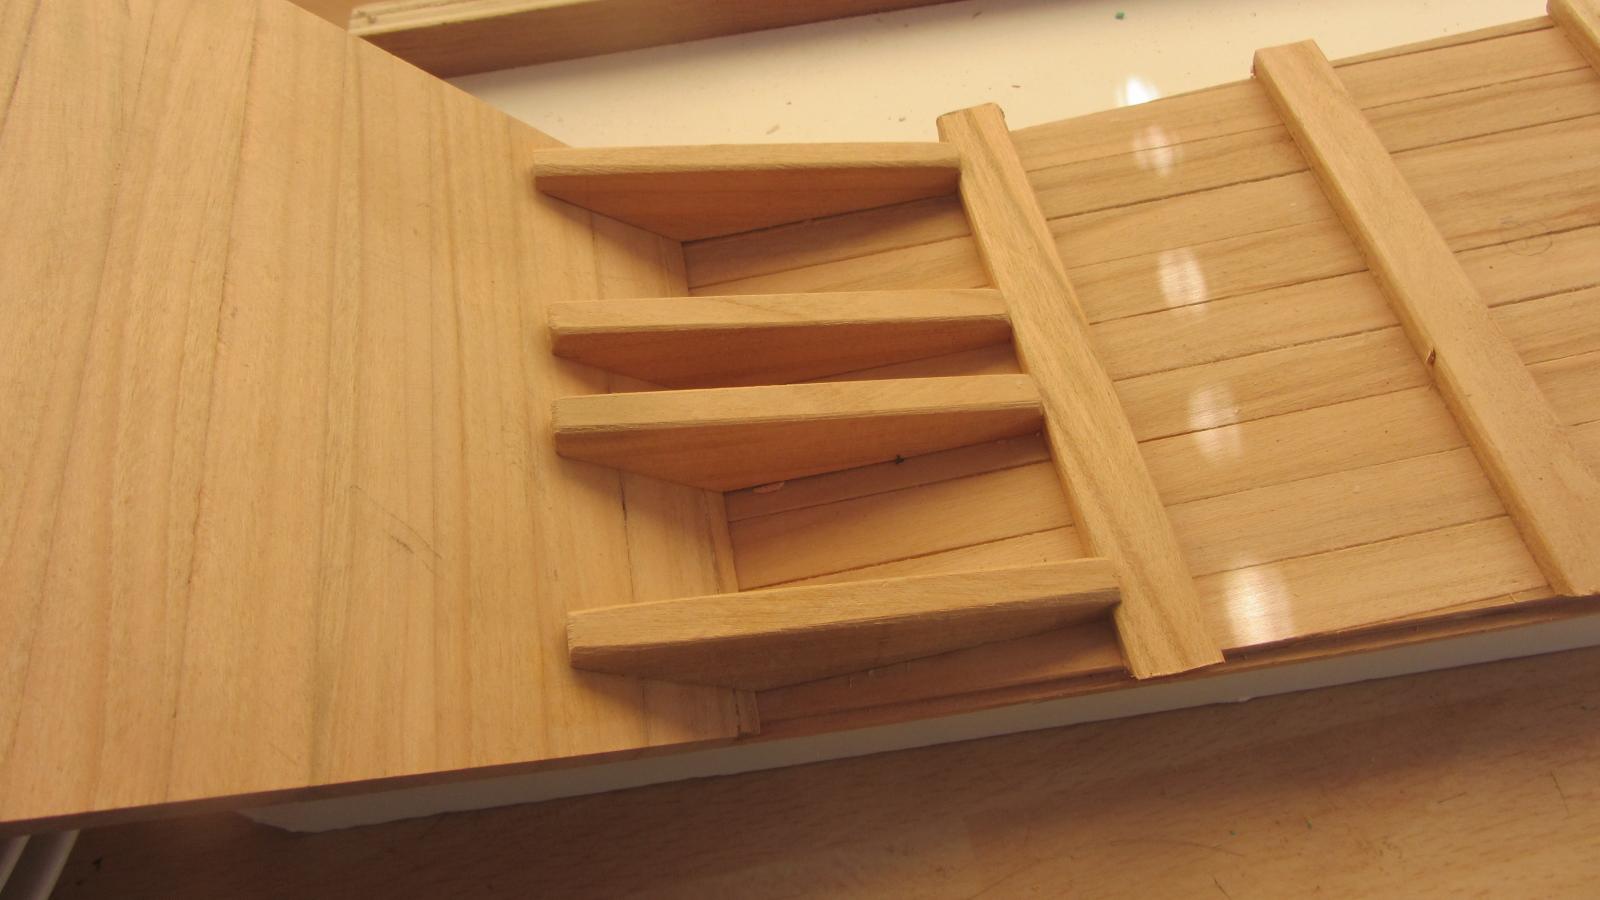
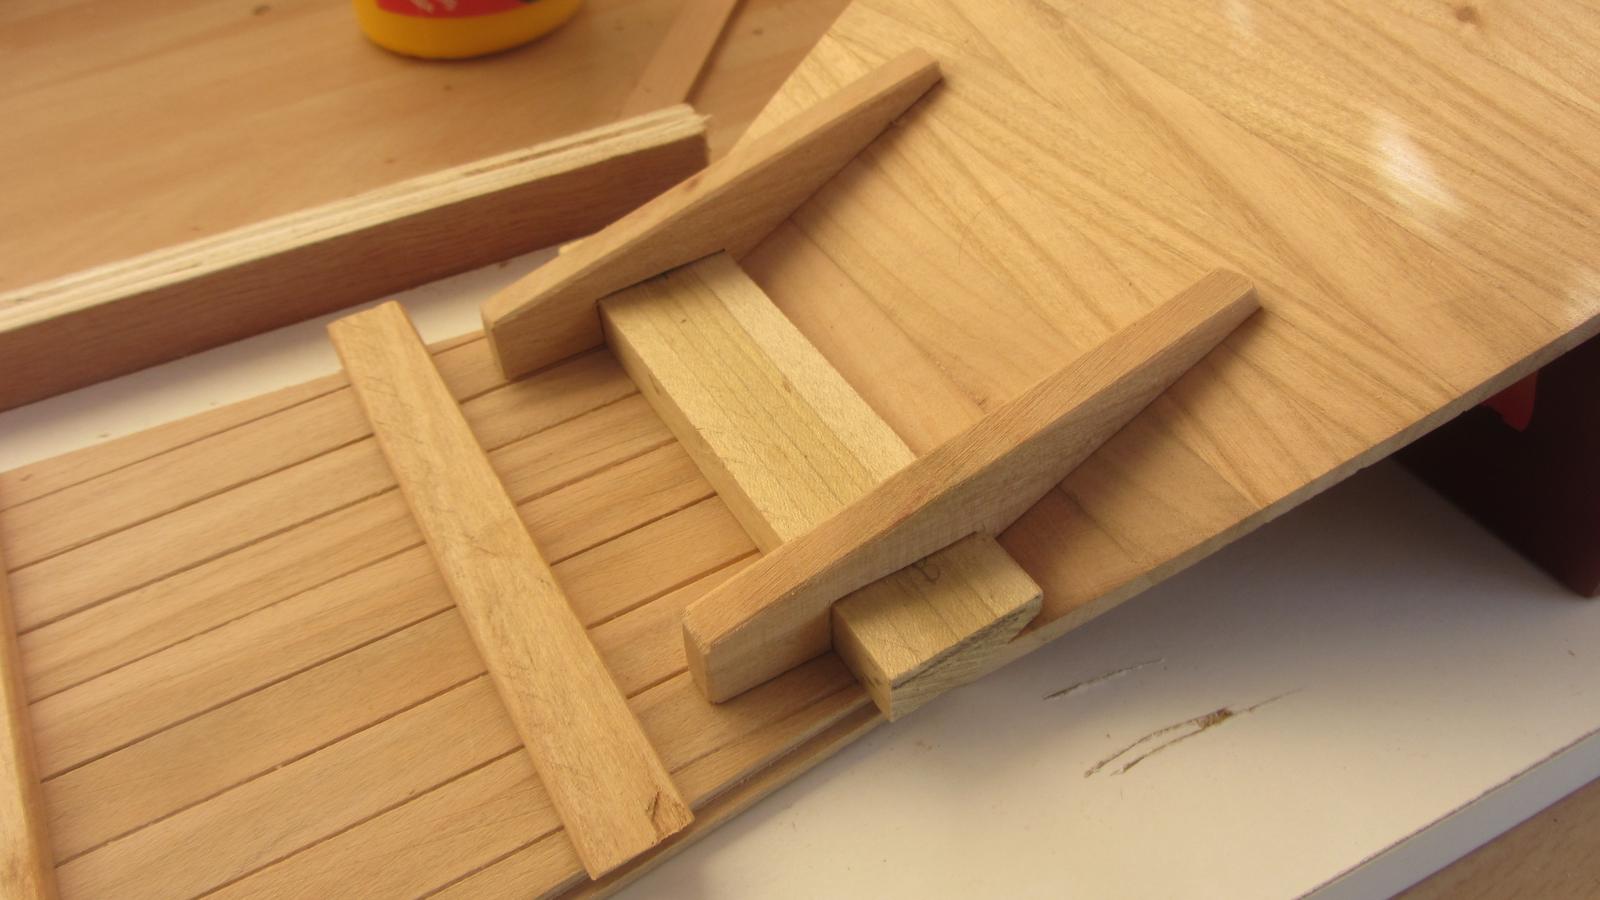
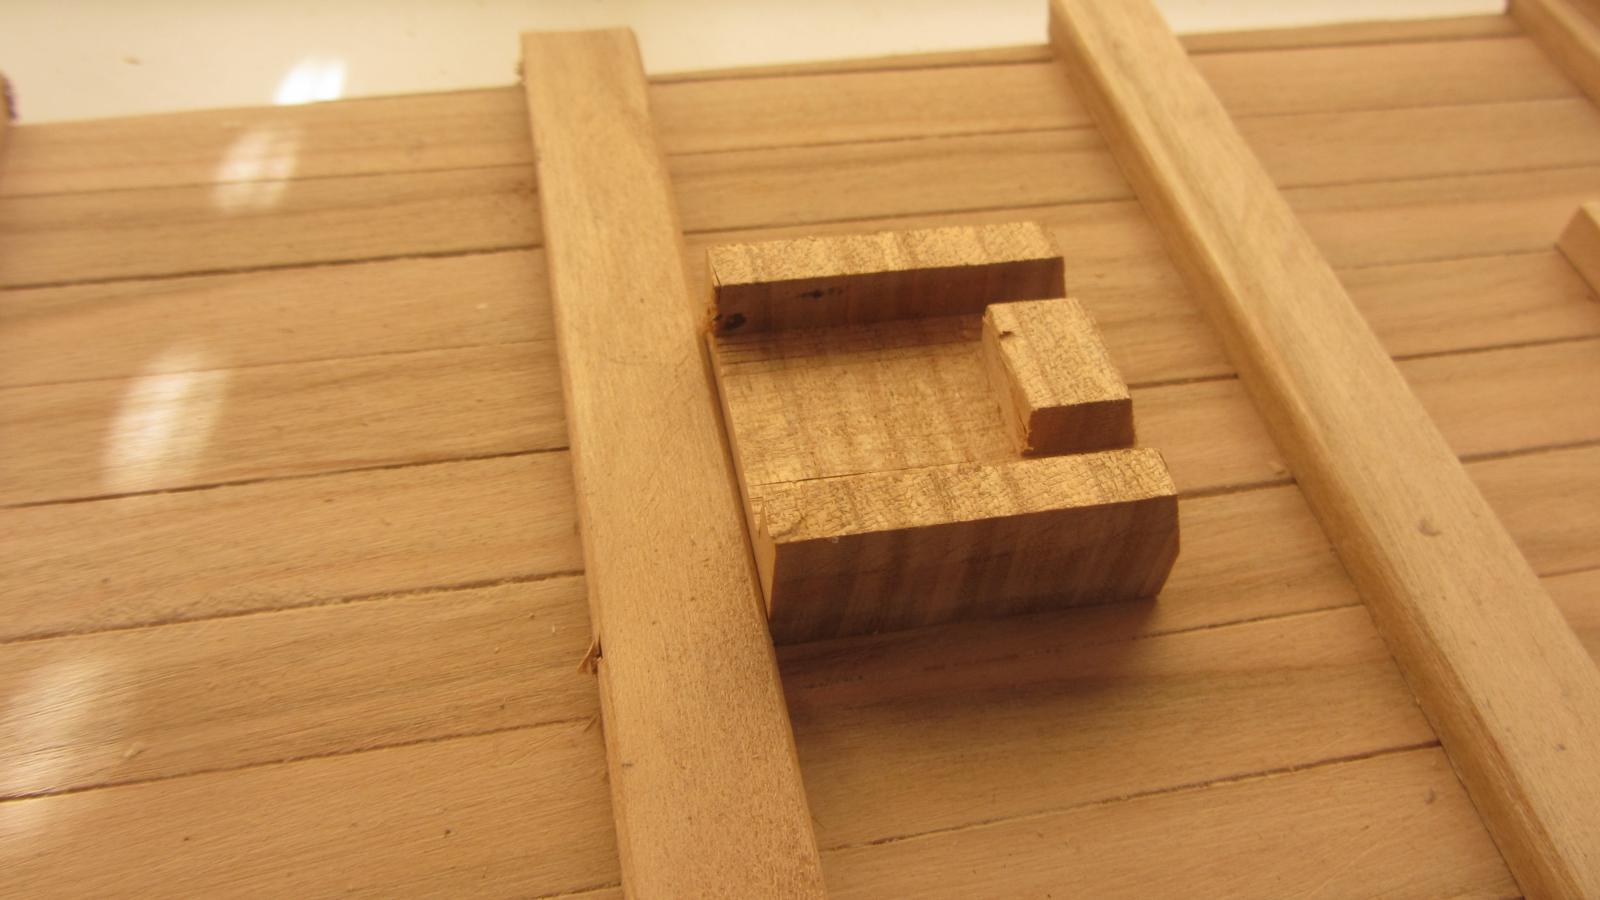
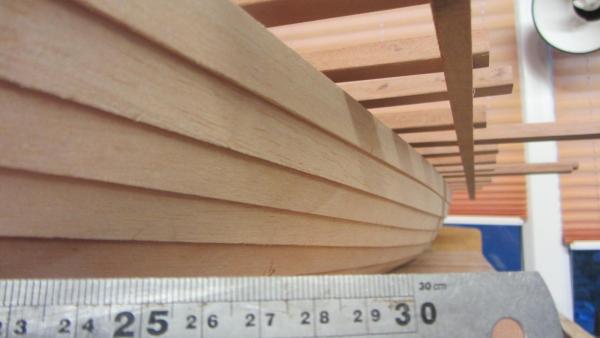
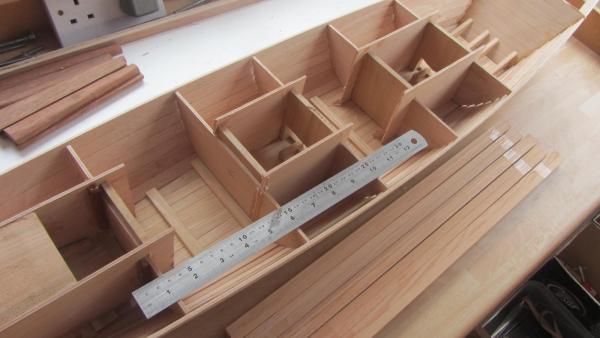
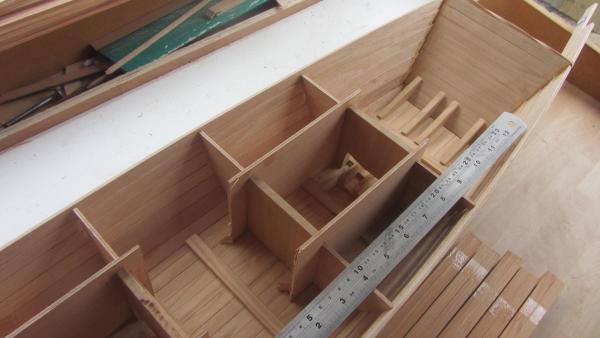
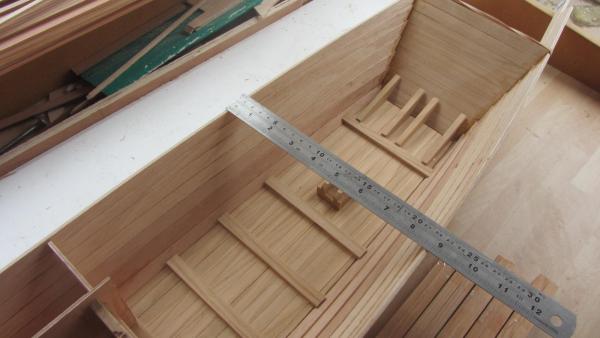
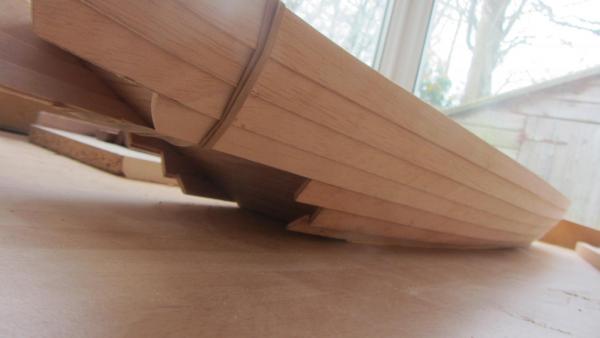
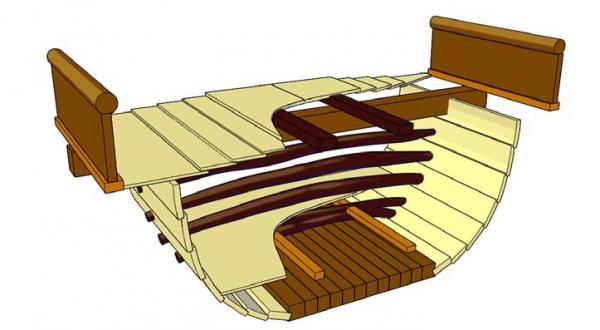
 Hi. Another update and whats next.. Planking now completed. Quite happy with the result. The deck beams and supports.. Not glued or trimmed to size at this stage. Side view of the planking. The stern area. Spacers not yet glued in position. The Tempory frame that I used to plank the hull with has now been cut into 3 sections. The gap's between them are for the hull supports. Close up of the hull on the inside. The bow fas not yet been trimmed as I need to finish the deck before this can be done. Another picture..... Supports removed. look like the hull is holding its shape quite well. Stern section. the bottom 3 planks are yet to be trimmed to size. Inside the bow area. Next I need to finish the Deck and its bits. Then I will start work on the Hull supports. This should be fun. Especially as I intend to do a cutaway to show its construction. The supports were held to the hull with huge nails made from wood and pinned with small tree nails. That's it for now.. Regards Antony.
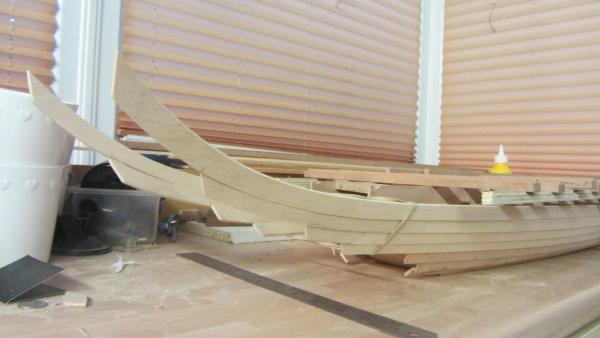


- 99 replies
-
- 18
-

-
- turtle ship
- korean
- (and 1 more)
-
Hi Dave. Nice model for a first time build. And welcome to MSW. The faring of the frames/bulkheads can now be finished. I normally do this after the stage you are at now. There are plenty of build logs of the Lady Nelson on the forum. Read up and look for issues they have had during the build. A very nice start and I'me real happy to see you making sure everything is square at this stage. Will you be filling the spaces between the bulkheads with timber to help with the lines and planking ?. Will follow along on this one. I like cutters. And the lady Nelson has nice lines. Regards Antony.
- 79 replies
-
- 7
-
-
- lady nelson
- amati
- (and 2 more)
-
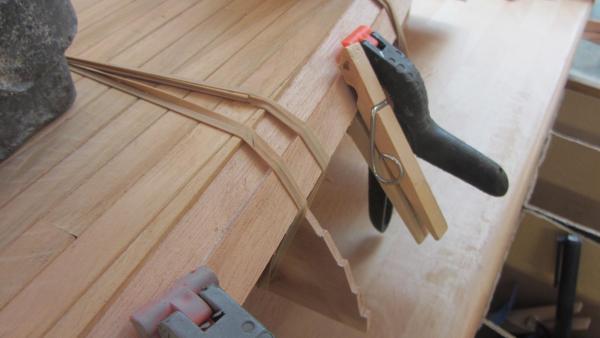
Hi. A little update. Started planking the Hull. First strip on each side. The strips are only glued to the Bow and Stern bulkheads and to the Base. Second plank on each side. Again only glued to the Bow and Stern Bulkheads and to the first plank. Close up of the plank overlap. While waiting on the planks to dry I started on the decks beams. All cut to shape but not in length yet. Not Glued at this point as I will cut them to length first. This is the Bulk timber that runs down at each side. Laminating the two planks will hold its shape. Note Also curved up at each end. Third planks in place. Hoping the hull will remain in shape after removing the building jig when all the planking is done.... might make some temporary external bulkheads to help before removing. That's it for now.. Regards Antony.


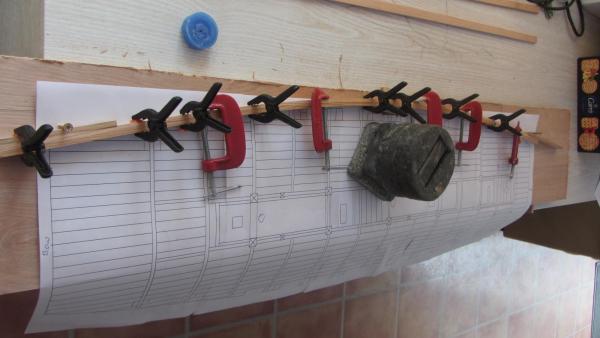

- 99 replies
-
- 17
-
-
- turtle ship
- korean
- (and 1 more)
-
Hi Walt. There has been a few issues lately with the quality of there plywood being very fragile and twisted. I have seen a few build logs on MSW that the builders have had to replace items of plywood. Make your choice and inspect the kit contents making sure that everything is there and is quality usable. If not take back to the shop were you purchased it. I have there Bounty to build. My kit looks Very good. So yes there kits are good for the bigginer at a good price as Brian pointed out. Follow the purchasing rules. Check kit contents... Check quality... Remember that we the customers that have rights. And don't put up with trash kits. All the best. Regards Antony.
-
Hi E&T. Nice research.. Down to the details as always. And the ships skylights and wheel are stunning. What a brill idea for building the ships wheel. The wheel spindles look good and you don't have a lathe. WOW And it's nice to see you back on the forum Regards Antony.
- 346 replies
-
- 3
-
-
- terror
- polar exploration
- (and 2 more)
-
HMS VICTORY 1759 by isalbert
AntonyUK replied to isalbert's topic in - Build logs for subjects built 1751 - 1800
Hello Isalbert. Wonderful work. You are a very talented person. Working to very fine details gives your ship a quality finish that I have yet to master. Regards Antony. -
Hi Wim. That is one fantastic build. My first attempt at ordering the ship failed. Out of stock... After 5 weeks. Yea right. But they did refund me. So all's well. Decided that I cannot wait for the kit to arrive so I started on a scratch build. Your model will be the backbone of my scratch But I intend to build it in the Korean method...no bulkheads or frames. Again what a wonderful ship. Regards Antony.
- 97 replies
-
- 2
-
-
- Turtle Ship;
- Korean Turtle War Ship
- (and 1 more)
-
Hi Navymast. You have a fine model that you are making. What timber are you using ? Regards Antony.
-
Hi Bob. It's shame on the manufactures that put such rubbish in our kits that we pay lots of money for. There are good manufactures out there that realy do care and they try there hardest to maintain the quality of there kits. One good reason to get into scratch building. Keep up the good work. Regards Antony.
-
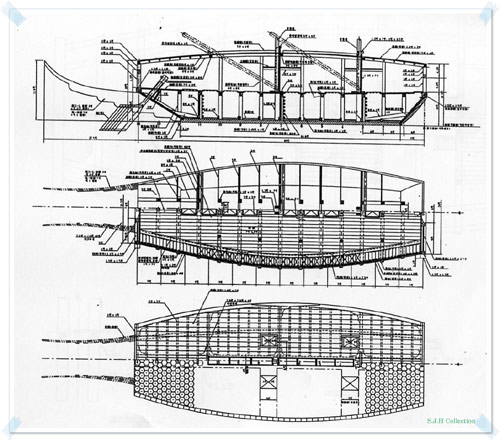
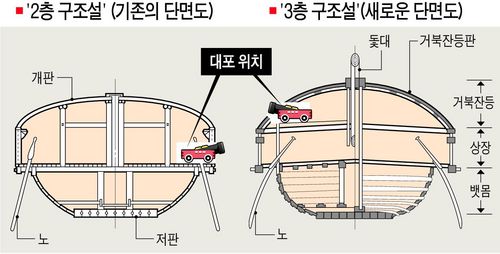
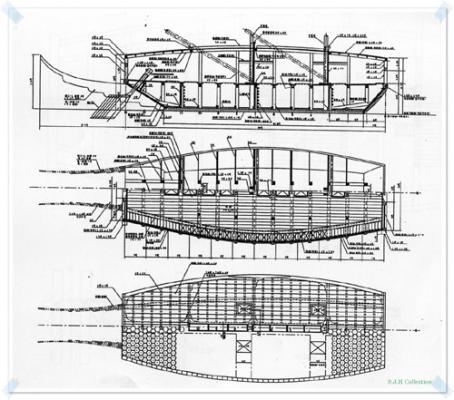
Hi. Just a little on were I have researched the information and construction methods. Some very intresting reading here. http://anthropology.tamu.edu/papers/Sasaki-MA2008.pdf page 38 and 40 show the basic method of hull construction. https://books.google.co.uk/books?id=ULh8BgAAQBAJ&pg=PA37&lpg=PA37&dq=korean+ancient+ship+building&source=bl&ots=6k05sVn3Ms&sig=fQa031fB0XcZHWltlczovosclAM&hl=en&sa=X&ved=0ahUKEwiq-7WxsLTLAhXBWxQKHbLbBHwQ6AEIPjAK#v=onepage&q=korean%20ancient%20ship%20building&f=false A drawing from this web page https://namu.wiki/w/거북선Showing a cross section of the hull. http://www.yi-sunsin.com/03ship/02_03_01.jsp This web page is in Korean.. but you can see there are a lot of differences between replica ships and models. The timbers below are the bow timbers that were pined to the front of the ship for ramming protection. Rough carved for appearance. Bow knees in place. This is just guess work But it is known that the Koreans used knees in there ship building. Stern Knees. A mast step. The mast on the Turtle Ship could be lowered down. and there must been some type of box to hold the mast base in place. again this is guess work. Step only placed and not yet fixed. This drawing shows the mast in the lowers position. But other information shows the mast pivoting from the hull base. Well that is about it for this post.. Regards Antony.


- 99 replies
-
- 12
-
-
- turtle ship
- korean
- (and 1 more)
-
Hi Bob. Got my seat booked. Just need the pop corn. Have seen this kit in a local shop. Looks nice. Regards Antony.
- 206 replies
-
- 5
-
-
- battle station
- panart
- (and 1 more)
-
Hi Gerhard. Agh found it. I was looking for Cures of the dark seas. Thanks. Antony.
- 99 replies
-
- 5
-
-
- turtle ship
- korean
- (and 1 more)
-
Hi. Thanks for the likes.. Have done a bit of digging on Google but I am unable to find anything on the Film listed below in Dave (Davyboy) Has anyone seen this and was it called "The curse of the dark seas" Regards Antony.
- 99 replies
-
- 3
-
-
- turtle ship
- korean
- (and 1 more)
-
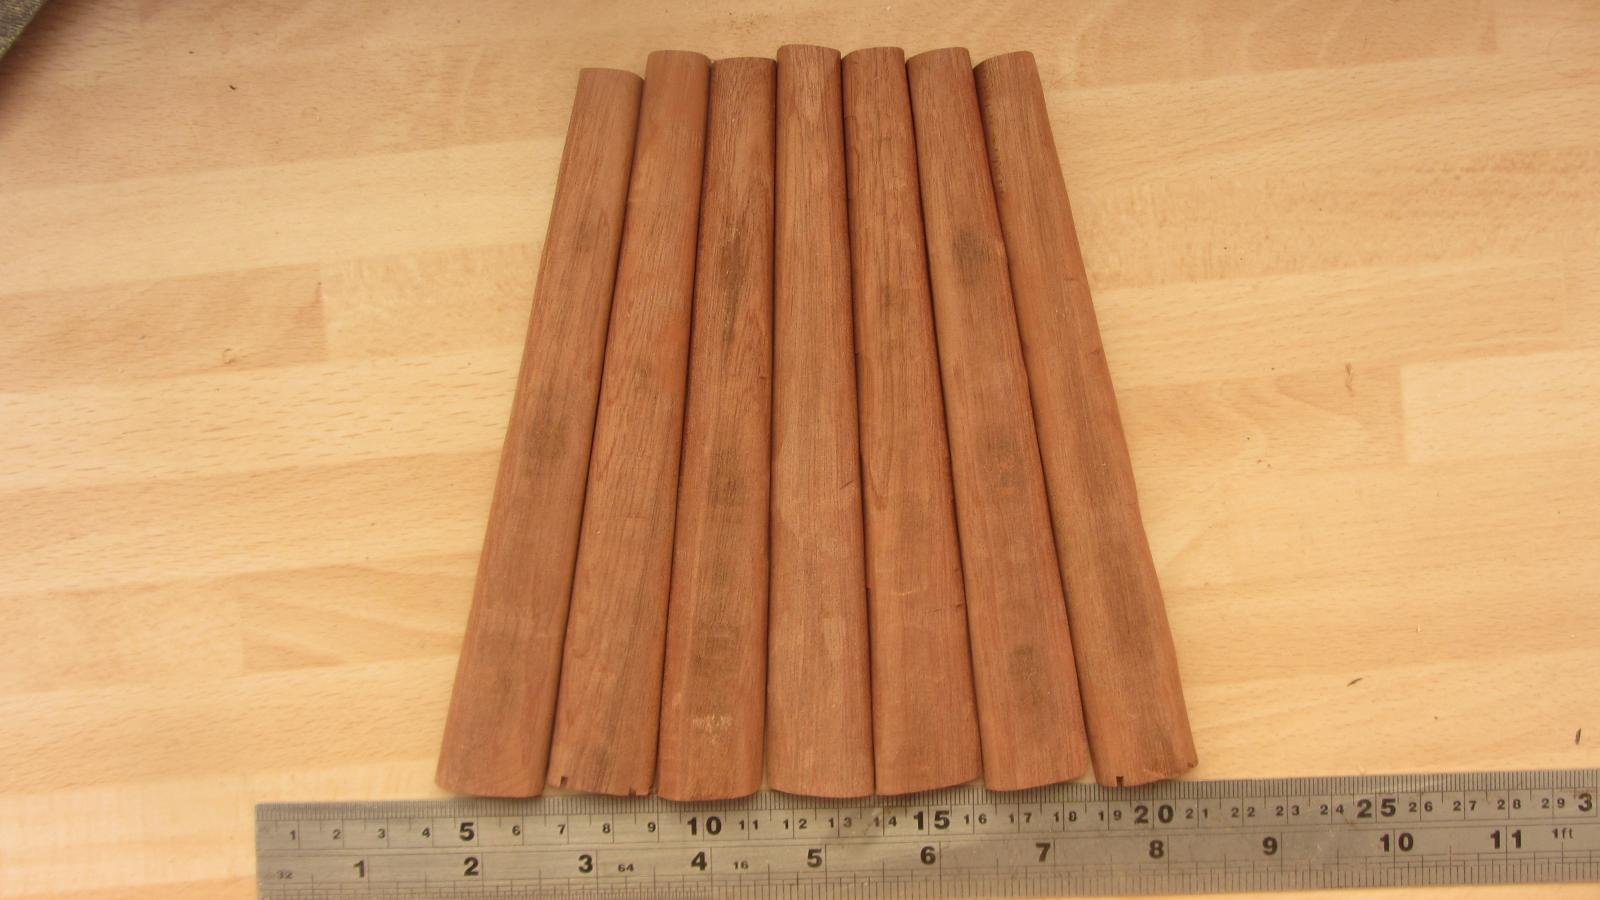
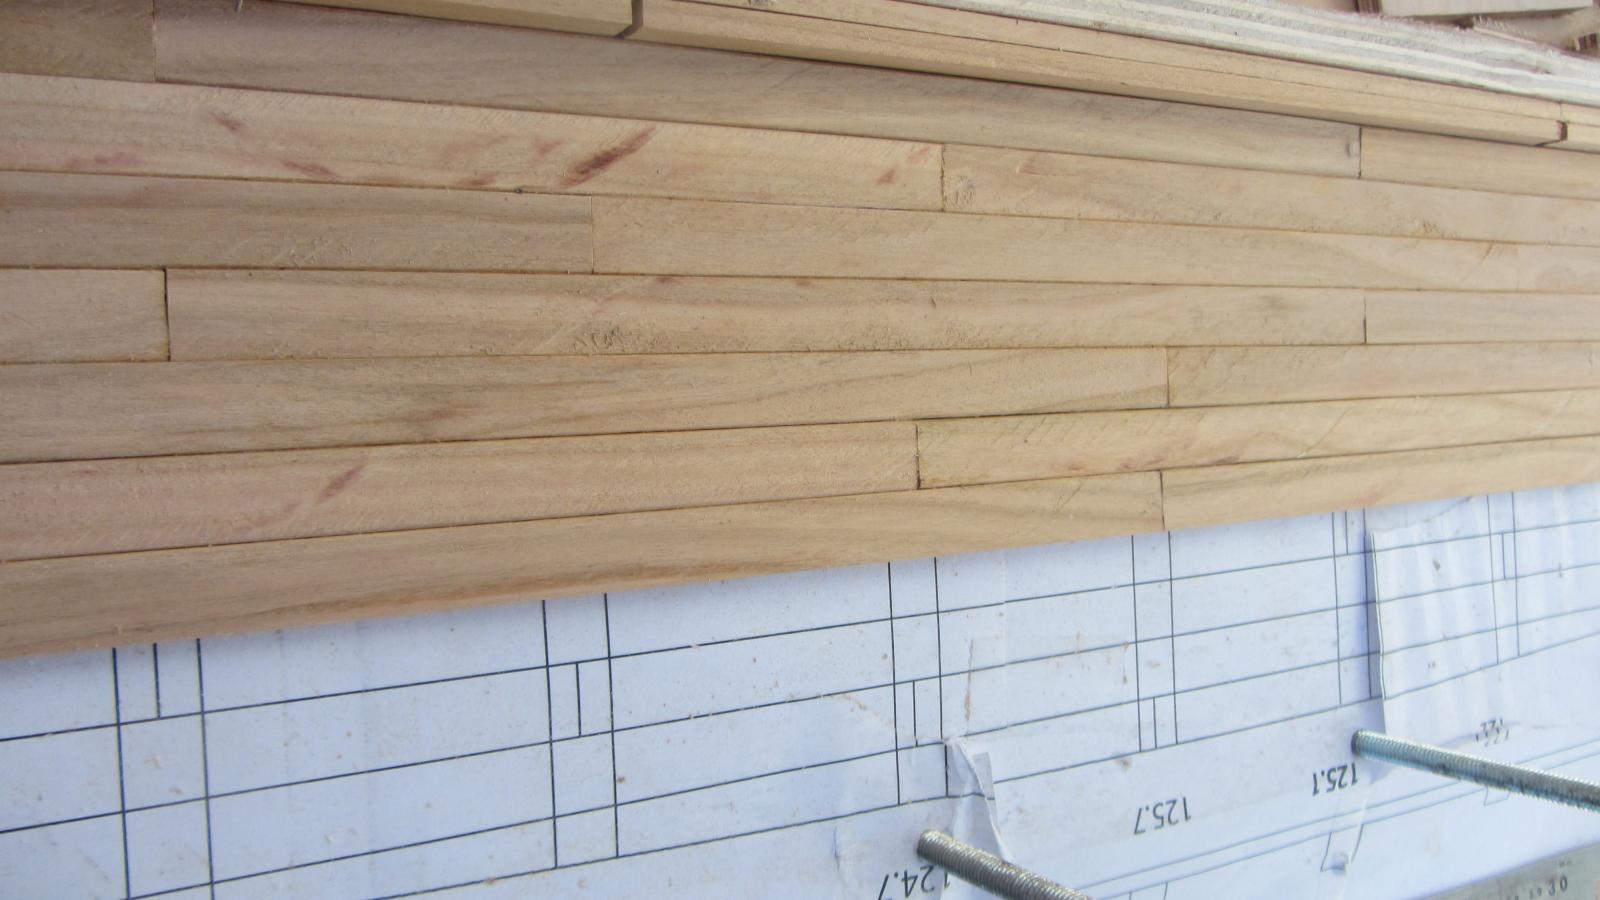
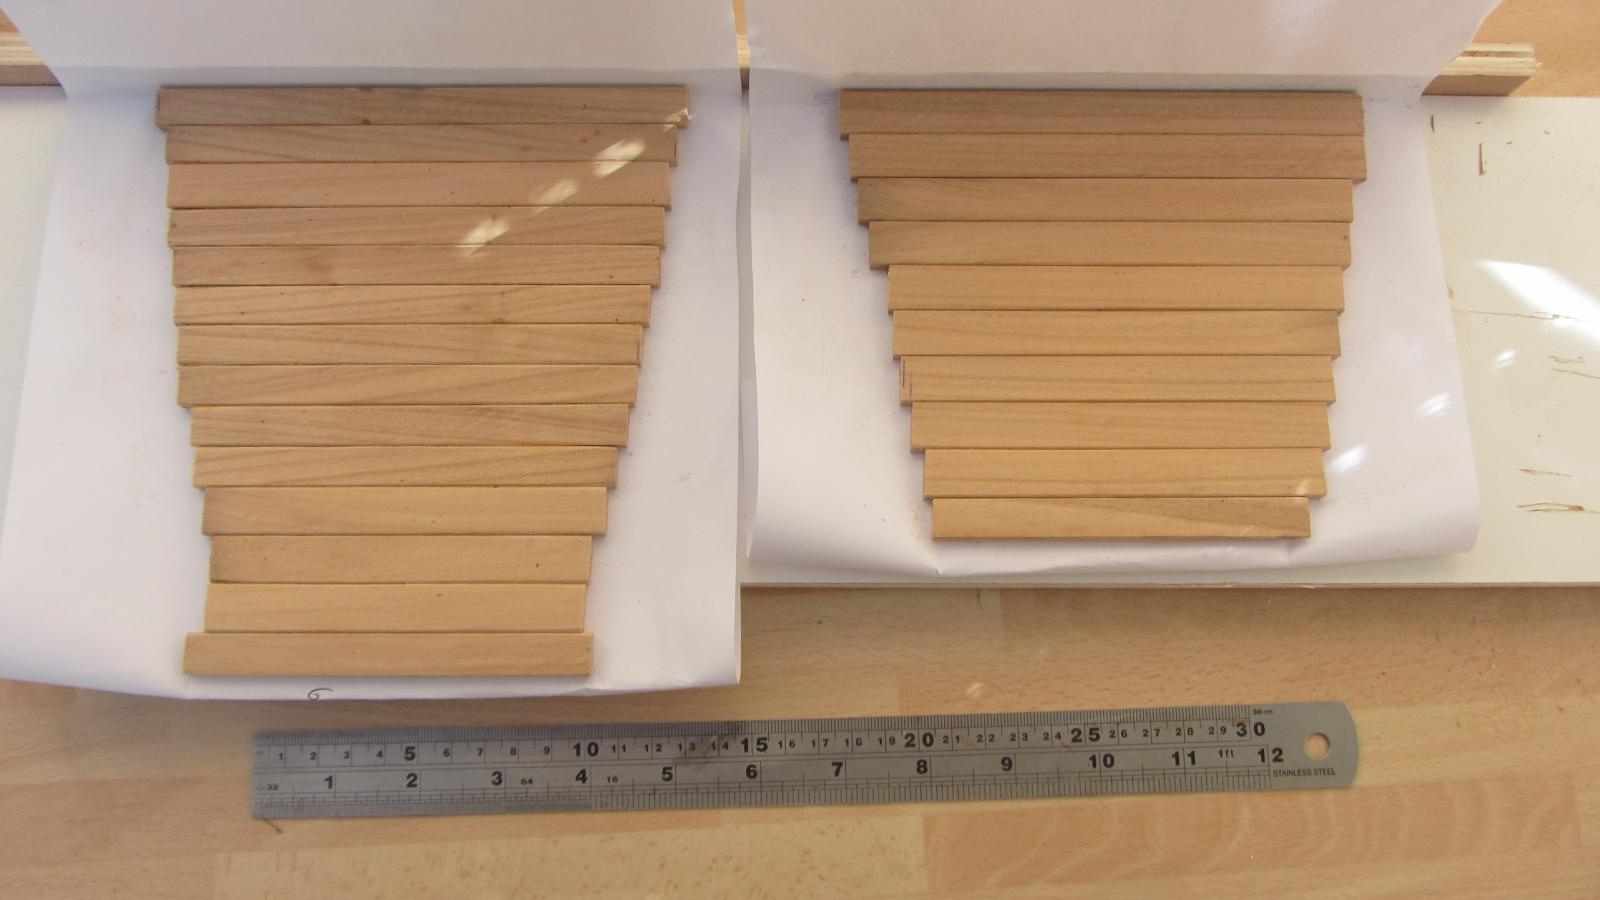
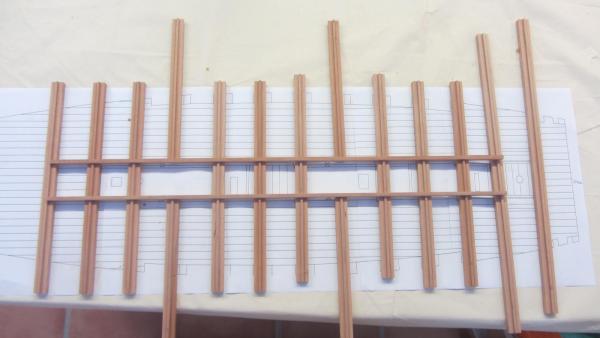
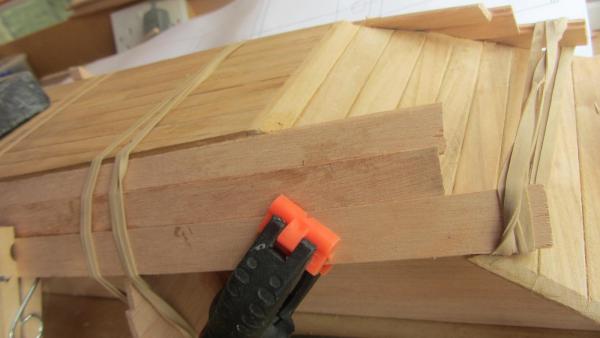
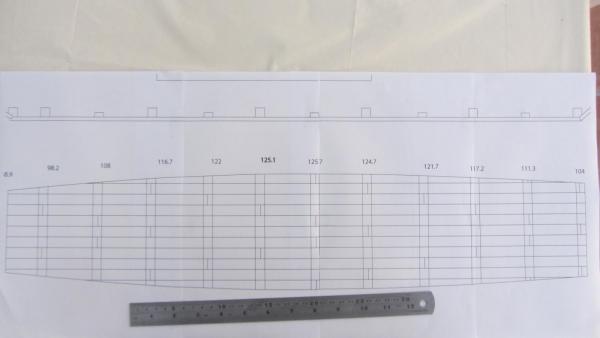
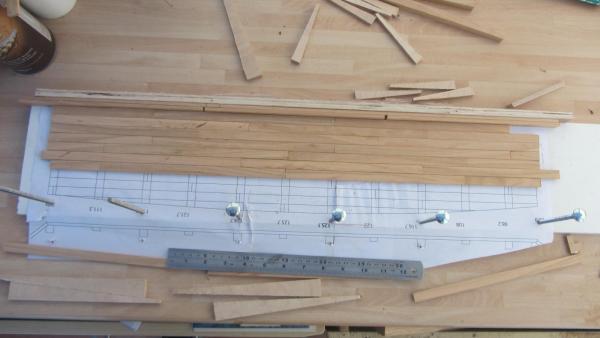
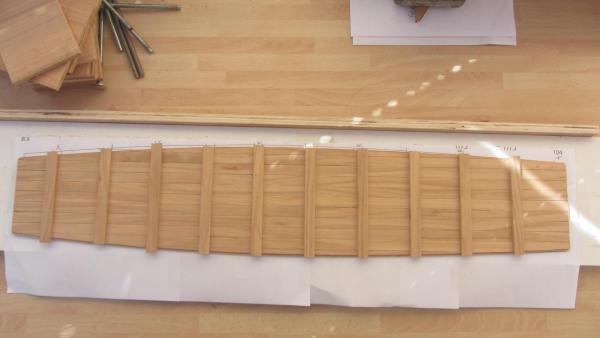
Hi. Made a good start with the information I have.. A drawing of the Hold base. No keel on this ship .Flat bottom with thick planking. The planking laid. I've used the studding and bolts to squeeze the planks with wedges. Base with cross sections ready to build up. Bow and stern planking. The bow will have extra bulks of timber on the bows for ramming the enemy ships. Made a jig to hold the planking in place while building. basic but that all that's needed. Another view of the jig. showing the planking positions. The jig is made of plylite. Will start to make the planks for the hull sides tomorrow. These are described as "L" shaped. Will post a photo of the making.. Regards Antony.


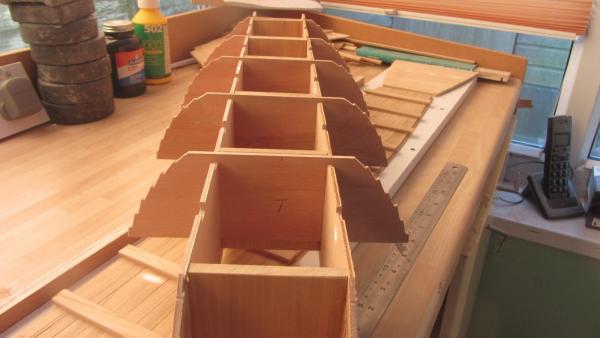
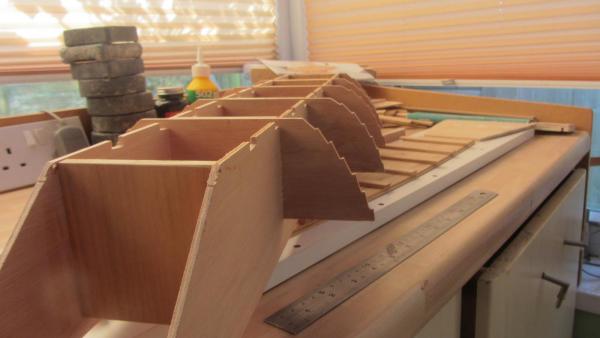
- 99 replies
-
- 17
-
-
- turtle ship
- korean
- (and 1 more)
-
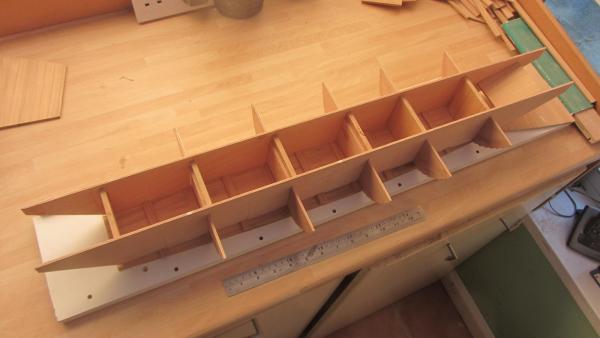
Hi Belco. Yea there are lots of information on Google. But not much with enough details to make a model. Even the replicas are so different and constructed in all sorts of ways. I have a bunch of friends in Korea that have assisted me in my search. I have done some drawings using Illustrater that look like the one in the Korean war museum. Started to cut the timbers for the base. Bow and Stern. The planking will require some sort of frame to hold the empty hull in shape help with the planking. Have done some drawings for this temporary frame. Thanks for looking in. Regards Antony.
- 99 replies
-
- 5
-
-
- turtle ship
- korean
- (and 1 more)
-
Hi. I have just been pointed to a Exelent PDF file. http://anthropology.tamu.edu/papers/Sasaki-MA2008.pdf It's just what I wanted. Regards Antony.
- 99 replies
-
- 7
-
-
- turtle ship
- korean
- (and 1 more)
-
Hi Dave. I have a blu-ray Roaring Currents. A really interesting film. I've not seen the TV program ..Will keep my eyes open for that. Regards Antony.
- 99 replies
-
- 4
-
-
- turtle ship
- korean
- (and 1 more)
-
Hi. A question regarding how did the Koreans fix the planking on there ships. I know they drove long pieces of Oak dowel into the top of the plank into the next plank below. But the planking has no support.. I.E. ribs or frames. The fixings into the side of the plank are big nails made of Oak and they are clearly visible in all models and replicas of the Turtle ship. And the Question is:- What do they drive into?? One sketch of a ship wreck drawing shows timbers going across one side of the hull to the other side. Could the nails be driven into thease ? That's a lot of timbers if so. Also some ship wreck drawings have metal brackets attached into the planks and to the timbers noted above. I would love to have some input on this.. Even the theory.. Will post the links and pictures mentioned above when I get computer access. Regards Antony.
- 99 replies
-
- 4
-
-
- turtle ship
- korean
- (and 1 more)
-
Hi Gerhard. Nice find. No I have not seen that information before most usefull. Thank you Daniel. Regards Antony.
- 99 replies
-
- 5
-
-
- turtle ship
- korean
- (and 1 more)
-
Hi. Its time for a new project.. Been looking at this for sometime now. I have made several trips to Korea and visited the war Museum in Seoul. This was my first encounter of this ship. There is a kit of this ship made by www.youngmodeler.com at 1/64 scale There are also a few on E-Bay by the same manufacture. There are no drawing of this ship and there are a lot of replicas made but most of them are very different. Very confusing. There are a few referrals to the Turtle ship here on MSW. including a Kit build by Wim500. Also lots of nice photos by Grimber. I intend to Build this @ 1/32 scale so the model will be big enough to include a bit of detail. Rule 1... No paint.. Rule 2.. Follow as much as possible the method of ship building as used in Korea. Lots of HELP wanted here. The main timber I will be using will be English Cherry as I have a vast stock of it. Other timber will be used to give contrast and looks. Most of the Timber is very thick on this ship. And the hull planking is pined downwards into the plank below.(very long tree nails) Will post a link to the information later. I am at the stage of just starting the build planning. and laying the hull base (No keel on this ship). Will be Building this in the Shed as its the only space big enough for the model and me. That's it for now. Thanks for looking in. Regards Antony.
- 99 replies
-
- 11
-
-
- turtle ship
- korean
- (and 1 more)
-
Hi Phill. Of to a good start. Good advice about keeping the keel and bulkheads square. Check the fairing with a strip of timber. On all areas of the ship. Following along with you on this one. Regards Antony.
-
Hi Bob. Thanks for the heads up on the deck plywood. Just checked mine and it's good quality. There will be a delay in me starting my Bounty as we are having a new kitchen and it's not good having models around.. So start will be in June. Must say your planking look nice Regards Antony.
-
Hi. I do the same as Jaager. Mix a little of the fine dust with the PVA glue to a soft putty. Works a treat. Regards Antony.
-
Hi Bryanc. You just could not help yourself.. He has gone and bashed it.. There will be no stoping you now. I don't know if I could possabley build a kit without bashing it here and there.. But think of all the extra work you can add I must say.. It's looking good. Regards Antony.
- 77 replies
-
- 4
-
-
- cross-section
- hms victory
- (and 2 more)
-
Hi Kmart. I think it look good. Honest Nice to see you still plodding on. Regards Antony.