AntonyUK
-
Posts
1,190 -
Joined
-
Last visited
Content Type
Profiles
Forums
Gallery
Events
Everything posted by AntonyUK
-
 Hi. Well done both of you. What a nice surprise for mum and dad. Give yourself a big pat on the back Greg for sharing your time and knowledge. And you have opened up another part of her mind to skills and modeling. She may become like so many females on this forum. Very skilled modelers. Regards Antony.
- 35 replies
-
- 1
-

-
- pirate ship
- pirateology
- (and 1 more)
-
Hi Aydin. Very impressed with the model and your skill's. Regards Antony.
- 414 replies
-
- 4
-
-
- riva aquarama
- amati
- (and 2 more)
-
Hi Torbogdan. Nice build.. I like your approach to modeling. The Halse is a interesting little ship that has some very nice features. John... perhaps a message to Daniel Dusek might have been more appropriate?.. It's not always easy to make a kit that is 100% correct and some of the other kit manufactures just guess what the ship looked like. Keep up the excellent build and ime following along with this one. Regards Antony.
- 84 replies
-
- 3
-
-
- hanse kogge
- dusek
- (and 1 more)
-
Hi Grandad. It's so nice to see people's interaction between different age groups. It's extra special for you both as you are working on the project together. Mind You.. it looks like she is doing most of the work. Love the last pic with the Safety googles. It's the only way to start.. All the best Antony.
- 35 replies
-
- 7
-
-
- pirate ship
- pirateology
- (and 1 more)
-
Hi Frank. Totally stunning. Very nice attention to detail. Regards Antony.
- 649 replies
-
- 7
-
-
- dunbrody
- famine ship
- (and 2 more)
-
A Tour of HMS Victory From VHS tape 1993
AntonyUK replied to Kevin's topic in Nautical/Naval History
Hi Kevin. Very nice find and thanks for posting. Gotta laugh at the spelling in the text. Mind you mine is not that good. Regards Antony. -
Hi Bob. You made a cracking job of the Gun bays. With lots of extra bits and details. Pat yourself on the back for me. What's next ?????? Regards Antony.
- 206 replies
-
- 3
-
-
- battle station
- panart
- (and 1 more)
-
Hi Dave. WOW spent just over 90 mins reading through your build log for your SOS. Must say you have the gift. Lowering the gun ports then ripping the sides out.. I would have scraped it.. but you just kept going. Then to be plagued with ear infections and skin grafting. YOU are amazing. Like a lot of people have said... you must be crazy to scratch build the SOS. But you have done it Will follow along with the rest of the build with eyes open wide. Regards Antony.
- 962 replies
-
- 7
-
-
- sovereign of the seas
- ship of the line
- (and 1 more)
-
Hi. Another one here that people are talking about. http://www.modelshipbuildingsecrets.com/model-ship-building-dvd Also look at the link here on MSW http://modelshipworld.com/index.php/topic/5592-model-ship-building-secrets-dvd/ Not used any myself so cannot recommend any. Regards Antony.
-
Hi Aydin. WOW. Nice very nice. Ideal boat to use the scrappers on. Nice flowing area's The lines on the boat are really showing up now. Only a Italion could design lines like that Regards Antony.
- 414 replies
-
- 4
-
-
- riva aquarama
- amati
- (and 2 more)
-
Hi Mike. Nice to have another gun deck under construction. As with most kits there are little tweets to be made. It's also nice having Cobr@ on board. You are off to a good start. It's a good idea not putting that centre beam in at this stage. You will need to get in there and work on the model. Regards Antony.
-
Hi Aydin. She is coming along very nicely. Problems lead to solutions and knowledge. In saying that you must have learnt a lot by building this kit Nice work through the the build. Regards Antony.
- 414 replies
-
- 3
-
-
- riva aquarama
- amati
- (and 2 more)
-
Hi. Thanks Frank. Ime about a 1/8 of the way drilling the 0.4 mm holes for the roof plate pins. And I needed all the likes and nice comments . Will post a few photos of the roof when completed. Back to the Dremel. Thanks for looking in Frank. Regards Antony.
- 99 replies
-
- 4
-
-
- turtle ship
- korean
- (and 1 more)
-
Hi Nils. It's much easer to do on a cross section as you do not have the curves to plate. Not looked at this build since it was finished. Thanks for the likes.. I missed seeing these. Regards Antony.
-
Hi Brian. Have been following along in the shadows with this one. Time to pop my head out and tell you what a excellent build you have. Nice work and fun build. Regards Antony.
-
Hi Frank. Off to a good start. Keel looks straight to me. Ime with you on the double planking. There is no horrible buff. Regards Antony.
-
Hi Patrick. Like I said you are a man of few words. Plan ahead and make provision for mounting on pillars or similar. Many examples on other builds. I like barrels or something similar. Regards Antony.
- 69 replies
-
- 1
-
-
- lady nelson
- victory models
- (and 1 more)
-
Hi Bob. I like the sacks. Very nice work. Nice details that sets the gundeck for realism. Keep up the good work. Regards Antony.
- 206 replies
-
- 5
-
-
- battle station
- panart
- (and 1 more)
-
Hi Danny. Have been following along on your build. Such high quality and attention to detail makes this one stunning model. And a nice choice of timber that gives a nice contrasting look. Congratulations on a fantastic build. Regards Antony.
-
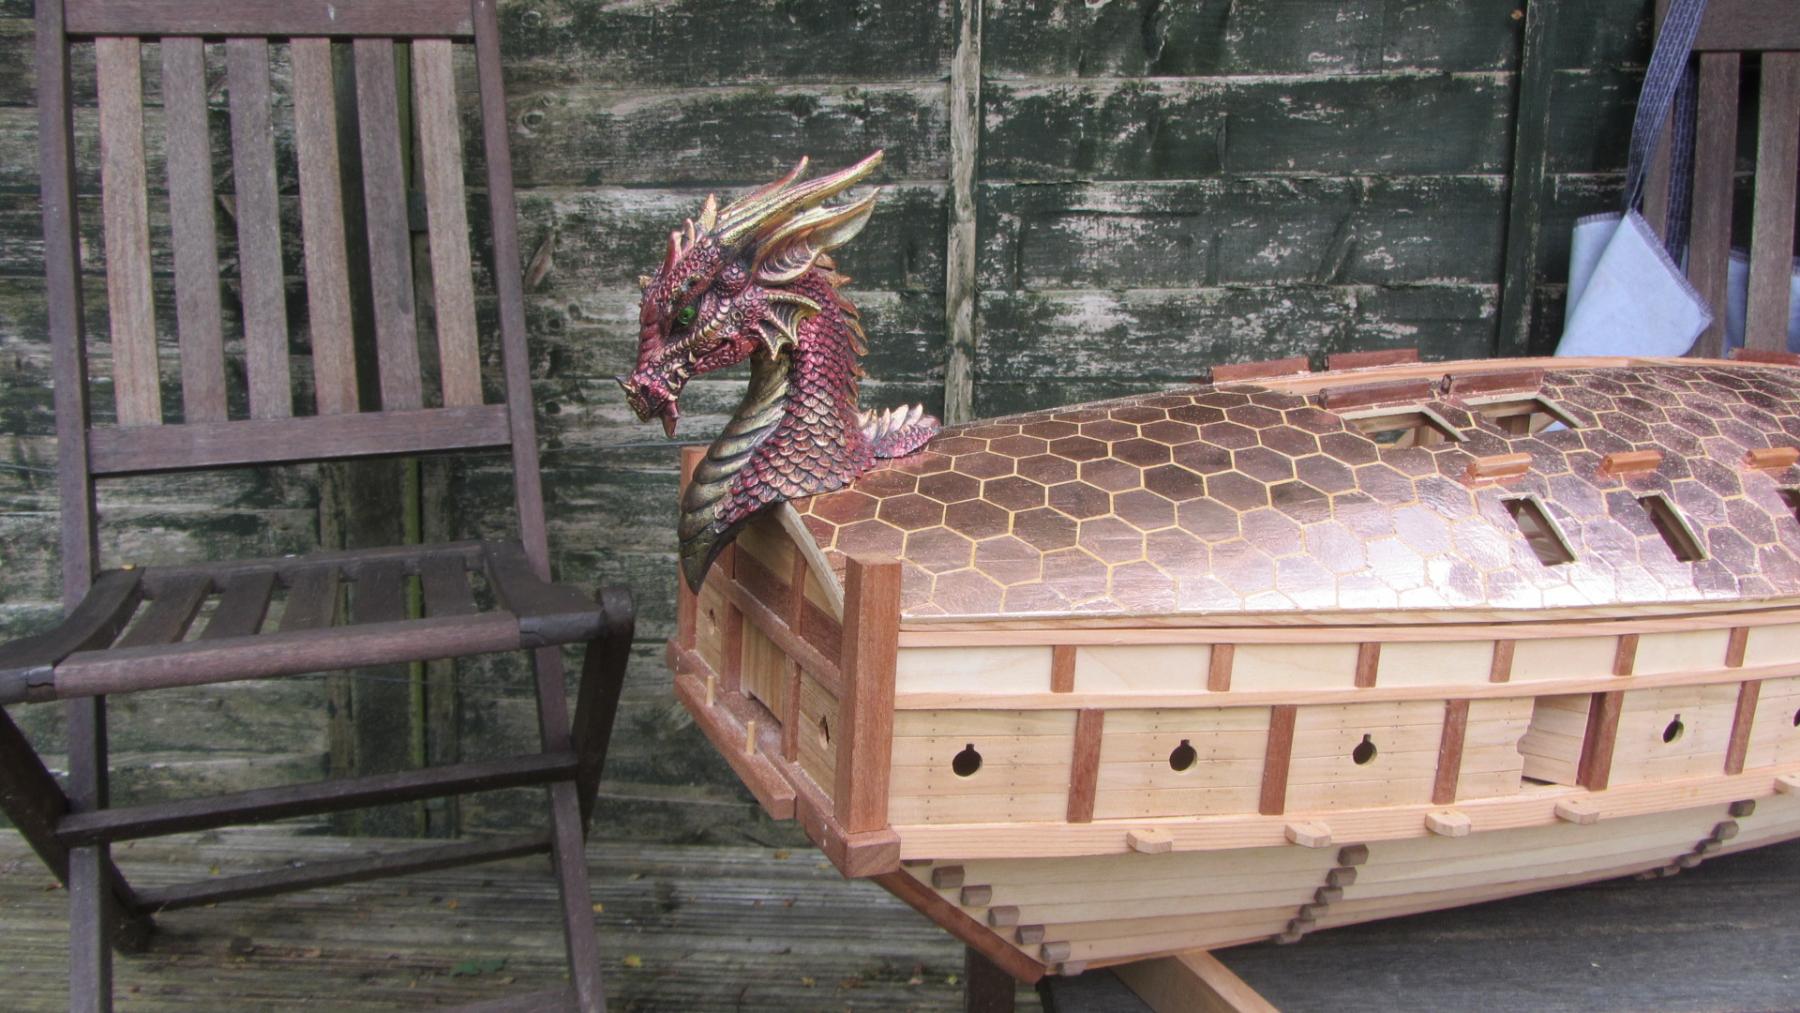
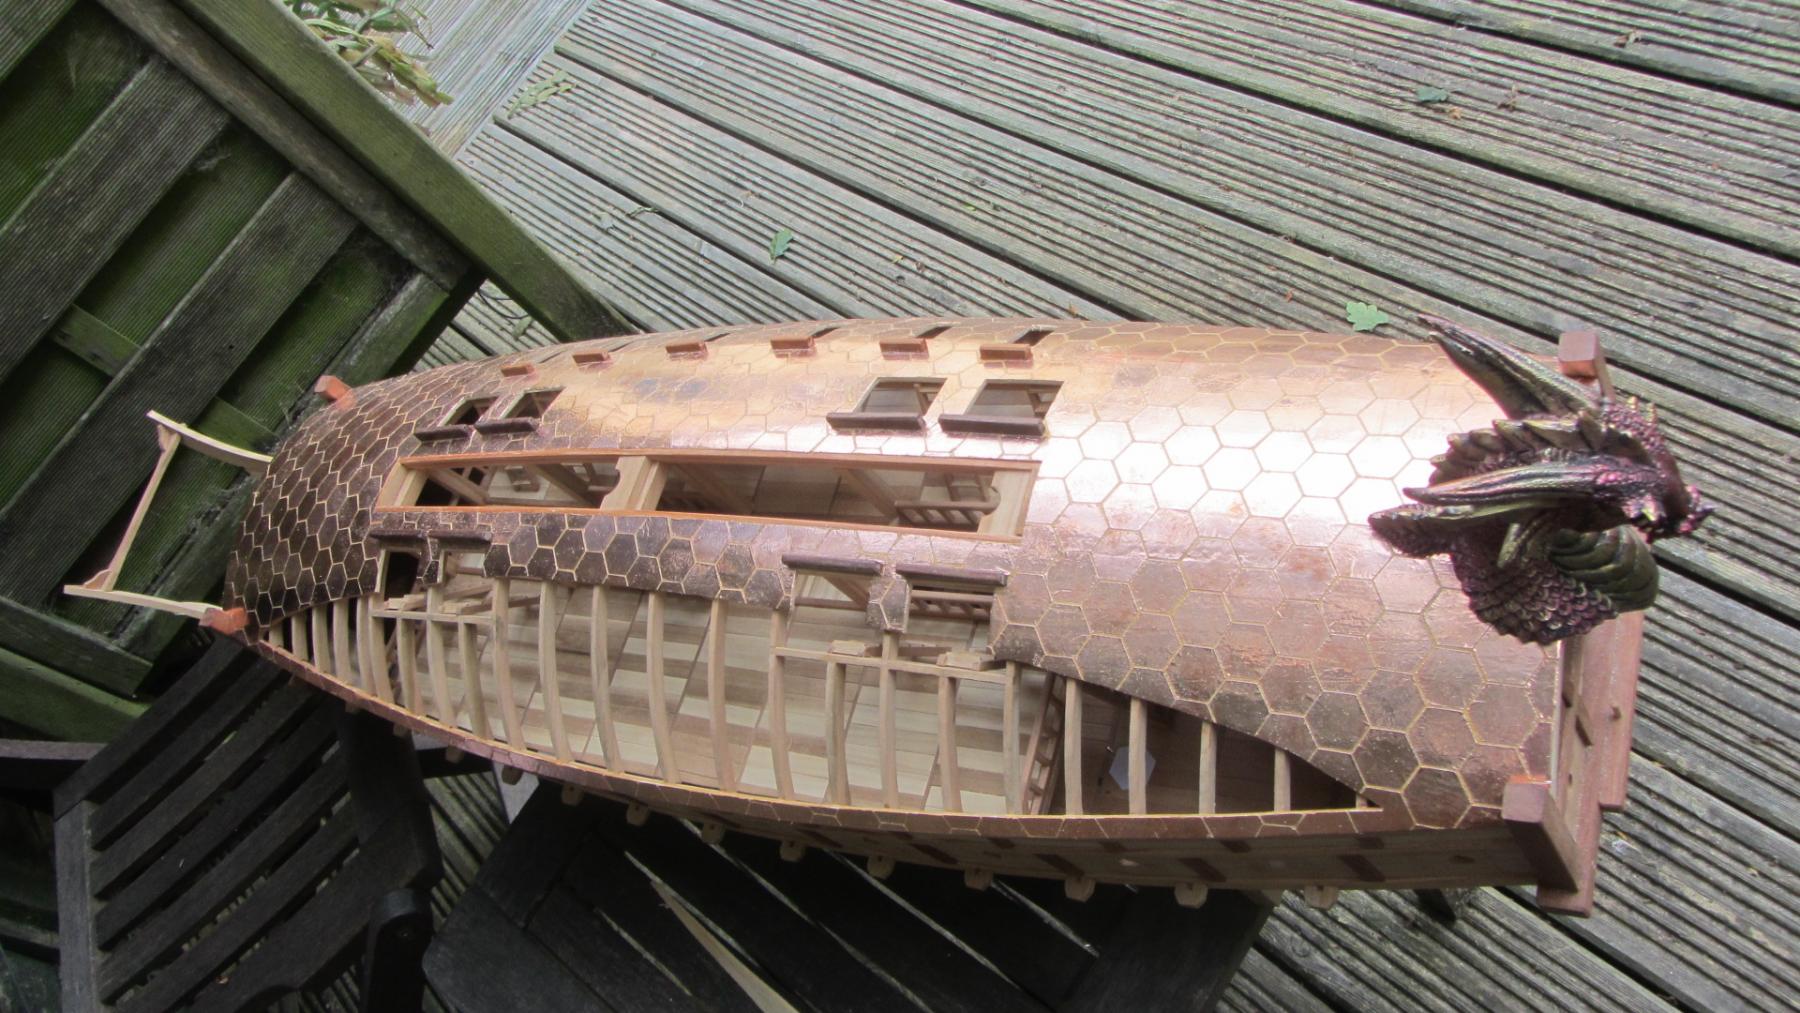
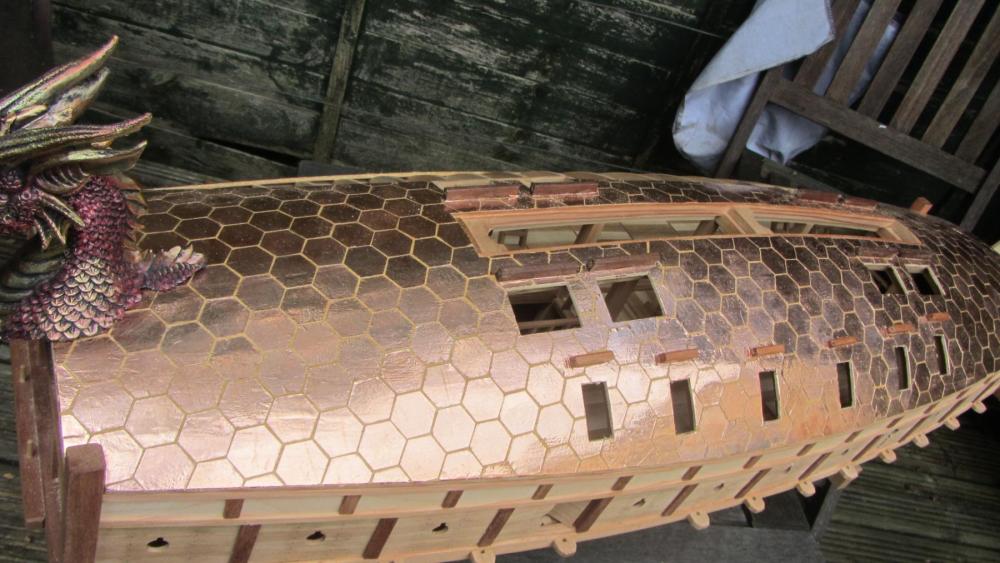
Hi. Thank you all for looking in and the likes. EJ The dragons head came painted . I like the colours also. I was going to paint it myself but it's just fine as it is. Mark. The plates will remain copper. Most of the hull fittings were made of copper in Asian ships during this time period. They did not use any steel in there ships at all. Need a nice day now with no one disturbing me so I can focus on drilling the plates pin holes. Music. Lots of tea. 0.4 mm drill. Dremel. Have a nice one. Regards Antony.
- 99 replies
-
- 8
-
-
- turtle ship
- korean
- (and 1 more)
-
Hi. Have a look here. http://modelshipworld.com/index.php/topic/716-hammocks-cranes-and-covers/ A interesting topic this one. Regards Antony.
-
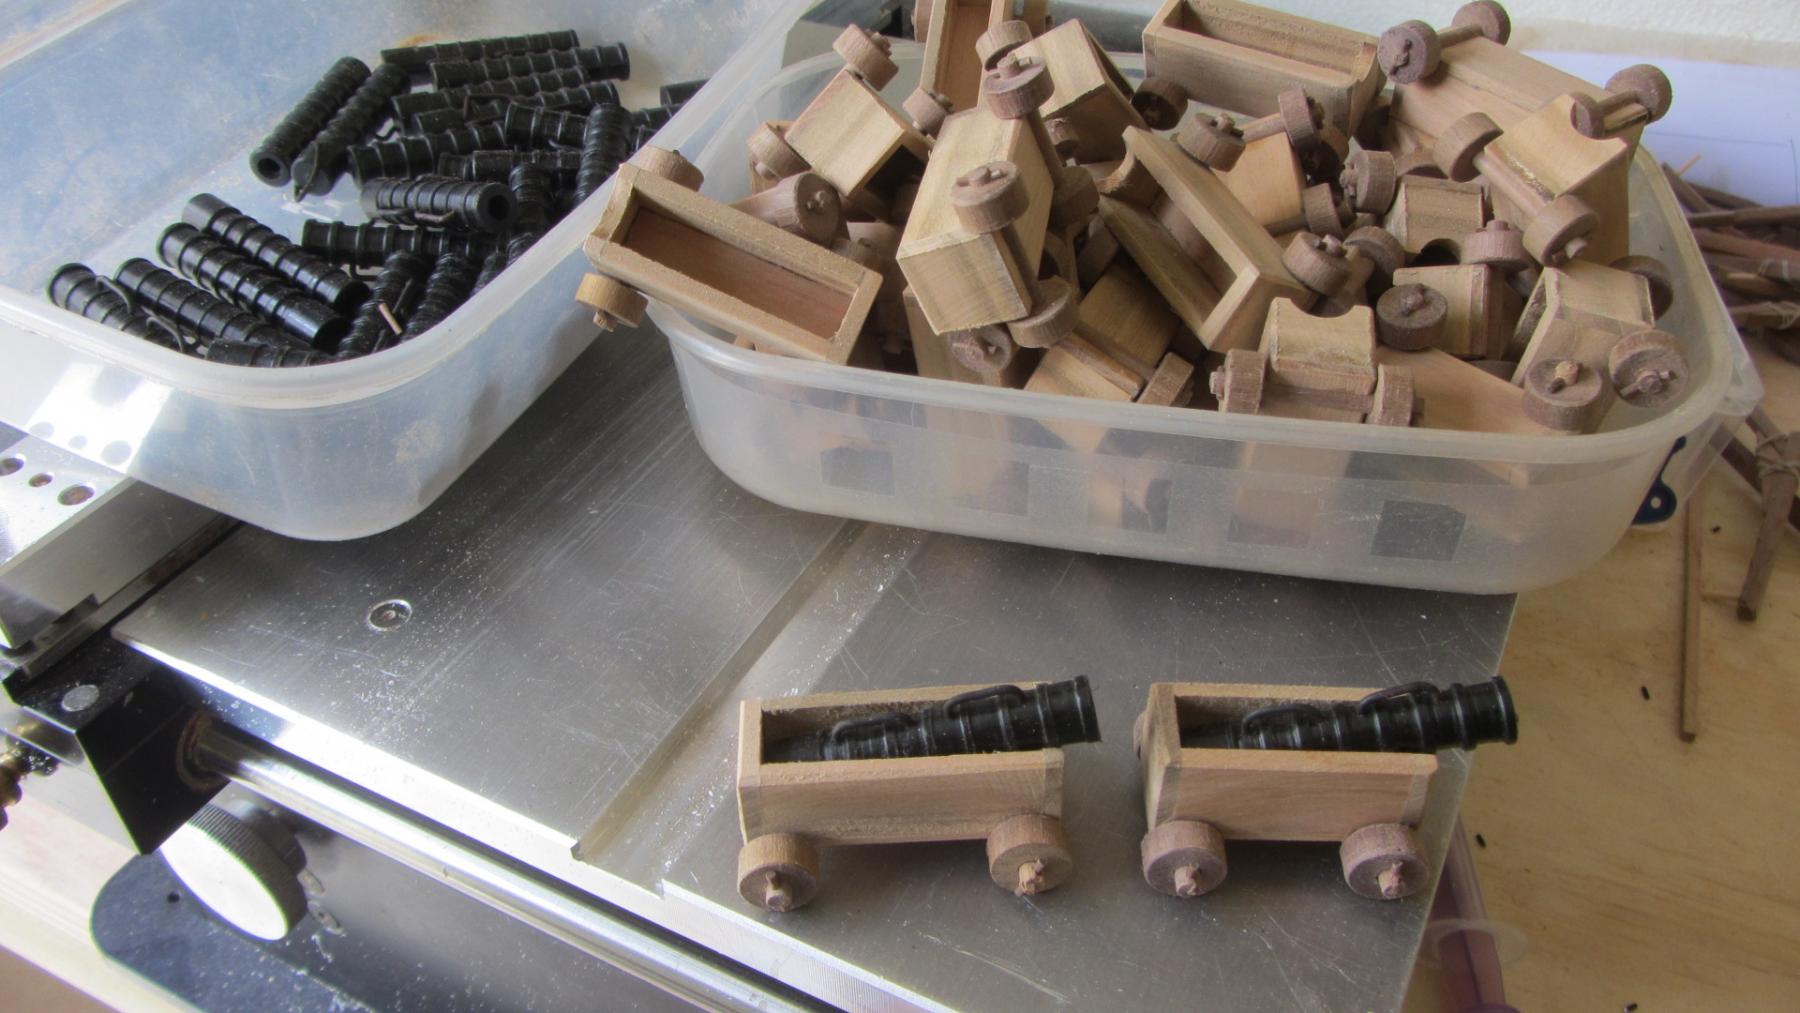
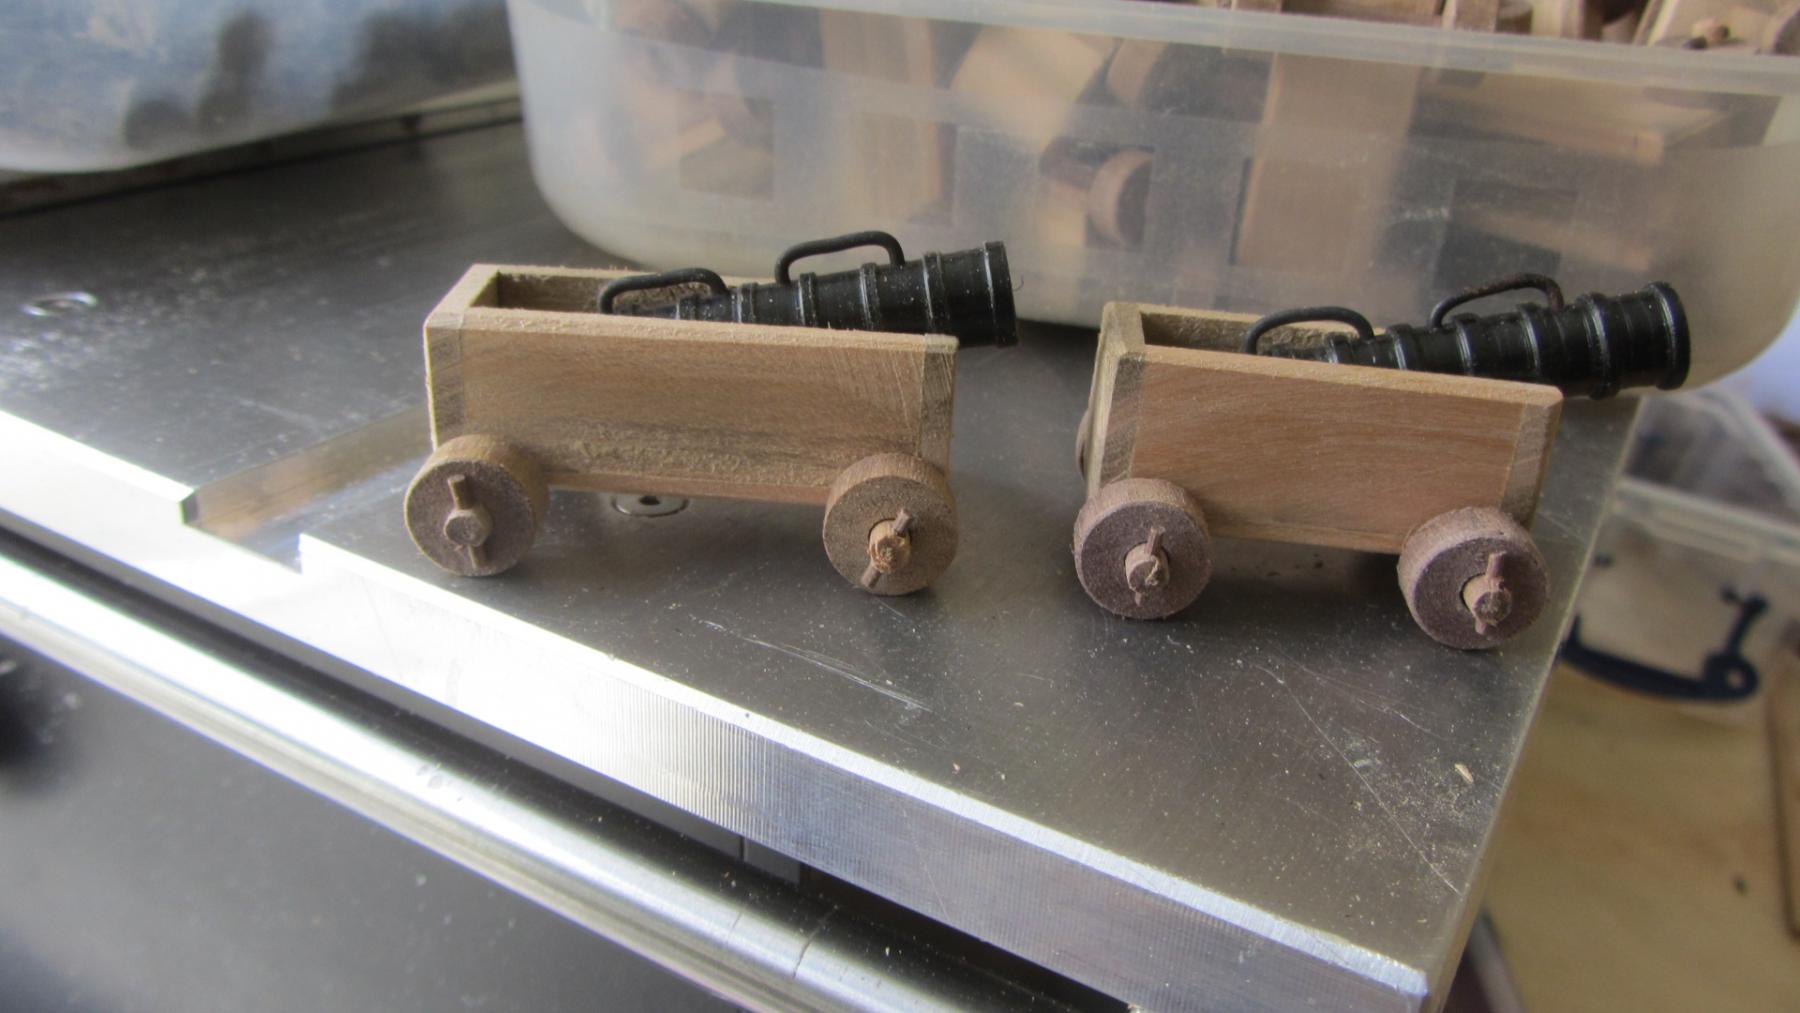
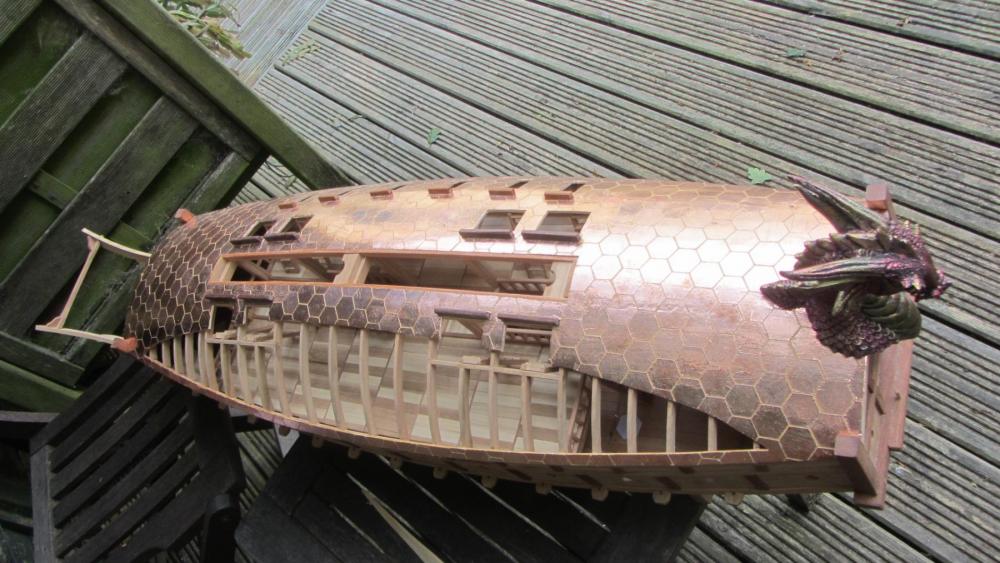
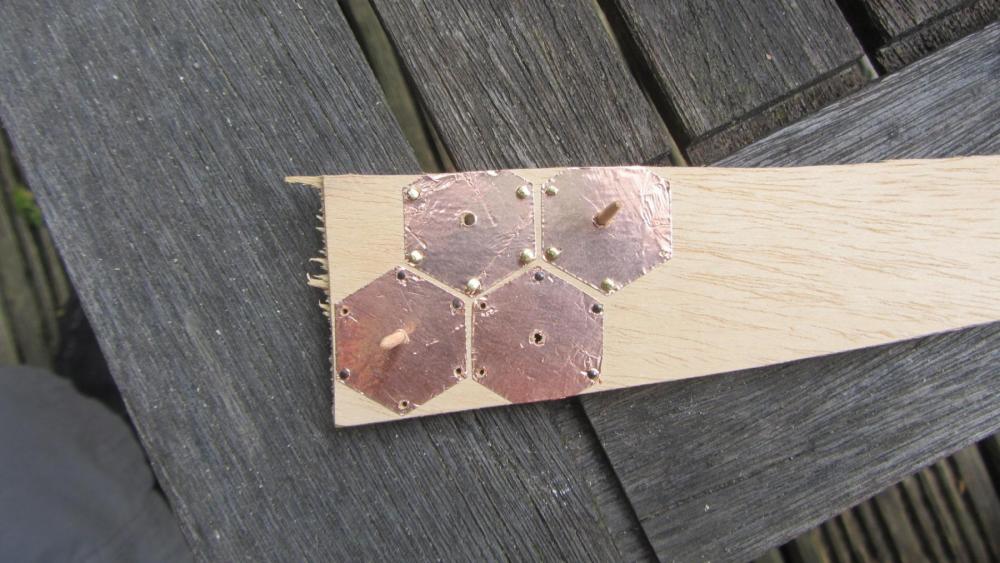
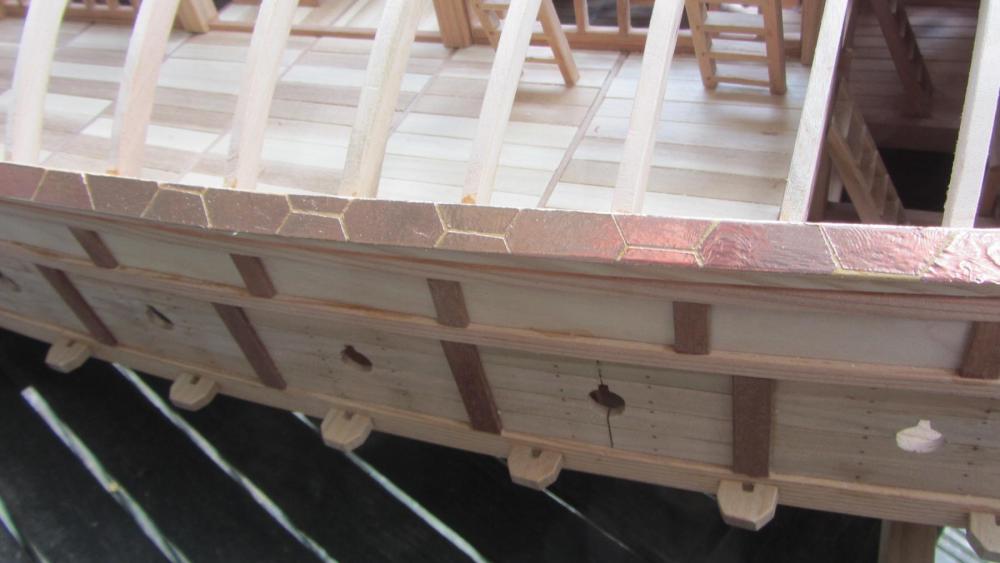
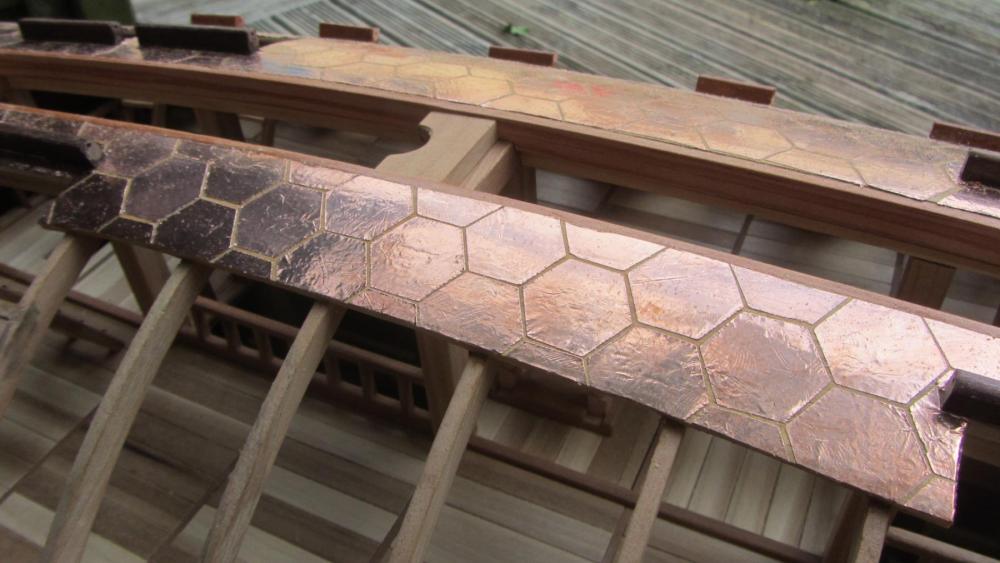
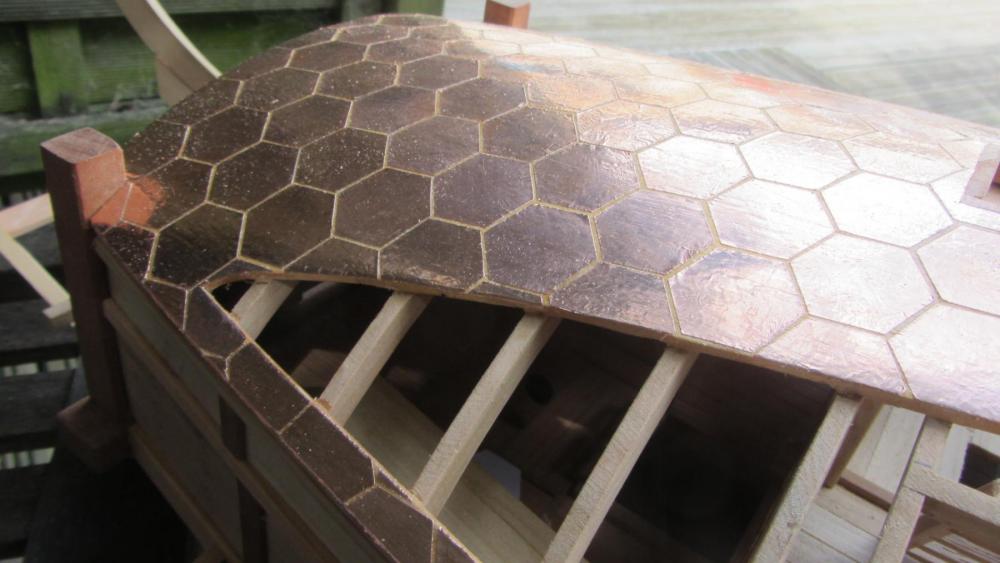
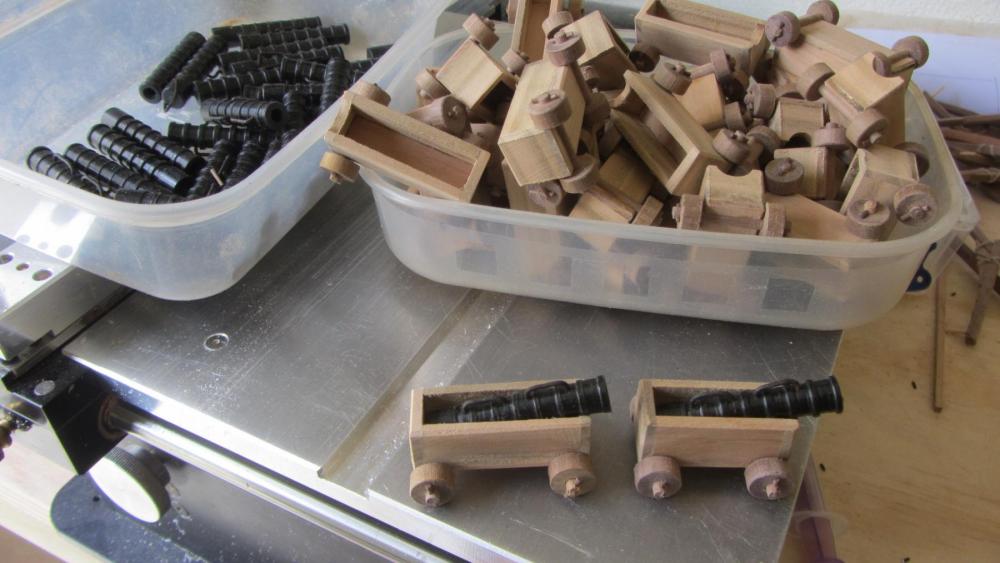
Hi. A update as promised. The dragons head is now in place.. No its not by my hand.. its a resin cast one. Tiles covering the roof are now finished. This is a test piece to check on the tile fixings. i will be using the black bottom pins as I think they look better. some 2400 in total...Wish me luck and retained sanity. With cocktail sticks in the centres. Close up of the tiling. And another. Yet another... Cannons in there carriages or boxes. Need to be finished and put into place on model when finished. Close up of the carriages..Now you can see that they need finishing. Thanks for looking in. Many thanks Antony.


- 99 replies
-
- 19
-
-
- turtle ship
- korean
- (and 1 more)
-
Hello and thank you for all the likes and wonderful comments. Have been busy with the boss having a new kitchen fitted. But have made lots of progress in the time that I have spent on the model. Not yet taken any photos of the updates but will do that later on in good daylight. Have finished making all the deck and Hull decoration bits. Cladding plates are on the roof. Just need to add the 1435 pins into the plates now..... and the spikes. Having thought about using metal for the spikes/ blades but I am concerned about someone damaging themselves on the ship. So I will use tooth picks that will protrude 14mm from deck. And not be glued in for safety reasons. This ship will look like a cross from a Turtle Imperial Arowana fish and a Hedgehog, a link to the fish http://www.imperialarowana.com/gallery.php?gid=129-6ccaac45d9 Sails, still not sure if I will add them yet. If I do I am thinking of using Egyptian cotton. Will post photos later on today. Regards Antony.
- 99 replies
-
- 5
-
-
- turtle ship
- korean
- (and 1 more)
-
Hi Frank. Will follow along on this one if you don't mind. I like my asian ships. Regards Antony.
-
Hi. I use the same as Steve a ponce wheel. Have a look at page 9 at the very bottom of page. http://modelshipworld.com/index.php/topic/3593-hms-victory-cross-section-by-antony-scale-136/page-9?hl=victory They come with different distance marking spaces. If you need very small spacings try using a small gear wheel ground to a point. Grinding both sides to the middle. Mount it on a shaft and away you go. Regards Antony.