HOLIDAY DONATION DRIVE - SUPPORT MSW - DO YOUR PART TO KEEP THIS GREAT FORUM GOING! (Only 13 donations so far - C'mon guys!)
×


AntonyUK
-
Posts
1,190 -
Joined
-
Last visited
Content Type
Profiles
Forums
Gallery
Events
Everything posted by AntonyUK
-
Hi. Mabe this is close enough to what you want. Most tea clippers were built with the same lines and the hull shape would be simular. http://www.cornwallmodelboats.co.uk/acatalog/mantua_thermopylae.html This is a nice kit that would require a little skill to build. The rigging on this type of ship would be quite a challenge to a beginner. Mabe you could pick one up ready made on the dreaded EBay. lots of the cuttysark on EBay with a little modification it could be turned into the Wynaud. Regards Antony.
-

Building boards
AntonyUK replied to Sgthod's topic in Building, Framing, Planking and plating a ships hull and deck
Hello. And welcome to MSW. I have never used a commercial building Jig or board. Always used a flat piece of MDF or other sheet timber I have lieing around. Plan the size and make supports for the bow timbers and stern timbers. Keep EVERY THING Square.. Unless your ship has a built in twist.LOL. If you are using the board in the house I would felt the bottom to stop scratching the boss's tables. Some ships do not have a flat keel.. Take this into consideration when building the board or clamp. Hint.. Always replace the boat back into the board .. It stops unessery twist developing. Regards Antony. -
HMS Alert 1777 by Jaekon Lee - 1/64
AntonyUK replied to Jaekon Lee's topic in - Build logs for subjects built 1751 - 1800
Hello Lee. Only one word to describe your skill... Stunning. Every time I look at your ship my jaw sits on my chest. It will be interesting to see how you blacken the brass nail heads. Regards Antony. -
Hi Paul. Thank you for your nice comments. I always keep my saw blades sharp and feed the wood into the saw at a slow and constant speed. Also keeping the wood pressed against the guide. If the wood is on show I will pull a sharp edge across the length. This makes it almost planed finish. As far as the grates.. There are some brilliant tutorial on MSW that cover making gratings. Most of what I have done I have learnt from this Forum. And welcome to MSW by the way. Regards Antony.
-
Hi Brian. You have made a nice start on the build. I have this kit to build but need to compleat other projects first. Will watch as you build.. Regards Antony.
-
Hi. News.. Here in the UK there is a documentary on this ship. Hunt for the artic ghost ship. On Tuesday 4th Aug C4 @ 9:00 pm. Sorry for spamming your post. Regards Antony.
- 346 replies
-
- 4
-

-
- terror
- polar exploration
- (and 2 more)
-
Hi Ted. Making amazing headway. Nice choice of timber colours. Continuing to watch this build develop and grow. Regards Antony.
-
Hi Michael. Very nice start. Will grab my chair and copa tea and follow along with this one. Interesting to see you have the bulkheads spaced to the gun ports. Nice one. Regards Antony.
-
Hi Jonny. Excellent progress with the Build and extras. They used to use old or damaged cannons in harbour walls as ballards as well as timber. Still many around the Cornish and Devon harbours. Photo of example. http://www.edwarddowden.co.uk/sale_paint4.htm Regards Antony.
- 188 replies
-
- 3
-
-
- Sherbourne
- Caldercraft
- (and 2 more)
-
Hi Jeff. Nice work with the hull plating. Looks very good. Watching you with this build makes me want to go out and purchase this kit.. All the best. Regards Antony.
-
Hi. Thank you all for the likes. I am looking forward to delivering it on Monday PM. Regards Antony.
-
As always. OUTSTANDING. They went to the most knowledgeable person on this subject... And that YOU. Congratulations on your acheavments. Going back to the model... Nice work on the rabbet. All of your research and recording of this model is just mind blowing. Nice mug. Do u use it. Have a nice one. Regards Antony.
- 346 replies
-
- 2
-
-
- terror
- polar exploration
- (and 2 more)
-
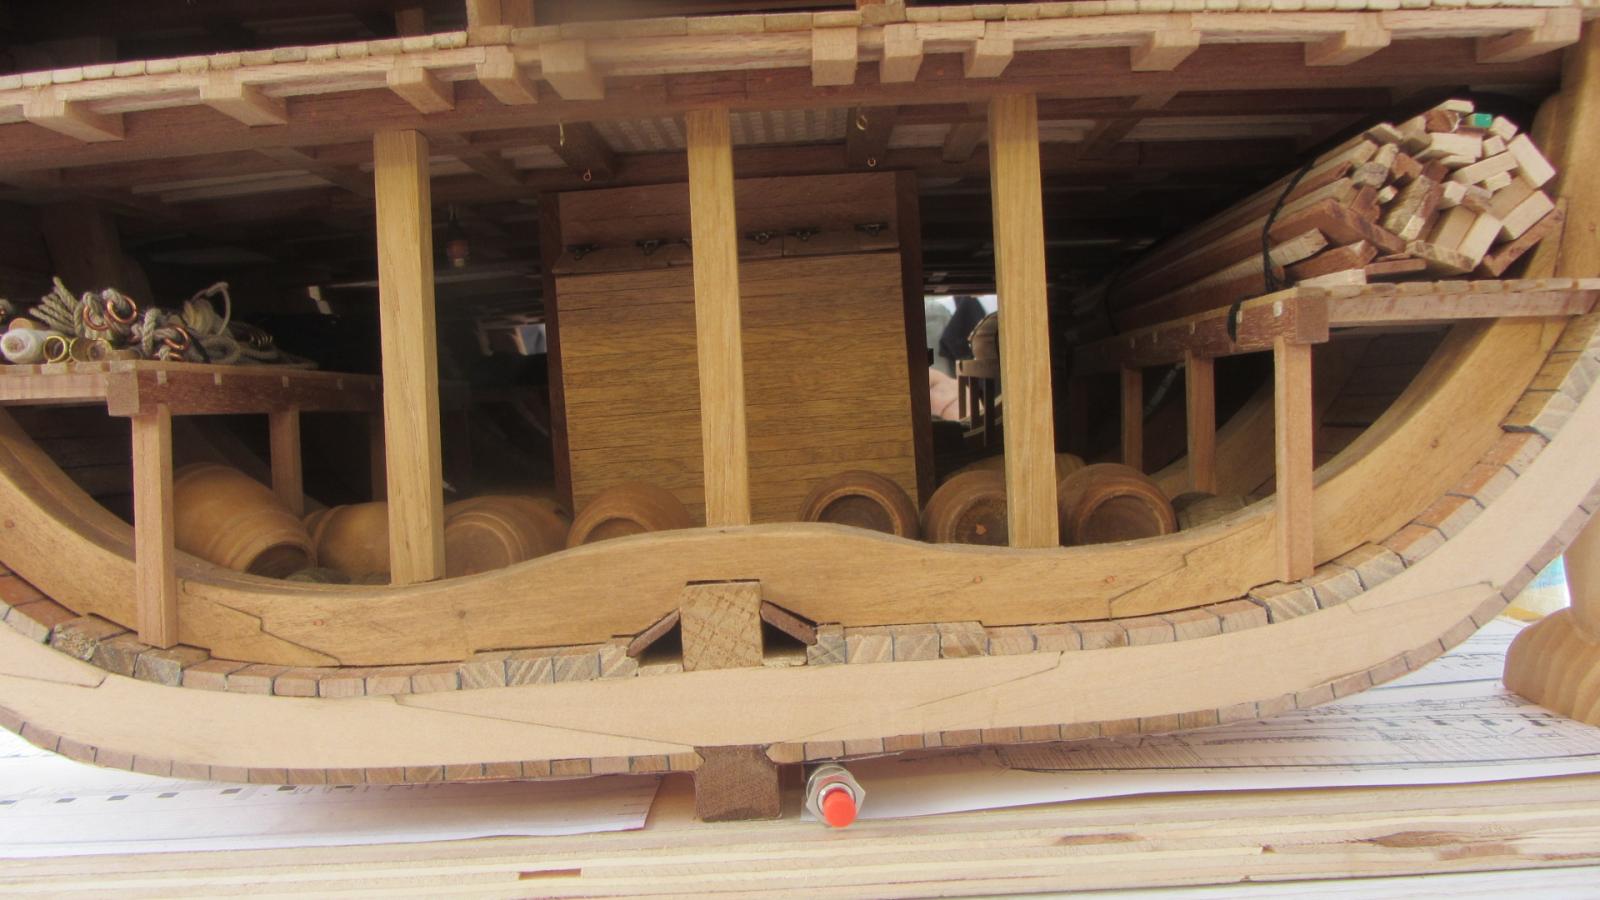
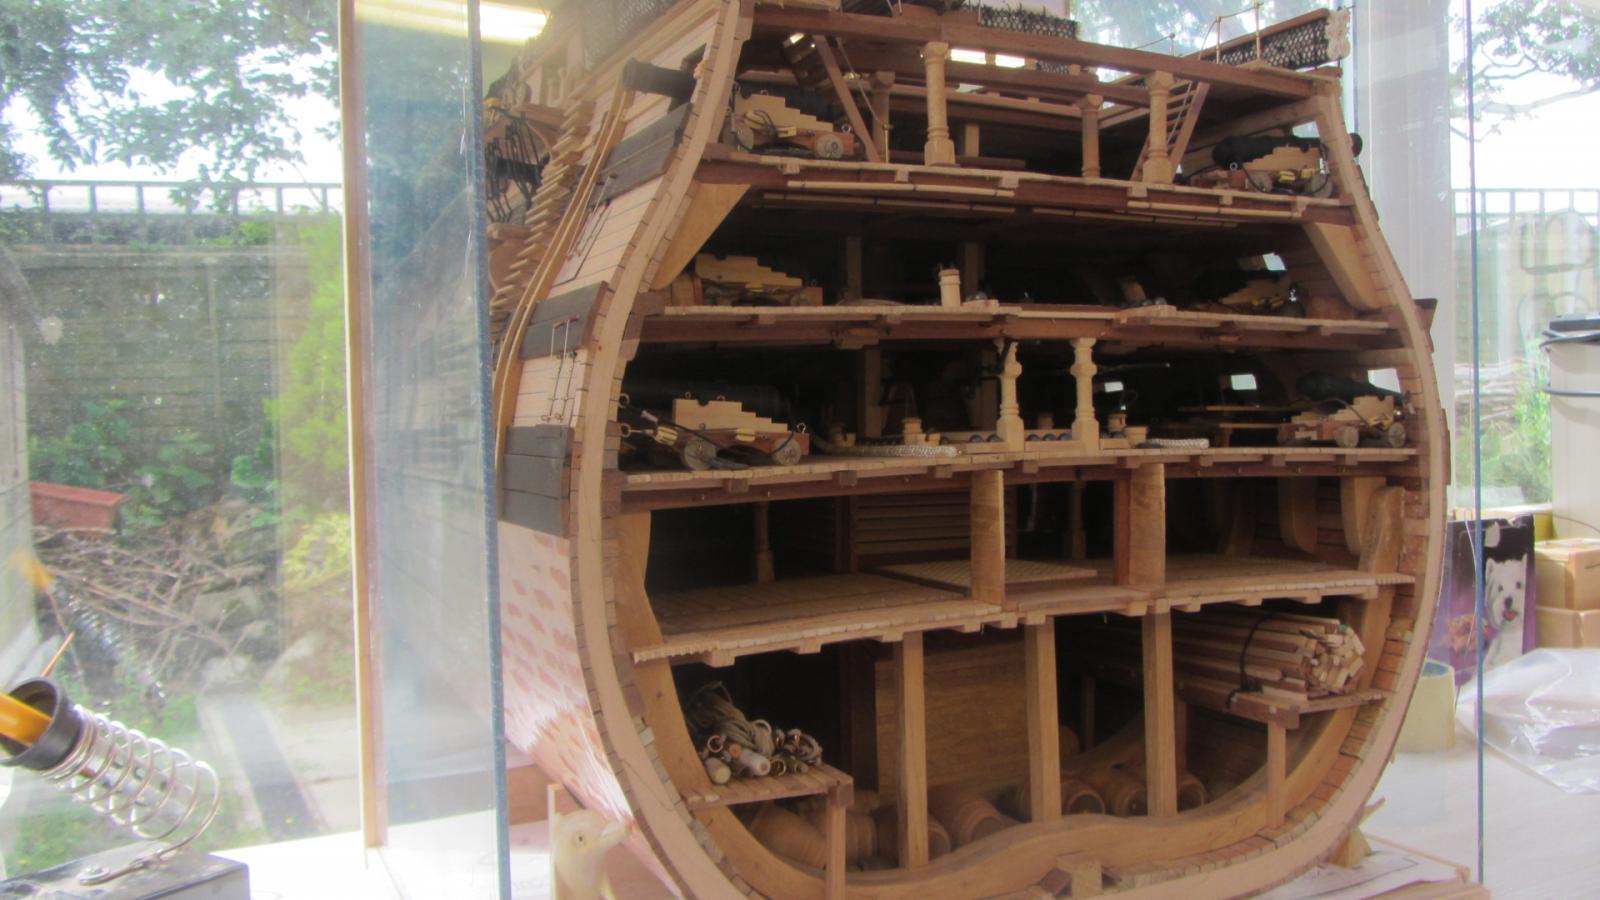
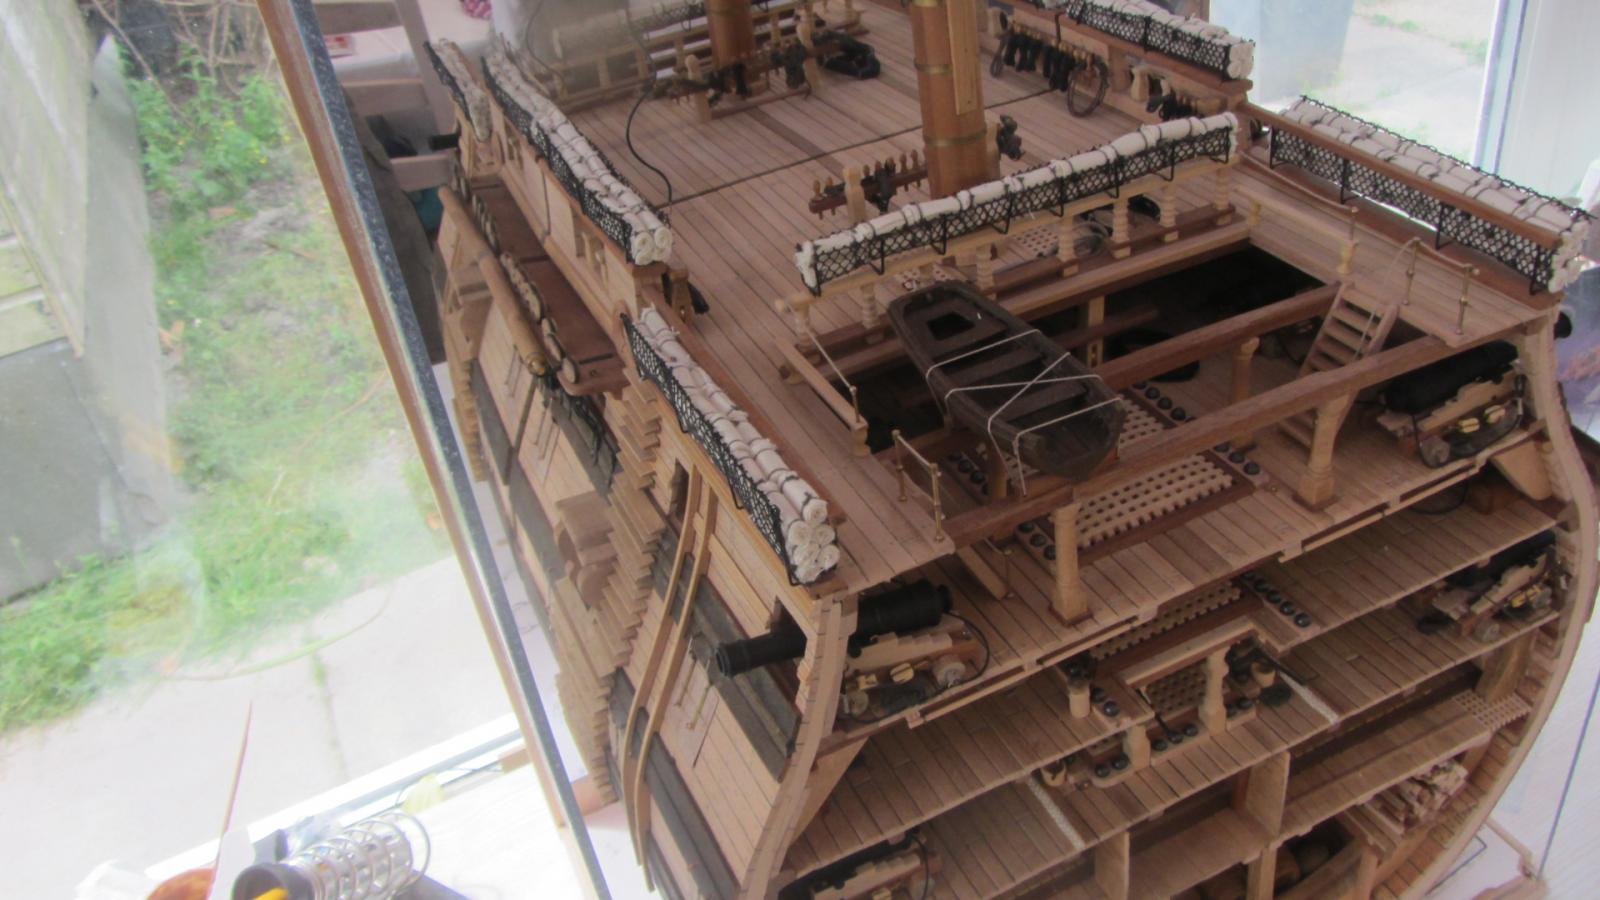
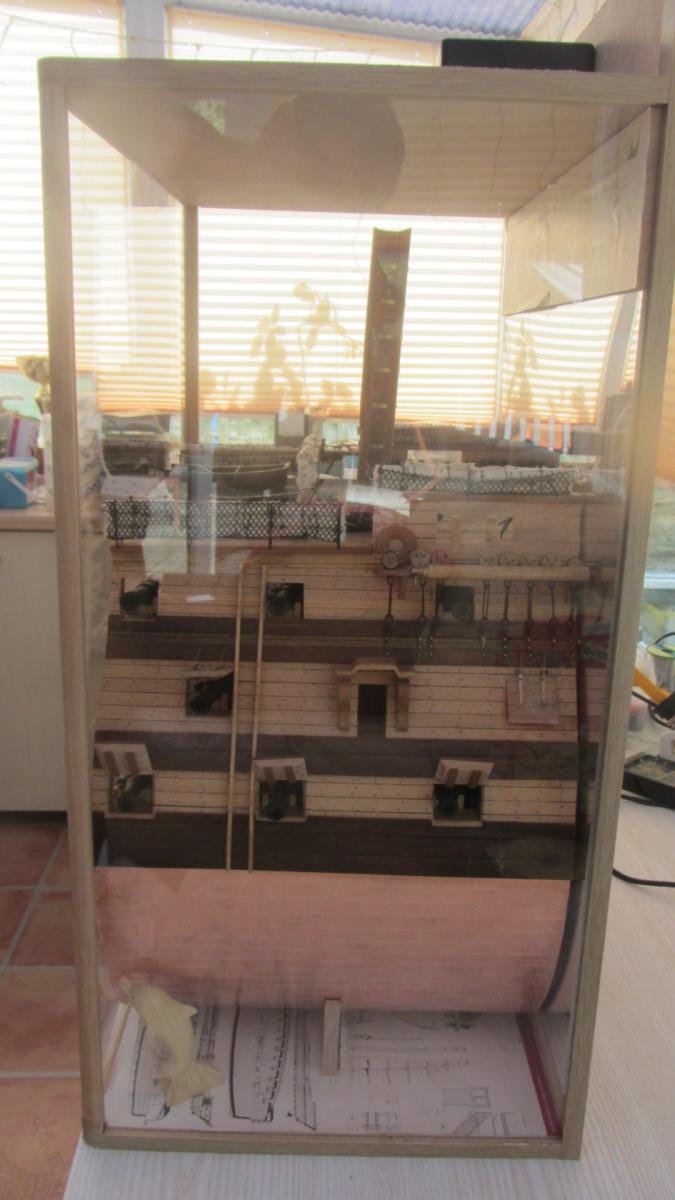
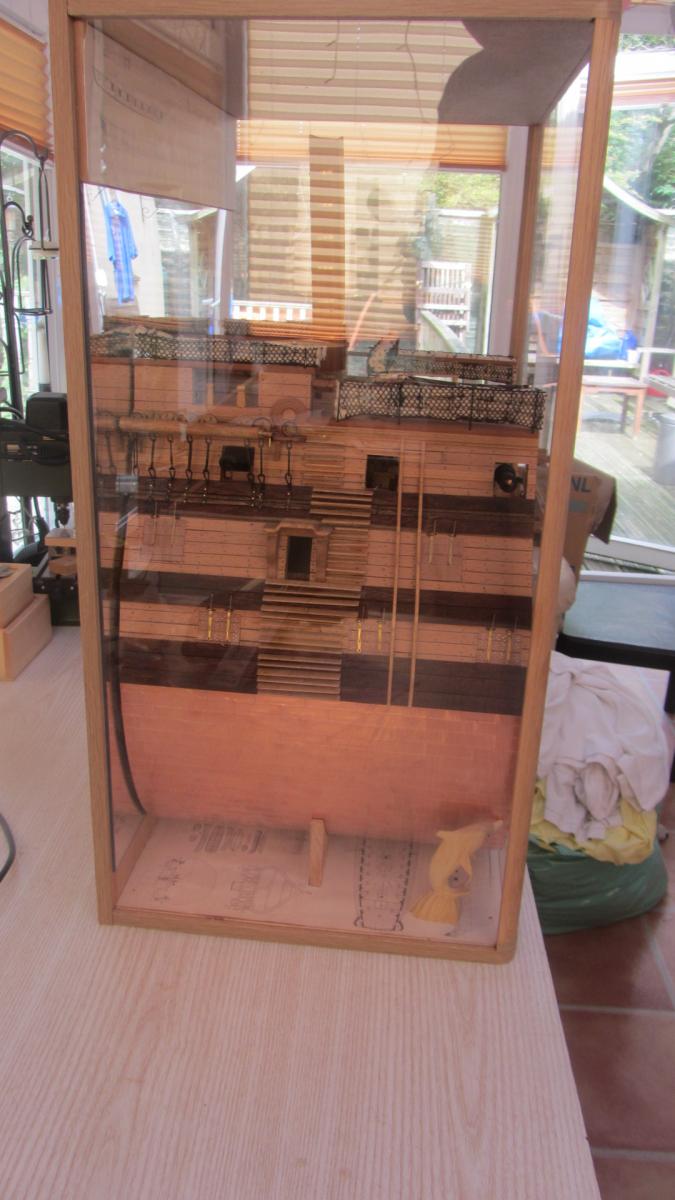
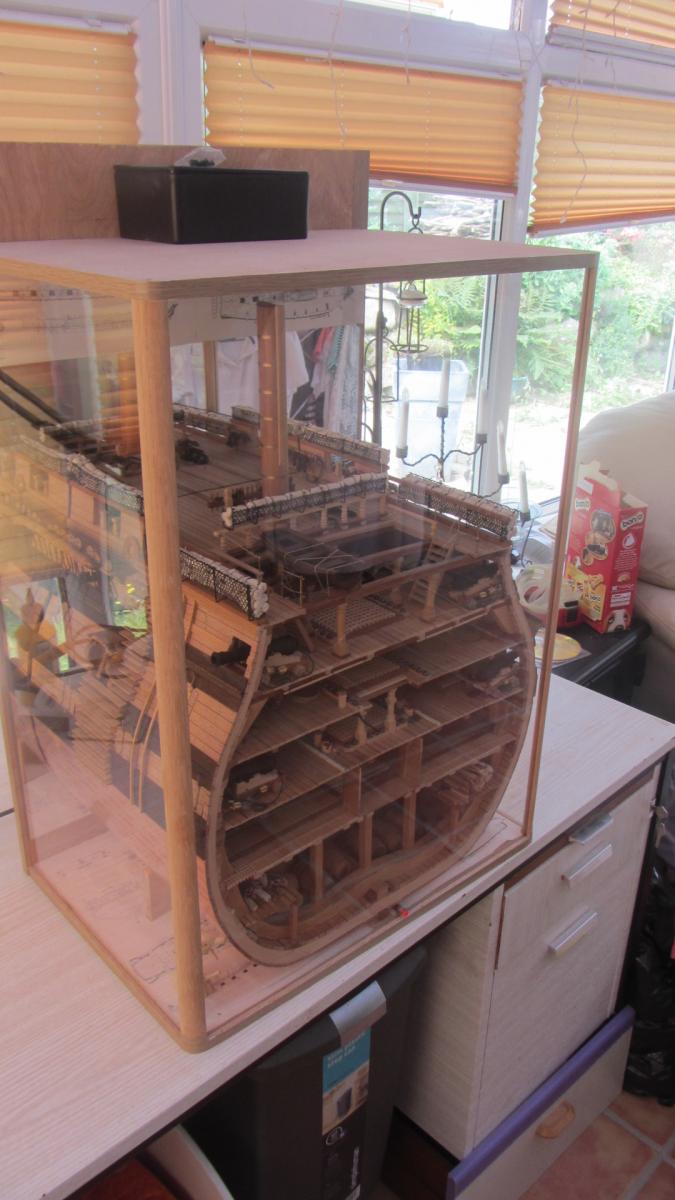
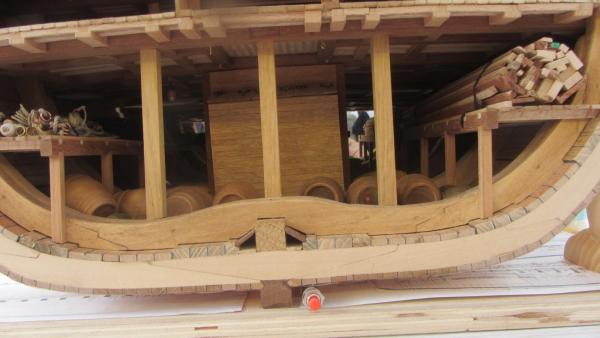
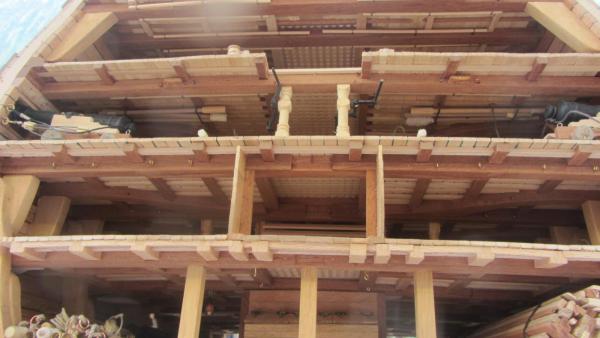
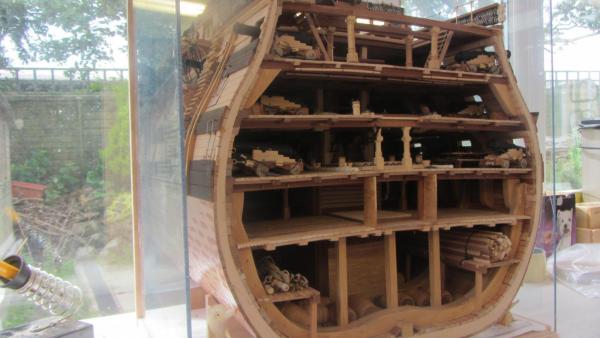
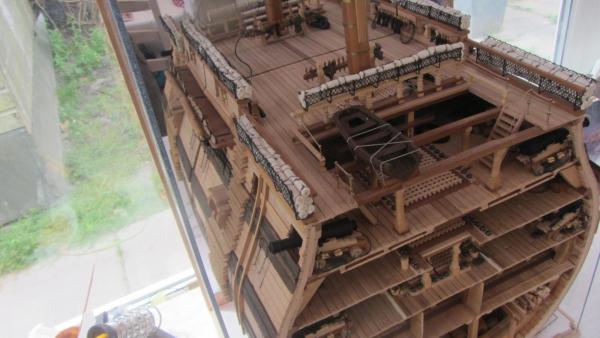
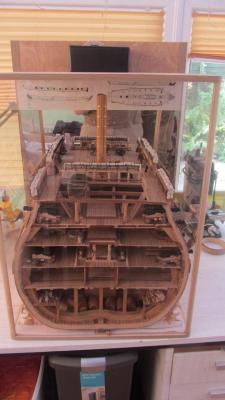
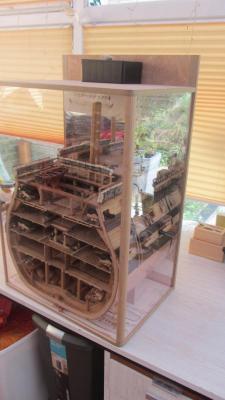
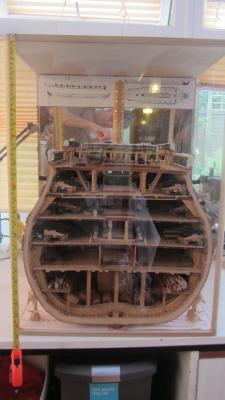
Hi. Well its the end of this build and its been a nice steady build. Started in September 2013. with a couple of breaks IE summer holidays. Daughters wedding. A few photos are in order.. The Enclosure is made from Fire resting poly-carbonate, as its Health and Safety thing. Top .bottom and back are 12mm plywood. There is also a Mirror at the back of the model..Gives it more depth. Doctor Who cheat. The Red button is a press to make switch. and holds the power on for 30 seconds. Lights that are in the Hold and Orlop deck flicker like oil lamps. The two Dolphins are carved from Boxwood (not by me) . Local shop sells then cheap. I did not put gravel into the hold in order to keep the weight down. The drawings are bits that I had lying around.. They cover the plywood nicely. The tape measure is showing the physical size of the enclosure I really appreciate the help and encouragement you people have given me throughout this build. I would also like to thank my friend Roy for supplying my with the timber for the build. And of course the person who keeps everything running in the house while I have my head buried in the model. Marian. And all the likes... There are soooooo many. Any questions.. Please ask. Regards Antony.


- 209 replies
-
- 30
-
-
Hi Jeff. Never 2 late to carry on with the build. Looks good from this side of the world. Regards Antony.
-
Hello Christian. This looks like a nice place to learn a new method of hull construction.. Not seen the method before.. Will follow along of this build if you don't mind. Regards Antony.
-
Hi. It's a old kit as you know. Google have come up with a few photos.. Not plans. IE http://www.dba.dk/seeadler/id-1015921066/billeder/2/ Don't know if you can get enough information from them. Regards Antony.
-
Hi Jonny. Grats on the k9. Major timber chewer if I am not mistaken . She looks adorable as most puppets do. Plenty of walks and puppy training to start with. Followed by more walks. The Sherbourne is looking real good. Some really good mods made and the result is showing in the model quality. Regards Antony.
- 188 replies
-
- 1
-
-
- Sherbourne
- Caldercraft
- (and 2 more)
-
Hi Shipwrights. Nice progress and she is realy taking shape. Keep the photos coming. Looking forward to the next instalment. Regards Antony.
-
Hi Don. Making very good progress on the planking .. Very neat and tidy. A question's if I may... How are you holding the planks in place ?. I see no clamp marks or pin holes. Regards Antony.
-
HMS VICTORY 1759 by isalbert
AntonyUK replied to isalbert's topic in - Build logs for subjects built 1751 - 1800
Hello Isalbert. Making Exelent progress. The finish on you timber is amazing and it shows in your build. I also like the number of photos you post with so many different angles. And nice camera work as well. A truly excellent build. Regards Antony. -
HMS Alert 1777 by Jaekon Lee - 1/64
AntonyUK replied to Jaekon Lee's topic in - Build logs for subjects built 1751 - 1800
Hello Lee. A wonderful job as always. Smart idea of the colouring of the glue. Regards Antony. -
Hi Crusoe. Welcome to MSW. You have made a Exelent start to your Bounty. Nice work area you have there.. Please keep posting your updates.. As it helps the people that have built this kit to help you.. Advice.. Check and double check .. Can save a lot of problems later on. Keep everything square that ment to be square.. Post any concerns you come across here.. Some one will know the answer Happy ship building. Regards Antony.
-
HMS Sussex by mij - Scale 1:48
AntonyUK replied to mij's topic in - Build logs for subjects built 1501 - 1750
Hi Mij. Wow big deciction to restart the model.. But it's gotta be done if you are not happy with the timber... It will always haunt you. Why not make a forward cross section with your mark 1. All the best. Antony. -
Hi Ted. Wow you have started already. Did you manage to find anymore information on the original ship ? Will be following along with this build. Regards Antony.