HOLIDAY DONATION DRIVE - SUPPORT MSW - DO YOUR PART TO KEEP THIS GREAT FORUM GOING! (Only 20 donations so far - C'mon guys!)
×


AntonyUK
-
Posts
1,190 -
Joined
-
Last visited
Content Type
Profiles
Forums
Gallery
Events
Everything posted by AntonyUK
-
 Hi. Have a look here. http://www.cornwallmodelboats.co.uk/acatalog/amati_gunports.html Regards Antony.
 -
Hi MD1400cs. Yea very very nice. I have a set of plans somewhere for the Nautilus . A interesting build as its a working version. Regards Antony.
-
Hi Yves. Yea. But you have the best timber ship model supplies in the World on your side of the water. Well that's my opinion Regards Antony.
-
3D Printer Software
AntonyUK replied to AntonyUK's topic in CAD and 3D Modelling/Drafting Plans with Software
Hi. Sharpie.. Never thought of the Stamp maker nice idea. But it's limmated on what you can do. Joe. Yes I do have Solidworks .. It's a very steep learning curve and I struggle with the simplest tasks. And doing something like the door entrances could not be justified in the time spent learning the software. There is software out there that can do what I want... Just keep looking. Regards Antony. -
Hi. Just noticed another kit being released in the UK. http://www.uboat-collection.com/index.html It's from Hatchetpartworks, It's a nice workable scale and it's got a lot of photo etched parts. Might be available in other country's . Regards Antony.
-
3D Printer Software
AntonyUK replied to AntonyUK's topic in CAD and 3D Modelling/Drafting Plans with Software
Hi Spyglass. The supplied software will not do what I want. I need to input a image then add a 45 degree angle to all the lines. Angle should be variable. This is what's wanted. Regards Antony. -
Hi. I have just been given a 3D printer kit. The previous owner got feed up with trying to build it and the soldering was a no no. http://www.velleman.co.uk/contents/en-uk/p576_k8200.html It has No software. He has misplaced it. or it never arrived What I would like to use it for is making small fittings and figures. Can anyone suggest a software package that will do this. To be able to scan a picture and then convert it into a 3D printable file. If its a freeware then even better. One of the first things I would use it for is to make the Victory captains entrance parts( carvings ) Thanks in advance. Antony.
-
Hi. Alex is really enjoying this build. Wants to do the next stage as soon as the he completes one. The kit is quite good and the hull is well machined. Some slight adjustments were done to round off the Bow area. Just done a lot this afternoon and he is doing the write up now. Took him 3 and half hours to type his first post. So don't expect a post today Regards Antony.
- 33 replies
-
- 1
-

-
- Black Queen
- Mamoli
- (and 2 more)
-
Hi Bob. You have made some excellent progress since my last post. As all the others have said everything that I could say. I will just keep browsing you log wondering when if I will ever be able to achieve such perfection and quality. Regards Antony.
-
Who makes the best model ships ??? - moved by moderator
AntonyUK replied to Gundorph's topic in Wood ship model kits
Hi. You could have a look at this very good database on models. http://mswshipkits.ampitcher.com/ Then browse the forum builds on one you like and make your own mind up. Regards Antony. -
Who makes the best model ships ??? - moved by moderator
AntonyUK replied to Gundorph's topic in Wood ship model kits
Hi. There is a discussion somewhere on MSW. There is no easy answer to your question. BUT my vote goes to Euromodels. Not built a Euromodel kit yet but after reading comments and reading lots of kit builds it seems to me to be the best out there. But ultimately Models that scratch build modellers are the best quality. Regards Antony. -
Hi? My next project will be a English cutter. I will be following this build with interest. As far as putting the deck on upside down ...I think we all have done things similar in our past. Nice fix on the dec. Regards Antony.
- 63 replies
-
- 1
-
-
- amati
- lady nelson
- (and 2 more)
-
Hi Gregor. I am suffering with the lack of updates on your wonderful build log:) Please revive me and post some more of your cutter. Regards Antony.
-
Hi. Found this while researching my next project. Thought I should share it with you. http://www.gutenberg.org/files/17563/17563-h/17563-h.htm#CHAPTER_XII Its a E-Book. Some nice drawings and lots of excellent history and content. Regards Antony
-
Hi Ollie. Just catching up on your build.. I started reading through last year. Amazing build and with all the improvements you have made makes for a real nice model to display. Lots of attention to details and accuracy in this build .. You should give your self a pat on the back. Regards Antony.
- 803 replies
-
- 1
-
-
- colonial cutter
- modellers shipyard
- (and 1 more)
-
Hi John. Looking very nice. Regards Antony.
-
Hello Alex. Outstanding, Brilliant, Superb are the first 3 words that come to me after looking at the photos. Nice very nice. Antony.
- 227 replies
-
- 1
-
-
- cumberland
- 74 gun
- (and 1 more)
-
Hi Greg. Another build log with lots of extra mods. http://translate.google.co.uk/translate?hl=en&sl=de&u=http://www.modellboard.net/index.php%3Ftopic%3D42235.0&prev=/search%3Fq%3DBaubericht%2BBLACK%2BPEARL%2Bvon%2BHachette%26client%3Dsafari%26hl%3Den%26biw%3D1024%26bih%3D672 Regards Antony.
-
Hi Greg. Are you talking about the 6mm gap each side in part 7 if so that's OK. Part number 16 fits in here. This gap is used to join the stern and the bow section together. Look at page 6 .drawing 16 shows the 6mm gaps. Regards Antony.
-
Hi Greg. Welcome to MSW. I started the pearl but hatchet part works failed to deliver . My advice is to stick with the instruction's step by step. Add or replace if you want to make improvements. The size is nice and makes into a fine scale model. Regards Antony.
-
Where is a good place to buy from? - moved by moderator
AntonyUK replied to wdretired's topic in Wood ship model kits
Hi. Shoping @ Cornwallmodelboats is a pleasure. Orderd late yesterday afternoon and it's arrived this morning. Yes it's just the next county. But that's service Avoide the dreaded TAX inport duties if you can. Shoping direct with Model Expo. Or ther EBay shop as suggested above by Geoff. All the best. Antony. -
Hi Rich. Making Exelent progress with the Victory. Looks good I also got the same sander.The rotary face was about 1.5 mm out of true when I got mine. The replacement was not much better. So I bore'ed out the shaft hole and resleaved it. Other than that it a great sander. Regards Antony.
-
Hi. There are a few on EBay. If you get a Byrnes saw order a couple of spares. Nice choice of blades for the saw. I am still on my first carbide blade and that's after cutting a mates timber for his build as well. Regards Antony.
-
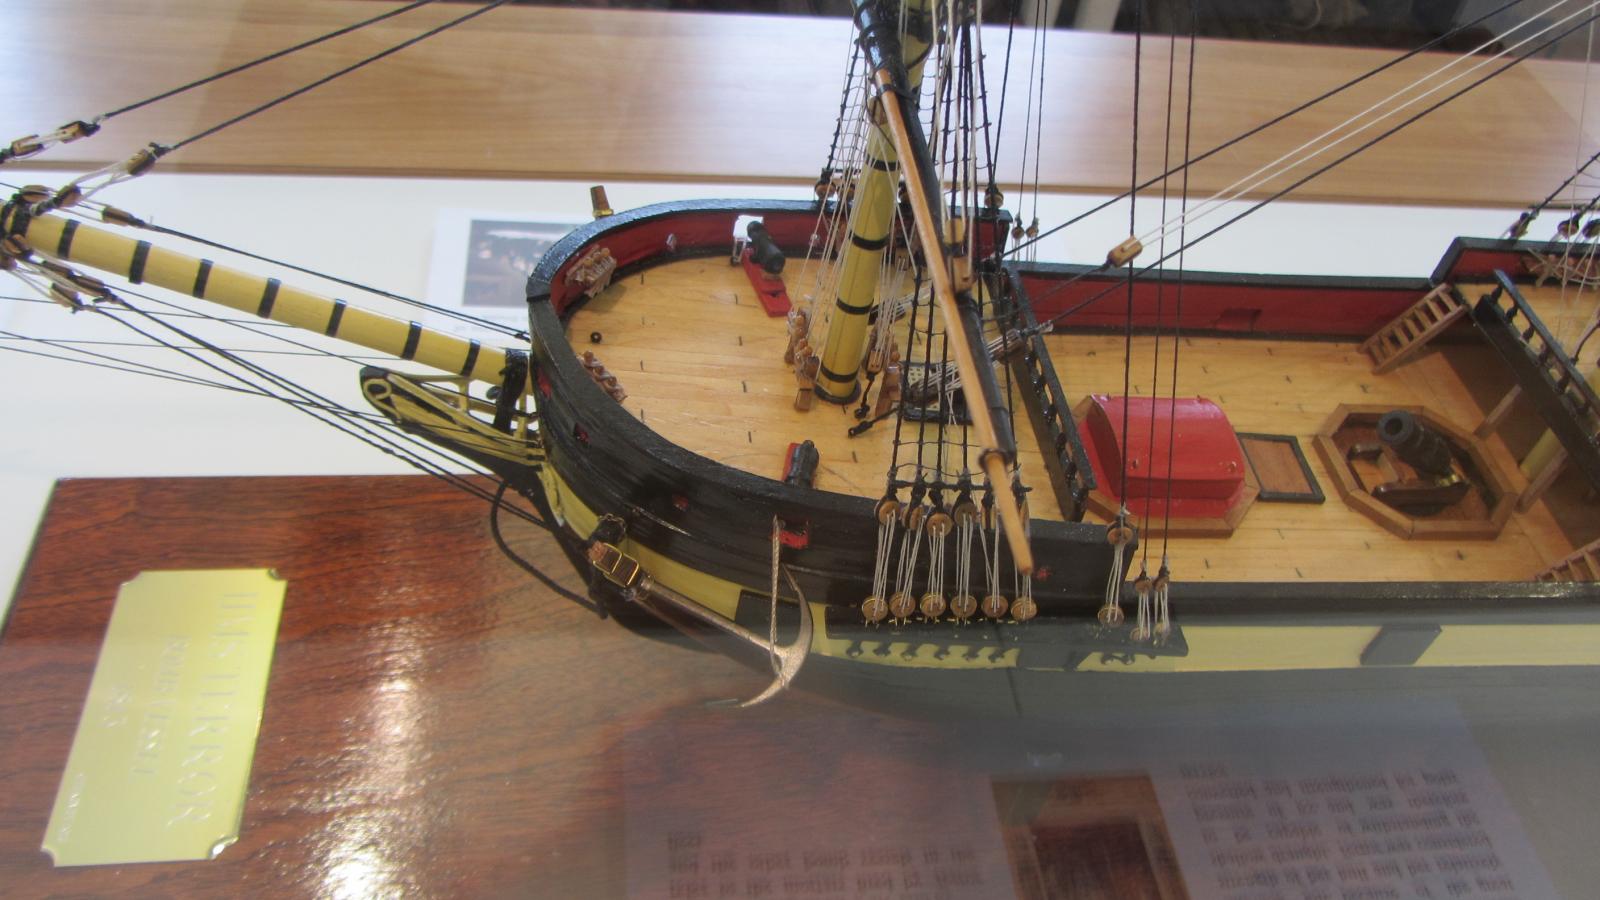
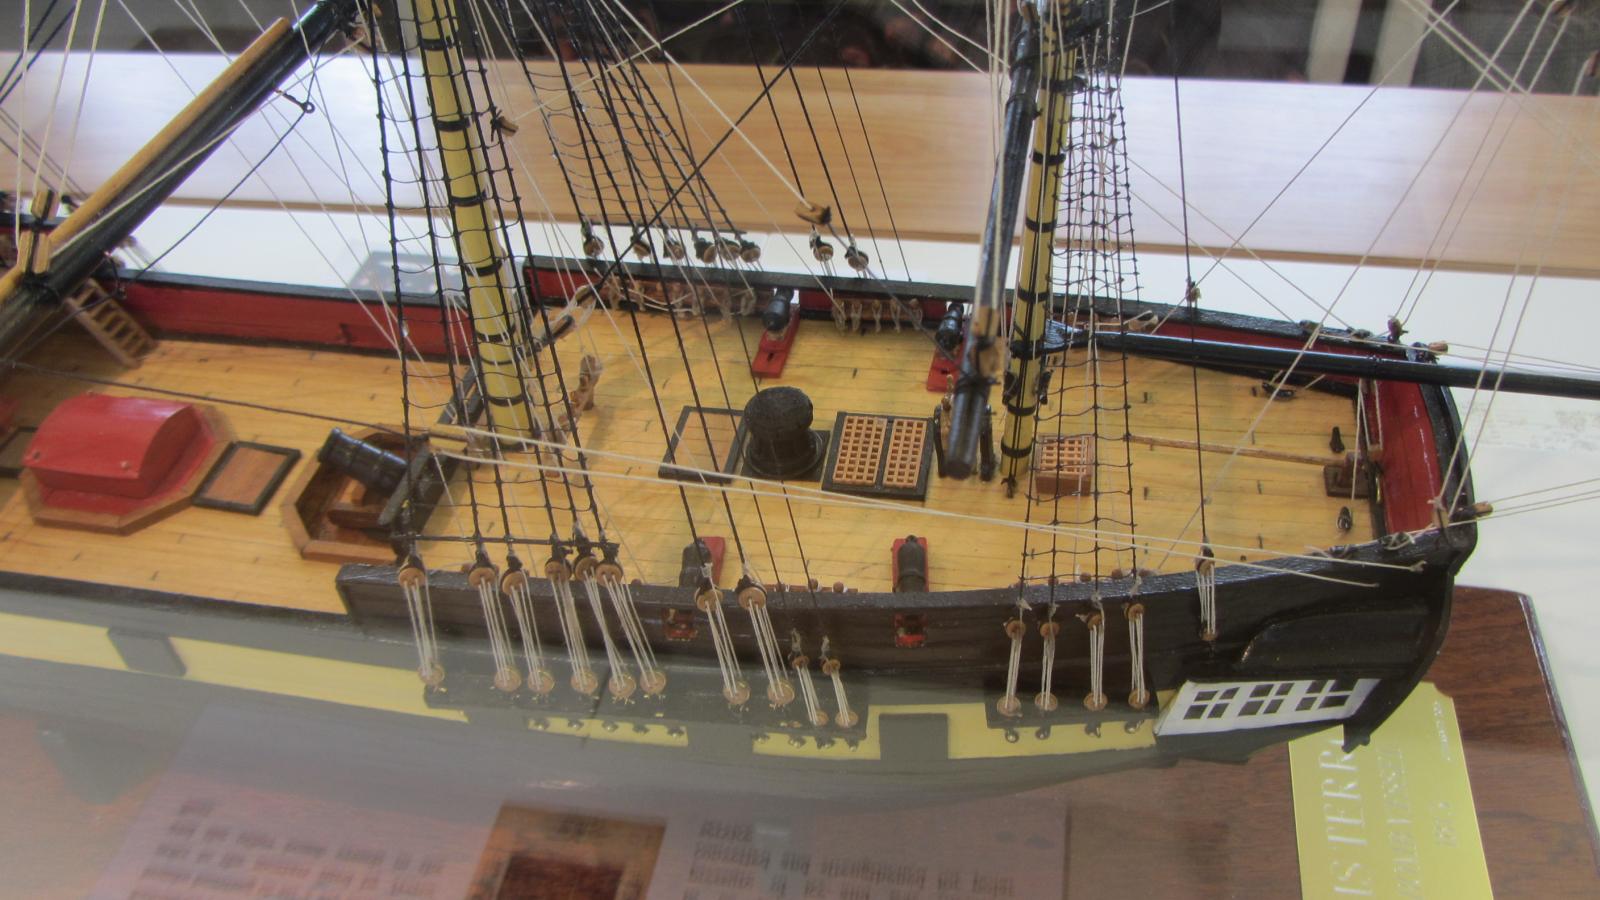
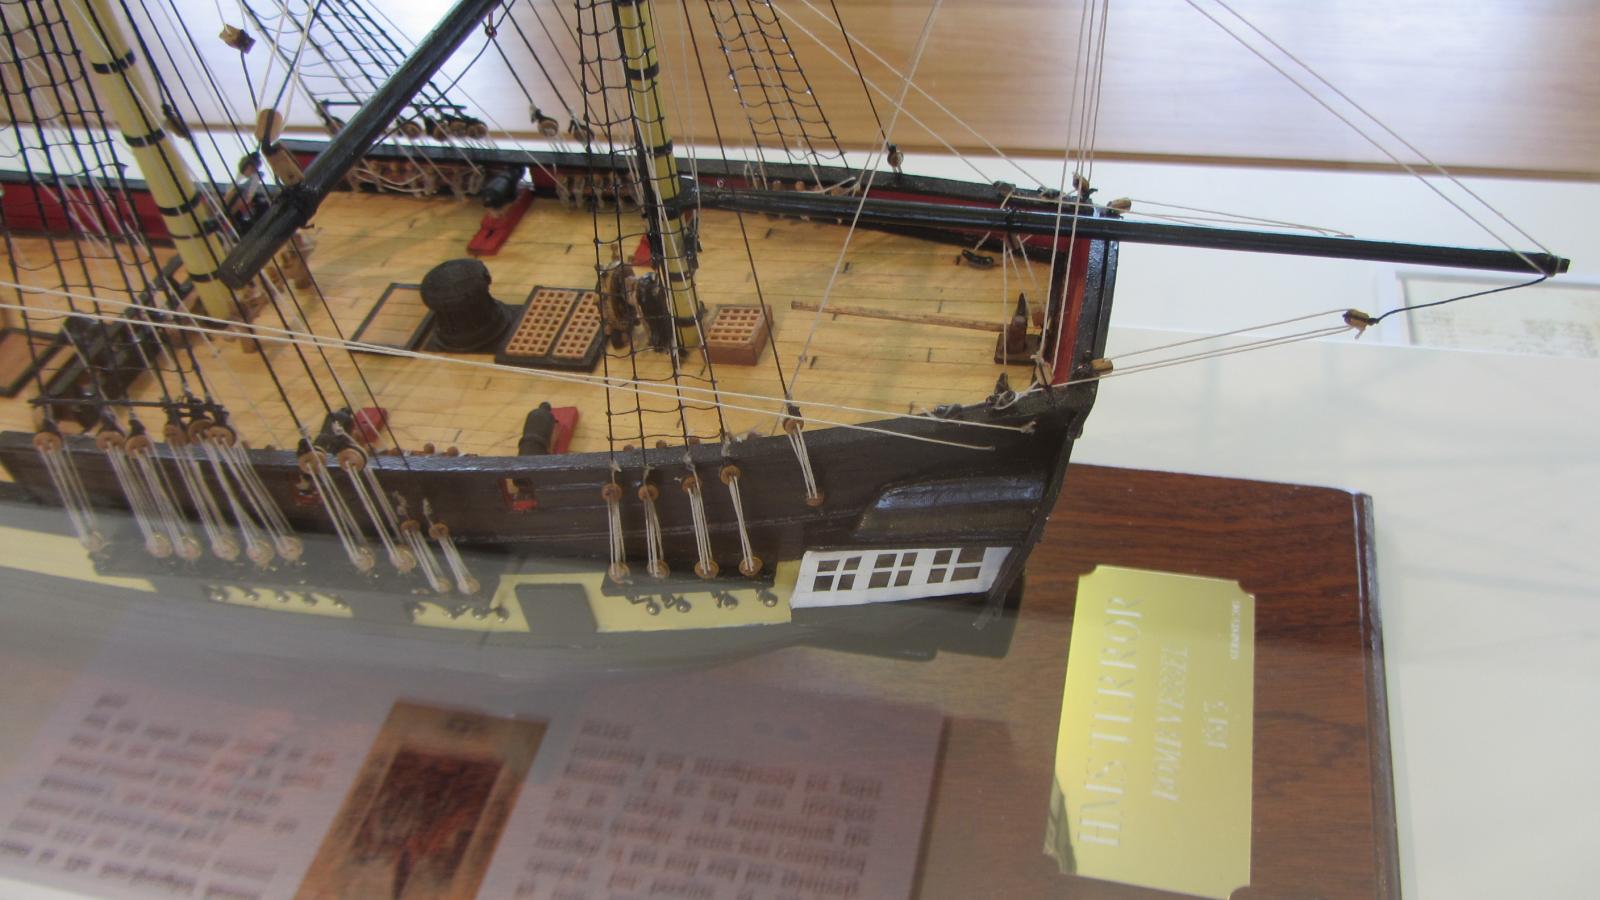
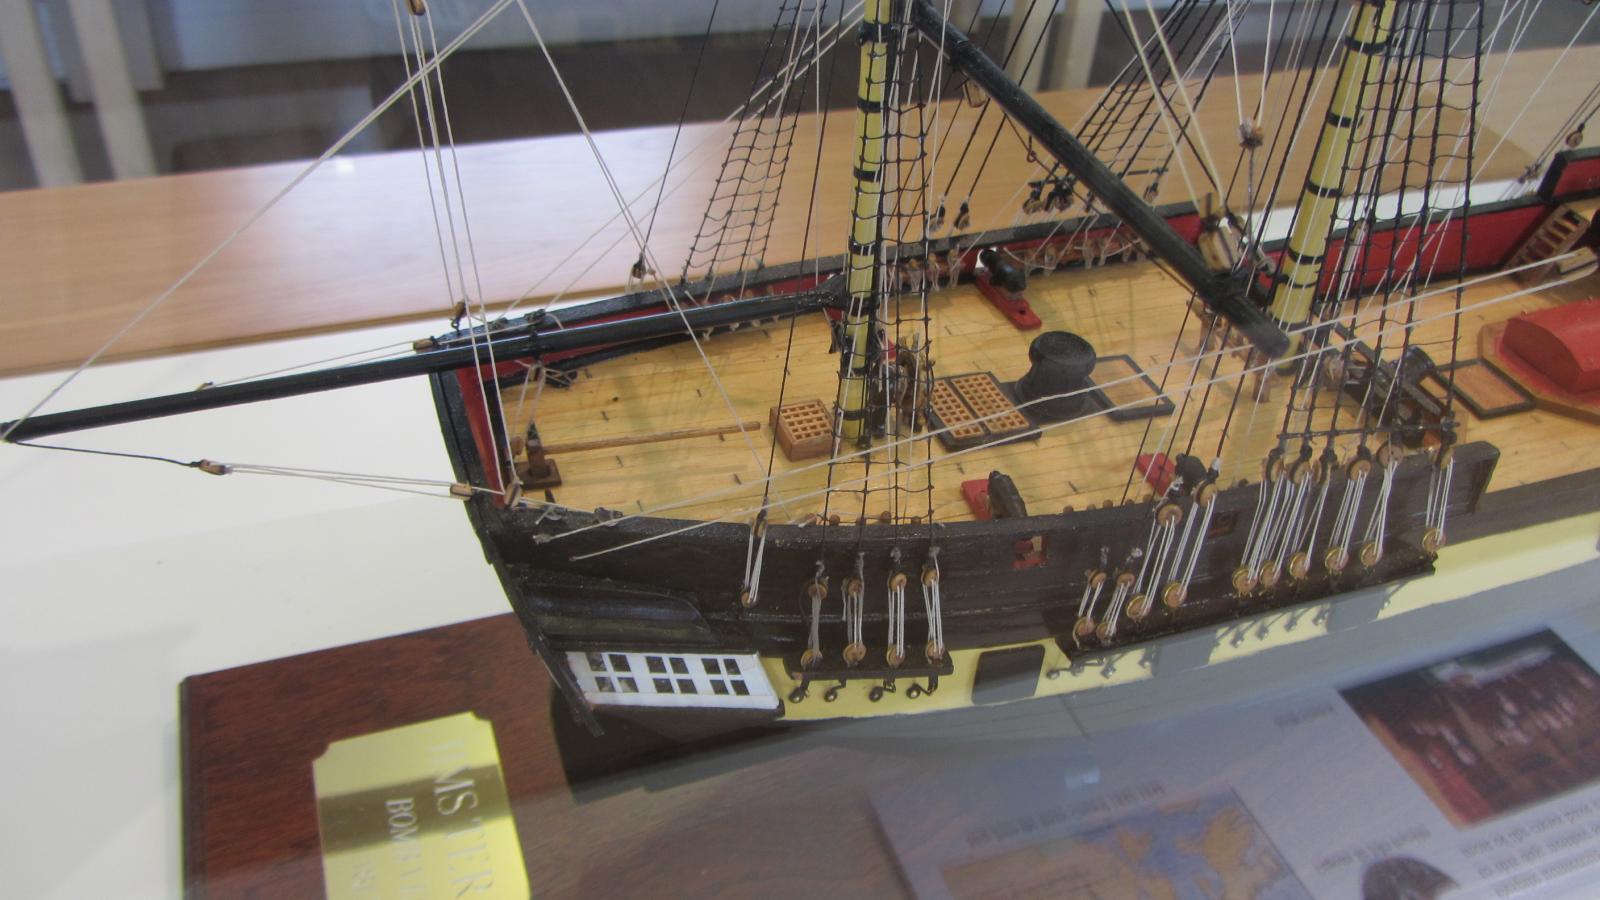
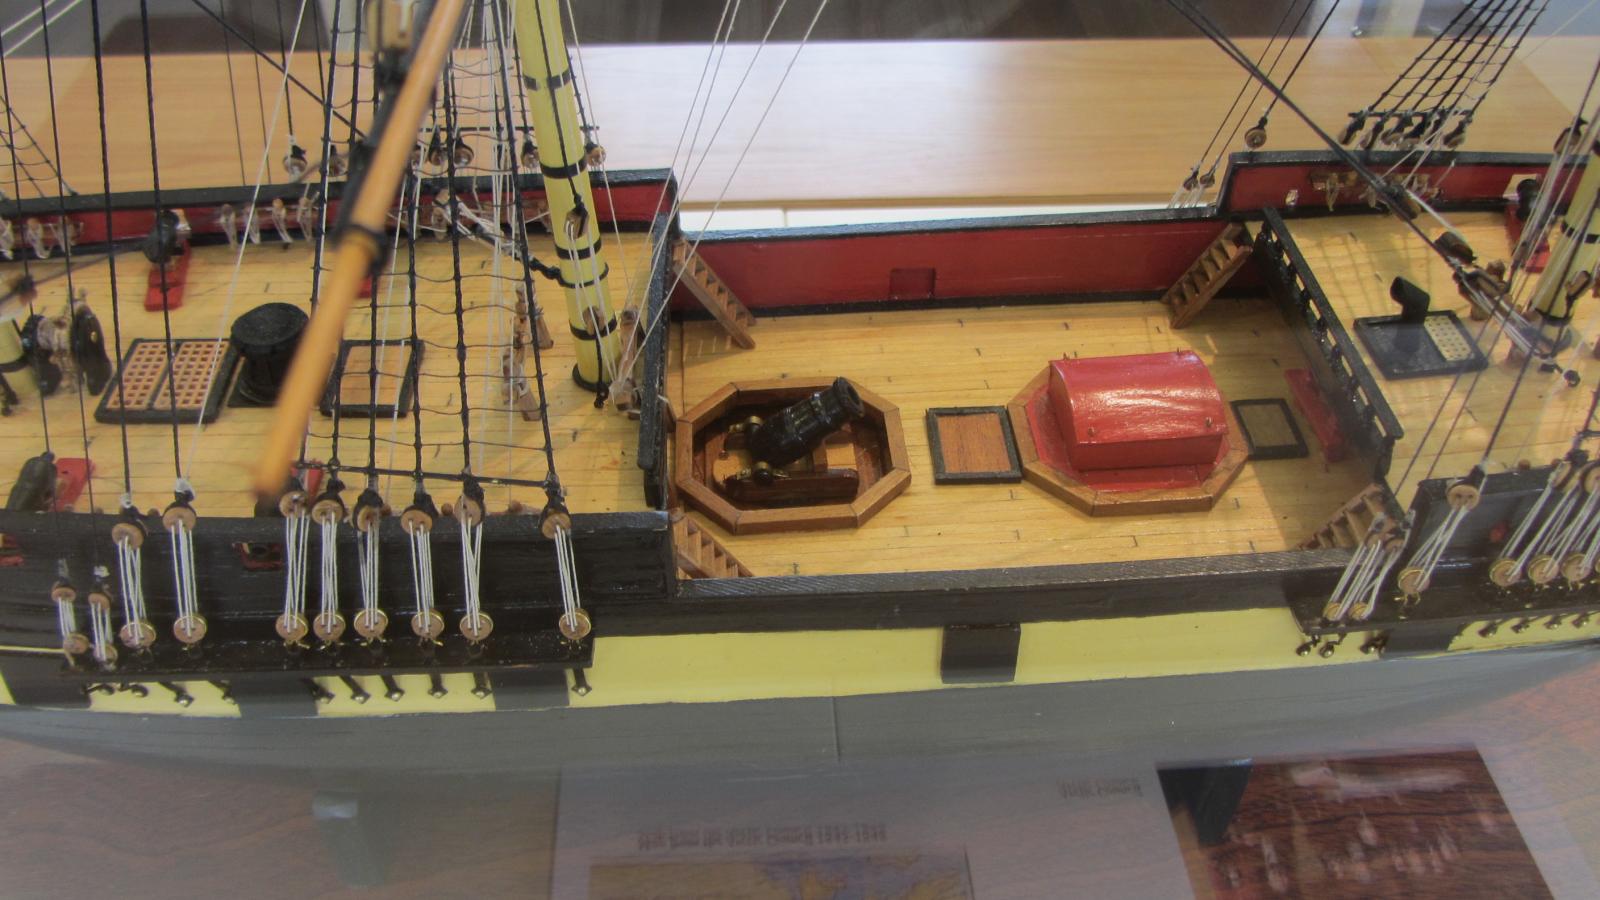
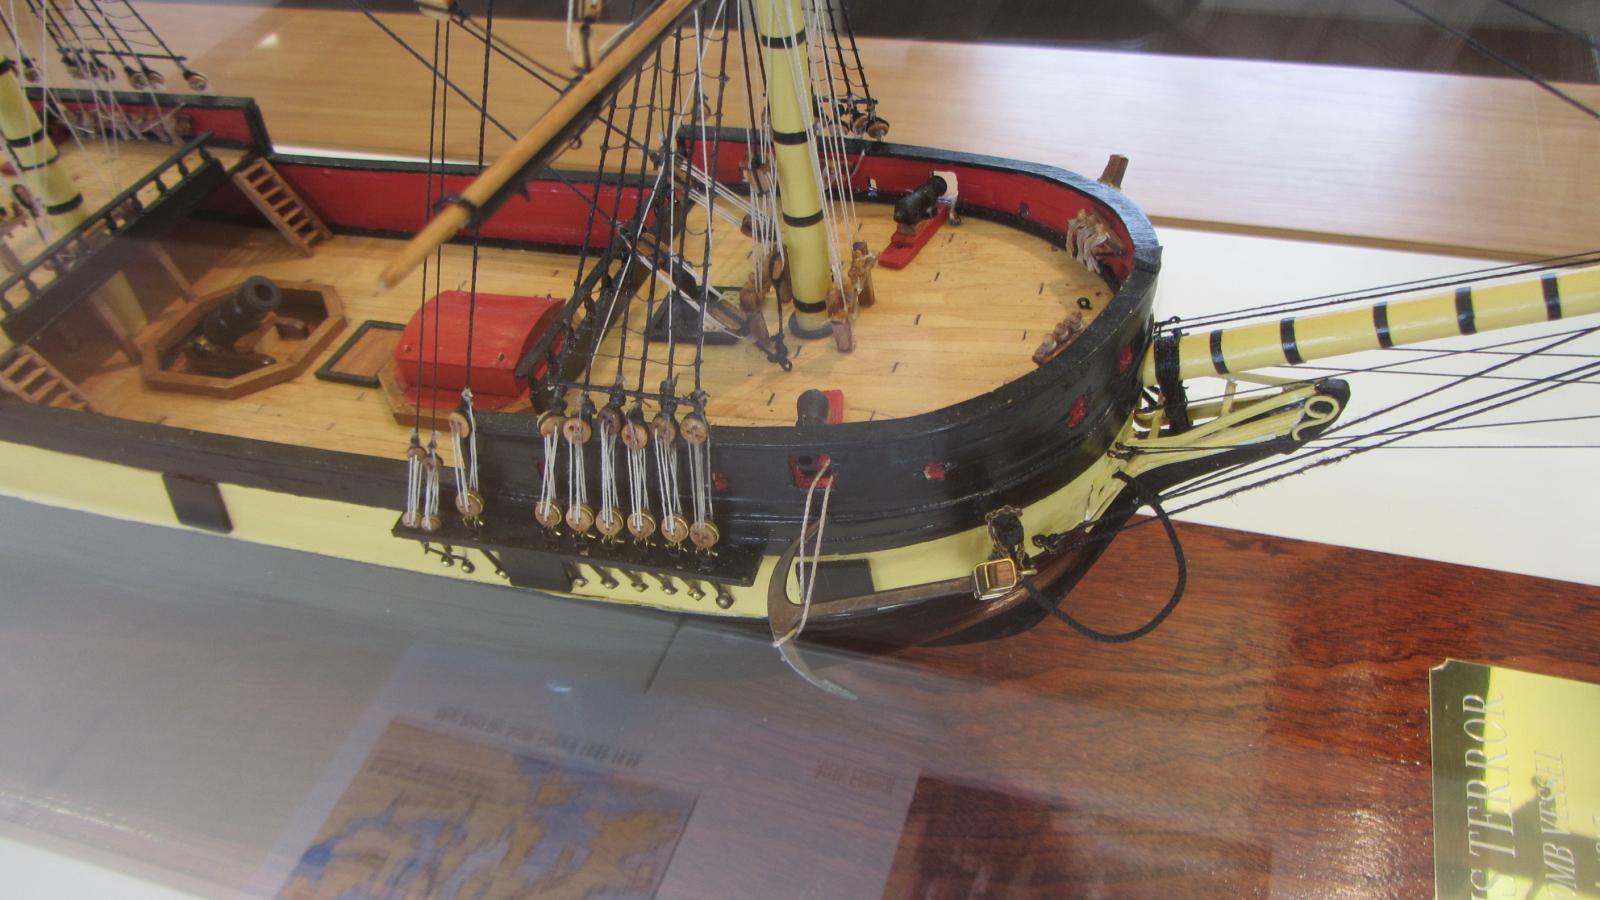
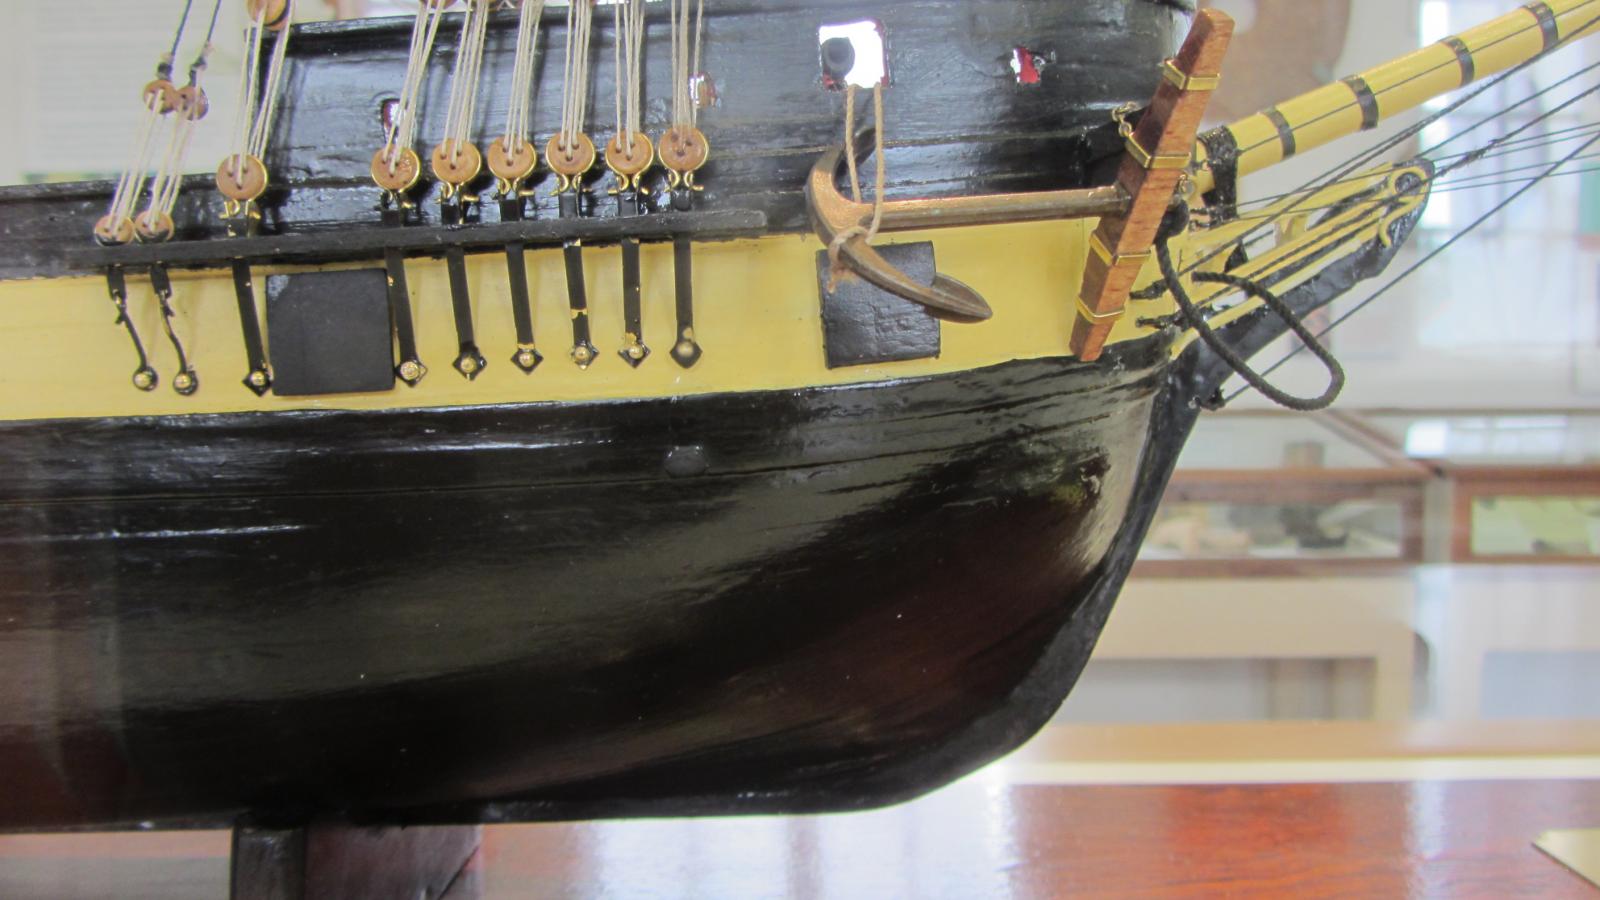
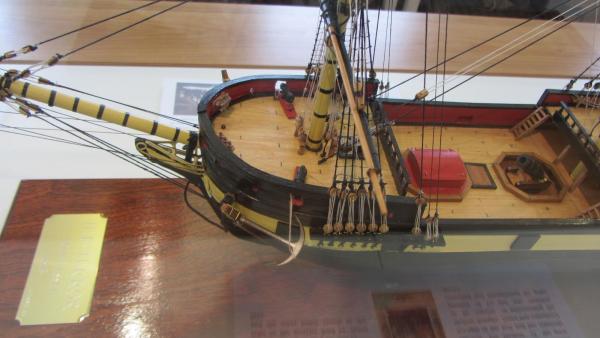
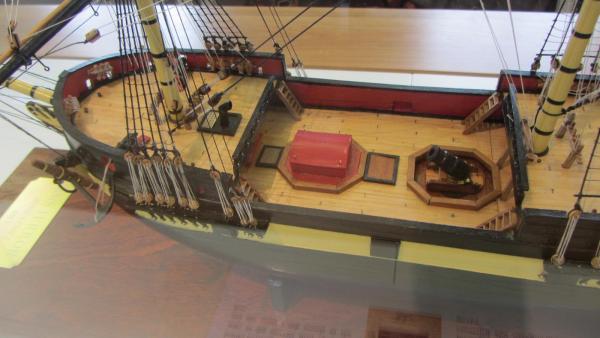
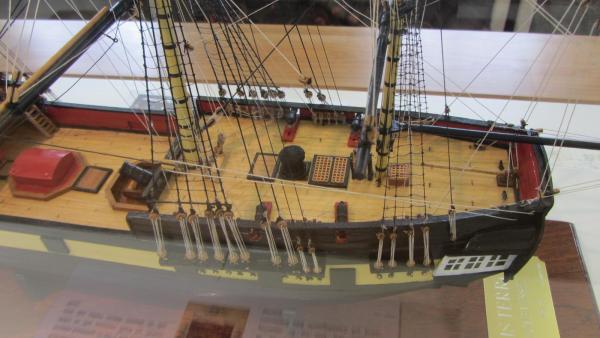
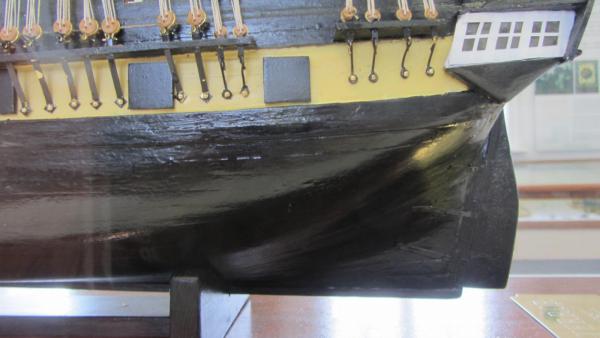
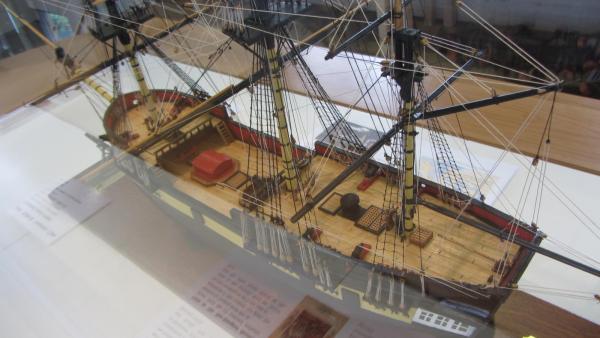
Hello E&T. had a day out at Topsham today. Managed a few photos of there ship. Photos are not good as exhibit is behind glass enclosure. The Dock she was built at. Photo of a diorama of Topsham. Hoping these will be of some use to you. If not please message me to remove them. Regards Antony.


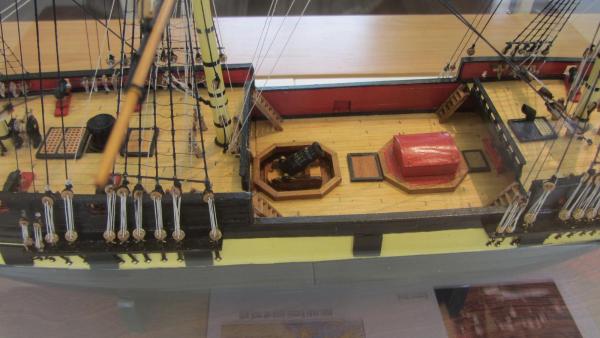


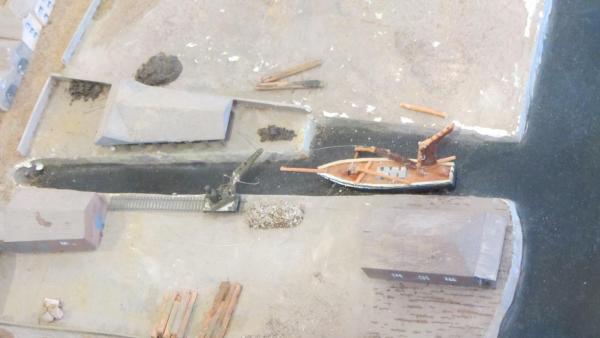
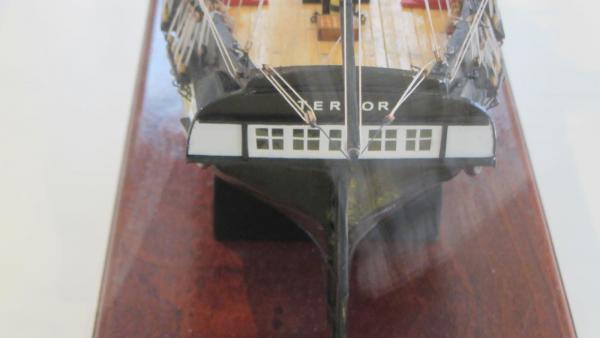
- 346 replies
-
- 12
-
-
- terror
- polar exploration
- (and 2 more)
-
Hi. Thanks for your nice comments and likes Michael . The film is very thin and flexible 100% clear plastic. It comes in a roll in many widths. Needs a lot of care putting it on as there is NO second chance to get it right. Would not be suitable for normal hull as there is very little stretch in the film. Regards Antony.