Ian_Grant
-
Posts
2,156 -
Joined
-
Last visited
Content Type
Profiles
Forums
Gallery
Events
Everything posted by Ian_Grant
-
 I guess another option would be to carry the rudder tube through to the well, then make a tiller like in the plan, and have the rudder servo pull the tiller arm via a string from each side, coming through the walls of the well. ps I assume the rudder shaft passes through a rudder tube in the hull; does the shaft extend above the waterline? Might be a problem if not. I could visualize a u-joint fitting on the rudder shaft with its second connector swivelling on a vertical shaft fixed under the well floor and a horn somehow attached to the vertical half of the u-joint. But in your case I don't think you have room for such a u-joint either. https://www.greathobbies.com/productinfo/?prod_id=DUM2013 There are ball-ish looking connectors for control horns but I've always just used quick-links. I doubt the b"ball" connectors would help in your case. https://www.greathobbies.com/productinfo/?prod_id=DUB2133 ps I added some pics to my earlier post - forgot them originally!!
 -
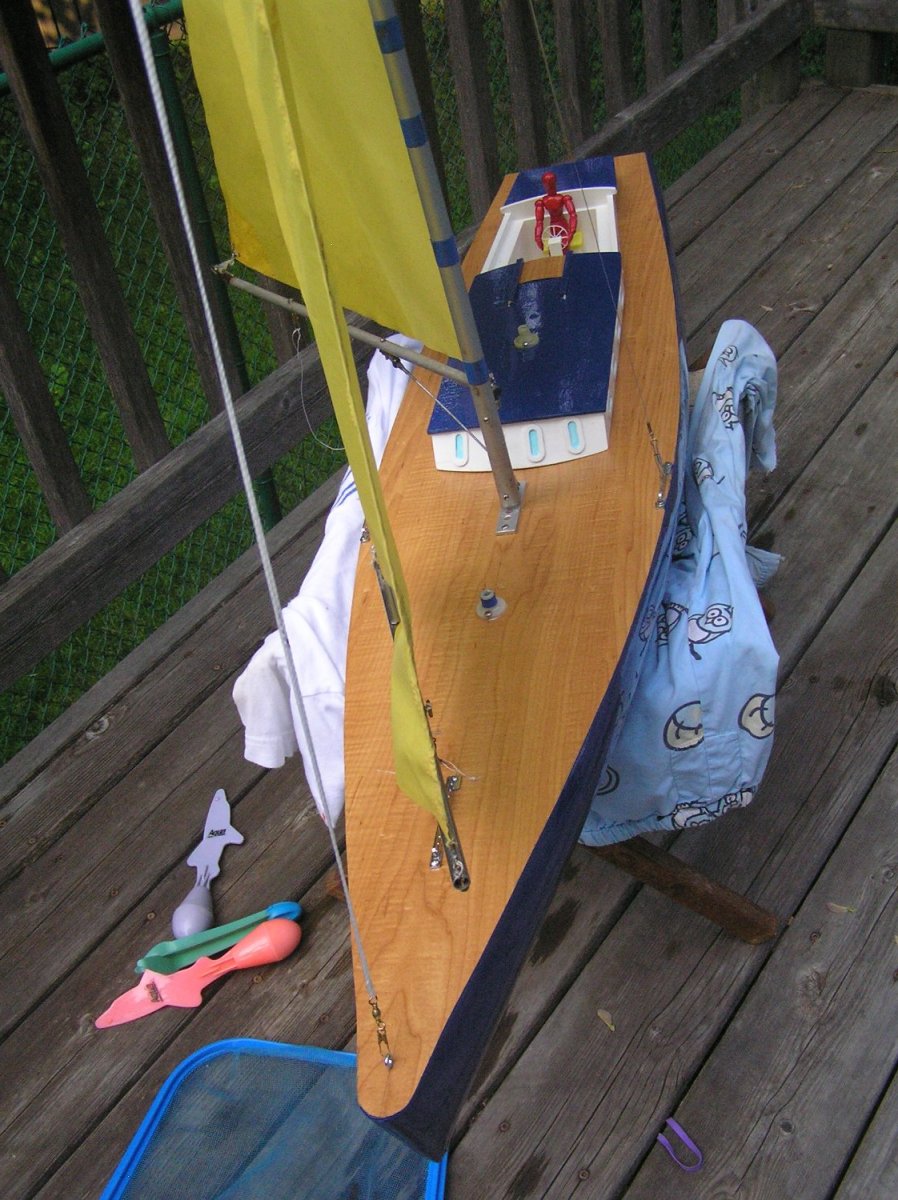
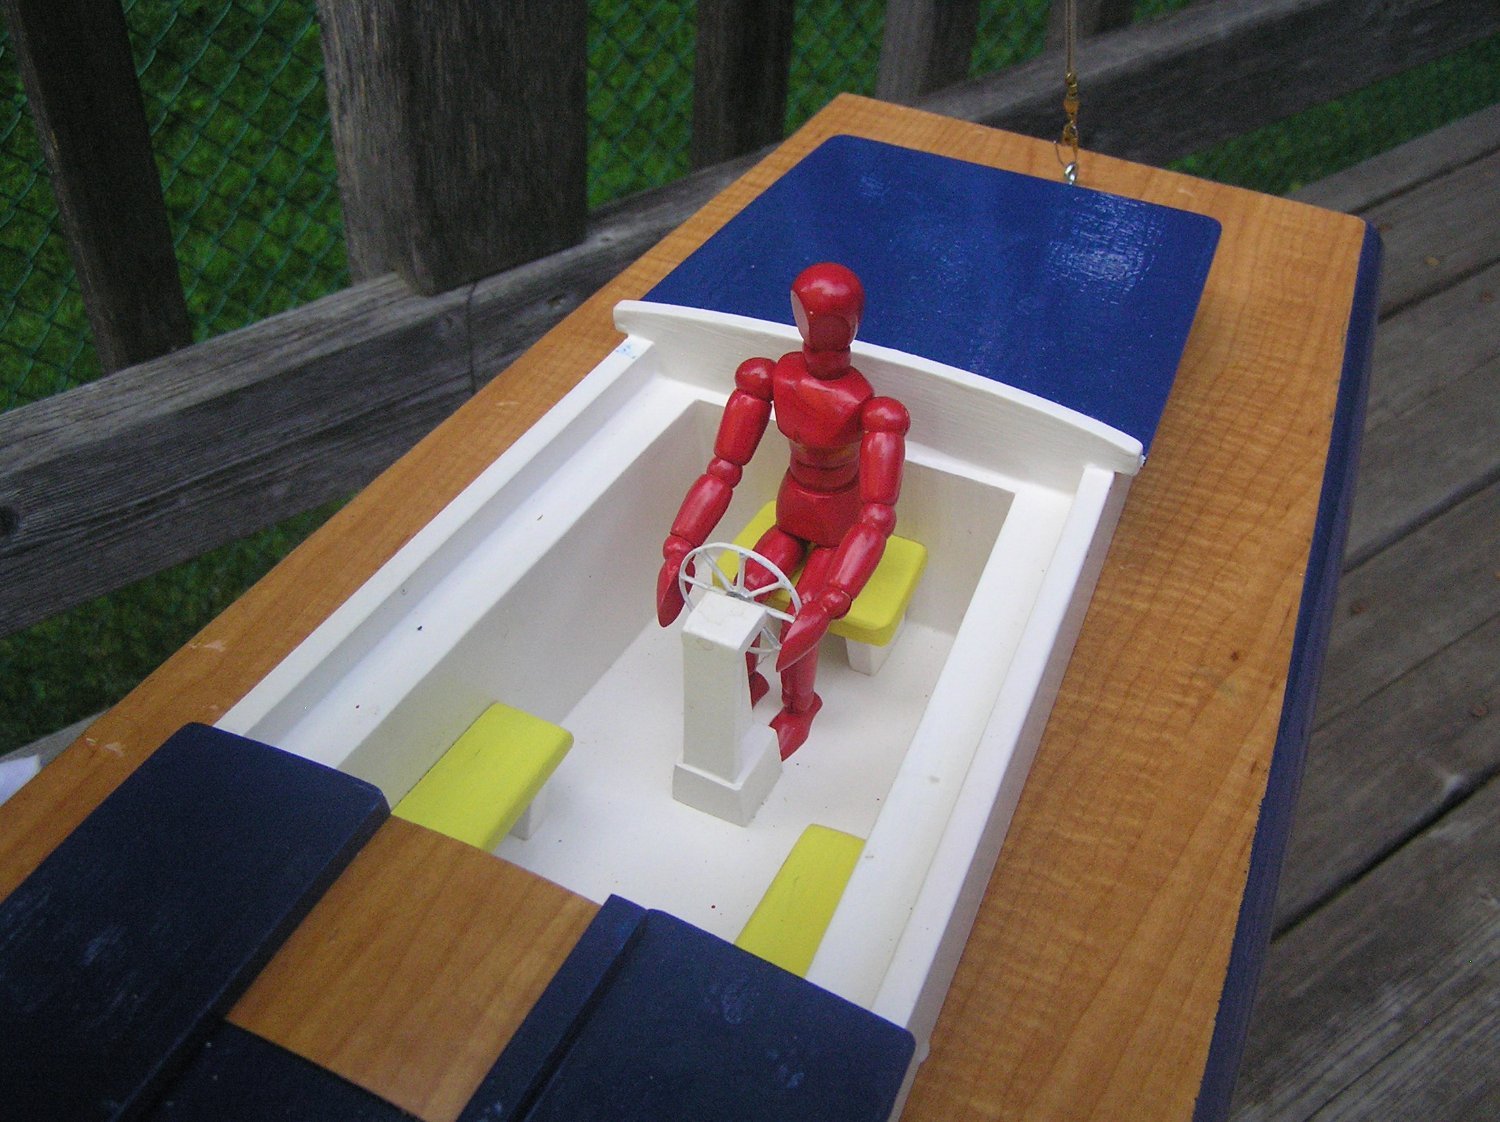
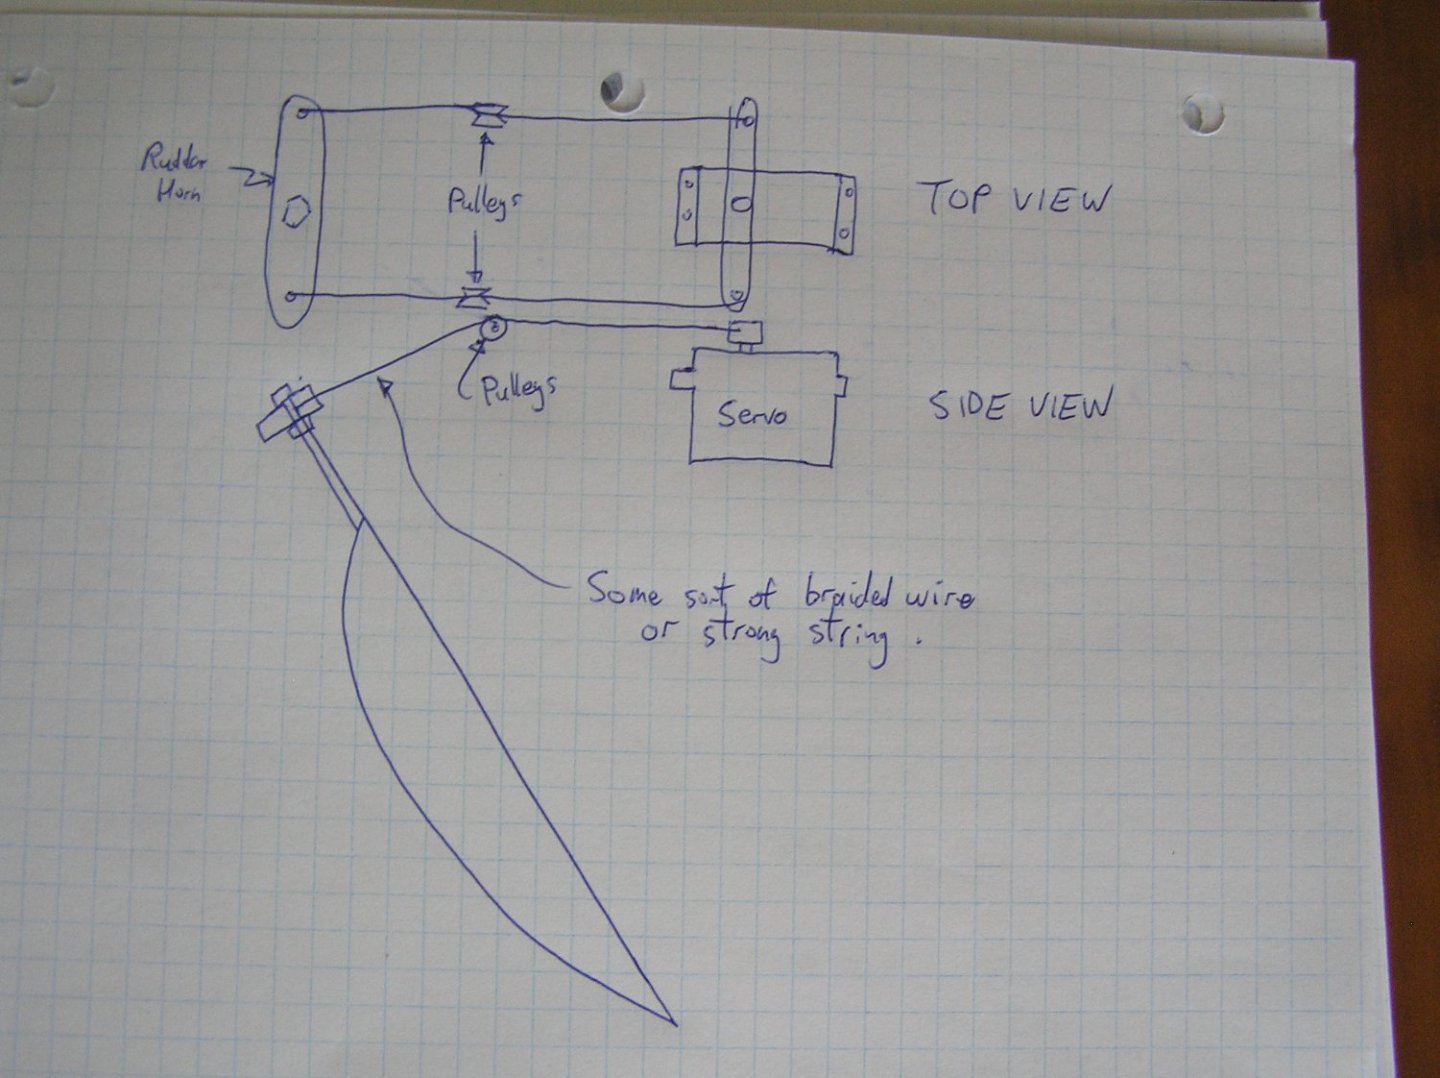
Jon, I see your problem with space for the rudder link. Hmmm,... could you make the well slightly shallower? or move its aft wall forward? Or maybe make it narrower at the aft end to allow for pulleys? It would be advisable to allow for access to the rudder head for maintenance/repairs. I've seen people add small platforms to allow for this. It depends how committed you are to exact scale appearance. Yes the sheets should rise from the centreline. ALERT: I was taking what I guess is a pic of your Bluenose for the Dorade!!! You must have wondered what I was talking about with flying jibs etc, HaHa!! Now I've googled the Dorade and I see the actual rig you discuss above. Disregard much of what I said earlier. The foot of the jib and the main boom are pretty close to the same length; I would just connect their sheets at the same distance back from the jib-front-corner/boom gooseneck. They could both be driven from the same winch, no issue (assuming the winch has the pull force). You will need some sort of reduction to sheet the whatchmacallit sail at the stern, or a second winch. 30-35 degrees is not very much swing, not really enough to broad-reach at 90 degrees to the wind. Ideally you want to achieve close to 90 degrees in order to run with the wind following. Re my yacht: Originally I had a small hatch amidships for access. I had to cut a hole in the aft deck to fix the rudder post mounting, and I decided to replace the entire deck and while I was at it make a "cabin" spanning from the old hatch location all the way back to over the rudder. See pics below. Unfortunately when I tried it out I had water coming in around the cabin....deck had "bulwarks" around the opening and the cabin walls fitted around said bulwark. Water was able to rise over the bulwark. Plus my poor "helmsman" ended up in water up to his ***. I needed to rethink the cabin construction but I then became distracted by first a static display build of HMS Victory, and for the last couple of years a Roman galley which rows under RC control (my build log is here on MSW). One day soon I will fix the yacht, but after the galley I want to make, again for RC, a square-rigger of at least 3 masts of which there are many impressive examples in Williams' book. Old white deck hacked off, and imprived transom. New melamine deck installed. The new cabin. Crash Test helmsman.


-
This is a wonderful example of scratch building. Really enjoying following along. Probably the calcets' contrast will be enhanced when you wipe on some finish....
-
Great project, Grant! I do recall seeing a build log of Billing AQ years ago where the builder found suitable 1/12 scale figures (which is a common dollhouse scale) to represent Bogart and a seated Hepburn. Hepburn was fantastic but Bogart required some painted stubble to age him a bit. I don't see it here so maybe it was on the old Pete Coleman "Victory" site...... at any rate I look forward to seeing your build and especially how you RC a steam plant.
- 57 replies
-
- 6
-

-
- live steam
- radio
- (and 2 more)
-
SEA TRIAL #2 !!!!! While getting set up for this trial, I noticed my supply to the Arduino was intermittent (thank God for the power indicator LED on the board). Without a USB connection from a laptop, the Arduino gets its power from a 9V battery connected via a jack and the Arduino regulates it down to 5V. Two issues: (1) my 9V battery was giving barely 6.5V so the regulator was close to not being able to work (needs a certain amount of ceiling above 5V at its input), and (2) I forgot to solder one of the connections in the jack (!). So that's why the problem in Trial #1. This time I simulated the second tier of oars by adding suitably sized slices of pine to the existing oars' blades with rubber bands. I am delighted with the result, she moves much better. I now look forward to making and adding the second tier of oars, finishing up the hull, adding the removable deck, and painting her. Here's a video of this trial. I remembered this time to try out the various turning features i.e. inside oars stopped, inside oars reversed, depending on how sharply rudder is turned.
- 536 replies
-
- 19
-
-

-
- Quadrireme
- radio
- (and 1 more)
-
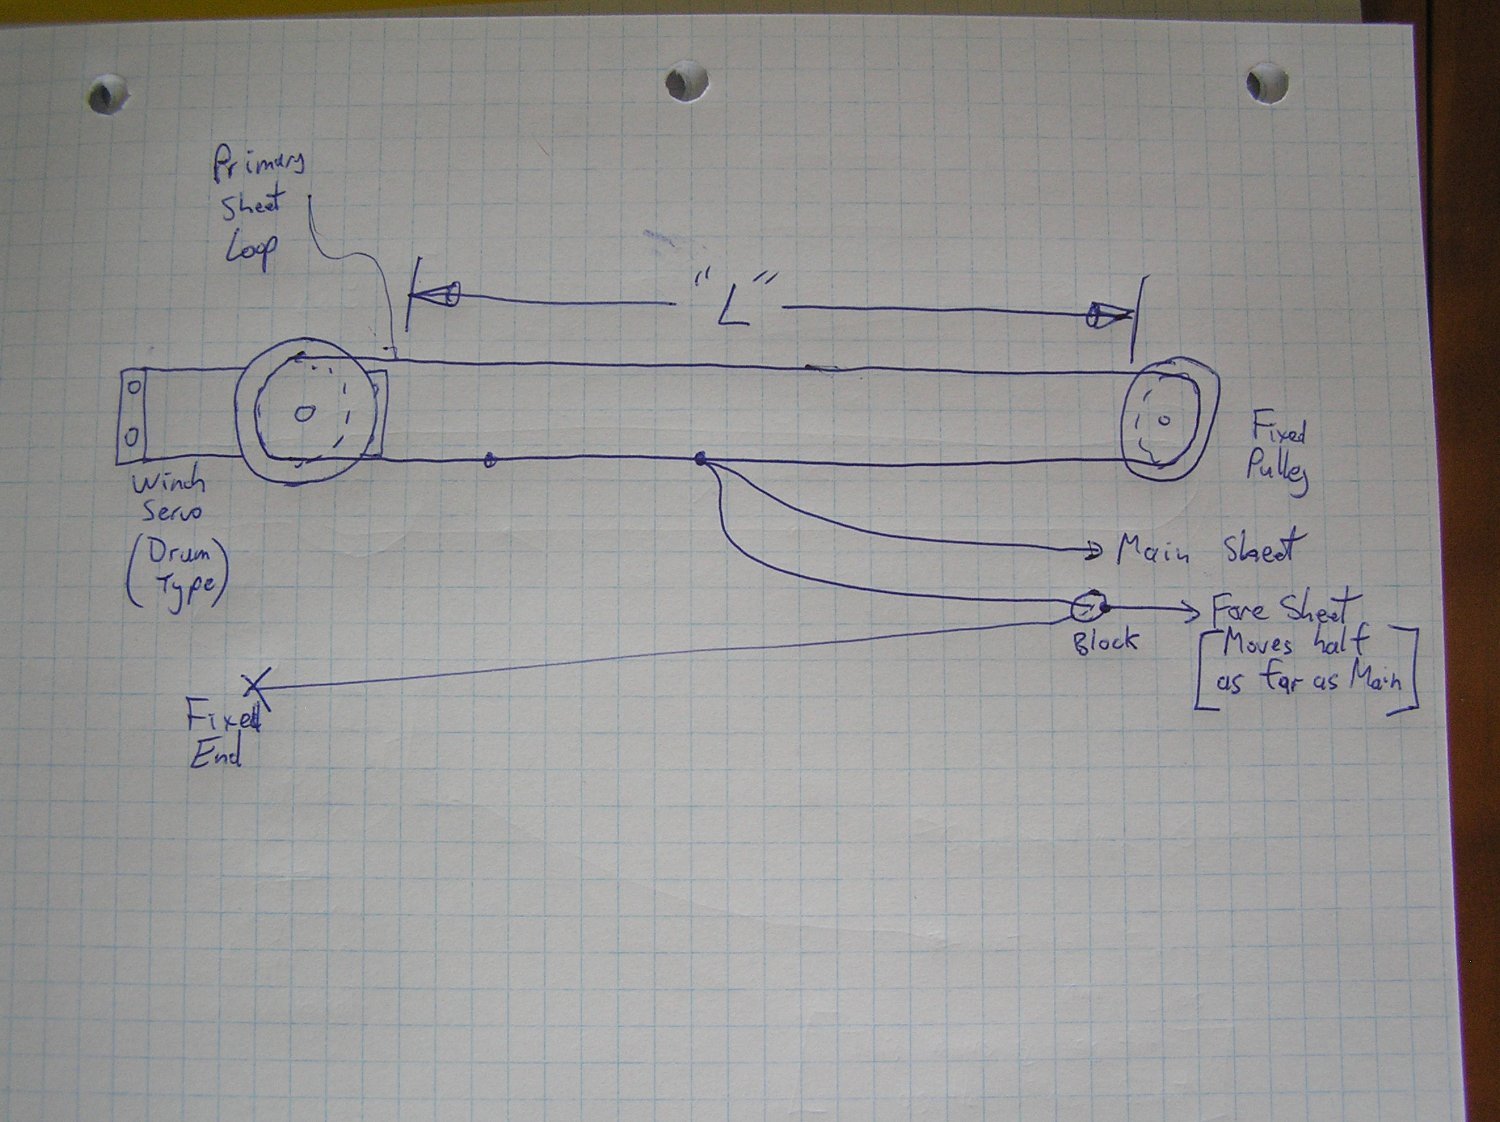
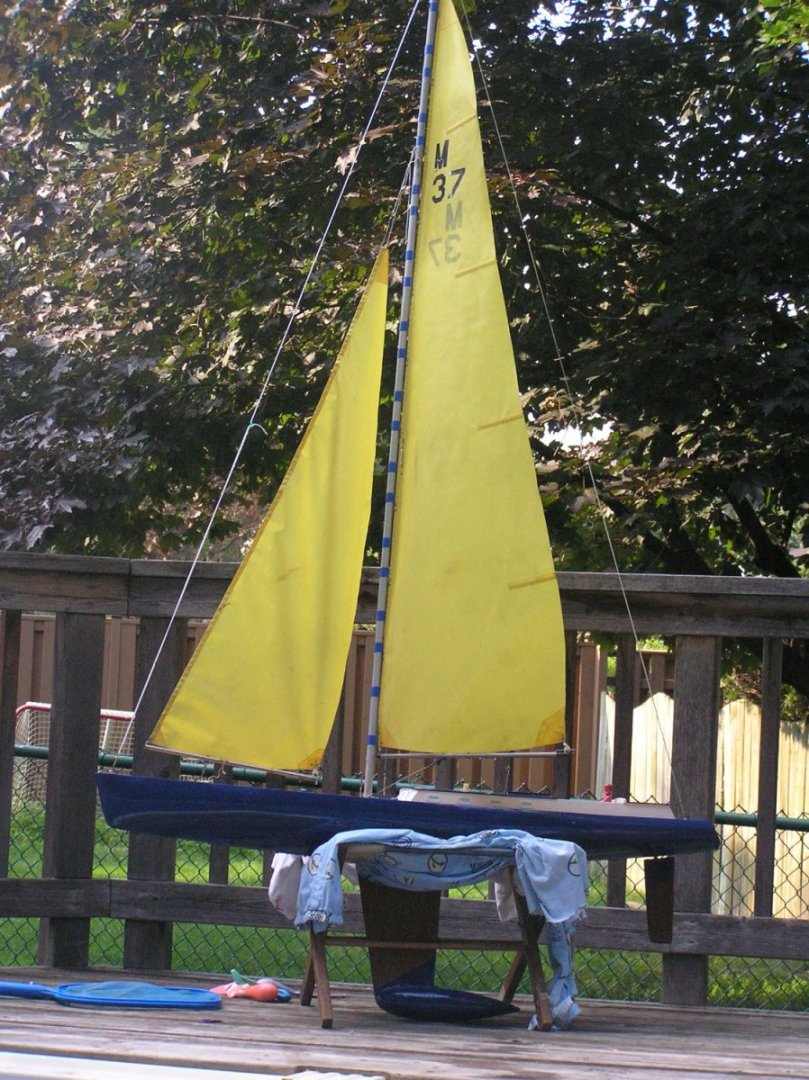
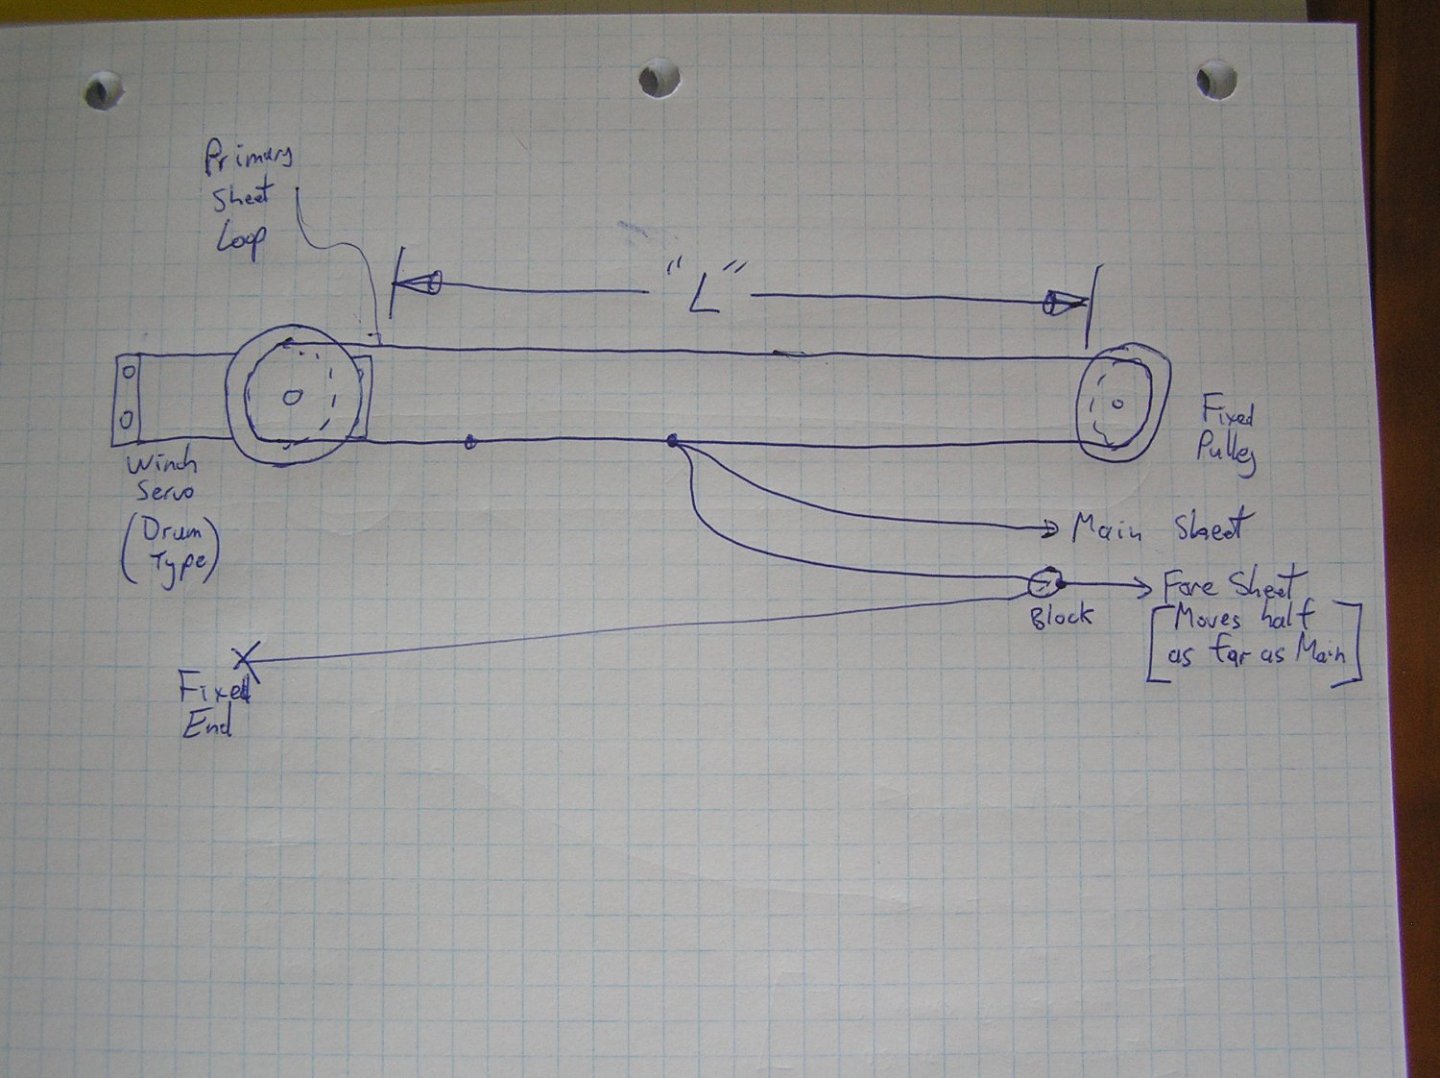
Jon, At least your rig is all fore-and-aft thus you don't have any yards with square sails to worry about controlling. By "snapped sheet" I just meant when one of your sheet lines to a sail/boom breaks. Which will happen. Rigging these is not just a one-and-done; you need to be able to replace the the sheets. Here are a few ideas to inspire your own........... With the rudder axis tilted, the rudder horn swings in a tilted plane, of course perpendicular to the axis. A servo connected to the horn with links running horizontally will not operate smoothly; the servo links should always run in the same plane as the servo arm. You could place the servo tilted to match the rudder axis, but you probably don't have room in your hull since the servo would lie well above the rudder horn. Instead you can switch to flexible links (since you have them on both sides of the horn) as below. The "pulleys" could even be just a round rod spanning the space. It/they would need to be above the highest point the ends of the rudder horn reach in a hard turn. Regarding the winches rolling back to their default position, you either have to keep your fingers constantly on the transmitter sticks to hold them in place, or open up your transmitter and remove the associated springs from the gymbals. Opening it may void your warranty. Ask about the springs at the hobby shop where you bought it. Regarding your need for different amounts of sheet movement for different sails, it is an issue with many models. Some approaches are: 1) Construct a multi-barrel drum with different diameter barrels > different diameters pull different lengths per turn. 2) Use a multi-barrel drum with constant diameter, and employ blocks/pulleys to double or half the pull on a given sheet. This is more or less easily done and is covered by Williams. 3) Use more then one winch, each with whatever barrel diameter is required. Your boat is a fair size with quite a bit of sail area. I don't know what pull will be required of the sheets or what your winches can pull. Perhaps you'll need two winches. At any rate here is a simple sketch to ponder. Williams highly recommends having a "primary loop" between the winch and a fixed pulley, which will never tangle, as opposed to running sheets direct from winch to sail(s) which can tangle, ie come off the drum, if you happen to try to move it at a moment when the sheets are not taut. Hard to put in words but I hope you see. Also shown in the sketch is how to have one sheet move half the distance of the other. If you attach the main sheet to the main boom at a point twice as far from the main mast as the other sheet attaches to the fore boom from the fore mast, the two booms will swing in unison. This probably means changing the point of attachment to the main boom from the "scale" position, but judging by the photo of the rigged model in your early post it should be pretty close. Of course, you will need room in the hull for the primary loop, whose length "L" must be greater than the travel of your longest-moving sheet, in your case the main sheet. In summary, attach the jib sheets to the jib sails (they look to have the same length along their bottoms); attach the fore sheet at the same distance with all three joining into one common sheet line; attach the main sheet at twice the distance; rig as in the sketch. There are also ways to arrange the sheet for a flying jib so it can properly fly to leeward of an overlapping jib no matter which tack - this is covered in Williams and also involves a simple factor-of-two rig. This is a lot to chew on but it is interesting to work things out to have a successful model. Good luck and I look forward to your progress! Lastly, here's a photo of a kit I made in the seventies and repainted and refurbished a few years ago (after the old girl sank at the cottage on her first sail in decades. The piece of wood embedding the rudder post detached from the inside of the hull and she went down by the stern. Fortunately I was able to find and recover her by snorkelling out). Much simpler rig than yours but needs a very powerful winch (still using the one from the seventies which has 20 lb pull but it is about the size of three hockey pucks (!!??).
-
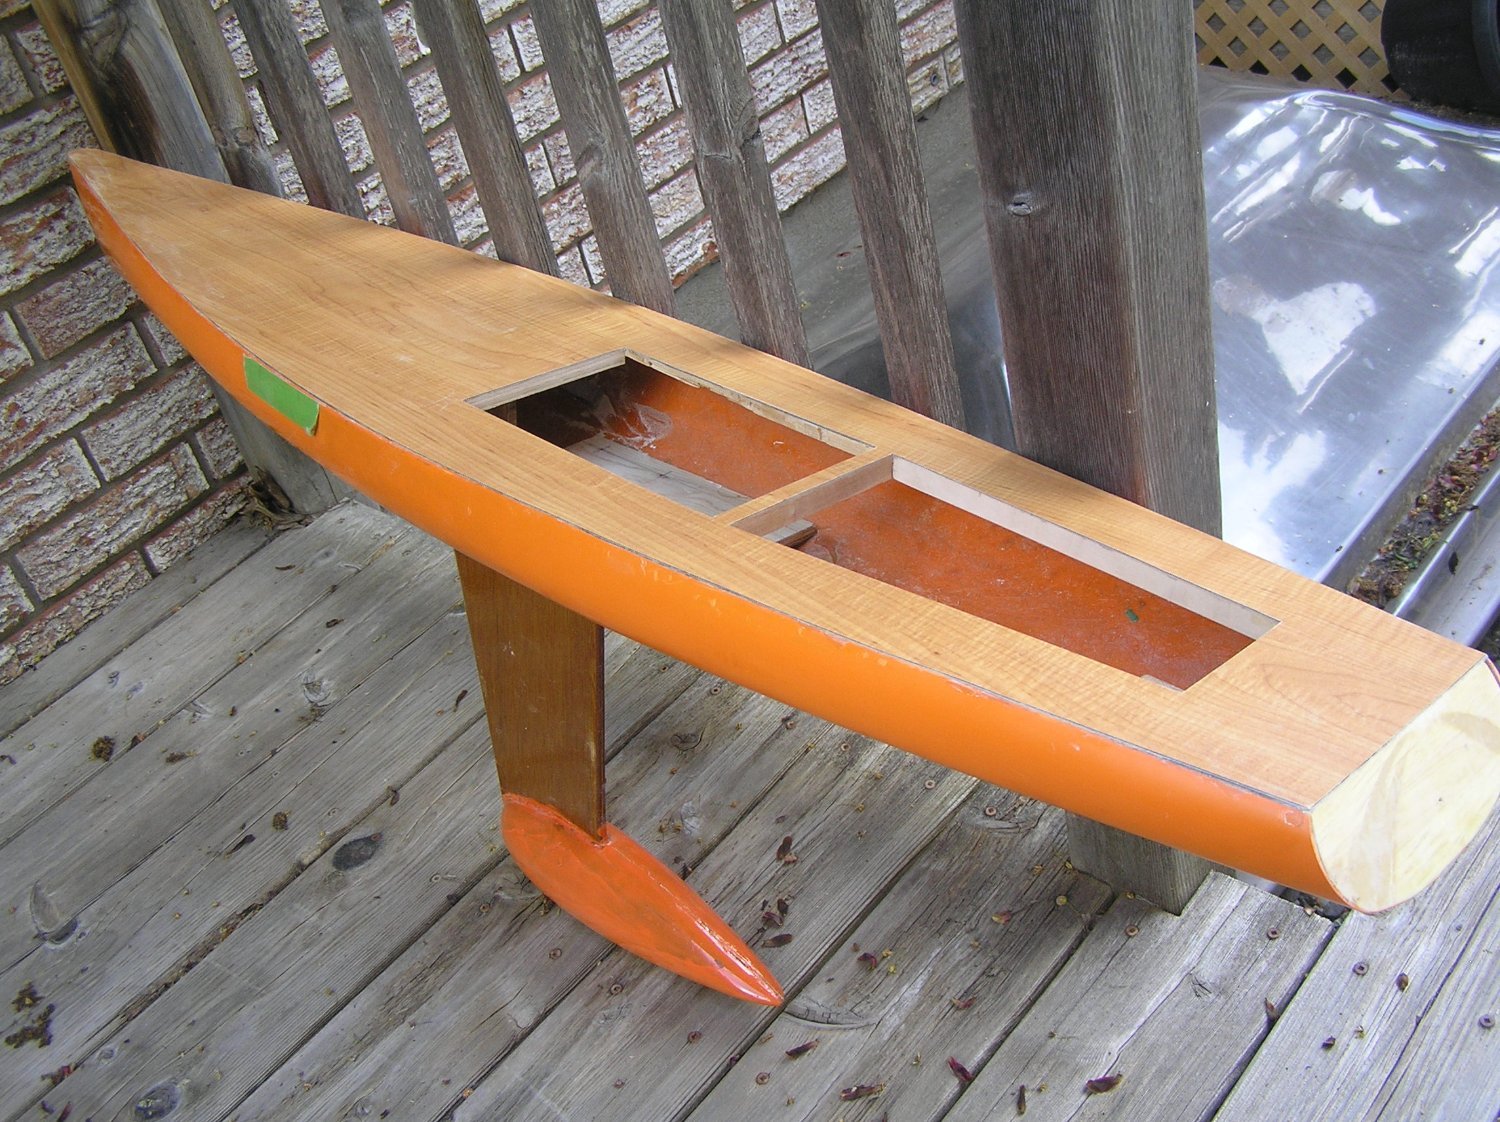
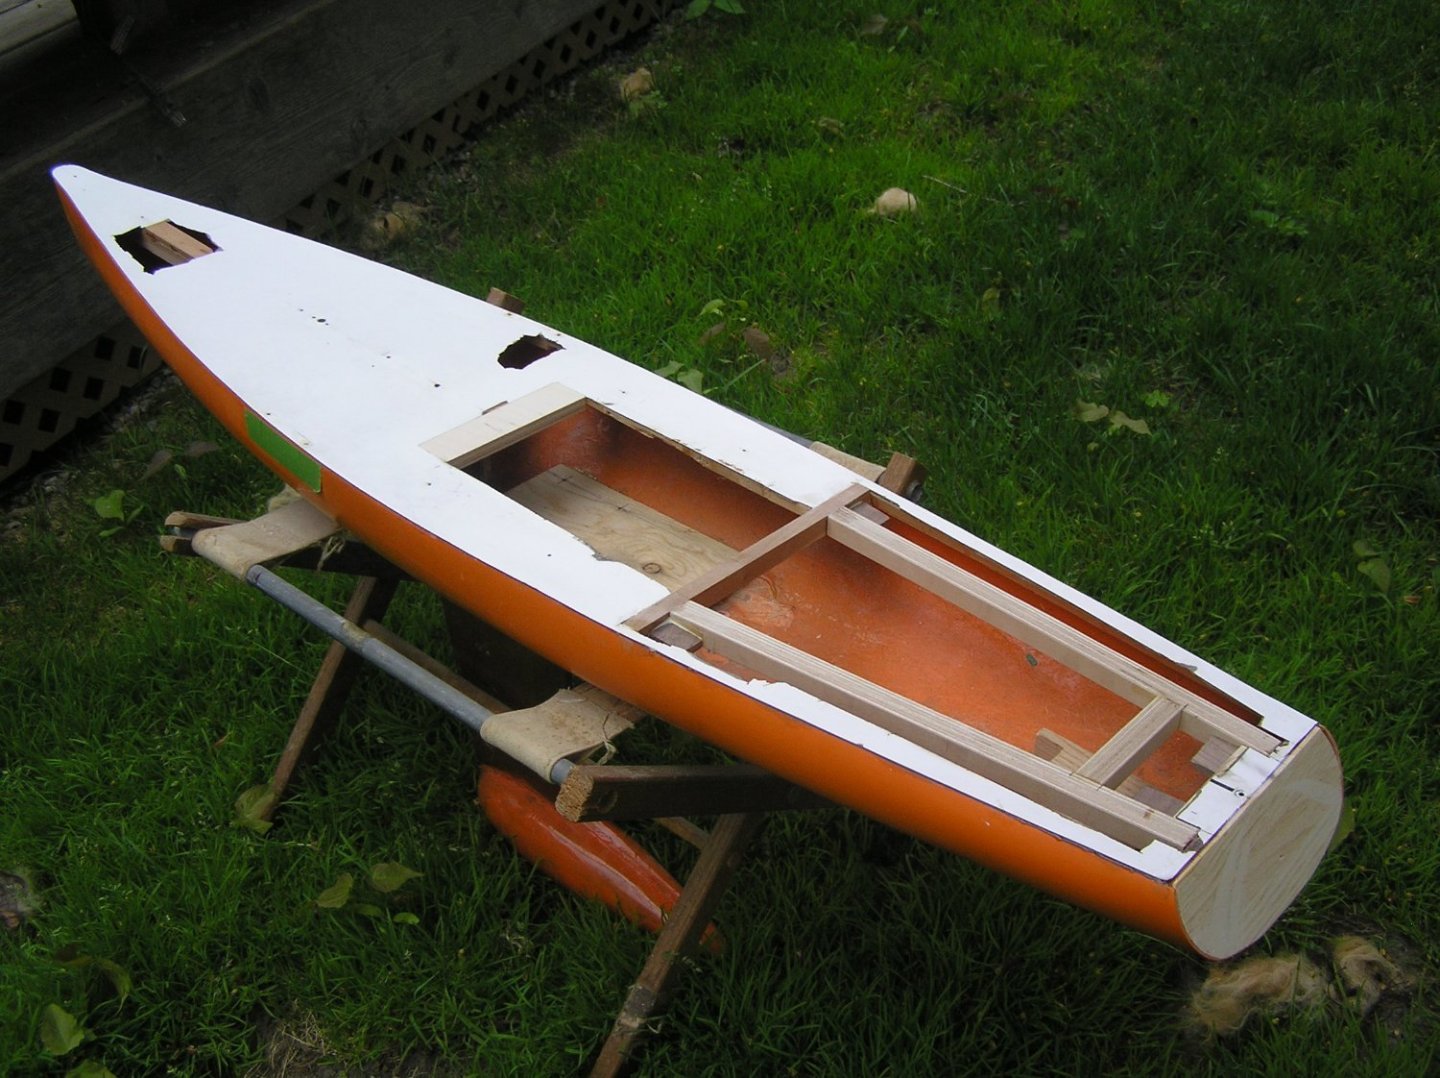
Always interested to see an RC Sail project. I'm curious about the length/beam of this model - I take it she has a white plastic hull judging from your pic? Again from the pic, the internal hull looks very sub-divided into small compartments. It's not trivial to convert a kit not intended for RC. You'll need more through-deck access than the small cabin shown. Give some thought to replacing snapped sheet lines - how do you get them in there? One suggestion I have ... if you buy a waterproof winch servo, you could have the drumhead above the deck and do your sheet routing on deck. Sometimes people disguise the drum as a capstan. Perhaps you could conceal it in the cabin. You mention a lead "sub-keel" by which you mean a fin keel with a bulb on the end, like RC racing yachts? You'll need it to sail in any kind of a wind. There's a very helpful book about RC Scale Sail, "An Introduction to RC Scale Sailing Models" by Philip Vaughn Williams, which covers sailing problems and solutions, making your sails and rigging, sheeting systems, and ballasting. By the way, I see you haven't "followed" this your own build log. If you go to the top of your log and click on "Follow" you will get notifications when someone posts a comment.
-
Bob, the RC is not too difficult. Your motors and ESC should be compatible since you got them from one supplier. Same for "binding" the transmitter to the receiver. If you have problems, just take the boat to a hobby shop which sells RC and they will be able to quickly assist you. 👍
-
It's always the man who wants to drive...............
-
I suppose they could have told oarsmen on one side or the other to "ease up" in order to steer, who knows now? My plan was to use rudders for slight/gradual course changes and leave the counter-stroking as an ace up the sleeve; I'm not sure they could even do that in reality. One gets far less power pushing an oar than pulling it..... During our week's cruise aboard "Royal Clipper" a 5-mast square rigger I had the opportunity to steer her one evening. What a rush! Five thousand tons under my helm control. If she was drifting off course, and you moved the rudder, her inertia slowed her response dramatically but once she was turning that same inertia made it hard to stop......took some getting used to anticipating it .... Yeah, the servos are noisy. I'm hoping the full deck will muffle them. Thank you Mark! I only wish I could stop the stammer which only started in my late 20's for some reason. I'm looking forward to adding the steering platforms and decorative trim, and painting of course....
- 536 replies
-
- 3
-
-
- Quadrireme
- radio
- (and 1 more)
-
Thanks Pat! Another challenge will be adding steering platforms and twin rudders controlled by a servo linkage through the hull sides, beneath the platforms. I already have the hardware parts. Need to determine suitable size for rudders. Thinking of using the library's laser etch/cut machine to etch the deck planking on the steering platforms, and if successful on the main deck and even the tops of the outriggers.
- 536 replies
-
- 4
-
-
- Quadrireme
- radio
- (and 1 more)
-
Looking really nice! You should get her onto some water this fall by the look of it! 🤞
-
You may be right ..... another trial with extra blade area rubber-banded on should give an indication, although I must say the blades look teeny when you view them against the large hull. Thank you for following thus far, and your good comments! Looks like it's time for some more math .... 🫢. Thanks for following from the beginning! HaHa! Thanks Glen. I really don't know what happened which is worrying. Is the 2-year old battery feeling the strain? Did the Arduino burp? Battery cable too long? Needs investigation.
- 536 replies
-
- 4
-
-
- Quadrireme
- radio
- (and 1 more)
-
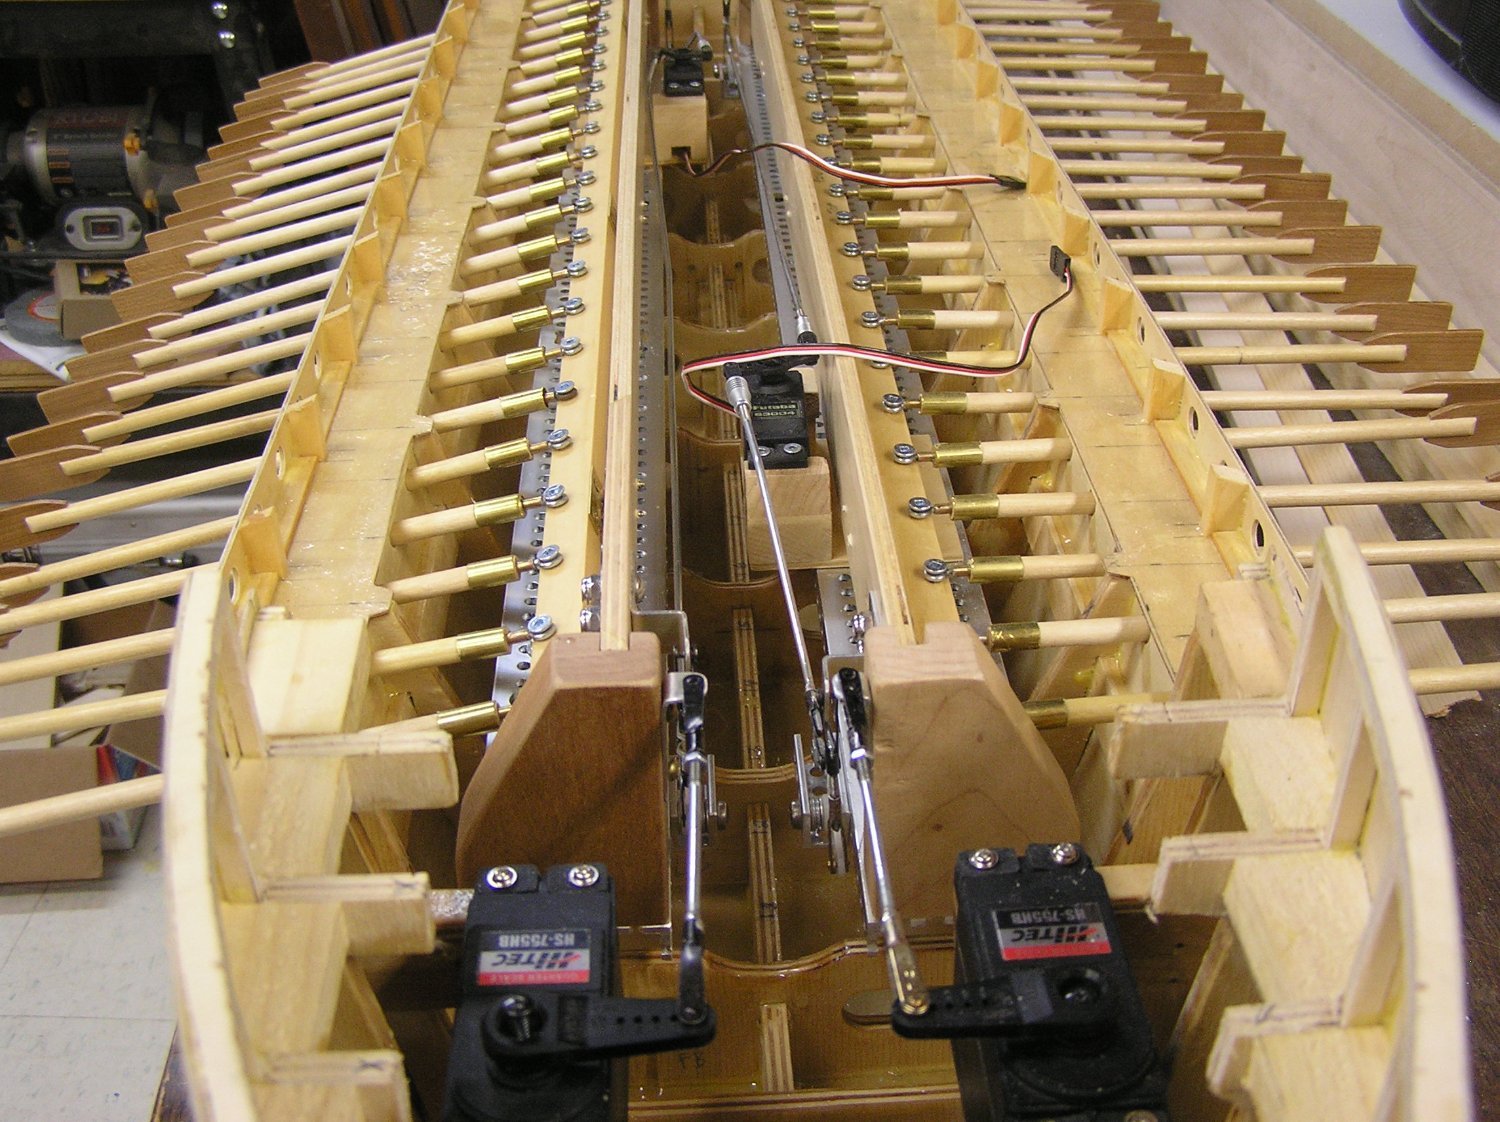
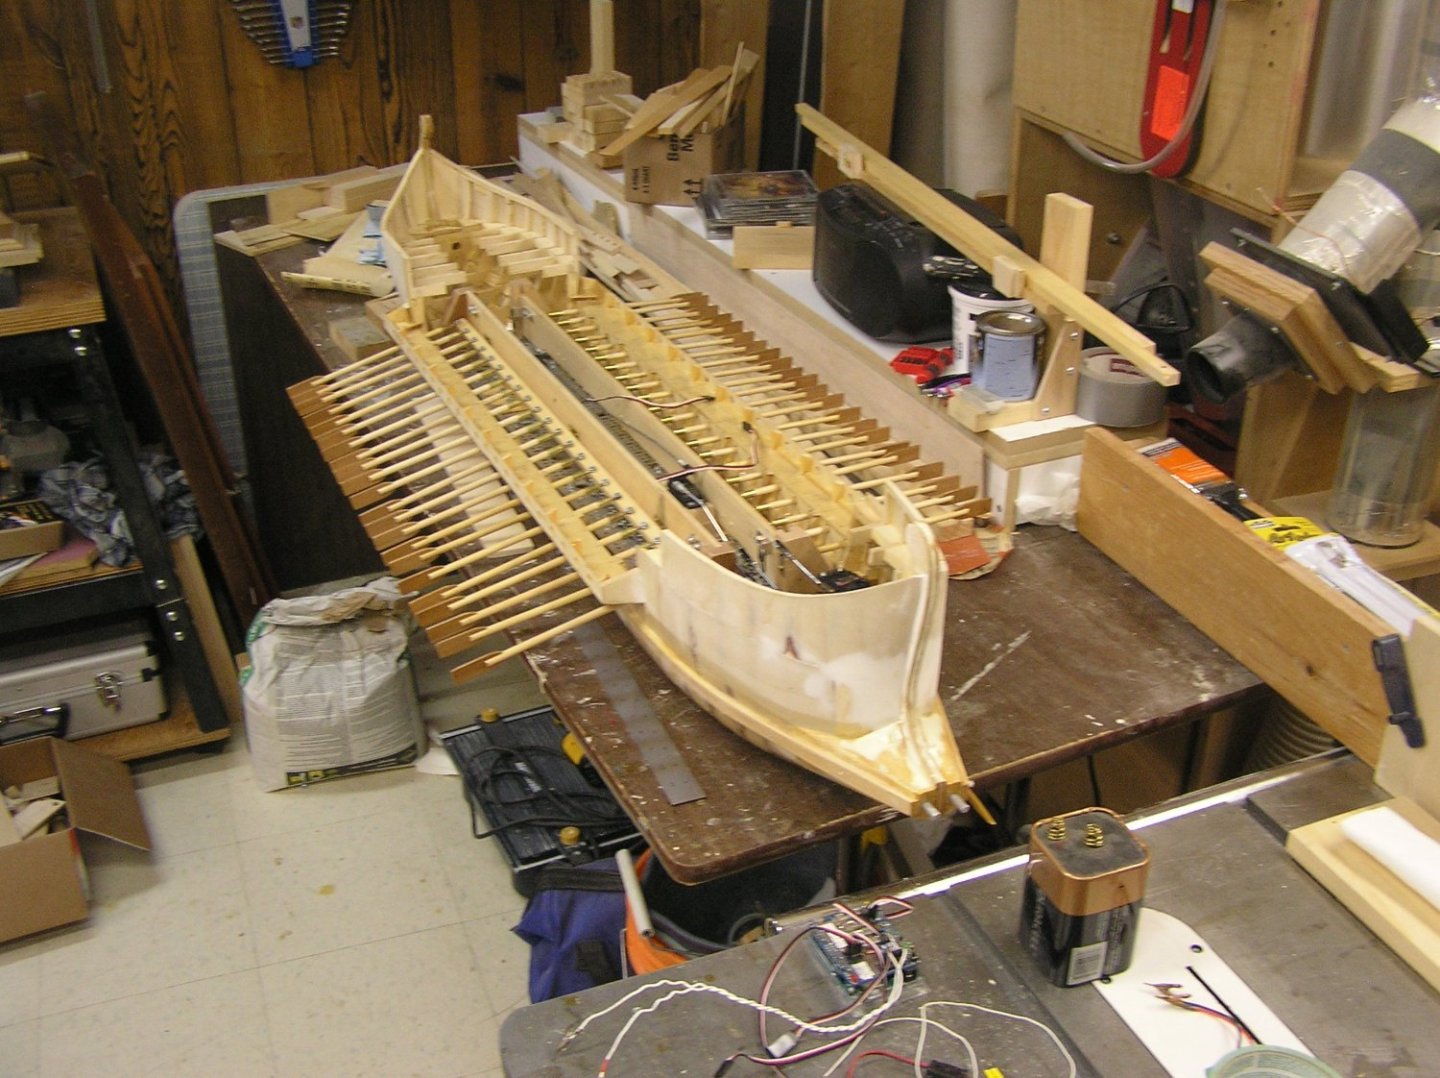
"SEA TRIAL #1" !!!!! Tweaked the software to map the servo signal pulses to appropriate limits and polarities to suit the actual physical setup. For example, the two sweep servos drive their associated mechanisms using opposite ends of their arms, so giving the same PCM signal to both would drive the oars in opposite directions. One pulse stream has to be "inverted" i.e. pulse width is "reflected" about the 1500 usec midpoint e.g. if one servo is at 1700usec (1500 + 200), the other has to be at 1300usec (1500 - 200) which results in both sweeps moving the same way. This is very easy to do using the Arduino "map" command. I made up little "sacks" for lead shot ballast using cut up envelopes wrapped in packing tape. They fit nicely in the hull bottom between the bulkheads. At our new pool, it became obvious that the bow is much more buoyant than the stern, so bow needs more ballast. There is an awful lot of ballast...an awful lot...haven't weighed it but it is many pounds. My hull weight estimate was far too high, my resulting u/w hull has far too much bilge. In the videos below, you can see that moving forward and back is pretty slow since all that dead weight must be moved; but with oars stroking in opposite directions it turns in place not too badly, since the weight is not having to be actually moved along. Question is whether she will move better with more oars of the same blade size. As mentioned in the video, the next step is to rubber-band larger oar blades on to try to predict the effect of 42 more oars in the second tier. I am thinking of making new partial oars with a bigger blade, then cutting the existing oars and scarfing the new ends on. This would be easier than trying to cut out exactly the old blade notches to add new blades. I also conclude that a central handle is absotively a requirement. Hefting this thing around is a chore even without the second tier of oars sticking out even further. Evidently she will not be finished this year. That being the case, I am wondering if over the winter I could cut out the bilge curves and form a new u/w hull with less volume (😒) thus less ballast required and more responsive operation. Very painful sounding especially as the u/w hull is epoxy-resined inside and out. Will have to mull it over given results of the next trial. Here's the first video: Then I realized I forgot to demonstrate the effect of opposite stroking. As a refresher, when software sees a "hard over" rudder signal, as currently written, it reverses the oars on the inside of the turn. Obviously she has no rudders, or indeed steering platforms, yet, but the software still reads the signal indicting position of my transmitter's rudder stick. Looking back, I think she spun to port when I "applied" hard-right rudder and vice-versa. That's a matter of more simple software tweaks in the unknowable future. Here's the "spinning" video:
- 536 replies
-
- 15
-
-
-

-
- Quadrireme
- radio
- (and 1 more)
-
Hi Kevin, it was a rafting trip, three rafts, four guests and one guide per raft. Guide is at centre with oars, two guests at front and two back, guests can paddle if they like (or to keep warm!). All we really had to do was pitch our tents and set up air mattresses etc, pack them in the mornings, and take a turn doing the dishes. As they said, "It's your holiday so don't paddle unless you want to". The chief guide was a chef for seven years, the second guide was a sous-chef, the third loved to bake at camp. The meals were fabulous eg arctic char, thai curry chicken, fresh-baked brownies or cake. Only two of us opted to swim amongst the icebergs in Alsek lake, it was REALLY bracing!! Great trip, but next time we think we'll go with canoes to be more active. We were lucky to pick this trip as some other rivers had too much smoke and trips were cancelled. And the Dempster highway was opening and closing seemingly at random. By the way, we met a few Brits in Whitehorse who had their motorcycles shipped to Anchorage, rode to Prudhoe Bay on the Beaufort Sea, had come down to Whitehorse, and were en route for Cape Horn; yes, THE Cape Horn. What an epic trip!
- 536 replies
-
- 5
-
-
- Quadrireme
- radio
- (and 1 more)
-
Yes, your MACK 1885 motor is brushed. Since you're a newbie, a warning about batteries - I don't think it's the case here (your battery looks like NiMH cells) - but if lithium batteries are being charged it's best not to leave them in the boat due to fire risk. 🔥 Look forward to your launch video! Wish I was as close ...... 😣
- 72 replies
-
- 1
-
-
- Seguin
- BlueJacket Shipcrafters
- (and 2 more)
-
Nice neat installation. Looks like a mini servo on the rudder. I only seem to see two terminals on the motor so I assume it's brushed? Is it geared down? Nice model by the way...... if I ever build a tug I'm quite taken with the "George W Washburn" by Dumas.
-
Glen, this is your best SIB yet!!! Can't wait to see it hooked up at the sea wall............. 👍
- 290 replies
-
- 5
-
-

-
- Quinquereme
- Finished
- (and 1 more)
-
Glen, she looks incredible!!!!!.....better than mine......love the oars.....
- 290 replies
-
- 4
-
-
-
- Quinquereme
- Finished
- (and 1 more)
-
I spent not one nanosecond thinking about it while passing down the Tatshenshini and Alsek Rivers from the Yukon to coastal Alaska. What a trip - grizzly bears, bald eagles, mountain views, hikes, glaciers calving into Alsek lake (where a polar bear swim is optional). Plus we got to fly back to Whitehorse in bush planes.
- 536 replies
-
- 3
-
-
-
- Quadrireme
- radio
- (and 1 more)
-
Unfortunately I did not get the boat to the pool for a water test today so it must wait until we return from our trip in two weeks. The mechanical setup is complete ie. all the servos have their mechanical links to the oar mechanisms and the 2nd lower oar bar is fixed via the requisite hinges to its beam. I also added the aluminum rods at the stem for mounting the printed ram when available, and also to prevent water reaching the wood interior of these holes. We need to finish packing so there's no time to install the Arduino, fire it up, and tweak the software to the actual physical connections of the servos in this final configuration. I expect the water test to be underwhelming. I plan to make the oar blades larger, but they will move just below the water surface. Deeper would be better but that would mean the loom ends would be higher and be interfered with by the deck beams. I can just see me reworking the mechanisms to shorten the oar looms (which would reduce their ultimate height) , if that is possible for the upper remes since they must reach the wall of the outrigger. Time will tell. I used the shortest arm possible on the sweep servos, to get the two inch stroke at minimum torque load using a reasonable total rotation. The arm must move over 120 degrees; looking at this I recalled Bedford's comment of long long ago when he suggested linear servos which would give constant sweep speed. Since my sweep servo arms are rotating, and the software as presently written generates a steady rotation of the arms, the sweep speed along the boat's axis decreases as the angle of the arms increases. I'll need to change the software to accelerate the sweep servo arm rotation as its angle increases, to maintain a constant "delta-x", if you will, forward and backward. Haven't looked at the math yet, should just be some basic trig. Here are a couple of shots of the boat "ready to go"; just needs electronics, updated software, and ballast.

- 536 replies
-
- 12
-
-
-
- Quadrireme
- radio
- (and 1 more)
-
Bill, have a look at the latest few posts on 72Nova's "Wasa" build. Rigging doesn't get much better than that! You will see realistic block spacing etc, but the exact number of blocks involved in the crowfeet varied over time. See Andersen pg 127; "The sprit topmast backstay was one of the places where the early 17th century rigger really let himself go." I love that sentence. He shows many variations by nationality and year ..... just look at that "backstay" on "Sovereign of the Seas" and thank your lucky stars you're not building a model of her! 😉
- 1,508 replies
-
- 1
-
-
- Le Soleil Royal
- Heller
- (and 1 more)
-
Good luck Bill!! 🖖