Supplies of the Ship Modeler's Handbook are running out. Get your copy NOW before they are gone! Click on photo to order.
×


FriedClams
-
Posts
1,357 -
Joined
-
Last visited
Content Type
Profiles
Forums
Gallery
Events
Everything posted by FriedClams
-
 Nice work on the winch, John. Fiddly work at that scale - looks good. Gary
 -
Simply superb, Valeriy! Gary
-
So good to see an update, Jean-Paul. Thanks for sharing your progress in detail with a series of posts. Extremely nice workmanship - immaculately clean. Gary
-
Sweet work, Keith! I too, like the view of the operator through the rear door. And I really like how the various individual elements of the model complement as a whole - everything looks and feels like it belongs together. Gary
-
Many of us modelers grumble about never having adequate time to work on our projects, so taking on this restoration project to simply help someone out who was previously unknown to you, strikes me as a very kind and generous act. Good on you, Glen! Best of luck on this project - I know it will turn out great! Gary
- 301 replies
-
- 6
-

-

-
- Constitution
- Bluejacket Shipcrafters
- (and 1 more)
-
Beautiful work on the prop, Keith! Jewelry! Have a safe cruise. Gary
-
Hey Keith, As Ken stated above, Tichy Train is quite reliable. I've ordered from them myself and have always been satisfied. Very nice products and they do indeed produce their own stuff. Every window I have bought from them has come with laser cut glazing to fit it included - pops right in. Gary
-
Hey Keith, It's injection molded styrene in HO scale from Grandt Line Products. I have a shoebox filled with assorted windows and doors from GLP and some are quite small. What are the dimensions of your window cutouts, upper and lower combined? It is certainly a PVA based product, but I find it thinner than Elmer's glue. And it dries very clear and more importantly shiny. It's similar to the product that @mcb mentioned above - Micro Kristal Klear. Is there a frame of some kind around the window on the backside of the wall? I think you will be able to achieve a cleaner film if there was a simple rectangular frame made from thin narrow wood strips surrounding the double cutouts at each window. This would this hold the film just a hair off the wall keeping the GG from clinging to the inside perimeter of the wall cutouts. Just a thought - and you're right, it does take a bit of practice. Gary
-
Nice work on the POB version, Andy. Something about the images in this last post reminded me that these models are quite large. About 29" LOA? Gary
- 174 replies
-
- 2
-
-
- Vigilance
- Sailing Trawler
- (and 1 more)
-
Marc - that is just so darned beautiful. Wonderful detail and colors! Gary
- 2,623 replies
-
- 3
-
-
-
- heller
- soleil royal
- (and 9 more)
-
Amen. I've got a razor chopper from Northwest Short Line that I used for decades, but about six months ago a purchased the “Slicer” cutter from Ultimation that's just the “bee's knees” and what an upgrade in quality and precision - a joy to use. Like the RPToolz cutter it was not cheap, but as you say - worth every penny. I also picked up Ultimation's precision sander several years ago and I don't want to wax poetic, so I'll just say – I like it. Good to hear you're happy with your new cutter. Looks like a great tool. Gallery Glass crystal clear is a good product, and I think it's a good choice for your tiny windows. It's thinner than PVA and has good surface tension properties, so it works well on small items. The lower window sash in the image below was done with GG. I screed across the back side of the window with the side of a toothpick loaded with the stuff. Sliding the toothpick diagonally across the opening works best to draw the film over the void. You can always wipe it off and try again. Look forward to your opinion of the product. Oh - and great work on the boiler, stand and ladder, Keith. Very nice! Gary
-
Great work, Ras! The model has a very nice feel of authenticity to it. Gary
- 128 replies
-
- 2
-
-
- zulu
- sternwheeler
- (and 1 more)
-
Congrats on your beautiful model, Mike. As Dan mentioned above - this is a beautiful color scheme. Extremely nice work! Gary
-
Nice progress, Keith. Placing the water tank behind the shed makes sense as its weight would help counterbalance that of the driver. Looking very good! Gary
-
Very interesting procedure for the hub slots - I bet that did take some head- scratching. Such nice work, Keith. Yea, the pipe vents are about as elegant as a mud fence, but in their favor, they are compact where the arc of a gooseneck might be prone to finding things to hook onto. Gary
-
Well as @JacquesCousteau has stated - very ambitious indeed! But what a great plan, Andy! I had been wondering if you intended to plank one side of the vessel and expose the other with some of the framing cut away - but this double your fun project is much better. That first shot in post #127 is a real beaut and shows off your advanced level of modeling skill. So good. Looking forward to more. Gary
- 174 replies
-
- 4
-
-
- Vigilance
- Sailing Trawler
- (and 1 more)
-
Really like the color tone of the planking, Paul! I think the pre-staining was a good way to go and brings out the individuality of the planks without it looking busy. Very nice ! Gary
- 201 replies
-
- 3
-
-
-
- Oyster Sharpie
- first scratch build
- (and 1 more)
-
Great progress, Mike - and like Glen stated, you are a master with paint. Listing your paint choices at the end of your post is very helpful. Thanks for the link, Craig! Gary
- 112 replies
-
- 10
-
-
-
Good progress, John - coming along nicely! Gary
-
Wonderful, and isn't it for times like these that we endure the tedious monotony of other tasks in modeling? Love this work you're doing and your vision for the project in total. I think you're being too critical of yourself - if this was in 1:24, you might be justified. Looking great, Keith! Gary
-
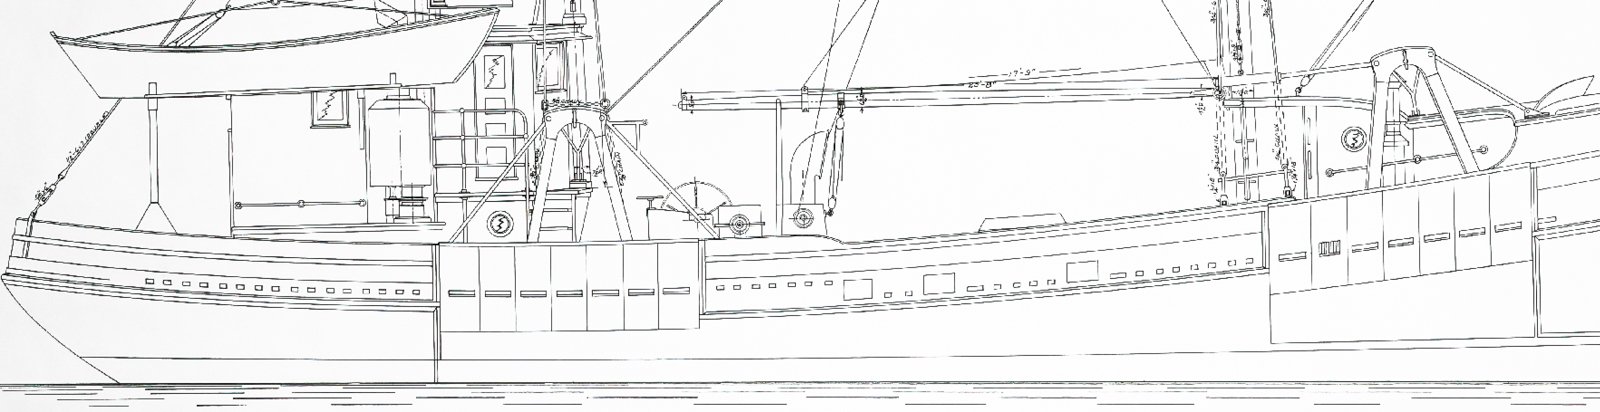
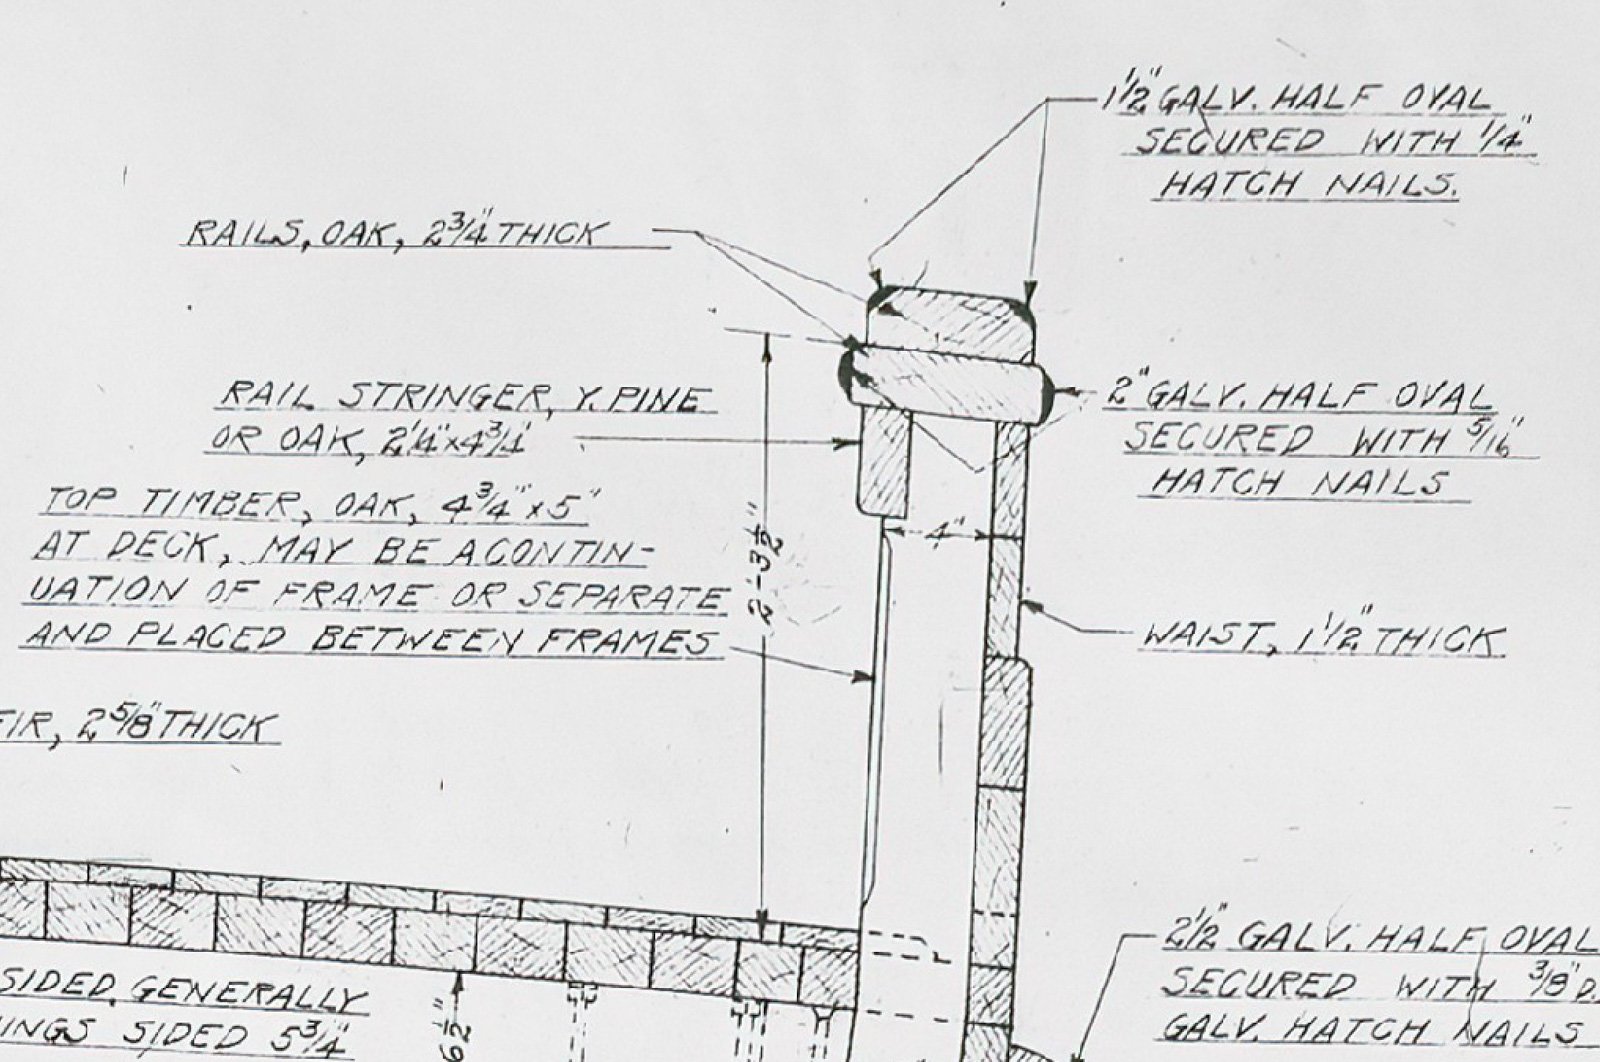
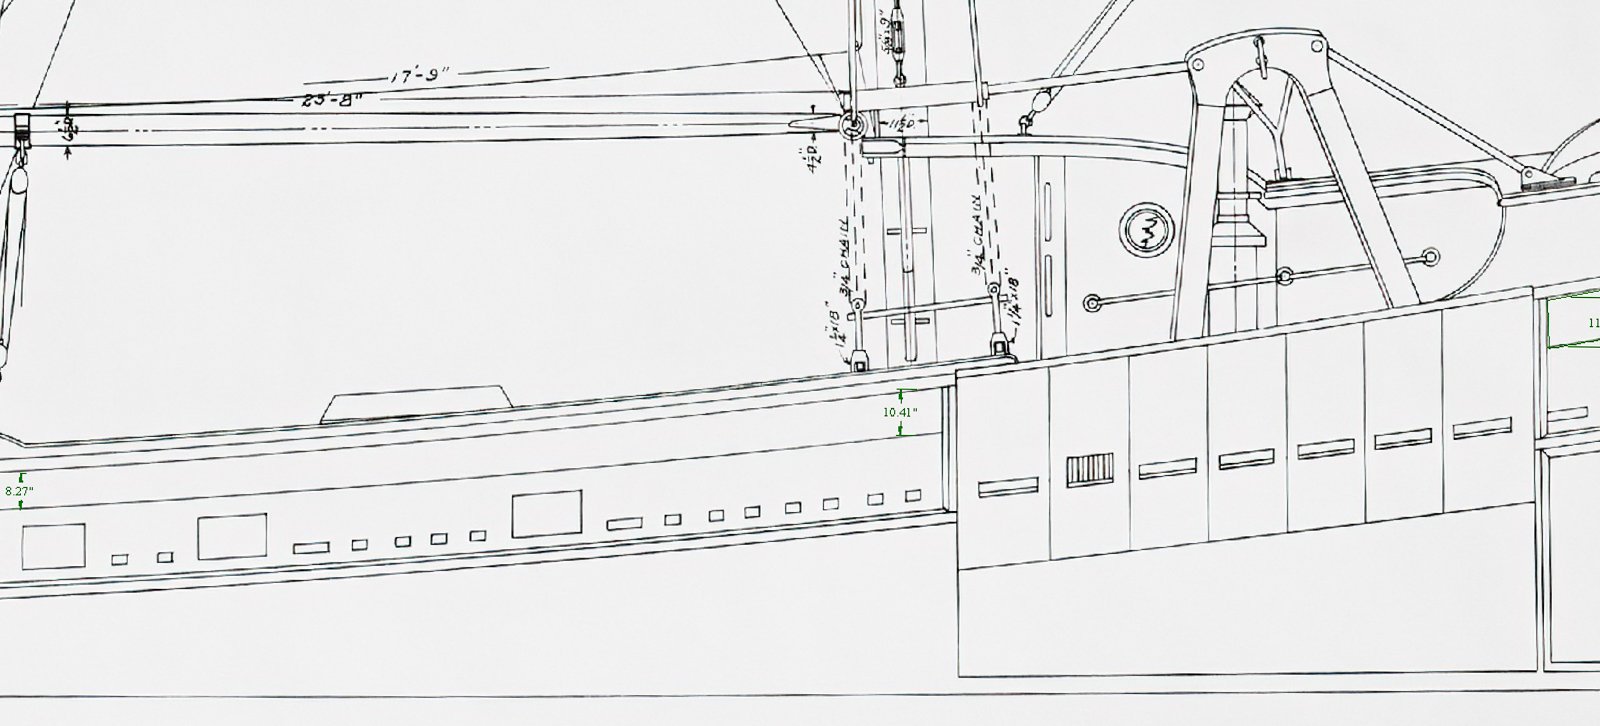
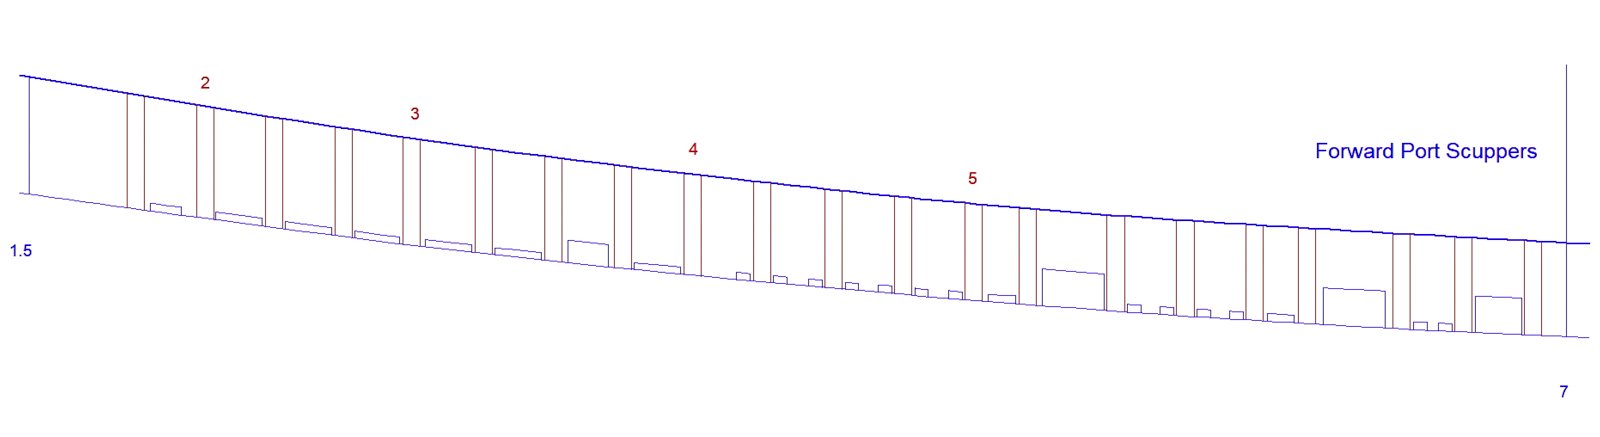
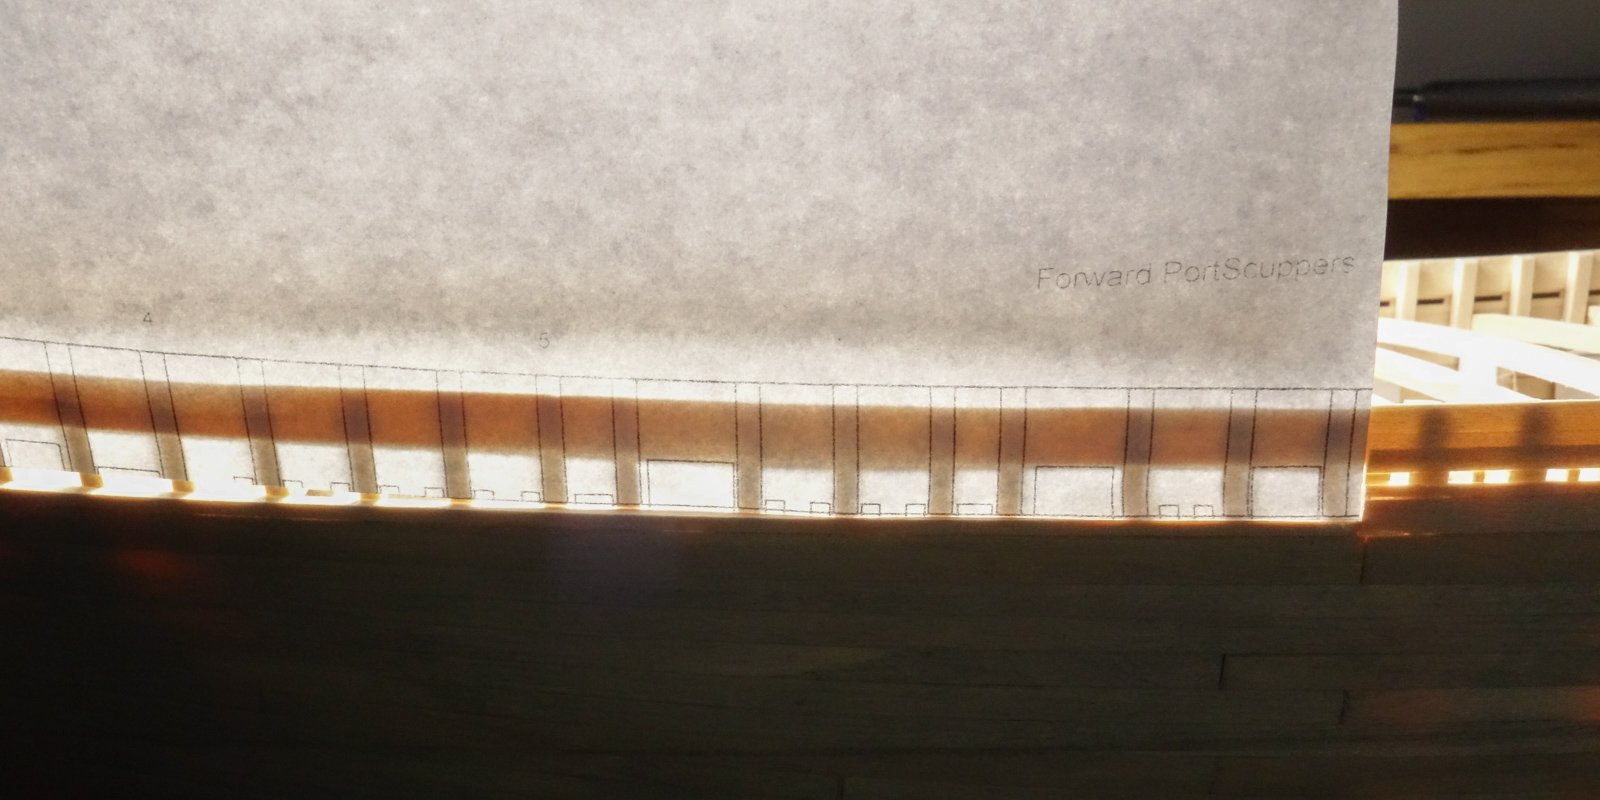
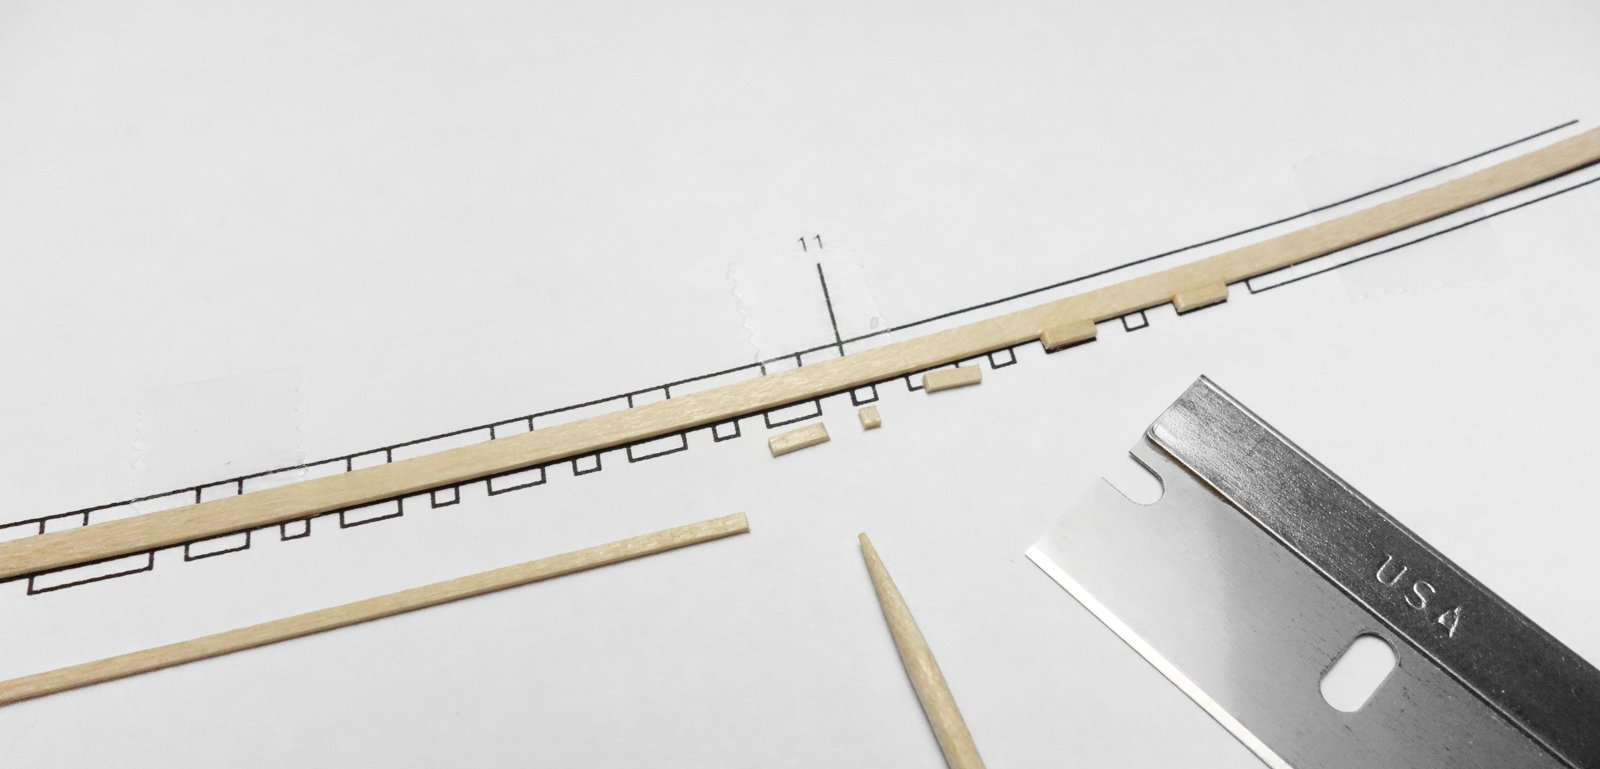
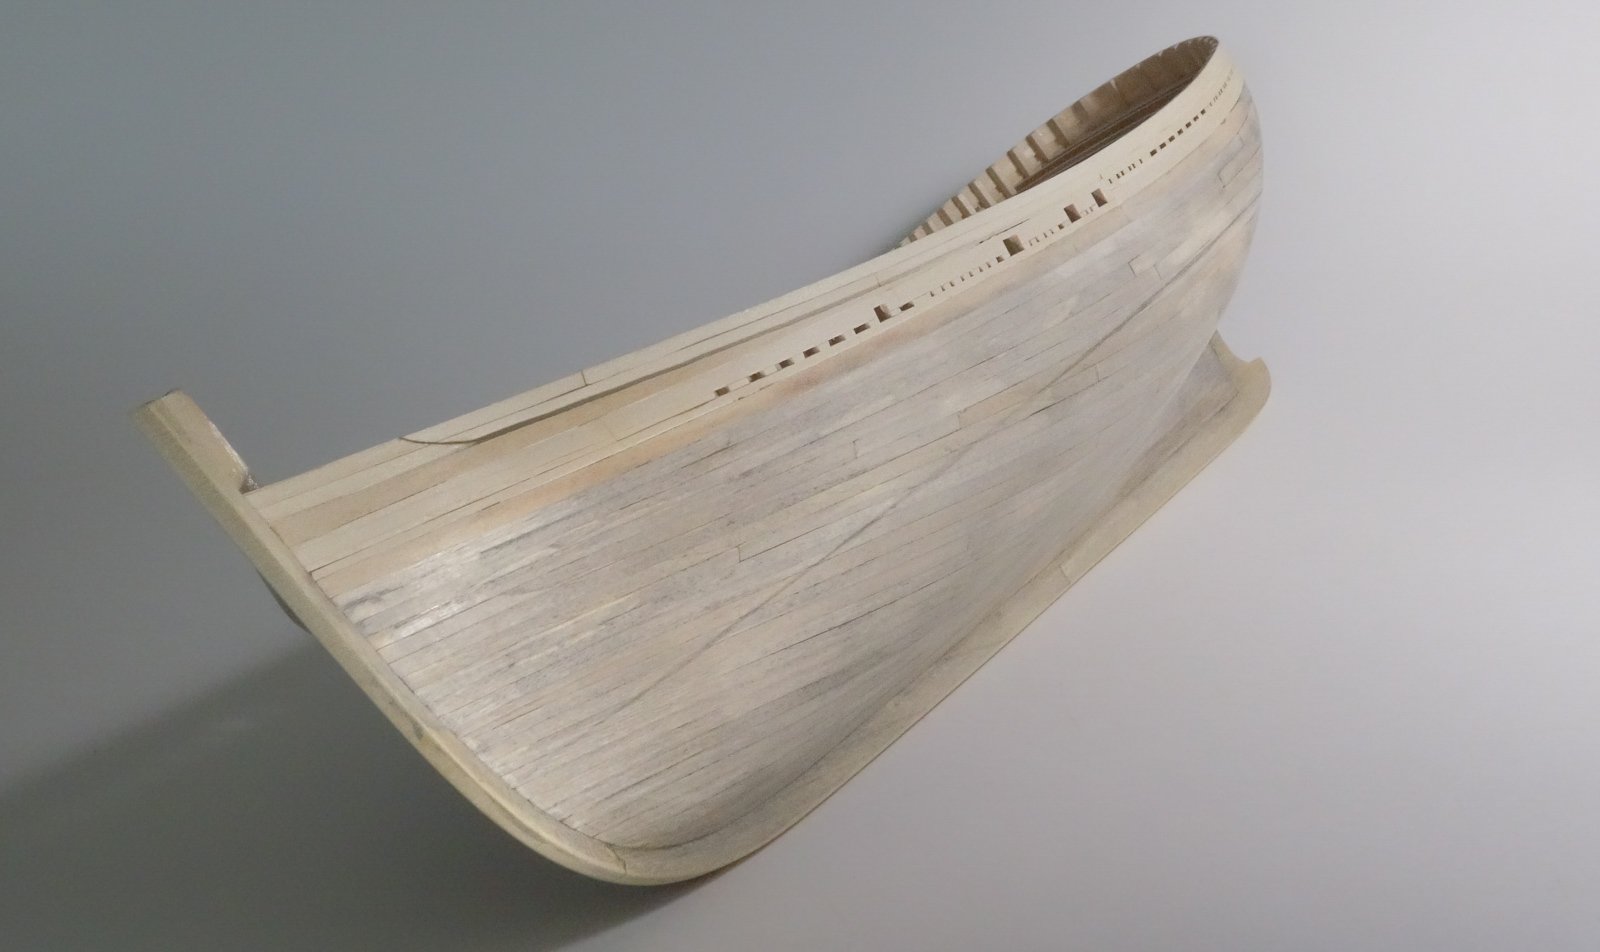
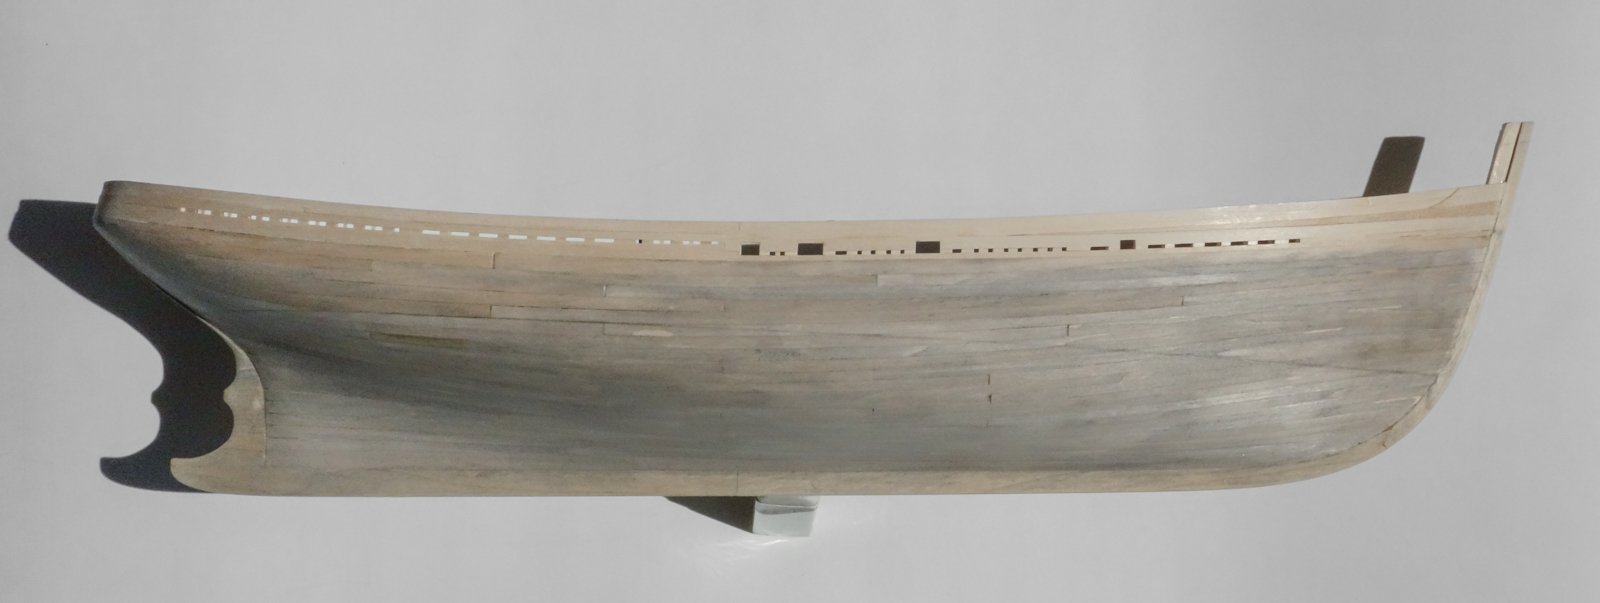
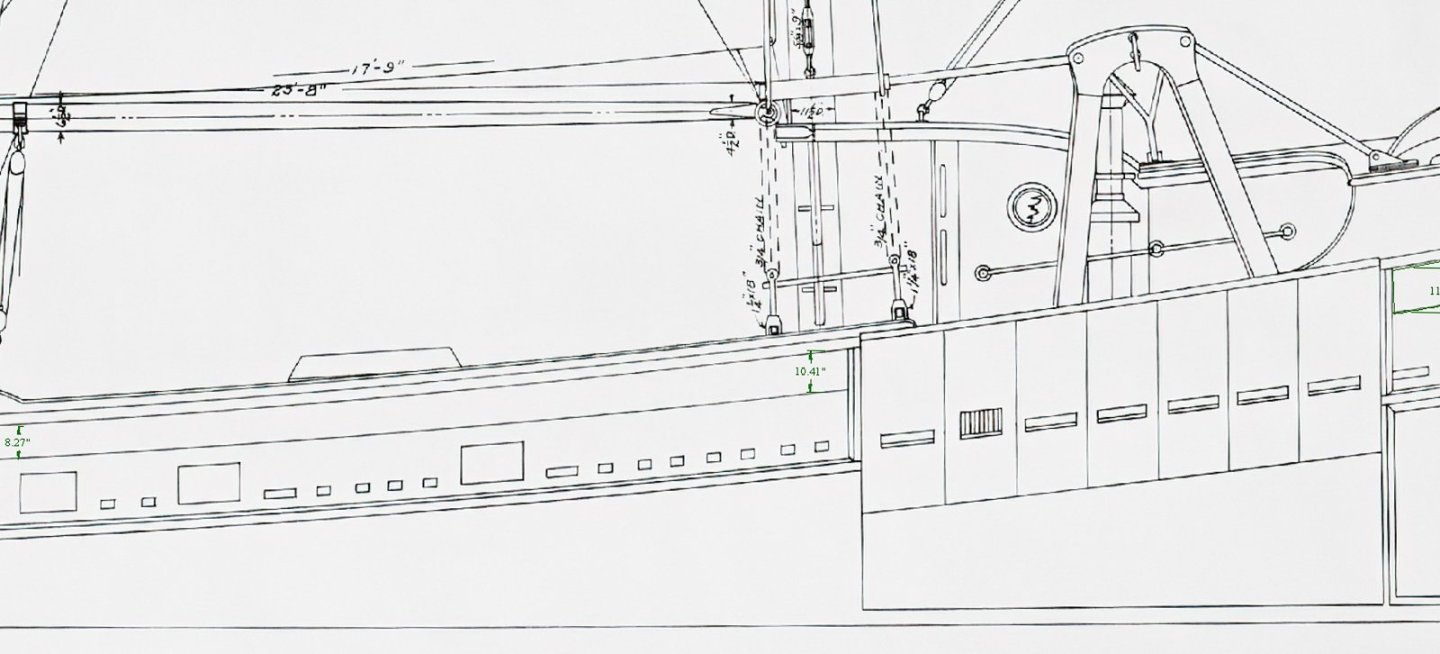
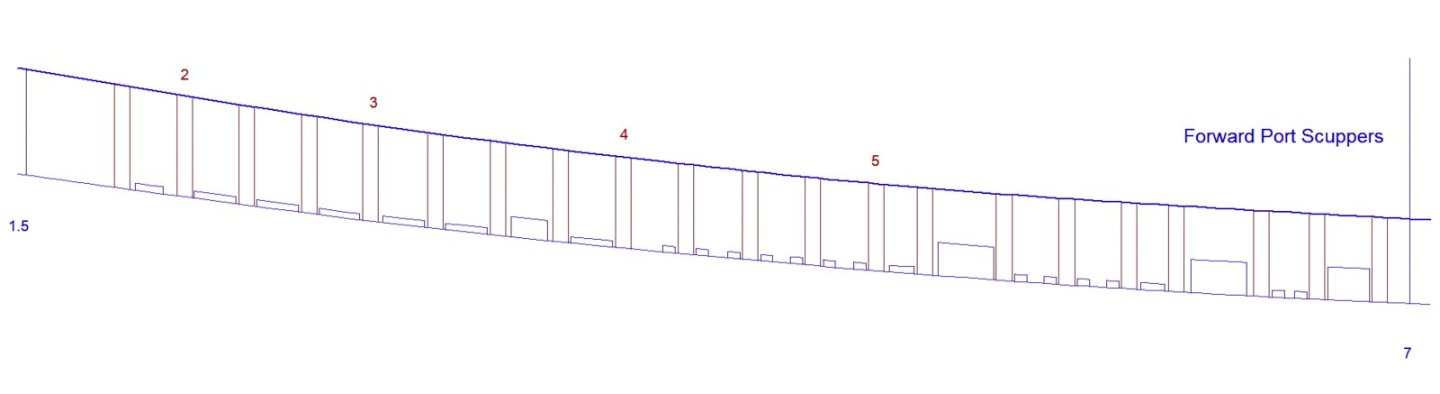
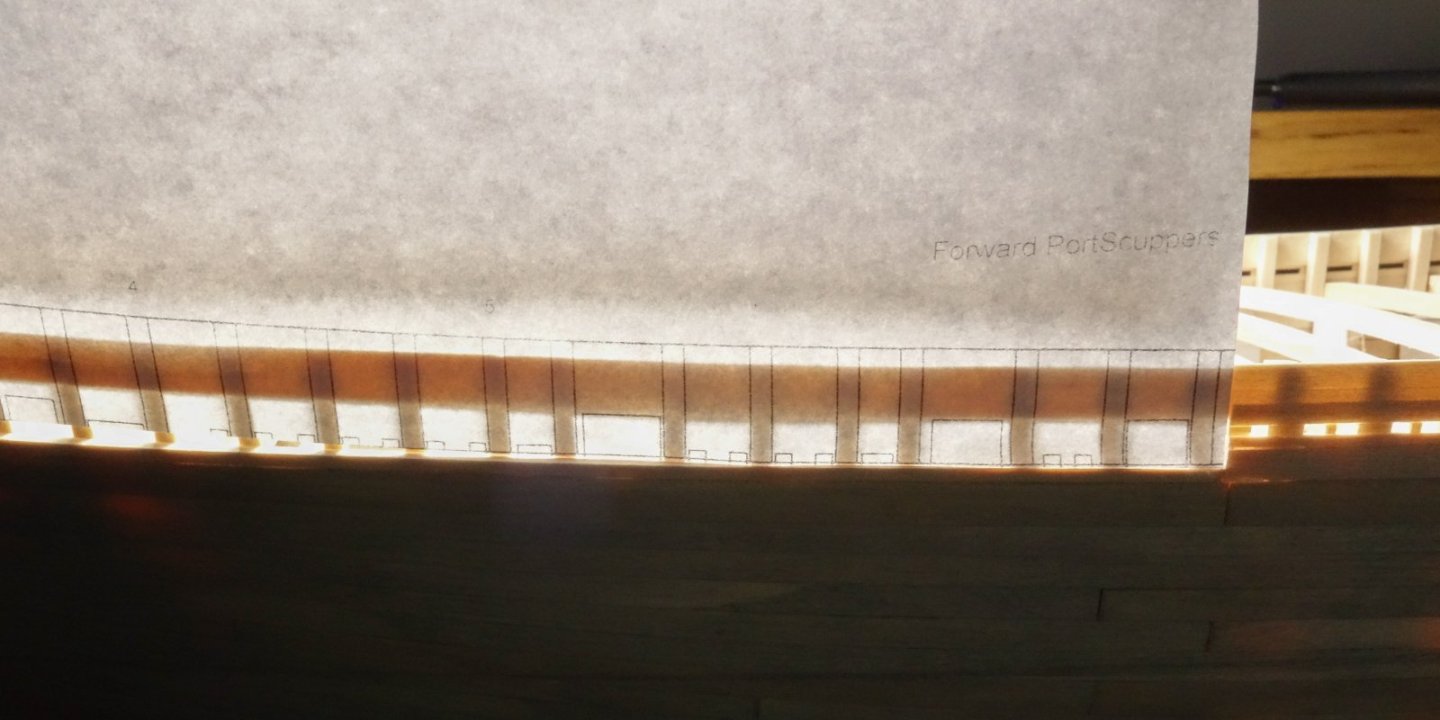
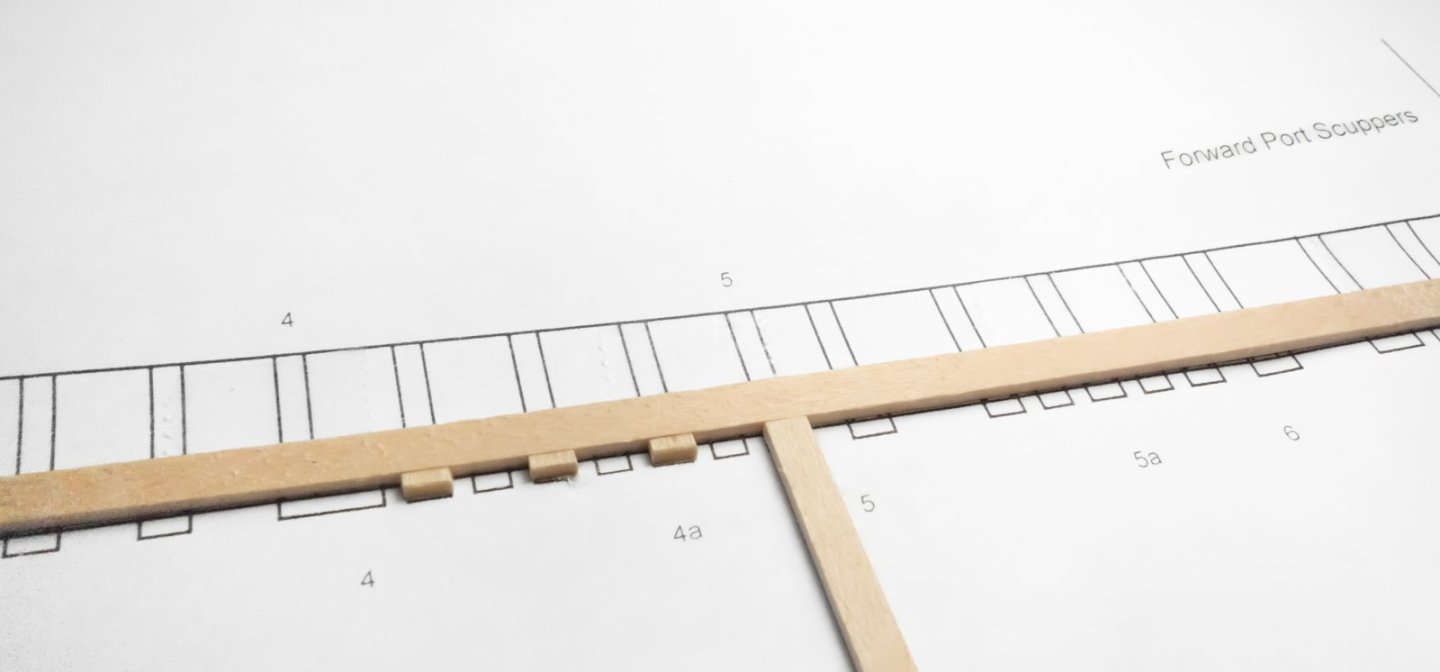
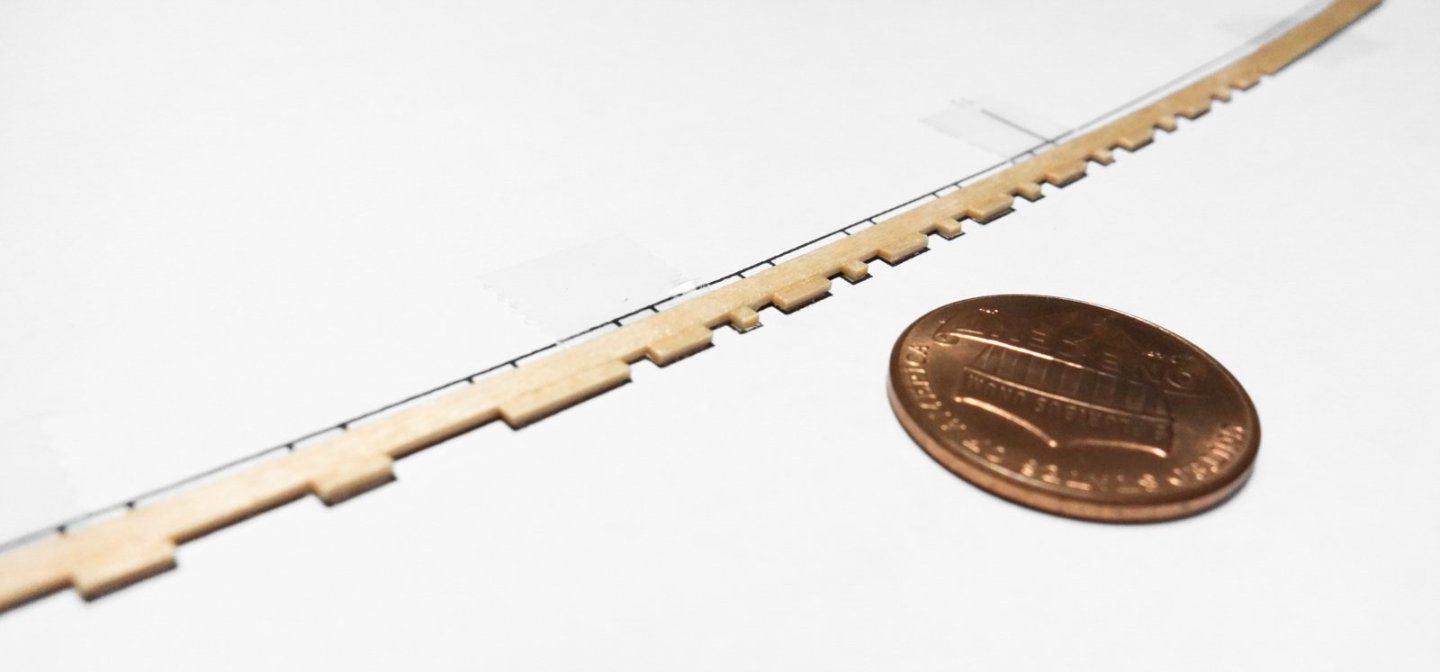
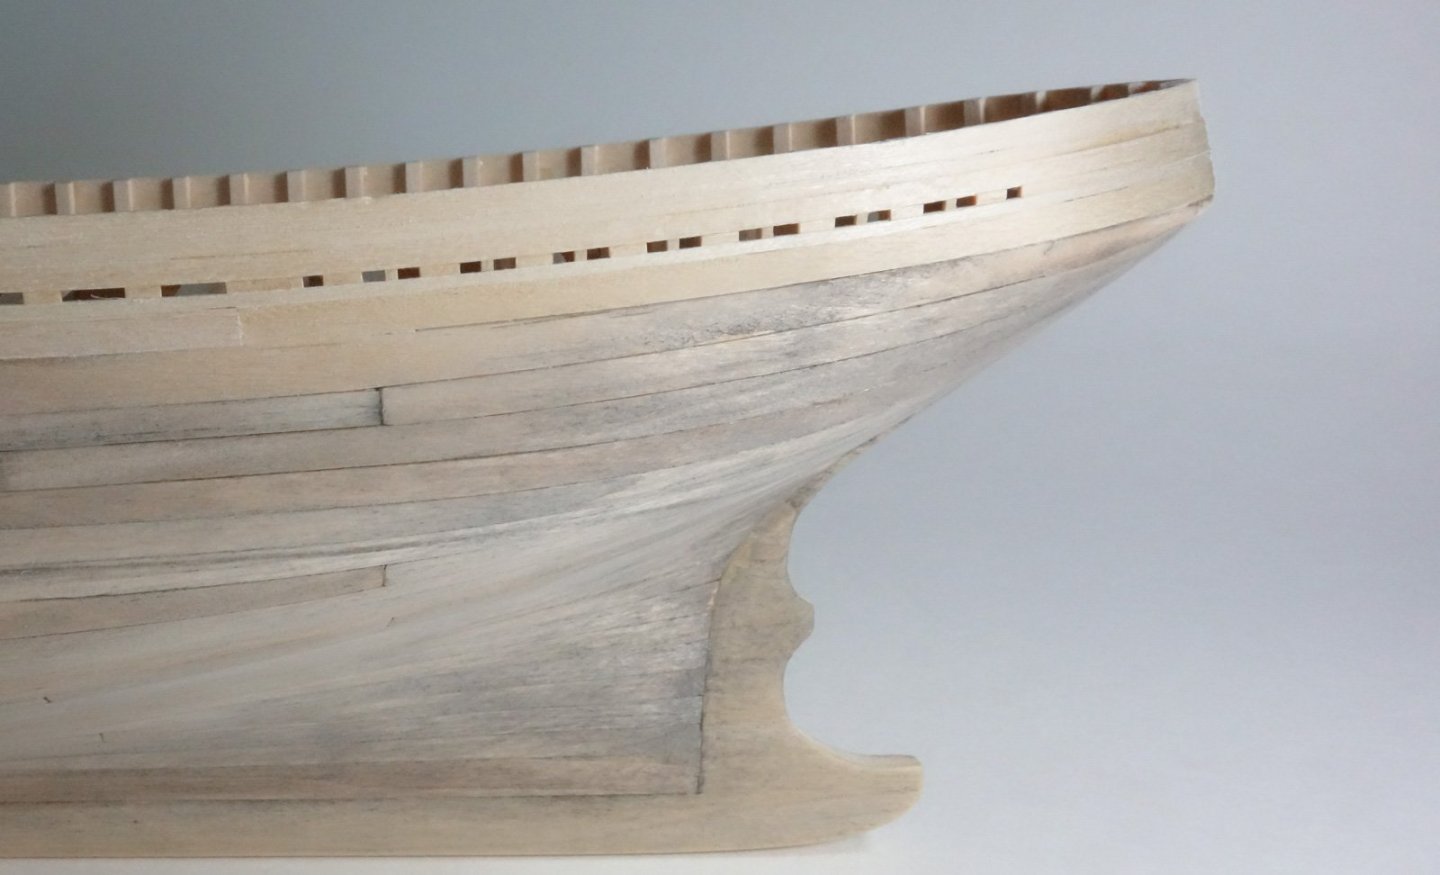
Greetings friends. Thanks to all for the comments and "thumbs up". Bulwark planking, scuppers and freeing ports. I expected to have the covering boards and rail stringers on by now, but . . . This fishing boat has a total of 104 scuppers and 8 freeing ports. The scuppers are 2” (5cm) in height and their width varies from 3” to 8”. There are three sizes of freeing ports, with the largest being 16” (40.6cm) wide by 9.5” (24cm) tall. The bulwark planking above the deck is the same thickness as the hull strakes and the waist strakes just below the rail are significantly thinner. Below is a closer look at the scuppers and ports at the forward deck. The cutouts are parallelograms that conform to the sweep of the sheer and their tilt angle is steeper the further forward they are positioned. The scupper cutouts below the gallows frame are almost as wide as the distance between the top timbers. Eventually they will be fitted with extensions that reach out through the vertical sheet steel that protects the hull from the heavy otter boards. Also, note the small freeing port in the sheet steel that has vertical bars instead of a hinged door. I made up the bulwark planking in four sections – P/S above the forward deck and P/S above the aft deck. I began with the forward port and made myself a template for the cutout positioning between the top timbers. As per the drawings, the top timbers are set to 18” centers except in the areas where the freeing ports are placed, which require added width. I printed out the template and checked registration against the “as built” top timber spacing by shadowing the timbers onto the drawing. I tweaked the drawing until it matched. I initially tried cutting out the scuppers/ports from a single wide plank using a scalpel and safety razor. Bad idea - crooked, sloppy and inconsistent. The majority of the cutouts are 2” x 3” which in 1:48 equates to approximately 1mm x 1.5mm and getting a uniform look was difficult. So rather than subtracting material from a wide plank, I added the material to a "header" plank between the cutouts to build up the plank width needed. The scuppers are of equal height, so the header plank provides for a nice even top edge. Many of the distances between cutouts are the same, so once I cut a wood strip of the correct dimensions to butt against the header plank, it could be used multiply times. I simply butt glued the strip to the header, chopped it to length with a razor blade and then moved it to the next location requiring that same width. Also, using the butt strips meant the vertical edges are always parallel and uniform. And to achieve the proper parallelogram tilt, I simply beveled the butt end of the strip as required. The freeing ports were enlarged with a scalpel and needle files. I rough cut the area out then hardened the basswood with “super thin” CA and file finished it. Next, the aft scuppers were done in a similar way, but because I cut them from thinner material and there are no freeing ports, I simply segmented a strip of wood and added back the spacing distances. Also, there is little or no parallelogram cutting needed. I added the lower waist strake and then glued on the scupper strips. At the stem, the waist strakes are sistered to increase the plank thickness for fitting into the rabbet. Thanks for stopping by. Take care and stay well. Gary


-
Nice - very nice, Keith! Gary