
Supplies of the Ship Modeler's Handbook are running out. Get your copy NOW before they are gone! Click on photo to order.
×

bruce d
-
Posts
3,020 -
Joined
-
Last visited
Content Type
Profiles
Forums
Gallery
Events
Everything posted by bruce d
-

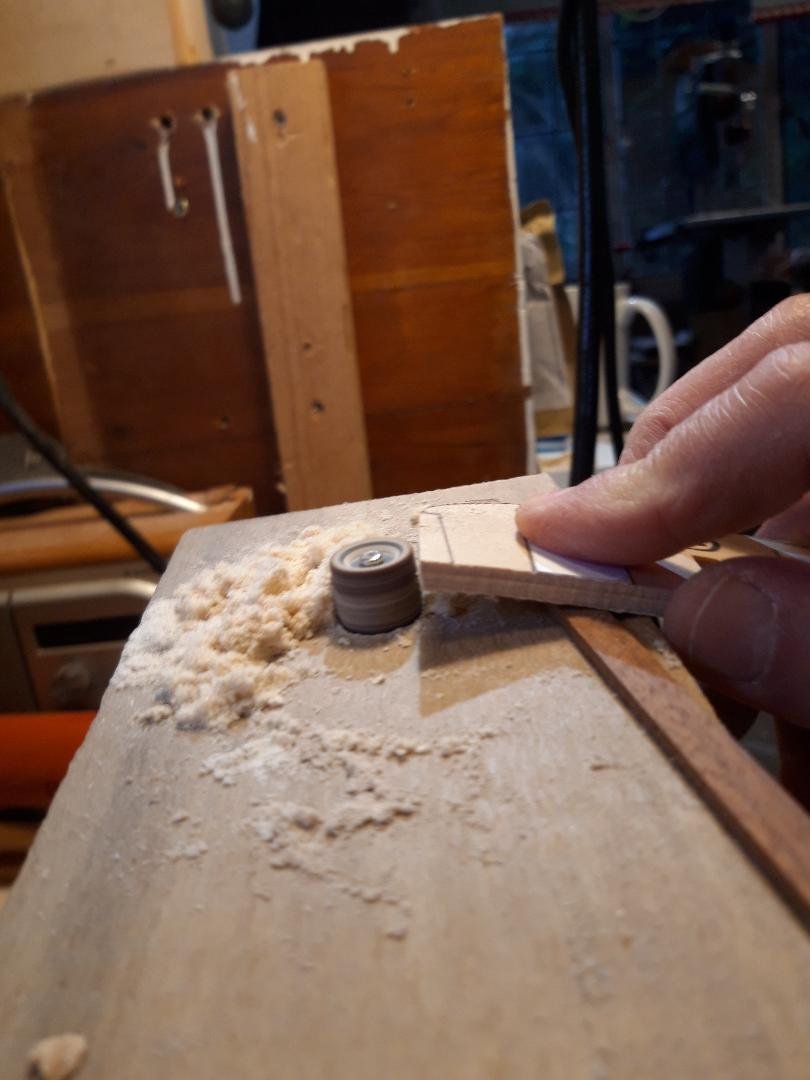
Turn a scalpel blade into a saw
bruce d replied to bruce d's topic in Modeling tools and Workshop Equipment
I don't know the advantage gained by using beeswax instead of water or oil but it seems to have been the standard way for jewelers to anneal gravers 'back in the day'. Possibly a metallurgist among us can shed some light? Having now watched a couple of his other videos I can see Paul Hamler, the guy behind it all, is quite a character. He has made a gazillion different things and can make you laugh. -
Congratulations on a beautiful model and a memorable build log.
- 855 replies
-
- 5
-

-

-
- Sphinx
- Vanguard Models
- (and 1 more)
-
Turn a scalpel blade into a saw
bruce d replied to bruce d's topic in Modeling tools and Workshop Equipment
Mark, I'm interested to know what others find when they try this trick. I have already found how the blades perform differently with different woods. -
Turn a scalpel blade into a saw
bruce d replied to bruce d's topic in Modeling tools and Workshop Equipment
From 20:45. I did a few experiments and found that I preferred the results obtained by using firm hand pressure (he uses a small hammer) and not going over the same spot twice. I am certain everyone will find their own style. Also, a straight blade converted to a saw will act completely differently from a curved one, at least in my hands. -
Hello Joe, Just FYI: it works fine for me. I am using Edge, if that matters. Good luck! Bruce
-
I found this trick buried in a YouTube video. After trying it out, I was pleasantly gobsmacked to find just how well it worked. Clamp a curved scalpel/craft blade in a vice, curved edge uppermost and exposed. Rock a file, not too worn, along the whole length of the exposed edge while pressing firmly but not too hard. Place the blade flat against a sharpening stone and make a single swipe on each side. You now have a saw. When pulling the saw across a test piece of wood it was surprising how much 'drag' I could feel as it cut compared to the same blade and same piece of wood before the saw-teeth were installed. It doesn't seem to matter if the blade is worn or new, so I know what I will do with tired blades in the future. It works best on curved blades used with a rocking motion but will also work with straight blade used for shorter strokes. The kerf is quite narrow and a saw made this way seems especially well suited for scoring straight lines in wood since the toothed edge resists following the grain. Maybe others already know this trick but hopefully someone will find this useful. Bruce
-
October 14, 1942. The German hilfskreuzer (auxiliary cruiser, disguised armed raider) Komet was sunk off Cap de la Hague in the early hours. Komet was attempting to break out into the Atlantic and was ambushed by British, Polish and Norwegian Hunt class destroyers and British and Dutch MTBs. The wreck was found in 2006.
-
Hello and welcome to MSW. I hope to you start a build log for your Bluenose.
-
Welcome to MSW from damp East Sussex. Look forward to seeing some of your subjects, liners are always cool. Bruce
-
My local Aldi has a small bench grinder with flexible shaft accessory for £29.99 which looks very useful. I almost talked myself into getting one despite having three flexi-shaft tools and two bench grinders already. If you know their habits, it will be 'first come, first served, sorry -don't-know-if-there-will-be-more-coming' so if it is of interest, get down there. This video from a couple of years ago looks like the same one I saw, not sure if the accessories are the same:
-
- 1
-
-
It will be well worth the wait, I'm sure. Think of all those lovely things you've done on the model and only we got to appreciate!
-
Looking good so far! 50 moulds? I think I will follow along if you don't mind. 👍
-
Looks like you are making progress, should be an attractive model when finished. Just a point to satisfy my curiosity: have you allowed for the camber of the deck? From the photos, especially photo #3, it seems the tops of the bulkheads are at full height for the intended level of the finished deck. If you have not glued them in place yet I suggest you cut the camber before assembly as it will be much easier than trying to do so after they are glued up. The camber will be the same along the whole length of the deck so a simple jig should make quick work of all the bulkheads. Use the curve shown in the stern view. If you have this in hand already, ignore me 🤐. Interesting subject, I will be watching to see the progress of a fellow first-time scratch builder. Bruce
-
I am lucky enough to have Timberline a few miles away. They have lancewood, lime, English lime and Castello on the shelf plus plenty of others. I didn't have the opportunity to discuss their sources in detail but know from the past that they only deal in 'legit' wood. Back to lancewood, thanks Vaddoc, I find the wood database to be compulsive reading 👍. It mentioned good turning properties but in this hobby we all know there is always more to the story. Thanks Bruce
-
I see now. How about doing it in two layers of identical wood, each plank 1.4 thick?
-
Brilliant work and a good attitude - that's why I watch this build!
-
I have just impulse-purchased a length of lancewood because I understand it is desirable for masts and spars. Then the questions began to bubble to the surface. (A) Is that correct, it is good for masts and spars? (B) What is the quality that makes it better in that application? (C) Does it have any pros & cons I should know about? My piece was obtained from a luthiers' supplier and I believe is sapwood. The application I have in mind is masts and spars, possibly cap rails? and the masts will have an octagonal section visible. Thanks in advance. Bruce
-
An 18th c record of what pieces were to be made from a piece of oak. This refers to a single piece from 'Load 36' delivered to Dudmans & Co at Deptford for conversion. Sadly there is no date so we can't narrow down which craft might have used these pieces. One of these instructions was produced for each harvested oak and was the contemporary equivalent of a modern work order. They were to be followed strictly. Another example of why the drawing office was always busy!

-
Zac, welcome to MSW from the UK. My advice is to read the advice above, it is all good. I am looking forward to your build logs. FWIW, I can't think of a better reason to get into this hobby than the one you gave: an interest in the history behind the ships. A model shipwright and an amateur historian are heads and tails of the same coin. Ask questions! 👍 Bruce
-
Dutch East India Company Shipbuilding by Wendy van Duivenvoorde Open access document Dutch_East_India_Company_Shipbuilding_Ch.pdf
- 1 reply
-
- 2
-
-
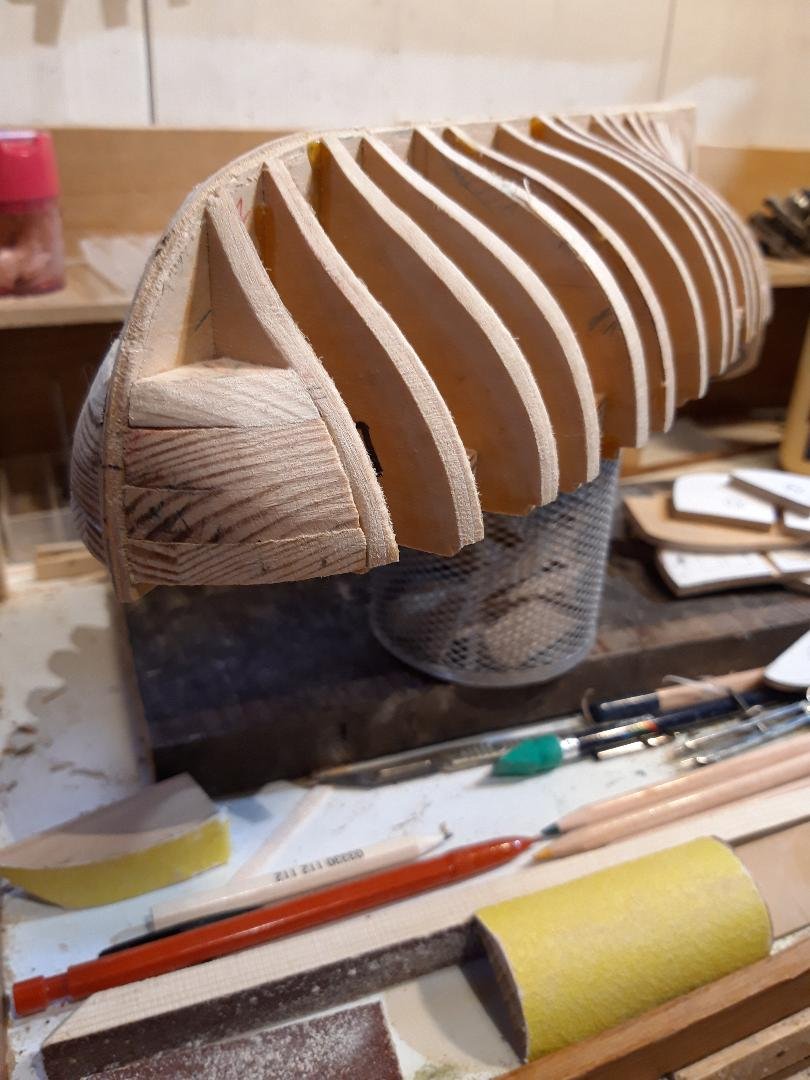
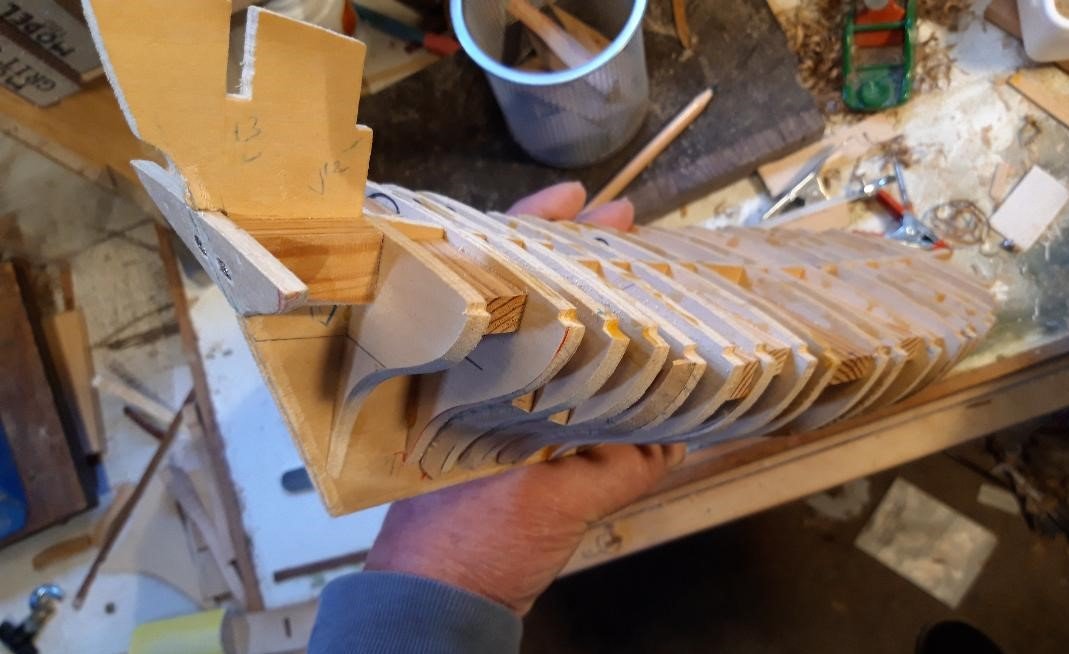
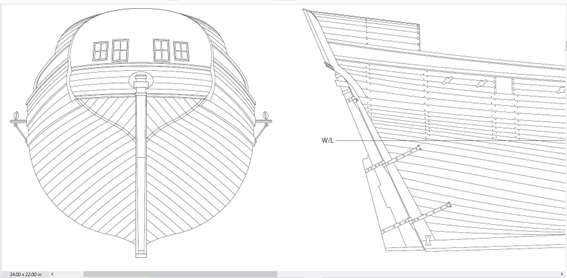
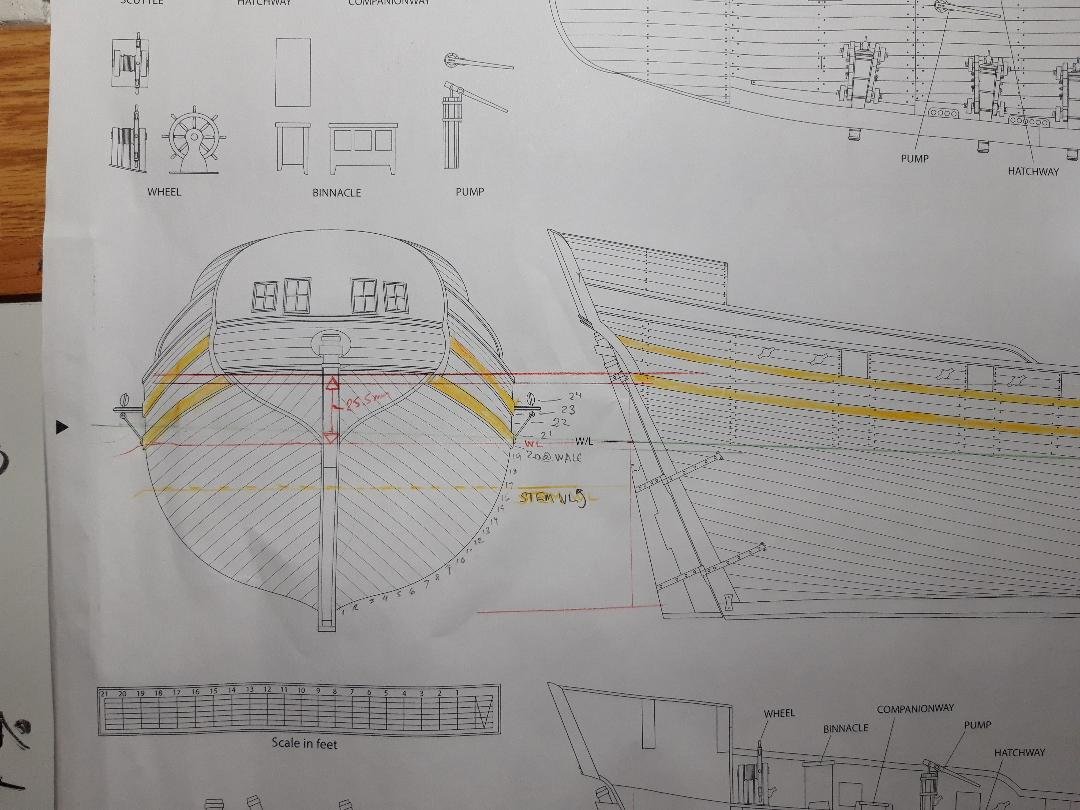
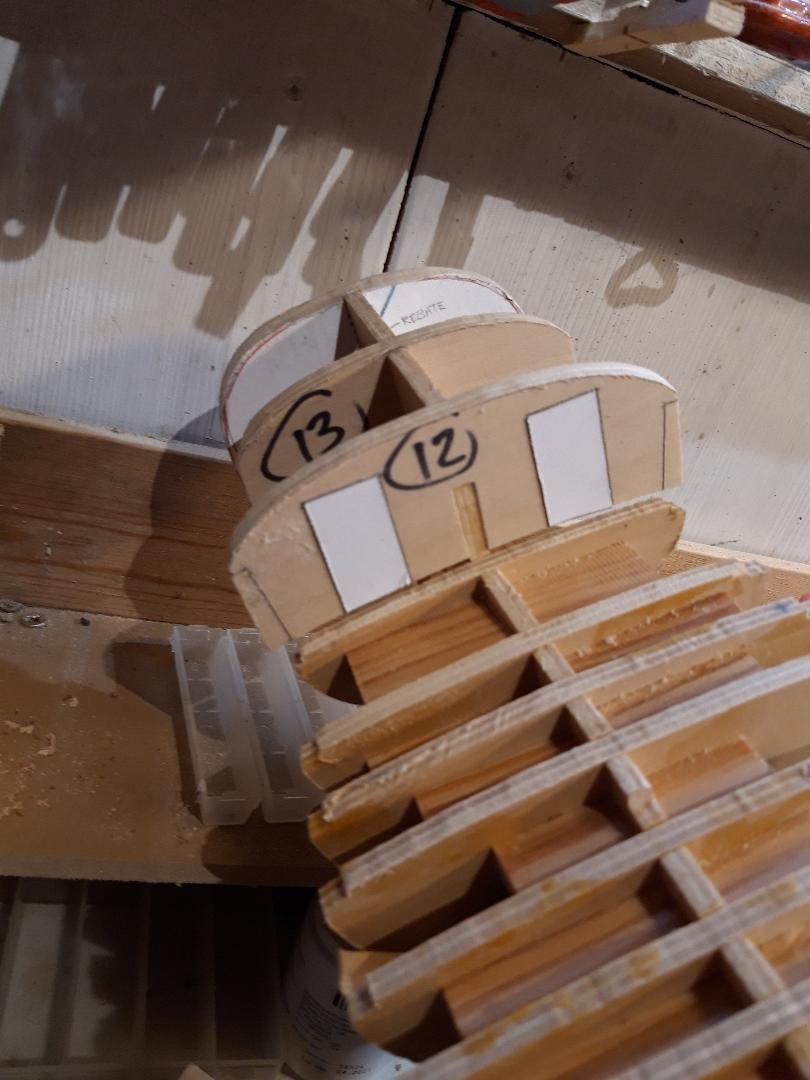
Fairing continues and has exposed a couple of my blind-spots. The filler blocks for the stem seem to be working and there are some ‘different-next-time’ moments but generally the process is sound. The stern has demanded some focus and re-thinking. No matter how much I stared at the assembled hull former and bulkheads I could not believe the planks would be able to run in the neat straight lines indicated on the stern view of the Stuadt plans as drawn. See below, pretty, ain’t they?: There are no fashion pieces illustrated but several different views are included in the plans to locate the pieces that make up the transom. It seems I missed something because I put the lower of the two pieces too low. This wasted a lot of time because of course the run of the planks now did not follow the plans. Doh! (Most of Post# 31 above is given over to me making this piece and then fixing it in what turns out to be the wrong place.) The error is understandable (he says defensively) as the location is shown on the plans but without mention of the fairing needed to all four edges of the piece. I tried to second guess the designer and got it wrong. Hopefully this will be of interest to anyone making their own Mediator. Having found my error, I focused on how to achieve those lovely straight lines of the stern planking. Fortunately, aligning with the lower wale gives a precise point of reference for this. Another view in the plans gives a positive position for the wale in relation to the level of the deck at the waterways so this can be taken from the assembly I have so far. See red lines in picture below. So, the plan is to fit a dummy wale, align the naughty transom piece and work upwards from there. Why upwards? Because the second issue that I encountered, while minor, still is at the stern of the boat and I must view them all together. The back of the ship has an enclosed cabin. One of the defining visual features of Mediator is the seamless transition from hull planking to cabin sides and cleanly into the ‘roof’. This is often associated with Bermuda sloops but was common also along the Eastern American yards at the time. On the model the shape of this cabin is defined by three bulkheads. They slot into the tail end of the main former which also creates the top of the cabin profile. The top profile of all three flow logically but the sides of the middle bulkhead do not extend to full width so I will have to fettle something to give support to the planking. The three bulkheads in the picture are dry fitted. Here is the improvised way I faired these bulkheads with my Foredom. I have come to love my Foredom. Sigh... So none of this is a problem, just stuff to do and enough to convince me to leave permanently attaching the cabin bulkheads, which may have to be modified, until satisfied that the transom and wales are all spot on target. It may be that I am getting ahead of myself but I want to get the lines of that cabin right, and I can’t complete the fairing until the transom is in place, and those junctions affect the cabin, and on and on… In case it sounds like I am grumbling, let me say for the record I am enjoying the whole process. Bruce
- 43 replies
-
- 10
-
-
- mediator
- first build
- (and 1 more)

