HOLIDAY DONATION DRIVE - SUPPORT MSW - DO YOUR PART TO KEEP THIS GREAT FORUM GOING! (89 donations so far out of 49,000 members - C'mon guys!)
×


Robin Lous
-
Posts
564 -
Joined
-
Last visited
Content Type
Profiles
Forums
Gallery
Events
Everything posted by Robin Lous
-
 I'm not telling you to hurry up, but man...I'm so looking forward to see this come together. Robin
 -
Good to see you're back in the saddle. Take it easy, we don't expect you to finish her anytime soon. Robin
-
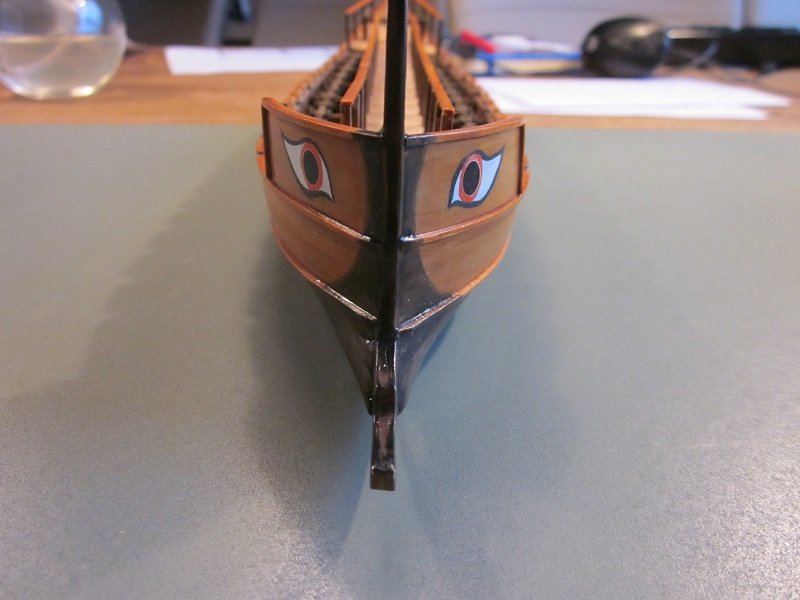
That was the first thing I thought when I looked at the result head on. Not something you like to see coming at you. So I guess they look okey.
- 473 replies
-
- 5
-

-
- greek bireme
- dusek
- (and 1 more)
-
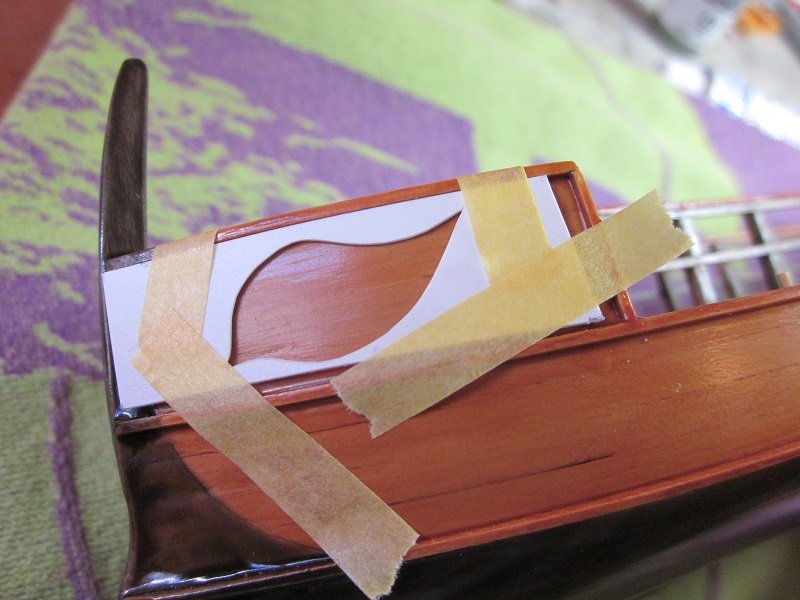
Yeah...it was! Had to remove the waterproof ink again, because it wasn't that waterproof after all. Marked with a pencil instead. I painted the white first and the dark grey outline after that. Finished!
- 473 replies
-
- 15
-
-
- greek bireme
- dusek
- (and 1 more)
-
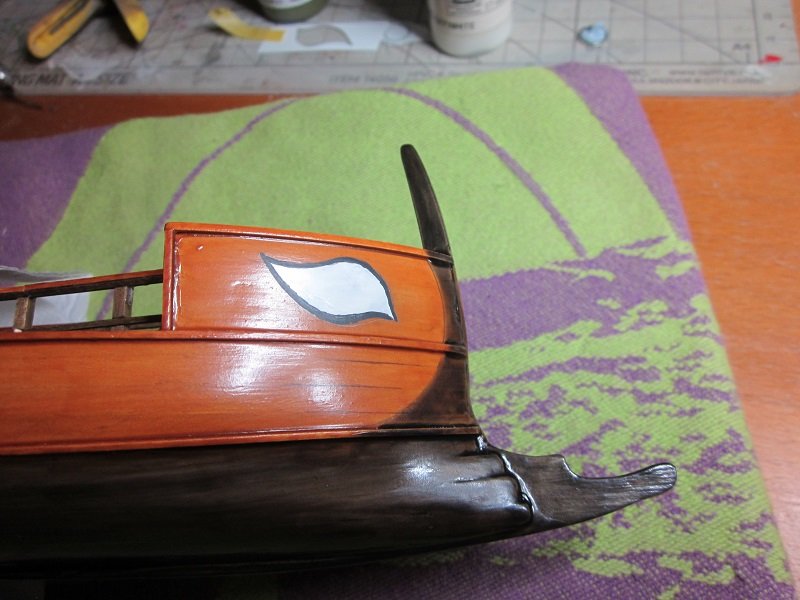
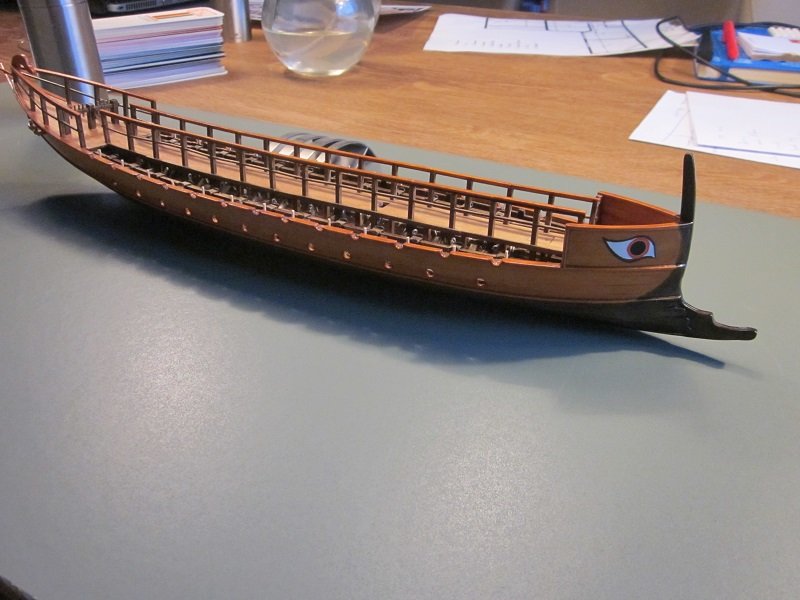
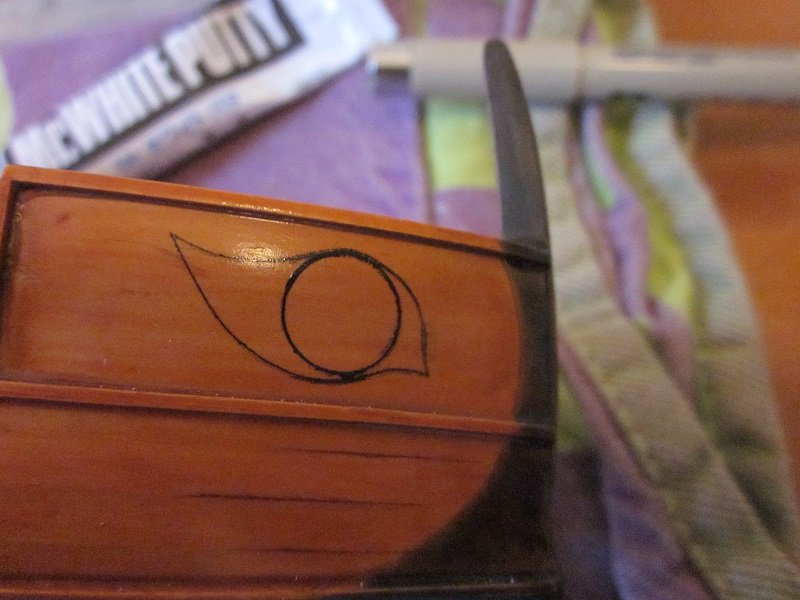
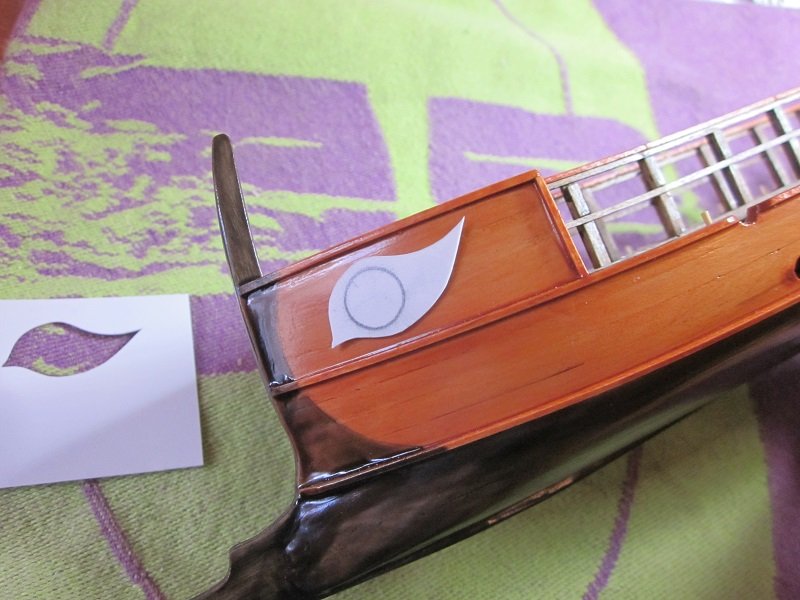
I don't have much time to work on my build at the moment and I hit some sort of "writer's block". One of the problems I have to deal with is the ships eye...and I have to do it before I start with the mast and rigging. Designing the eye took me countless tries the last few weeks, but I finally made one I'm happy with. I cut out the design I made to see how it looks and where to position it. And the template. I can use it on both sides. Marked the lines with a fine waterproof marker pen. I'll let it dry overnight before I start painting the eyes, so hopefully I can get this done tomorrow...and move on to the mast. More soon, Robin
- 473 replies
-
- 11
-
-
- greek bireme
- dusek
- (and 1 more)
-
It's getting better and better Torbogdan, I really like it! Some barrels and other cargo will look nice, but don't go over the top with it please. Robin
- 84 replies
-
- 1
-
-
- hanse kogge
- dusek
- (and 1 more)
-
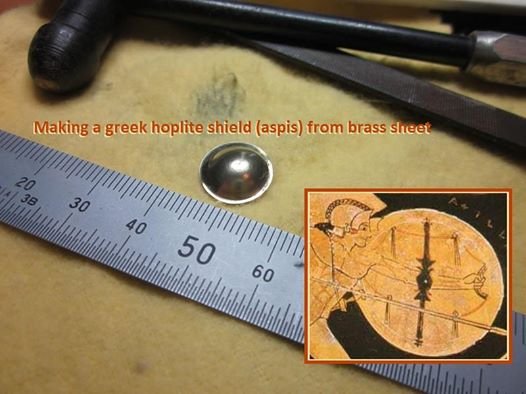
Today we returned from our city trip to Paris and to get back on track I started making the shield I want to hang on the railing. Just one shield...it wasn't common practise to have a full line of shields on the sides (like on Norse and Phoenician ships), so one shield for decorative purpose will do. At first I planned to use one of the plastic shields I have now, but...well...they're not that great, so I decided to make one from brass... Hammered the bowl and filed and sanded the rim. I'll make the inside lining from fine red silk, the arm loop from brass and the rope and tassels from...thin rope. I'll try to do the shield decoration with a 0,2mm waterproof marker pen, when I fail...a decal Will start with the mast and stay also this week. So...more soon, Robin
- 473 replies
-
- 11
-
-
- greek bireme
- dusek
- (and 1 more)
-
Almost a pitty to see this come to an end....I enjoyed watching this come together. Beautiful! One minor issue I noticed...the blue waterline tape. I see gaps and I'm afraid it won't stay on when she goes for a swim. Maybe seal the strip with varnish?
- 414 replies
-
- 5
-
-
- riva aquarama
- amati
- (and 2 more)
-
Thanks! I was also wondering about this. Robin
-
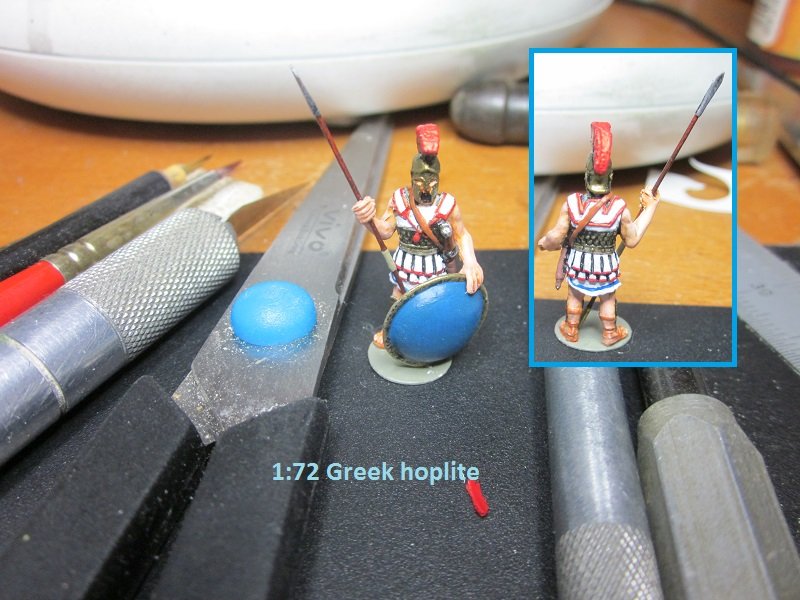
Thanks gentlemen, you're all too kind! A Hoplite is an ancient greek soldier armed with a spear and protected by a helmet and large round shield (aspis). With or without additional body armor The battle formation was almost always the phalanx, a close formation, 8 to 16...and even 32 ranks deep. For painting the skin I used Vallejo basic skintone 70.815. Applied a brown wash afterwards and softened / highlighted by drybrushing the skintone paint again.
- 473 replies
-
- 5
-
-
- greek bireme
- dusek
- (and 1 more)
-
To be honest...I think the Amati is anything but Greek. Maybe something else, but I think it's some sort of fantasy design. The Dusek kit is obviously based on the images we have from Greek black pottery, maybe not perfect, but close enough. Robin
- 473 replies
-
- 6
-
-
- greek bireme
- dusek
- (and 1 more)
-
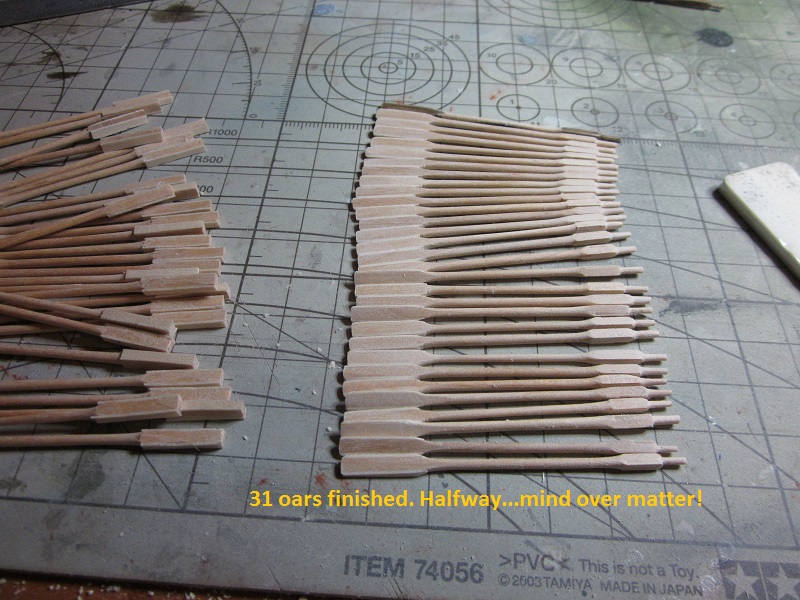
Well...that's not a silly question / remark. Triremes had different lenghts for different levels, Not sure about the Dusek trireme though...I'll figure that out soon enough. For this build I did a test and measured before I started to make the oars. The historical lenght (9.5 cubits / 4,22 metres) used on triremes worked fine for my build also. The dusek plan oars are 7 cm....mine are 6 cm (the 9,5 cubits). This works for both levels. Note...I lowered the oar holes. Top row 2mm lower and bottom row is about 4 mm lower. This makes a difference, because "my" oars touch water closer to the hull. Nice you hope to receive these kits for Christmas. I'm sure you'll enjoy building them as much as I do. I'm eager to start working on the trireme. All the oars needed. Robin
- 473 replies
-
- 7
-
-
- greek bireme
- dusek
- (and 1 more)
-
Done! Feels like.... Pfff! I can now continue with the mast, stay, sail and rigging. Will probably do the steering oars somewhere in between. From friday to monday we're a long weekend in Paris and I work the rest of the week, so not much will happen until after Paris. More soon though, Robin
- 473 replies
-
- 6
-
-
- greek bireme
- dusek
- (and 1 more)
-
Maybe when you have some left over sail material...try it on that? Looks good Robin
- 84 replies
-
- 1
-
-
- hanse kogge
- dusek
- (and 1 more)
-
Thanks! ......but Looks horrid....double the real size and straight underneath my magnifying lamp. I probably repaint the shield to all bronze and I expect to receive shield decoration decals soon.
- 473 replies
-
- 3
-
-
- greek bireme
- dusek
- (and 1 more)
-
Not finished yet, but getting there... Mike...they're kinda hard to find, but still available on ebay. Some ask rediculous prices, but I got them for a reasonable price from a seller in Taiwan. More soon, Robin
- 473 replies
-
- 12
-
-
- greek bireme
- dusek
- (and 1 more)
-
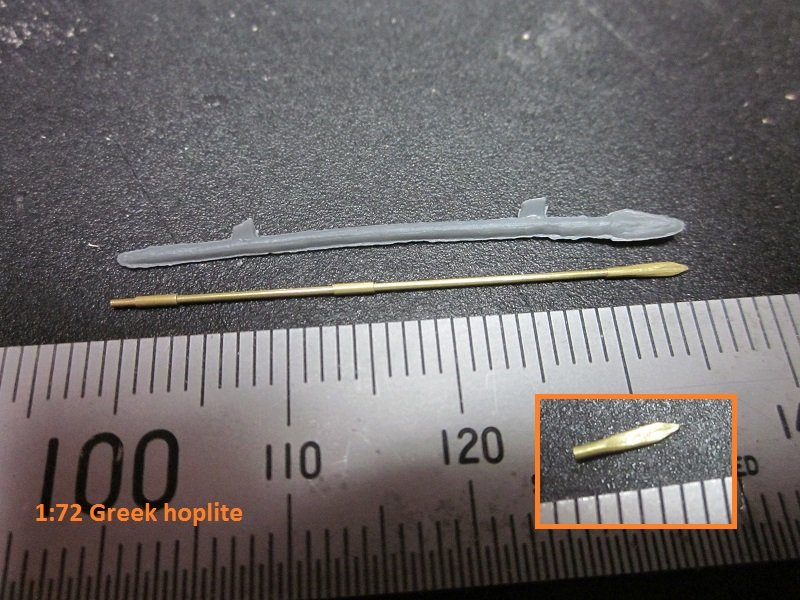
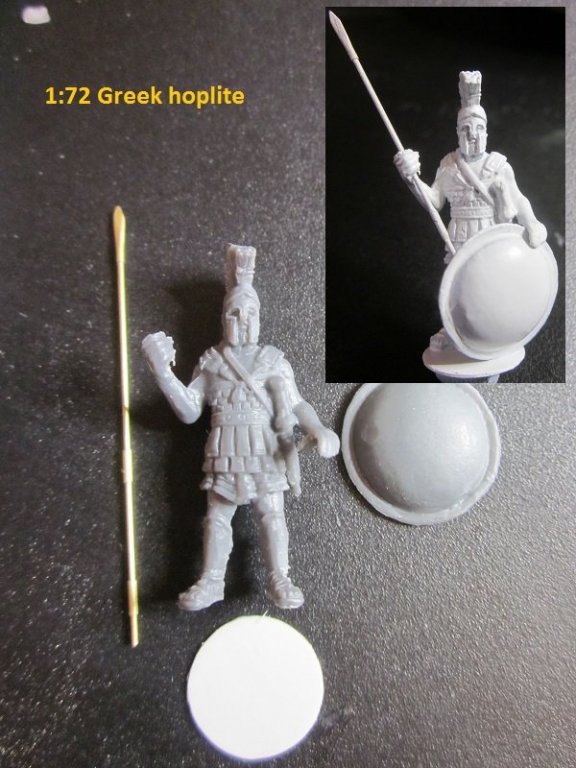
Thanks guys! The spear.... Oh dear, oh dear...well, let's say the supplied spears aren't impressive. I used 0,5 and 0,7 mm brass sliding tube to make a new one. 0,5 mm for the shaft and 0,7 used for the counterweight spike (nicknamed: salamander crusher), the leather grip and the spear-head. Removed the base and made a new thinner one, cleaned up the flash and a white basecoat. Ready for some paint Robin
- 473 replies
-
- 12
-
-
- greek bireme
- dusek
- (and 1 more)
-
Beautiful! to be proud of. Poker cards, a bottle of bourbon and the setting is complete. Robin
- 225 replies
-
- 5
-
-
- chaperon
- model shipways
- (and 1 more)
-
This is a beautiful ship type and it looks like MarisStella made a really good model of it. Looks really good and thanks for explaining the building process. obin
- 174 replies
-
- 1
-
-
- gaeta falcata
- marisstella
- (and 1 more)
-
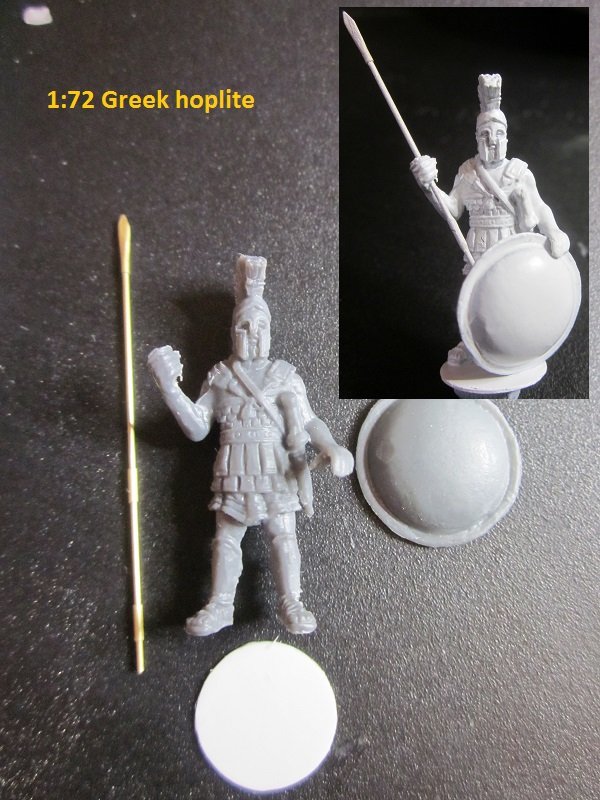
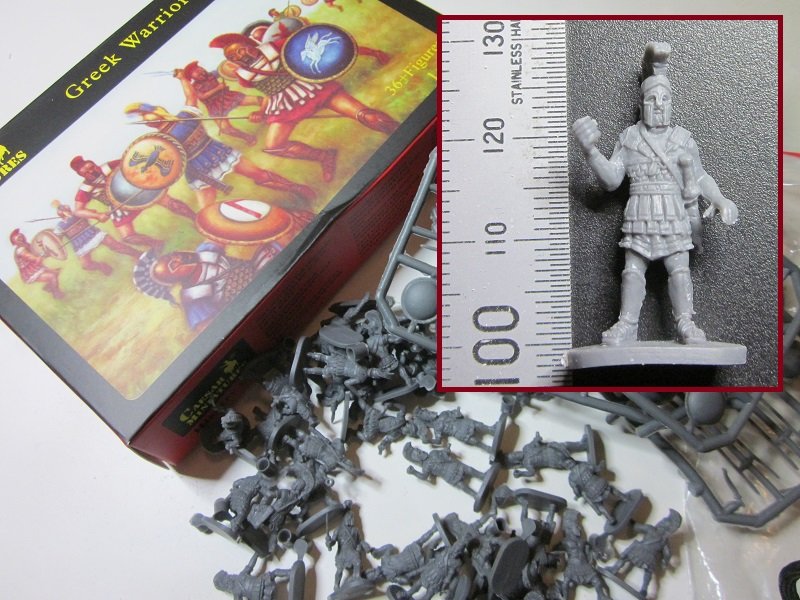
Today I worked from 9 until 7, so I didn't had much shipyard time, but.... No skin left on the tip of my index finger...time to do something else tomorrow.... The Caesar Miniatures 1:72 scale hoplites.... Again...only 1 or 2 needed...and perhaps a single shield on the railing somewhere behind one of the steering oars. Not even sure I'll fix them to the deck....to be decided. The quality is pretty good. Fairly hard plastic (that's a good thing) and minimal flash. Good details and historical correct. The seperate shields are neat, but I'll replace the spears with scratch build ones. I'll remove the bases and glue them on very thin acetate sheet. When one goes on the deck...I'll remove the base and pin it. So...tomorrow I'll take a closer look and see what I can do with them. More soon, Robin
- 473 replies
-
- 14
-
-
- greek bireme
- dusek
- (and 1 more)
-
hi Chris, I worked on the dining table for a long time. I made a moveable space from thin plywood with a matching sheet of foamboard glued onto it. This made it very rigid and ultra light despite it's large size (100cm x 70cm). On top of it a cutting mat. By the way...foamboard is handy fun stuff....can use it to stick knives, files and whatever in it. Robin
-
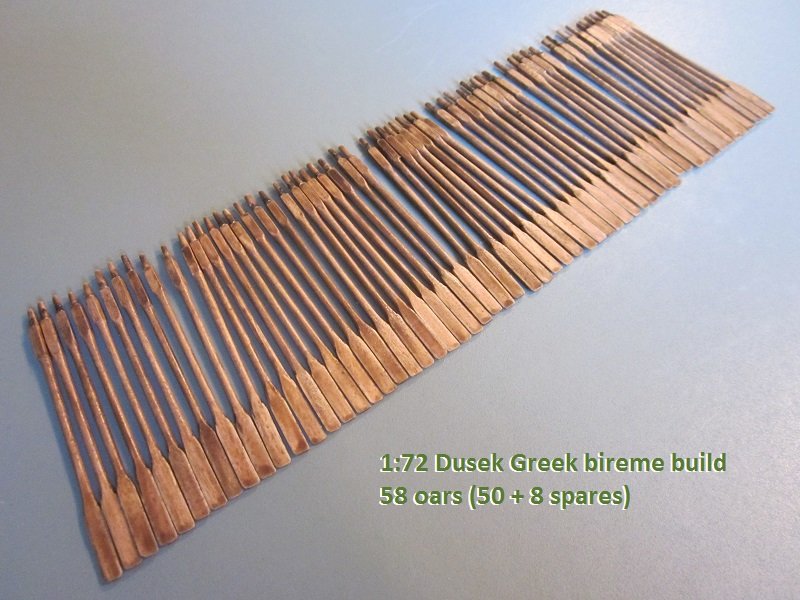
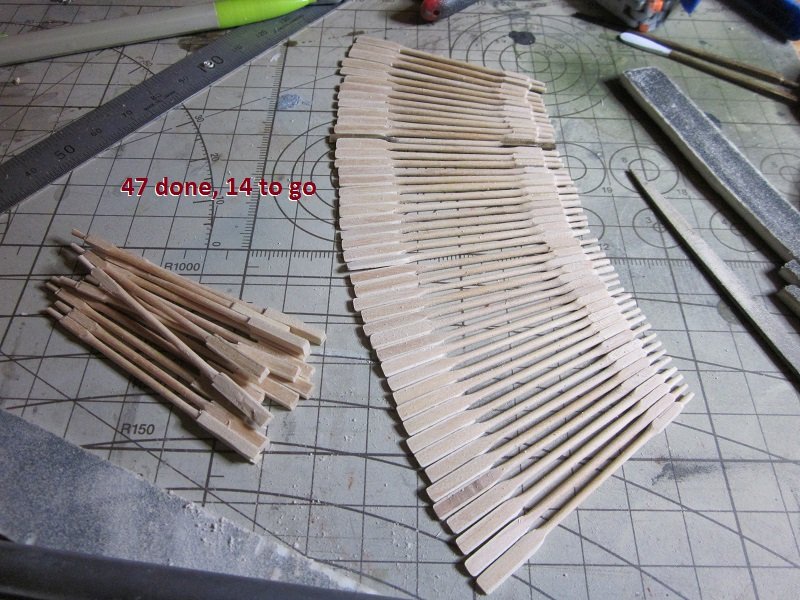
pfff! i really want that disk sander. Done these "hecho a mano"...my hand hurts now. More soon, Robin
- 473 replies
-
- 15
-
-
- greek bireme
- dusek
- (and 1 more)
-
I'm pretty much new to this, but I think deck goes before mast.
- 653 replies
-
- 7
-
-
- trabakul
- marisstella
- (and 1 more)
-
That's beautiful! ....bordering cute. A lot of skill went into that little thingie! Robin
- 653 replies
-
- 5
-
-
- trabakul
- marisstella
- (and 1 more)