Robin Lous
-
Posts
564 -
Joined
-
Last visited
Content Type
Profiles
Forums
Gallery
Events
Everything posted by Robin Lous
-
 Good point Don and OC! With the sail furled, the rigging, deck and general appearance of the ship will be more visible. Together with the historical sail/oar "issue"....I guess I better stick to my plan. EJ....I come from planet Plastic and I'm used to do stuff never to be seen again. Something the Admiral loves to point out.
- 473 replies
-
- 4
-

-
- greek bireme
- dusek
- (and 1 more)
-
Thanks a lot gents! As you can see, I still have to do the clewlines (the ones on the edge of the sail). The brass eyes for them on the yard are already there, but I'm unsure about loops on the sail for them. Didn't spot any on the Olkas photo's. I think I do just one loop in the middle, so the line won't wander off that much. What shall I do? A furled sail or a deployed sail? Historical....sail + oars are a no no. the Greek didn't use both together I planned to do a furled sail, because of that, but with the added details a deployed sail can look nice. I don't know what to do now!
- 473 replies
-
- 4
-
-
- greek bireme
- dusek
- (and 1 more)
-
True...although....about 550 BC...thread and fabric were likely not as fine as in more recent years. But the ingenuity and craftmanship of the ancient Greeks were amazing, so who knows? the "curtain lines" (does anyone know a better word for this?).... I take the evening off...done enough for today Robin
- 473 replies
-
- 10
-
-
- greek bireme
- dusek
- (and 1 more)
-
To my own amazement....so far...I kinda like rigging. One mast, one sail...I can handle that! The vertical "curtain" lines and the loops on the lower corners of the sail will be next. More soon, Robin
- 473 replies
-
- 12
-
-
- greek bireme
- dusek
- (and 1 more)
-
Congrats Torbogdan! I really enjoyed following this build and I already look forward to your next. Robin
- 84 replies
-
- 1
-
-
- hanse kogge
- dusek
- (and 1 more)
-
Best ask Daniel Dusek about the wood. He is a forum member and very helpful. I was wondering about the wood of my bireme also...I asked Daniel and got the answer pretty quick. (Alder wood...amazing stuff). I look forward to see your Golden Hind build. Robin
-
Looks fantastic! Robin
-
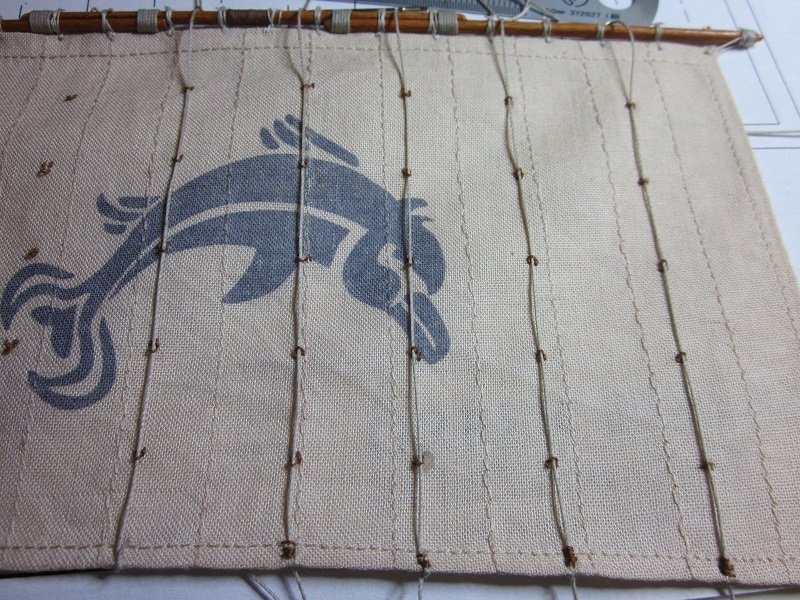
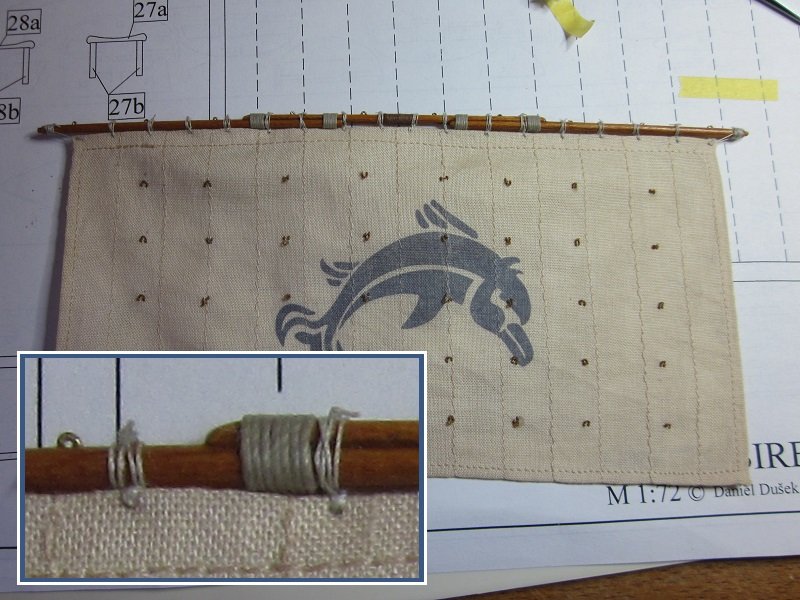
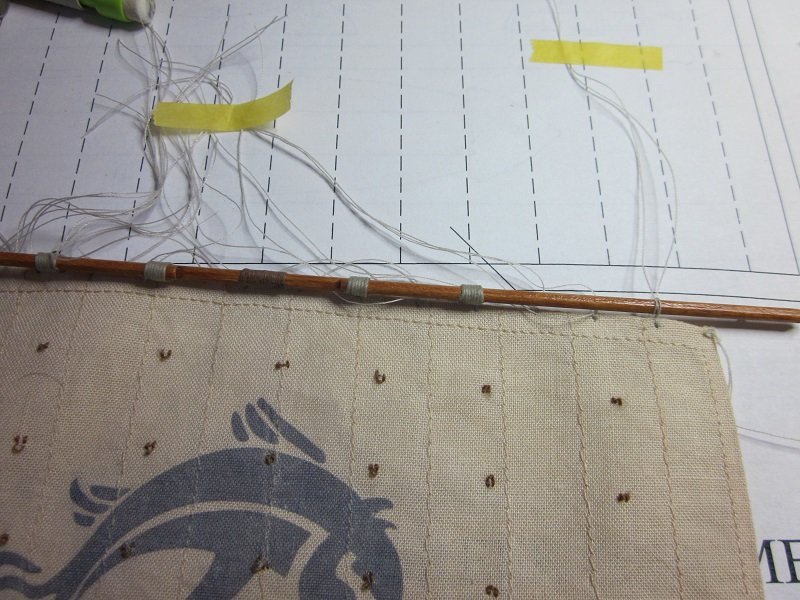
Thanks gentlemen, you're all too kind. Sunday I took a day off from the shipyard. Was too tired after some crazy busy days...and had to watch the last Formula 1 Grand Prix race of the season (with "our" hero Max Verstappen). Yesterday I started with the rigging. Sail first....and I'm amazed about the amount of "stuff" that has to go on it. Started with the "curtain loops" 8 rows of 5 loops needed, so that's 40. 7 rows...35...done. Very time consuming, because I didn't do just a loop through the sail. 3 stitches one side...loop...3 stitches other side. When I finished this, the rest will be fairly easy. I first planned to use the sewing thread for the (10) lines that go from from the bottom of the sail...over the yard to the pin rail on the rear deck (is there a proper nautical word for them?), but I use the 0,5 mm Corel instead. Perhaps the sewing thread is more true to scale, but it will be hardly vissible and I'm afraid it won't look good. More soon! Robin
- 473 replies
-
- 10
-
-
- greek bireme
- dusek
- (and 1 more)
-
When you can still remove the window frames....microscope cover glasses are great.
-
I hardly used the manual, because I changed, modified or scratchbuild most of the build. The shape of the hull is what remains "original" ...the rest is....different.
- 473 replies
-
- 5
-
-
- greek bireme
- dusek
- (and 1 more)
-
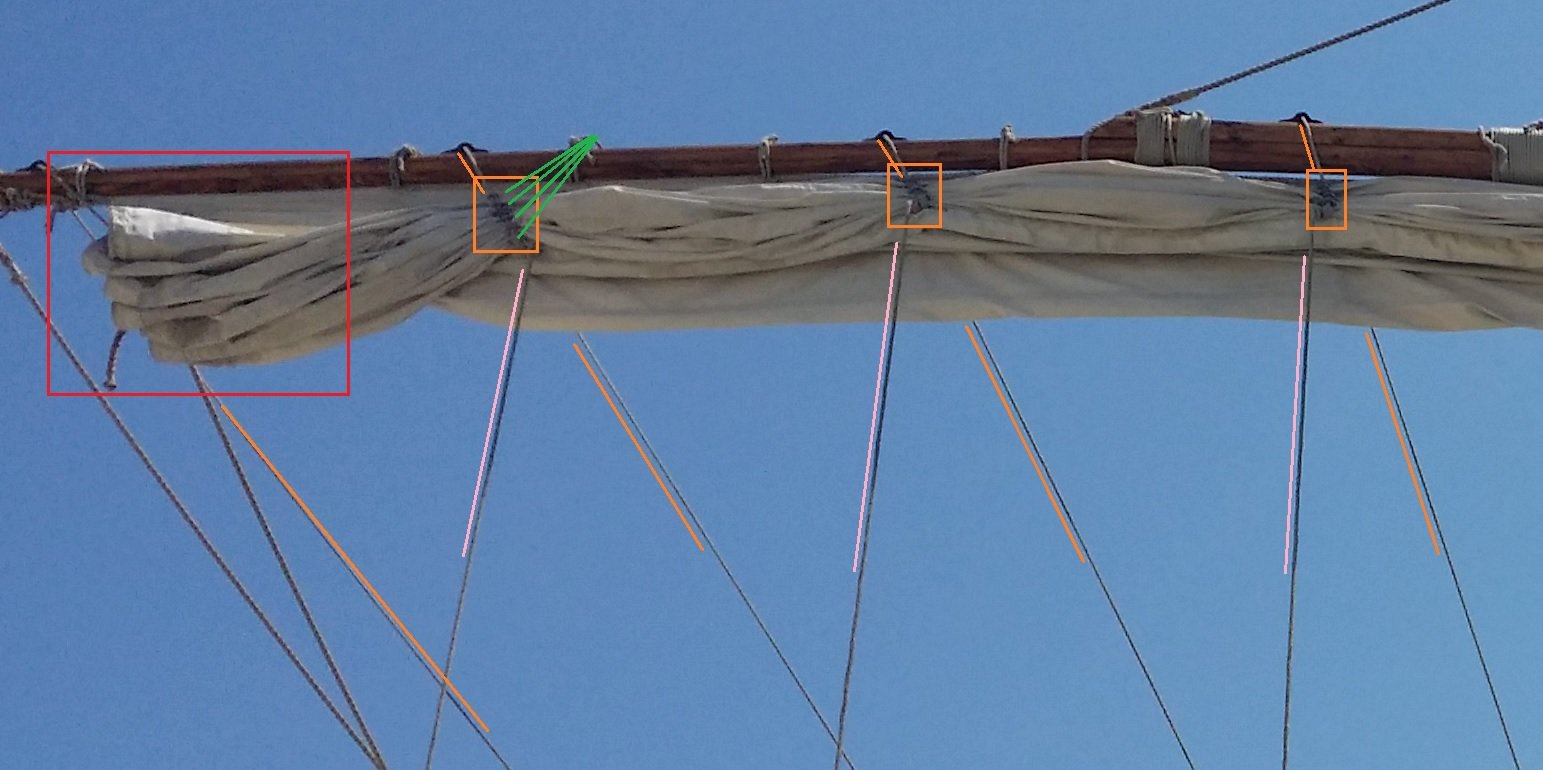
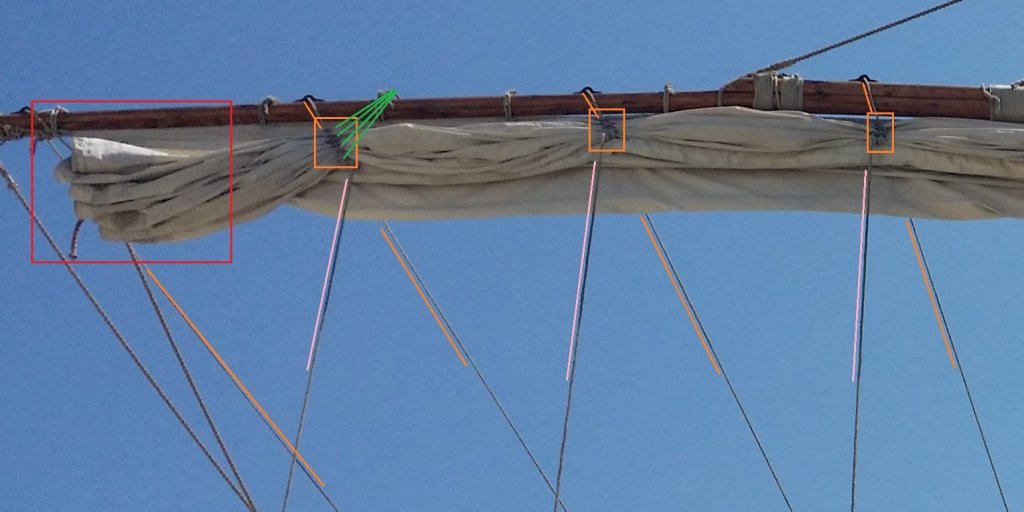
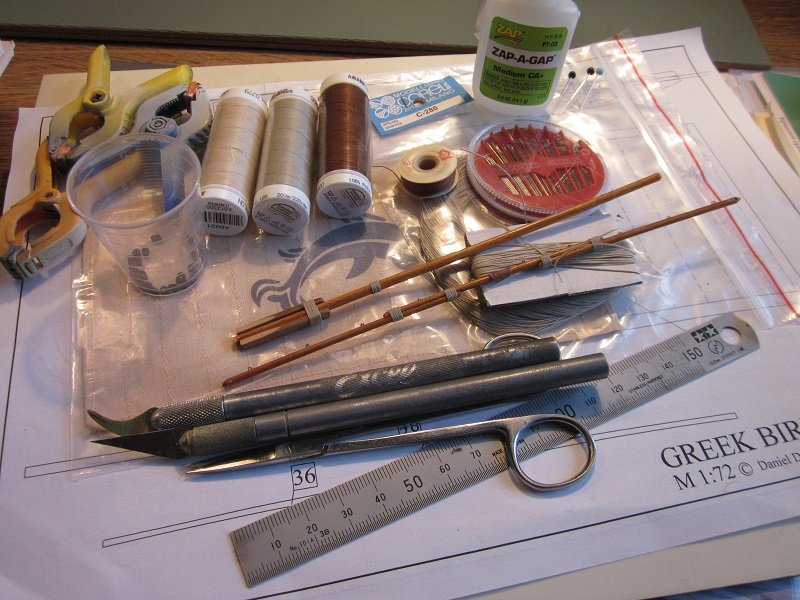
Mike...I won't mind you sneaking in a few photo's of your stagecoach build here I had to solve one last rigging mystery. Already figured out the Greek lowered and raised their sails with the lines (orange) that go from the bottom line of the sail...over the yard...to the rear deck of the ship. But I wondered about only pulling the bottom line of the sail up...this will result in the rest of the sail ballooning in the wind...or a shapeless sack at best. Making the whole system pointless. A closer look at one of the Olkas photo's showed how ingenious the ancient Greek were... Several rope loops stitched to the sail (green) keep the sail from ballooning. It works like a horizontal curtain or blinds (red). The (pink) free hanging lines to secure the sail to the yard are only needed when the yard is lowered and stowed for battle. This will keep me busy for a while... I replaced the Dusek rope with Corel 0,5mm. The Dusek rope (on the piece of cardboard) is great, but I need more. Also got some sewing thread from Amman Mettler for the thinner ropes I need. Same colour as the Corel rope, sail colour and a dark brown. I can imagine my eyes go on strike when I work on the rigging for a while, so I might do the ladder and/or the steering oars somewhere in between. Also thinking about making the ram, but I'm not sure how to make it yet. Meanwhile...the burnished copper sheet is still weathering naturally outside. I'm not sure this build tought me much about how to build a wooden ship, but it surely tought me a lot about ancient Greek ships. Robin
- 473 replies
-
- 10
-
-
- greek bireme
- dusek
- (and 1 more)
-
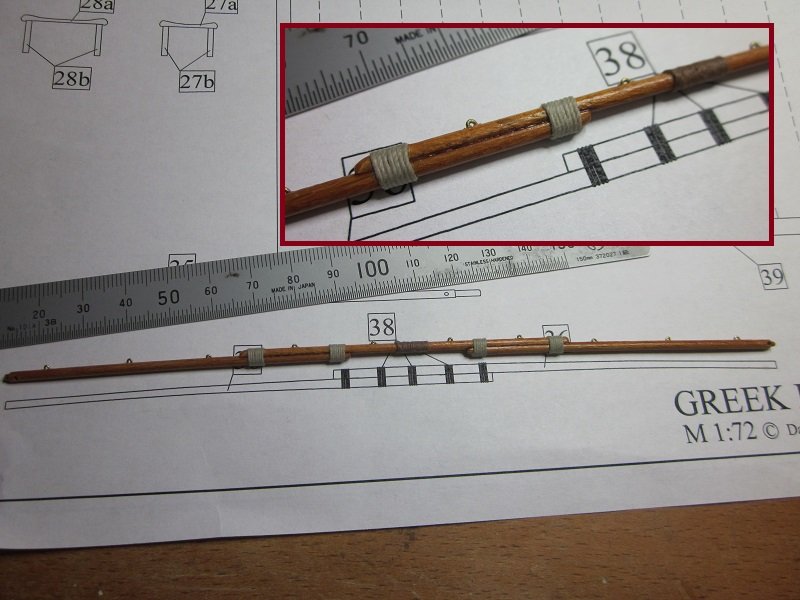
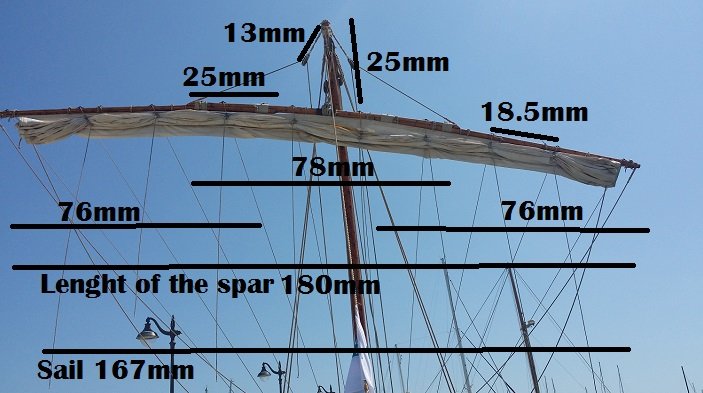
Today I made the yard. The 10 brass eyelets (U shaped brass wire, so I had to drill 20 0,5mm holes for them) are there for the lines to raise and lower the sail. The yard is made from a 2mm dowel. This took me whole darn day (ok...with lots of breaks and time searching for escaping tiny eyelets on the floor). Mast done, yard done...sail and rigging next! More soon! Robin
- 473 replies
-
- 10
-
-
- greek bireme
- dusek
- (and 1 more)
-
Beautiful! Almost a pitty you can close this book soon. Perhaps ruffle the flags somewhat? They look a bit stiff now. What will be your next build? Robin
- 84 replies
-
- 3
-
-
- hanse kogge
- dusek
- (and 1 more)
-
Slow is good and try to think and rethink before you grab the glue. Dry fit when possible and when in doubt...throw your hands in the air and make sure something goes smooth. It's better to spend some time figuring something out than spending the same (or more) time to fix something that went wrong. The kind people here are always willing to help when you face an issue. I'm new and still learning myself, so I'm of no use, but I follow your build and it's nice to see you're learning and improving. The hull looks much better already! Robin
-
QFT...Harder & Steenbeck airbrushes are superb. I own several...my first is a 12 years old Evolution and it's still going strong....not a single part replaced yet. Highly recommended!
-
They're for sale on his website...several designs and a plain sail. Millions?...nah...only 200 for my next build
- 473 replies
-
- 5
-
-
- greek bireme
- dusek
- (and 1 more)
-
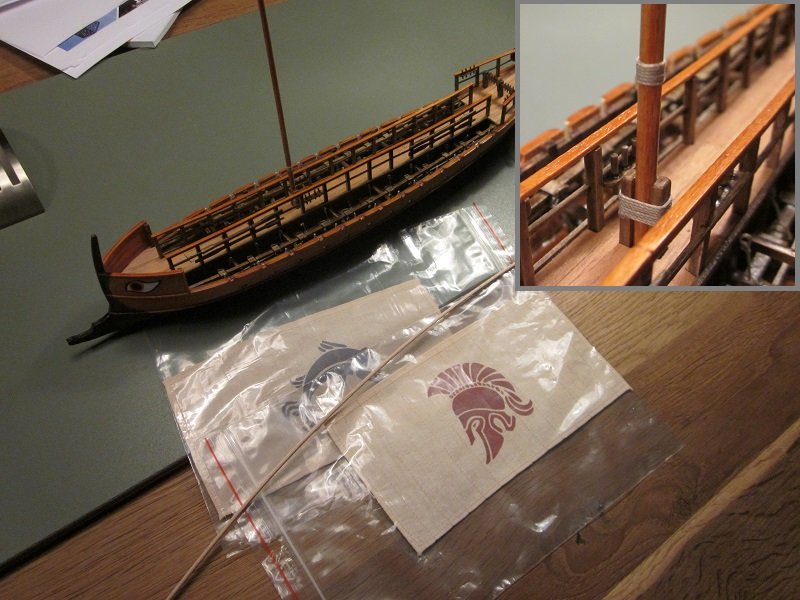
Err....well, making them wasn't too bad, but I was happy when I finished the job. With the eyes painted on...mast, yard and rigging time. I doubt I'll ever enjoy doing the rigging, because I still have nightmares from rigging WWI biplane models. Anyway.... For the mast, yard and rigging I use the Olkas trade ship photo's from Messis (thanks again!) I have some prefab painted and stitched bireme sails from Daniel Dusek. They're wonderful! very fine thin sails and the stitching looks fantastic. I'm not 100% sure painted sails were common, but I know Homer mentioned them, so ...ok. Won't see much of it anyway, because I do a furled sail. The yard will be a 3 part construction (seen on the Olkas trade ship and Argo). I already curved a dowel to match the shape of the sail. The mast is not fixed to the (lower) deck yet. I'll do (part of) the rigging and the yard before I fix the mast to the ship. I used the width of the sail and compared it to one of the sublime Olkas photo's from Messis to get the measurements for the yard right. More soon, Robin Edit: I also adjusted the lenght of the mast to make it all work. +1cm (above the deck). Not much going on above the yard in the manual and a lot going on there on the Olkas, so I need that extra 1 cm.
- 473 replies
-
- 9
-
-
- greek bireme
- dusek
- (and 1 more)
-
Dear Daniel, My wishlist: 1. An early Greek penteconter. Like the Argo recontruction. 2. A Greek trade ship. Like the Olkas reconstruction. Both 1:72 scale please. It will take me at least 6 months to finish my bireme and trireme, so no hurry. Thanks! Robin
-
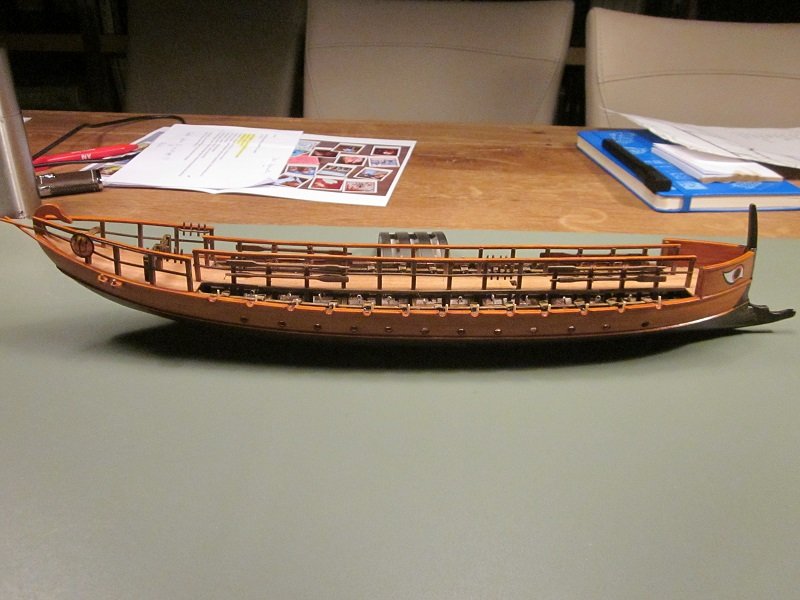
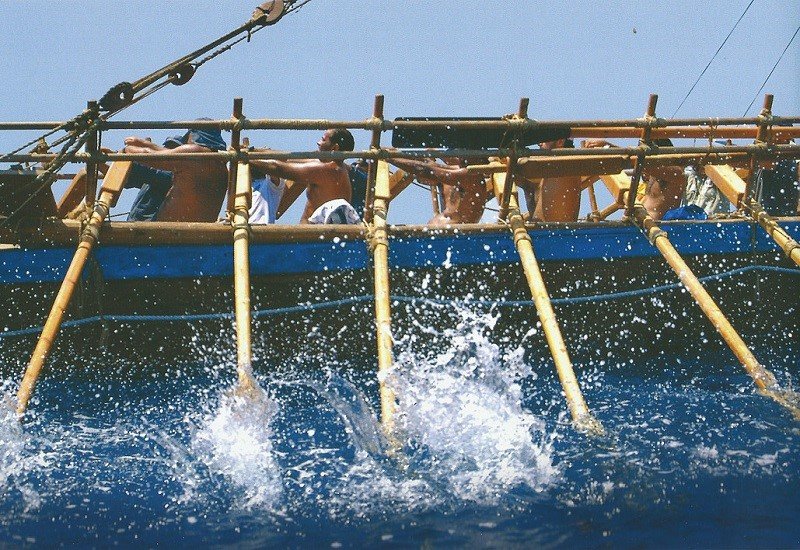
Thanks guys! Another small update... About the spare oars. It's unknown how many spare oars a penteconter carried, but a trieres with 170 oars had 30, so 50 plus 8 spares is an estimated guess. To replace broken oars quickly, there's only one suitable spot to place them. Tied to the centre top deck railing. So that's what I did.... Also made a bench on the rear deck (just a plank) and placed the pin rails...on the rear deck railing and centre deck railing. And the shield I mentioned before. A nice photo of the Argo at full speed...with the spare oars. More soon, Robin
- 473 replies
-
- 9
-
-
- greek bireme
- dusek
- (and 1 more)